Bayer HealthCare CLINITEK 50 User manual

USER’S GUIDE

1996 Bayer Corporation
All Rights Reserved
Printed in the U.S.A.
Unless otherwise noted, all
trademarks are the property
of Bayer Corporation.
Revised 3/02 99915549
Bayer Corporation
Elkhart, IN 46515 USA

Contents
iii
A Brief Description . . . . . . . . . . . . . . . . . . . . iv
1Unpacking and Setup . . . . . . . . . . . . . . . . . . . 1
Unpacking . . . . . . . . . . . . . . . . . . . . . . 1
Installing the battery pack . . . . . . . . . . . . . 4
Loading the paper roll . . . . . . . . . . . . . . . 5
Powering up . . . . . . . . . . . . . . . . . . . . . 6
Final paper work . . . . . . . . . . . . . . . . . . 8
2Selecting your Options . . . . . . . . . . . . . . . . . . 9
Location of results and number of copies . . . . 9
Setting the time . . . . . . . . . . . . . . . . . . .10
Setting the date . . . . . . . . . . . . . . . . . . .10
Reporting the urine color . . . . . . . . . . . . .11
Setting the sequence number . . . . . . . . . . .11
Clearing the memory and marking positives . .12
Printing the instrument setup . . . . . . . . . . .12
3Testing Controls . . . . . . . . . . . . . . . . . . . . . .13
4Testing Routine Urines . . . . . . . . . . . . . . . . . .14
Procedure . . . . . . . . . . . . . . . . . . . . . .14
Summary of steps . . . . . . . . . . . . . . .16
Getting results . . . . . . . . . . . . . . . . . . .16
If results are printed . . . . . . . . . . . . . .16
If results are displayed . . . . . . . . . . . . .16
When you are finished testing . . . . . . . . . .17
Operating notes . . . . . . . . . . . . . . . . . .17
5Cleaning the Instrument . . . . . . . . . . . . . . . . .18
Daily cleaning . . . . . . . . . . . . . . . . . . . .18
Disinfecting the table . . . . . . . . . . . . . . . .19
Removing heavy buildup . . . . . . . . . . . . .20
General cleaning . . . . . . . . . . . . . . . . . .21
Appendix . . . . . . . . . . . . . . . . . . . . . . . . . .22
Solving problems . . . . . . . . . . . . . . . . . .22
If the display is blank . . . . . . . . . . . . . .22
Error messages and remedies . . . . . . . .23
Problem checklist . . . . . . . . . . . . . . . .24
Where to call for service . . . . . . . . . . . .25
Ordering accessories . . . . . . . . . . . . . . .26
Ordering replacement parts . . . . . . . . . . . .27
Specifications . . . . . . . . . . . . . . . . . . . .28
Tables of results . . . . . . . . . . . . . . . . . .29
CHAPTER

iv
A Brief Description
What does this instrument do?
Your CLINITEK®50 Urine
Chemistry Analyzer is a portable
instrument for reading traditional
Bayer Reagent Strips for Urinalysis
(e.g., MULTISTIX®10 SG), Bayer
MULTISTIX PRO®Reagent Strips,
and CLINITEK®Microalbumin
Reagent Strips. Refer to the bottle
label or carton for the tests that
are included with each product.
The Analyzer can also report the
color of the urine sample. No spe-
cial training is needed to use the
instrument.
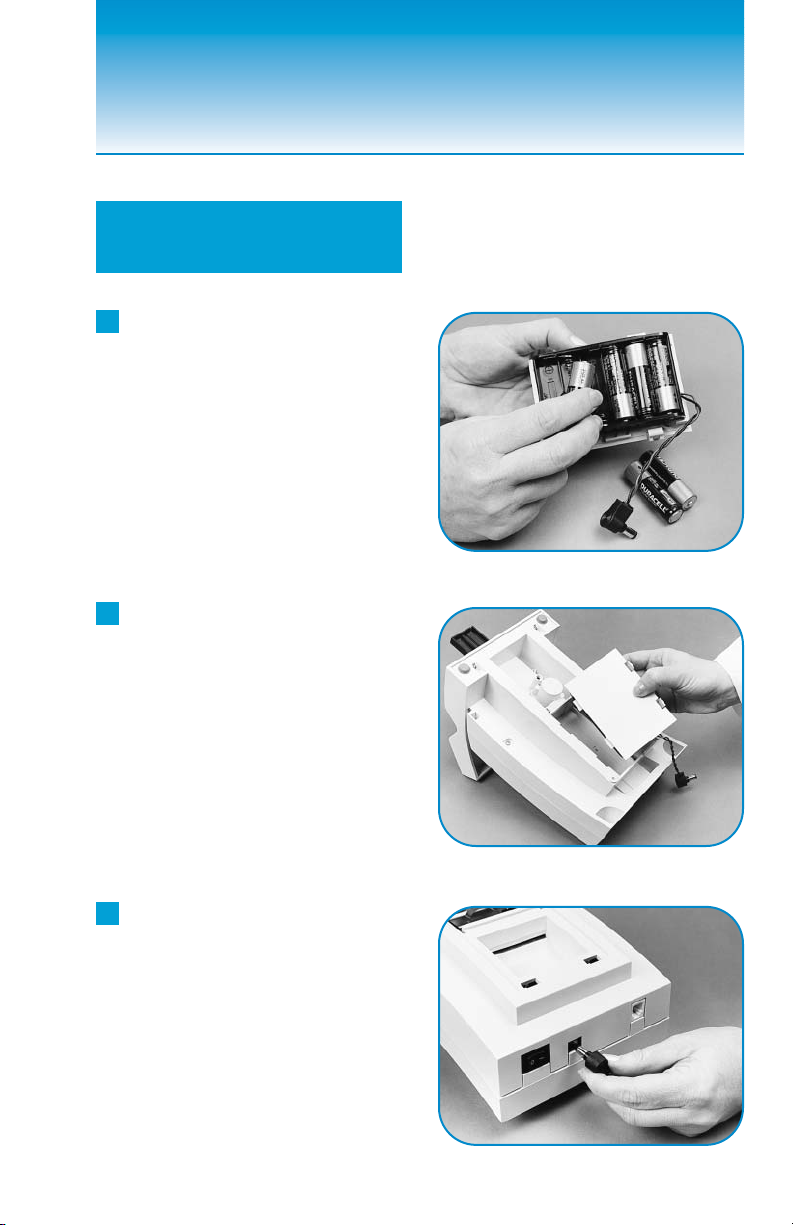
The Analyzer can be plugged
into an electrical outlet for use on
the benchtop, or it can be
powered by batteries and freely
moved from one testing site to
another.The battery pack, which
is purchased separately, fits into
an opening on the bottom side of
the instrument.
Do I have to calibrate?
You do not have to do anything
extra to calibrate.The instrument
performs a “self-test” and calibra-
tion each time it is turned on.
Then, each time a test is run, the
instrument calibrates again, using
the white plastic bar located on the
end of the test strip table.
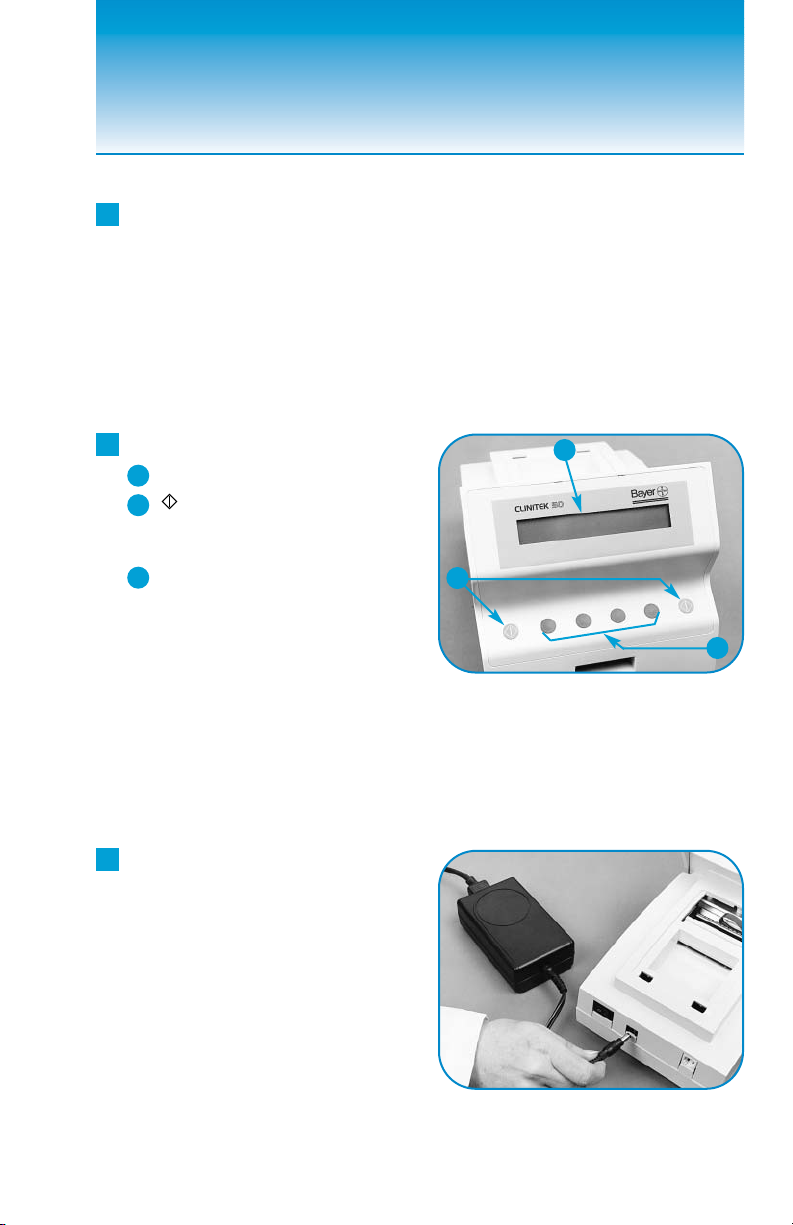
How does it work?
Testing starts when either of the
two Start keys (labeled “ ”) is
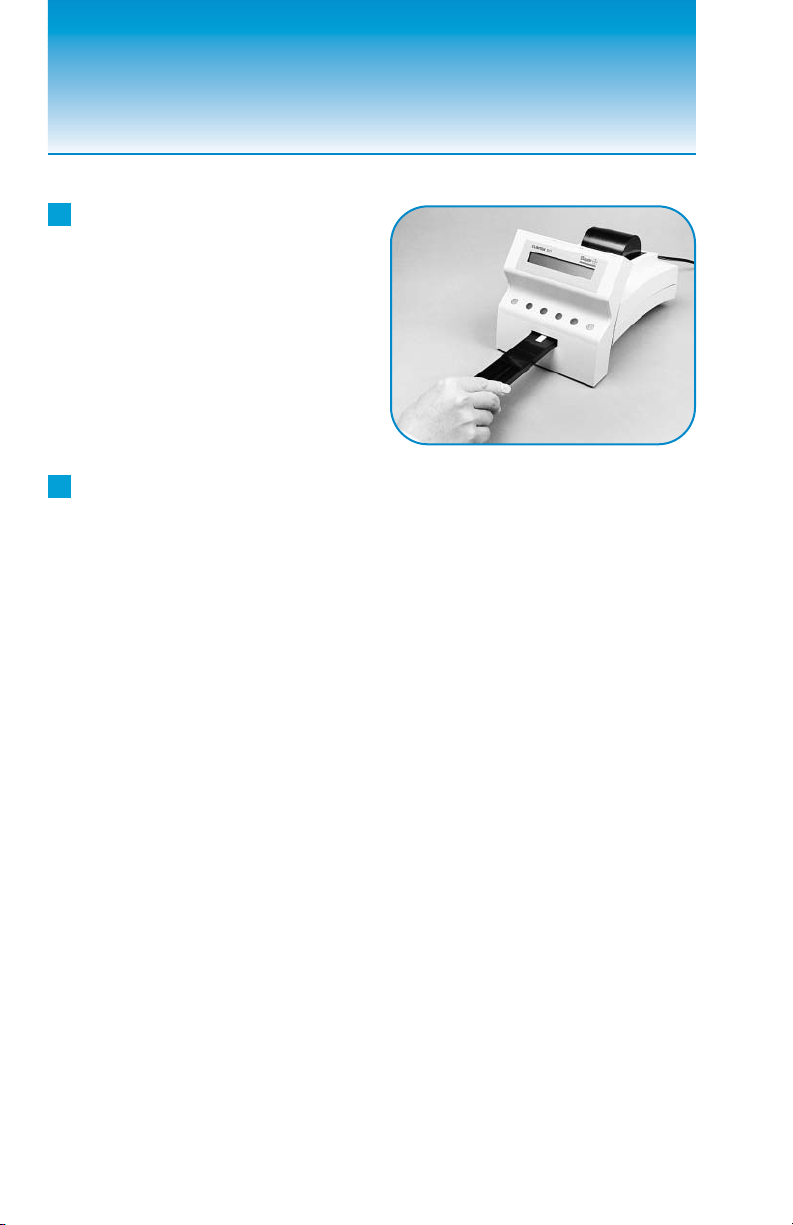
pressed.You have 10 seconds
after the key is pressed to blot
the edge of the wet reagent test
strip (if required for the test) and
place it on the test strip table.The
table is then pulled into the instru-
ment, where the test strip is read.
The instrument measures the
color and amount of light that is
reflected from the test pads on the
strip.It then converts these mea-
surements into meaningful results.
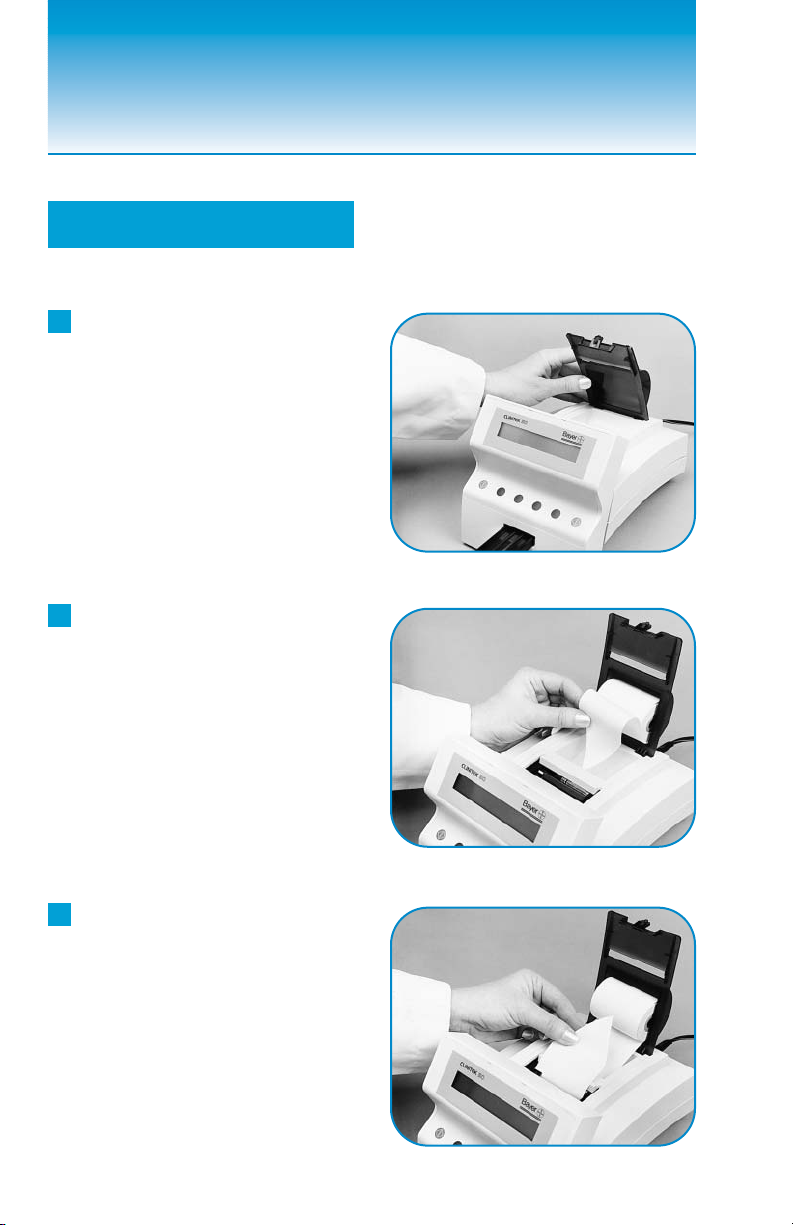
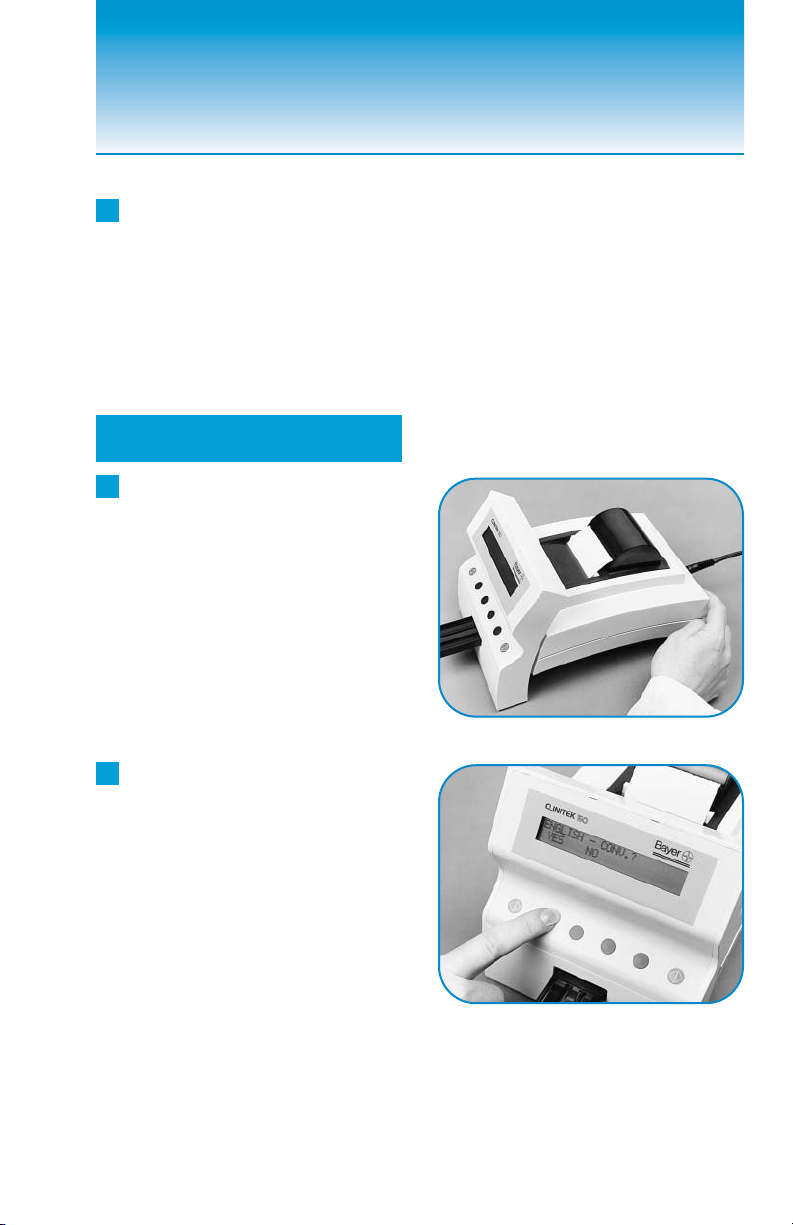
How do I get results?
Results can be either printed or
displayed.The results can also be
transferred to a computer using a
special cable that is plugged into
the computer port on the back of
the instrument.
What about this User’s Guide?
The User’s Guide contains the
directions you need to unpack the
instrument, use it for your daily
urine testing, and keep it in good
working condition.The User’s
Guide is provided in several
languages; please recycle the
Guides you will not be using.
As you read through the User’s
Guide, you will find these symbols:
NOTES contain useful tips
on using your instrument. They
appear in italicized type.
CAUTIONS should be
followed carefully to ensure your
instrument operates correctly and
is not damaged.Cautions appear
in bold type like this.
✏

1Carefully remove the
contents of the shipping carton.
Check the carton and instrument
for visible signs of damage; if
seen, immediately contact the
carrier.
2Remove each of the
wrappings and check for the
following items:
1
Unpacking
1CLINITEK®50 Analyzer
2Test strip table
(Do not touch the white bar!)
If you will be using a Reagent Strip
that has four or fewer test pads, you
must use a short test strip table, which
must be ordered separately (see page
27).(CLINITEK®Microalbumin Strips
are run using the long table.)
3Printer cover
4Power transformer
5Power cord
If the power cord is not the style you
need, contact your Bayer office
(see page 25).
6Paper roll
Depending on the model you have
received, there may also be a Warranty
Registration Card, Customer Information
Card, Unpacking/Setup Guide, and/or
Quick Reference Guide included.
1
2
6
4
5
3
Unpacking and Setup 1

3Place the instrument on a
level work surface where the
temperature and humidity are
fairly constant.
4Locate the following:
1Display
2(START) Keys
Either green key can be
pressed to start a test.
3Option Keys
Each dark gray key corresponds
to one of four words that may be
shown on the bottom line of the
display; press the key beneath
the word to select that choice.
If you will be using the
optional battery pack instead of
the power cord and transformer,
skip Step 5.
5Plug the power cord into
the transformer, then plug the
transformer cord into the
instrument. Plug the power
cord into an appropriate
grounded AC electrical
wall outlet.
2
The best temperature
for using the instrument is
between 22°C and 26°C (72°F
to 79°F). Do not place the
instrument near such things
as an outside window, oven,
hot plate, or radiator.
✏
1
2
3

3
6Insert the test strip table into
the instrument, holding it by the
end opposite the white bar and
with the flat side facing up.Do
not touch the white bar. Push
the table in about halfway.
7If you will be sending results
to a computer, you must obtain
a special Computer Cable/
Connector Kit (see page 26 to
order).The kit includes all the
information you need to connect
and use the cable.

4
2Turn the instrument over
and snap the battery pack into
the opening.
3Plug the cord into the
power inlet.
1If you will be using the
optional battery pack, place
six AA-size batteries into
the battery compartment.
Installing the
Battery Pack

5
If changing the paper,
leave the cover down and pull
out the remaining paper.Then
raise the cover and remove
the empty core to continue.
3Pulling toward the back,
gently pull the end of the paper
until the full width of the paper
is completely exposed.
1Insert the two tabs on the
printer cover into the two openings
on the instrument. Rest the cover
on its back edge.
2Trim the end of the paper so
it has a large “V” shape at least
2 inches (5 cm) long.With the
paper unrolling from underneath,
insert the paper under the printer
roller until the tip comes through
the other side of the roller.
Loading the Paper Roll
Do not pull the paper
straight up or toward the
front, as this will damage
the printer.
✏

The cover must be
latched in order for the
instrument to function.
1Press the power switch on
the back of the instrument to
the “––” (ON) position.
2If you want to use the
language and units shown
on the screen, press the key
under the word YES. If you
want another language and/or
units, press the key under the
word NO.
6
4Feed the paper through the
printer cover opening and snap
the cover into position.
To prevent damage
to the printer, do not tear
the paper without the cover
in place.
Powering Up
Refer to pages 29 to 34
for the test abbreviations and
results that are used with each
of the three options for English.
For tests not shown in these
tables, refer to the insert
included with the product.
✏
✏

7
3Press the key under the word
NORMAL if you want the results
to appear in clinical units.Press
the key under +/– if you prefer
plus and minus signs.
4If you want to use the Bayer
Reagent Strip shown on the
screen, press the key under the
word YES. If you want to use a
different strip, press the key
under the word NO.
✏
The MULTISTIX PRO®
and CLINITEK Microalbumin
Strips are not included in this list.
✏
5Your selections will be printed.
If they are correct, press the key
under YES. If they are not correct,
press NO and repeat Steps 2 to 4.
The screens shown in
Steps 2, 3, and 4 appear only
the first time the instrument is
turned on.

1Find the bar-coded serial
number label on the bottom of
the instrument.Write this
number and today’s date on the
Problem Checklist on page 24.
2Fill out and mail the Warranty
Registration Card and Customer
Information Card if these are
included with your instrument.
Final Paper Work
8
6The instrument briefly
displays two screens while it
does an internal check.When
the check is complete, the
READY screen appears.Look
for the names of the products
that can be used — they are
shown after the words
“READY FOR TEST.” MULTISTIX PRO and
CLINITEK Microalbumin Reagent
Strips are automatically identified
by the instrument; if your software
cannot identify a test, the test is
rejected and the display will
show “STRIP PROBLEM –
RETEST.”
✏
Do not use any
traditional Bayer Reagent
Strip product other than what
is shown on the display. Using
the wrong Reagent Strip will
give you incorrect results.

9
1If you want more than one
printed copy or if you prefer
results to be displayed on the
screen, press the key under
the word OUTPUT.
3If you pressed PRINTER,
you can choose to have more
than one copy of the results.
Press the key under your choice.
Location of Results
and Number of Copies One copy of each set of
results will be printed if you do
not change this option.
✏
2Press the key under your
choice.
Selecting Your Options 2

10
1Press the key under the
word SET.
2Press the key under DATE
and select a date format:
MDY Month-Day-Year
DMY Day-Month-Year
YMD Year-Month-Day
3Press the key to adjust
the first number.
4Press the ➞ key, then press
to adjust the second number.
5Press the ➞ key, then press
to adjust the third number.
6Press EXIT.
4Press the ➞ key, then press
to adjust the minutes.
5Press EXIT.
If you press and hold
the key, the numbers will
advance more quickly.
Setting the Date
1Press the key under the
word SET.
2Press the key under TIME
and select the 12 hour (AM/PM)
format or the 24 hour (military)
format.
3Press the key to adjust
the hour.
✏
Setting the Time

11
1Press the key under the
word SET.
2Press MORE, then press
COLOR. Press the YES or NO
key to make your selection.
3Press EXIT as needed.
Reporting the Urine
Color
Setting the Sequence
Number
Color will be reported
automatically when using Bayer
Reagent Strips that include the
leukocyte test pad if this option
is set to YES. If there is no
leukocyte pad, lines for manual
entry of the color and clarity are
printed.
The sequence number
will not be displayed or printed
unless you change this option.
If you are already using
sequence numbers and the
number is greater than 001,
you will first be given the option
of setting it to 001.
Color results reported
by the instrument may be
different from the color seen
visually.This is because of the
inherent differences between the
human eye and the optical
system of the instrument.
1If you want to have the
sequence number appear, press
the key under the word SET.
2Press MORE, then press
SEQ#.
3Press YES to use sequence
numbers (or press NO if you
don’t want them displayed).
4Press EXIT as needed.
✏
✏
✏
✏

12
Clearing the Memory
and Marking Positives You can connect the
instrument to a computer to
transfer results. Fifty sets of
results are stored (for transfer
only) if the memory is not
cleared.
Check whether your
software program can accept
the asterisk that marks positive
results. Press NO if it cannot.
1If you want to clear the
instrument’s memory of all test
results, or to turn off the
asterisk, press the key under
the word SET.
2Press MORE, then press
CMPTR.
3Press YES to clear the
memory and reset the sequence
number to 001.
4Then select whether
positives will be marked with
an asterisk (*).
5Press EXIT as needed.
✏
✏
Printing the
Instrument Setup
If you want to print a list of your
instrument’s setup selections,
press the key under the word
LIST.

13
Positive and negative control
solutions should be tested on a
regular basis.This provides a
check to ensure that the test
strips are reacting properly and
the instrument is reading the
strips properly.Testing controls
also helps detect errors caused
by incorrect user technique.
CHEK-STIX®Positive and
Negative Control Strips are
available for use in your quality
control program for routine urine
testing (see page 26 for product
numbers).Prepare the control
solutions as instructed in the
package insert that comes with
the control product.Then test the
control solution using the same
procedure as you use when
testing patient urines.
Record the control results.If
any results are not within the
expected range, notify the lab
supervisor or physician. Refer to
the bottle label and/or package
insert for storage information
and expiration date.
Expected values are found
in the package insert that comes
with the control product.
✏
If using a MULTISTIX PRO®
or CLINITEK®Microalbumin
Reagent Strip, quality control
should be performed using
commercially-available controls
that include values for each test
on the strip; CHEK-STIX Control
Strips are not suitable for use
with these products.For informa-
tion about control manufacturers,
contact your local Bayer office or
representative.In the United
States, call the Bayer Technical
Care Center at 1-877-229-3711.
✏
You should test controls:
▲at the start of the day;
▲when you open a new bottle
of test strips;
▲whenever test results are
in doubt;
▲when training instrument
operators.
Te s ting Controls 3

14
Procedure
Testing can be started only
from the READY FOR TEST
screen. Be sure the Reagent
Strip name agrees with the
strip being used, unless using
MULTISTIX PRO®or CLINITEK®
Microalbumin Reagent Strips,
which are automatically
identified after testing begins.
Before beginning the day’s
testing, check the test strip
table to make sure it is clean.
If it looks dirty, remove the
table and clean it, as described
on page 18.
The urine specimen should
be fresh, well-mixed, and
uncentrifuged. If the urine depth
is less than about 3 inches
(7.6 cm), pour the specimen
into a narrow tube, such as a
URIN-TEK®Specimen Tube.
1Dip a Bayer Reagent Strip
into the urine. Be sure all the
test pads are wet.
2Immediately remove the
Reagent Strip from the urine,
dragging the edge of the strip
against the side of the container
as you remove the strip. At the
same time, press either green
(START) key.You now have
10 seconds to complete Steps 3
and 4.
✏
Replace the cap as soon
as you remove each strip from
the bottle.
✏
Refer to the direction
insert included with your
Reagent Strips for complete
information on using the strips.
✏
4Te s ting Routine Urines

15
You must place the test
strip while the message
PLACE STRIP ON TABLE is
on the screen. It will appear
for 10 seconds.
5The table is automatically
pulled into the instrument for
reading. Results are available in
one minute.Be sure not to move
or bump the table.
3Blot the strip to remove
excess urine by touching the
edge to a paper towel.Do not
drag the strip across the towel;
touch the edge only.
4Place the Reagent Strip,
with the test pads facing up,
into the middle trough of the test
strip table.Slide the strip along
the table until it touches the end
of the trough.

16
If results are printed:
The test results are automatically
printed. Press the PRINT key to
reprint the last set of test results.
Press PAPER, if desired, to add
blank lines after the results.
If results are displayed:
To view results, press the key
repeatedly.When all results have
been displayed and recorded,
press EXIT. To display the
results again, press DISPL.
Getting Results
Wipe the test strip table
with a damp, lint-free tissue.
Do this as often as needed to
prevent urine from building up.
Also, wipe the table after testing
a urine that is visibly bloody or
that gives a very high result on
any test pad.
Thermal print will fade
with time. Also, do not cover
thermally printed results with
transparent tape.
6Remove the used Reagent
Strip and discard it in the
proper container.
Summary of Steps:
1Dip a new Reagent Strip
into the urine sample.
2 Press as the strip is
removed from the urine; at the
same time, drag the strip edge
against the side of the container.
3Blot by touching the edge
of the strip to a paper towel.
4Place it on the test strip
table within 10 seconds.
5Discard the strip when the
test is finished.
✏
Table of contents
Other Bayer HealthCare Measuring Instrument manuals
Popular Measuring Instrument manuals by other brands

Simpson
Simpson 897 Operator's manual

Sigineer Power
Sigineer Power MH-M80 Installation and operation manual

palintest
palintest Lumiso Ammonia user manual

Gossen MetraWatt
Gossen MetraWatt LonWorks ENERGYMID U228 W1 Series Interface description

Vega
Vega VEGAPULS 61 operating instructions

SMC Networks
SMC Networks PPA100 Series instruction manual