Transtech PQI 380 Service manual

1
Pavement Quality Indicator
Operator’s Handbook

2
Introduction 3
Measurement Technology 3
Application Summary 4
Safety 4
Disclaimer 4
Controls & Components 5
Contents 5
Gauge Features 6
External / Internal Controls 7
Power Save / Auto Shutdown 8
Setting Up the PQI 380 8
Installing / Charging the Batteries & Battery Care Tips 9
Battery Voltage 10
Starting the Software 10
Main Menu 11
Local Time and Change Date Format 11
Setup the GPS 13
Control Menu 14
Select Measurement Units 15
Data Logging 15
Mix Details 16
Editing Mix Details 16
Project Details 20
Editing Project Details 21
Reading Modes-Selection and Denition 22
Reading Mode Selection 22
Reading Mode Denition 22
Single Reading Mode 23
Average Reading Mode 24
Continuous Reading Mode 26
Segregation Reading Mode 26
Calibration 28
Core Calibration Method 28
Calculating the Offset 29
PQI 380 Offset Setup 29
Data Storage and Downloading Data 31
Downloading Data 32
Viewing, Printing or Deleteing a Project File 32
Maintenance & Troubleshooting 34
Factory Calibration 34
Calibration Reset 35
Factory Parameters 35
Maintenance 36
Troubleshooting 37
Standardization 38
Measurement Table / Core Comparison Calibration Worksheet 40
Warranty 43
Table of Contents

3
TransTech’s Pavement Quality Indicator model PQI 380 utilizes state of the art technology to achieve
accurate asphalt pavement density readings. It’s primary features are:
• No special license or radioactive materials required
• Lightweight and easy to use
• 12 hours of portable operation
• Measures density in common units (lb/ft3or kg/m³)
• Relative moisture detection and correction when necessary
•Storesinniterecords
•DatadownloadviaUSBashdrive(semicolondelimitedtextleformat)
Introduction
Measurement Technology
The PQI 380 uses impedance spectroscopy to measure the electrical response of asphalt from which
thedensityiscalculated.AsshownintheComsolsimulationbelow,theelectricaleldtransmits
through the material from the sensor plate of the PQI 380. The impedance is then measured and
usedinthecalculationofthedensityforthatspecicaggregate.

4
Application Summary
The PQI 380 is intended primarily for use on newly-laid asphalt pavements with lift thickness ranging
from 0.75 inches to 6 inches. The calibration of the PQI 380 to a density standard (core) is very
important for the reliability and consistency of the density measurements for each material.
Safety
Every effort has been made to make the PQI 380 convenient to use and inherently safe. The PQI 380
uses non-nuclear, low-voltage direct current to obtain measurements, therefore, there are no badges,
licensing,storageortransportconcerns.Likeanyinstrument,however,theusershouldexercisecare
and common sense in its use to prevent mishaps.
Warning
Do not use the unit on or near electrical wiring.
A potential shock hazard exists if contact is made with the exposed wiring.
Warning
Use care in handling the unit. Personal injury can occur through improper handling.
Take proper care to avoid accidentally dropping the unit.
Warning
Unauthorized disassembly of the unit will void the warranty.
Warning
Shipping the gauge with the batteries inside is not recommended.
Caution
Charging the gauge overnight or unattended is not recommended
Caution
Turn the unit off when not in use and during transport.
Caution
Be sure not to switch standardization plates with other gauges. Check the
Serial Numbers located on the gauge and on the plate to be sure they match.
Disclaimer: TransTech reserves the right to change or modify product design, construction,
specications,ormaterialswithoutpriornoticeandwithoutincurringanyobligationtomakesuch
changesandmodicationsonTransTechproductspreviouslyorsubsequentlysold.

5
Controls & Components - Contents
Fold open
compartment
contents
Charger
AC Cord
DC Cord
CD Manual
Handle
CD Manual
Slot for PQI 380 and
Standardization Plate
(To remain in case)
The PQI 380 is packaged and shipped with the following components. Contact TransTech Systems
customer service if any of the parts are missing.
• PQI 380 unit
• Standardization Plate
• Storage/shipping case
• Operators Quickstart Guide
• CD Manual
• PQI 380 handle
• 120/220V AC to 12V DC battery charger
• 12V DC Car Charger
• Battery Pack

6
Gauge Features
Handle
TouchScreen
Used to input and
interact with the gauge
Faceplate
Protective bezel
for touchscreen
GPS Module
(Accurate to 5+/- Meters)
On / Off Button
Powers gauge ON / OFF
Handle Extension
Connection for handle
extension
USB Port
Allows communication
betweenaashdrive
Charger Port
Allows connection to
the ac or dc charger
Infrared
Temperature
Sensor
Reports surface
temperature of the soil
Shroud with
10” Sensor Plate
Location where sensor
plate is located
Battery Door
battery cover plate
Gauge Shell
Body of the gauge
Reective Vinyl
Operation in dark areas
safety feature
Battery

7
External / Internal Controls
ExternalcontrolsonthePQI380consistof
anON/OFFswitchanda480x640VGA
touch screen display for navigating through
the user interface and entering alpha/
numeric data.
Besurenottodragyourngerfromone
buttontothenext.Armyetlighttouchis
all that is needed to navigate from screen
to screen.
Unique yet consistent icons are located on most screens for easy one touch navigation. When data
input is required of the operator the screen will display the above keyboard. Toggle from upper to
lower case letters using the Shift button. The upper case keyboard provides the option of a
minus key while the lower case keyboard provides the plus key. Once editing is completed simply
press Enter to save and return to the previous screen.

8
The Status Barislocatedatthebottomofthescreen(excludingthekeyboardscreens)andwill
continuously update the remaining voltage of the batteries while displaying the date, time and status
of the GPS and data logging features.
Thenumerickeypadasshowninthisexampleallowsforonlynumbersandadecimalpoint.
Press Accept to save your entry and in most cases return to the previous screen.
External / Internal Controls
ThePQI380hasabuiltinpowersavingmode.Iftherearenobuttonspressedafterapproximately
20 minutes the unit will go into a power saving mode. Pressing any key will wake the PQI 380 for
continued use. If the PQI 380 is left on for an hour without any buttons being pressed, it will shut itself
down, to conserve battery run time
Power Save / Auto Shut Down
PriortousingthePQI380forthersttimethegaugewillneedtobeconguredtomake
measurements and record data correctly.
The following steps must be completed before operating the PQI 380:
1. Installing and charging the batteries
2. Starting the software
3. Set the local time / set date
4. Set up the GPS
5. Select units of measurement
6. Select data logging
7.Denetheasphaltbeingtested(MixDetails)
8.Deneprojectdetails(forthedataloggingfeature)
9. Select measurement mode
Setting up the PQI 380

9
Installing Batteries
1. Turn the PQI 380 unit OFF
2. Connect the charger to the charger connector located on the back of the PQI 380
3. Plug the charger into a standard AC outlet
4.Theredindicatorlampwillturngreentoindicatethatthebatteriesarecharged(approx.4hrs)
5. Unplug charger from the power source before disconnecting the charger from the PQI 380
YouwillndaplateonthebackofthePQI380with4springloadedbolts.
1.Turneachboltapproximately2fullturnsuntilthespringreleases
2. Remove the plate from the gauge
3.Nextyouwillndawirewithaconnector,disconnectthebatteryfromthegauge
4. Then pull the nylon strap to slide the battery out of the compartment.
(Do not pull the battery by the connector wire, doing so could damage the battery)
Charging Batteries
Battery Care Tips
• Whenever uncertain about the battery charge level or condition, recharge it
• The battery will self-discharge and should NOT be left uncharged for more than 30 days
• An occasional complete discharge followed by a full recharge is recommended
• NEVER drop the battery as this can damage the internals
• DO NOTstoreinfreezerorexposetoextremeheat
• Battery should be fully charged before use

10
Starting the Software
Battery voltage can be viewed on the status bar located at the bottom of all screens. A fully charged
battery will display over 8 volts. The battery voltage will decrease as the PQI 380 is used. A low
batteryvoltageiconwillbedisplayedatapproximately6.5 volts.
Battery Voltage
Low Battery Indicator
The gauge will continue to operate until the battery can not supply enough voltage to complete a
measurement. Once this happens, the gauge will automatically shut down and will not restart until
charged. Depending on the condition of the batteries, once the voltage drops below 6 volts, the
gauge may be able to take about 12 to 15 additional readings. It is important to re-charge the
battery after each use.
Pressing the ON button will power on the PQI 380. After a few seconds the TransTech splash screen
willappearfollowedbytheMainMenuscreen.TheMainMenuscreenwilldisplayveoptions,
Start PQI380, Calculator, Contact TransTech, GPS Control and Update
Software.

11
Main Menu
Start button opens the
Control Menu screen
Calculator button opens the
built in calculator
Contact button displays
TransTech and distributor
contact information
GPS Control button opens
the GPS Settings screen
Update Software button opens
the software update screen
Local Time and Change Date Format
You may set the date and time in two locations. From the Main Menu, press Set Time & Date
located on the status bar or from the Control Menu press Date & Time.

12
Local Time and Change Date Format
To set the time, press the Set Time button. Press the appropriate numbers for the time in
24hourformat.Onceyouaresatisedwithyourentry,pressAccept to save and return to the
previous screen.
To set the date, press the Set Date button. The date will display in either the MM/DD/YY or
DD/MM/YY format which may be toggled from the button located on both screens. As you did with the
time, press the appropriate numbers for the date in the format chosen. Press Accept to save
and return to the previous screen. (Note: Date will be preset by the factory)

13
When the GPS is enabled the satellite icon on the status bar turns from red to green.
GPS formatting can also be toggled from the Universal Transverse Mercator (UTM) grid to
Latitude/Longitude (LAT-LON). Initially the display will read Sats 0 for both formats until connections
havebeenmade.Theaboveexamplesshowaconnectiontovesatellites(Sats5)inbothformats.
GPS locations will appear on the bottom left corner of all reading mode screens and will store with
each reading when data logging is enabled.
Setup the GPS
Setting up the GPS is nothing more than turning it on and waiting to connect to satellites. The GPS
feature can take up to 15 minutes to connect to satellites depending on your location. From the Main
Menu, press GPS Control. GPS status can be toggled ON or OFF.

14
Control Menu
From the Main Menu press Start PQI 380 to enter the Control Menu. From this menu, you will
ndtheiconslistedbelow.
Starts the
standardization process
Openstheproject
details screen
Opens the
diagnostics screen
Opens the time
and date screen
Opens the
mixdetailsscreen
Starts the
measurement process
Opens the datalogging
screen where you can toggle
datalogging on / off
Opens the modes screen
where you can choose a
measurement mode
Opens the units screen, where
you can toggle lbs/ft3to kg/m3,
F° to C°, in. to mm. or
%compaction to %voids
Opens the data management
screen, where you can delete,
downloadandprintjobles

15
From the Control Menu, press Units. Density, Temperature, Depth, Stone Size and
% Compaction can be toggled independently between system international (SI “metric”) and U.S.
customaryunits.Forexample,youcansetthedensitytolb/ft3while temperature is set to celsius,
depth is set to inches while stone size is set for millimeters.
Data Logging
From the Control Menu, press Data Logging. If you wish to save your data, you must enable
thedataloggingfeaturebytogglingthebuttontoON.Theoppydiskonthestatusbarwillturnfrom
red to green when data logging is enabled.
Data will not save for continuous or segregation reading modes.
Datastoredincludesallprojectandmixdetails,aswellasthecompaction,density,temperatureand
the date and time of each reading. If the GPS is on and it is connected to satellites, the location in the
format chosen as well as GPS date and GPS time for each reading will also be recorded.
Select Measurement Units

16
Mix Details
ThedensitydeterminedbythePQI380ishighlymaterialdependentsoitisextremelyimportantthat
themixinformationforeachmixdesignareinputaccuratelyintothegauge.
Note: Readings taken prior to accurately setting up the mix details section of the gauge will
result in incorrect density and compaction results.
ThePQI380isconguredtostore20uniquemixesthatareidentiedbyuserentereddescriptions.If
20mixeshavebeendenedinthePQI380anda21stmixisrequired,oneoftheoriginal20willneed
tobemodiedtoreectthemixdetailsofthenewmixdesign.Thedetailsofthenewmixwillneed
tobeinputbyeditingthedetailsofapreviouslydenedmix.Oncetheoldmixdetailsareoverwritten
with new information, the old information is gone and the new information is saved in the gauge.
Previouslystoreddataleswiththeoldmixinformationwillnotbeoverwritten.
ThedefaultmixesstoredinanewPQI380willhavegenericmixnames(i.e.Mix1,Mix2,etc),the
stonesizeswillallbesetto9.5mm(0.375in.)atadepthof5incheswithaMaximumTheoretical
Density (MTD) of 125lb/ft3. Readings taken prior to editing the default information on a mix that
does not resemble the default information will result in incorrect density and compaction.
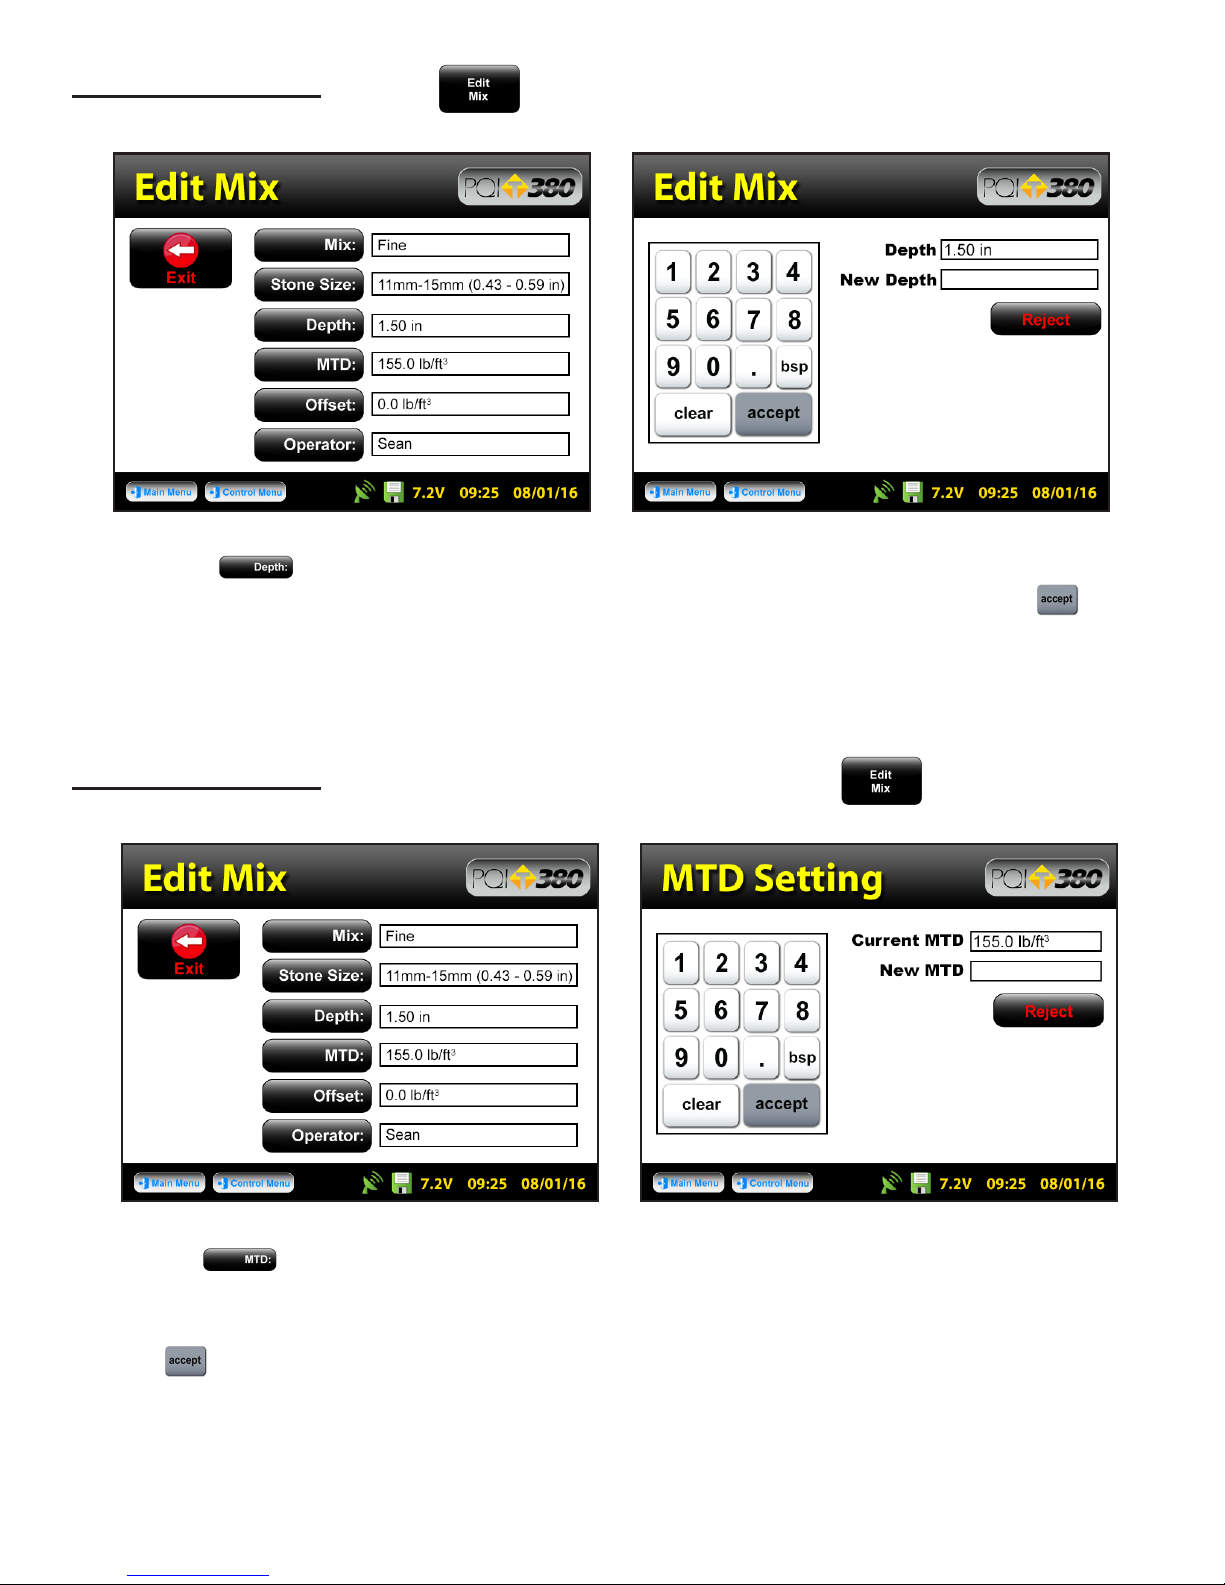
Editing Mix Details
From the Control Menu, press Mixtoenterthemixdetailsscreen.Themixhighlightedingreen
ontheleftisdisplayedindetailontheright.Toeditthedetailsofthismix,press
Edit Mix.

17
TherearesixblackbuttonslabeledMix,StoneSize,Depth,MTD,
Offset and Operator. By pressing one of these labeled buttons, you will enter the
keyboardscreenwhichwillallowyoutoeditandsaveinformationforthatmixvalue.
ForexamplepressMix,thekeyboardwillopenallowingyoutochangethemixname.Press
clear if you would like to start over with a new name. Press shift to toggle from lowercase
to uppercase letters. Once editing has been completed, press Enter.
Press Stone Size.Thereareveoptionsofaggregatesizeslistedinmillimeters(inches).If,
however,youdonotseeyourspecicstonesizelistedchoosethecloseststonesizeavailable.For
example,ifyourmixhasanaggregatesizeof20mm(0.79in),select16mm - 23mm (0.63 - 0.91).
Press Accept after you made your selection.
Editing Mix Details - Mix Name
Fine
Editing Mix Details - Stone Size
18
Press Depth. enter the depth of the asphalt mat on the numeric keypad in the units you
previously selected for the depth. Once the correct value has been entered, press Accept.
An out of range Warning will display for depths entered outside of the following range:
0.75in - 6.0in (19.05mm - 152.4mm)
Press MTD. enter the Maximum Theoretical Density (MTD)ofthemixonthenumeric
keypadintheunitsyoupreviouslyselected.TheMTDisprovidedfromtheasphaltmixdesignerand
is a key value in determining the percent compaction. Once the correct value has been entered, press
Accept.
An out of range Warning will display for an MTD entered outside of the following range:
100lb/ft3- 200lb/ft3(1601.8kg/m3 - 3203.7kg/m3)
Editing Mix Details - Depth
Editing Mix Details - Maximum Theoretical Density (MTD)

19
Theoffsetforthismaterialcanbeadjustedatalatertime.Measurements taken prior to adjusting
the offset will not include the offset. You will need to take a measurement to determine the offset.
The offset feature will be revisited later in the calibration section of this document.
Press Operator. Enter your name as the operator of the gauge, press Enter. The gauge
willreturntotheeditmixscreen.Verifyallmixinformationonthisscreen.Onceyouhaveveriedthe
resultsofthemix,pressExittosavethemix.
Editing Mix Details - Offset
Sean
Editing Mix Details - Operator

20
AfterpressingExitfromtheEditMixscreenthegaugewillreturntotheMix Details screen. Here you
mayusethegreenupordownarrowstoselectanewmixforeditingorchangeanexisting
mix.ThegreenhighlightedmixistheCURRENTMIXthatthegaugewillusewhentaking
readings.Priortoexitingthisscreen,besurethisisthemixyouwantandtheinformationtotheright
hasbeenveried. Press Control Menu on the status bar to return to the Control Menu. If
thegaugeisshutdown,thecurrentmixpriortoshutdownwillremainthecurrentmixwhenstarted
back up.
Project Details
ThePQI380isconguredtostore10uniqueprojectsthatareidentiedbyuserentereddescriptions.
If10projectshavebeendenedinthePQI380andan11thprojectisrequired,oneoftheoriginal10
willneedtobemodiedtoreectthenewproject.Thedetailsofthenewprojectwillneedtobeinput
byeditingthedetailsofapreviouslystoredproject.Oncetheoldprojectsareoverwrittenwithnew
information, the old information is gone and the new information is saved in the gauge. Previously
storeddataleswiththeoldmixinformationwillnotbeoverwritten.
Youmayrevisiteachprojectatanygiventimetocontinuetakingreadings.Datafromreadingstaken
withineachprojectwillstoreintheorderofwhichtheyweretaken.Ifmixdetailschangewithina
project(i.e.offset,stonesize,etc)orprojectdetailsareadded,dataforreadingstakenafterthe
changeswillcontinuetostoreonthesamedatleintheorderofwhichtheyweretaken.Onlyby
changingtheprojectnameitselfwillthedatabestoredonaseparatedatle.
ThedefaultprojectsstoredinanewPQI380willhavegenericprojectnames(i.e.Project1,Project2,
etc)alongwithgenericprojectdetails(i.e.MyStreet,MyRoad,Contact).TheProjectDetailsscreen
willresembletheMixDetailsscreensuchthatyouareabletoselectyourprojectusingtheup
anddownarrows.ThegreenhighlightedprojectistheCURRENT PROJECT.
ReadingstakenwillstoreonadatleusingtheCURRENT PROJECT NAME. If the gauge is
shutdown,thecurrentprojectpriortoshutdownwillremainthecurrentprojectwhenstartedbackup.
Editing Mix Details
Other manuals for PQI 380
1
Table of contents
Other Transtech Measuring Instrument manuals


