manuals.online logo
Brands
  1. Home
  2. •
  3. Brands
  4. •
  5. BD Sensors
  6. •
  7. Switch
  8. •
  9. BD Sensors DS 6 User manual

BD Sensors DS 6 User manual

www.bdsensors.com
E
Operating Manual
Pressure Switch DS 6
Headquarter Western Europe / International
BD SENSORS GmbH
BD-Sensors-Str. 1
D - 95199 Thierstein
Germany
Tel: +49 (0) 92 35 / 98 11-0
Fax: +49 (0) 92 35 / 98 11-11
Headquarter Eastern Europe
BD SENSORS s.r.o.
Hradištská 817
CZ - 687 08 Buchlovice
Czech Republic
Tel: +42 (0) 5 72 / 4 11-0 11
Fax: +42 (0) 5 72 / 4 11-4 97
Russia
BD SENSORS RUS
39a, Varshavskoe shosse
RU - Moscow 117105
Russia
Tel: +7 (0) 9 59 81 / 09 63
Fax: +7 (0) 9 57 95 / 07 21
further agencies in:
EUROPE
•Belgium
•Denmark
•France
•Greece
•Italy
•Lithuania
•Luxemburg
•Netherlands
•Norway
•Poland
•Romania
•Sweden
•Switzerland
•Slovakia
•Spain
•Turkey
•UK
•Ukraine
ASIA
•Iran
•Israel
•Kazakhstan
•Taiwan
•Thailand
AUSTRALIA
The addresses of our distribution partners are listed on our
homepage www.bdsensors.com. It is possible to download
data sheets, operating manuals, ordering codes and certifi-
cates, as well.
1. General information
1.1 Information on the operating manual
This operating manual contains important information on
proper usage of the device. Read this operating manual
carefully before installing and starting up the pressure
measuring device.
Adhere to the safety notes and operating instructions which
are given in the operating manual. Additionally applicable
regulations regarding occupational safety, accident preven-
tion as well as national installation standards and engineer-
ing rules must be complied with!
This operating manual is part of the device, must be kept
nearest its location, always accessible to all employees.
This operating manual is copyrighted. The contents of this
operating manual reflect the version available at the time of
printing. It has been issued to our best knowledge. However,
errors may have occurred. BD SENSORS is not liable for
any incorrect statements and their effects.
– Technical modifications reserved –
1.2 Symbols used
DANGER! – dangerous situation, which may result in
death or serious injuries
WARNING! – potentially dangerous situation, which
may result in death or serious injuries
CAUTION! – potentially dangerous situation, which may
result in minor injuries
!
CAUTION! – potentially dangerous situation, which may
result in physical damage
NOTE – tips and information to ensure a failure-free
operation
1.3 Target group
WARNING! To avoid operator hazards and damages of
the device, the following instructions have to be worked
out by qualified technical personnel.
1.4 Limitation of liability
By non-observance of the operating manual, inappropriate
use, modification or damage, no liability is assumed and
warranty claims will be excluded.
1.5 Intended use
- The electronic pressure switch DS 6 has been designed
for universal use. Preferred areas of use are, among
others, machine building industry, hydraulics, meas-
urement, and controls. Media wetted materials are
stainless steel for the pressure port, ceramics Al
2
O
3
for
the pressure sensor, and FKM or NBR for the seals.
These materials have been chosen particularly in order
to achieve high media compatibility even in standard
version. The new microcontroller switching electronics
offer – besides the standard functions – many additional
features for an optimal adaptation to the measuring re-
quirements. The one or two freely programmable con-
tacts whose status is indicated by differently coloured
LEDs can be quickly and comfortably configured either
by means of the optionally available configuration kits
CIS 685 or CIS 686 or the programming device P6.
- It is the operator's responsibility to check and verify the
suitability of the device for the intended application. If
any doubts remain, please contact our sales department
in order to ensure proper usage. BD SENSORS is not
liable for any incorrect selections and their effects!
- It has to be ensured, that this medium is compatible with
the media wetted parts.
- The technical data listed in the current data sheet are
engaging and must be complied with. If the data sheet is
not available, please order or download it from our
homepage. (http://www.bdsensors.com/products/down-
load/datasheets)
WARNING! – Danger through improper usage!
1.6 Package contents
Please verify that all listed parts are undamaged included in
the delivery and check for consistency specified in your
order:
- pressure switch DS 6
- mounting instructions
2. Product identification
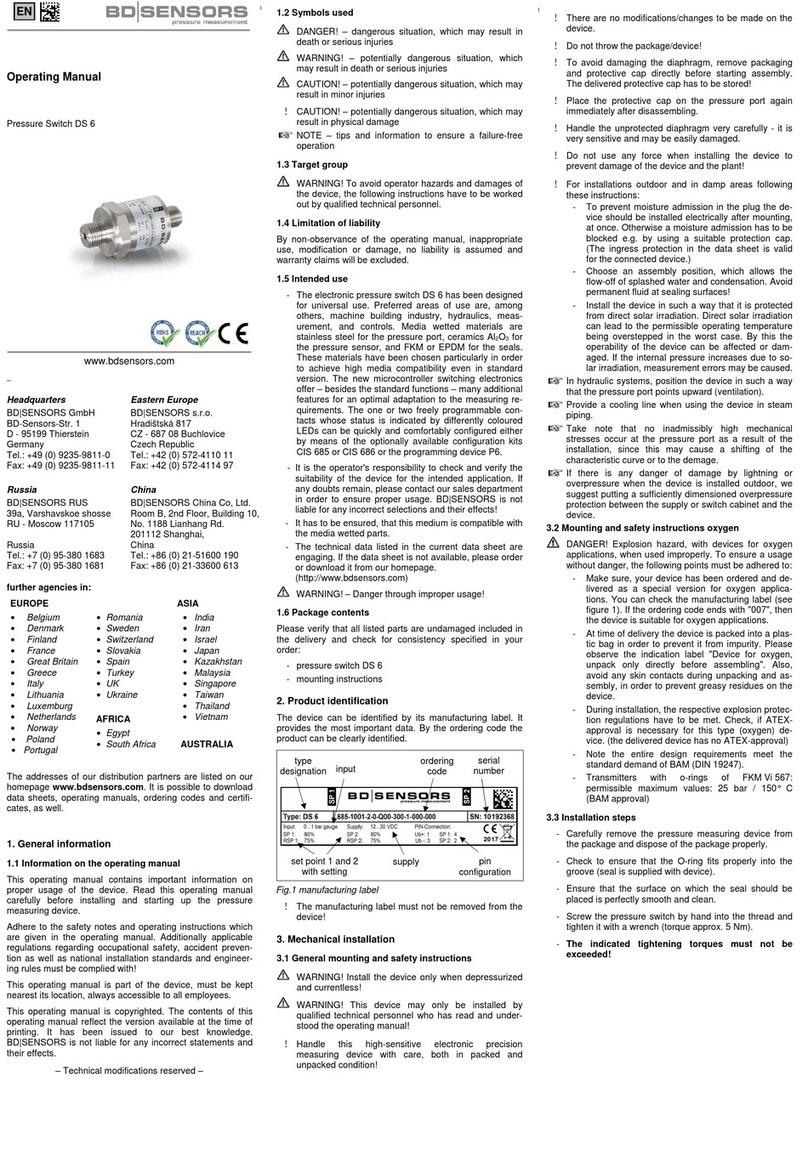
The device can be identified by its manufacturing label. It
provides the most important data. By the ordering code the
product can be clearly identified.
!
The manufacturing label must not be removed from the
device!
3. Mechanical installation
3.1 Mounting and safety instructions
WARNING! Install the device only when depressurized
and currentless!
WARNING! This device may only be installed by
qualified technical personnel who has read and under-
stood the operating manual!
DANGER! Explosion hazard, with devices for oxygen
applications, when used improperly. To ensure a usage
without danger, the following points must be adhered to:
- Make sure, your device has been ordered and de-
livered as a special version for oxygen applica-
tions. You can check the manufacturing label (see
figure 1). If the ordering code ends with "007", then
the device is suitable for oxygen applications.
- At time of delivery the device is packed into a plas-
tic bag in order to prevent it from impurity. Please
observe the indication label "Device for oxygen,
unpack only directly before assembling". Also,
avoid any skin contacts during unpacking and as-
sembly, in order to prevent greasy residues on the
device.
- During installation, the respective explosion protec-
tion regulations have to be met. Check, if ATEX-
approval is necessary for this type (oxygen) de-
vice. (the delivered device has no ATEX-approval)
- Note the entire design requirements meet the
standard demand of BAM (DIN 19247).
- For devices with oxygen capability up to 50 bar, o-
rings V747-75 with BAM-approval are being used.
The max. capabilities allowed, are 40 bar/130°C
and 50 bar/100°C.
- For devices with oxygen capability over 50 bar, o-
rings FKM 90 are being used. These have been
tested up to 95°C and 215 bar in the scientific coal
research institute in Ostrava – CZ.
!
Handle this high-sensitive electronic precision
measuring device with care, both in packed and
unpacked condition!
!
There are no modifications/changes to be made on the
device.
!
Do not throw the package/device!
!
To avoid damaging the diaphragm, remove packaging
and protective cap directly before starting assembly.
The delivered protective cap has to be stored!
!
Place the protective cap on the pressure port again
immediately after disassembling.
!
Handle the unprotected diaphragm very carefully - it is
very sensitive and may be easily damaged.
!
Do not use any force when installing the device to
prevent damage of the device and the plant!
In hydraulic systems, position the device in such a way
that the pressure port points upward (ventilation).
Provide a cooling line when using the device in steam
piping.
Take note that no assembly stress occurs at the
pressure port, since this may cause a shifting of the
characteristic curve.
3.2 Installation steps
- Carefully remove the pressure measuring device from
the package and dispose of the package properly.
- Check to ensure that the O-ring fits properly into the
groove (seal is supplied with device).
- Ensure that the surface on which the seal should be
placed is perfectly smooth and clean.
- Screw the pressure switch by hand into the thread and
tighten it with a wrench (torque approx. 5 Nm).
4. Electrical Installation
WARNING! Install the device in currentless environ-
ments only!
Establish the electrical connection of the device according to
the technical data shown on the manufacturing label, the
following table and the respective wiring diagram.
Wiring diagram:
Pin configuration:
Electrical connection M12x1 (5-pin)
Supply +
Supply –
Contact 1
Contact 2
1
3
4
5
Shield
plug housing
For the electrical connection a shielded and twisted
multicore cable is recommended.
Supply
+
Supply –
Contact 1
Contact 2
VS
R
L
R
L
U
pin
configuration
ordering
code
type
designation
supply
input
set point 1
with setting
serial
number
Fig.1 manufacturing label
DS6_E_190509
5. Initial start-up
WARNING! Before start-up, the user has to check for
proper installation and for any visible defects.
WARNING! The device can be started and operated by
authorized personnel only, who have read and under-
stood the operating manual!
WARNING! The device has to be used within the
technical specifications, only (compare the data in the
data sheet)!
6. Operation
Set point adjustment – factory set
The set points are factory set either to ordered values or to
BD SENSORS standard:
Switching function n/o (normally opened)
Switching mode hysteresis mode
Switch on point 80 % FSO
Switch off point 75 % FSO
Switch on/switch off delay off
Set point adjustment – user specific
Every DS 6 can be quickly and comfortably configured either
by means of the optionally available configuration kits
CIS 685 or CIS 686 as well as the programming device P6.
These devices can be ordered as accessories from
BD SENSORS. In the following, a short description of these
possibilities is given:
Configuration via configuration kit
The DS 6 can be connected to a PC via the programming
adapter and configured by the programming-software P-Set.
The setting of the following parameters for both set points is
possible:
- operation mode (hysteresis or window mode)
- switch-on and switch-off point
- set point negation
- switch on and switch off delay
The programming adapter is part of the programming kits
CIS 685 and CIS 686 which contains i.a. a CD-ROM with the
configuration software P-Set. All cables required for connect-
ing the pressure switch have to be plugged to the program-
ming adapter (included in scope of delivery). The user only
requires a Windows
®
PC with serial interface (CIS 685) or
USB-interface (CIS 686). Installing the configuration soft-
ware P-Set is very easy. P-Set runs on all Windows
®
PC’s
(95, 98, ME, 2000, NT, XP).
Configuration via programming device P6
The programming device P6 is simply plugged between
DS 6 and the female connector. Via two push-buttons and a
4-digit LED display, all possible settings can be realized. The
menu system of the device includes 27 menus and is easy
to handle. The following menus are – among others –
available for configuration:
- read all and store all
- operation mode
- switch-on and switch-off point
- set point negation
- switch on and switch off delay
- teach switch-on and switch-off point
- load of stored configurations
- storage off current configurations
- showing the current pressure value
- showing the limits of the measuring range
7. Placing out of service
WARNING! When dismantling the device, it must
always be done in the depressurized and currentless
condition! Check also if the medium has to be drained
off before dismantling!
WARNING! Depending on the medium, it may cause
danger for the user. Comply therefore with adequate
precautions for purification.
8. Maintenance
In principle, this device is maintenance-free. If desired, the
housing of the device can be cleaned when switched of
using a damp cloth and non-aggressive cleaning solutions.
Depending on the measuring medium, however, the dia-
phragm may be polluted or coated with deposit. If the
medium is known for such tendencies, the user has to set
appropriate cleaning intervals. After placing the device out of
service correctly, the diaphragm can usually be cleaned
carefully with a non-aggressive cleaning solution and a soft
brush or sponge. If the diaphragm is calcified, it is recom-
mended to send the device to BD SENSORS for decalcifica-
tion. Please read therefore the chapter “Repair” below.
!
An incorrect cleaning can cause irreparable damages
on diaphragm. Never use spiky objects or pressured air
for cleaning the diaphragm.
9. Return
9.1 Recalibration
During the life-time of a transmitter, the value of offset and
span may shift. As a consequence, a deviating signal value
in reference to the nominal pressure range starting point or
end point may be transmitted. If one of these two phenom-
ena occurs after prolonged use, a recalibration is recom-
mended to ensure furthermore high accuracy.
9.2 Return
Upon every return of the device, no matter if for recalibration,
decalcification, modifications or repair, it is necessary
to contact us to guarantee a quick execution of your
request. Please inform us by sending an email to:
[email protected]. Include the number of devices sent
and request a RMA. Afterwards clean the device, pack it
shatterproof and send it to BD SENSORS indicating the
RMA.
10. Disposal
The device must be disposed according to the
European Directives 2002/96/EG and
2003/108/EG (on waste electrical and electronic
equipment) Waste of electrical and electronic
equipment may not be disposed by domestic
refuse!
WARNING! Depending on the measuring medium,
deposit on the device may cause danger for the user
and the environment. Comply with adequate precau-
tions for purification and dispose of it properly.
11. Warranty conditions
The warranty conditions are subject to the legal warranty
period of 24 months from the date of delivery. In case of
improper use, modifications of or damages to the device, we
do not accept warranty claims. Damaged diaphragms will
also not be accepted. Furthermore, defects due to normal
wear are not subject to warranty services.
12. Error handling
13. Declaration of conformity / CE
The delivered device fulfils all legal requirements.
The applied directives, harmonised standards and docu-
ments are listed in the EC declaration of conformity, which is
available online at: http://www.bdsensors.com/products/
download/certificates.
Additionally, the operational safety is confirmed by the CE
sign on the manufacturing label.
Malfunction
Possible cause
Error detection / co
rrective
no output signal although
LEDs are working line break inspect all connecting lines of the contacts (including the connecting
plugs)
no output signal and
LEDs are not working
wrong setting of the set
points
verify that all switch parameters are useful and permitted
(e.g. the set parameters must lie within the applied pressure range)
device does not respond to
pressure change defective sensor please send the device for inspection to our service address
little shift of the output
signal
diaphragm is contami-
nated
if a contamination is suspected, please send the device to
BD SENSORS for repair
large shift of the output
signal diaphragm is damaged if a damage (e. g. by overpressure) is suspected, please send the
device to BD SENSORS for repair
If you detect an error, please try to eliminate it by using this table or send the device to our service address for repair.
!
Improper action and opening can damage the device. Therefore repairs on the device may only be executed by the manu-
facturer!
Fig. 4 Programming device P 6
Fig. 3 Programming
adapter
Fig. 2 Programming
Software

Other BD Sensors Switch manuals

BD Sensors DS 6 User manual

BD Sensors

BD Sensors DS 6 User manual

BD Sensors DS 230 User manual

BD Sensors

BD Sensors DS 230 User manual

BD Sensors DS 6 User manual

BD Sensors

BD Sensors DS 6 User manual

BD Sensors DS 6 User manual

BD Sensors

BD Sensors DS 6 User manual

BD Sensors DS 4 User manual

BD Sensors

BD Sensors DS 4 User manual

BD Sensors iS4 User manual

BD Sensors

BD Sensors iS4 User manual

BD Sensors DS 200 User manual

BD Sensors

BD Sensors DS 200 User manual

BD Sensors DS 4 User manual

BD Sensors

BD Sensors DS 4 User manual

BD Sensors DM 200 User manual

BD Sensors

BD Sensors DM 200 User manual

BD Sensors DM01 User manual

BD Sensors

BD Sensors DM01 User manual

Popular Switch manuals by other brands

Smartwares SHS-51001-EU installation instructions

Smartwares

Smartwares SHS-51001-EU installation instructions

Endress+Hauser OTR31 operating instructions

Endress+Hauser

Endress+Hauser OTR31 operating instructions

TRENDnet TEG-S081FMi user guide

TRENDnet

TRENDnet TEG-S081FMi user guide

Kramer VIA CONNECT PRO user manual

Kramer

Kramer VIA CONNECT PRO user manual

TP-Link TL-SG3109 installation guide

TP-Link

TP-Link TL-SG3109 installation guide

LEGRAND Raritan RSS4-102 Administrator's guide

LEGRAND

LEGRAND Raritan RSS4-102 Administrator's guide

IOGear GUWH104KIT installation guide

IOGear

IOGear GUWH104KIT installation guide

Moxa Technologies EDS-316 Series Quick installation guide

Moxa Technologies

Moxa Technologies EDS-316 Series Quick installation guide

Tripp Lite NetDirector B064-016-02-IP owner's manual

Tripp Lite

Tripp Lite NetDirector B064-016-02-IP owner's manual

H3C S5120-EI Series Command reference

H3C

H3C S5120-EI Series Command reference

StarTech.com ST124WGB installation guide

StarTech.com

StarTech.com ST124WGB installation guide

Konig CMP-EHUB41 manual

Konig

Konig CMP-EHUB41 manual

GarrettCom Magnum CSG14 Installation and user guide

GarrettCom

GarrettCom Magnum CSG14 Installation and user guide

Cisco CDB-8U installation guide

Cisco

Cisco CDB-8U installation guide

LevelOne GSW-0509 manual

LevelOne

LevelOne GSW-0509 manual

Omron ER5018 datasheet

Omron

Omron ER5018 datasheet

Kramer TP-900UHD user manual

Kramer

Kramer TP-900UHD user manual

Carrier CRSTATUS001A00 Installation and operating instructions

Carrier

Carrier CRSTATUS001A00 Installation and operating instructions

manuals.online logo
manuals.online logoBrands
  • About & Mission
  • Contact us
  • Privacy Policy
  • Terms and Conditions

Copyright 2025 Manuals.Online. All Rights Reserved.