Beast Seatpost User manual
V2021.01
Page 1
INSTRUCTION MANUAL
SEATPOST STRAIGHT & OFFSET
INTRODUCTION
Welcome to the Beast family! Thank you for putting your trust in our
components. You have chosen one of the sturdiest, lightest, best
quality products. Genuine craftsmanship - developed, designed and
manufactured in Germany.
Your safety is very important to us, so please read this manual
carefully before you install your new Beast Components product or
ride it for the first time. Third party users must also be informed
about the following provisions. Therefore, please keep these
instructions in a safe place for later usage.
These operating instructions are intended for the user of the
seatpost and include information on the installation, maintenance
and care. For your own safty please follow all instructions. The
instruction manuals of all other components on your bike should
also be taken into account.
Your Beast Components-Team
Release your Beast and share experiences with our community!
#beastcomponents #releaseyourbeast #beabeast
WARRANTY & SERVICE
OUR PROMISE
We manufacture the highest quality products for your bike and also
want to ensure the best possible service and support. Therefore we
offer the original owner of Beast Components products a 5-year
warranty and a lifetime crash replacement program for our entire
product range.
PRODUCT REGISTRATION
To get the manufacturer‘s warranty and to participate in the crash
replacement program, you must register your components with
us. Send us an email with a copy of the invoice and the following
Name, First Name
Address
Phone number
5 YEARS MANUFACTURER WARRANTY
We vouch for the quality of our products „Made in Germany“. This
is why we warrant our carbon products to be free from defects in
material or workmanship for 5 years from the original purchase date
(product registration required).
Modified, misplaced, misused, improperly installed or obviously
abused Beast Components products are not covered by this
warranty.
Based on this warranty, the company Black East GmbH is not liable
for compensation, especially not for indirect damage caused by
accidents, collateral damage and consequential damage.
LIFELONG CRASH REPLACEMENT
We offer the original owners of Beast Components products a
lifetime crash replacement program that covers all damages
(optical damages are excluded) outside of the warranty, whether
self-inflicted or third-party caused (product registration required).
In this case we guarantee you a one-time discount of 50% on
our recommended retail price if you decide to buy any new Beast
Components product in the same product category.
Please note that VAT, packaging, shipping and installation costs and
any import duties are not covered.
INTENDED OF USE
The seatpost is suitable for use on both mountain bikes and road
bikes.
The intended use of Beast Components product is divided into six
categories, from riding on paved roads to downhill and freeride use.
Details can be found in the enclosed classification or at www.beast-
components.de/en/service. Beast Components products may only
be used within or below the intended category. Otherwise the user
takes full responsibility.
SEATPOST STRAIGHT & OFFSET
Includes category 3, as well as rides on
rougher unpaved terrain with sporadic
jumps of up to 0.5 m, where the wheels are
in constant contact with the ground or briefly
lose contact with the ground due to bumps
such as roots. Larger obstacles and higher
speeds require increased riding skills.
ATTENTION:
Incorrect handling, installation, maintenance or servicing
can lead to accidents causing severe injuries or death!

V2021.01
Page 2
INSTRUCTION MANUAL
SEATPOST STRAIGHT & OFFSET
GENERAL INFORMATION
Damage can lead to failure of the component and thus to serious
injury or even death. Externally damaged or defective components
must not be used under any circumstances and must be replaced
immediately. If you are unsure, contact us or a specialist dealer.
WEIGHT LIMIT
The Seatpost Straight and the Seatpost Offset are not subject to
any weight restriction.
SHORTEN THE SEATPOST
The seatpost can be shortened correctly if you do not use the entire
extension length. Please shorten the seatpost only when you are
sure that you have found the maximum saddle height.
The necessary dimensions for minimum insertion depth and
minimum extension height remain and should be observed. For this
purpose, please consider the illustration below.
APPEARANCE
Our components are 100% handmade. Thereby it can come to
different appearances. It makes each component unique and has
no influence on the safety. By direct incidence of light you get a
great view of the individual fibers with partly shimmering shades.
INSTALLATION
INSTALLATION COMPATIBILITY
Before mounting, make sure that the diameter of the seat tube on
the frame is suitable for the seatpost. The inner diameter of the
frame tube should be at least 0.1 to a maximum of 0.3 mm larger
than the seatpost dimension.
Attention: Diameter of colored components
Colored seatposts may have a slightly larger diameter.
Therefore, it should be checked in advance whether
the colored seatpost fits into the frame. If necessary,
the colored varnish can be carefully removed with very
fine grit paper. Please be sure to wear a mask for this
purpose. You can find more information in our FAQs.
Please make sure that the seatpost clamp is suitable for carbon
seatposts.
Make sure to check the instruction manual of your saddle for any
possible particularities regarding the mounting.
The seatpost is suitable for both round 7mm diameter seatposts
and high oval seatposts.
MOUNTING OF THE SEATPOST
Attention: Sharp edges
Sharp edges, especially at the end of the tubes, can
cause damage that may lead to breakage of the
seatpost.
Check the seat tube of the frame for sharp edges and burrs, both at
the top edge of the seat tube and along the clamping slot. Deburr
all sharp edges, especially also at the top edge of the seat tube,
with a fine half-round file and sandpaper with 300-400 grit. Grinding
residues and other impurities must be removed.
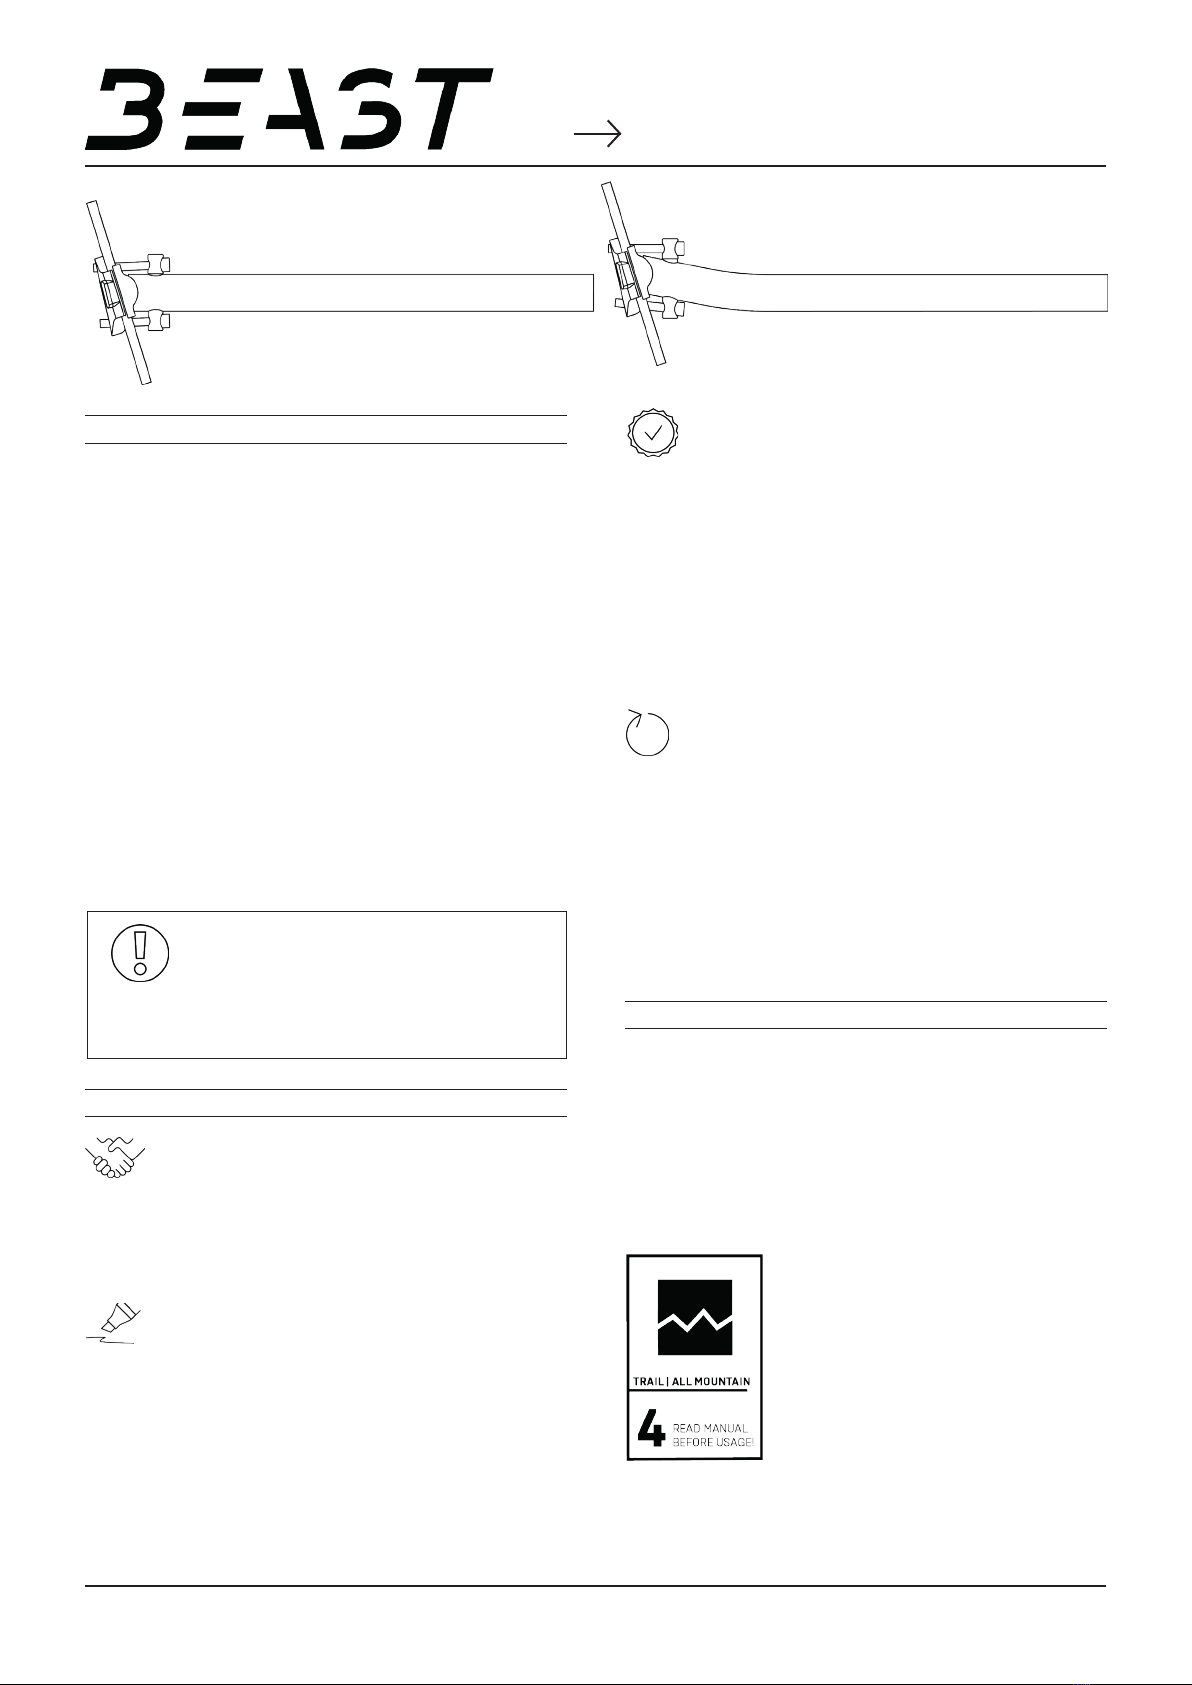
Attention: positioning of the saddle clamp
When positioning the saddle clamp on the seat tube,
make sure that the slotted areas do not overlap (see
illustration).
• The seatpost has different wall thicknesses. This can be seen
especially at the upper end of the seatpost. It must be ensured
that the side with the greater wall thickness must be aligned to
the rear (in relation to the riding direction).
• The marking at the bottom of the seatpost indicates the
minimum insertion depth of the seatpost and must disappear
into the frame. In addition please note the minimum extension
height of 100 mm (see figure on the left). Please note that on
many frames the seatpost must be inserted even further
(usually at least to the lower edge of the top tube). If the
seatpost is not pushed far enough into the frame, the frame
and/or the seatpost can be damaged.

V2021.01
Page 3
INSTRUCTION MANUAL
SEATPOST STRAIGHT & OFFSET
• Under no circumstances you should use any force during
assembly if the seatpost can only be pushed into the seat tube
with great difficulty.
• The usage of the supplied assembly paste reduces the
necessary torque.
• The bolts on the seatpost clamp may only be mounted with
grease-free bolts. The maximum tightening torque of 5 Nm
must not be exceeded.
• Abrasions of the carbon surface during assembly are
completely normal.
MOUNTING OF THE SADDLE
• Attach the cross bolt. When doing so, the side with the
increment must face the rear and the smaller countersinks
must face upwards, as shown in the figure below.
• Then place the lower clamping shell on the seatpost that the
relief heightening faces forward. An arrow (representing the
riding direction) is printed in the lower clamping shell and will
help you with the correct adjustment.
• The upper clamping shell is mounted in the riding direction
with the slightly higher side facing forwards according to the
illustration below. An arrow (representing the riding direction)
is printed in the lower clamping shell and will help you with the
correct adjustment.
• Afterwards, the longer screw (50mm) must be inserted at the
rear and the shorter screw (45mm) at the front.
• Now place the saddle with its rails into the saddle support
grooves.
• Set the desired saddle tilt by tightening the two screws
alternately. Never exceed the maximum permissible torque of
5 Nm.
• Make sure that the clamping shells are aligned centrally in the
riding direction.
• The saddle rail may only be clamped in the intended clamping
area.
• If necessary, retighten the clamping screws to the maximum
specified torques after 1-2 hours of riding.
MAINTENANCE AND CARE
Always inspect your Beast Components product for integrity before
riding. Damage can lead to component failure, resulting in serious
injury or even death. Defective components should not be driven
on under any circumstances and should be replaced immediately. If
you are unsure, contact us or a specialist dealer.
The following issues should always be considered:
• Regularly check the tight fit of all parts
• When frequently adjusting the height of your seatpost in muddy
or dusty conditions, material wear actually takes place on the
surface of both the seat tube and seatpost. To keep this wear
to a minimum, we recommended removing the seatpost from
the frame after every ride in wet/muddy conditions and then to
clean it. The inside of the seat tube should also be cleaned with
a rag. Check the inside of your seatpost regularly for moisture
and remove if found.
• Check the inside of your seatpost regularly for moisture and
remove if found.
Proper maintenance and care ensure a long service life and reliable
function.
DISPOSAL AND ENVIRONMENTAL PROTECTION
The statutory regulations shall apply. Whenever possible, avoid
creating waste. Waste, especially carbon, lubricants, cleaners and
any other fluids must be disposed in an environmentally compatible
manner.
CONTACT
Black East GmbH
Beast Components
Hermann-Mende-Str. 5-7
01099 Dresden, Germany
+49 351 501 937 00
www.beast-components.de
Other Beast Bicycle Accessories manuals


