Bedford 2 Door Tall/Split Unit User manual

WARNING: Contains small parts, keep out
of reach of children.
Global
615 Goodwood Road,
Panorama SA 5041
PO Box 18 Melrose Park SA 5039
Telephone: 1800 822 823, Fax: (08) 8460 0009
Email: [email protected]
ww
w
.bedfordgroup.com.au
IMPOR
T
ANT
Before Commencing Assembly:
• Read all instructions COMPLETELY
• Ensure all listed parts are present
2 Door Tall/Split Unit
ASSEMBL
Y GUIDE
If any parts are missing from Parts List 1, please
contact 1800 822 823.
If any parts are missing from Parts List 2, please
Contact HAFELE, Australia at 1300 559 387.
.
NUMBER SHOWN ON THE CARTON.
1800 822 823 AND QUOTE THE BA
TCH
REGARD TO THIS PRODUCT
PLEASE CALL
IF YOU NEED TO CONTACT US
WITH
as described in the Assembly Instructions.
• Ensure ALL melamine edges are facing
CARPET)
clean and flat (DO NOT WORK ON
• Ensure your work surface is solid, level,
CAUTION
(Philips Head Screwdriver, Hammer &
Wood Glue)
complete the assembly
• Ensure you have the required tools to
Page 1 of 10

1800
390
9
Part No. Description Qty.
Fix Shelf
11
2 2Top & Bottom
Qty.DescriptionPart No.
2
3Adjustable Shelf
Qty.DescriptionPart No.
Part No. Description Qty.
Toe Rail6 1
Part No. Description Qty.
Top Back Rail 5 224 Door
Qty.DescriptionPart No.
Part No. Description Qty.
Back7 2
Part No. Description Qty.
Hinge Screws10 12 411 Handle Screws
Qty.DescriptionPart No.
212 Handle
Qty.DescriptionPart No.
28 Cabinet End Panel
Qty.DescriptionPart No. Part No. Description Qty.
Division 1
1672
447
128
868
370
424
426
390
75
426
390
868
1669
447 390
1640
Parts List 1
2 Door Tall/Split Unit
Parts List 2
2Door Tall/Split Unit
Page 2 of 10

16
Part No. Description Qty.
Hinge13 6 414 Glides
Qty.DescriptionPart No.
815 Shelf Support
Qty.DescriptionPart No.
Part No. Description Qty.
Hardware Pin17 16
24
16 Screw Cams
Qty.DescriptionPart No.
Part No. Description Qty.
Cover Caps19 16 50
20 Nails
Qty.DescriptionPart No.
Part No. Description Qty.
Small Wooden Dowel22 4
221 Large Wooden Dowel
Qty.DescriptionPart No.
1
23 Allen key (4mm)
Qty.DescriptionPart No. Part No. Description Qty.
Medium Wooden Dowel 4
Parts List
2
2
Door Tall/Split Unit
Page 3 of 10

Plate
Hinge Mounting
Hinge
Screw 2
1717
17
17
8 (Right Cabinet End)
2424
4
1717171717
8 (Left Cabinet End)
17
22222222
6
Edge Strip
8 (Left Cabinet End Panle)
from Top
15th & 16th Hole
3rd & 4th Hole
from Top
Top Edge
5 (Door)
Edge Strip
27th & 28th Hole
from Top
Step 3
Inserting dowels into rails
Please insert small wooden dowel (22) into the
toe rail (6) and medium wooden dowel (24)
into top back rails (4). It is recommended to use
glue prior to inserting wooden dowels (22) and
(24) into the holes (Please remove excess glue
with a damp cloth). Make sure t
o push the
dowels (22) and (24) all the way in by gently
tapping them in with a hammer.
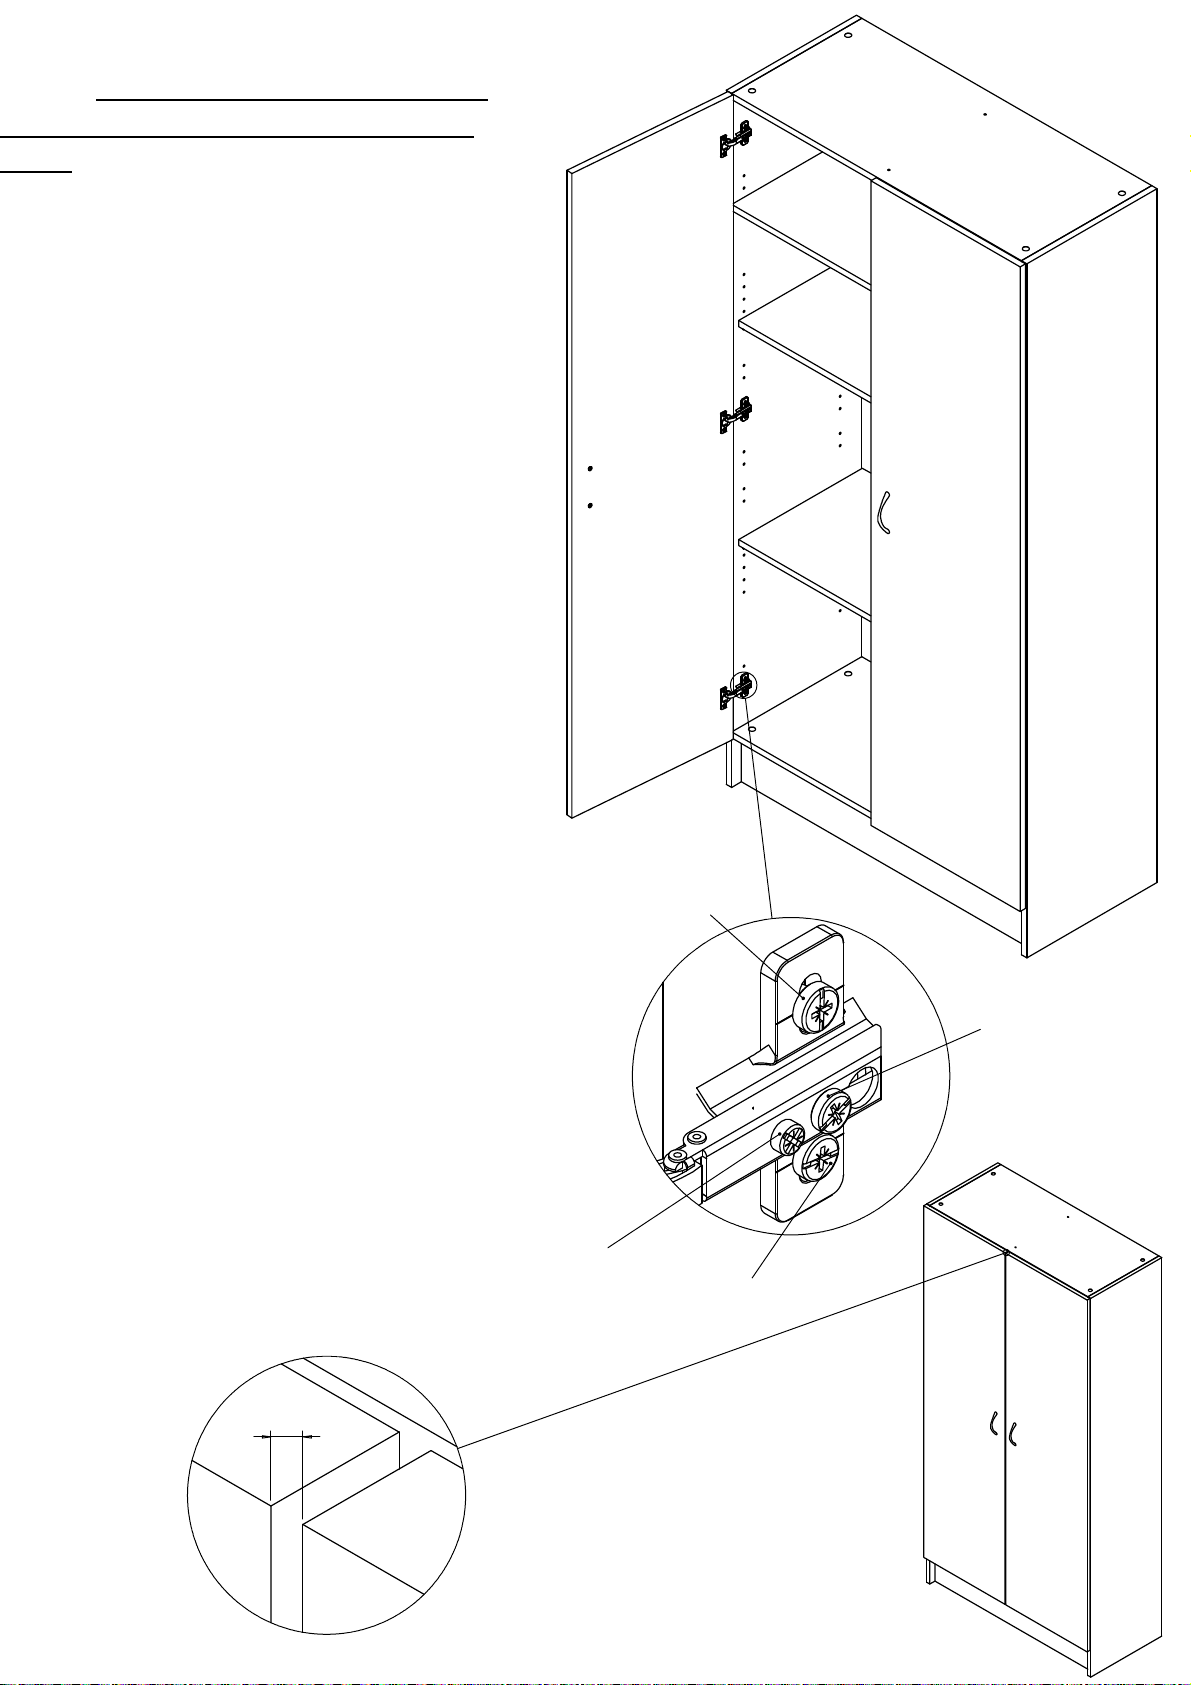
Step 2
Assembling hinge to door and
cabinet end panel
With the left cabinet end (8) lying
flat and with its melamine edge
facing toward the assembler, lay
the door panel (5) next to the
cabinet end panel as shown,
making sure that top of cabinet
end panel (8) and door (5) is
parallel. The door panels (5) can
easily be identified by large 26mm
diameter holes.
Loosen centre screw 2 and
separate the hinge mounting plates from hinges.
Attach hinge to the
door panel (5) by positioning
the body of hinge in large 26mm holes and secure
in place using hinge screws (10). Secure the three
hinge mounting plates on the cabinet end panel
(8) in the holes directly opposite to the hinge in the door.
Step 1
Cabinet end panel
Please lay cabinet end panel (8)
on flat protected surface with
holes facing up. Please note that
left and right end panels look
similar as they are reversible.
Screw the hardware pins (17)
in the holes shown.
Follow the diagram to assemble
the right cabinet end (8).
Page 4 of 10

Start
1 (Bottom)
1 (Top)
16161616
4 (Top Back Rail)
6(Toe rail)
Edge StripEdge Strip
Edge Strip
Edge Strip
2 (Fix Shelf)
1616
Edge Strip
Finish
1 (Bottom)
1616
1616
1717
1616
1 (Top)
16161717
16
1616
2 (Fix Shelf)
16
Step 4
Fix shelf, top and bottom
Lay the top (1), bottom (1) and fix shelf (2) on a flat surface with holes facing up and
insert the cams (16) in holes with arrows pointing to the side
as shown. Make sure to
push the cams (16) all the way in by gently tapping them with hammer.
Screw in the hardware pins (17) in the top and bottom shelf (1) as shown.
Step 5
Assembling cabinet ends,
shelves and rails
With the left cabinet end (8)
lying flat and with its melamine
edge facing toward the
assembler, fix the toe rail (6)
and top back rail (4) to the
cabinet end (8). Please make
sure that the melamine edge
on the top back rail faces toward
the bottom of the unit. It is also
recommended to use small
amount of glue in the dowel
holes prior to inserting rails.
Attach the
top (1) and bottom (1)
to the cabinet end (8) making sure
that the edge strip faces toward the
front of the unit and cams are
facing toward the top of the unit.
Attach the fix shelf (
2) to the cabinet
end with cams facing to the bottom
of the unit. Lock in place by rotating
cams (16) in clock wise direction by
18
0
0
using Allen Key (2
3
).
Page 5 of 10

Edge Strip
4b (Top Back rail)
4a (Top Back rail)
9 (Division Panel)
Edge Strip
Edge Strip
9 (Division)
1616
1616
1717
Step 6
Assembling the division
Please lay down the division panel (9)
on a flat protected surface and insert
the cams (16) in the holes as shown.
Make sure to push cams (16) all the way
in by gently tapping them with hammer.
Screw in the hardware pins (17) in the
holes shown.
Step 7
Assembling division with
the unit
CAUTION: Assembly by two
person
s recommended
Making sure that the edge strip
of the division panel (9) face
towards the front of the unit,
and hardware pins in the
division panel (9) align with
the holes in fix shelf, carefully
push the top shelf away from
the unit (slightly) and place the
division panel between the top
and bottom. Align the hardware
pins in the holes in the fix shelf
and hardware pins in the bottom.
Once aligned, release the top
and insert the hardware pins in top
into the division. Lock all the cams
(16) in place by rotating the cams
in clockwise direction through 180o.
Step 8
Inserting large wooden dowels and
rail
Please align together the holes in top
back rail (4a) and division panel (9)
and gently hammer in the large wooden
dowels (21) through the hole in the
division panel (9) to the top back rail (4a).
Insert the other top back rail (4b) on the
dowels with edge strip facing toward the
bottom of the unit.
Page 6 of 10

Start
8 (Cabinet End Panel)
Edge Strip
16161616
202020
2020
20
20202020
Finish
1
Step 9
Assembling right end panel
It is recommended to insert small
amount of glue in the dowel holes
in the rails (4b) & (6) and clean
the excess glue with a damp cloth.
Making sure, that, all the hardware
pins and dowel holes in the left
cabinet end align with the above
assembly and edge strip faces
toward the front of unit, gently press
the left cabinet end down so that it
is completely pressed up along the
shelves and rails (no gap). Lock the
cams (16) in position by rotating
clockwise 1800, using Allen key (23).
Step 10
Attaching MDF back panel
Lay unit face down on a protected surface to avoid damaging melamine edges and position the back panels (7)
against the top rear of the unit (approximately 1.5 mm in from the top edge) with white side facing inward. The gap
between both the back panels would be approximately 1 mm.
Ensuring that the cupboard is square, nail the back panels (7) along all the edges taking care to avoid nail
breakage through the surface of the fix shelves, cabinet ends and division panel.
Fix the cover caps (19) on the cams (16).
Page 7 of 10

14141414
1111
12
Screw 2
Step 12
Inserting adjustable shelves and
assembling doors to the unit
Caution: If the unit is not secured to the
wall, it may tip forward, when, the cabinet
is opened empty.
Stand the unit upright and fit the adjustable
shelf supports (15) and adjustable shelves
(3) in position. Hold the door straight
against the unit so that screw 2 in hinge
plate is in line with hole in the hinge and
top edge of door is parallel to the top of the
cabinet, secure the door by tightening
hinge screw 2.
Fix handle (12) onto the door using handle
screws (11).
Repeat for the other door.
Step 11
Attaching plastic glides
While unit is lying face down, attach
the four plastic glides (14) on the
underside corners of the cabinet end
panels.
Page 8 of 10
2
Screw 1
Screw 2
Screw 3
Screw 4
Step 13
Hinge adjustment
Caution: If the unit is not secured to the wall, it
may tip forward, when, the cabinet is opened
empty.
•Screw 1 is used for gap adjustment
between cabinet end and door.
•Screw 2 is used to secure hinge to end.
•Screw 3 & 4 is used for gap adjustment
between cabinet top and door as well as
to secure hinge plate to cabinet end.
Following instructions should be followed to
adjust hinges if the gap between the doors is
too wide or narrow:
1. Start from the top hinge.
2. Loosen screw 2 by turning screw in an
anti-clockwise direction.
3. Now, turn screw 1 in a clockwise direction
(the amount to turn this screw is determined
by the width of the gap between the doors).
4. Tighten screw 2 by turning in a clockwise
direction.
5. Repeat these steps for the centre hinge and
bottom hinge.
6. Repeat these steps again with the other door.
7. Check gap between cabinet doors (should be
approx. 2mm), if not, repeat steps 1 to 6.
To adjust the gap between cabinet top and door top
edge (should be parallel), loosen screw 3 & 4 of top,
middle and bottom hinge by turning screws in
anticlockwise direction. Adjust the gap between
cabinet top and top edge of door. Once adjusted,
tighten the screw 3 & 4 by turning in clockwise direction.
Page 9 of 10

Bedford Furniture is part of the Bedford Group. Bedford is
a South Australian not-for-profit organisation dedicated to
enhancing the lives of people with a disability or disadvantage
through employment, training, residential services and life-skills.
Bedford Furniture Employee – Nick Fuller
615 Goodwood Road, Panorama SA 5041
PO Box 18 Melrose Park SA 5039
Telephone: 1800 822 823, Fax: (08) 8460 0009
Email: [email protected]
www.bedfordgroup.com.au
Page 10 of 10
Other Bedford Indoor Furnishing manuals

Bedford
Bedford WS-1200mm User manual

Bedford
Bedford 2660036 User manual

Bedford
Bedford 2 Door Robe Unit User manual

Bedford
Bedford HMR 2 Door Split Cabinet 600 User manual

Bedford
Bedford 2 Door Robe Unit User manual

Bedford
Bedford 2 Door Robe Unit User manual

Bedford
Bedford WS 3 User manual

Bedford
Bedford 2 Door HMR Base Cabinet User manual

Bedford
Bedford HMR Solutions User manual
Popular Indoor Furnishing manuals by other brands

Regency
Regency LWMS3015 Assembly instructions

Furniture of America
Furniture of America CM7751C Assembly instructions

Safavieh Furniture
Safavieh Furniture Estella CNS5731 manual

PLACES OF STYLE
PLACES OF STYLE Ovalfuss Assembly instruction

Trasman
Trasman 1138 Bo1 Assembly manual

Costway
Costway JV10856 manual


