BEE'S DS-A23 User manual


2
Table Of Contents
NL - Handleiding...................................................................................................................................... 3
EN –User Manual ................................................................................................................................. 11
FR –Des Instructions ............................................................................................................................ 18
GER - Anweisungen............................................................................................................................... 25

3
NL - Handleiding
Product parameters
Product
12 standen en temperaturen
Model
DS-A23
Afmetingen
90mm*90mm*78mm
Voltage
5V 2A
Zuigkracht
-60~0kPa
Wattage
5W
EU Standaard
GB4706.1-2005 GB4706.10-2008

4
Operationele richtlijnen
Voorbereiding voor gebruik
1. Lees de veiligheidsmaatregelen zorgvuldig door bij het gebruik van dit product, als het niet aan de
gebruiksvoorwaarden voldoet, is dit product defect.
2. Het wordt aanbevolen om de huid te reinigen en te hydrateren met een natte handdoek of spray
om de gebruikservaring te verbeteren.
3. Draai de transparante tank vast en installeer deze (veeg de Cupping Cup voor en na gebruik af met
een natte handdoek).
4. Controleer of de Cupping Cup compleet en normaal is!

5
Vermogen/ modus
1. Houd 1,5 seconde ingedrukt om de machine te starten, het LCD-scherm gaat aan en geeft 20
minuten weer en de temperatuurindicator licht brand. De Cupping Cup is uitgerust met een timer
van 20 minuten en schakelt automatisch uit na 20 minuten gebruik.
2. Houd 1,5 seconde ingedrukt om uit te schakelen en het LCD-scherm en de temperatuurindicator
gaan uit.
3. Druk in de ingeschakelde toestand kort op om de modus te wijzigen. De Cupping Cup heeft twee
modi, diepe negatieve drukmodus en rustgevende modus ademhalingspatroon.
4. De standaard opstartmodus is diepe negatieve drukmodus, de onderdrukfunctie en
verwarmingsfunctie worden automatisch ingeschakeld.
Zuigkracht
1. Bij het aanzetten is de Cupping cup standaard ingesteld op de derde stand.
2. Druk kort om de zuigkracht aan te passen (DS-A23 heeft 0-12 standen, stand 0 schakelt de
zuigkracht uit)
3. Elke korte druk verhoogt de stand met 1 en het LCD-scherm geeft de overeenkomstige stand weer,
na 1 seconde wordt de timer van 20 minuten weergegeven.
4. Wanneer de intensiteit de hoogste stand bereikt, drukt u nogmaals kort om terug te keren naar
stand 0 en de onderdrukfunctie uit te schakelen.
5. Het wordt aanbevolen om de Cupping cup voor de eerste keer op stand 1 te gebruiken.

6
Temperatuur standen
1. De standaardtemperatuur is ingesteld op 3 wanneer de Cupping cup wordt gestart, het rode
lampje aan de onderkant is ingeschakeld en de temperatuur kan worden aangepast door kort te
drukken (DS-A23 heeft 0-12 standen en stand 0 schakelt de verwarmingsfunctie uit).
2. Wanneer de temperatuur van de DS-A23 stand 9 bereikt, begint de kleur van de
temperatuurindicator te veranderen in een kleurrijk licht en knippert. Hoe hoger de temperatuur,
hoe sneller de veranderingssnelheid van de kleurrijke lamp
3. Wanneer de temperatuur de hoogste stand bereikt, drukt u nogmaals kort om de
verwarmingsfunctie uit te schakelen (stand 0), en de temperatuurindicator gaat uit, het rode lampje
aan de onderkant gaat uit
Drukontlasting/ pauze
DS-A23: Als u tijdens het cuppen het product wilt stoppen of verwijderen, drukt u kort op de toets
om het cuppen te pauzeren. De tankadsorptiefunctie en drukontlasting kunnen de tank gemakkelijk
optillen en in de standby-status gaan.
Opmerking: 1. Wanneer u deze machine gebruikt met vloeibare perifere producten zoals etherische
olie, zorg er dan voor dat u de essentiële olie op de huid houdt nadat het huidoppervlak gelijkmatig is
gecoat en er geen duidelijke vloeistof is, adsorbeer de machine naar de vereiste positie.
2. De machine is ontworpen met een filter dat de meeste deeltjes tijdens het gebruik van het product
of vloeibare onzuiverheden kan filteren om de interne reiniging van de romp te beschermen en de
levensduur van het product te behouden. Gebruik het volgens uw persoonlijke behoeften.
Controleer en vervang het filterkatoen regelmatig.
Oplaadinstructies
1. Sluit de type-C-oplaadkabel aan op de adapteraansluiting en sluit het andere uiteinde naar de
interface voor het opladen van het product om te beginnen met opladen SV2= 2A
2. Houd de oplaadpoort van het type C tijdens het opladen droog en schoon. De oplaadtijd kan
enigszins variëren als gevolg van de omgevingsomstandigheden. Afhankelijk van de werkelijke tijd.
Laad niet langer dan 8 uur op. Tijdens het opladen knippert de witte indicator en gaat uit nadat hij
volledig is opgeladen
3. Het product kan niet worden gebruikt tijdens het laden

7
Veiligheidsmaatregelen
GEVAAR! (Inhoud met betrekking tot ernstig persoonlijk letsel veroorzaakt
door verkeerde bediening)
Niet gelijktijdig gebruiken met de volgende medische elektronische apparatuur, aangezien dit fouten
of schade aan medische instrumenten kan veroorzaken Ernstig levensbedreigend
1. Implanteerbare medische elektronische apparaten zoals een pacemaker
2. Levens ondersteunende medische elektronische apparaten zoals een kunsthart en een afgestemde
long
3. Elektrocardiograaf en andere medische elektronische instrumenten
4. Patiënten met andere medische implantaten.
Gelieve niet te gebruiken onder de volgende omstandigheden om ongelukken
of ongemak te voorkomen.
1. Patiënten met zwangerschap, menstruatie, beschadigde opperhuid, spataderen en drugsgebruik
2. Patiënten met infectieziekten, huidgevoeligheden, postoperatieve patiënten, hoge koorts of
kritieke ziekte zijn verboden.
3. Patiënten met kwaadaardige tumor of lokale schade en ulceratie, traumatische breuk, acute
etterige ontsteking en huidpatiënten met verlies van elasticiteit
4. Patiënten met een abnormaal hart, hersenzenuw en bloeddruk
5. Ernstig neuroticisme, convulsies, spasmen en manische angst
6. Bloedingsgevoelige ziekten, zoals trombocytopenie, leukemie, hemofilie, Henoch Schonlein-
purpura en andere ziekten waarbij de patiënt lijdt van bloeden.
7. In de buurt van het hart, gelaatstrekken, geslachtsdelen of grote bloedvaten op het
lichaamsoppervlak.
8. Patiënten met een huidperceptiestoornis of een abnormale huid
9. Een patiënt die wordt behandeld door een arts of zich lichamelijk abnormaal voelt
10. Overmatige vermoeidheid, dronkenschap en te laat opblijven (2 uur voor en na de maaltijd zijn
ook verboden).
11. Patiënten van wie de huid allergisch is voor metaal en rood licht
12. Het product heeft een verwarmingsoppervlak dat niet gevoelig is voor warmte, kinderen niet in
staat zijn om vrijuit hun wensen te uiten of zelfbeheersing niet mogelijk zijn.

8
Wees voorzichtig (inhoud gerelateerd aan ernstig persoonlijk letsel
veroorzaakt door verkeerde bediening)
1. Gebruik dit product correct volgens de gebruiksaanwijzing!
2. Bij gebruik van het product moet het nauw op de huid worden bevestigd en gelijkmatig worden
gecontacteerd om contact met wonden en littekens te voorkomen.
3. Hetzelfde deel van dit product kan bij langdurig gebruik brandwonden bij lage temperaturen of
overbelasting van de huid veroorzaken. Let op het gebruik!
4. Als u zich tijdens of na gebruik onwel voelt, stop dan onmiddellijk en raadpleeg een arts.
5. Het wordt aanbevolen dat één gebruiker het gebruikt. Schakel bij gebruik door meerdere
gebruikers de transparante tank uit en reinig deze voor gebruik!
6. Gebruik geen ingekeept of beschadigd transparant bliklichaam
7. Na gebruik van dit product treedt roodheid of ecchymose op, wat een normaal verschijnsel is en
gewoonlijk binnen 2 dagen vanzelf verdwijnt (afhankelijk van de individuele huidtypes).
8. Wanneer het product lange tijd werkt, zal er verwarming op het oppervlak zijn, wat een normaal
verschijnsel is.
9. In geval van een afwijking, gelieve deze onmiddellijk te verwijderen.
10. Gebruik dit product niet tijdens het rijden.
11. Sluit de USB-oplaadkabel niet aan en verwijder deze niet met natte handen om elektrische
schokken of ongelukken te voorkomen.
12. Dit product bevat een lithiumbatterij. Gelieve niet uit elkaar te halen, te veranderen, onder te
dompelen in water of in het vuur te gooien om schade en explosie van het product te voorkomen.
13. Na gebruik zullen de bloedvaten op het huidoppervlak verwijden. U moet 45 minuten rusten
voordat u gaat baden.

9
Schoonmaak en onderhoud
› Houd u aan de reinigings- en onderhoudsmethoden om de levensduur van de Cupping cup te
verlengen:
1. Veeg de romp af met een droge niet-geweven doek. Gebruik geen zuur-base wasmiddel, alcohol,
verdunningsmiddel, benzine schoon met oplosmiddel zoals nagellak verwijderraar.
2. Schakel na elk gebruik de voeding uit en maak deze schoon (met een natte handdoek).
3. Bewaar dit product op een veilige en droge plaats.
4. Laat het product niet inactief als er waterresten zijn.
5. Gebruik geen harde borstel of roestvrijstalen bal om af te vegen, om het oppervlak niet te
beschadigen.
6 Gebruik geen water of andere vloeistoffen om het instrument direct in te ademen om te snurken.
7. Laad het product op wanneer het lange tijd inactief is regelmatig om de normale werking ervan te
verzekeren.

10
* Gebruik of bewaar dit product niet op de volgende plaatsen*
Plaatsen die kwetsbaar zijn voor trillingen en stoten; Plaatsen met direct zonlicht; Heet en vochtige
plaatsen; Plekken met water; Sterk elektromagnetisch veld; In de buurt vuurwerk; Voor kinderen
toegankelijke plaatsen, enz.
Fout fenomeen
Foutoordeel en oplossing
Gaat niet aan
1. Houd de aan/uit-knop langer dan 1,5
seconde ingedrukt om op te starten.
2. Laad de machine op en probeer het
opnieuw.
Problemen met het opladen
1. Vervang de adapter door een rij-socket
en probeer het opnieuw
2. Trek de oplaadkop eruit en sluit deze
opnieuw aan en bevestig dat deze op
zijn plaats is geplaatst
3. Controleer de oplaadkop en
oplaadpoort op vuil of diversen. Zo ja,
gelieve op te ruimen.
4. Vervang de adapter of de oplaadkabel
Zwakke zuigkracht
1. Verwijder het transparante deel van de
beker en draai het opnieuw vast voor
installatie
2. Controleer of de luchtinlaat- en
uitlaatopeningen geblokkeerd zijn
3. Controleer of het filterkatoen moet
worden vervangen
Lage temperatuur
1. Controleer of de temperatuurfunctie is
ingeschakeld en of het
temperatuurindicatielampje brandt.
2. Verhoog de temperatuurversnelling
vanwege de invloed van de
omgevingstemperatuur.
3. De batterij is bijna leeg, laad deze op.
Als het probleem niet kan worden opgelost, demonteer de cup dan niet zonder toestemming.
Garantie
Je hebt 2 jaar fabrieksgarantie op de Cupping Cup. U kunt een beroep doen op de fabrieksgarantie als
de oorsprong van het defect niet wijst op onjuist en/of ruw gebruik. Neem contact op met de
klantenservice van Bee’s om aanspraak te maken op uw garantie. Geef bij contact met ons aan waar
het artikel is gekocht en voeg uw kassabon en/of bestelnummer toe in de bijlagen.
Einfo@beestech.nl

11
EN –User Manual
Product parameters
Product
12 levels and temperatures
Model
DS-A23
Product Size
90mm*90mm*78mm
Voltage
5V 2A
Suction Strength
-60~0kPa
Wattage
5W
EU Standard
GB4706.1-2005 GB4706.10-2008

12
Operational guidelines
Preparation before use
1. Please read the safety precautions carefully when using this product, if it does not meet the
use conditions, this product is disabled a product
2. It is recommended to clean and moisturize the skin with a wet towel or spray to improve the
sense of use experience.
3. Tighten and install the transparent tank (wipe the instrument with a wet towel before and
after use).
4. Check whether the instrument is complete and normal
Power / mode
1. Press and hold for 1.5 seconds to start the machine, the LCD displays the 20-minute countdown,
and the temperature indicator lights up. The machine is equipped at 20-minute timing and
automatically shuts down after 20 minutes!
2. Press and hold for 1.5 seconds to shut down, and the LCD and temperature indicator will go out.
3. In the power on state, short press to change the mode. The machine has two modes, deep
negative pressure mode and soothing mode breathing pattern.
4. The default start-up mode is deep negative pressure mode, and the
negative pressure function and heating function are automatically turned on
Suction Strength
1. The power on defaults to the third gear strength.
2. Short press to adjust the suction strength (DS-A23 has 0-12 gears, 0 gear is off (negative pressure
function)
3. Each short press will increase 1 gear upward, and the LCD will display the corresponding strength
gear, after 1 second it will display the 20 minutes countdown.
4. When the intensity reaches the highest gear, short press again to return to gear 0 and turn off the
negative pressure function.
5. It is recommended to use it from gear 1 for the first time or when the skin is not adapted.

13
Temperature control
1. The default 3-gear temperature is started, the red light at the bottom is turned on, and the
temperature can be adjusted by short press (DS-A23 has 0-12 gears, and gear 0 is to turn off the
heating function).
2. When the temperature of DS-A23 reaches the ninth gear, the colour of the temperature indicator
starts to change into a colourful light and flashes, The higher the temperature, the faster the change
speed of the colourful lamp
3. When the temperature reaches the highest gear, short press again to turn off the heating function
(gear 0), and the temperature indicator goes out, the red light at the bottom goes out
Pressure relief / pause
DS-A23: during cupping, if you want to stop or remove the product, briefly press this key to pause
cupping. The tank adsorption function and pressure relief can easily lift the tank and enter the
standby state.
Note: 1. When using this machine with liquid peripheral products such as essential oil, please be sure
to keep the essential oil on the skin after the skin surface is evenly coated and there is no obvious
liquid, adsorb the machine to the required position.
2. The machine is designed with a filter device, which can filter out most of the particles in the
process of product use or liquid impurities to protect the internal cleaning of the fuselage and
maintain the service life of the product. Please use it according to your personal needs Frequency,
check and replace the filter cotton regularly.
Charging instructions
1. Connect the type-C charging cable to the adapter socket, and connect the
other end to the product charging interface to start charging Electricity Adapter side SV2= 2A
3. Please keep the type C charging port dry and clean during charging. The charging time will vary
slightly due to environmental conditions Subject to the actual time. Do not charge for more than 8
hours. During charging, the white indicator flashes and goes out after being fury charged
4 The product cannot be used when it is charged

14
Safety precautions
DANGER! (Contents related to serous personal injury caused by wrong operation)
Do not use with the following medical electronic equipment at the same time, which will cause
errors or damage to medical instruments Seriously life-threatening
1. Implantable medical electronic devices such as cardiac pacemaker
2. Life sustaining medical electronic devices such as artificial heart and tuned lung
3. Electrocardiograph and other medical electronic instruments
4. Patients with other medical implants.
Please do not use under the following circumstances to avoid accidents or
discomfort.
1. Patients with pregnancy, menstruation, damaged epidermis, varicose veins and taking drugs
2. Patients with infectious diseases, skin sensitivities, postoperative patients, high fever, or critical
illness are prohibited.
3. Patients with malignant tumour or local damage and ulceration. traumatic fracture, acute
suppurative inflammation, skin patients with loss of elasticity
4. Patients with abnormal heart, brain nerve and blood pressure
5. Severe neuroticism, convulsion, spasm, and manic anxiety
6., Bleeding prone diseases, such as Thrombocytopenia, leukaemia, hemophilia, Henoch Schonlein
purpura and other diseases where the patient is suffering from bleeding.
7. Near the heart, facial features, private parts, or large blood vessels on the body surface.
8. Patients with skin perception disorder or abnormal skin
9. A patient who is being treated by a doctor or feels physically abnormal
10. Excessive fatigue, drunkenness and staying up too late (2 hours before and after meals are also
prohibited).
11. Patients whose skin is allergic to metal and red light
12. The product has a heating surface, which is not sensitive to heat, children unable to express their
wishes freely or unable self-management.

15
Be careful (contents related to serious personal injury caused by wrong
operation)
1. Please use this product correctly according to the operating instructions
2. When using the product, the transparent body shall be closely attached to the skin and evenly
contacted to avoid contact with wounds and scar marks.
3. The same part of this product may cause low-temperature scald or skin strain when used for a long
time. Please pay attention to the use
4. If you feel unwell during or after use, please stop immediately and consult a doctor.
5. It is recommended that one user use it. When cross users use, please turn off and clean the
transparent tank before use
6. Do not use a notched or damaged transparent can body
7. After using this product, redness or ecchymosis occurs, which is normal phenomenon and usually
subsides naturally within 2 days (according to each individual skin types vary).
8. When the product works for a long time, there will be heating on the surface, which is a normal
phenomenon.
9. In case of abnormality, please remove it immediately.
10. Do not use this product while driving.
11. Do not plug and unplug the USB charging cable with wet hands to prevent electric shock or
accidents.
12. This product contains lithium battery. Please do not disassemble, change, immerse in water or
throw it into the fire to prevent damage and explosion of the product blow up.
13. After use, the blood vessels on the skin surface will dilate. You should rest for 45 minutes before
bathing.

16
Cleaning and maintenance
› Please observe the cleaning and maintenance methods to prolong the
service life of the instrument:
1. Please wipe the fuselage with dry non-woven cloth. Do not use acid-base
detergent, alcohol, diluent, gasoline clean with solvent such as nail remover.
2. After each use, please turn off the power supply and clean it (with wet towel).
3. Please store this product in a safe and dry place.
4. Do not leave the product idle when there is water residue.
5. Do not use a hard brush or stainless-steel ball to wipe, so as not to damage the surface.
6 Do not use water and other liquids to directly inhale the instrument for noshing.
7. When the product is idle for a long time, please charge the product regularly to ensure its normal
operation.

17
* Do not use or store this product in the following places:
Places vulnerable to vibration and impact; Places with direct sunlight; Hot
and humid places; Places with water; Strong electromagnetic field; Near
fireworks; Places accessible to children, etc,
Fault phenomenon
Fault judgement and solution
Unable to power on
1. Press and hold the power button for
more than 1.5 seconds to start up.
2. Please charge the machine and try
again.
Unable to charge
1. Replace the adapter with a row socket
and try again
2. Please pull out the charging head and
plug it in again and confirm that it is
inserted in place
3. Please check the charging head and
charging port for dirt or sundries. If yes,
please clean up.
4. Replace the adapter or the charging
cable
Weak suction
1. Remove the transparent part of the cup
and re tighten it for installation
2. Check wether the air inlet and exhaust
holes are blocked
3. Check whether the filter cotton needs
to be replaced
Weak temperature sense
1. Check whether the temperature
function is turned on and the
temperature prompt light is on.
2. Due to the influence of ambient
temperature, please increase the
temperature gear.
3. The battery is low, please charge it.
If the problem cannot be solved, do not disassemble the machine without permission.
Guarantee
You have a 2-year manufacturer's warranty on the Cupping Cup. You can invoke the manufacturer's
warranty if the origin of the defect does not indicate incorrect and/or rough use. To make a claim
under your warranty, please contact Bee's customer service. Indicate when contacting us where the
item was purchased and add your receipt and/or order number in the attachments.
18
FR –Des Instructions
Paramètres du produit
Product
12 positions et températures
Model
DS-A23
Des mesures
90mm*90mm*78mm
Voltage
5V 2A
Puissance d'aspiration
-60~0kPa
Puissance
5W
Norme européenne
GB4706.1-2005 GB4706.10-2008

19
Directives opérationnelles
Préparation avant utilisation
1. Veuillez lire attentivement les précautions de sécurité lors de l'utilisation de ce produit, s'il ne
répond pas aux conditions d'utilisation, ce produit a désactivé un produit
2. Il est recommandé de nettoyer et d'hydrater la peau avec une serviette humide ou un spray pour
améliorer le sens de l'expérience d'utilisation.
3. Serrez et installez le réservoir transparent (essuyez l'instrument avec une serviette humide avant
et après utilisation).
4. Vérifiez si l'instrument est complet et normal
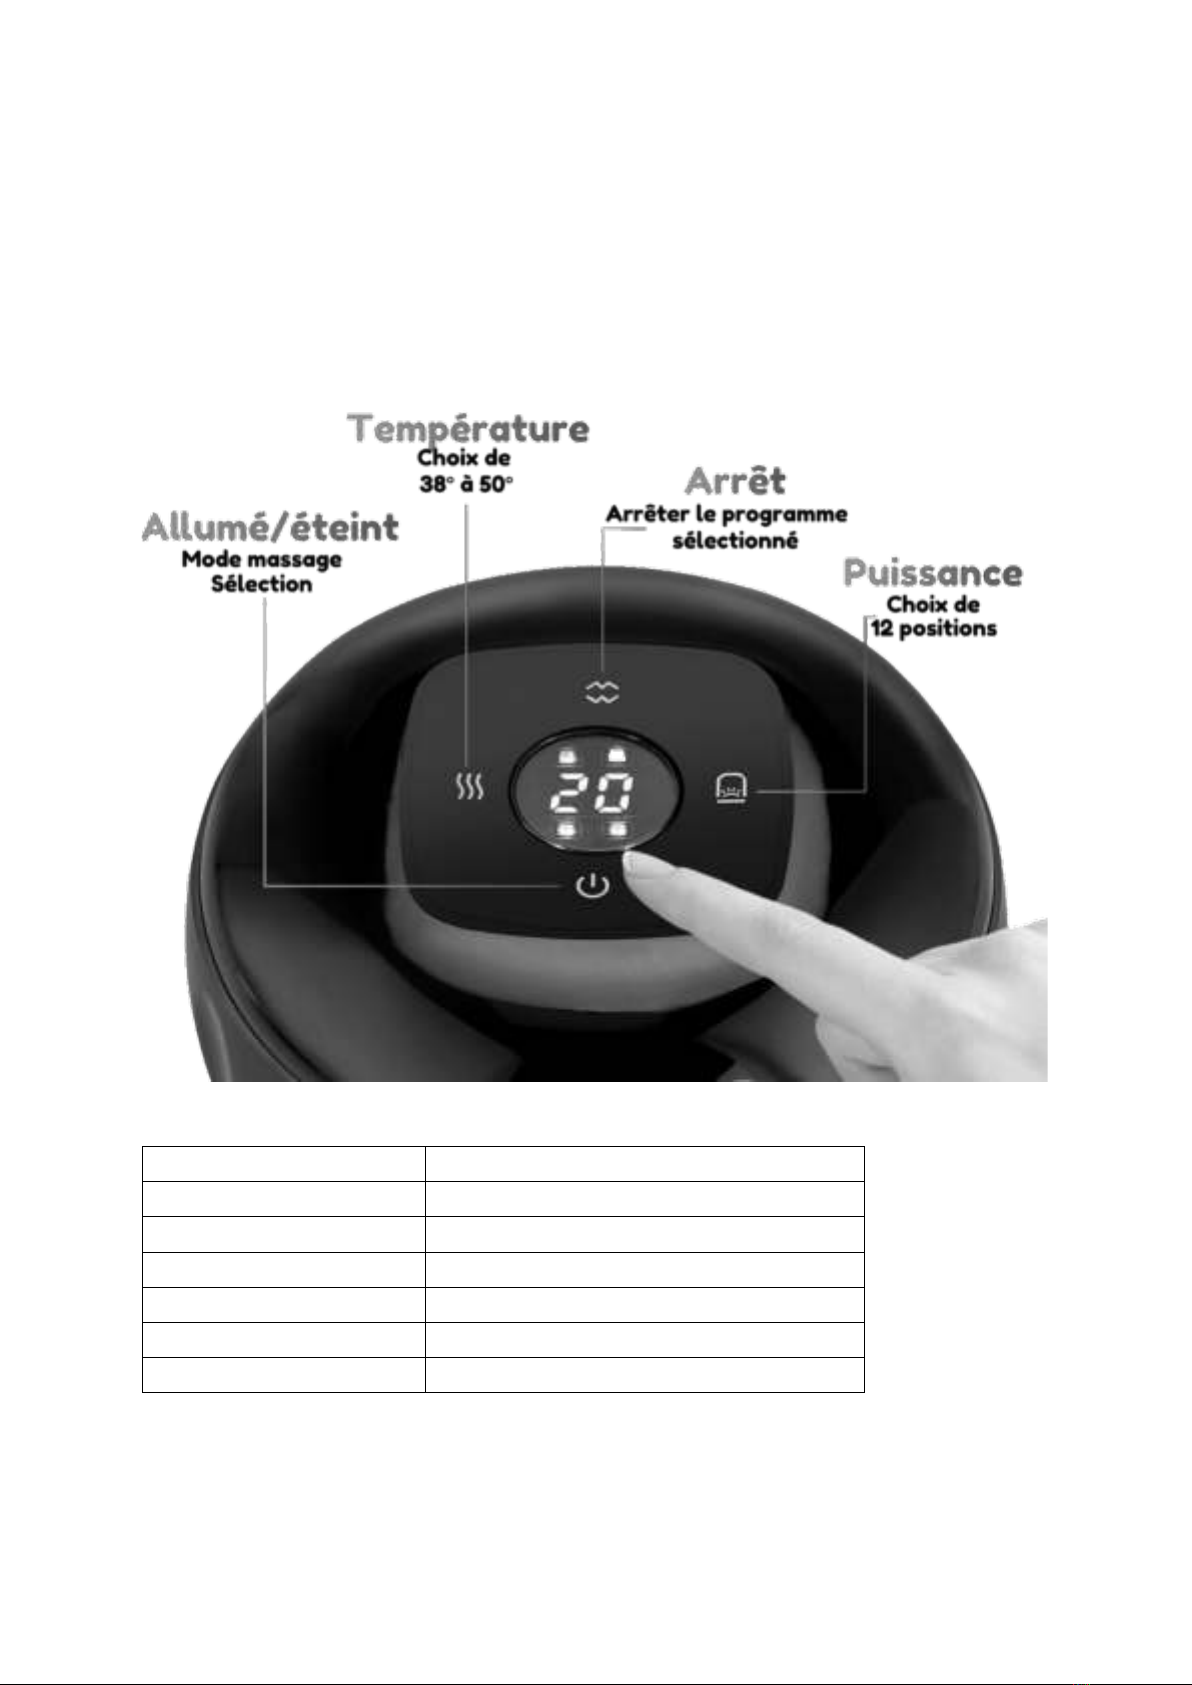
Puissance/mode
1. Appuyez et maintenez enfoncé pendant 1,5 seconde pour démarrer la machine, l'écran LCD affiche
le compte à rebours de 20 minutes et l'indicateur de température s'allume. La machine est équipée
d'un chronométrage de 20 minutes et s'éteint automatiquement après 20 minutes !
2. Appuyez et maintenez enfoncé pendant 1,5 seconde pour éteindre, et l'écran LCD et l'indicateur
de température s'éteindront.
3. À l'état sous tension, appuyez brièvement pour changer de mode. La machine a deux modes, le
mode de pression négative profonde et le mode de respiration apaisant.
4. Le mode de démarrage par défaut est le mode de pression négative profonde, et le la fonction de
pression négative et la fonction de chauffage sont automatiquement activées
Force d'aspiration
1. La mise sous tension passe par défaut à la force de la troisième vitesse.
2. Appuyez brièvement pour régler la force d'aspiration (DS-A21 et DS-A22 ont 0-6 engrenages, DS-
A23 a 0-12 engrenages, 0 engrenage est éteint (fonction de pression négative)
3. Chaque pression courte augmentera de 1 vitesse vers le haut, et l'écran LCD affichera la vitesse de
force correspondante, après 1 seconde, il affichera le compte à rebours de 20 minutes.
4. Lorsque l'intensité atteint la vitesse la plus élevée, appuyez à nouveau brièvement pour revenir à
la vitesse 0 et désactiver la fonction de pression négative.
5. Il est recommandé de l'utiliser à partir de la vitesse 1 pour la première fois ou lorsque la peau n'est
pas adaptée.

20
Contrôle de la température
1. La température par défaut à 3 vitesses est démarrée, le voyant rouge en bas est allumé et la
température peut être ajustée par une courte pression (DS-A23 a 0-12 vitesses, et la vitesse 0 est
pour éteindre la fonction de chauffage).
2. Lorsque la température du DS-A23 atteint la neuvième vitesse, la couleur de l'indicateur de
température commence à se transformer en une lumière colorée et clignote. Plus la température est
élevée, plus la vitesse de changement de la lampe colorée est rapide.
3. Lorsque la température atteint la vitesse la plus élevée, appuyez à nouveau brièvement pour
éteindre la fonction de chauffage (vitesse 0), et l'indicateur de température s'éteint, le voyant rouge
en bas s'éteint
Décompression / pause
DS-A23 : pendant la ventouse, si vous souhaitez arrêter ou retirer le produit, appuyez brièvement sur
cette touche pour mettre la ventouse en pause. La fonction d'adsorption du réservoir et la
décompression peuvent facilement soulever le réservoir et passer en état de veille.
Remarque : 1. Lorsque vous utilisez cette machine avec des produits périphériques liquides tels que
l'huile essentielle, veillez à conserver l'huile essentielle sur la peau une fois que la surface de la peau
est uniformément enduite et qu'il n'y a pas de liquide évident, adsorbez la machine à la position
requise.
2. La machine est conçue avec un dispositif de filtrage, qui peut filtrer la plupart des particules en
cours d'utilisation du produit ou des impuretés liquides pour protéger le nettoyage interne du
fuselage et maintenir la durée de vie du produit. Veuillez l'utiliser en fonction de vos besoins
personnels. Fréquence, vérifiez et remplacez régulièrement le coton filtre.
Instructions de charge
1. Connectez le câble de charge de type C à la prise de l'adaptateur et connectez là l’autre extrémité
de l'interface de charge du produit pour commencer à charger l'adaptateur électrique côté SV2 = 2A
3. Veuillez garder le port de charge de type C sec et propre pendant la charge. Le temps de charge
variera légèrement en raison des conditions environnementales Sous réserve du temps réel. Ne
chargez pas plus de 8 heures. Pendant la charge, le voyant blanc clignote et s'éteint après avoir été
chargé furieusement
4 Le produit ne peut pas être utilisé lorsqu'il est chargé
Table of contents
Languages:
Other BEE'S Medical Equipment manuals

Popular Medical Equipment manuals by other brands

Kegel8
Kegel8 Mother Nurture Operator's manual

AUTOMATE SCIENTIFIC
AUTOMATE SCIENTIFIC EcigAero user manual

Ofa Bamberg
Ofa Bamberg memory Instructions for use

Drive
Drive DeVilbiss Healthcare Hybrid-Power user manual

Bayer HealthCare
Bayer HealthCare MEDRAD 800 Module Operation & installation manual

UNITED
UNITED Baxter 6201 quick start guide

ImpediMed
ImpediMed SOZO Instructions for use

Hitachi
Hitachi EUP-L65 instruction manual

Fresenius Medical Care
Fresenius Medical Care Liberty manual

SAM MEDICAL
SAM MEDICAL IO Stabilizer Instructions for use

3B
3B RESmart CPAP user manual

Welch Allyn
Welch Allyn Connex Vital Signs Monitor 6000 Series Service manual


