bell marine Viper S Series User manual
Viper SSeries
MORE POWER! MORE SPEED! MORE TORQUE!
Factory 1, 2 Network Drive Carrum Downs Victoria Australia 3201 Tel: 61 3 9708 2846 Fax: 61 3 9708 2845 [email protected]
bellmarine.com.au
Gravity Feed
Free Fall Anchor Winch
USER GUIDE

What’s Included In Your Viper Winch Bundle
Viper SSeries “Gravity Feed” Anchor Winch Bundle
Viper Deluxe Anchor Roller (#30009)
Viper Deluxe Stainless Steel Anchor Swivel (#30001)
90 meters of Premium Blend Double Braid Anchor Rope
Pre Spliced to 8mtrs of 6mm Short Link Gal Anchor Chain (#30032) Standard Inclusion Kit
183 meters H-Spec, rope/chain combo kit (30059) Optional Upgrade Kit *
200 Amp Reversing Solenoid (#30020)
Illuminated LED Up/Down Elite 2 Gang Switch Panel (#90109)
100 Amp Flush Mount Circuit Breaker Including Rubber Seal For Wall Mount (#90046)
Single Switch Stainless Steel Face Plate (#30051)
5mm Stainless Steel Sandwich Plate
Emergency Manual Safety Release Tool
All Stainless Steel fixings, Bolt, Screws, Nuts, Washers, Heat-shrink etc Included
Viper User Guide, Wiring Diagram
Viper Wiring Loom Order Form
5 Year Manufacturers Warranty
bellmarine.com.au
Please note: If there is any items missing from your winch bundle please contact Bell Marine on (03) 9708 2846 or email us at [email protected]
and we will express your items immediately
A.This Limited warranty is given by Bell Marine (the company) to the original purchaser (the “purchaser”) of a Bell Marine Viper Winch (the “Product”)
specified in this manual. This 5 Year limited warranty is not transferable to any other party.
B. Responsibilities of the Company under this Limited Warranty
1. Repair or replace (at the discretion of the Company) any part or parts of the Product found by the Company to be defective within a 5 year period
from the date of purchase.
2. The Company will pay the transportation charge for shipment back to the Purchaser of any Product received for legitimate Warranty repair.
C: Responsibilities of the purchaser under this warranty.
1. Complete (fully and accurately) and return to the Company, the Warranty card included in the box. Otherwise, Purchaser will have to show dated
proof of purchase to qualify for service under the provisions of the Limited Warranty.
2. Promptly notify the Seller or the Company of any claim hereunder.
3. At the Option of the Company, return the product to the company for inspection. Authorization must be given prior to any product return. Call the
Company 61 3 9708 2846 or write the Company at Factory 1, 2 Network Drive Carrum Downs Victoria Australia 3201,for authorization and complete
instructions on how to return the product directly to the company.
4. Use reasonable care in installation, maintenance, operation, use and storage of the Product.
5. Have Warranty work, installation performed by a authorized dealer or representative approved by the company if required.
6. Except as noted in B.2., transportation charges to return the unit back to the manufacturer are the responsibility of the Purchaser.
7. Labour costs incured at any authorised, non authorised service centre, shop, and or place or repair are not covered under the warranty, and are the sole
responsibilty of the owner/purchaser.
D. This Limited warranty covers:
1. Defects in workmanship or materials.
2. Any part or parts of the product sold or manufactured by the Company, excluding wearable components including but not limited to brushes, and or
bearings.
E: This limited warranty does not cover:
1. Any failure that results from improper installation of the Product.
2. Any failure that results from accident, purchaser’s abuse, neglect, modification, improper maintenance, or failure to operate and use the product in
accordance with Bell Marine.
3. Wearable components including but not limited to brushes, and or bearings, which are considered to be consumable items under normal working
conditions.
4: Rope and chain kit breakage, damage due to usage, age and or misconduct of boating activity for which the rope/chain was not designed for.
5: Labour costs incured at any authorised, non authorised service centre, shop, and or place of repair are not covered under the warranty, and are the sole
responsibilty of the owner/purchaser (as listed above in Sub Cat. C)
6: Any opening or attempt to open the winch motor and or gearbox will VOID warranty
F. There is no other express warranty. Implied warranties, including those of merchantability and fitness for a particular purpose are limited to one (1) year from date
of purchase. This is the exclusive remedy and any liability for any and all incidental or consequential damages or expenses whatsoever is excluded. Some states do
not allow limitations on how long an implied warranty lasts, or do not allow exclusion or limitation of incidental or consequential damages, the above limitations may
not apply to you. This Limited Warranty gives you specific legal rights and you may also have other rights which vary from state. Bell Marine reserves the right to alter
specifications on any product without notice. All rights reserved. This publication or part thereof may not be reproduced in any form without written permission.
5 Year Limited Warranty
Please note: If there is any items missing from your winch bundle please contact Bell Marine on (03) 9708 2846 or email us at [email protected]
and we will express your items immediately

Anchor Winch Wiring Diagram A
Battery
Electric Winch Motor
Up Down
Switch
100 Amp Circuit Breaker
+
-
3 B&S Cable
Reversing
Solenoid
3 B&S Cable
3 B&S Cable
3 B&S Cable
4
BAT
AUX
RE: 01072016C
SSERIES GRAVITY FEED DRUM WINCH
Please note: solenoid must
be mounted with terminals
in the up position.
Polarity (+/-) only denotes
motor rotation direction
Only use 3 B&S Tinned Marine Cable = 25mm Sq Cable
All switch wire must be 1.5mm Tinned Marine Cable
https://bellmarine.com.au/wp-content/uploads/GRAVITYFEED-WIRING-DIAGRAM.pdf
WARNING: Remember never to connect your battery leads until your installation is complete!
PLEASE NOTE: Pull your wiring loom through your boat first to calculate the position of your
winch accessories before cutting any holes.
Please note: Do not remove the serial number sticker or dismantle the electric
motor under any circumstances as you will void your warranty as you could
cause yourself serious harm.
Every Viper winch electric motor is pressure tested and sealed in our factory to
ensure no water ingress into your electric motor.
Viper
A
B
C
12
3
VIPER PERFORMANCE
VIPER PERFORMANCE
VIPER PERFORMANCE
VIPER PERFORMANCE
C
C
(+)
(-)
C
Rear view
TO +
TO
TO +
TO
Side view
-
--
-
+
+
bellmarine.com.au
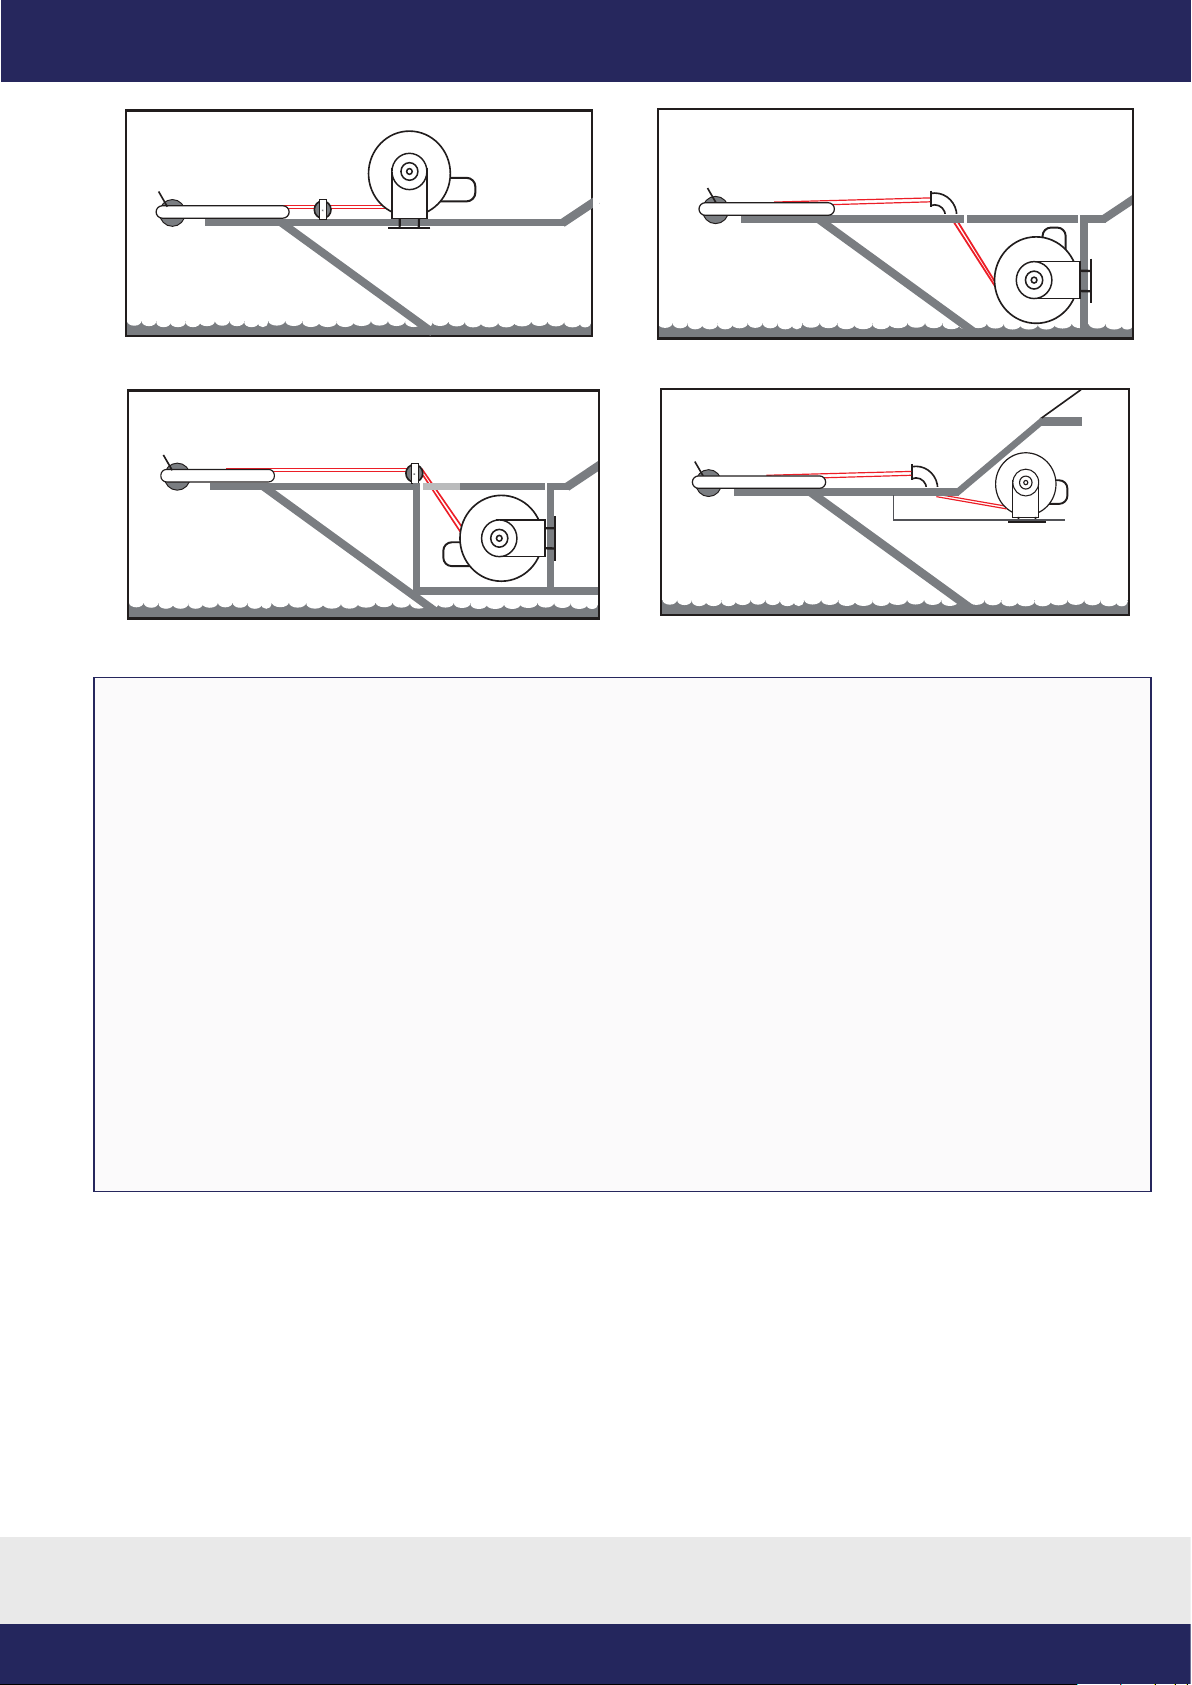
DeckMountInstallationDiagram 1
Anchor Well Installation
Using An Anchor Roller
Diagram 2
Anchor Well Installation
using Hawse Pipe
Diagram 3
Cuddy Cab Installation
Diagram 4
Typical Winch Installation Samples
Installation Note
For the gravity feed winch, rope can only be wound onto the drum in one direction due to its
working design - see the list below to help you work out which direction will work for your installation.
These directions are based on your view if you are standing at the steering wheel and facing towards
the bow.
Rope Installation:
Winch Motor is on the Right/Starboard side, feed the rope over the drum shaft.
Winch Motor is on the Left/Port side, feed the rope under the drum shaft.
Factory 1, 2 Network Drive Carrum Downs Victoria Australia 3201 Tel: 61 3 9708 2846 Fax: 61 3 9708 2845 [email protected]
bellmarine.com.au

Troubleshooting Guide
- If there is a build up on one side of the drum:
The winch has been installed off-center. This means the center of the drum has not been lined up on the center lines between the bow sprit and the center of
the anchor well or the winch installation is not square to the bow sprit.
- If the rope and/or chain jams on the baseplate:
If you have installed a non factory rope/chain kit, then you may have too much rope. You will need to remove rope from the drum to rectify this problem.
If you have a Viper rope & chain kit, then you may be causing this problem by driving too far forward when retrieving your anchor, and creating a loose line
effect, hence this can cause the rope/chain in the middle of your drum
If your anchor fails to fall:
When the down switch is pressed, check that there is a natural force of gravity when the anchor is up and located in the bow sprit. If this is not the case you
may look at a replacement bow roller/sprit or lower your front roller.
- If you over-run the rope and the rope spills over the side of the drum
Have a second person apply tension on the rope whilst you inch the winch in opposite direction. Continue this until all of the rope is spooled back onto the
drum. (ensure to keep your fingers and body parts far enough away from any moving parts)
- If the operation of the winch slows down check that the batteries are charged or connect to a second battery. If your boat is fitted
with dual batteries, have the battery switch on BOTH.
- If the drum spools only in one direction check the connections to the solenoid, motor, circuit breaker and battery.
- If your winch fails to operate check that the circuit breaker is switched on.
- If the actuator fails, check the 100amp circuit breaker to make sure it has not tripped.
OPERATING INSTRUCTIONS
Viper S Series GRAVITY FEED (free fall) Anchor Drum Winch
HOW TO ANCHOR USING THE GRAVITY FEED:
• Please make sure your engine is running while operating your winch.
• Engage the circuit breaker to power up your winch.
• Press the down button for 1-2 seconds or until your winch starts to feed rope and release the switch immediately.
• Once your anchor has hit the bottom, if you require more rope, simply reverse your boat back to release more rope.
• Select boats neutral gear, when your drum stops rotating, press the up button for 1-2 seconds to lock your winch into gear
DO NOT OVER RUN THE ROPE ON THE DRUM:
• Once you are anchored in your desired position, there is no need to tie off the rope.
• Disengage the circuit breaker to cut power from the winch.
RETRIEVING THE ANCHOR:
• Engage the circuit breaker to power up the winch.
• In ideal weather conditions - Start your engine, simply push the UP switch to retreive your anchor.
• In rough weather conditions - Start your engine, place your engine in forward gear (moving slowly)
realeasing the tension of your anchor rope and at the same time pressing your UP switch.
• Continue to push the UP switch until you can see the chain or your chain sock – Then short taps on the switch to bring the
anchor up and lock it into your bow roller/sprit.
• Disengage the circuit breaker to cut power to your winch and your right to go. (optional)
SAFETY SWITCH:
The Viper Pro Series Winch has a safety switch (circuit breaker) located on the switch panel or under your dash.
When traveling or anchored disengage the red lever on the circuit breaker to cut power to your winch. This will
prevent accidental use while anchored or traveling.
MAINTENANCE:
No specific maintenance is required however, a quick hose down with fresh water when washing your boat is optional,
a quick check of your rope and anchor chain before each trip is recommended. Also soaking your anchor rope in a bucket of
warm water and fabric softener annually will keep your anchor rope soft and subtle ensuring it lays on nice and evenly.
ELECTRICAL FAILURE:
It is advised that a spare anchor, rope and chain is available on the boat so the anchor can be deployed for safety reasons,
if your electrics fail or you flatten your battery/s.
Warning!
Please ensure hands, feet, hair and
clothing are kept well away from the drum
winch whilst in use.
bellmarine.com.au

Viper
GALVANIZED & POLISHED STAINLESS STEEL ANCHORS
Designed by Bell Marine to suit most bow rollers and a must for
electric winch installations, these ploughs are guaranteed to hold
bottom in any weather conditions and will not damage your bow
roller on retrieval which prevents your rope from damage. You
will never need to go up to the bow of your boat ever again and
kick your anchor off, these plough anchors self-launching, each
and every-time and now come with stainless steel D shackle with
counter sunk allen key S/S bolt.
P/N 30015 10LB/5KG GALVANISED PLOUGH ANCHOR RRP $ 66.
P/N 30011 15LB/7KG GALVANISED PLOUGH ANCHOR RRP $ 88.
P/N 30012 20LB/9KG GALVANISED PLOUGH ANCHOR RRP $ 99.
P/N 30028 25LB/12KG GALVANISED PLOUGH ANCHOR RRP $149.
P/N 30029 35LB/16KG GALVANISED PLOUGH ANCHOR RRP $189.
“S” SERIES ALLOY BOAT FITMENT KIT
As the production of alloy boats increases, more and more winches are
being fitted to aluminum run abouts and Pro Series boats. The two (2)
biggest problems with fitting a full stainless steel winch or any
stainless fitting to an aluminum boats is the reaction between the 2
different metals in a salt water environment.
The second issue is, if there is a 12V power supply to the equipment
you are fitting and unless you are 100% sure you have insulated all
stainless steel from your aluminum hull, deck or dash, electrolysis will
eat everything away.
The Alloy fitment kit includes 2 HD plastic winch sandwich plates,
anchor roller insulation, insulation spacers for each bolt, aluminum
switch face plate. RECOMMENDED FOR EVERY ALLOY BOAT!
P/N 30038-A ALLOY FITMENT KIT FOR VIPER S SERIES MICRO WINCH RRP $ 30.
P/N 30021-A ALLOY FITMENT KIT FOR VIPER S SERIES RAPID WINCH RRP $ 35.
P/N 30072-A ALLOY FITMENT KIT FOR VIPER S SERIES GRAVITY FEED RRP $ 35.
P/N 30003-A ALLOY FITMENT KIT FOR VIPER S SERIES 1500 WINCH RRP $ 39.
NEW
RELEASE!
“Recommened for all aluminum boats”
PRO SERIES MARINE GRADE WIRING LOOMS
FOR MICRO/RAPID/GRAVITY FEED
& 1500 WINCHES
Viper
Viper
P/N 30034 MARINE WIRING LOOM FOR BOATS
UP TO 6 MTR (MICRO/1000) RRP $259.
P/N 30035 MARINE WIRING LOOM FOR BOATS
UP TO 8 MTRS (MICRO/1000) RRP $299.
P/N 30060 MARINE WIRING LOOM FOR BOATS
9MTRS & UNDER- (SERIES 1500) RRP $399.
P/N 30061 CUSTOM MADE WIRING LOOM $ POA
Anchor Winch Options
PRO SERIES HAWSE PIPES
Viper
Viper
PRO SERIES DELUXE ANCHOR SWIVELS
Bell Marine deluxe anchor swivels are normally attached between
your chain and anchor, reducing the chance of your rope and
chain getting twisted and your anchor spinning on the way up and
damaging your hull. The 316 stainless steel joint allows for
perfect transition through your anchor rollers with no risk of
damage to any components on your boat - rated to
200kgs/440lbs
.
P/N 30019
VIPER PRO SERIES DELUXE ANCHOR SWIVEL
LARGE
SUIT 8-12MM CHAIN
RRP
$75.
P/N 30001
VIPER PRO SERIES DELUXE ANCHOR
SWIVEL SMALL
SUIT 6 - 8MM CHAIN
RRP
$40
PRO SERIES DELUXE STAINLESS STEEL BOW ROLLERS
P/N 30006
VIPER PRO SERIES DELUXE
SINGLE ROLLER BOW ROLLER
RRP $239.
P/N 30007 VIPER PRO SERIES DELUXE BOW ROLLER LARGE RRP $395.
W70 X L370 X H210MM (MOUNT AREA 210 X 70MM)
W100 X L500 X H 250MM
(MOUNT AREA 300 X 100MM)
P/N 30016
VIPER PRO SERIES
DELUXE BOW ROLLER SMALL
RRP $329.
ORIGINAL AND THE BEST CHAIN SOCKS - AUST MADE
P/N 30053 VIPER CHAIN SOCK TO SUIT 6MM SHORT LINK CHAIN-8MTRS RRP $34.
P/N 30053G VIPER CHAIN SOCK TO SUIT 6MM SHORT LINK CHAIN-8MTRS RRP $34.
P/N 30036 VIPER CHAIN SOCK TO SUIT 6MM SHORT LINK CHAIN-10MTRS RRP $39.
P/N 30036G VIPER CHAIN SOCK TO SUIT 6MM SHORT LINK CHAIN-10MTRS RRP $39.
P/N 30037 VIPER CHAIN SOCK TO SUIT 8MM SHORT LINK CHAIN-12MTRS RRP $49.
Viper
ALSO AVAILABLE
IN FLURO GREEN
30023 - VIPER PRO SERIES HAWSE PIPE SMALL
Opening W90 x 55mm
Flange W158 X D97mm
Cut Out W120 X 65mm
Overall Height 78mm
RRP $139.
30031 VIPER PRO SERIES HAWSE PIPE LARGE
Opening W195 X H100mm
Flange W220 X D120mm
Cut Out W190 X 85mm
Overall Height 130mm
RRP $336.
NEW
VERSION!
P/N 30013 5kg S/S PLOUGH ANCHOR RRP $379.
P/N 30014 7kg S/S PLOUGH ANCHOR RRP $429.
P/N 30030 9kg S/S PLOUGH ANCHOR RRP $499.
bellmarine.com.au
Table of contents
Other bell marine Winch manuals

Popular Winch manuals by other brands


BRADEN
BRADEN PD12C Series Installation maintenance and service manual

Mile Marker
Mile Marker PEC8 Installation and operator's manual

Multi
Multi 3000 Instructions for use and maintenance

Kong
Kong ORTLES Maintenance and operating instructions

Comeup
Comeup DP-10000 instruction manual

Warn
Warn 60272 Instalation instruction

Comeup
Comeup GIO 100 quick start guide

Smittybilt
Smittybilt 35220 installation instructions

Traxxas
Traxxas Pro Scale TRX4 installation instructions

Warn
Warn 95740 installation instructions

Conveying & Hoisting Solutions
Conveying & Hoisting Solutions Star Installation and operating instructions

HADEF
HADEF 42/87P-EX Installation, Operating and Maintenance Instruction