BellAire 9000 User manual

BellAire™ Model 9000 Tire Inflator Instructions
Tire Inflator
BellAire9000
12V12V
PURE•PSI
ATTENTION! READ ALL INSTRUCTIONS
AND WARNINGS CAREFULLY BEFORE USE
INFLATES CAR TIRES & OTHER INFLATABLES
INSTRUCTIONS FOR USE

2
BellAire™ Model 9000 Tire Inflator Instructions
TABLE OF CONTENTS
Introduction____________________________________________________________________2
Featured Product Illustrations____________________________________________________3
General Safety Rules and Warnings_______________________________________________4
Inflator Operation_______________________________________________________________5
Inflating Tires_________________________________________________________________5
Inflating sports balls or other high pressure small inflatables__________________________5
Work Light___________________________________________________________________6
Maintenance____________________________________________________________________6
Trouble Shooting________________________________________________________________7
Notes___________________________________________________________________________7
Warranty_______________________________________________________________________8
Contact Us______________________________________________________________________8
INTRODUCTION
Some of the following symbols may be used on this product. Please study them and learn their mean-
ing. Proper interpretation of these symbols will allow you to operate the product better and safer.
SYMBOL NAME DESIGNATION/EXPLANATION
Safety Alert
Read The Operator’s Manual
Eye Protection
Wet Conditions Alert
Hot Surface
Indicates a potential personal injury hazard.
To reduce the risk of injury, user must read and under-
stand operator’s manual before using this product.
Always wear eye protection with side shields marked to
comply with ANSI Z87.1.
Do not expose to rain or use in damp locations.
To reduce the risk of injury or damage, avoid contact
with any hot surface.
Your new inflator provides up to 150 PSI and must be connected to a 15 amp 12 Volt DC
power outlet. The BellAire™ 9000 includes a high pressure inflator for vehicle tires and
sports balls. This model also includes a LED work light.
INSPECT INFLATOR AFTER UNPACKING
After unpacking your inflator, carefully inspect the inflator to ensure there is no
damage that may have occurred during transit and verify all components have been
included as listed and shown on page 3.
IMPORTANT! READ ALL INSTRUCTIONS CAREFULLY BEFORE ATTEMPTING TO
USE THIS INFLATOR. FAILURE TO FOLLOW WARNINGS AND COMPLY WITH
ALL INSTRUCTIONS COULD RESULT IN FIRE, PROPERTY DAMAGE OR INJURY TO
PERSONS.
PROTECT YOURSELF AND OTHERS BY OBSERVING ALL SAFETY INFORMATION.
OPERATE INFLATOR WITH 15 AMP 12 VOLT DC CIGARETTE LIGHTER SOCKETS
OR 12 VOLT POWER OUTLETS ONLY. DO NOT USE WITH OLDER 8 AMP CIGA-
RETTE LIGHTER RECEPTACLES.
RETAIN INSTRUCTIONS FOR FUTURE REFERENCE.

3
T
I
G
H
T
E
N
T
I
G
H
T
E
N
T
I
G
H
T
E
N
T
I
G
H
T
E
N
T
I
G
H
T
E
N
T
I
G
H
T
E
N
2
3
9
7
8
5
1
4
6
6
7
PRODUCT ILLUSTRATIONS
BellAire™9000 Tire Inflator
— FIGURE 1 —
Tire Inflation Options
— FIGURE 2 —
Toy Inflator
Adapter
(Option A) (Option B)
Presta
Valve
Adapter
Sports Ball
Adapter
1. Power Trigger - On/Off
2. Power Trigger Lock
3. Pressure Gauge
4. LED Work Light
5. Air Chuck
6. 4 Inch Air Hose
7. Inflator Needle Kit
8. 10 Foot 12 Volt Power Cord
with replaceable fuse
9. Air Intake/Exhaust Vents
10. Storage/Carry Bag
(Not shown)
(High Pressure Inflator
Needle Kit Storage)

4
BellAire™ Model 9000 Tire Inflator Instructions
GENERAL SAFETY RULES and WARNINGS
WARNING!
Failure to follow warnings and comply with all instructions listed below could
result in fire, property damage or injury to persons.
• Keep children and others away while operating inflator.
• Keep the inflator dry, clean and free from oil and grease. Always use a clean
cloth when cleaning. Never use typical vehicle fluids such as brake fluid, gaso-
line, any petroleum products or strong solvents to clean inflator.
• Operate inflator in an open area and away from any objects that could restrict
the flow of air to ventilation openings.
• Do not operate inflator near fire, flammable liquids or in gaseous or explosive
atmospheres.
Always wear eye protection.
• Always use in a safe area away from traffic and other dangers.
• Do not attempt to disassemble inflator. No user serviceable parts inside. Only
user serviceable part is fuse replacement. See maintenance section on page 6.
• Before each use, always check inflator hoses and 12 Volt cord for weak or worn
condition and make certain all connections are secure. Do not use if a defect is
present.
• Do not pull or carry the inflator by the power cord or air hose.
• Do not over stretch power cord or air hose.
• Never point an inflator air hose toward yourself, others or animals.
• Never start a vehicle with the inflator plugged into the DC 12 Volt power socket.
See operation instructions on pages 5 through 6.
• Use the inflator for its intended use only. Do not alter or modify the inflator.
Do not store inflator in a damp or wet location. Protect the inflator from rain,
snow or other moisture sources.
• When not in use, make certain the inflator power trigger is in the off (unlocked)
position. See #1 and #2 in figure 1, page 3. Store inflator out of the reach of
children.
• IMPORTANCE OF PROPER TIRE PRESSURE
— Correct tire pressure is vital to road safety.
— Correct tire pressure can help improve vehicle fuel economy.
— Regularly check tires on vehicles to meet manufacturer’s recommended tire
pressure.
— Always check pressures at ambient temperature, never check immediately
following a long trip.
WARNING: COMPRESSED AIR CAN BE DANGEROUS
— Never allow children to use this inflator.
— Never leave inflator unattended while running.
— Never over-inflate items. Over-inflation could cause property damage or
personal injury.
— Check manufacturer’s recommended inflation pressure before starting the
inflation process.
WARNING: VEHICLE EXHAUST WITHOUT PROPER VENTILATION IS EXTREMELY
DANGEROUS
— Never start and leave a vehicle running in a confined or enclosed space such as
a garage. Start and run vehicles outdoors.

5
INFLATOR OPERATION
TO INFLATE TIRES:
1. Unwind 12 Volt power cord. See #8 in figure 1, page 3.
2. Make certain the inflator power trigger is in the off (unlocked) position. See #1 and #2
in figure 1.
3. Set emergency brake and start vehicle engine. See “Warning: Vehicle Exhaust Without
Proper Ventilation”, page 4.
4. Plug inflator lighter plug into vehicle 12 Volt cigarette lighter socket.
5. Check manufacturer’s recommended tire pressure specifications indicated on the tire
sidewall.
6. There are two options in which you may inflate vehicle tires. See “Tire Inflation Op-
tions” in figure 2, page 3.
Option A: Loosen air chuck (counterclockwise), attach 4 inch air hose into air
chuck (#5 and #6 in figure 1) and tighten chuck (clockwise) to secure.
Attach the air hose nozzle to vehicle tire valve stem by threading the
nozzle onto the tire stem (clockwise) until secure. Do not turn
inflator on.
Option B: Loosen air chuck (counterclockwise), attach the air chuck (#5 in figure
1) directly onto the tire valve stem and tighten air chuck until secure.
Do not turn inflator on.
NOTE: When the nozzle is connected correctly, wait 5-7 seconds and the gauge will indi-
cate the current tire pressure. See #3 in figure 1. Always follow the manufacturer’s inflation
pressure recommendations to avoid over-inflation.
The pressure gauge on the inflator is for reference only and is therefore not binding for
exact values. While inflating, the gauge is a measurement of the fluctuating pressure
between the tire and the high pressure hose. To reduce the risk of over-inflation, use a reli-
able pressure gauge periodically during inflation before driving a vehicle inflated with the
inflator.
7. Squeeze on the inflator power trigger to begin inflation. See #1 in figure 1. The Bell-
Aire™ 9000 will now inflate your tire. Carefully monitor the pressure gauge to avoid
over-inflation. To lock trigger in place, slide middle lever all the way up the trigger.
See #2 in figure 1.
8. Once the desired pressure has been reached, slide lock lever down if in use and stop
the inflator by releasing the inflator power trigger to the off position. See #1 in
figure 1.
9. Wait several moments as air hose and nozzle or air chuck may naturally heat during
inflation. Then, remove air hose nozzle (by turning counterclockwise) or air chuck (by
turning clockwise) from vehicle tire valve stem.
10. Unplug inflator from vehicle 12 Volt cigarette lighter socket.
11. Turn off vehicle.
12. Properly store your tire inflator in the carry bag provided.
TO INFLATE SPORTS BALLS AND OTHER HIGH PRESSURE SMALL INFLATABLES:
1. Unwind 12 Volt power cord. See #8 in figure 1, page 3.
2. Loosen air chuck (counterclockwise), attach 4 inch air hose into air chuck (#5 and #6
in figure 1) and tighten chuck (clockwise) to secure.
3. Select one of the small adapter needles provided in the storage compartment.
See #7, page 3.
4. Attach the adapter needle to the air hose nozzle (see #6 in figure 1) by turning the
adapter needle clockwise.
5. Check manufacturer’s recommended pressure specifications for inflatable.
6. Insert adapter needle into inflatable.
6
BellAire™ Model 9000 Tire Inflator Instructions
7. Make certain the inflator power trigger is in the off position. See #1 and #2 in figure 1.
8. Set emergency brake and start vehicle engine. See “Warning: Vehicle Exhaust Without
Proper Ventilation”, page 4.
9. Plug inflator lighter plug into vehicle 12 Volt cigarette lighter socket.
NOTE: When the nozzle is connected correctly, wait 5-7 seconds and the gauge will indi-
cate the current inflatable item’s pressure. See #3 in figure 1. Always follow the manufac-
turer’s inflation pressure recommendations to avoid over-inflation.
The pressure gauge on the inflator is for reference only and is therefore not binding for
exact values. While inflating, the gauge is a measurement of the fluctuating pressure be-
tween the inflatable item and the high pressure hose.
When inflating items requiring 10 PSI or less, inflate in short bursts and check by feel or by a
reliable measuring device to determine accurate pressure.
10. Squeeze the inflator power trigger to the inflate position. See #1 in figure 1. The
BellAire™ 9000 will now inflate your inflatable item. Carefully monitor the pressure
gauge to avoid over-inflation.
11. Once the desired pressure has been reached, slide lock lever down if in use and stop
the inflator by releasing the inflator power trigger to the off position. See #1 in
figure 1.
12. Wait several moments as air hose and nozzle may naturally heat during inflation.
Then, remove air hose nozzle from inflatable, remove adapter needle from air hose
nozzle by turning the adapter needle counterclockwise, and return the adapter needle
to its storage location on inflator. See #7 in figure 1.
13. Loosen air chuck (counterclockwise) to remove the air hose and return air hose to
storage location.
14. Unplug inflator from vehicle 12 Volt cigarette lighter socket.
15. Turn off vehicle.
16. Properly store your tire inflator in the carry bag provided.
USING THE LED WORK LIGHT:
The LED work light turns on when inflator unit is plugged into vehicle 12 Volt cigarette
lighter socket.
MAINTENANCE
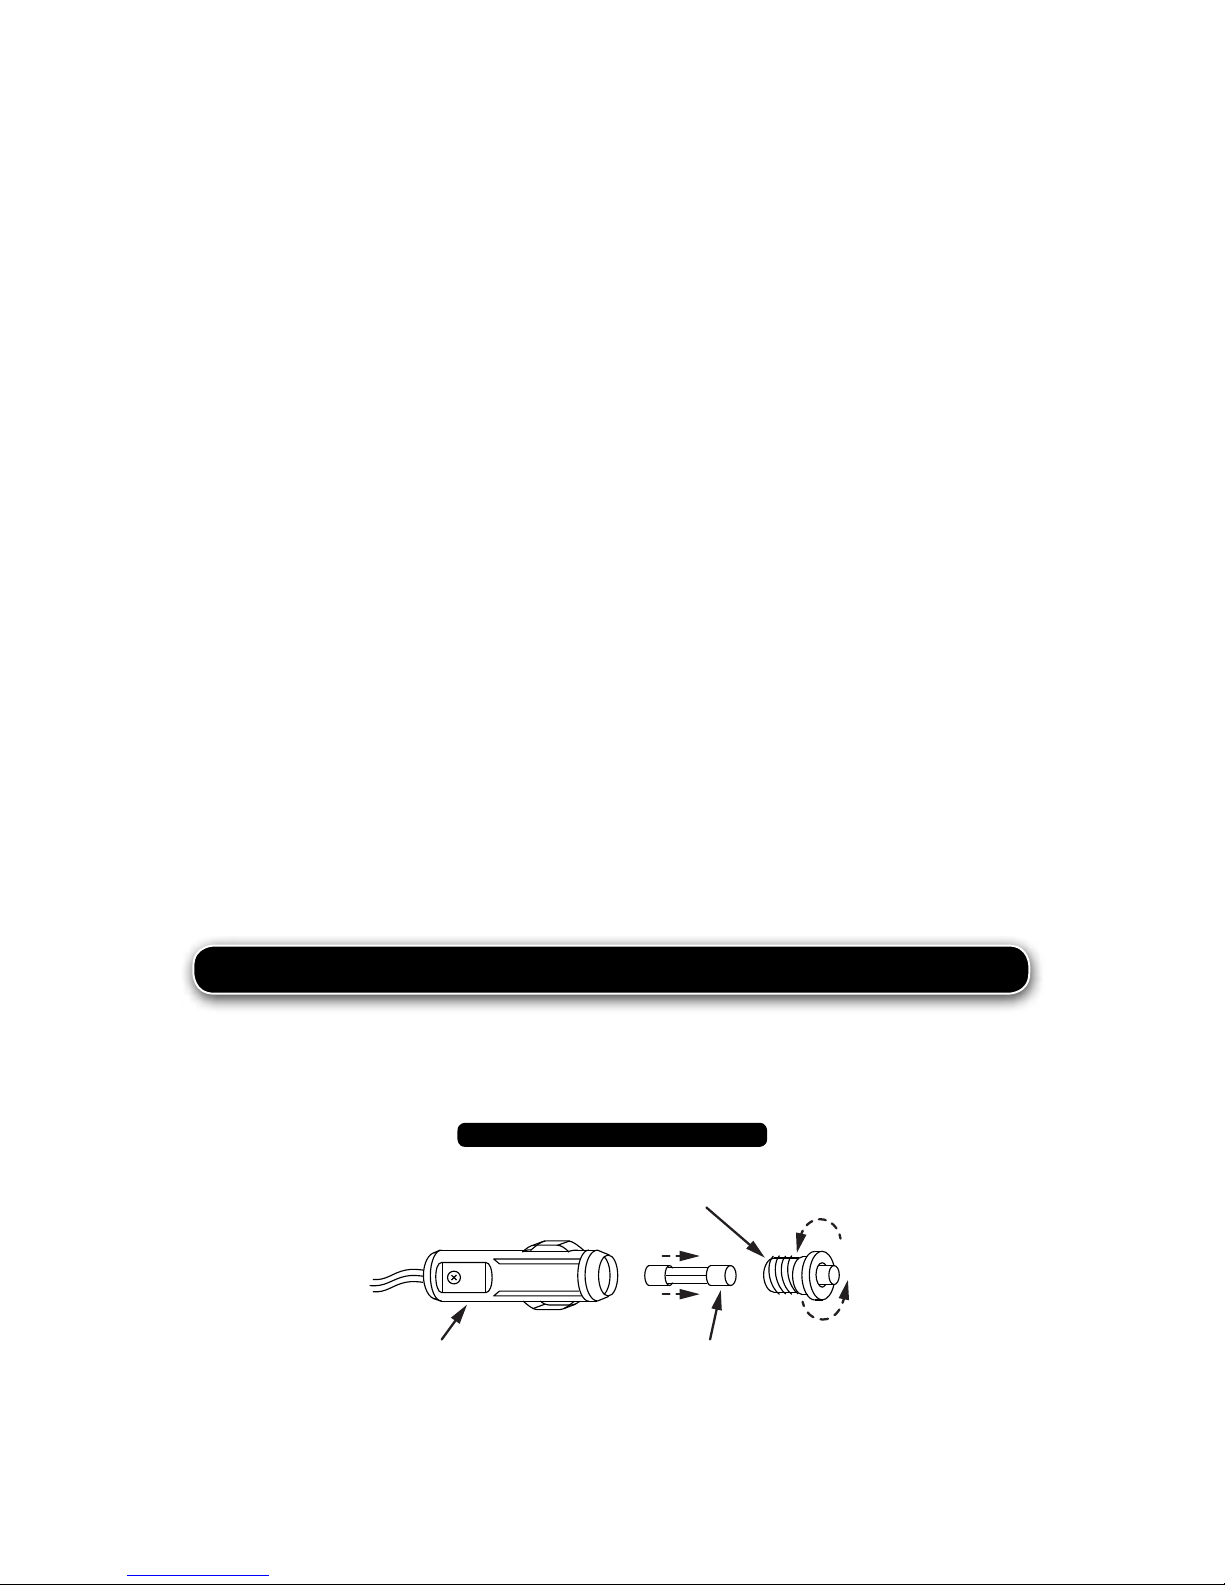
1. Your BellAire™ 9000 has a replaceable fuse providing maximum protection for the
inflator and/or your vehicle. See figure 3 for fuse replacement instructions.
2. Regularly check inflator air hose, 12 Volt cord and adapters for damage.
3. Always keep the inflator in its carry case when not in use.
4. Keep the inflator dry, clean and free from oil and grease. Always use a clean cloth
when cleaning.
Turn tip counterclockwise to unlock Fuse Adapter Body
Fuse (Replace with ACG glass 15 amp fuse only)Adapter Body
12 Volt Adapter Fuse Replacement
— FIGURE 3 —

7
TROUBLE SHOOTING
NOTES
The inflator fails to run with the inflator power switch turned on:
• Check that the plug is fully inserted into 12 Volt cigarette lighter socket. See operation
instructions on pages 5-6.
• Your vehicle may require the ignition be turned to the accessory position for the ciga-
rette lighter to have power. The inflator should be used with the vehicle running.
• Check to see if the fuse in the 12 Volt lighter plug has blown. See fuse replacement
instructions in the maintenance section. See figure 3, page 6 .
12 Volt power cord gets hot:
• Make certain power cord is not coiled up or in a knot or damaged.
Pressure gauge appears to read incorrectly:
• Make certain when you attach the air hose nozzle to the tire stem that the gauge is
reading the current tire pressure before turning on the inflator switch.
• Wait 5-7 seconds for gauge to display proper pressure.
The inflator is running but the tire is not inflating:
• Turn off inflator and check that the air hose nozzle is securely attached to the tire valve
stem.

8
BellAire™ Model 9000 Tire Inflator Instructions
WARRANTY
1-Year Limited Warranty
Bell Automotive® Products, Inc. warrants that for a period of one year from the date of
original retail purchase, this product will be free from defects in material and workmanship.
Bell Automotive® Products, Inc., at its option, will repair or replace this product or any com-
ponent of the product found to be defective during the warranty period. Replacement will
be made with a new or remanufactured product or component. In the event the product
is no longer available, replacement may be made with a similar product. No warranty is
provided on lighting components. This is your exclusive warranty.
This warranty is valid for the original retail purchaser from the date of initial retail purchase
and is not transferable. Keep the original sales receipt. Proof of purchase is required to
obtain warranty coverage.
What This Warranty Does Not Cover
This warranty does not cover normal wear of parts, parts that are not genuine Bell Automo-
tive® parts, or damage resulting from any of the following: negligent use or misuse of the
product; use on improper voltage or current; commercial use of the product; use other
than the operating instructions, disassembly, repair or alteration by anyone other than Bell
Automotive® Products, Inc. Further, the warranty does not cover Acts of God, such as fire,
flood, hurricanes and tornadoes.
Bell Automotive® Products, Inc. shall not be liable for any incidental or consequential dam-
ages caused by the breach of any express or implied warranty or conditions, except to the
extent prohibited by applicable law, any implied warranty of merchantability or fitness for a
particular purpose is limited in duration to the duration of the above warranty or condi-
tions. Some states, provinces, or jurisdictions do not allow the exclusion or limitation of
incidental or consequential damages or limitations on how long an implied warranty lasts
so the above limitations or exclusion may not apply to you. This warranty gives you specific
legal rights, and you may also have other rights that vary from state to state or province to
province.
The costs of transporting the product to Bell Automotive® Products, Inc. for warranty ser-
vice are the responsibility of the purchaser.
DO NOT RETURN THIS PRODUCT TO THE PLACE OF PURCHASE
If you have any questions regarding this warranty please contact us below:
CONTACT INFORMATION
Bell Automotive® Products, Inc.
Attn: Customer Service
18940 N. Pima Road, Suite 200
Scottsdale, AZ 85255
www.bellautomotive.com
Table of contents
Other BellAire Power Tools manuals


