Belle Group Minitile 200 User manual

1
- Spare Parts Book
- Pièces détachées
- Libro Despiece
- Запасные части Книга
44
870/30006/3
06/14
Operators Manual
Operators Manual
Manuel De L'Opérateur
Manual del Operador
Рyкoвoдcтвo для oпepaтopa
GB
US
F
E
RUS
4
12
20
28
36
TILE
SAWS

2
Managing Director - On behalf of BELLE GROUP (SHEEN) UK.
Le Directeur Général - Pour le compte de la SOCIETE BELLE GROUP (SHEEN) UK.
Director Gerente - En nombre de BELLE GROUP (SHEEN) UK.
Director-Geral - Em nome de BELLE GROUP (SHEEN) UK.
Algemeen Directeur - Namens BELLE GROUP (SHEEN) UK.
Administrerende direktør – På vegne af BELLE GROUP (SHEEN) UK.
PRODUCT TYPE................. TYPE DE PRODUIT.............. TIPO DE PRODUCTO..........
MODEL................................. MODELE............................... MODELO..............................
SERIAL No........................... N° DE SERIE........................ N° DE SERIE........................
DATE OF MANUFACTURE. DATE DE FABRICATION..... FECHADE FABRICACIÓN..
SOUND POWER LEVEL NIVEAU DE PUISSANCE NIVEL DE POTENCIA
MEASURED / SONORE MESUREE / ACÚSTICA MEDIDO /
....................(GUARANTEED) ............................(GARANTIE) ..................(GARANTIZADO)
WEIGHT............................... POIDS................................... PESO....................................
We, Belle Group Sheen UK, Sheen, Nr. Buxton, Derbyshire, SK17 0EU, GB, hereby certify that if the product described within this certificate is bought from an
authorised Belle Group dealer within the EEC, it conforms to the following EEC directives: 2006/42/CE (This directive replaces directive 98/37/EC), Electromagnetic
Compatibility Directive 2004/108/CE (as amended by 89/336/EEC, 92/31/EEC & 93/68 EEC). The Waste Electrical and Electronic Equipment (WEEE) 2002/96/CE, the
low voltage directive 2006/95/CE, BS EN ISO 12100-1:2003 Safety of machinery and associated harmonised standards, where applicable.
Noise Technical files are held by Ray Neilson at the Belle group Head Office address which is stated above.
Nous soussignés, Belle Group Sheen UK, Sheen, Nr Buxton, Derbyshire, SK17 0EU, GB, certifions que si le produit décrit dans ce certificat est acheté chez un
distributeur autorisé Belle Group au sein de la CEE, il est conforme aux normes CEE ci-après: 2006/42/CE (Cette norme remplace la norme 98/37/CE), Norme
compatible pour l'électromagnisme 2004/108/CE (modifié par 89/336/EEC, 92/31/EEC & 93/68 EEC). Les déchets électriques, et d’équipement électronique 2002/96/CE,
caractéristiques basse tension 2006/95/CE, BS EN ISO 12100-1:2003 Norme de sécurité des machines et des critères associés et configurés, si applicable.
Les fichiers techniques des émissions sonores sont détenus par Ray Neilson à l’adresse du Siège du Groupe Belle qui est indiqué ci-dessus.
La Sociedad, Belle Group Sheen UK, Sheen, Nr. Buxton, Derbyshire, SK 17 OEU, GB, por el presente documento certifica que si el producto descrito en este
certificado es comprado a un distribuidor autorizado de Belle Group en la CEE, este es conforme a las siguientes directivas: 2006/42/CE de la CEE (Esta directiva
sustituye a la Directiva 98/37/CE), Directiva 2004/108/CE sobre Compatibilidad Electromagnética (según enmiendas 89/336/EEC, 92/31/EEC & 93/68 EEC). Los
residuos eléctricos y electrónicos (RAEE) 2002/96/CE, Directiva sobre Bajo Voltaje 2006/95/CE, BS EN ISO 12100-1:2003 de Seguridad de Maquinaria y Niveles
armonizados estándares asociados donde sean aplicables.
Archivos de ruido técnicos están en manos de Ray Neilson en la dirección del grupo Belle Sede de la que se ha dicho.
O signatário, Belle Group Sheen UK, Sheen, Nr Buxton, Derbyshire, SK 0EU, GB, pelo presente, declara que se o produto descrito neste certificado foi adquirido a
um distribuidor autorizado do Belle Group em qualquer país da UE, está em conformidade com o estabelecido nas seguintes directivas comunitárias: 2006/42/CE (Esta
directiva substitui a Directiva 98/37/EC), Directiva de Compatibilidade Electromagnética 2004/108/CE (conforme corrigido pelas 89/336/EEC, 92/31/EEC & 93/68 EEC).
O Eléctrico de Desperdício e Equipamento Electrónico (DEEE) 2002/96/CE, a directiva de baixa voltagem 2006/95/CE, BS EN ISO 12100-1:2003 Segurança da
maquinaria e às normas harmonizadas afins se aplicáveis.
Arquivos de ruído técnicos são detidos por Ray Neilson no endereço Escritório Belle grupo Cabeça que é dito acima.
Ondergetekende, Belle Group Sheen UK, Sheen, Nr. Buxton, Derbyshire, SK17 OEU, GB, verklaren hierbij dat als het product zoals beschreven in dit certificaat is
gekocht van een erkende Belle Group dealer binnen de EEG, het voldoet aan de volgende EEG richtlijnen: 2006/42/CE (Deze richtlijn vervangt Richtlijn 98/37/EC),
Electromagnetische Compatability Richtlijn 2004/108/CE (geamendeerd door 89/336/EEC, 92/31/EEC & 93/68 EEC). De afgedankte elektrische en elektronische
apparatuur (AEEA) 2002/96/CE, de Laagspannings Richtlijn 2006/95/CE, BS EN ISO 12100-1:2003 Veiligheid van Machines en hieraan gekoppelde geharmoniseerde
Standaarden, waar deze van toepassing is.
Lawaai Technische dossiers zijn in handen van Ray Neilson op de Belle groep hoofdkantoor adres, dat staat boven.
Vi, Belle Group Sheen UK, Sheen, Nr. Buxton, Derbyshire, SK17 0EU, GB, erklærer hermed, at hvis det i dette certifikat beskrevne produkt er købt hos en autoriseret
Belle Group forhandler i EU, er det i overensstemmelse med følgende EØF-direktiver: 2006/42/CE (Dette direktiv erstatter direktiv 98/37/EF), 2004/108/EØF (som ændret
ved 89/336/EEC, 92/31/EØF & 93/68 EØF), Affald af elektrisk og elektronisk udstyr (WEEE) 2002/96/CE, og tilknyttede, harmoniserede standarder, hvor relevant.
Støjniveauet er i overensstemmelse med direktiv 2006/95/CE, BS EN ISO 12100-1:2003.
Støj Tekniske filer er i besiddelse af Ray Neilson på Belle-gruppen hovedkontoret adresse, som er nævnt ovenfor.
EC DECLARATION OF CONFORMITY / DECLARATION CE DE CONFORMITE / DECLARACIÓN
DE CONFORMIDAD CE / DECLARAÇÃO CE DE CONFORMIDADE / EG-VERKLARING
VAN OVEREENSTEMMING / EF OVERENSSTEMMELSESERKLÆRING
Ray Neilson
TIPO DE PRODUCTO.......... PRODUCTTYPE................... PRODUKTTYPE...................
MODELO.............................. MODEL................................. MODEL.................................
NO. DE SÉRIE..................... SERIENUMMER................... SERIENR..............................
DATA DE FABRIC................ FABRICAGEDATUM............ FREMSTILLINGSDATO.......
NIVEL DE POTÊNCIA GEMETEN LYDEFFEKTNIVEAU
DE SOM MEDIDO / GELUIDSSTERKTENIVEAU / MÅLT /
.......................(GARANTIDO) ...............(GEGARANDEERD)
.....................(GARANTERET)
PESO.................................... GEWICHT............................. VÆGT...................................
GB
F
E
P
NL
DK
Signed by:
Signature:
Medido por:
Assinado por:
Getekend door:
Uunderskrevetaf:
Place of Declaration - Sheen, Nr. Buxton, Derbyshire, SK17 0EU, UK Date of Declaration - 1999...........................................................................
Lieu de déclaration - Sheen, Nr. Buxton, Derbyshire, SK17 0EU, UK Date de déclaration - 1999...........................................................................
Declaración hecha en - Sheen, Nr. Buxton, Derbyshire, SK17 0EU, UK Fecha de la declarachón - 1999..................................................................
Lugar de Declaração - Sheen, Nr. Buxton, Derbyshire, SK17 0EU, UK Data da Declaração - 1999...........................................................................
Plaats van de Verklaring - Sheen, Nr. Buxton, Derbyshire, SK17 0EU, UK Datum van de verklaring - 1999..................................................................
Sted i erklæring - Sheen, Nr. Buxton, Derbyshire, SK17 0EU, UK Dato for erklæringen - 1999.........................................................................
3
Ɇɵ, ɧɢɠɟɩɨɞɩɢɫɚɜɲɢɟɫɹ, ɨɬ ɢɦɟɧɢ Belle Group Sheen (ȼɟɥɢɤɨɛɪɢɬɚɧɢɹ), Sheen, Nr. Buxton, Derbyshire SK17 0EU, ȼɟɥɢɤɨɛɪɢɬɚɧɢɹ, ɡɚɹɜɥɹɟɦ, ɱɬɨ ɜɫɥɭɱɚɟ,
ɟɫɥɢ ɨɩɢɫɚɧɧɚɹ ɜɞɚɧɧɨɦ ɫɟɪɬɢɮɢɤɚɬɟ ɩɪɨɞɭɤɰɢɹ ɛɵɥɚ ɩɪɢɨɛɪɟɬɟɧɚ ɭɭɩɨɥɧɨɦɨɱɟɧɧɨɝɨ ɩɪɟɞɫɬɚɜɢɬɟɥɹ Ȼɟɥɥɟ Ƚɪɭɩ ɜȿɋ, ɬɨ ɨɧɚ ɫɨɨɬɜɟɬɫɬɜɭɟɬ ɫɥɟɞɭɸɳɢɦ
ɞɢɪɟɤɬɢɜɚɦ ȿɋ: 2006/42/CE (ɗɬɚ ɞɢɪɟɤɬɢɜɚ ɡɚɦɟɧɹɟɬ ɞɢɪɟɤɬɢɜɭ 98/37/ȿȿɋ), ɞɢɪɟɤɬɢɜɟ ɷɥɟɤɬɪɨɦɚɝɧɢɬɧɨɣ ɫɨɜɦɟɫɬɢɦɨɫɬɢ 2004/108/CE (ɞɨɩɨɥɧɟɧɧɨɣ
89/336/EEC, 92/31/EEC & 93/68 EEC). ɍɬɢɥɢɡɚɰɢɢ ɷɥɟɤɬɪɢɱɟɫɤɨɝɨ ɢɷɥɟɤɬɪɨɧɧɨɝɨ ɨɛɨɪɭɞɨɜɚɧɢɹ (WEEE) 2002/96/CE. ɞɢɪɟɤɬɢɜɟ ɜɨɛɥɚɫɬɢ ɧɢɡɤɨɝɨ ɧɚɩɪɹɠɟɧɢɹ
2006/95/CE, ɩɨ ɩɪɢɦɟɧɢɦɵɦ ɩɚɪɚɦɟɬɪɚɦ ɫɬɚɧɞɚɪɬɭ BS E+ISO 12100-1:2003 ©Ȼɟɡɨɩɚɫɧɨɫɬɶ ɦɚɲɢɧ ɢɫɜɹɡɚɧɧɵɟ ɫɷɬɢɦ ɝɚɪɦɨɧɢɡɢɪɨɜɚɧɧɵɟ ɫɬɚɧɞɚɪɬɵª.
ɒɭɦɬɟɯɧɢɱɟɫɤɨɝɨɮɚɣɥɵɯɪɚɧɹɬɫɹɊɷɣɇɟɥɶɫɨɧɧɚɪɭɤɨɜɨɞɢɬɟɥɹɝɪɭɩɩɵ%HOOHɍɩɪɚɜɥɟɧɢɹɚɞɪɟɫɤɨɬɨɪɵɣɭɤɚɡɚɧɜɵɲɟ
Meie, %HOOH*URXS6KHHQ8.6KHHQ1U%X[WRQ'HUE\VKLUH6.(8*%, kinnitan, et kui kirjeldatud toote jooksul klesoleva sertifikaadi on ostetud lubatud Belle
nimel vahendaja jooksul EMh, see vastab jlrgmistele EMhdirektiividele: 2006/42/CE (klesolev direktiiv asendab direktiivi 98/37/Eh) , elektromagnetilise hilduvuse
direktiivi 2004/108/CE (muudetud 89/336/EMh, 92/31/EMhja 93/68 EMh). -a elektroonikaseadmete jlltmete (WEEE) 2002/96/CE, madalpinge direktiivi 2006/95/CE,
BS EN ISO 12100-1:2003 Masinate ohutus ning sellega seotud htlustatud standarditele, kui see on kohaldatav.
Müra Tehniline faile hoitakse Ray Neilson kell Belle grupi peakontor aadress, mis on märgitud eespool.
MƝs, %HOOH*URXS6KHHQ8.1U%X[WRQ'HUE\UVKLUH6.(8DUãRDSOLHFLQƗP, ar ão apliecinu, ka gadƯjumƗ, ja produkts aprakstƯts ãajƗsertifikƗtƗir iegƗdƗjies
no pilnvarota Belle grupas dƯlera teritorijƗEEK, tƗatbilst ãƗdƗm EK direktƯvƗm: 2006/42/CE (âƯ direktƯva aizvieto DirektƯvu 98/37/EK) , ElektromagnƝtiskƗs saderƯbas
direktƯvu 2004/108/CE (kurƗgrozƯjumi izdarƯti ar 89/336/EEK, 92/31/EEK un 93/68 EEK). Elektrisko un elektronisko iekƗrtu atkritumiem (EEIA), 2002/96/CE,
zemsprieguma directive 2006/95/CE, BS EN ISO 12100-1:2003 MaãƯnu droãƯba un saistƯtos saskaƼotus standartus, ja vajadzƯgs.
7URNãƼD7HKQLVNƗVIDLOLWXU5D\1HLOVRQSLH%HOOHJUXSDVJDOYHQƗELURMDDGUHVHNDVQRUƗGƯWVLHSULHNã
Mes, %HOOH*URXS6KHHQ8.6KHHQ1U%X[WRQ'HUE\VKLUH6.(8*%, patvirtinu, kad jei produktas, kaip apraãyta ãio sertifikato pirkti iãleidåiama Belle frakcijos
atstovas pagal EEB, jis atitinka ãiuos EEB direktyvas: 2006/42/CE (ãi direktyva pakeiþia Direktyvą98/37/EB) , elektromagnetinio suderinamumo direktyvos 2004/108/CE
(su pakeitimais, padarytais 89/336/EEB, 92/31/EEB ir 93/68 EEB). Elektros ir elektroninơs Ƴrangos atliekǐ(EEƲatliekǐ), 2002/96/CE, äemosios Ƴtampos Ƴrangos direktyvą
2006/95/CE, LST EN ISO 12100-1:2003 Maãinǐsauga ir susijĊdarnieji standartai, jei taikytina.
7ULXNãPR7HFKQLQLDLIDLODLY\NV5D\1HLOVRQ%HOOHJUXSơVEXYHLQơVDGUHVXNXULVQXURG\WDVDXNãþLDX
.À¾Á²¿ºÑIJ%HOOH*URXS6KHHQ8.6KHHQ1U%X[WRQ'HUE\VKLUH6.2(8*%ɫɟɭɞɨɫɬɨɜɟɪɹɜɚɱɟɚɤɨɫɬɨɤɚɬɚɟɨɩɢɫɚɧɨɜɬɨɡɢɫɟɪɬɢɮɢɤɚɬɟɡɚɤɭɩɟɧɨɬ
ɨɬɨɪɢɡɢɪɚɧɞɢɥɴɪ%HOOHɝɪɭɩɚɜɪɚɦɤɢɬɟɧɚȿɂɈɬɨɨɬɝɨɜɚɪɹɧɚɫɥɟɞɧɢɬɟɞɢɪɟɤɬɢɜɢɧɚȿɂɈ&(ɧɚɫɬɨɹɳɚɬɚɞɢɪɟɤɬɢɜɚɡɚɦɟɧɹȾɢɪɟɤɬɢɜɚȿɈ
ɟɥɟɤɬɪɨɦɚɝɧɢɬɧɚɫɴɜɦɟɫɬɢɦɨɫɬȾɢɪɟɤɬɢɜɚ&(ɤɚɤɬɨɟɢɡɦɟɧɟɧɫȿɂɈȿɂɈȿɂɈɁɚɨɬɩɚɞɴɰɢɬɟɨɬɟɥɟɤɬɪɢɱɟɫɤɨɢɟɥɟɤɬɪɨɧɧɨ
ɨɛɨɪɭɞɜɚɧɟɈȿȿɈ&(ɧɢɫɤɨɬɨɧɚɩɪɟɠɟɧɢɟɞɢɪɟɤɬɢɜɚ&(%6(1,62Ȼɟɡɨɩɚɫɧɨɫɬɧɚɦɚɲɢɧɢɬɟɢɫɜɴɪɡɚɧɢɬɟɫɬɹɯ
ɯɚɪɦɨɧɢɡɢɪɚɧɢɫɬɚɧɞɚɪɬɢɤɨɝɚɬɨɟɩɪɢɥɨɠɢɦɨ
ɒɭɦɌɟɯɧɢɱɟɫɤɢɮɚɣɥɨɜɟɫɟɩɪɨɜɟɠɞɚɬɨɬɊɟɣɇɢɣɥɫɴɧɜɝɪɭɩɚɬɚɚɞɪɟɫ%HOOHɰɟɧɬɪɚɥɧɨɬɨɭɩɪɚɜɥɟɧɢɟɤɨɟɬɨɟɩɨɫɨɱɟɧɨɩɨɝɨɪɟ
ǼȝİȓȢ, Ș%HOOH*URXS6KHHQ8.6KHHQ1U%X[WRQ'HUE\VKLUH6.(8ȂİȖȐȜȘǺȡİIJĮȞȓĮ, ȕİȕĮȚȫȞȦ ȩIJȚ, ĮȞ IJȠ ʌȡȠȧȩȞ ʌȠȣ ʌİȡȚȖȡȐijİIJĮȚ ıİ ĮȣIJȩ IJȠ
ʌȚıIJȠʌȠȚȘIJȚțȩ ȑȤİȚ ĮȖȠȡĮıIJİȓ Įʌȩ İȟȠȣıȚȠįȠIJȘȝȑȞȠ ĮȞIJȚʌȡȩıȦʌȠ Belle ȠȝȐįĮ ıIJȠ İıȦIJİȡȚțȩ IJȘȢ ǼȅȀ, șĮ ıȣȝȝȠȡijȫȞİIJĮȚ ȝİ IJȚȢ ĮțȩȜȠȣșİȢ ȠįȘȖȓİȢ ǼȅȀ: 2006/42/CE
(ǾʌĮȡȠȪıĮ ȠįȘȖȓĮ ĮȞIJȚțĮșȚıIJȐ IJȘȞ ȠįȘȖȓĮ 98/37/ǼȀ) , ǾȜİțIJȡȠȝĮȖȞȘIJȚțȒ ȈȣȝȕĮIJȩIJȘIJĮ ȠįȘȖȓĮ 2004/108/CE (ȩʌȦȢ IJȡȠʌȠʌȠȚȒșȘțİ Įʌȩ IJȘȞ 89/336/ǼȅȀ, 92/31/ǼȅȀ țĮȚ
93/68 ǼȅȀ). ȉĮ ǹʌȩȕȜȘIJĮ ǾȜİțIJȡȚțȠȪ țĮȚ ǾȜİțIJȡȠȞȚțȠȪ ǼȟȠʌȜȚıȝȠȪ (ǹǾǾǼ) 2002/96/CE, ȘȠįȘȖȓĮ 2006/95/CE ȤĮȝȘȜȒȢ IJȐıȘȢ, BS EN ISO 12100-1:2003 ǹıijȐȜİȚĮ
ȝȘȤĮȞȫȞ țĮȚ IJȦȞ ıȤİIJȚțȫȞ İȞĮȡȝȠȞȚıȝȑȞȦȞ ʌȡȠIJȪʌȦȞ, ĮȞȐȜȠȖĮ ȝİ IJȘȞ ʌİȡȓʌIJȦıȘ.
ȅȚșȠȡȪȕȠȣȉİȤȞȚțȐĮȡȤİȓĮʌȠȣțĮIJȑȤȠȞIJĮȚĮʌȩ5D\1HLOVRQıIJȘȞȠȝȐįĮ%HOOHǻȚİȪșȣȞıȘȑįȡĮȢʌȠȣĮȞĮijȑȡİIJĮȚʌĮȡĮʌȐȞȦ
ɋȿɊɌɂɎɂɄȺɌɋɈɈɌȼȿɌɋɌȼɂə / EÜ VASTAVUSDEKLARATSIOON / ATBILSTĪBAS
DEKLARĀCIJA / ES ATITIKTIES DEKLARACIJA / £©²¤¢
¤²ǻǻǺǽȀȌȇǽǿǸȈǸȀȀǽȀȄȈǽȈǸȇ
Ray Neilson
RUS
EST
LV
LT
BG
GR
Ɇɟɫɬɨɞɟɤɥɚɪɢɪɨɜɚɧɢɹ - Sheen, Nr. Buxton, Derbyshire, SK17 0EU, UK Ⱦɚɬɚɞɟɤɥɚɪɢɪɨɜɚɧɢɹ - 1999.....................................................................
.RKWGHNODUDWVLRRQL - Sheen, Nr. Buxton, Derbyshire, SK17 0EU, UK 'HNODUDWVLRRQLNXXSlHY - 1999....................................................................
9LHWDVGHNODUƗFLMX - Sheen, Nr. Buxton, Derbyshire, SK17 0EU, UK 'LHQDVGHNODUƗFLMD - 1999.............................................................................
9LHWDGHNODUDFLMRV - Sheen, Nr. Buxton, Derbyshire, SK17 0EU, UK 'DWDGHNODUDFLMRV - 1999 ..............................................................................
Ⱦɚɬɚɧɚɞɟɤɥɚɪɚɰɢɹ - Sheen, Nr. Buxton, Derbyshire, SK17 0EU, UK Ɇɹɫɬɨɧɚɞɟɤɥɚɪɚɰɢɹ - 1999......................................................................
ȉȩʌȠȢǻȚĮțȒȡȣȟȘȢ - Sheen, Nr. Buxton, Derbyshire, SK17 0EU, UK ǾȝİȡȠȝȘȞȓĮįȒȜȦıȘȢ - 1999.......................................................................
ɍɃɊɊɋɉȿɎɅɑɃɃ 7227(7hh3 352'8.7$7,36
ɇɉȿɀɆɗ 08'(/ 02'(/,6
ɌɀɋɃɄɈɖɄɈɉɇɀɋ 6(5,$180%(5 6Ɲ5,-$615
ȿȻɍȻȽɖɊɎɌɅȻ 9$/0,67$0,6(.883b(9 ,=*$7$92ã$1$6'$7806
ɎɋɉȽɀɈɗɓɎɇȻɂȻɇɀɋ +(/,78*(986(7$6( ,=0Ɲ5Ư7$,66.$Ƽ$6
ɊɋɉɃɂȽɀȿɀɈ 0¯¯'(78' -$8'$6/Ư0(1,6
...............(ȾȻɋȻɈɍɃɋɉȽȻɈ *$5$17((5,78' *$5$17Ɲ7$,6
ªȻɌɍɉɍȻ .$$/ 0$6$
*$0,1,27,3$6 ȽɃȿɈȻɊɋɉȿɎɅɍȻ ȈȩʋȟȡʋȠȟȦȨȝıȟȡ..........
02'(/,6 ɇɉȿɀɆ ȁȟȝıȐțȟ ............................
6(5,-2615 ɌɀɋɃɀɈɈɉɇɀɋ ǸȠșȘȜȨȡȇįșȠȏȡ ..............
3$*$0,1,02'$7$
ȿȻɍȻɈȻɊɋɉɃɂȽɉȿɌɍȽɉ
ȁįıȠȗȜįȝȗ .......................
*$56267,35802 ɈɃȽɉɈȻɌɃɆȻɍȻɈȻȇıĭȘȜȗīȟȠȢȔȟȢ
/<*,6,ã0$7827$6 ɂȽɎɅȻɃɂɇɀɋɀɈɉ
ǿĭıĭȈȗȝǽȜįȠȟȜȗȝșĭ
*$5$17827$6 ȾȻɋȻɈɍɃɋȻɈɉ
ǿĭıĭİȚįȢȗİǻȕȕȢȗȜįȝȗ
6925,6 7ɀɉ
²
Ɇ ǻȑȢȡȣ
ɢɫɩɨɥɧɢɬɟɥɶɧɵɣɞɢɪɟɤɬɨɪɨɬɢɦɟɧɢȻȿɅɅȿȽɊɍɉɒɂɂɇ (ȼȿɅɂɄɈȻɊɂɌȺɇɂə).
Tegevdirektor - BELLE GROUP (SHEEN) UK poolt.
Vadoãais direktors3ƗUVWƗYRW%(//(*52836+((18.
*HQHUDOLQLVGLUHNWRULXV%(//(*52836+((18.YDUGX
3e»º½ÃÌ¿- ¥Á²´½Ñ´²Ë¶ºÂ·¼ÄÀÂÀĺ¾·ÄÀ¿²BELLE GROU3(S+EEN) UK.
ǻȚİȣșȪȞȦȞ ȈȪȝȕȠȣȜȠȢ ±İț ȝȑȡȠȣȢ IJȘȢ BELLE GROU3(S+EEN) ȂİȖȐȜȘ ǺȡİIJĮȞȓĮ.
ɉɨɞɩɢɫɶ
:
$OODNLUMXWDQXG
3DUDNVWV
3DVLUDãe:
ɉɨɞɩɢɫ
:
ȉʋȟȕȠĭIJȑ:
4
How To Use This Manual
GB
This manual has been written to help you operate and service the Tile Saw safely. This manual is intended for dealers and operators of
the Tile Saw.
Foreword
The ‘Environment’ section gives instructions on how to handle the recycling of discarded apparatus in an environmentally friendly way.
The ‘General Safety’ and ‘Health and Safety’ sections explain how to use the machine to ensure your safety and the safety of the
general public.
The ‘Trouble Shooting Guide’ helps you if you have a problem with your machine.
The ‘Service & Maintenance’ section is to help you with the general maintenance and servicing of your machine.
The ‘Warranty’ Section details the nature of the warranty cover and the claims procedure.
The ‘Declaration of Conformity’ section shows the standards that the machine has been built to.
Directives with regard to the notations.
Text in this manual to which special attention must be paid are shown in the following way:
The product can be at risk. The machine or yourself can be damaged or injured if procedures are not
carried out in the correct way.
CAUTION
The life of the operator can be at risk.
WARNING
WARNING
GB
Before you operate or carry out any maintenance on this machine YOU MUST READ and STUDY
this manual.
WARNING
Contents
KNOW how to safely use the unit’s controls and what you must do for safe maintenance. (NB Be sure that you know how to switch the
machine off before you switch on, in case you get into dif¿culty.)
ALWAYS wear or use the proper safety items required for your personal protection. If you have ANY QUESTIONS about the safe use
or maintenance of this unit, ASK YOUR SUPERVISOR OR CONTACT: BELLE GROUP (UK): 44 (0) 1298 84606
GB
How to use this manual ............................................................................................................................................................................. 4
Warning ...................................................................................................................................................................................................... 4
Technical Data............................................................................................................................................................................................ 5
Environment ............................................................................................................................................................................................... 5
General Safety ........................................................................................................................................................................................... 6
Health & Safety .......................................................................................................................................................................................... 7
Connecting to the Power Supply ............................................................................................................................................................... 7
Pre-Start Checks........................................................................................................................................................................................ 7
Adjusting the Blade Guard......................................................................................................................................................................... 8
Installation .................................................................................................................................................................................................. 8
Transportation ............................................................................................................................................................................................ 8
Operating Instructions ................................................................................................................................................................................ 9
Service & Maintenance ............................................................................................................................................................................ 10
Trouble Shooting Guide ............................................................................................................................................................................11
Warranty....................................................................................................................................................................................................11
Declaration of Conformity .......................................................................................................................................................................... 2
%HOOH*URXSUHVHUYHVWKHULJKWWRFKDQJHPDFKLQHVSHFL¿FDWLRQZLWKRXWSULRUQRWLFHRUREOLJDWLRQ

5
Technical Data
GB
Environment
GB
Safe Disposal.
Instructions for the protection of the
environment. The machine contains valuable
materials. Take the discarded apparatus and
accessories to the relevant recycling facilities.
Component Material
Electric Motor Aluminium
Steel
Copper
Polyamide
Main Body Steel
Polystyrene
Polyamide
Model Minitile 180 Minitile 200 Minitile 230 Magiktile 180 Maxitile 260
Width (mm) 478 460 585 394 440
Height (mm) 270 260 333 158 1240
Length (mm) 498 330 560 394 1150
Blade Diameter (mm) 180 200 230 180 200
Blade Speed (rpm) 2800 2800 2800 2800 2800
Blade Centre Hole (mm) 25.4 25.4 25.4 25.4 25.4
Max. Cutting Depth (mm) 30 40 70 30 40
Machine Weight (kg) 12 24 30 10 34
Water Tank Capacity (Ltr) 5 2 2 5 25
Motor Power (W) 550 550 1200 550 650
Capacitor (230v 50Hz) (F) 8 8 16 8 10
Capacitor (115v 50Hz) (F) 30 30 70 30 40
Sound Power Level (230v 50Hz) (dBW(A)) 75 75 75 75 75
Sound Power Level (110v 50Hz) (dBW(A)) 75 75 775 75 75

6
General Safety
GB
Keep your work area perfectly clean
- Cluttered areas invite injuries.
Consider work area environment
- Don’t expose tools to rain.
- Don’t use tools in damp or wet locations. Keep work area well lit.
- Don’t use tools in presence of Àammable liquids or gases.
Guard against electric shocks
- Prevent body contact with grounded surfaces.
Keep children away!
- Do not let third parties contact tool or extension cord. All visitors should be kept away from work area.
Store your tools in a safe place
- When not in use, tools should be stored in dry and save places, out of the reach of children.
Don’t force tool
- It will function better and in a safer way at the rate for which it was intended.
Use the right tool
- Don’t use low duty tools or accessories to do the job of a heavy-duty tools. Don’t use tools for purposes not intended.
Dress properly
- Rubber gloves and non-slip footwear are recommended when working outdoors. Wear protective hair covering to contain long hair.
- Use safety glasses.
- Use a mask if working operations are dusty.
Don’t abuse cord
- Never carry tool by cord or yank it to disconnect it from socket.
- Keep cord from heat, oil and sharp edges.
Avoid unsteady positions
- Be sure to work in a safe and balanced position.
Maintain tools with care
- Keep tools sharp and clean for better and safer performance.
- Follow all maintenance advice and instructions to replace accessories subject to wear. Inspect tool cords periodically and, if
damaged, have them repaired by an authorised expert. Check extension cords periodically and replace them if damaged.
- Keep handles dry, clean and free from oil and grease.
Disconnect tools
- When not in use, before servicing, and when changing accessories subject to wear.
Remove service keys from tool
- Form the habit of checking to see that keys and adjusting spanners are removed from tool before turning it on.
Avoid unintentional starting
- Be sure that the switch is off when plugging in the tool.
Extension cords for outdoor works
- When tool is used outdoors, use only extension cords intended for this particular use and so marked.
Stay alert
- Watch what you are doing. Use common sense. Do not operate tool when you are inattentive.
Check tool for damaged parts
- Before further use of the tool, check it and the safety devices for damages and be sure that they operate properly. Check for
functioning and binding of moving parts, breakage of parts, correct mounting, and any other conditions that may affect the
correct operation of the tool.
- Damaged safety devices or other parts should be properly repaired or replaced by an authorised Service Centre unless otherwise
indicated elsewhere in this instruction manual.
- Have defective switches replaced by an authorised Service Centre.
- Do not use tool if its switch cannot be turned on or off.
Warning
- For your personal safety use only accessories recommended in this instruction manual or in the relevant catalogues The use of
any other accessory or attachment other than those recommended in this instruction manual or in the relevant catalogue may
present a risk of personal injury.
+DYHWRROVUHSDLUHGE\TXDOL¿HGSHUVRQQHO
- This electric appliance is in accordance with the safety rules in force. Only quali¿ed experts may carry out repairing of electric
appliances otherwise it may cause considerable danger for the user.
When using electric tools, following safety precautions should always be followed to reduce the risk
of ¿re, electric shock and personal injuries. Read and follow all these instructions before attempting to
operate this product.
WARNING

7
Health and Safety
GB
PPE (Personal Protective Equipment).
Suitable PPE must be worn when using this equipment i.e. Safety Goggles, Gloves, Ear Defenders, Dust Mask and Steel Toe capped
footwear.
Wear clothing suitable for the work you are doing. Tie back long hair and remove any jewellery which may catch in the equipment’s
moving parts.
Dust.
The sawing process will occasionally produce dust, which may be hazardous to your health. Always wear a mask that is suited to the
type of dust being produced.
Pre-Start Checks
GB
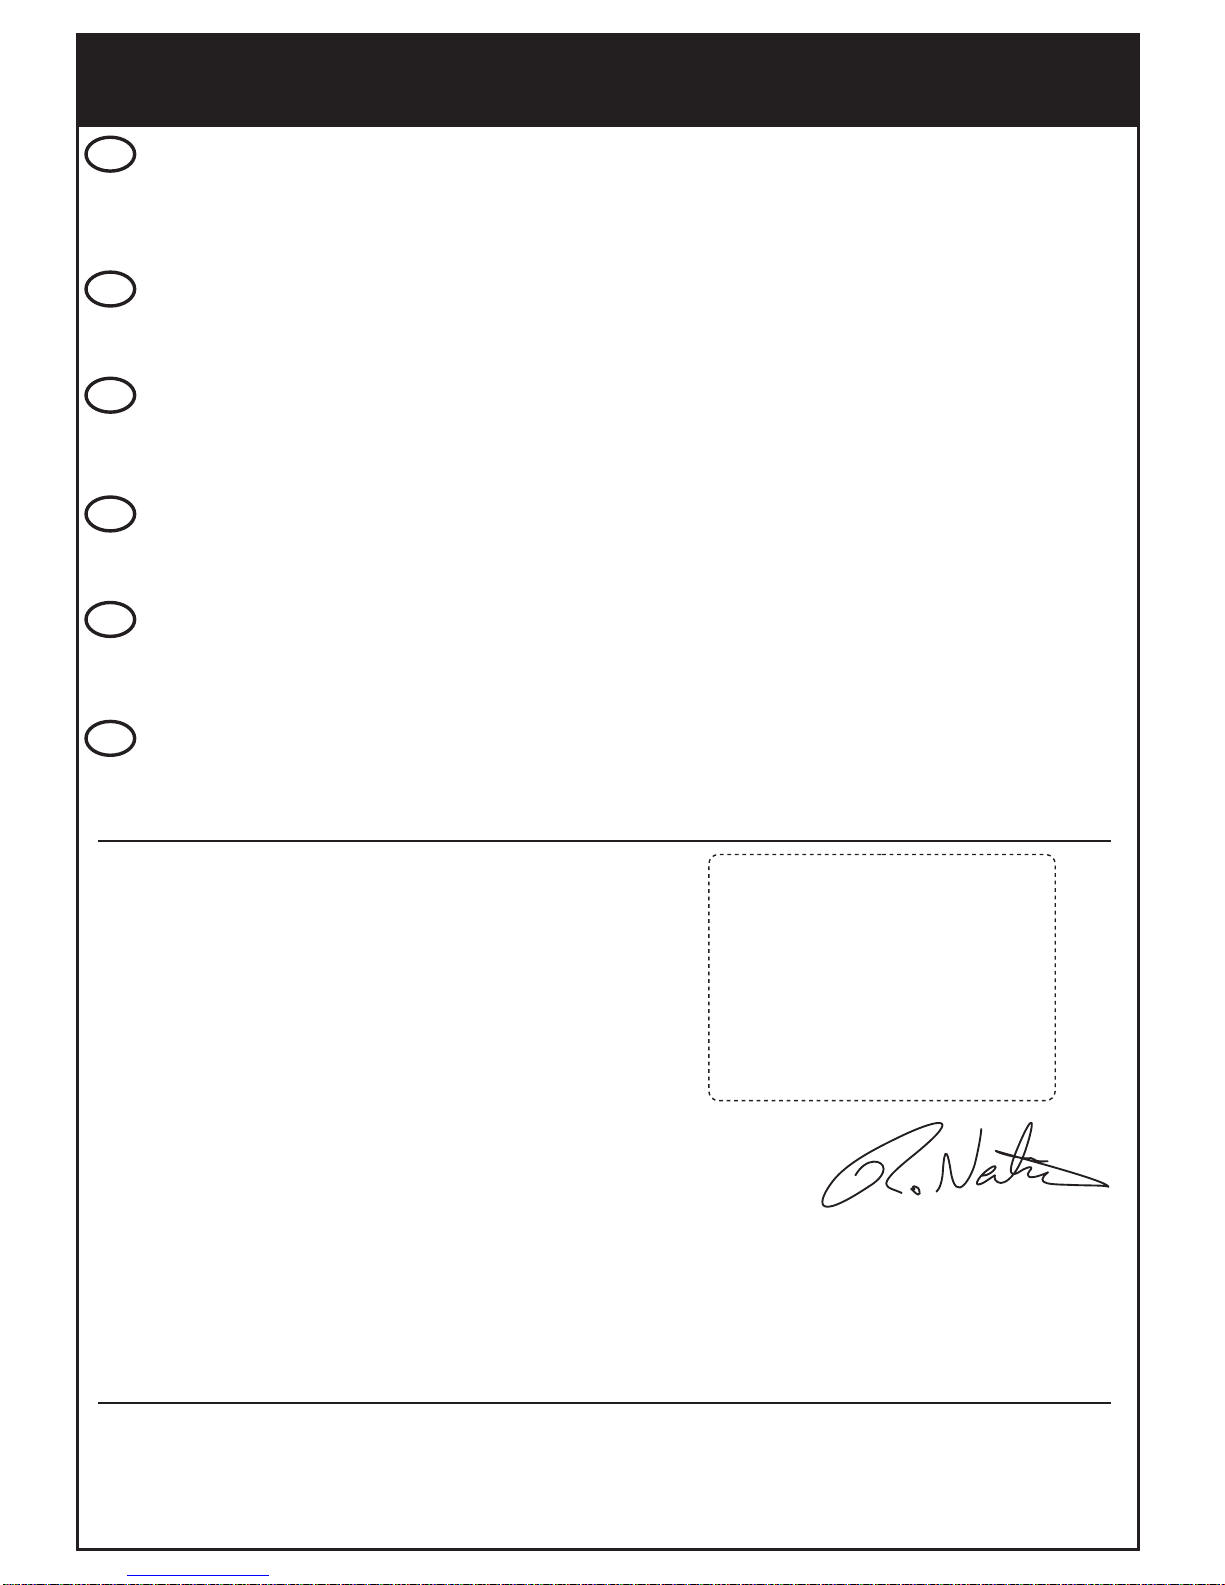
THE MINITILE / MAGIKTILE MACHINE IS DESIGNED FOR WORKING WITH
WATER.
Before and during cutting operations, make sure that the water level is suf¿cient to
cover the diamond part of the blade. Fill or top up the basin directly, as shown in the
picture 1a.
In particular cases, it may be necessary to use a tray to recover the cooling water.
If so, use a tray with the following dimensions:
MINITILE 180 =L 50 cm, P 60 cm, H 10 cm
MINITILE 200 =L 50 cm, P 60 cm, H 10 cm
MINITILE 230 =L 60 cm, P 60 cm, H 10 cm
MAGIKTILE 180 =L 50 cm, P 60 cm, H 10 cm
THE MAXITILE MACHINE IS DESIGNED FOR WORKING WITH WATER.
Before any cutting operation, make sure that the water level inside the basin is the
same as the one shown in picture 1b.
Through an on-off valve it is possible to adjust the water Àow according to the type of
material to be cut. An innovative cooling system makes it possible and allows the disk
to be always wet.
1a
1b
Connecting To The Power Supply
GB
The machine is to be connected to the mains by a residual current circuit breaker (RCCB) or class II isolation transformer with the
following characteristics:
MINITILE 180
RCCB 230V In 3 A Id 20 mA 115V In 6 A Id 20 mA
TRANSFORMER 230V 50 Hz 650 W 115V 50 Hz 650 W
MINITILE 200
RCCB 230V 5 A Id 20 mA 115V 6 A Id 20 mA
TRANSFORMER 230V 50 Hz 650 W 115V 50 Hz 650 W
MINITILE 230
RCCB 230V 10 A Id 20 mA 115V 16 A Id 20 mA
TRANSFORMER 230V 50 Hz 1500 W 115V 50 Hz 1500 W
MAGIKTILE 180
RCCB 230V In 6 A Id 20 mA 115V In 3 A Id 20 mA
TRANSFORMER 230V 50 Hz 650 W 115V 50 Hz 650 W
MAXITILE 260
RCCB 230V In 5 A Id 20 mA 115V In 10 A Id 20 mA
TRANSFORMER 230V 50 Hz 1000 W 115V 50 Hz 1000 W

8
Adjusting The Blade Guard
GB
The machine is equipped with a continuous diamond rim blade. Even though this blade has been designed
for operator safety if unintentionally touched, pay particular attention to avoid contact between your ¿ngers
and the blade during operation of the machine.
CAUTION
MINITILE & MAGIKTILE ONLY!!
Position the blade guard approximately half a centimetre above the tile surface.
Lock the blade guard in position by fully tightening the screw illustrated in the ¿gure.
2
Installation
GB
3a 3b 3c
MAXITILE ONLY!!
Remove the machine from the packaging with the aid of the side carrying handles. To set up the machine for work proceed as follows:
1) Remove the leg lock pin and raise the rear side (pump side) of the machine with the handle until the leg is fully extended
(See picture 3a).
2) Raise the leg by sliding it inside the slot.
3) Repeat the operation for the front side of the machine (See picture 3b).
4) Insert the tube-holder rod in its seat (See picture 3c).
Transportation
GB
MAXITILE ONLY!!
The MAXITILE machine is easy to carry by using the specially provided side handles
(See picture 4).
Before carrying the machine make sure that:
the motor slide is locked in place with the two cutting adjustment knobs on the slide rail;
the motor slide is completely lowered and locked with the locking lever;
the machine is in the 45(jolly) position and that the inclination adjustment knobs are
properly tightened;
the tube-holder rod is out of its housing;
the feet are closed and the leg lock pin inserted.
4
8

9
MAXITILE ONLY!!
Cutting at 90°
Thanks to the great versatility of the MAXITILE machine it is possible to carry out different
types of cutting.
Adjust the blade to the 0position with the inclination adjustment knobs (See picture 6a).
Position the piece which needs cutting on the working table and make sure that it is
properly up against the tile-stop. If necessary, a square can be of help.
In order to carry out any diagonal cutting lean the tile against the square the way it is
shown in picture 6b and go on with the cutting operation.
Operating Instructions
GB
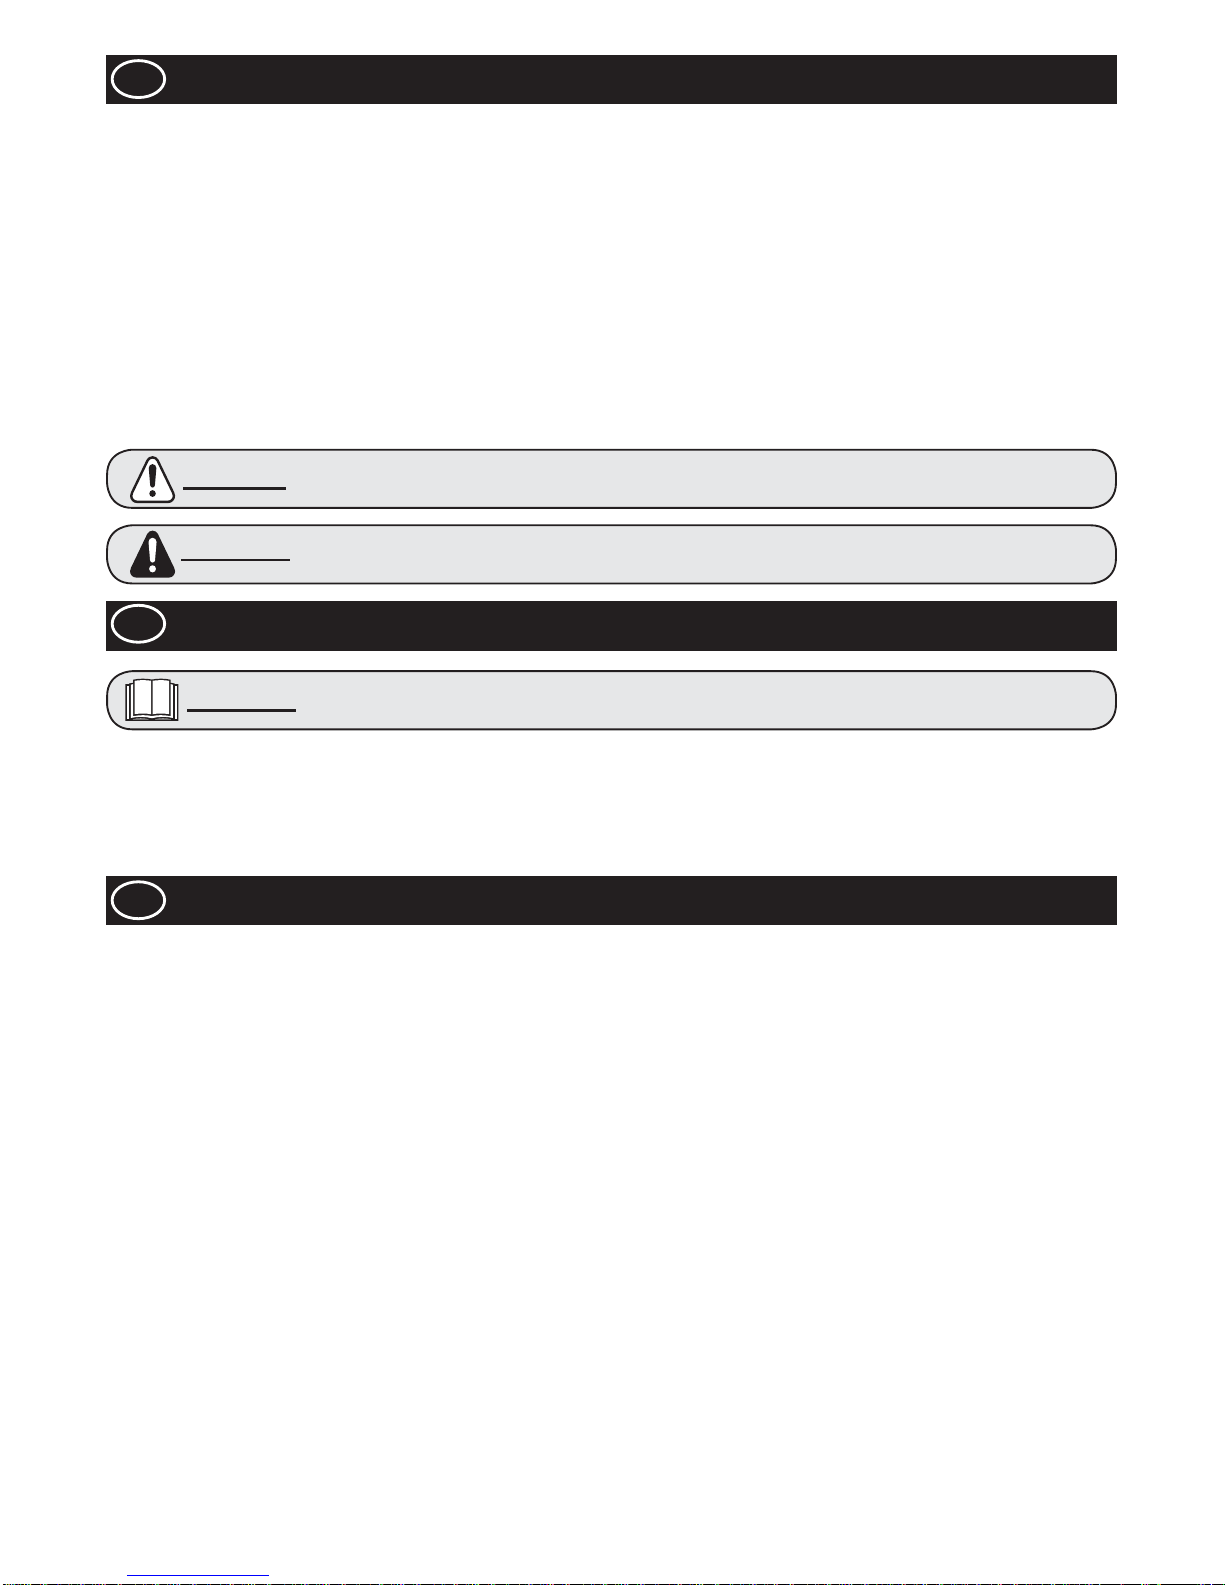
MINITILE & MAGIKTILE ONLY!!
Cutting at 90°
Position the cutting guide and lock it by tightening the knobs fully. (See Figure 5a)
The picture on the right shows how to position hands correctlyduring cutting at 90. The
forward movement of the piece must be proportional to the blade cutting capacity, to
prevent hazardous fragments that would involve accidents or injuries from breaking off.
Cutting a surface at 45°
Position the tilting table as shown in ¿gure 5b, then lock it in place with the knobs.
Position the cutting guide approx. 2 mm from the diamond blade, then lock it in place by
tightening the knobs fully.
Position the tile with the enamel surface downwards; make sure that the diamond blade
does not come into contact with the tile enamel. Adjust the position of the cutting guide
as necessary.
5a
5b
Figure 5b illustrates the correct position of the hands in the case of 45angle cuts. Note that the right
hand holds the piece in contact with the diamond blade, while the left hand moves the piece forward.
The forward movement of the piece must be proportional to the blade cutting capacity, to prevent
hazardous fragments which would involve accidentsor injuries from breaking off.
CAUTION
6c
6a
6b
6d
The millimetre ruler placed on the Working table helps only for
linear Cutting.
CAUTION
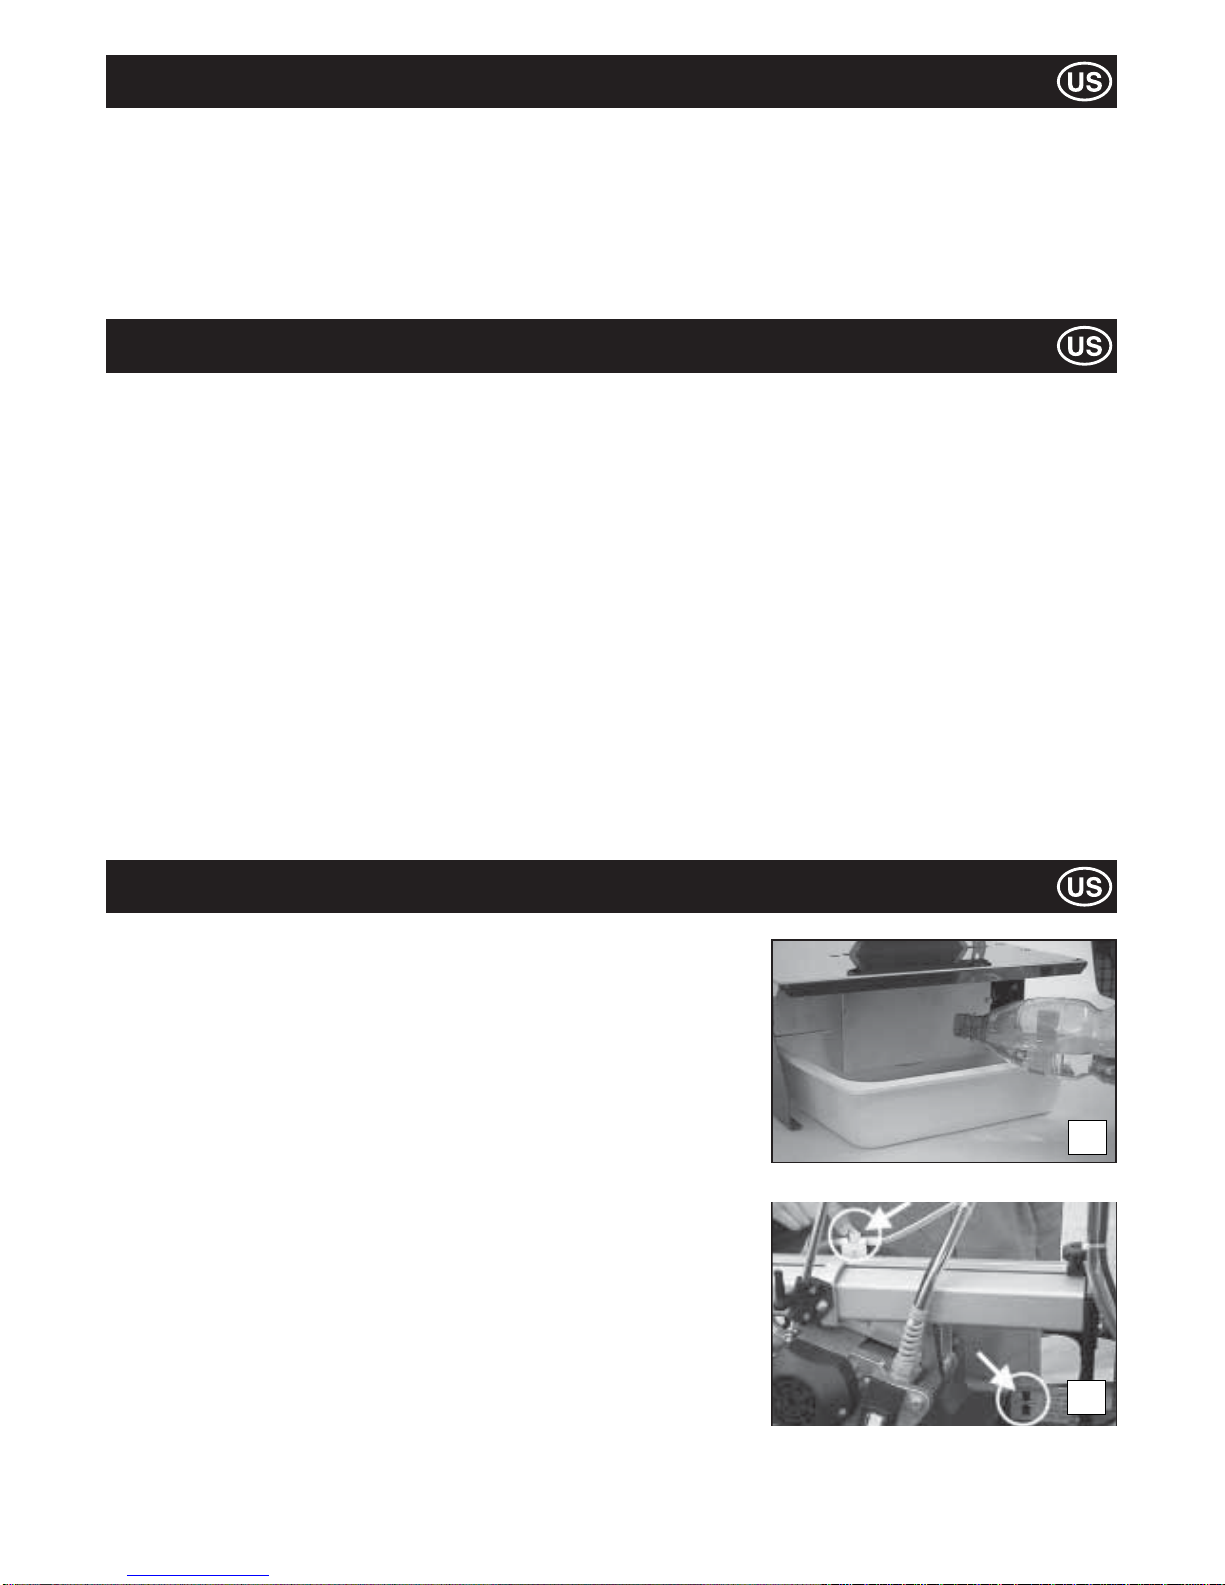
Cutting at 45°
Adjust the blade to the 45° position with the
inclination adjustment knobs (See picture 6b)
Lock the motor carriage at the max. cutting depth with the locking lever. Picture 6c shows
the proper way the machine should be used.
In order to carry out special working it is possible to set out any cutting inclination ranging
from 0° to 45° as marked on the machine side (See picture 6d).
Before any cutting make sure that the Tile to be cut is properly
up against The tile-stop.
CAUTION
With the MAXITILE machine it is also possible to set out:
a- the cutting length with the cutting adjustment knobs;
b- the cutting depth with the locking lever;
c- the straight cut measurement with the tile bearing square as well as the ruler placed
on the working table;
d- the cutting adjustment with the specially provided indicator and ruler placed on the
slide rail.

10
Maintenance
GB
MINITILE & MAGIKTILE ONLY!!
DIAMOND BLADE DISASSEMBLY
Remove the blade guard.
Use the 4mm Allen Key to hold the motor shaft. Unscrew the blade Àange block nut with
the 19mm spanner.
After removing the blade, clean the blade Àange thoroughly and check for wear.
Lubricate surfaces with ¿ne oil, then ¿t new blade.
MAXITILE ONLY!!
After dismantling the blade, clean the blade
Àanges carefully and check them for wear.
Grease any surface with ¿ne oil and go on
with the assembly of a new blade.
Check for correct direction of rotation as
clearly indicated on the blade.
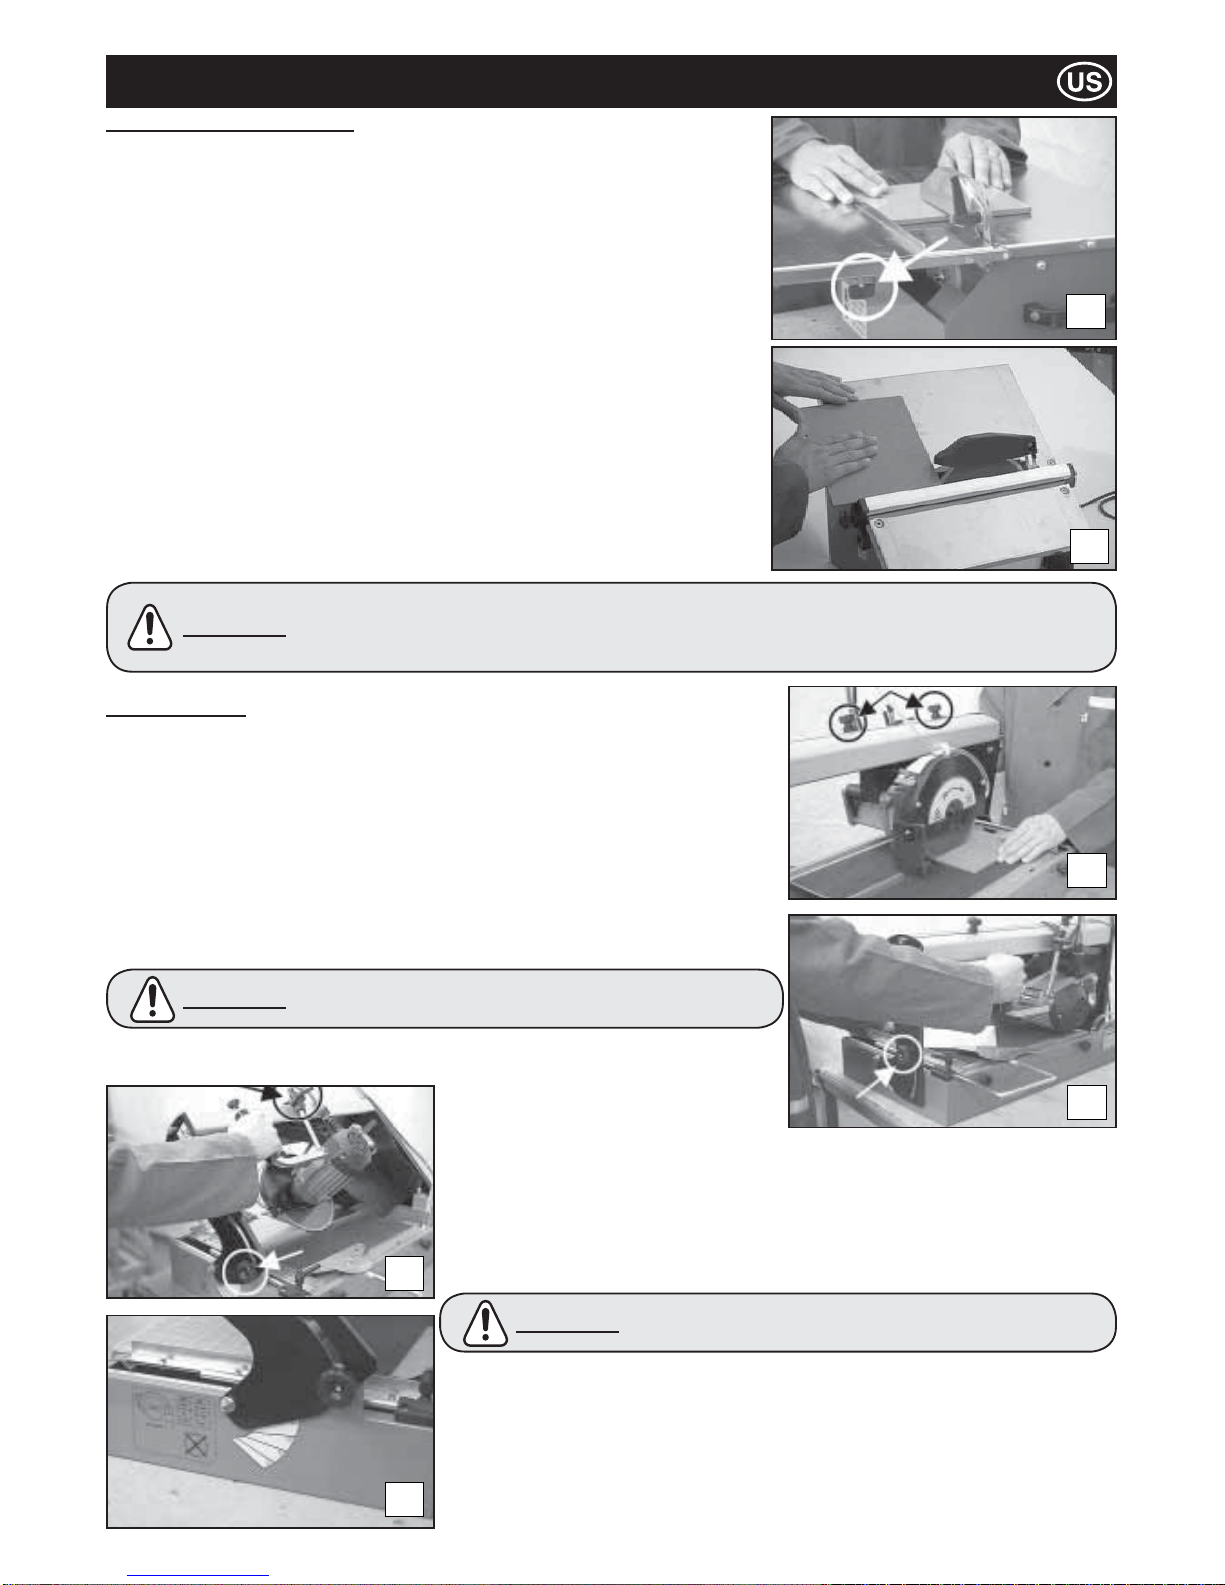
MOTOR CARRIAGE ADJUSTMENT
The motor carriage is provided with a register
for the vertical play adjustment. If any
excessive play of the motor carriage should
take place, act as follows:
1) Loosen the register ¿xing nut with a
10mm spanner;
2) Screw down the dowel with a 4 mm Allen
Key until the play is eliminated;
3) Lock the register again with the ¿xing nut.
CLEANING
It is extremely easy to clean the MAXITILE machine by loosening the side knobs and
dismantling the working table.
Through the side drain remove any residue (See picture 7d).
When necessary clean the sprayer as shown in pictures 7e and 7f.
7a
Before performing any maintenance operation, ensure the machine is disconnected from the power
supply.
CAUTION
7b 7c
7d 7e
7f

11
Troubleshooting Guide
GB
Fault Cause Remedy
The machine does not The power supply cable is damaged or Press the plug ¿rmly into the power socket.
function. not properly connected.
No voltage in the socket. Have the socket checked.
Switch is damaged. Consult local dealer.
Diamond blade is bent due to Replace diamond blade.
incorrect use.
If lubrication does not The sprayer unit is clogged. Dismantle the sprayer assembled inside the blade cover
arrive at the blade with the and remove any possible residuals.
pump running.
Motor gives off unpleasant Water may have seeped through inside Unplug the power supply cable and consult local dealer.
odour. the motor.
Capacitor is damaged. Unplug the power supply cable and consult local dealer.
Machine is dif¿cult to start. Motor bearings are damaged. Consult local dealer.
Warranty
GB
Your new Belle Group Tile Saw is warranted to the original purchaser for a period of one-year (12 months) from the original date of
purchase. The Belle Group warranty is against defects in design, materials an workmanship.
The following are not covered under the Belle Group warranty:
1. Damage caused by abuse, misuse, dropping or other similar damage caused by or as a result of failure to follow assembly,
operation or user maintenance instructions.
2. Alterations, additions or repairs carried out by persons other than Belle Group or their recognised agents.
3. Transportation or shipment costs to and from Belle Group or their recognised agents, for repair or assessment against a warranty
claim, on any machine.
4. Materials and/or labour costs to renew, repair or replace components due to fair wear and tear.
The following components are not covered by warranty:
Drive belt(s)
Engine air ¿lter
Engine spark plug
Belle Group and/or their recognised agents, directors, employees or insurers will not be held liable for consequential or other damages,
losses or expenses in connection with or by reason of or the inability to use the machine for any purpose.
Warranty Claims
All warranty claims should ¿rstly be directed to Belle Group, either by telephone, by Fax, by Email, or in writing.
For warranty claims:
Belle Group Warranty Department,
Unit 5, Bode Business Park
Ball Haye Green
Leek
Staffordshire
ST13 6BW.
England.
Tel : 44 (0)1538 380000
Fax : 44 (0)1538 380038
HAVE YOUR MACHINE REPAIRED BY A QUALIFIED PERSON ONLY
This electric machine complies with the relevant safety rules. Repairs should only be carried out by quali¿ed persons using original
spare parts, otherwise this may result in considerable danger to the user.

12
How To Use This Manual
This manual has been written to help you operate and service the Tile Saw safely. This manual is intended for dealers and operators of
the Tile Saw.
Foreword
The ‘Environment’ section gives instructions on how to handle the recycling of discarded apparatus in an environmentally friendly way.
The ‘General Safety’ and ‘Health and Safety’ sections explain how to use the machine to ensure your safety and the safety of the
general public.
The ‘Trouble Shooting’ guide helps you if you have a problem with your machine.
The ‘Service & Maintenance’ section is to help you with the general maintenance and servicing of your machine.
The ‘Warranty’ Section details the nature of the warranty cover and the claims procedure.
The ‘Declaration of Conformity’ section shows the standards that the machine has been built to.
Directives with regard to the notations.
Text in this manual to which special attention must be paid are shown in the following way:
The product can be at risk. The machine or yourself can be damaged or injured if procedures are not
carried out in the correct way.
CAUTION
The life of the operator can be at risk.
WARNING
WARNING
Before you operate or carry out any maintenance on this machine YOU MUST READ and STUDY
this manual.
WARNING
Contents
KNOW how to safely use the unit’s controls and what you must do for safe maintenance. (NB Be sure that you know how to switch the
machine off before you switch on, in case you get into dif¿culty.)
ALWAYS wear or use the proper safety items required for your personal protection. If you have ANY QUESTIONS about the safe use
or maintenance of this unit, ASK YOUR SUPERVISOR OR CONTACT: BELLE GROUP (UK): 44 (0) 1298 84606
How to use this manual ........................................................................................................................................................................... 12
Warning .................................................................................................................................................................................................... 12
Technical Data.......................................................................................................................................................................................... 13
Environment ............................................................................................................................................................................................. 13
General Safety ......................................................................................................................................................................................... 14
Health & Safety ........................................................................................................................................................................................ 15
Connecting to the Power Supply ............................................................................................................................................................. 15
Pre-Start Checks...................................................................................................................................................................................... 15
Adjusting the Blade Guard....................................................................................................................................................................... 16
Installation ................................................................................................................................................................................................ 16
Transportation .......................................................................................................................................................................................... 16
Operating Instructions .............................................................................................................................................................................. 17
Service & Maintenance ............................................................................................................................................................................ 18
Trouble Shooting Guide ........................................................................................................................................................................... 19
Warranty................................................................................................................................................................................................... 19
%HOOH*URXSUHVHUYHVWKHULJKWWRFKDQJHPDFKLQHVSHFL¿FDWLRQZLWKRXWSULRUQRWLFHRUREOLJDWLRQ

13
Technical Data
Environment
Safe Disposal.
Instructions for the protection of the
environment. The machine contains valuable
materials. Take the discarded apparatus and
accessories to the relevant recycling facilities.
Component Material
Electric Motor Aluminium
Steel
Copper
Polyamide
Main Body Steel
Polystyrene
Polyamide
Model Minitile 180 Minitile 200 Minitile 230 Magiktile 180 Maxitile 260
Width (in) 18.8 18.1 23.0 15.5 17.3
Height (in) 10.6 10.2 13.1 6.2 48.8
Length (in) 19.6 13.0 22.0 15.5 45.3
Blade Diameter (in) 7.1 7.9 9.1 7.1 7.9
Blade Speed (rpm) 2800 2800 2800 2800 2800
Blade Centre Hole (in) 1 1 1 1 1
Max. Cutting Depth (in) 1.2 1.6 2.8 1.2 1.6
Machine Weight (lbs) 26.5 53.0 66.1 22.0 75.0
Water Tank Capacity (Gals) 1.3 0.5 0.5 1.3 6.6
Motor Power (W) 550 550 1200 550 650
Capacitor (230v 50Hz) (F) 8 8 16 8 10
Capacitor (115v 50Hz) (F) 30 30 70 30 40
Sound Power Level (230v 50Hz) (dBW(A)) 75 75 75 75 75
Sound Power Level (110v 50Hz) (dBW(A)) 75 75 775 75 75

14
General Safety
Keep your work area perfectly clean
- Cluttered areas invite injuries.
Consider work area environment
- Don’t expose tools to rain.
- Don’t use tools in damp or wet locations. Keep work area well lit.
- Don’t use tools in presence of Àammable liquids or gases.
Guard against electric shocks
- Prevent body contact with grounded surfaces.
Keep children away!
- Do not let third parties contact tool or extension cord. All visitors should be kept away from work area.
Store your tools in a safe place
- When not in use, tools should be stored in dry and save places, out of the reach of children.
Don’t force tool
- It will function better and in a safer way at the rate for which it was intended.
Use the right tool
- Don’t use low duty tools or accessories to do the job of a heavy-duty tools. Don’t use tools for purposes not intended.
Dress properly
- Rubber gloves and non-slip footwear are recommended when working outdoors. Wear protective hair covering to contain long hair.
- Use safety glasses.
- Use a mask if working operations are dusty.
Don’t abuse cord
- Never carry tool by cord or yank it to disconnect it from socket.
- Keep cord from heat, oil and sharp edges.
Avoid unsteady positions
- Be sure to work in a safe and balanced position.
Maintain tools with care
- Keep tools sharp and clean for better and safer performance.
- Follow all maintenance advice and instructions to replace accessories subject to wear. Inspect tool cords periodically and, if
damaged, have them repaired by an authorised expert. Check extension cords periodically and replace them if damaged.
- Keep handles dry, clean and free from oil and grease.
Disconnect tools
- When not in use, before servicing, and when changing accessories subject to wear.
Remove service keys from tool
- Form the habit of checking to see that keys and adjusting spanners are removed from tool before turning it on.
Avoid unintentional starting
- Be sure that the switch is off when plugging in the tool.
Extension cords for outdoor works
- When tool is used outdoors, use only extension cords intended for this particular use and so marked.
Stay alert
- Watch what you are doing. Use common sense. Do not operate tool when you are inattentive.
Check tool for damaged parts
- Before further use of the tool, check it and the safety devices for damages and be sure that they operate properly. Check for
functioning and binding of moving parts, breakage of parts, correct mounting, and any other conditions that may affect the
correct operation of the tool.
- Damaged safety devices or other parts should be properly repaired or replaced by an authorised Service Centre unless otherwise
indicated elsewhere in this instruction manual.
- Have defective switches replaced by an authorised Service Centre.
- Do not use tool if its switch cannot be turned on or off.
Warning
- For your personal safety use only accessories recommended in this instruction manual or in the relevant catalogues The use of
any other accessory or attachment other than those recommended in this instruction manual or in the relevant catalogue may
present a risk of personal injury.
+DYHWRROVUHSDLUHGE\TXDOL¿HGSHUVRQQHO
- This electric appliance is in accordance with the safety rules in force. Only quali¿ed experts may carry out repairing of electric
appliances otherwise it may cause considerable danger for the user.
When using electric tools, following safety precautions should always be followed to reduce the risk
of ¿re, electric shock and personal injuries. Read and follow all these instructions before attempting to
operate this product.
WARNING
15
Health and Safety
PPE (Personal Protective Equipment).
Suitable PPE must be worn when using this equipment i.e. Safety Goggles, Gloves, Ear Defenders, Dust Mask and Steel Toe capped
footwear.
Wear clothing suitable for the work you are doing. Tie back long hair and remove any jewellery which may catch in the equipment’s
moving parts.
Dust.
The sawing process will occasionally produce dust, which may be hazardous to your health. Always wear a mask that is suited to the
type of dust being produced.
Pre-Start Checks
THE MINITILE / MAGIKTILE MACHINE IS DESIGNED FOR WORKING WITH
WATER.
Before and during cutting operations, make sure that the water level is suf¿cient to
cover the diamond part of the blade. Fill or top up the basin directly, as shown in the
picture 1a.
In particular cases, it may be necessary to use a tray to recover the cooling water.
If so, use a tray with the following dimensions:
MINITILE 180 =L 19.7 in, P 23.6 in, H 4.0 in
MINITILE 200 =L 19.7 in, P 23.6 in, H 4.0 in
MINITILE 230 =L 23.6 in, P 23.6 in, H 4.0 in
MAGIKTILE 180 =L 19.7 in, P 23.6 in, H 4.0 in
THE MAXITILE MACHINE IS DESIGNED FOR WORKING WITH WATER.
Before any cutting operation, make sure that the water level inside the basin is the
same as the one shown in picture 1b.
Through an on-off valve it is possible to adjust the water Àow according to the type of
material to be cut. An innovative cooling system makes it possible and allows the disk
to be always wet.
1a
1b
Connecting To The Power Supply
The machine is to be connected to the mains by a residual current circuit breaker (RCCB) or class II isolation transformer with the
following characteristics:
MINITILE 180
RCCB 230V In 3 A Id 20 mA 115V In 6 A Id 20 mA
TRANSFORMER 230V 50 Hz 650 W 115V 50 Hz 650 W
MINITILE 200
RCCB 230V 5 A Id 20 mA 115V 6 A Id 20 mA
TRANSFORMER 230V 50 Hz 650 W 115V 50 Hz 650 W
MINITILE 230
RCCB 230V 10 A Id 20 mA 115V 16 A Id 20 mA
TRANSFORMER 230V 50 Hz 1500 W 115V 50 Hz 1500 W
MAGIKTILE 180
RCCB 230V In 6 A Id 20 mA 115V In 3 A Id 20 mA
TRANSFORMER 230V 50 Hz 650 W 115V 50 Hz 650 W
MAXITILE 260
RCCB 230V In 5 A Id 20 mA 115V In 10 A Id 20 mA
TRANSFORMER 230V 50 Hz 1000 W 115V 50 Hz 1000 W

16
Adjusting The Blade Guard
The machine is equipped with a continuous diamond rim blade. Even though this blade has been designed
for operator safety if unintentionally touched, pay particular attention to avoid contact between your ¿ngers
and the blade during operation of the machine.
CAUTION
MINITILE & MAGIKTILE ONLY!!
Position the blade guard approximately half a centimetre above the tile surface.
Lock the blade guard in position by fully tightening the screw illustrated in the ¿gure.
2
Installation
3a 3b 3c
MAXITILE ONLY!!
Remove the machine from the packaging with the aid of the side carrying handles. To set up the machine for work proceed as follows:
1) Remove the leg lock pin and raise the rear side (pump side) of the machine with the handle until the leg is fully extended
(See picture 3a).
2) Raise the leg by sliding it inside the slot.
3) Repeat the operation for the front side of the machine (See picture 3b).
4) Insert the tube-holder rod in its seat (See picture 3c).
Transportation
MAXITILE ONLY!!
The MAXITILE machine is easy to carry by using the specially provided side handles
(See picture 4).
Before carrying the machine make sure that:
the motor slide is locked in place with the two cutting adjustment knobs on the slide rail;
the motor slide is completely lowered and locked with the locking lever;
the machine is in the 45° (jolly) position and that the inclination adjustment knobs are
properly tightened;
the tube-holder rod is out of its housing;
the feet are closed and the leg lock pin inserted.
4
17
MAXITILE ONLY!!
Cutting at 90°
Thanks to the great versatility of the MAXITILE machine it is possible to carry out different
types of cutting.
Adjust the blade to the 0° position with the inclination adjustment knobs (See picture 6a).
Position the piece which needs cutting on the working table and make sure that it is
properly up against the tile-stop. If necessary, a square can be of help.
In order to carry out any diagonal cutting lean the tile against the square the way it is
shown in picture 6b and go on with the cutting operation.
Operating Instructions
MINITILE & MAGIKTILE ONLY!!
Cutting at 90°
Position the cutting guide and lock it by tightening the knobs fully. (See Figure 5a)
The picture on the right shows how to position hands correctlyduring cutting at 90°. The
forward movement of the piece must be proportional to the blade cutting capacity, to
prevent hazardous fragments that would involve accidents or injuries from breaking off.
Cutting a surface at 45°
Position the tilting table as shown in ¿gure 5b, then lock it in place with the knobs.
Position the cutting guide approx. 2 mm from the diamond blade, then lock it in place by
tightening the knobs fully.
Position the tile with the enamel surface downwards; make sure that the diamond blade
does not come into contact with the tile enamel. Adjust the position of the cutting guide
as necessary.
5a
5b
Figure 5b illustrates the correct position of the hands in the case of 45° angle cuts. Note that the right
hand holds the piece in contact with the diamond blade, while the left hand moves the piece forward.
The forward movement of the piece must be proportional to the blade cutting capacity, to prevent
hazardous fragments which would involve accidentsor injuries from breaking off.
CAUTION
6c
6a
6b
6d
The millimetre ruler placed on the Working table helps only for
linear Cutting.
CAUTION
Cutting at 45°
Adjust the blade to the 45° position with the
inclination adjustment knobs (See picture 6b)
Lock the motor carriage at the max. cutting depth with the locking lever. Picture 6c shows
the proper way the machine should be used.
In order to carry out special working it is possible to set out any cutting inclination ranging
from 0° to 45° as marked on the machine side (See picture 6d).
Before any cutting make sure that the Tile to be cut is properly
up against The tile-stop.
CAUTION
With the MAXITILE machine it is also possible to set out:
a- the cutting length with the cutting adjustment knobs;
b- the cutting depth with the locking lever;
c- the straight cut measurement with the tile bearing square as well as the ruler placed
on the working table;
d- the cutting adjustment with the specially provided indicator and ruler placed on the
slide rail.

18
Maintenance
MINITILE & MAGIKTILE ONLY!!
DIAMOND BLADE DISASSEMBLY
Remove the blade guard.
Use the 4mm Allen Key to hold the motor shaft. Unscrew the blade Àange block nut with
the 19mm spanner.
After removing the blade, clean the blade Àange thoroughly and check for wear.
Lubricate surfaces with ¿ne oil, then ¿t new blade.
MAXITILE ONLY!!
After dismantling the blade, clean the blade
Àanges carefully and check them for wear.
Grease any surface with ¿ne oil and go on
with the assembly of a new blade.
Check for correct direction of rotation as
clearly indicated on the blade.
MOTOR CARRIAGE ADJUSTMENT
The motor carriage is provided with a register
for the vertical play adjustment. If any
excessive play of the motor carriage should
take place, act as follows:
1) Loosen the register ¿xing nut with a
10mm spanner;
2) Screw down the dowel with a 4 mm Allen
Key until the play is eliminated;
3) Lock the register again with the ¿xing nut.
CLEANING
It is extremely easy to clean the MAXITILE machine by loosening the side knobs and
dismantling the working table.
Through the side drain remove any residue (See picture 7d).
When necessary clean the sprayer as shown in pictures 7e and 7f.
7a
Before performing any maintenance operation, ensure the machine is disconnected from the power
supply.
CAUTION
7b 7c
7d 7e
7f

19
Troubleshooting Guide
Fault Cause Remedy
The machine does not The power supply cable is damaged or Press the plug ¿rmly into the power socket.
function. not properly connected.
No voltage in the socket. Have the socket checked.
Switch is damaged. Consult local dealer.
Diamond blade is bent due to Replace diamond blade.
incorrect use.
If lubrication does not The sprayer unit is clogged. Dismantle the sprayer assembled inside the blade cover
arrive at the blade with the and remove any possible residuals.
pump running.
Motor gives off unpleasant Water may have seeped through inside Unplug the power supply cable and consult local dealer.
odour. the motor.
Capacitor is damaged. Unplug the power supply cable and consult local dealer.
Machine is dif¿cult to start. Motor bearings are damaged. Consult local dealer.
Warranty
Your new Belle Group Tile Saw is warranted to the original purchaser for a period of one-year (12 months) from the original date of
purchase. The Belle Group warranty is against defects in design, materials an workmanship.
The following are not covered under the Belle Group warranty:
1. Damage caused by abuse, misuse, dropping or other similar damage caused by or as a result of failure to follow assembly,
operation or user maintenance instructions.
2. Alterations, additions or repairs carried out by persons other than Belle Group or their recognised agents.
3. Transportation or shipment costs to and from Belle Group or their recognised agents, for repair or assessment against a warranty
claim, on any machine.
4. Materials and/or labour costs to renew, repair or replace components due to fair wear and tear.
The following components are not covered by warranty:
Drive belt(s)
Engine air ¿lter
Engine spark plug
Belle Group and/or their recognised agents, directors, employees or insurers will not be held liable for consequential or other damages,
losses or expenses in connection with or by reason of or the inability to use the machine for any purpose.
Warranty Claims
All warranty claims should ¿rstly be directed to Belle Group, either by telephone, by Fax, by Email, or in writing.
For warranty claims:
Belle Group Warranty Department,
Unit 5, Bode Business Park
Ball Haye Green
Leek
Staffordshire
ST13 6BW.
England.
Tel : 44 (0)1538 380000
Fax : 44 (0)1538 380038
HAVE YOUR MACHINE REPAIRED BY A QUALIFIED PERSON ONLY
This electric machine complies with the relevant safety rules. Repairs should only be carried out by quali¿ed persons using original
spare parts, otherwise this may result in considerable danger to the user.

20
Comment Utiliser Ce Manuel
Ce manuel est rédigé pour vous aider à vous servir et à entretenir la ‘Tile Saw’ en toute sécurité. Il est destiné aux concessionnaires et
aux opérateurs de la ‘Tile Saw’.
Avant-propos
La section ‘Respect de l’environnement’ contient des instructions sur les méthodes de recyclage et d’élimination des appareils dans
le respect de l’environnement.
Les sections ‘Consignes de Sécurité Générales’ et ‘Santé et Sécurité’ expliquent la manière dont il faut utiliser l’appareil pour
assurer votre sécurité et celle des membres du public, en général.
La section ‘Dépistage des Anomalies’ vous donne des conseils en cas de problèmes concernant votre appareil.
La section ‘Entretien et Révision’ vous donne des conseils sur l’entretien général et les révisions de votre appareil.
La section ‘Garantie’ donne des renseignements sur la couverture sous garantie et la méthode à suivre pour les réclamations sous
garantie.
La section ‘Déclaration de Conformité’ donne la liste des normes auxquelles l’appareil est conforme.
Renseignements concernant les notations utilisées dans ce manuel.
Dans ce manuel, il faut prêter une attention toute particulière au texte signalé comme suit:
Il peut y avoir un danger mortel pour l’opérateur.
AVERTISSEMENT
Ce produit peut présenter des risques. Si les méthodes indiquées ne sont pas rigoureusement
respectées, l’appareil ou l’opérateur risque de subir des dommages / blessures.
ATTENTION
Avertissment
Sommaire
Il faut SAVOIR comment utiliser les commandes en toute sécurité, et avoir assimilé les mesures à prendre pour effectuer un entretien
en toute sécurité. (NB : Avant de le mettre en route, il faut savoir comment arrêter l’appareil, en cas de dif¿cultés éventuelles).
Il faut TOUJOURS porter ou utiliser les articles de protection appropriés pour assurer votre protection personnelle.
Pour TOUTES QUESTIONS EVENTUELLES sur l’utilisation ou l’entretien en toute sécurité de cet appareil, CONSULTEZ VOTRE
RESPONSABLE OU CONTACTEZ BELLE GROUP: 44 (0)1298 84606
Comment Utiliser Ce Manuel ................................................................................................................................................................... 20
Avertissement........................................................................................................................................................................................... 20
Caractéristiques Techniques .................................................................................................................................................................... 21
Respect de l’environnement..................................................................................................................................................................... 21
Consignes de Sécurité ............................................................................................................................................................................. 22
Santé et Sécurité...................................................................................................................................................................................... 23
Branchement............................................................................................................................................................................................ 23
Contrôles Préalables au Démarragee...................................................................................................................................................... 23
Réglage de la Protection du Disque ........................................................................................................................................................ 24
Installation ................................................................................................................................................................................................ 24
Transport .................................................................................................................................................................................................. 24
Fonctionnement de la Scie a Sol ............................................................................................................................................................. 25
Entretien ................................................................................................................................................................................................... 26
Recherches des Pannes .......................................................................................................................................................................... 27
Garantie.................................................................................................................................................................................................... 27
Déclaration de Conformité.......................................................................................................................................................................... 2
%HOOH*URXSUHVHUYHVWKHULJKWWRFKDQJHPDFKLQHVSHFL¿FDWLRQZLWKRXWSULRUQRWLFHRUREOLJDWLRQ
Avant d’utiliser ou d’effectuer toute intervention d’entretien dans cette machine, il est
IMPERATIF de LIRE et d’ASSIMILER le contenu de ce manuel.
AVERTISSEMENT
This manual suits for next models
4
Table of contents
Languages:
Other Belle Group Saw manuals


Popular Saw manuals by other brands


Dremel
Dremel MS20 Original instructions

MK Diamond Products
MK Diamond Products MK-101 PRO24 Owners manual, parts list & operating instructions

macc
macc SPECIAL 380 A Instruction Manual for Operation

Ryobi
Ryobi EMS254L-LSG Original instructions

Makita
Makita 5740NB instruction manual

Craftex
Craftex CX116 user manual