manuals.online logo
Brands
  1. Home
  2. •
  3. Brands
  4. •
  5. Bellman & Symfon
  6. •
  7. Receiver
  8. •
  9. Bellman & Symfon Visit BE1470 User manual

Bellman & Symfon Visit BE1470 User manual

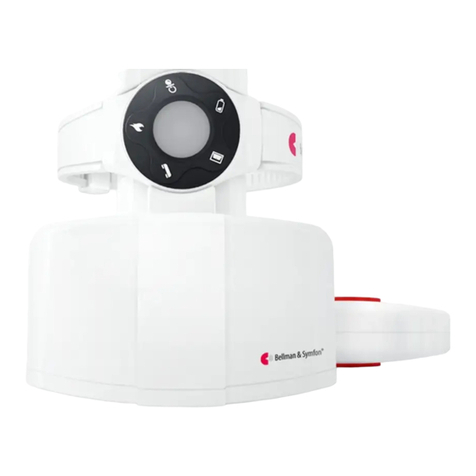
Function button
Belt clipVisit LEDs
Battery LED
Battery eject Battery compartment
Optional safety cord with clip
Front label Battery cover
Buttons and controls
In the box
BE1470 Visit pager receiver
Safety cord with clip
Extra front label
Power and battery
Mains power
7.5 V DC 200 mA via the charger
Battery power
1.5 V AAA alkaline or
1.2 V AAA NiMH rechargeable battery
Operation time
Alkaline battery: 2 – 3 weeks
NiMH battery: ~1 week
Power consumption
Active: ≤200 mA, Idle position: ≤1 mA
Environment
For indoor use only
Operating temperature
15° to 35° C, 59° to 95° F
Relative humidity
5% to 95%, non-condensing
Frequency and coverage
Radio frequency
314.91 MHz, 433.92 MHz or 868.30
MHz, depending on the region
Coverage
50 – 250 m, 55 - 273 yd. depending
on the radio frequency and the
characteristics of the building
Accessories
BE1260 Pager charger
BE1270 Bed shaker
Dimensions and weight
Height: 86 mm, 3.4"
Width: 57 mm, 2.2"
Depth: 29 mm, 1.1"
Weight: 70 g, 2.5 oz. incl. battery
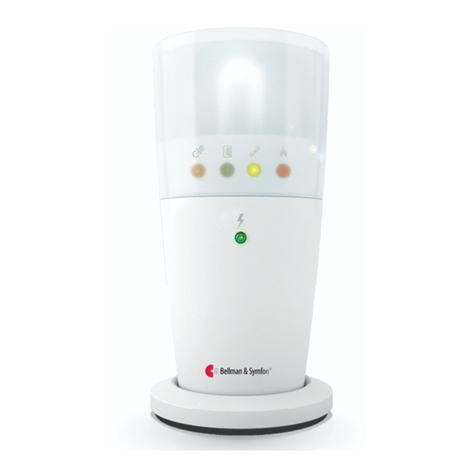
Visit LEDs
The Visit LEDs normally indicates
the following:
Orange LED, pacier symbol
The baby monitor is activated
Green LED, door symbol
The door transmitter is activated
Yellow LED, telephone symbol
The phone transmitter is activated
Red LED, re symbol
The smoke alarm is activated
Technical specications
Visit pager receiver BE1470
1.5V AAA
Getting started
1Open the battery cover, t the battery and close the cover again.
Attach the pager to your belt using the belt clip. For extra security, use the supplied safety cord.
2To test the radio link you need a Visit transmitter. Press the test button/s on the transmitter.
3The pager starts to vibrate and lights up a Visit LED. If a bed shaker is connected during charging, it will vibrate.
If nothing happens, see Troubleshooting.
1 2 3
Default signal pattern
When a transmitter is activated, the pager lights up an LED and starts to vibrate with a certain pace. This is called signal
pattern. The transmitters determine the pattern, and the default is as follows:
Activated transmitter Pager LED Pager / bed shaker vibration
Door transmitter Green Slow
Push button transmitter Green Slow
Telephone transmitter Yellow Medium
Baby monitor Orange Fast
Smoke alarm Red Long
Changing the signal pattern
The signal pattern can only be changed on the transmitters. See Changing the signal pattern for the relevant transmitter.
Changing the front label
If you want to use Visit for other purposes, the pager front label can be replaced with a customized one. Here is how it’s done:
Open the battery cover, replace the original label with the supplied extra label and close the cover again.
Replacing the battery
When the battery LED starts to blink in yellow, the battery is nearly depleted. Here is how you replace it:
Open the battery cover and press the battery eject button to remove the old battery. Insert a 1.5 V AAA alkaline battery
or a 1.2 V AAA NiMH rechargeable battery if you are using the BE1260 charger accessory.
Visit pager receiver
Changing the radio key
If your Visit system is activated for no reason, there is probably a nearby system that triggers yours. In order to avoid radio
interference you need to change the radio key on all units. The radio key switches are located on the transmitters.
Here is how you change the radio key:
1Open the transmitter cover and move any radio key switch to the up (on position) to change
the radio key. See Changing the radio key for the relevant transmitter.
2Press and hold the function button on the pager until the green and yellow Visit LEDs blink
alternately. Release the button.
3Press the test button/s on the transmitter within 30 seconds to send the new radio key.
4All Visit LEDs on the pager blink 5 times to show that the radio key has been changed. It then returns to normal mode.
Note: All Visit units must be set to the same radio key in order to operate as a group.
1 2 3 4
°5
Visit pager receiver
Pager accessories
The pager can be complemented with the following accessories:
BE1260 Pager charger
Charges your pager during the night. Place it on the
bedside table and connect up to two bed shakers.
Note: The pager will not vibrate when it’s charging,
but the Visit LEDs will act as usual.
BE1270 Bed shaker
Wakes you with vibrations if anything happens
while you are asleep. Connect it to the pager
charger and slide it under your pillow or mattress.
Warning! When using the pager charger ONLY USE RECHARGEABLE NiMH BATTERIES in the pager.
Non-rechargeable batteries will start to leak if the pager is placed in the charger and the battery acid will
damage the electronics. The resulting damage is not covered by warranty.
BE1260
BE1270
On
O
Advanced programming
By using advanced programming, you can customize the signal pattern from a specic transmitter and event, displaying
the LED colour and vibration pattern of your choice. The advanced programming overrides the radio key and pairs the
units via the serial number. Please note that smoke alarms cannot be programmed for safety reasons.
Note: The transmitter must be activated as it is intended to be used in the system to generate the right signal.
This means that you can’t always use the transmitter test button (see Default signal pattern for the relevant transmitter).
Here is how you program the pager:
1Press and hold the function button on the pager. The green and yellow Visit LEDs will start to blink alternately.
While still holding down the button, activate the desired transmitter as intended. The yellow battery LED on the pager
will light up to indicate that you are in advanced programming mode. Release the button.
2Scroll through the dierent Visit LED options by pressing the function button on the pager. Select the desired Visit LED
pattern by holding down the function button until the battery LED goes out and lights up again.
3Scroll through the dierent vibration options by pressing the function button on the pager. Select the desired
vibration pattern by holding down the function button until the battery LED goes out and lights up again.
4The pager will now show the new Visit LED colour and vibration pattern. Press the function button briey to end the
demonstration. After a short while, the pager will return to normal mode.
Deleting the advanced programming
Follow the procedure below to delete the advanced programming.
1Hold down the function button on the pager until the green and yellow Visit LEDs blink alternately. Release the button.
2Press the function button on the pager 3 times in quick succession.
3All Visit LEDs will light up for ~2 seconds to show that it has been deleted.
Troubleshooting
Most problems with the pager can be solved quickly by following the advice below.
If Try this
The pager seems to be turned o The battery is depleted. Replace it with a 1.5V AAA alkaline battery.
Important! If you have a pager charger; only use a rechargeable 1.2 V AAA
NiMh battery in the pager.
The battery LED blinks in yellow The battery level is low. Replace it with a 1.5V AAA alkaline battery.
Important! If you have a pager charger; only use a rechargeable 1.2 V AAA
NiMh battery in the pager.
The pager does not respond
when a transmitter is activated
Check the batteries in the transmitters.
Move the pager closer to the transmitter to make sure it’s within radio range.
Check that the pager is set to the same radio key as the other units in the Visit
system, see Changing the radio key.
The pager is activated for no
apparent reason
There is probably another Visit system installed nearby that triggers your system.
Change the radio key on all units, see Changing the radio key.
Visit pager receiver
Other manuals for Visit BE1470

5

This manual suits for next models

1

Other Bellman & Symfon Receiver manuals
Bellman & Symfon BE8102 User manual

Bellman & Symfon

Bellman & Symfon BE8102 User manual

Bellman & Symfon BE1441 User manual

Bellman & Symfon

Bellman & Symfon BE1441 User manual

Bellman & Symfon Visit Installation and operation manual

Bellman & Symfon

Bellman & Symfon Visit Installation and operation manual

Bellman & Symfon BE1441 Application guide

Bellman & Symfon

Bellman & Symfon BE1441 Application guide

Bellman & Symfon Visit BE1470 User manual

Bellman & Symfon

Bellman & Symfon Visit BE1470 User manual

Bellman & Symfon Bellman Visit BE1033 User manual

Bellman & Symfon

Bellman & Symfon Bellman Visit BE1033 User manual

Bellman & Symfon Visit BE1470 User manual

Bellman & Symfon

Bellman & Symfon Visit BE1470 User manual

Bellman & Symfon Visit User manual

Bellman & Symfon

Bellman & Symfon Visit User manual

Bellman & Symfon BE1442 Assembly instructions

Bellman & Symfon

Bellman & Symfon BE1442 Assembly instructions

Bellman & Symfon BE1450 User manual

Bellman & Symfon

Bellman & Symfon BE1450 User manual

Bellman & Symfon BE1442 User manual

Bellman & Symfon

Bellman & Symfon BE1442 User manual

Bellman & Symfon BE1441 User manual

Bellman & Symfon

Bellman & Symfon BE1441 User manual

Bellman & Symfon Visit User manual

Bellman & Symfon

Bellman & Symfon Visit User manual

Bellman & Symfon Bellman Visit 868 User manual

Bellman & Symfon

Bellman & Symfon Bellman Visit 868 User manual

Bellman & Symfon Bellman Visit BE1330 User manual

Bellman & Symfon

Bellman & Symfon Bellman Visit BE1330 User manual

Bellman & Symfon BE1441 User manual

Bellman & Symfon

Bellman & Symfon BE1441 User manual

Bellman & Symfon Visit User manual

Bellman & Symfon

Bellman & Symfon Visit User manual

Bellman & Symfon Visit 868 BE1450 User manual

Bellman & Symfon

Bellman & Symfon Visit 868 BE1450 User manual

Bellman & Symfon BE1450 User manual

Bellman & Symfon

Bellman & Symfon BE1450 User manual

Popular Receiver manuals by other brands
Rockford Fosgate punchPMX-3 Installation & operation

Rockford Fosgate

Rockford Fosgate punchPMX-3 Installation & operation

BluDento BLT-2 user manual

BluDento

BluDento BLT-2 user manual

Pioneer VSX-816-K Specifications

Pioneer

Pioneer VSX-816-K Specifications

Remote Control MARANTEC D343 Programming manual

Remote Control

Remote Control MARANTEC D343 Programming manual

Dr.HD F15 user manual

Dr.HD

Dr.HD F15 user manual

Panasonic SA-HT17PP Service manual

Panasonic

Panasonic SA-HT17PP Service manual

RTS Easywave RCJ06 quick start guide

RTS

RTS Easywave RCJ06 quick start guide

Furuno MF/HF DSC/Watch Receiver DSC-60 installation manual

Furuno

Furuno MF/HF DSC/Watch Receiver DSC-60 installation manual

Pioneer XD-DV350 Service manual
Pioneer
Pioneer XD-DV350 Service manual

Switchcraft 318BTS user manual

Switchcraft

Switchcraft 318BTS user manual

Integra DTR-70.2 instruction manual

Integra

Integra DTR-70.2 instruction manual

RF Central RFX-RMR Operator's manual

RF Central

RF Central RFX-RMR Operator's manual

Topfield TF 5200 PVRc user guide

Topfield

Topfield TF 5200 PVRc user guide

Gembird BTR-002 user manual

Gembird

Gembird BTR-002 user manual

Strong SRT 8102+ user manual

Strong

Strong SRT 8102+ user manual

JVC KD-X220 instruction manual

JVC

JVC KD-X220 instruction manual

AOR AR7000 manual 

AOR

AOR AR7000 manual 

New Focus 1801 user guide

New Focus

New Focus 1801 user guide

manuals.online logo
manuals.online logoBrands
  • About & Mission
  • Contact us
  • Privacy Policy
  • Terms and Conditions

Copyright 2025 Manuals.Online. All Rights Reserved.