Benchmark 1282 206 User manual
WEAR CSA APPROVED
EYE PROTECTION
WEAR EAR
PROTECTION
WEAR A
FACE MASK
READ ALL INSTRUCTIONS BEFORE FIRST USE.
KEEP THIS MANUAL FOR FUTURE REFERENCE.
KEEP AWAY FROM CHILDREN.
5 Year Limited Warranty
PNEUMATIC PIN NAILER

1
PRODUCT SPECIFICATIONS
PNEUMATIC PIN NAILER
Magazine Capacity 100 nails
Pin Nail Size Range 1/2" ~ 1-1/2" long
Magazine Angle 90°
Working Pressure 70-110 PSI
Fastener Capacity Ga 23 (Φ 0.64)
Average Air Consumption 0.75 CFM @ 90 PSI
120 PSI
Max pressure
1/4" or 3/8"Recommended Hose
2.6 lbs. (1.2kg)Weight
Air Inlet 1/4” NPT
NEED ASSISTANCE?
Call us on our toll- free customer support line:
1-866-349-8665 (Monday through Friday 9am – 5pm Eastern Standard Time)
Note these instructions pertain to the tool only. Please refer to your
compressors operators manual and follow the manufacturers instructions.
• Technical questions
• Replacement parts
• Parts missing from package
*Please note (where the ¼” NPT connecter is not already installed on the tool) your
tool may be shipped with a black plastic cap installed in the air inlet. Pry the cap out
prior to installing the ¼” NPT connector.

1282 206
PNEUMATIC PIN NAILER
2
TABLE OF CONTENTS
Product Specifications................................................................................... 1
Table of Contents........................................................................................... 2
Safety Guidelines ..................................................................................... 3-6
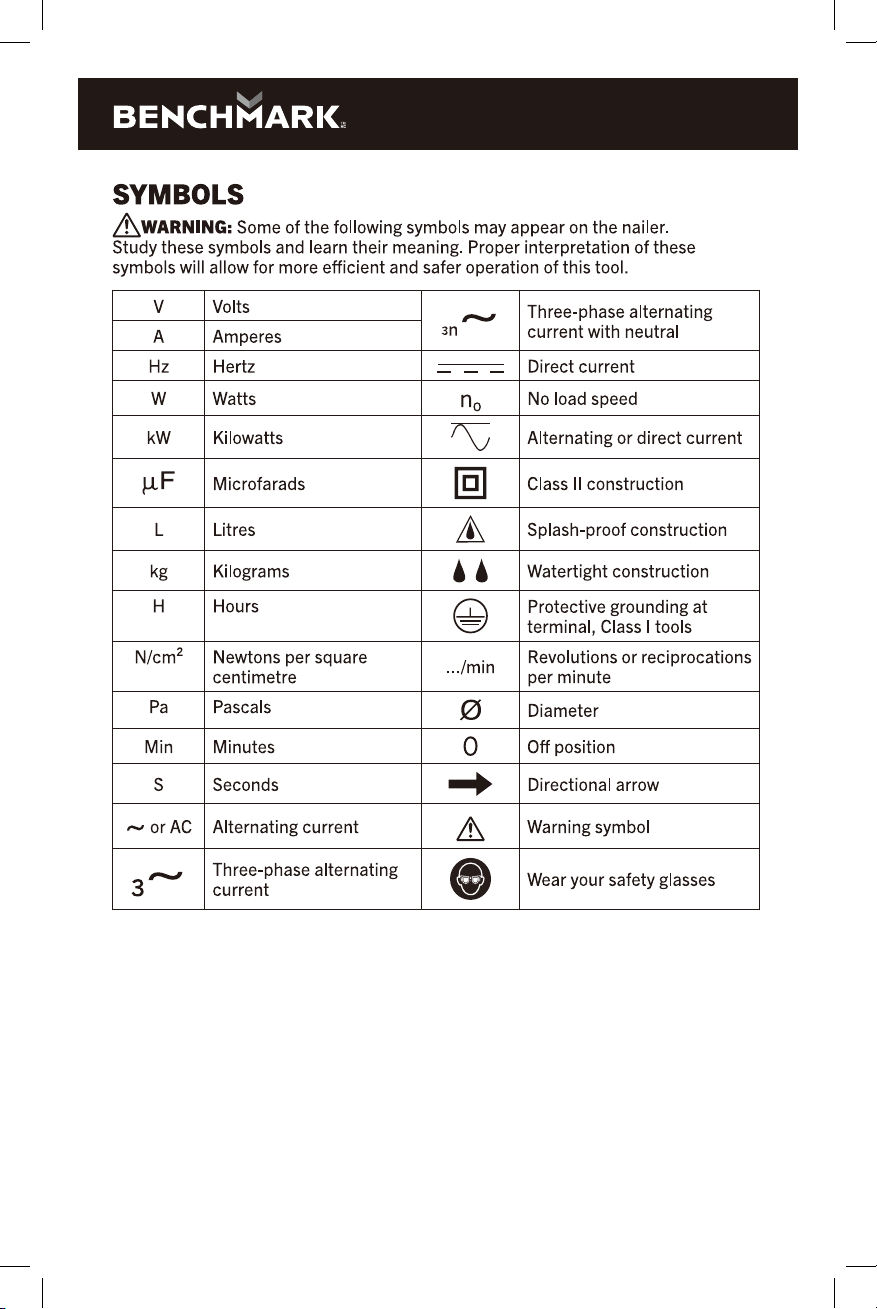
Symbols ....................................................................................................... 7
Tool Specific Warnings .................................................................................. 8
.................................................................. 9
Know Your Pneumatic Pin Nailer
....................................................................... 10-15
Assembly and Operating
Maintenance
Troubleshooting
Exploded View
....................................................................................... 16
Parts List .............................................................................................
............................................................................................
.................................................................................... 17-18
Warranty......................................................................................................
19
20-22
23
3
SAFETY GUIDELINES
DANGER! Potential hazard that will result in serious injury or loss of life.
WARNING:
WARNING! Potential hazard that could result in serious injury or loss of life.
CAUTION! Potential hazard that may result in moderate injury or damage to
equipment.
Note - The word " Note " is used to inform the reader of something he / she needs to
know about the tool.
This manual contains information that relates to PROTECTING PERSONAL SAFETY
and PREVENTING EQUIPMENT PROBLEMS. It is very important to read this manual
carefully and understand it thoroughly before using the product. The symbols listed
below are used to indicate this information.
These precautions are intended for the personal safety of the user and others working
with the user. Please take time to read and understand them.
PERSONAL SAFETY
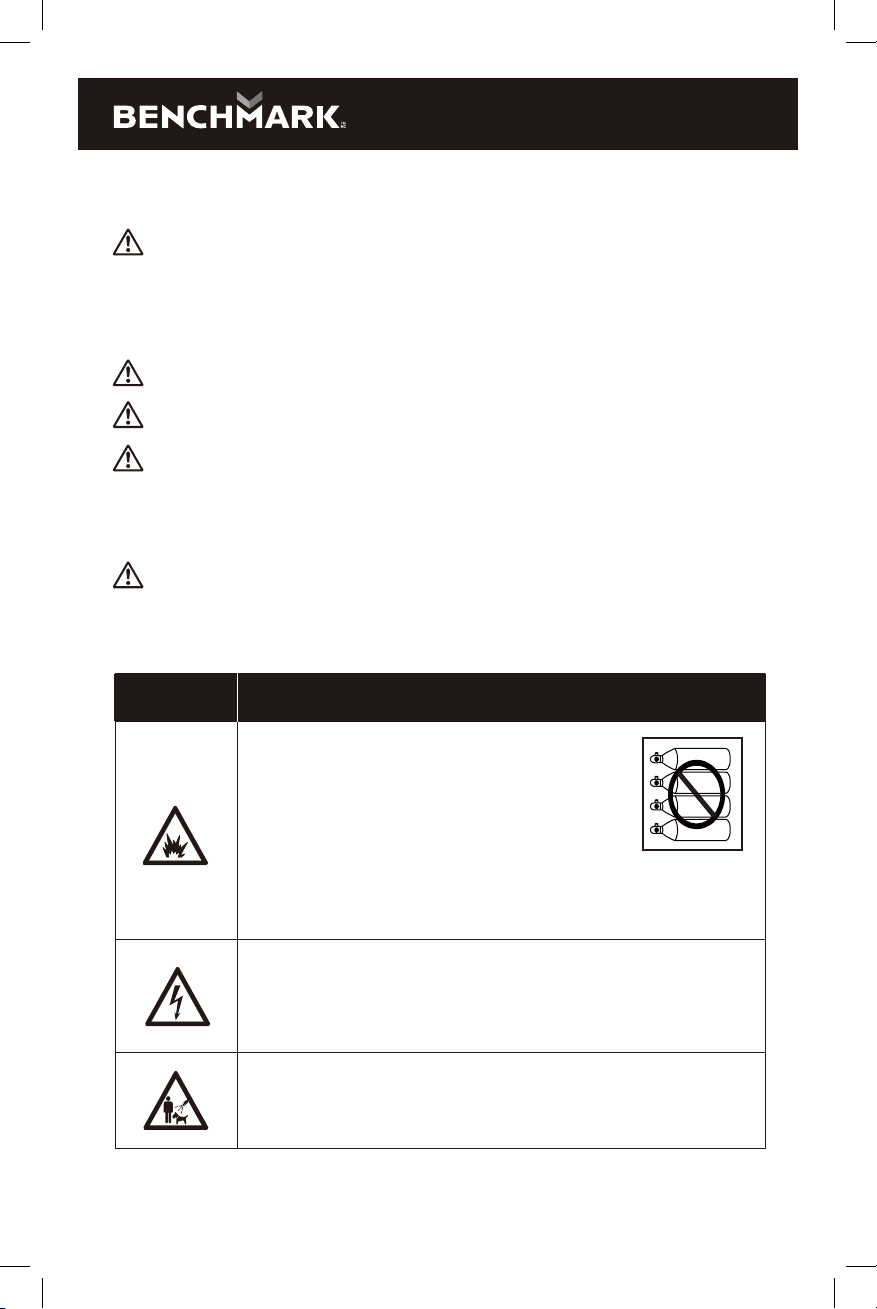
Do not use oxygen or any other combustible or
bottled gas to power air-powered tools. Failure
to observe this warning can cause explosion
and serious personal injury or death.
Use only the compressed air to power the
air-powered tools. Use a minimum of 25’
(7.6 m) of hose to connect the tool to the
compressor. Failure to comply will result in
serious injury or loss of life.
•
Risk of electric shock: Do not expose a compressor to rain.
Store it indoors. Disconnect the compressor from power
source before servicing. Compressor must be grounded. Do
not use grounding adaptors.
•
Risk of personal injury: Do not direct compressed air from the
air hose towards the user or other personnel.
•
Oxygen
Hydrogen
Explosive
Combustible
SYMBOL MEANING
1282 206
PNEUMATIC PIN NAILER
4
DANGER!
Keep children away from the work area. Do not allow children to handle
power tools.
Do not use this tool in the presence of flammable liquids or gases. Sparks
that are created during use may ignite gases.
Keep air hose away from heat, oil, and sharp edges. Check air hose for wear
before each use and ensure that all connections are proper.
Always ensure that the workpiece is firmly secured leaving both hands free
to control the tool.
Always ensure that the tool has stopped before putting it down after use, for
safety purposes and to prevent possible damage to the tool/user.
Keep proper footing at all times in order to ensure correct balance.
Always assume that the tool contains fasteners.
Do not point the tool toward yourself or anyone else.
•
•
•
•
•
•
•
•
Risk of inhalation: Never directly inhale the air produced by the
compressor.
•
Risk of bursting: Do not adjust the pressure switch or safety
valve for any reason. They have been preset at the factory for
this compressor’s maximum pressure Tampering with the
pressure switch or the safety valve may cause personal injury
or property damage.
•
Risk of burns. The pump and the manifold generate high
temperatures. In order to avoid burns or other injuries, do not
touch the pump, the manifold, or the transfer tube while the
compressor is running. Allow the parts to cool down before
handling or servicing. Keep children away from the compressor
at all times.
•
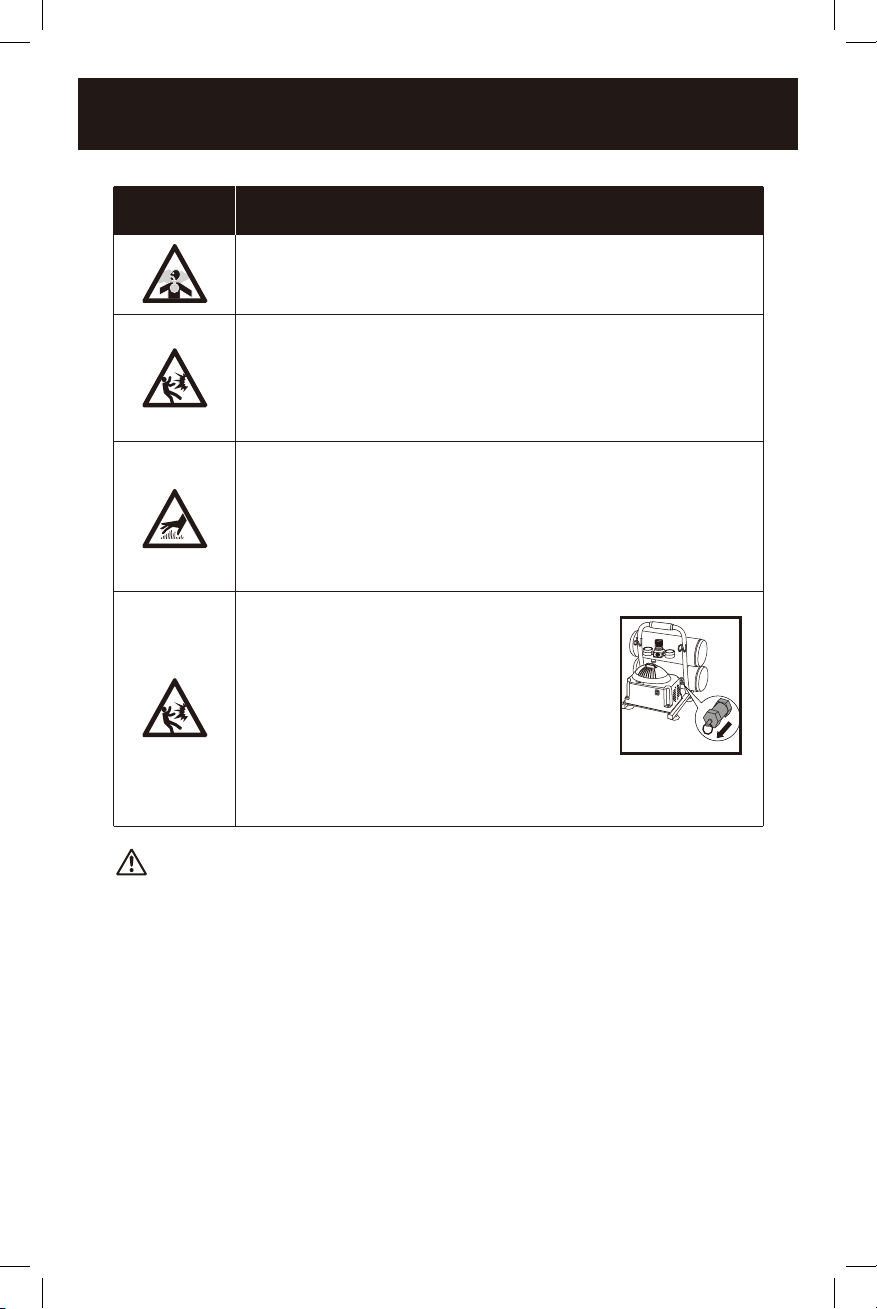
Risk of bursting: Make sure the regulator is
adjusted so that the compressor outlet
pressure is set lower than the maximum
operating pressure of the tool. Before
starting the compressor, pull the ring on the
safety valve to make sure the valve moves
freely. Drain water from tank after each use.
Do not weld or repair tank. Relieve all
pressure in the hose before removing or
attaching accessories.
•
SYMBOL MEANING

5
WARNING!
Do not allow unskilled or untrained individuals to operate the air tool.
Do not use the tool for any task other than that it is designed to perform.
Locate the compressor in a well-ventilated area for cooling, and a minimum
of 12” (31 cm) away from the nearest wall.
Protect the air hose and the power cord from damage and puncture. Inspect
them for weak or worn spots every week and replace them if necessary.
Always wear hearing protection when using the air compressor. Failure to do
so may result in hearing loss.
Do not carry the compressor while it is running.
Do not operate the compressor if it is not in a stable position.
Do not operate the compressor on a rooftop or an elevated position that
could allow the unit to fall or be tipped over.
Always replace a damaged gauge before operating the unit again.
Do not connect the tool to a compressed air source with a pressure output
that is higher than 120psi.
•
•
•
•
•
•
•
•
•
•
CAUTION!
Always ensure that the tool has stopped before disconnecting the air supply.
Do not wear watches, rings, bracelets, or loose clothing when using any
air- powered tool.
Do not overload the tool. Allow the tool to operate at its optimum speed for
maximum eciency.
Do not use a tool that is leaking air, that has missing or damaged parts, or
that requires repairs. Verify that all screws are securely tightened.
For optimal safety and tool performance, inspect the tool before every usage,
in order to ensure free movement of the trigger, safety mechanisms, and
springs. Always keep your air tool clean and lubricated. Daily lubrication is
essential to avoid internal corrosion and possible failures.
Ensure the floor is not slippery and wear non-slip shoes. Floors should be
kept clean and clear.
Always follow all workshop safety rules, regulations, and conditions when
using the tool and keep the work area clean.
Carry the tool by the handle only, keeping fingers away from the trigger. Do
not carry the tool by the hose, magazine, or any other parts.
Do not use the tool near or below freezing point, as doing so may cause tool
failure. Do not store the tool in a freezing environment to prevent ice
formation on the tools operating valves, as doing so may cause tool failure.
Handling and storage of oil: Use with adequate ventilation. Avoid contact of
oil with eyes, skin, and clothing. Avoid breathing spray or mist. Store in a
tightly closed container in a cool, dry, well-ventilated area free from
Incompatible substances.
Tripping hazard. The air hose may become a tripping hazard when it is
placed in the work area. Use care when walking in the work area.
•
•
•
•
•
•
•
•
•
•
•
1282 206
PNEUMATIC PIN NAILER
6
CAUTION!
Disconnect tool from the air supply and turn o the
compressor before performing any maintenance or
changing accessories, when clearing a jammed
fastener, when the tool is not in use, when it is being
handed to another person, and when it is left
unattended. Failure to comply may result in moderate
injury or damage to equipment.
•
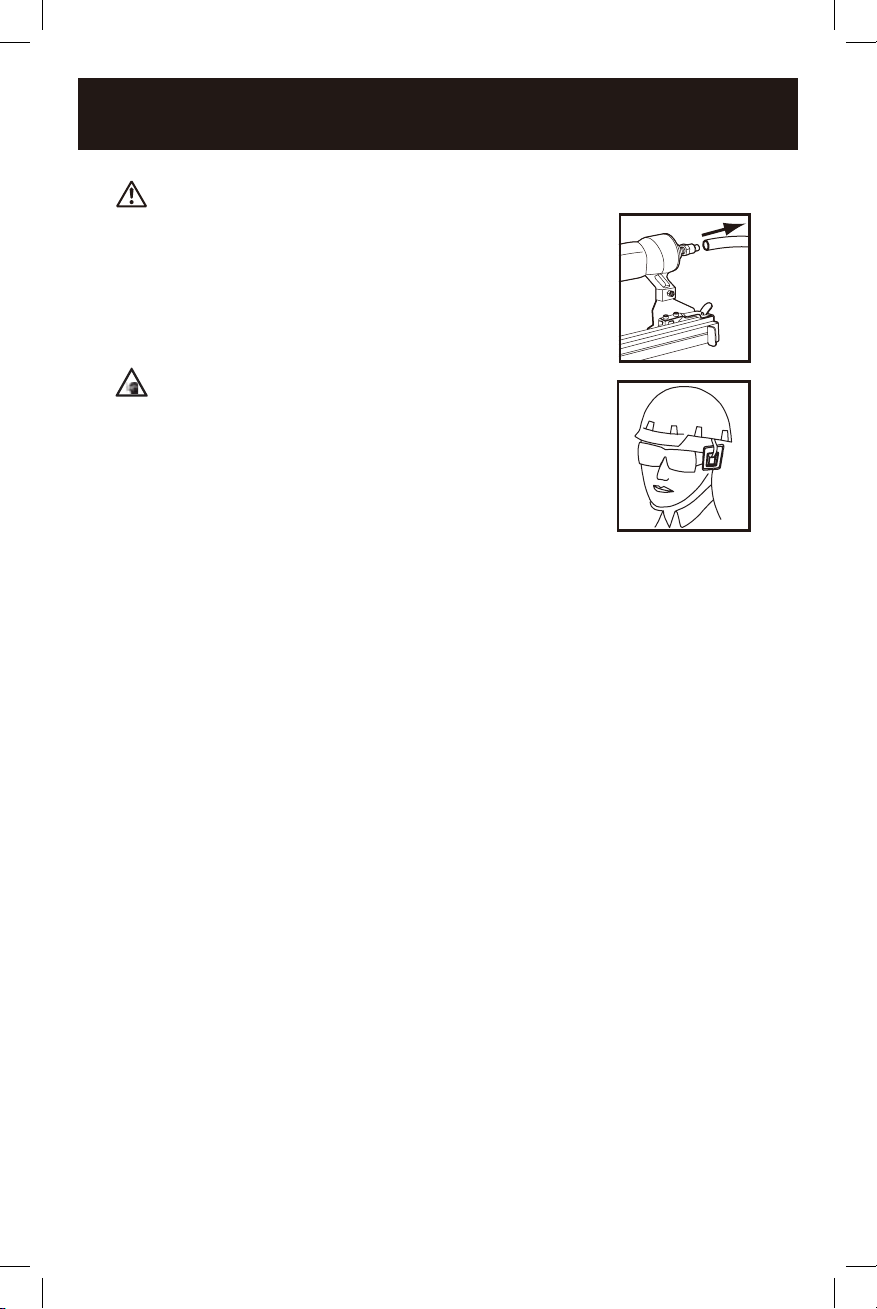
Use safety goggles and ear protection: Wear safety
glasses with side shields when operating the
tool/compressor and verify that others in the work
area are also wearing safety glasses. Safety glasses
must conform to American National Standards
Institute (ANSI Z87. 1) requirements and must
provide protection from flying particles from the front
and the sides.
Air-powered tools are loud, and the sound can cause hearing damage.
Always wear ear protection to prevent hearing damage and loss. Failure to
comply may result in moderate injury.
Note: Recycle unwanted materials rather than disposing of them as waste. Sort the
tools, hoses, and packaging in specific categories and take to the local recycling
centre or dispose of in an environmentally safe way.
•
7

1282 206
PNEUMATIC PIN NAILER
8
Do not disconnect or reconnect the air hose with the tool pressed or with a
fastener in the guide. The tool may fire when it is reconnected to the air
supply.
•
TOOL SPECIFIC WARNINGS
DANGER Potential hazard that will result in serious injury or death.
Keep hands and other parts of the body away from the nail guide during use.
Keep hands and feet and all other parts of the body at least 8” (20cm) away
from the firing head.
Objects in the workpiece can cause serious injury if they cause the fasteners
to be deflected or to be driven away from the point of entry.
Do not drive fasteners on top of a fastener. The fastener may ricochet,
causing serious personal injury.
Do not drive fasteners on scaoldings, ladders, or such similar construction.
Use only fasteners of the proper size and gauge, as specified in this manual.
Do not drive fasteners close to the edge of the workpiece. The workpiece may
split which could allow the fastener to fly free or ricochet and cause serious
personal injury.
•
•
•
•
•
•
WARNING Potential hazard that could result in serious injury or death.
9
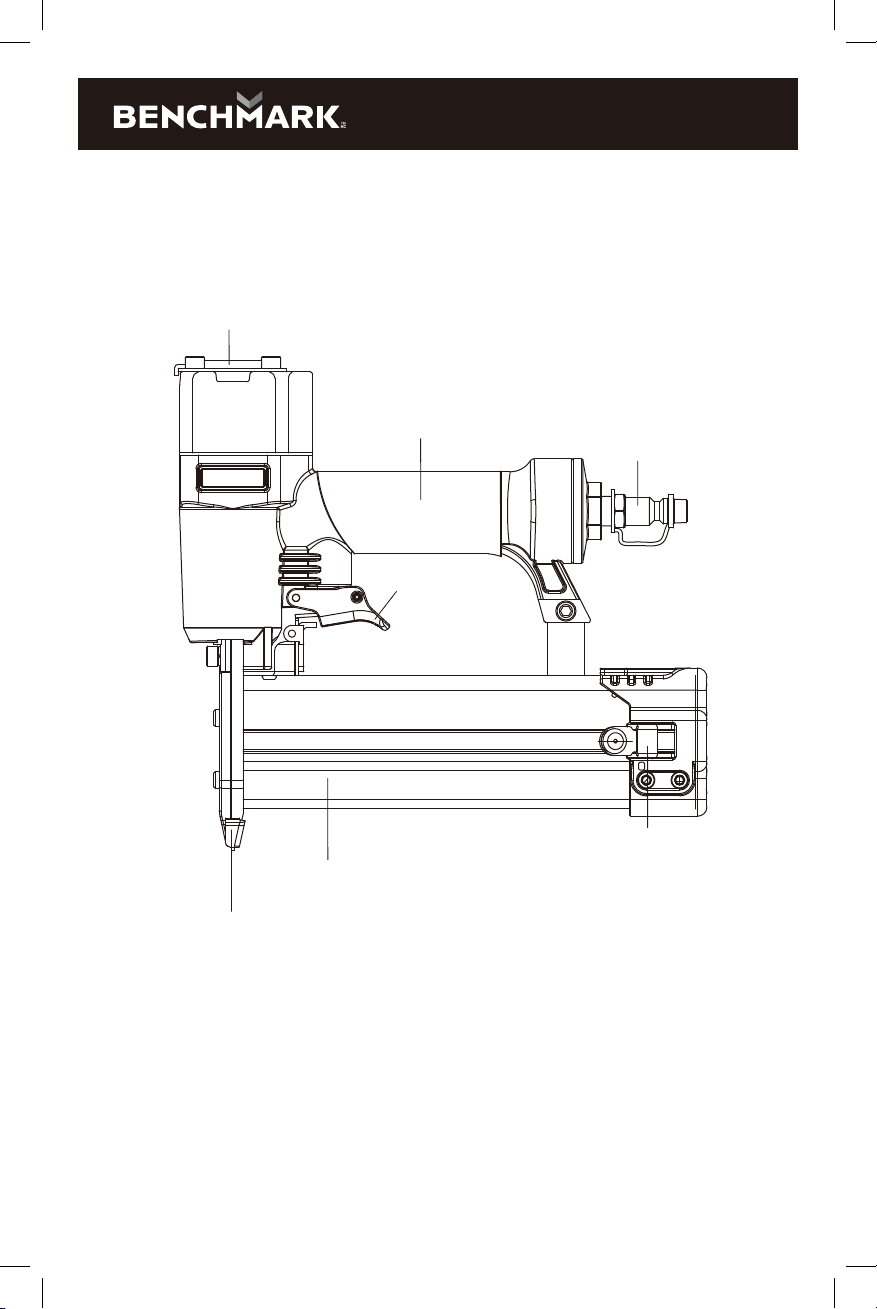
KNOW YOUR
PNEUMATIC PIN NAILER
Air inlet plug
Rubber grip
Magazine
Workpiece
Contact
Magazine Latch
Exhaust deflector
Trigger
ASSEMBLY AND OPERATING
1282 206
PNEUMATIC PIN NAILER
10
Be sure to use a proper air compressor with air-powered tools. The compressor
should be able to supply a minimal air delivery of 2.0 SCFM @ 90 psi to ensure the
compressor can run continuously with the tool.
COMPATIBLE COMPRESSORS
GUIDELINES FOR PROPER USE AND OPERATION
Air Compressor
Size & Power
>0.6g/cm3<1/16" (15mm)
≥1/16" (15mm)
<1/16" (15mm)
≥1/16" (15mm)
80 psi
110 psi
70 psi
80 psi
≤0.6g/cm3
Wood density Nail size Compressor air pressure
2 - 6 Gallons Light duty and
intermittent use
Light duty and
intermittent use
Light duty and
intermittent use
8 - 11 Gallons Light duty and
intermittent use
Medium duty and
intermittent use
Medium duty and
intermittent use
15+ Gallons Medium duty and
intermittent use
Medium duty and
intermittent use
Heavy duty and
continuous use
1/3–1 1/3 HP 1 1/2–2 HP 2+ HP

11
Air system
Always use clean, dry, regulated compressed air at 4.8 to 7.5 bar (70 to 110 PSI).
Do not exceed the maximum or minimum pressures. Operating the tool at the
wrong pressure (too low or too high) will cause excessive noise or rapid wear.
•
•
For optimal performance, install a quick connector to the tool and a quick
coupler on the hose, if applicable.
Verify that all of the connections in the air supply system are sealed in order to
prevent air leakage.
•
•
No. Description No. Description
Pneumatic Pin Nailer
Quick connector
Quick coupler
Air hose
Lubricator
Regulator (0 to 8.5 bar)
Filter
Cut-o valve
Air compressor
1
2
3
4
5
6
7
8
9
Read this Instruction Manual carefully before using the nailer.
Read and follow all the safety instructions at the beginning of this manual. Inspect
the Air Pin Nailer prior to each use in order to:
– ensure that the proper power source is being used.
– verify that the tool is in proper working order.
•
WARNING! Potential hazard that could result in serious injury or loss of life.
Keep hands and other parts of the body away from the tool’s discharge and
working areas when connecting the air supply. Failure to comply could lead
to serious injury or loss of life.
It is recommended that a filter-regulator-lubricator be used and be located
as close to the tool as possible.
If a filter-regulator-lubricator is not installed, place up to 6 drops of
compressor oil into the air inlet plug before each use.
If a filter-regulator-lubricator is installed, keep the air filter clean. A dirty
filter will reduce the air pressure to the tool, which will cause a reduction in
power, eciency, and general performance.
•
•
•
•
257
133
6
8
9
4
1282 206
PNEUMATIC PIN NAILER
12
WARNING! Potential hazard that could result in serious injury or loss of life.
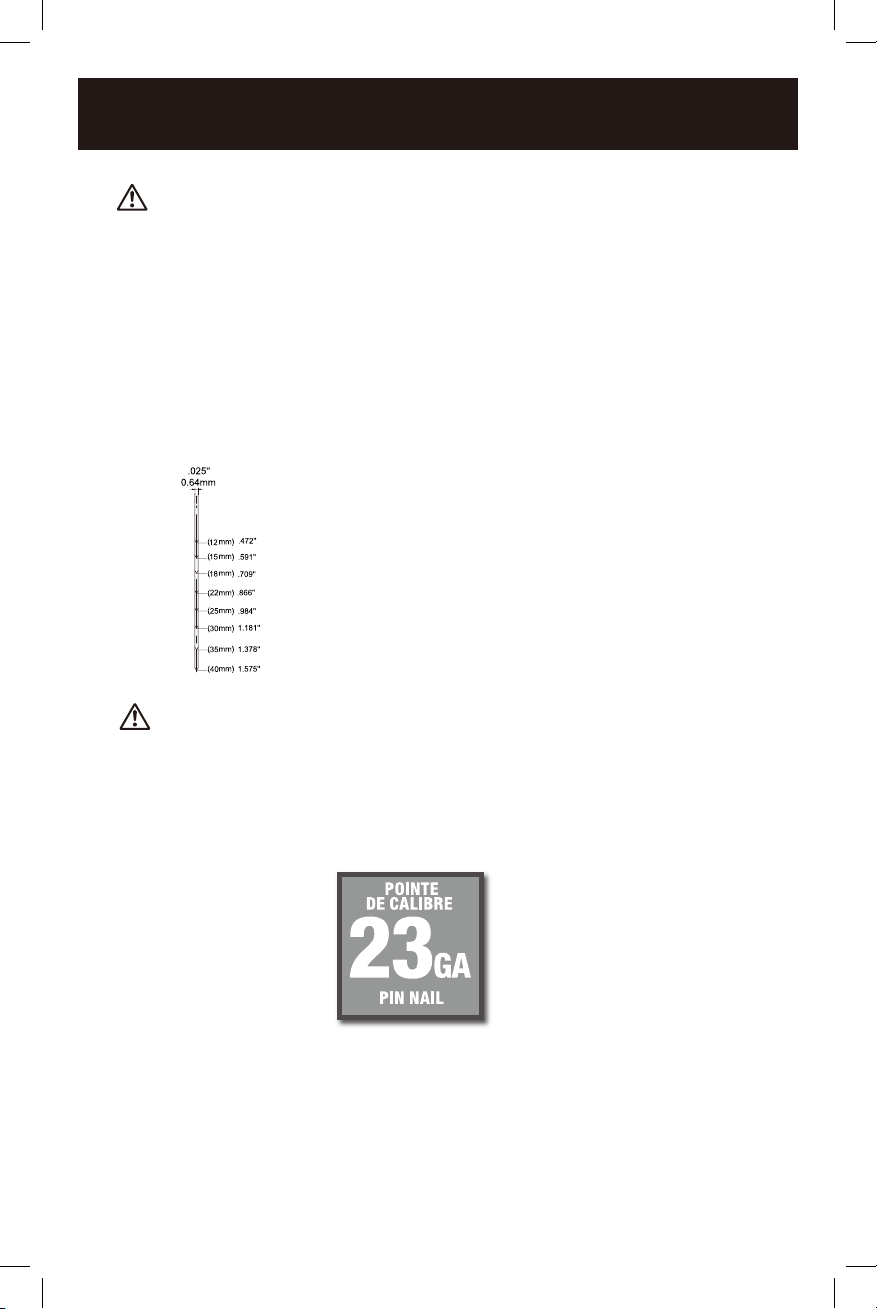
• The use of any other types of nails will cause the nailer to jam and could lead to
serious injury or loss of life.
Length: 1/2” to 1-3/8”
ACCEPTABLE NAILS
These Icons are used to select the proper nails for this specific nailer.
Note: Icons are colour coded, please refer the actual tool for the specific colour.
Nail type icons
WARNING! Potential hazard that could result in serious injury or loss of life.
• Do not use the tool if it is not in proper working order.
• Do not use oxygen or any other combustible or bottled gas to power this tool.
• Do not use this tool in the presence of any flammable liquids or gases.
• Keep hands and other parts of the body away from the firing head during use.
• Do not point the tool towards the operator or other people.
• Do not attempt to clear a jammed nail when the air hose is connected.
• Do not drive a nail on top of an existing nail. Failure to comply could lead to
serious injury or loss of life.
13
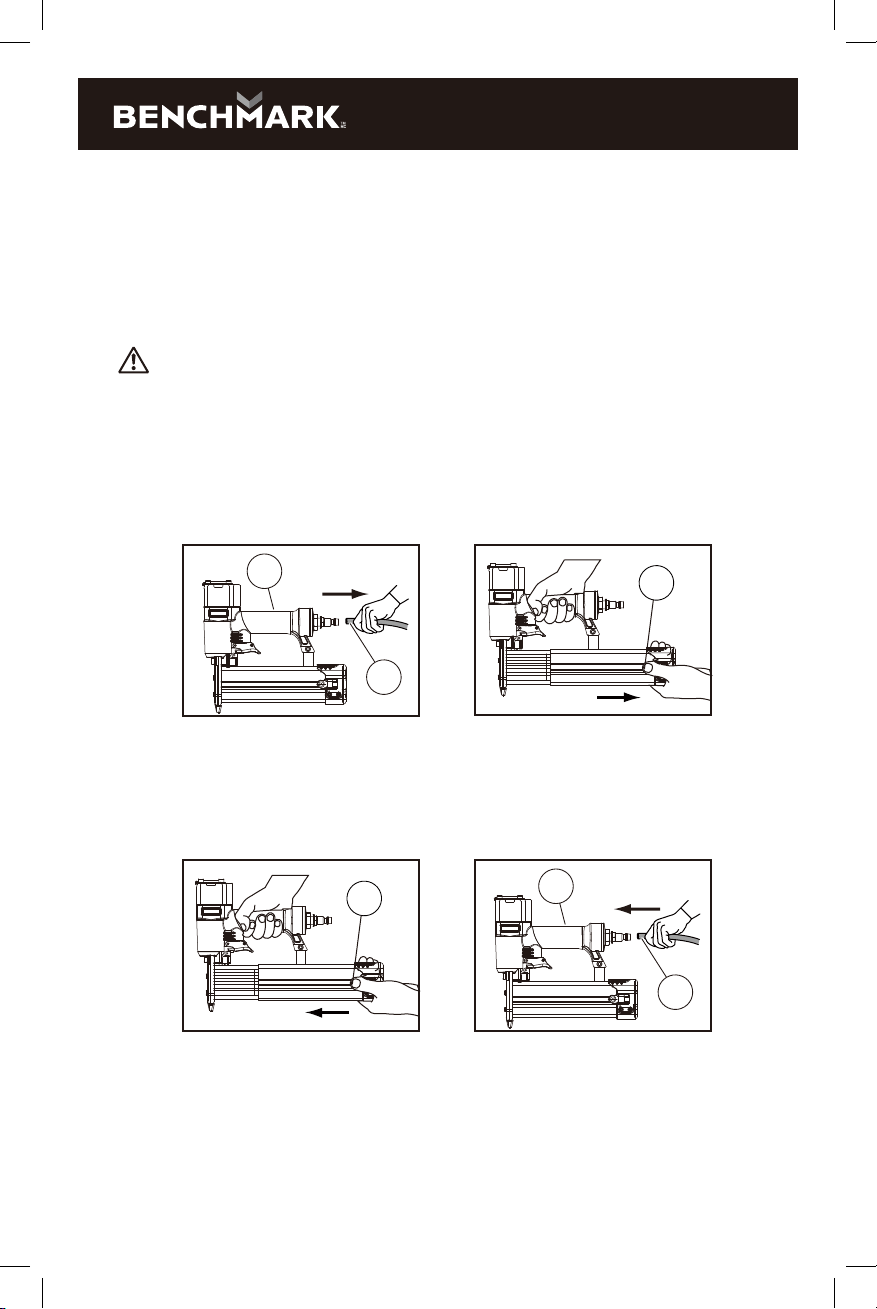
DANGER! Potential hazard that will result in serious injury or loss of life.
• Disconnect the tool from the compressed air source before loading nails.
• Do not point the tool towards the operator or other people while changing
nails.
• Do not hold the tool with the trigger pressed while changing nails. Failure
to comply will lead to serious injury or loss of life.
Disconnect the tool (1) from the air supply (2) (fig A).
Loading nails
1.
2. Take hold of the nailer firmly with one hand and use the other hand to press the
magazine latch (1) and slide it back. Insert a strip of nails into the magazine.
Ensure the points of the nails are facing down (fig C).
General use
23 Gauge Pin Nailer provides powerful firing of up to 1-3/8” pins into the hardest
hardwoods with ease. The lightweight, narrow body tool is easy to handle, making it
ideal for cabinet trim. Ideal for detailed woodworking, molding, decorative trim,
lightweight paneling, pictures frames plus arts and crafts.
fig A fig B
fig C fig D
1
2
1
2
1
1

WARNING! Potential hazard that could result in serious injury or loss of life.
The Workpiece Contact (nose of tool) must be in contact with the workpiece
before activating the tool.
Do not operate the tool if the nails are not loaded, as doing so may damage
the tool.
Do not fire nails into the air, as doing so may cause injury to the operators
or others, apart from damaging the tool.
Load the correct type of nails only. Failure to comply could lead to serious
injury or loss of life.
Slide the magazine latch (1) against the nails to close the magazine until it comes
into contact with the nails (fig C).
4.
•
•
•
•
1282 206
PNEUMATIC PIN NAILER
14
Plug in compressor, turn it on, set the pressure regulator to 90 psi, attach one
end of the air hose to the compressor and the other end of the air hose (2) to
the tool (1) (fig D).
5.
Use plumber’s tape to avoid air leak. Verify that the air pressure is in the correct
range (see section “Technical specifications”). The tool is now ready for use.
6.
Press the Workpiece Contact (1) against the workpiece (2) (fig E).1.
Pull the trigger (1) to drive the nail with the Workpiece Contact (2) firmly
pressed against the workpiece (fig F)
2.
The Pin Nailer is equipped with a single sequential actuation mode.
Firing modes
fig E fig F
2
1
2
1
CAUTION! Potential hazard that may result in moderate injury or damage to
equipment
Operate the tool with utmost care when connected with the air compressor.
Failure to comply may result in moderate injury or damage to equipment.
•
WARNING! Potential hazard that could result in serious injury or loss of life.
Disconnect the tool from the air supply line before clearing a jammed nail.
Failure to comply could cause them to be fired out of the tool causing serious
injury.
Do not point the tool towards the operator or other people. Serious personal
injury could result if these instructions are not followed.
Operate the magazine latch and slide the pusher back to open the magazine
for checking the jammed nails.
Use pliers or any appropriate tool to remove the jammed nails.
Close the magazine cover and slide the pusher to its original position.
Reload the nails into the tool magazine.
Reconnect the air supply line to the tool’s air inlet.
Test fire 3 to 5 nails into a piece of scrap wood in order to ensure a proper
operation.
•
•
•
•
•
•
•
•
15
If the Workpiece Contact (nose of tool) remains pressed, successive nails will fire
each time the trigger is pulled.
3.
Verify the compressor tank have been properly drained prior to use.
Keep tools as warm as possible using any safe, convenient method.
Place up to 6 drops of pneumatic tool oil into the tool’s air inlet.
Adjust the air pressure to 80 psi or lower.
Load the nails into the magazine ( if required).
Actuate the tool 5 to 6 times into a scrap wooden piece in order to lubricate the O-rings
Adjust the air pressure to the operating level (do not exceed 120 psi) and use the tool
normally.
Relubricate the tool, as described in the maintenance section.
Drain the compressor tank at least once per day.
•
•
•
•
•
•
•
Clearing a jammed nail
When operating any air-powered tool below freezing temperature. Do not use below
14°F(-10°C) freezing temperature.
Do not store tools in a cold weather environment to prevent frost or ice formation on
the tools operating valves and mechanisms that could cause tool failure.Store in a dry
place.
Cold weather operation

1282 206
PNEUMATIC PIN NAILER
16
DANGER!
Disconnect the tool from the air compressor before maintenance/service,
adjusting, cleaning jams, reloading, and when it is not in use. Repairs must be
performed by a qualified service technician only. Failure to comply will lead to
serious injury or loss of life.
MAINTENANCE
Lubrication: If the tool and the compressor are not equipped with an in -line
lubrication system, place up to 6 drops of pneumatic tool oil into the air inlet
before each use or after every 2 hours of continuous use, depending on the
characteristics of the workpiece and type of fasteners used.
Air-operated tools must be inspected periodically, and worn or broken parts
must be replaced to ensure that the tools are operating safely and eciently.
Inspect and replace worn or damaged O-rings, seals, etc. Tighten all screws and
caps frequently in order to help prevent personal injury.
Keep the magazine of the tool clean and free of any dirt or abrasive particles.
MAINTENANCE
REQUIRED
TOOLS OR
MATERIALS
REQUIRED
Each Use or
every 2 Hrs. Monthly As
Needed
DESCRIPTION
MAXIMUM SERVICE INTERVAL
General inspection –
free movement
Trigger, spring,
safety mechanism
In-depth inspection Worn or broken
parts
Replace worn or
broken parts
Lubrication See below Pneumatic tool
oil
None X
X X
X
X
Note: Do not store the tool anywhere temperatures will fall below freezing.
The following chart lists common issues and solutions. Please read it carefully and
follow all instructions closely.
PROBLEM POSSIBLE CAUSES SOLUTIONS
Air leakage at the
top of the tool or in
the trigger area.
Air leakage near
the bottom of the
tool.
1. O-rings in the trigger valve are
damaged.
2. The trigger valve heads are
damaged.
3. Trigger valve stem, seal, or
O-rings are damaged.
1. Inspect and replace the O-ring.
2. Inspect and replace trigger valve heads.
3. Inspect and replace the trigger valve
stem, seal, or O-ring.
Have the tool serviced by a qualified
service technician.
Air leakage
between the
bottom and the
cylinder cap.
1. The screws are loose.
2. The O-rings or the seals are
worn or damaged.
1. Tighten the screws.
2. Inspect and replace the O-rings or the
seals.
Have the tool serviced by a qualified
service technician.
The tool does not
operate properly-it
does not drive the
nails or operates
sluggishly.
The nails are being
driven too deep.
1. The bumper is worn.
2. The air pressure is too high.
3. The depth adjustment knob
is not adjusted properly.
1. Replace the bumper.
2. Adjust the air pressure.
3. Adjust the depth setting by turning the
depth adjustment knob counterclockwise
(see section “Adjusting nail depth” for
more detailed instructions).
1. The air supply is inadequate.
2. Lubrication is inadequate.
3. The O-rings or seals are worn
or damaged.
4. The exhaust deflector in the
cylinder head is blocked.
1. Verify that the air supply is adequate.
2. Pour up to 6 drops of oil into the air inlet.
3. Inspect and replace O-rings or seals.
4. Replace the damaged internal parts.
Have the tool serviced by a qualified
service technician.
The tool skips
nails.
1. The bumper is worn or the
spring is damaged.
2. There is dirt in the front plate.
3. Nails cannot move freely in the
magazine due to dirt or wear.
4. The O-ring on the piston is
worn or dry or lubrication is
insucient.
5. The cylinder cover seal Is
leaking.
1. Replace the bumper or spring.
2. Clean the drive channel on the front
plate.
3. Clean the magazine.
4. Replace the O-ring.
5. Replace the sealing washer.
Have the tool serviced by a qualified
service technician.
1. The screws are loose.
2. The O-rings or the bumper are
worn or damaged.
1. Tighten the screws.
2. Inspect and replace the O-rings or the
bumper.
Have the tool serviced by a qualified
service technician.
DANGER! Potential hazard that will result in serious injury or loss of life.
If any of the following symptoms appear while the tool is in use, turn it o and
disconnect it from the air supply immediately. Failure to comply will lead to
serious injury or loss of life.
Disconnect the tool from the air supply before making any adjustments.
Repairs must be performed by a qualified service technician only.
TROUBLESHOOTING
•
•
•
17

1282 206
PNEUMATIC PIN NAILER
18
PROBLEM POSSIBLE CAUSES SOLUTIONS
The tool jams.
Air exhaust is being
directed towards
the operator.
1. Improper nails are used, or
nails are damaged.
2. The driver guide is damaged
or worn.
3. The magazine screw is loose.
4. There is dirt in magazine.
1. Use proper nails.
(see section “Clearing a jammed nail.”)
2. Inspect and replace the driver.
3. Tighten the magazine.
4. Open and clean the magazine.
The direction of the exhaust
deflector requires adjustment.
Direct the exhaust deflector away from the
operator.
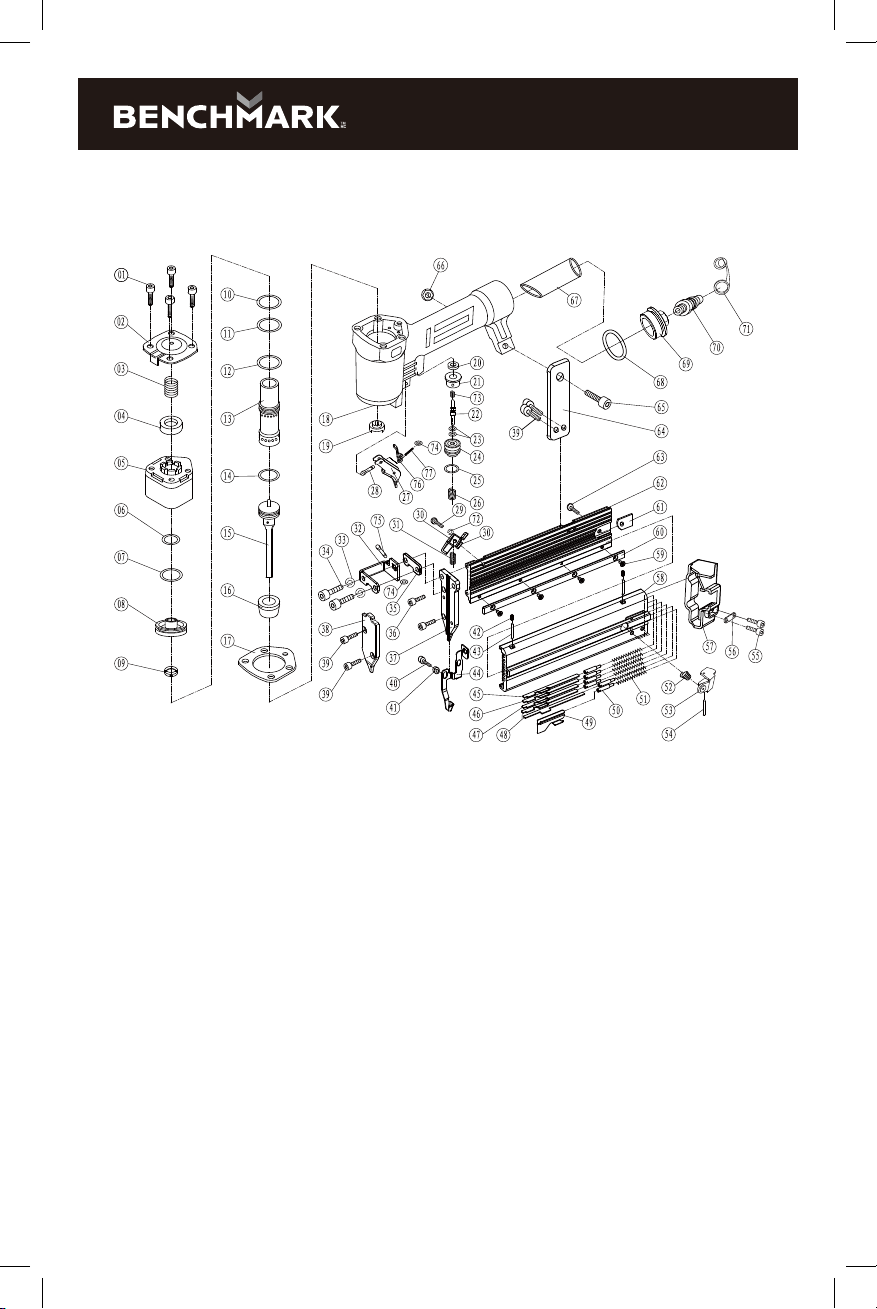
EXPLODED VIEW
19
Table of contents
Other Benchmark Nail Gun manuals


Popular Nail Gun manuals by other brands


Campbell Hausfeld
Campbell Hausfeld IN727900AV Operating instructions and parts manual

Makita
Makita AN450H instruction manual

MasterCraft
MasterCraft AIR-POWERED BRAD NAILERS operating instructions

Senco
Senco PalletPro50 operating instructions

DeWalt
DeWalt DCN680 instruction manual

Silverline
Silverline 955431 manual


