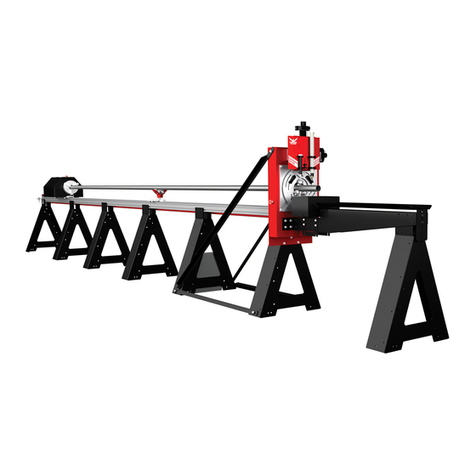
Bend-Tech Dragon A400 Operating instructions

A400
Part 1 of 2
Maintenance & Troubleshooting
Part 1: Dragon A400
Version 2 | English ©2020 Bend-Tech LLC

ii Bend-Tech Dragon A400
Maintenance & Troubleshooting
©2020 Bend-Tech LLC
All rights reserved. The information in this manual is subject to change without notice.
Bend-Tech LLC strives to produce the most complete and accurate information regarding
its products. We are constantly working to improve and advance our products to increase
performance, user satisfaction and experience. Bend-Tech LLC assumes no responsibility for
errors or omissions regarding this manual. Bend-Tech LLC assumes no liability for damages
resulting from the use of the information contained in this publication.

iiiBend-Tech Dragon A400 Maintenance & Troubleshooting
Dragon A400
Maintenance & Troubleshooting
Version 2
English
Original Instructions
March 2020
Bend-Tech, LLC
729 Prospect Ave.
Osceola, WI 54020 USA
(651) 257-8715
www.bend-tech.com

iv Bend-Tech Dragon A400
Maintenance & Troubleshooting
Covering Bend-Tech Dragon
Bend-Tech, LLC provides a limited warranty on all new Dragon machines that are
manufactured directly or under license by Bend-Tech, LLC, and sold by Bend-Tech, LLC or its
approved distributors.
Warranty Coverage
Each Bend-Tech Dragon machine is warrantied by the manufacturer against defects in material
workmanship for 12-months. The warranty period commences the date the Dragon machine is
installed at the customer’s facility.
Repair or Replacement Only
The Manufacturer’s sole liability, and the Customer’s exclusive remedy under this warranty
shall be limited to repairing or replacing the defective part. Repair or replacement of parts
is at the sole discretion of the manufacturer. The Customer is responsible for warranty parts
installation. Bend-Tech does not provide warranty service labor.
Limits
This warranty does not cover components subject to wear due to normal use of the machine
such as belts, lights, tooling etc. This warranty is void if Bend-Tech, LLC has determined any
failure is the result of mishandling, abuse, misuse, improper installation, improper storage,
Software
Dragon software is covered by a 2-year maintenance plan from the purchase date of the
Dragon A400 machine. After the 2-year maintenance plan is expired, the Customer can
purchase a maintenance plan. A maintenance plan will ensure the customer always has
the newest version of Dragon software. The maintenance plan is critical to keeping Dragon
software updated with the newest capabilities possible, and is critical to the servicing of the
machine. Bend-Tech, LLC will contact the Customer regarding updates to the maintenance
plan within 1-month of expiration. Contact Bend-Tech Support to ensure software is up to date:
Limited Warranty

vBend-Tech Dragon A400 Maintenance & Troubleshooting
Any questions or concerns regarding this manual can be directed to Bend-Tech, LLC
representatives via the Dragon website, www.bend-tech.com. Click Contact in the menu bar for
communication options and send your comments to the Dragon Customer Service department.
Online Resources
• https://www.youtube.com/user/bendtech2020
• http://www.bend-tech.com/wiki7
• http://www.bend-tech.com
• https://www.facebook.com/2020ssi
• https://www.instagram.com/bend_tech
Customer Service
Congratulations on your purchase of the world’s best CNC plasma tube and pipe cutting
machine, the Dragon A400. Bend-Tech, LLC places great pride in customer satisfaction and it
our support is a key factor in your success.
Contact Us
You can contact Bend-Tech, LLC customer service at 651-257-8715. Our support hours are
mailing address is: Bend-Tech LLC, 729 Prospect Ave., Osceola, WI 54020, U.S.A..
Customer Satisfaction Commitment

vi Bend-Tech Dragon A400
Maintenance & Troubleshooting
This manual contains important statements that are called out from the regular text with an
associated signal word: “Danger,” “Warning,” “Caution,” or “Note.” Each of these signal words
is accompanied by its own icon. These signal words and icons indicate the severity of the
condition and the warning. The machine operator should familiarize themselves with these
warnings and read the statements before operating the machine.
Denitions & Examples
Danger
Danger indicates a serious condition that could cause severe injury or death to the operator or
bystanders if the instructions are not followed.
Warning
A Warning indicates there is a possibility for minor injury if the instructions are not followed
correctly.
! Danger !
Exceeding the material weight limit of the Dragon A400 can result in serious injury
to the operator and/or bystanders.
! Warning !
Due to the extreme temperatures that result from the plasma cutting process, parts
cooled in water in the parts catcher can still be extremely hot. Always use caution
when handling newly-cut parts.
Warnings
Example
Example

viiBend-Tech Dragon A400 Maintenance & Troubleshooting
Caution
Caution warns the operator that minor injury or machine damage could occur if instructions are
being performed.
Note
! Caution !
the Dragon A400.
Water Cooling system greatly reduces smoke and vapor emitted by the machine.
Bend-Tech recommends use of the Water Cooling system whenever possible.
Example
Example

viii Bend-Tech Dragon A400
Maintenance & Troubleshooting
Glossary
Glossary
A400
Indicates machine with 400-lb weight limit.
Axis
Bend-Tech 7X
Machine design software - CAD.
BOB
Breakout Board.
Material Support Lifter
The Material Support Lifter supports
material to reduce sag.
Chuck
Located on the Trolley, the Chuck holds the material
so it can be moved forward, backward and rotated.
Control Box
Connects Dragon Software Suite to the Dragon A400.
Coolant Tray
Cools cut parts as they are produced.
Drive Belt
The X Motor uses the Drive Belt to power the
Trolley along the Rail. The Drive Belt is mounted
stationary along the length of the machine.
Drive Belt Pulley
Located on the X Motor, it works in conjunction with
the Drive Belt to power the Trolley along the Rail.
E-Stop
Emergency stop.
ESS
Ethernet Smooth Stepper (Control Board).
Ethernet
System for connecting multiple computers
via a Local Area Network.
Front Gate
The Gate supports the material at the
front of the machine. It consists of two
sets of self-centering roller jaws.
Gate Lead Screw
Controls operation and adjustment of the Gate.
Interface
Any particular screen display generated
by Bend-Tech software.
Mach3
Machine driver software.
Parts Catcher
The parts catcher is placed at the front of the
machine to catch parts as they are cut.
Rail
The Rail is the main structure of the Dragon
A400. The Trolley rides on the Rail.
Tail
The Tail is located at the opposite end of the Head
of the machine. The Tail arrives pre-assembled. The
X Axis homing sensor, Drive Belt Adjustment Block
and E-Stop are located at the Tail of the machine.
Toolhead
Operates the Marker, Engraver and Torch.
Trolley
The Trolley rides on the Rail, and carries
the Chuck forward and backward along
the length of the Rail Support Beam.

ixBend-Tech Dragon A400 Maintenance & Troubleshooting
Contents
Limited Warranty .....................iv
Customer Service.................... v
Customer Satisfaction
Commitment............................. v
Warnings ..................................vi
Glossary ..................................viii
Contents...................................ix
01
Introduction............................. 13
Introduction ...................... 13
How To Send A Support Session ...... 13
02
Gate ......................................... 15
Gate Troubleshooting............... 15
Eccentric bearing on Gate sticking .. 15
Front Gate binding .............. 15
.... 15
Loose front Gate................ 15
Gate Not Operating Smoothly. . . . . . 16
Play in Gate ................... 16
Gate Jaws not operating smoothly .. 16
Contents
03
Laser........................................ 17
Laser Troubleshooting .............. 17
Laser not lining up with end of tube . 17
Laser failure ................... 18
04
Torch & Cutting....................... 19
Diagnosing Cutting and Torch Issues... 19
Cope at both ends of the tube are
not the same rotation ............ 19
Cut quality issues ............... 20
Round holes are coming out oval ... 20
Machine cutting and then returning to
previous engraving .............. 20
material....................... 20
Jagged Cuts ................... 20
Grounding The Torch ............... 21
Torch Not Firing ................ 21
Torch Colliding With Material ...... 21
05
Engraver.................................. 23
Engraver Guide ................... 23
Setting Engraver Air Pressure ..... 23
Engraver digging into material or
marking too light ................ 23

xBend-Tech Dragon A400
Maintenance & Troubleshooting
Contents
Engraver not turning on .......... 23
Engraver Bleeder Valve .......... 24
06
Material Support Lift............... 25
Material Support Lift Guide .......... 25
Material Support Lift Settings In
Bend-Tech 7x .................. 25
Change the Support Lifter Gap..... 25
Lifter colliding with Rail ........... 26
Lifter Not Homing ............... 26
Lifter pausing at wrong time ....... 26
Lifter too high, Trolley hitting Lifter
as it travels down the Rail......... 26
Lifter bottoming out on top of housing 26
Adjusting Lifter Trigger Pause. . . . . . 26
Material Support Lift Support Retraction
Settings....................... 26
Setting Material Support Lift Actuation
and Retraction Adjustment ........ 26
Disabling the Material Support Lift .. 27
07
X Axis Motor............................ 29
X Axis Motor Troubleshooting ........ 29
X Axis Won’t Jog................ 29
X Axis Motor or Trolley Binding While
Jogging At Full Speed............ 29
X Axis Motor Skipping Steps. . . . . . . 30
Setting Rail Distance ............... 30
Adjusting Trolley Eccentric Bearings ... 30
08
Drive Belt................................. 33
Drive Belt Troubleshooting........... 33
Belt running up on lip of Drive Belt
Pulley ........................ 33
Bonding the Drive Belt Pulley ........ 34
Replacing the Drive Belt. . . . . . . . . . . . . 35
Drive Belt Replacement Procedure . 35
Checking Drive Belt Tension ......... 36
Drive Belt Tensioning Procedure ...... 37
Adjusting Belt Tension ........... 38
09
Chuck ...................................... 39
Chuck Troubleshooting ............. 39
Chuck skipping steps ............ 39
Chuck not level in load position .... 39
Removing and Cleaning Chuck Jaws .. 40
Removing The Chuck............... 40
Cleaning The Chuck................ 40
10
Control Box............................. 41
Control Box ...................... 41
Replacing a Motor Driver ......... 41
Replacing the Control Box Power
Switch ........................ 42
Replacing the Smoothstepper ..... 42
Replacing Control Box Fuses ...... 43

xiBend-Tech Dragon A400 Maintenance & Troubleshooting
Contents
Reseating the Breakout Board ..... 43
Replacing the Control Box ........ 43
11
ESS Connections ................... 47
Troubleshooting the ESS Connections . 47
ESS Failure To Connect .......... 47
Connection Lost While Machine Is
Running ...................... 48
12
Sensors ................................... 49
Sensor Overview .................. 49
Diagnosing Sensor Issues ........ 49
Setting a Sensor. . . . . . . . . . . . . . . . . . . 49
Inspecting Sensor Cables ........... 50
Checking a Sensor................. 50
A and Z sensors ................... 50
13
Miscellaneous......................... 51
Ethernet Connections. . . . . . . . . . . . . . . 51
Rail Alignment .................... 53
Poor cutting accuracy and/or quality 53
Drive Belt riding up on edges of Drive
Belt Pulley..................... 53
Checking Rail Beam For Straightness/
Level ......................... 53
Trueing the Dragon A400 Rail Beam 53
Rail Splices.................... 54

xii Bend-Tech Dragon A400
Maintenance & Troubleshooting
Contents

13Bend-Tech Dragon A400 Maintenance & Troubleshooting
Introduction
01
01
Introduction
Introduction
The Dragon A400 Maintenance & Troubleshooting guide contains information intended
to assist the Operator in maintaining proper operation of the machine as well as solving
operational issues that may arise during regular use. This guide addresses typical operations
and procedures to resolve them. Should the User encounter an issue or situation that cannot
be resolved using this guide, or that goes beyond the scope of this guide, please contact
How To Send A Support Session
Properly setting up a Support Session with a Bend-Tech Service Technician can be key
to keeping the Dragon A400 up and running. Bend-Tech knows keeping the Dragon A400
performing optimally is critical to our customers’ bottom line. We are more than happy to help,
possible. Many times, if the right information is given, a Service Tech can have a solution ready
before we even pick up the phone.
1.
sending a Support Session, then keep the project open after submitting.
2. In the Bend-Tech Dragon Home interface, click the Help tab, then click Support Session.
3. Fill in Name, E-mail, Phone, and if you know a Service Tech or have had help with this

14 Bend-Tech Dragon A400
Maintenance & Troubleshooting
Introduction
01
4. Give a detailed description of the issue in the Description of Problem text box. The more
information given the better our Service Techs can help.
5.
Click Submit.

15Bend-Tech Dragon A400 Maintenance & Troubleshooting
Gate
02
02
Gate
Gate Troubleshooting
The majority of Gate issues are the result of a dirty Gate. It is important to clean the Gate on a
regular basis to keep it working smoothly and properly.
with older machines who are having this issue should contact Bend-Tech regarding updating
the Gate Lead Screws. Original design Gate Lead Screws have right-hand threads that place
too much pressure on the lead screw clip. Updated Gate Lead Screws are designed with left-
hand threads that hold pressure via the the block and threads rather than the retaining clip.
Symptom Cause Corrective Action
Eccentric bearing on
Gate sticking Bearings dirty. Clean the bearings with compressed
air and/or brake cleaner.
Front Gate binding
Dirty bearings or dirty bearing
rotation plate.
Clean Gate using brake cleaner and/
or compressed air.
Eccentric bearing out of
adjustment.
Remove Gate and adjust eccentric
bearing on Bearing Rotation Plate/
Gate Ring Gear.
C drive motor backlash out of
adjustment.
Perform visual check of C Motor and
drive gear. If play is observed loosen
C Motor mount bracket and adjust so
gear meshes smoothly around the
circumference of the Gate Ring Gear.
screw
Obsolete Gate lead screw
design.
Contact Bend-Tech Service for an
updated Lead Screw design.
Loose front Gate Eccentric bearing has come out
of adjustment.
Remove Gate and adjust eccentric
bearing to eliminate play in Gate jaws.

16 Bend-Tech Dragon A400
Maintenance & Troubleshooting
Gate
02
Symptom Cause Corrective Action
Gate Not Operating
Smoothly
Gate dirty
Clean Gate with compressed air
and/or brake cleaner. If the Gate is
extremely dirty use a rag or toothbrush
to help clean it.
Eccentric bearing out of
adjustment
Remove Gate from machine and
adjust eccentric bearing so there is no
play and the Gate spins smoothly.
Play in Gate Eccentric bearing out of
adjustment
Remove Gate from machine and
adjust eccentric bearing so there is no
play and the Gate spins smoothly.
Gate Jaws not
operating smoothly
Dirty Lead Screws
Clean Gate Lead Screws, with brake
cleaner and/or compressed air. Re-
lubricate.
Dirty Gate Jaw rack Clean Gate Jaw Rack with brake
cleaner and/or compressed air.
Rack out of adjustment Remove the Gate and adjust Gate
jaws using the eccentric bearing.
Rack eccentric bearings dirty Clean the bearings with brake cleaner
and/or compressed air.
The Gate is exposed to Torch slag, cutting fumes and, if equipped with a Cooling
System, moisture. It is important to keep the Gate clean.

17Bend-Tech Dragon A400 Maintenance & Troubleshooting
Laser
03
03
Laser
Laser Troubleshooting
Symptom Cause Corrective Action
Laser not lining up with
end of tube
Material length set wrong
in software.
Check material length on machine,
verify length is correct in software
project settings.
Chuck grip set wrong in
software.
Verify the Chuck grip setting is correct
in Dragon CAM > Tube Library >
Machine > Chuck Grip. Click the
question mark to see examples of
Chuck grip settings.
Machine not homed/
calibrated correctly.
From the Bend-Tech Dragon home
interface click Machine Control, then
click Home All Axis to home the
Dragon A400. If it is determined the
machine needs to be calibrated, the
Operator can perform a full calibration
by clicking into Machine Library, and
in the Main interface click the Wizard
icon.

18 Bend-Tech Dragon A400
Maintenance & Troubleshooting
Laser
03
Symptom Cause Corrective Action
Laser failure
Laser burned out. Replace laser.
Cable or plug issue. Inspect cables, inspect plugs, replace
if damaged.
The Laser is a consumable. If the Laser quits working it may have reached the end of
its service life. Contact Bend-Tech to order a new Laser.

19Bend-Tech Dragon A400 Maintenance & Troubleshooting
Torch
04
04
Torch & Cutting
Diagnosing Cutting and Torch Issues
Symptom Cause Corrective Action
Cope at both ends of the
tube are not the same
rotation
Material not properly
secured in the Chuck.
Ensure material is tight in Chuck. If
using spacers for the material ensure
the measurements are correct.
Settings in Nesting Project
not correct. Check the part in Edit Flat.
Y Motor Backlash
incorrect.
Remove Trolley Cover and observe
backlash on Y Motor. If incorrect adjust
on machine. Perform a Backlash
Test in Machine Library > Mechanical
Settings.
Y Motor loose/Drive Gear
loose.
Remove Trolley Cover and perform
visual and physical check of Y Motor
and Y Motor Drive Gear.
Y Motor skipping steps.
Check Ethernet connectivity. Check
to ensure Breakout Board is seated
in Motor Drivers properly. Ensure
consistent power to machine.

20 Bend-Tech Dragon A400
Maintenance & Troubleshooting
Torch
04
Symptom Cause Corrective Action
Cut quality issues
Torch consumables worn
out.
Inspect Torch consumables, measure
pit depth of electrode.
Incorrect Torch height
settings.
Check settings in software and Torch
height on machine.
Incorrect cutting speed.
Ensure cutting speed is correct in
regard to amperage and material
thickness.
Incorrect cutting
amperage.
Ensure consumables match the
amperage settings on the machine.
Set cut speed appropriately.
Round holes are coming
out oval
Cutting speed. Adjust material feed rate.
Material loose in Chuck. Ensure material is secure in Chuck.
Gate too tight or too loose. Ensure material moves freely in Gate
with no play.
Backlash.
Perform a Backlash Test in Machine
Library > Mechanical Settings.
Remove the Trolley cover and perform
a visual inspection of backlash.
Ensure all motors are tight.
Machine cutting and then
returning to previous
engraving
Order of actions incorrect
in software settings.
Change order of actions
Machine Library > Basic > Default
Process Order.
rectangular material
Gate out of position.
Check homing sensors, check X
backlash, re-home, load material with
Gate in home position and perform
X Axis backlash out of
spec.
Remove Trolley Cover and observe
backlash on X Motor. If incorrect
adjust on machine. Perform a
Backlash Test in Machine Library >
Mechanical Settings.
Machine not homed
properly.
In the Machine Control interface click
Home All Axis.
Jagged Cuts
Material feed rate too high.
Ensure consumables match the
amperage settings on the machine.
Set cut speed appropriately.
Loose set screws on X or
Y Axis.
Remove Trolley cover and perform
inspection of X and Y Axis.
Gate too tight on material. Ensure material moves freely in Gate
with no play.
Other manuals for Dragon A400
14
Table of contents
Other Bend-Tech Control System manuals
Popular Control System manuals by other brands
OBSIDIAN CONTROL SYSTEMS
OBSIDIAN CONTROL SYSTEMS NX DMX installation guide
Stagnoli
Stagnoli H230 manual
Norac
Norac UC4 Total Control installation manual
Redmond
Redmond SkyCenter RSC-12S-A user manual
Deif
Deif DELOMATIC 4 Series Replacement instructions
Barrier Systems
Barrier Systems X-TENSION Installation and maintenance manual
Weishaupt
Weishaupt WCM-FS 2.0 Installation and operating instruction
Paso
Paso PM2021-V Instructions for use
Varifan
Varifan DIP-1/115 Installation & user guide
Union Instruments
Union Instruments CWD2005 SPC OPERATING INSTRUCTIONS AND SAFETY NOTES

Uponor
Uponor A3800165 instruction sheet
Centroid
Centroid Acorn CNC installation manual
