BENDIX AD-IP INTEGRAL PURGE AIR DRYER User manual

1
SD-08-2414
Bendix®AD-IP™Integral Purge Air Dryer
DESCRIPTION
ThefunctionoftheBendix®AD-IP™integralpurgeairdryer
is to collect and remove air system contaminants in solid,
liquidandvaporformbeforetheyenterthe brake system. It
providesclean,dryairtothecomponentsofthebrakesystem
which increases the life of the system and reduces
maintenancecosts. Daily manual draining ofthereservoirs
is eliminated.
The AD-IP™air dryer consists of a desiccant cartridge
secured to a die cast aluminum end cover with a single,
centralbolt.Theendcovercontainsacheck valveassembly,
safety valve, heater and thermostat assembly, three pipe
thread air connections and the purge valve assembly.The
removablepurgevalveassemblyincorporatesthepurgevalve
mechanismandaturbochargercutofffeaturethatisdesigned
to prevent loss of engine “turbo” boost pressure during the
purgecycleoftheAD-IP™airdryer.Foreaseofserviceability,
allreplaceableassembliescanbereplaced withoutremoval
of the air dryer from its mounting on the vehicle.
FIGURE 1 - AD-IP™INTEGRAL PURGE AIR DRYER
HEATER &
THERMOSTAT
CONNECTOR
DESICCANT
CARTRIDGE SADDLE
MOUNTING
BRACKET
CONTROL
PORT
LOWER
MOUNTING
BRACKET
SUPPLY
PORT
SAFETY VALVE
HEATER & THERMOSTAT
CONNECTOR
SUPPLY
PORT
MOUNTING
STRAP
The AD-IP™air dryer has three female pipe thread air
connectionsidentified as follows:
Air Connection Port ID Function/Connection
CON 4...................... ControlPort(purgevalve control
&turbo cutoff).
SUP 11 .................... Supply Port (air in).
DEL 2 ...................... DeliveryPort (air out).
SAFETY
VALVE
CONTROL
PORT

2
OPERATION
GENERAL
The AD-IP™air dryer alternates between two operational
modes or “cycles” during operation: the Charge Cycle and
the Purge Cycle. The following description of operation is
separatedintothese “cycles” of operation.
CHARGE CYCLE (refer to Figure 4)
When the compressor is loaded (compressing air)
compressed air, along with oil, oil vapor, water and water
vapor flows through the compressor discharge line to the
supply port of the air dryer body.
Asair travels through the end cover assembly,its direction
of flow changes several times, reducing the temperature,
causingcontaminants to condense and drop to the bottom
orsump of the air dryer end cover.
After exiting the end cover, the air flows into the desiccant
cartridge. Once in the desiccant cartridge air first flows
throughanoilseparatorlocatedbetween theouterandinner
shellsofthe cartridge.Theseparatorremoveswater inliquid
form as well as liquid oil and solid contaminants.
FEEDBACK
LINE
SPECIAL DISCHARGE
PORT FTG. W/
FEEDBACK LINE
CONNECTION CHECK
VALVE
DISCHARGE
PORT
SPECIAL DISCHARGE
PORT FTG. W/
FEEDBACK LINE
CONNECTION END COVER
BOTTOM VIEW
LOWER
MTG. BRKT.
(PARTIAL) FEEDBACK
LINE
DISCHARGE LINE
HOLSET COMPRESSOR
SUPPLY
RES.
FIGURE A
HOLSET TYPE E & QE COMPRESSORS - NO AIR DRYER
FIGUREC
AD-IP™DI DROP IN AIR DRYER AND
HOLSET TYPE E & QE COMPRESSORS
AD-IP™DI DROP IN AIR
DRYER W/FEEDBACK
LINE & CHECK VALVE SUPPLY
RES.
HOLSET
COMPRESSOR
FIGUREB
STANDARD AD-IP™AIR DRYER AND
HOLSET TYPE E & QE COMPRESSORS
FEEDBACK LINE
W/CHECK VALVE
SUPPLY
RES.
STANDARD AD-IP™AIR
DRYER
AD-IP™DI “DROP IN” AIR DRYER MODEL
In addition to the standard AD-IP™air dryer, the Bendix®
AD-IP™DI(DropIn)airdryerisalsooffered.Itisaspecialized
version designed especially for air systems that use either
theHolset (Cummins)TypeE or QE air compressor.These
Holset compressors utilize an unusual unloading system
that requires that air pressure remain in the discharge line
during the entire unloaded cycle of the compressor. To
accomplishthis, Holset compressors rely on air“feedback”
from the supply reservoir as shown in Figure 3B. When an
air dryer is installed the direct “feedback” from the supply
reservoirisinterruptedandanalternatesourcefor“feedback”
pressuremust beprovided.AstandardAD-IP™airdryer can
beinstalled,howeveraseparate“feedback”linewithasingle
check must be installed as shown in Figure 3C.
The AD-IP™DI drop in air dryer model incorporates the
feedback line and single check as an integral part of the
dryerandeliminatestheneedforthesecomponentsasshown
in Figures 2 & 3C.
FIGURE 2 - AD-IP™DI DROP IN AIR DRYER FOR HOLSET
COMPRESSORS FIGURE 3 - AD-IP™AIR DRYER AND HOLSET TYPE E & QE
COMPRESSORS
HOLSET
COMPRESSOR

3
FIGURE 4 - AD-IP™INTEGRAL PURGE AIR DRYER CHARGE CYCLE
Air, along with the remaining water vapor, is further cooled
as it exits the oil separator and continues to flow upward
between the outer and inner shells. Upon reaching the top
ofthecartridgetheairreversesitsdirectionofflowandenters
thedesiccantdryingbed.Airflowingdownthroughthecolumn
of desiccant becomes progressively drier as water vapor
adheres to the desiccant material in a process known as
“ADSORPTION.” The desiccant cartridge using the
adsorptionprocesstypicallyremovesmostofthewatervapor
fromthe pressurized air.
Dryair exits the bottomofthe desiccant cartridge andflows
throughthe centerof the boltused tosecurethe cartridgeto
the end cover. Air flows down the center of the desiccant
cartridgebolt, through acrossdrilled passage and exitsthe
airdryerdeliveryportthrough thedeliverycheckvalve. Note:
theearly end cover designsincorporateda vertical delivery
checkvalvewhilethenewerversionshaveahorizontalcheck
valve. Both have the same function, but the components
arenot interchangeable. See Figure 7.
Dryair flowing throughthecenter of the desiccantcartridge
boltalso flowsoutthe crossdrilledpurge orificeandinto the
purgevolume.
The air dryer will remain in the charge cycle until the air
brakesystempressurebuildstothegovernorcutout setting.
PURGE CYCLE (refer to Figure 5)
Asair brake system pressure reaches the cutout settingof
the governor, the governor unloads the compressor (air
compressionisstopped)and thepurge cycleofthe airdryer
begins. When the governor unloads the compressor, it
pressurizes the compressor unloader mechanism and the
lineconnecting thegovernorunloader porttotheAD-IP™air
dryer end cover control port. The purge piston moves in
responseto airpressurecausing the purgevalveto open to
the atmosphere and the turbo cutoff valve to close off the
supply of air from the compressor (this will be further
discussed in the Turbo Cutoff Feature section). Water and
contaminants in the end cover sump are expelled
immediately when the purge valve opens. Also, air which
wasflowingthroughthedesiccantcartridgechangesdirection
and begins to flow toward the open purge valve. Liquid oil
and solid contaminants collected by the oil separator are
removed by air flowing from the purge volume through the
desiccantdrying bed to the openpurgevalve.
Theinitialpurgeanddesiccantcartridgedecompressionlasts
onlya few seconds and is evidenced by an audibleburstof
airat theAD-IP™airdryer exhaust. Nopurgingof airshould
occurafter 30 seconds.
DESICCANT
BED
DELIVERY
CHECK VALVE
(OLD STYLE
SHOWN)
PURGE
VOLUME
DISCHARGE
PORT
EXHAUST
PURGE
VALVE
TURBO
CUTOFF
VALVE
ENGINE
TURBO
COMPRESSOR
GOVERNOR
PURGE
CONTROL
LINE
CONTROL
PORT
SUPPLY
PORT
OIL
SEPARATOR
PURGE
ORIFICE

4
FIGURE 5 - AD-IP™INTEGRAL PURGE AIR DRYER PURGE CYCLE
The actual reactivation of the desiccant drying bed begins
as dry air flows from the purge volume through the purge
orificeinthe desiccantcartridgebolt, thenthroughthecenter
of the bolt and into the desiccant bed. Pressurized air from
thepurge volume expands after passing throughthepurge
orifice; its pressure is lowered and its volume increased.
The flow of dry air through the drying bed reactivates the
desiccantmaterial byremovingthe watervaporadhering to
it. Generally 30 seconds are required for the entire purge
volume of a standardAD-IP™air dryer to flow through the
desiccantdryingbed.
Thedelivery check valveassembly prevents airpressurein
the brake system from returning to the air dryer during the
purge cycle. After the 30 second purge cycle is complete
thedesiccant has beenreactivated or dried.Theair dryer is
readyfor thenext chargecycleto begin.However thepurge
valve will remain open and will not close until air brake
system pressure is reduced and the governor signals the
compressor to charge the system.
TURBO CUTOFF FEATURE (Refer to Figure 6)
The primary function of the turbo cutoff valve is to prevent
lossofengineturbochargerairpressure throughtheAD-IP™
air dryer in systems where the compressor intake is
FIGURE 6 - AD-IP™INTEGRAL PURGE AIR DRYER TURBO
CUTOFF
DESICCANT
BED
PURGE
VOLUME
DISCHARGE
PORT
EXHAUST
PURGE
VALVE
TURBO
CUTOFF
VALVE
ENGINE
TURBO
COMPRESSOR
GOVERNOR
PURGE
CONTROL
LINE
CONTROL
PORT
SUPPLY
PORT
OIL
SEPARATOR
PURGE
ORIFICE
SUPPLY
PORT
TURBO
CUTOFF
VALVE
CONTROL
PORT
PURGE
VOLUME
PURGE
VALVE
DELIVERY
CHECK VALVE
(OLD STYLE
SHOWN)

5
CARTRIDGE
BOLT
PURGE
VOLUME
DELIVERY
PORT
CHECK
VALVE
(BLACK)
PURGE
VALVE
TURBO
CUTOFF
VALVE
SUPPLY
PORT
CONTROL
PORT
OIL
SEPARATOR
FIGURE 7 - AD-IP™AIR DRYER SECTIONAL VIEW
DESICCANT
BED
PURGE
ORIFICE
DESICCANT
CARTRIDGE
Every 900 operating hours, or 25,000 miles or three (3)
months:
1. Check for moisture in the air brake system by opening
reservoirs,drain cocks,ordrain valvesandchecking for
presenceofwater. If moisture is present, the desiccant
cartridgemayrequirereplacement;however,thefollowing
conditions can also cause water accumulation and
shouldbe considered before replacing the desiccant:
A. An outside air source has been used to charge the
system. This air does not pass through the drying
bed.
B. Airusageisexceptionallyhighandnotnormalfora
highwayvehicle.
Thismay be duetoaccessory air demands orsome
unusualairrequirementthatdoes notallow thecom-
pressor to load and unload (compressing and
non-compressingcycle) in a normal fashion.Check
for high air system leakage. If the vehicle vocation
has changed it may be necessary to upgrade the
compressor size. Refer toAppendixA, TableAand
the column entitled Vehicle Vocation.
C. The air dryer has been installed in a system that
has been previously used without an air dryer. The
system will be saturated with moisture and several
weeks of operation may be required to dry it out.
connectedtothe engineturbocharger.Theturbocutoffvalve
alsoremoves the“puffing” ofairout theopen purgeexhaust
when a naturally aspirated, single cylinder compressor,
equipped with an inlet check valve, is in use.
At the onset of the purge cycle, the downward travel of the
purgepistonisstoppedwhenthe turbocutoff valve(tapered
portion of purge piston) contacts its mating metal seat in
thepurge valve housing. With the turbo cutoffvalveseated
(closed position), air in the compressor discharge line and
AD-IP™airdryer inlet port cannot enter the air dryer. In this
manner the turbo cutoff effectively maintains turbocharger
boostpressuretotheengine.
PREVENTIVE MAINTENANCE
Important: Review the warranty policy before performing
anyintrusivemaintenanceprocedures.Anextendedwarranty
maybe voided ifintrusive maintenance isperformedduring
thisperiod. Note: Itisacceptableforthepurgevalvetobe
maintained as necessary, i.e., the installation of a purge
valvemaintenance kit, without voiding thewarranty.
Becausenotwo vehiclesoperate underidentical conditions,
maintenanceandmaintenanceintervalswillvary.Experience
is a valuable guide in determining the best maintenance
intervalfor anyoneparticular operation.
NewStyleEnd Cover -HorizontalDeliveryCheck Valve
SPRING
O-RING
PIPE PLUG
CARTRIDGE
BOLT
DELIVERY
PORT
OldStyleEnd Cover -Vertical Delivery CheckValve
CHECK VALVE
(WHITE)

6
D. Location of the air dryer is too close to the air com-
pressor. Refer to “Locating AD-IP™Air Dryer On
Vehicle” section andAppendixA,TableA, column 2
fordischarge line length.
E. Inareaswhere morethan a30degree rangeoftem-
peratureoccursinoneday, small amountsofwater
cantemporarilyaccumulate in the air brake system
due to condensation. Under these conditions, the
presence of small amounts of moisture is normal
and should not be considered as an indication that
thedryer is not preforming properly.
OPERATION & LEAKAGE TESTS
1. Install a pressure gauge in the #1 reservoir. Check all
lines and fittings leading to and from the air dryer for
leakageand integrity. Testthedelivery port checkvalve
assembly by building the air system to governor cutout
andobservingatestairgaugeinstalledinthe#1reservoir.
Notethepressureontheairgaugeaftergovernorcutout
pressure is reached, a rapid loss of pressure could
indicate a failed delivery port check valve. This can be
confirmed by shutting the engine off, draining system
pressure to a point below governor cutin (usually not
less than 95 psi), draining residual air pressure in the
compressordischarge line. Remove the discharge line
at the supply port of the dryer, and use soapy water to
determine if air is flowing out of the supply port. Make
sure there is no air pressure at the control port, by
removing the line from the control port to the governor
UNLport. The reservoir needs to have a least50PSIG
forthis test. If a 1” bubble forms within one second, the
delivery check valve should be repaired. Remove the
testgauge before returning the vehicle to service.
AD-IP™AIR
DRYER END
COVER
LOCKING LATCH
(MUST BE INSERTED UNTIL IT
SNAPS OVER THE MATING
CONNECTOR ON AD-IP™AIR DRYER
TOP VIEW
SIDE VIEW
FIGURE 8 - AD-IP™AIR DRYER HEATER AND
THERMOSTAT CONNECTOR
A two lead wire harness with attached weather resistant connector is
suppliedwithallreplacementandretrofitAD-IP™airdryers. Oneofthe
twoleads isconnected tothe engine“kill switch”or ignition while the
othermustbeconnected toagood vehicleground. Afuse is installed
in the lead carrying vehicle power; install a 10 amp fuse for 12 volt
heatersand a5 amp fuse for the24 voltheater.
Use14 AWGwire if itis necessary tolengthen the wire harness leads.
Make certain all splices are weatherproofed. Tie wrap or support all
electrical wires leading to the AD-IP™air dryer.
WEATHERPROOF
ACCORDIAN
SEAL
HEATER &
THERMOSTAT
CONNECTOR
Note: A small amount of oil in the system is normal and
should not be considered as a reason to replace the
desiccant cartridge; oil stained desiccant can function
adequately.
2. Visually check for physical damage to the AD-IP™air
dryer such as chaffed or broken air and electrical lines
and broken or missing parts.
3. Check mounting bolts for tightness. Re-torque to
270-385 in.lbs.
4. Perform the Operation & Leakage Tests listed in this
publication.
WARNING!
This air dryer is intended to remove moisture and other
contaminants normally found in the air brake system.
Do not inject alcohol, anti-freeze, or other de-icing
substances into or upstream of the air dryer. Alcohol
is removed by the dryer, but reduces the effectiveness
of the device to dry air. Use of other substances can
damage the air dryer and may void the warranty.
2. Check for excessive leakage around the purge valve.
Withthe compressorinloaded mode(compressingair),
apply a soap solution to the purge valve exhaust port
and observe that leakage does not exceed a 1” bubble
in 1 second. If the leakage exceeds the maximum
specified,repair the purgevalveassembly.
3. Closeallreservoirdraincocks. Buildupsystempressure
togovernorcutoutand notethatAD-IP™airdryerpurges
with an audible escape of air. “Fan” the service brakes
to reduce system air pressure to governor cut-in. Note
thatthe system once againbuildsto full pressure andis
followedby anAD-IP™air dryer purge.
4. Check the operation of the end cover heater and
thermostat assembly during cold weather operation as
follows:

7
109498 .............................................. CARTRIDGEBOLTKIT
Containsareplacementdesiccant cartridgebolt andrelated
o-rings.
5003547 ............. PURGEVALVEHOUSINGMAINTENANCEKIT
This kit contains the parts necessary to rebuild the purge
valvehousing.
800404 ............................. PURGEVALVEREPLACEMENTKIT
This kit contains the parts necessary to replace the purge
valve.
5018313 ............................PURGEVALVEMAINTENANCEKIT
This kit contains the parts necessary to replace and
relubricatethepurgevalve quad-ringand o-rings.
065626 .... SERVICE NEW PURGE VALVE HOUSING ASSEMBLY
Containsa service new assembly and related components
toaccomplish replacement.
109494 .............. DELIVERYCHECKVALVE MAINTENANCE KIT
Thiskit contains thepartsnecessary to replacethedelivery
portcheck valve.
109495 ............................. 12V HEATER&THERMOSTATKIT
109496 ............................. 24V HEATER&THERMOSTATKIT
Each contains a replacement heater and thermostat
assemblyandrelatedcomponentsrequiredforreplacement.
GENERAL SAFETY GUIDELINES
WARNING! PLEASE READ AND FOLLOW
THESE INSTRUCTIONS TO AVOID
PERSONAL INJURYOR DEATH:
When working on or around a vehicle, the following
general precautions should be observed at all times.
1. Park the vehicle on a level surface, apply the
parking brakes, and always block the wheels.
Always wear safety glasses.
2. Stop the engine and remove ignition key when
working under or around the vehicle. When
working in the engine compartment, the engine
should be shut off and the ignition key should be
removed. Where circumstances require that the
engine be in operation, EXTREME CAUTION should
be used to prevent personal injury resulting from
contact with moving, rotating, leaking, heated or
electrically charged components.
3. Do not attempt to install, remove, disassemble or
assemble a component until you have read and
thoroughly understand the recommended
procedures. Use only the proper tools and observe
all precautions pertaining to use of those tools.
4. If the work is being performed on the vehicle’s air
brake system, or any auxiliary pressurized air
systems, make certain to drain the air pressure from
A. Electric Power to the Dryer
Withthe ignition or enginekillswitch in the ON posi-
tion,checkforvoltage to the heater and thermostat
assemblyusing a voltmeter or test light. Unplug the
electrical connector at the air dryer and place the
test leads on each of the pins of the connector with
the locking latch. If there is no voltage, look for a
blownfuse, broken wires,orcorrosion in thevehicle
wiring harness. Check to see if a good ground path
exists.
B. ThermostatandHeaterOperation
Note:Thesetestsarenotrequiredexceptincoldweather
operation.
Turn off the ignition switch and cool the thermostat
and heater assembly to below 35 degrees Fahren-
heit. Using an ohmmeter, check the resistance
between the electrical pins in the air dryer connec-
tor half. The resistance should be 1.5 to 3.0 ohms
forthe12 volt heater assembly and 6.0 to 9.0 ohms
forthe24 volt heater assembly.
Warm the thermostat and heater assembly to over
90 degrees Fahrenheit and again check the resis-
tance.The resistance should exceed 1000 ohms. If
theresistance values obtained are withinthestated
limits, the thermostat and heater assembly is oper-
atingproperly. If the resistancevaluesobtainedare
outsidethestated limits,replace theheater andther-
mostat assembly.
REBUILDING THE AD-IP™AIR DRYER
GENERAL
If,after completing the routineoperationand leakage tests,
ithas been determinedthatone or morecomponents of the
airdryer requires replacement or maintenance, refer to the
followinglisttofindtheappropriatekit(s).
When rebuilding or replacing components of the air dryer
use only genuine Bendix®parts. For ease in servicing, the
AD-IP™air dryer has been designed so that any of the
followingmaintenancekitscanbeinstalledwithoutremoving
theair dryer from the vehicle.
MAINTENANCE KITSAVAILABLE:
065624 ...............SERVICE NEW DESICCANT CARTRIDGE KIT
This kit contains the parts necessary to change the
desiccant cartridge only.
109493 ........REMANUFACTUREDDESICCANTCARTRIDGEKIT
This kit contains the parts necessary to change the
desiccant cartridge only.
5001247 ....................................... MOUNTINGBRACKETKIT
This kit contains the upper and lower brackets as well as
the necessary hardware items to mount them.

8
all reservoirs before beginning ANY work on the
vehicle. If the vehicle is equipped with an AD-IS®
airdryer system or a dryer reservoir module, be sure
to drain the purge reservoir.
5. Followingthe vehicle manufacturer’s recommended
procedures, deactivate the electrical system in a
manner that safely removes all electrical power from
the vehicle.
6. Never exceed manufacturer’s recommended
pressures.
7. Never connect or disconnect a hose or line
containing pressure; it may whip. Never remove a
component or plug unless you are certain all system
pressure has been depleted.
8. Use only genuine Bendix®replacement parts,
components and kits. Replacement hardware,
tubing,hose, fittings, etc. must be of equivalent size,
type and strength as original equipment and be
designed specifically for such applications and
systems.
9. Components with strippedthreads ordamaged parts
should be replaced rather than repaired. Do not
attempt repairs requiring machining or welding
unless specifically stated and approved by the
vehicle and component manufacturer.
10.Priorto returning thevehicle to service, make certain
all components and systems are restored to their
proper operating condition.
11.For vehicles with Antilock Traction Control (ATC),
the ATC function must be disabled (ATC indicator
lamp should be ON) prior to performing any vehicle
maintenance where one or more wheels on a drive
axle are lifted off the ground and moving.
AD-IP™AIR DRYER REMOVAL
This air dryer removal process is presented in the event it
becomes necessaryto replace theentire airdryer. Normal
service and parts replacement does not require
removal of the air dryer from the vehicle.
1. Parkthevehicleonalevelsurfaceandpreventmovement
by means other than the brakes.
2. Drain all reservoirs to 0 p.s.i. — Caution: Compressor
discharge line may still contain residual pressure.
3. Identify and disconnect the three air lines from the end
coverand notethe positionofend coverports relativeto
thevehicle.
4. Unplug the vehicle wiring harness from the heater and
thermostat assembly connector on the end cover
assembly.
5. Remove the four bolts that secure both the upper and
lowermounting brackets tothevehicle, and remove the
airdryer from the vehicle.
6. Mark the relationship of the saddle bracket (5) to the
end cover assembly (6). Remove the 5/16" cap screw
(1)andsleevenut(3)securingtheuppermountingstrap
(4)tothesaddlebracket(5). Earliermodelsusedwasher
andnutin placeof thesleeve nut(3). Remove theupper
mountingstrap (4) from the end cover assembly (6).
7. Markthe relationship of the lower bracket (9)totheend
coverassembly (6).Remove thetwo3/8" endcover cap
screws (7) and two washers (8) that retain the lower
mountingbracket (9) to the end cover (6).
DISASSEMBLY
The following disassembly and assembly procedure is
presented for reference purposes and presupposes that a
major rebuild of the AD-IP™air dryer is being undertaken.
The replacement parts and maintenance kits available
generally do not require full disassembly. The instructions
providedwith these partsandkits should befollowedin lieu
ofthe instructions presented here. Refer to Figure 9 during
disassembly.
Caution: Whileperforming serviceontheAD-IP™airdryer,
itisnotrecommendedthat aclampingdevice(vise,C-clamp,
etc.) be used to hold any die cast aluminum component as
damage may result. To hold the end cover, install a pipe
nipple in the supply port and clamp the nipple into a vise.
1. Using an adjustable or socket wrench, loosen the
desiccantcartridgebolt(10),thenseparatethedesiccant
cartridge(11) from the end cover (6).Pullthedesiccant
cartridgebolt out of the end cover (6).
Caution: Disassembly of the desiccant cartridge
assemblyshouldnotbeattempted! Detailparts for the
cartridge are not available and the cartridge contains a
150# spring which can not be mechanically caged.
2. Remove both o-rings (12 & 13) from the desiccant
cartridgebolt.
3. Remove the retaining ring (14) that secures the purge
valveassembly (15) intheend cover (6).
4. Remove the 1/4" shoulder bolt (16) from the bottom of
the purge valve housing assembly (19) using a 3/8"
socket wrench and a large blade screw driver, inserted
in the slot on top of the purge piston (20). Remove the
exhaustdiaphragm(17), and the purge valve (18) from
thepurgevalvehousing(19).
5. Removetheo-rings(23&24)fromthepurgevalvehousing
(19). DischargeLineUnloader(DLU)modelsdonothave
o-ring(23).
6. Removethe purgepiston(20)andthereturnspring (22).
7. Removethe o-ring (21)fromthe purge piston(20).

9
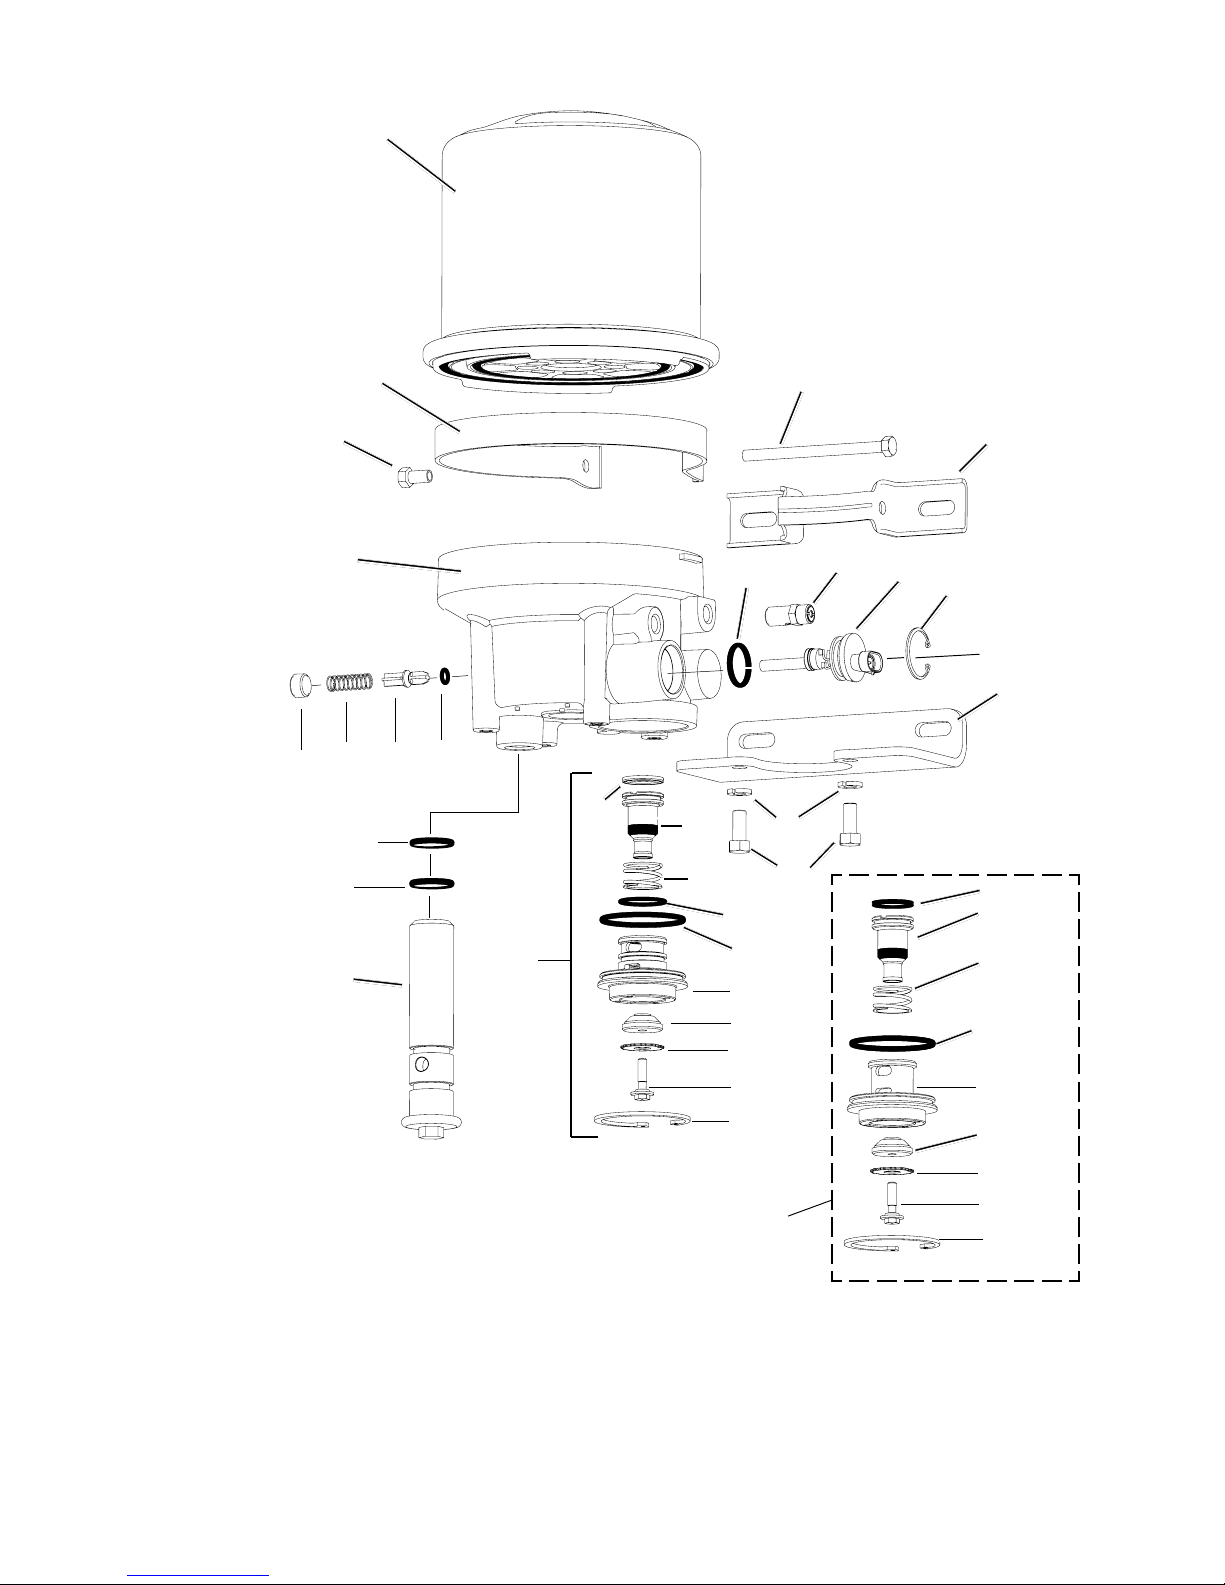
2. Install and center the exhaust diaphragm (17) over the
shoulderbolt (16) making certainthatthe diaphragm ID
is over the bolt shoulder. Then install the purge valve
(18)ontheshoulderboltmakingcertainitsmetalsupport
sideis against the diaphragm (17).
3. Push the purge piston (20) into the housing (19) until it
bottoms and insert a large blade screw driver in the
piston’sslottedhead.Whiledepressingthe purgepiston
with the screw driver, install the shoulder bolt (16) with
exhaustdiaphragm(17)andpurgevalve(18)inthepiston.
Torque the shoulder bolt (16) to between 60-80 in. lbs.
4. Installthetwoo-rings(23&24)onthepurgevalvehousing
(19)placingeachinitsappropriate location.DLUmodels
donotcontaino-ring (23). Install the assembled purge
valvehousing in the end cover (6) while making certain
the purge valve housing is fully seated against the end
cover.Securethepurge valve housing in the end cover
usingtheretaining ring (14). Make certain the retaining
ring is fully seated in its groove in the end cover (6).
5. Usinga 9/16” wrench, install the safety valve assembly
(33)into the end cover (6).
6. Vertical check valve models: Installtheo-ring(29) on
the check valve body (28) and push the o-ring down,
over the 3 guide lands until it is in the o-ring groove of
thecheck valvebody(28). Installthecheck valvespring
(27) on the check valve body so that the small coils of
the spring slip over the check valve body. Install the
assembledcheck valve body,o-ring, and spring(27,28
& 29) in the end cover (6) so that the o-ring rests on its
seatin theendcover (6) andthespring is visible. Install
theperforatedplate (26),in theend cover(6) andsecure
the check valve assembly using the retaining ring (25).
Makecertaintheretainingringisfullyseated initsgroove
inthe end cover (6).
7. Horizontal check valve models: Install o-ring (2)onto
check valve (36). Place the check valve in the delivery
check valve port of the end cover (6). Install the spring
(35)overthe delivery check valve (36) and secure with
thedelivery checkvalveplug (34).
8. Install the o-ring (32) on the heater and thermostat
assembly (31).After making certain the sponge rubber
cushion is positioned between the connector body and
thermostat, gently push the heater and thermostat
assembly (31) into the end cover (6), making certain
the heating element enters the small diameter bore in
the larger heater and thermostat bore in the end cover
(6). Secure the heater and thermostat assembly in the
body using the retaining ring (30). Make certain the
retainingringisfullyseatedinitsgrooveintheendcover
(6).
9. Installboth o-rings (12 & 13) on the desiccant cartridge
bolt (10) and using a twisting motion, insert the
assembleddesiccant cartridge boltin the end cover(6).
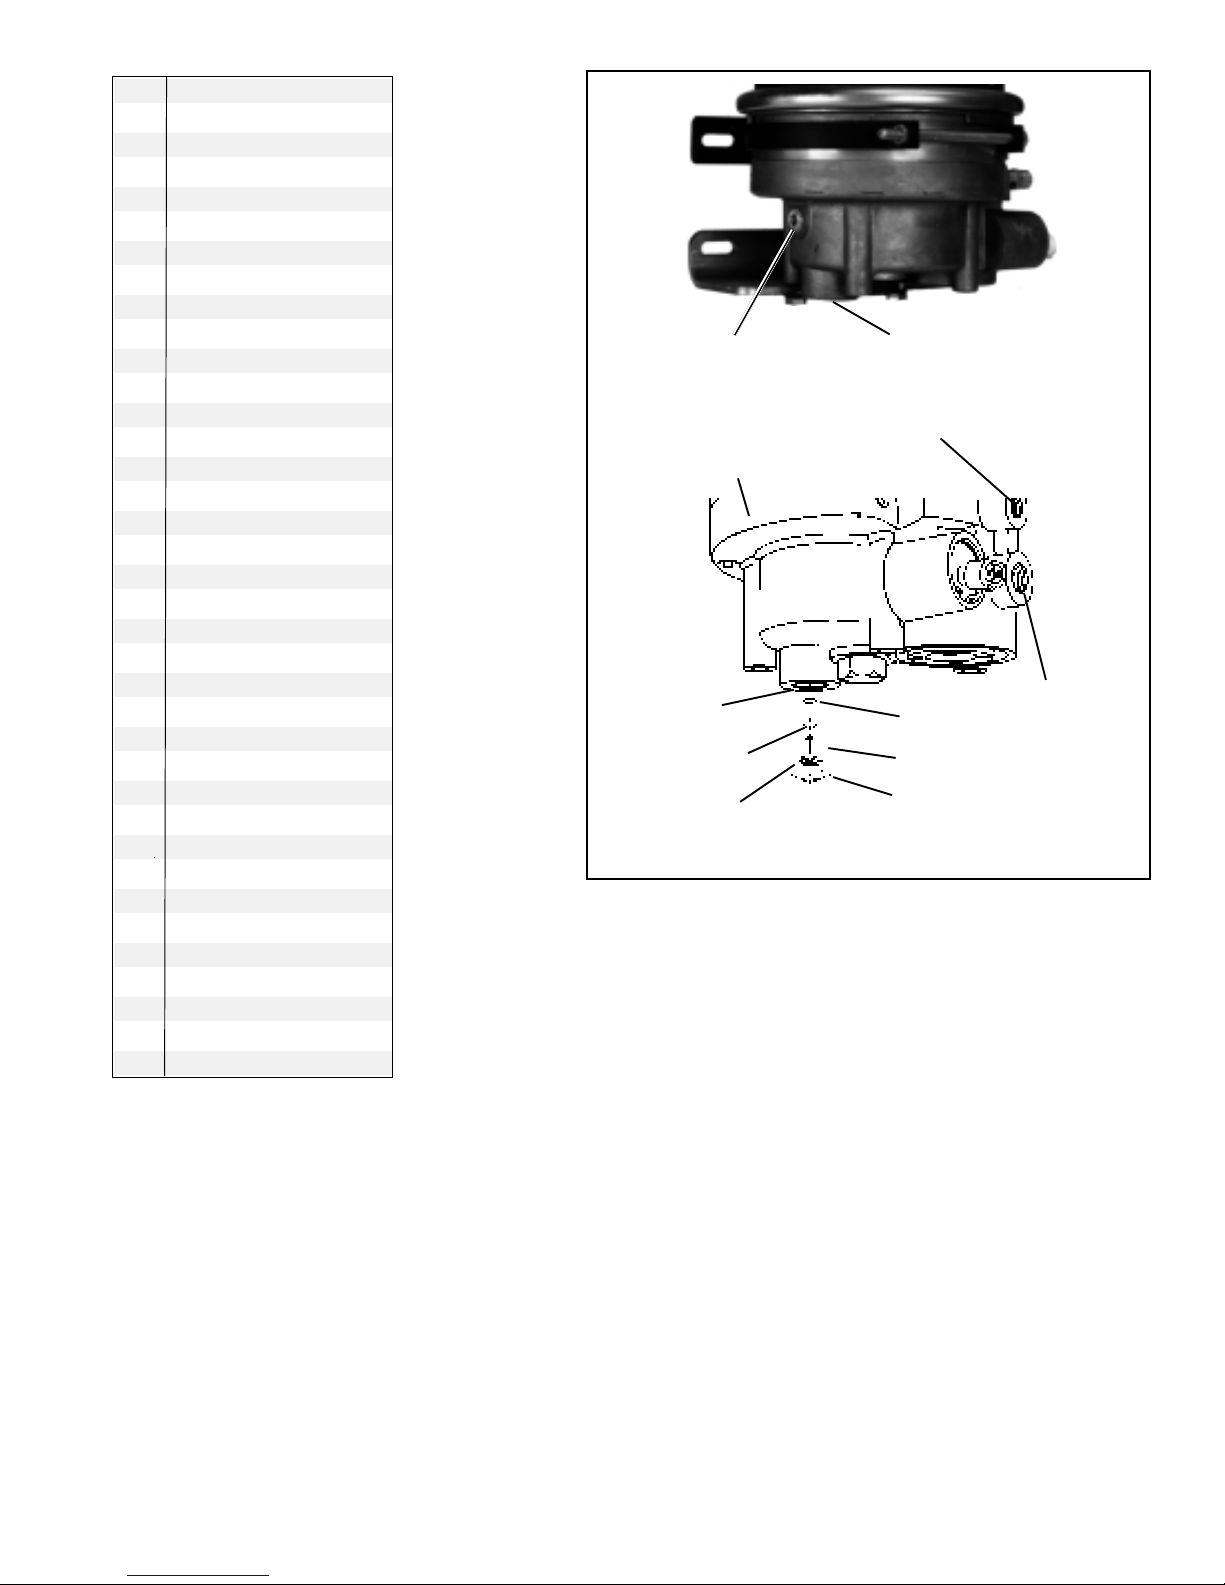
8. Vertical check valve models: Remove the retaining
ring(25)thatsecures thedelivery checkvalve assembly
intheendcover(6).Removeandseparatetheperforated
plate(26), spring (27),checkvalve body (28)ando-ring
(29).
9. Horizontal check valve models: Remove delivery
check valve plug (34) that secures the check valve
assemblyin the endcover(6). Remove the spring(35),
checkvalve (36)and o-ring (2).
10. Remove the retaining ring (30) that secures the heater
andthermostatassembly(31)intheendcover(6).Gently
pullthe heater and thermostat (31) out of the endcover
(6)and removethe o-ring (32).
11. Usinga9/16”wrench,remove thesafetyvalveassembly
(33)from the endcover (6).
CLEANING & INSPECTION
1. Usingmineral spiritsor an equivalentsolvent, cleanand
thoroughly dry all metal parts except the desiccant
cartridge.
2. Inspect the interior and exterior of all metal parts that
will be reused for severe corrosion, pitting and cracks.
Superficialcorrosionand orpittingontheexteriorportion
oftheendcoverisacceptable.
3. Inspect the bores of both the end cover and the purge
valvehousing fordeep scuffingorgouges.
4. Makecertain thatall purge valvehousing andendcover
passagesare open and free of obstructions.
5. Inspectthe pipe threads in the end cover. Make certain
theyareclean and free of thread sealant.
6. Inspect the purge valve housing bore and seats for
excessivewear and scuffing.
7. Inspectthe purge valve pistonseatfor excessive wear.
8. Make certain that the purge orifice in the cartridge bolt
isopenandfreeofobstructions.
9. Inspect all air line fittings for corrosion. Clean all old
threadsealant from the pipe threads.
10. All o-rings removed should be discarded and replaced
withnew o-rings providedinappropriate kit(s).
ASSEMBLY
Priortoassembly,coat allo-rings, o-ringgrooves, andbores
withagenerousamountofsilicone grease.(RefertoFigures
9and 10 during assembly unless otherwise advised.)
1. Installthe quad ring (21) in its groove on theO.D.ofthe
purge piston (20). Place the return spring (22) in the
boreofthepurgevalvehousing(19),theninsertthepurge
piston (20) into the I.D. of the spring (22).

10
11
16
18
19
12
13 20
22
23
10
24
15
14
7
4
6
35
1
33
32 30
31
14
8
24
17
19
16
18
34 35 36 2
DLUStylePurge Valve
17
22
20
21
21
15
9
FIGURE 9 - AD-IP™AIR DRYER INTERNAL COMPONENTS

11
ITEM# DESCRIPTION
1 5/16” Cap Screw
2 O-ring
3 5/16” Sleeve Nut
4 MountingStrap
5 SaddleBracket
6 End Cover
7 3/8” Cap Screw
8 3/8”LockWasher
9 LowerMountingBracket
10 CartridgeBolt
11 DesiccantCartridge
12 O-ring
13 O-ring
14 RetainingRing
15 PurgeValveCartridgeAssembly
16 ShoulderBolt
17 ExhaustDiaphragm
18 PurgeValve
19 PurgeValveHousing
20 PurgeValvePiston
21 QuadRing
22 PistonReturnSpring
23 O-ring
24 O-ring
25 RetainingRing
26 PerforatedPlate
27 CheckRingSpring
28 Check Valve
29 O-ring
30 RetainingRing
31 Heater&ThermostatAssembly
32 O-ring
33 Safety Valve Assembly
34 Delivery Check Valve Plug
35 Spring
36 Check Valve Body (white)
29
25
26
27
Supply Port
(From Compressor)
Control Port
(From Governor
unloader port)
Delivery Port
(To Supply
Reservoir)
Air Dryer End Cover
28
Delivery Port
(To Supply Reservoir)
Pipe Plug
OldStyleAD-IPEndCover - Vertical Delivery Check Valve
FIGURE 10 - AD-IP™AIR DRYER INTERNAL COMPONENTS

12
10. Install the desiccant cartridge (11) on the end cover (6)
makingcertainthecartridge isproperly seatedand flush
onthe end cover.
Note: Itmaybenecessary torotate thecartridgeslightly
untilthe anti-rotationlugs areproperlyaligned andallow
the cartridge to rest flush against the end cover.
11. Using an adjustable wrench or a socket, tighten the
desiccant cartridge bolt (10), to secure the desiccant
cartridge(11) to theendcover (6).Torque the desiccant
cartridge bolt to 65-75 ft. lbs. (40ft. lbs. minimum).
Caution: Donot over torque.
AD-IP™AIR DRYER INSTALLATION
1. Usingthe relationshipmarksmade during step 7 of the
“AD-IP™AIR DRYER REMOVAL”, install the lower
mountingbracket (9) on the end cover (6) and secure it
using the two 3/8” cap screws and washers (7 & 8).
Torque the cap screwsto300-360 in.lbs.
2. Usingthe relationshipmarksmade during step 6 of the
AD-IP™AirDryerRemovalProcedure, installthesaddle
bracket(5) and mounting strap(4)on the end cover(6),
and using the 5/16" cap screw (1) and sleeve nut (3)
secure the strap to the saddle bracket. Tighten the
5/16"nutontheuppermountingbracket.Torque to 60-
100 in. lbs.
3. Install theAD-IP™air dryer on the vehicle using the four
bolts that secure both the upper and lower mounting
brackets.
4. Reconnect the three airlines to the proper ports on the
endcover(identifiedduringstep3oftheAD-IP™AirDryer
Removal).
5. Reconnectthe vehicle wiring harness to theAD-IP™air
dryer heater and thermostat assembly connector by
plugging it into the air dryer connector until its lock tab
snaps in place.
6. Before placing vehicle back into service, perform the
Operation and Leakage Tests stated elsewhere in this
manual.
RETROFITTING THE AD-IP™AIR DRYER
GENERAL
Thefollowingretrofitinstructionsarepresented forreference
purposes only since Bendix aftermarket retrofit and
replacement air dryers are packaged with the most up-to-
dateinstallationinstructions. Theinstructionspackagedwith
the AD-IP™air dryer should be followed in lieu of those
presentedhere.
Thepreceding portion ofthismanual deals with“in-service”
repairand/orreplacementoftheAD-IP™airdryer.Theportion
of the manual that follows is concerned with installing an
AD-IP™air dryer on a vehicle not previously equipped with
one.
VEHICLE APPLICATION REQUIREMENTS
Thebasic applicationrequirements presentedhereapply to
a standard air dryer installation. The majority of highway
vehicles in use today will meet these basic requirements
however,somemay not. Examplesof vehicles thatmaynot
meetthe requirements include,refusetrucks, city coaches,
bulk trailer unloading operations and other high air
consumption systems. While the AD-IP™air dryer can be
usedon these vehicles the standard installation procedure
presentedinthismanual mayrequire modificationto assure
proper operation and service life. Consult your local
authorized Bendix parts outlet or sales representative for
additionalinformation.
Charge Cycle Time —TheAD-IP™airdryer is designed to
provideclean,dry airfor thebrake system.When avehicle’s
air system is used to operate non-brake air accessories it
isnecessarytodeterminethat,duringnormaldailyoperation
the compressor should recover from governor “cut-in” to
governor“cut-out” (usually100 psito 120psi)in 90seconds
orless atengine RPMsnormal tothevehicle vocation.If the
recovery time consistently exceeds this limit, it may be
necessaryto “bypass” theairaccessory responsible for the
high air usage. Consult your local authorized Bendix parts
outletor sales representativeforadditional information.
Purge Cycle Time —During normal vehicleoperation,the
aircompressormust remain unloaded for a minimum of 30
seconds. This minimum purge time is required to ensure
completeregenerationof thedesiccantmaterial.Ifthe purge
time is occasionally shorter than the times specified, no
permanentilleffectshouldbeexpected,however,ifthepurge
time is consistently less than the minimum, an accessory
bypass system must be installed. Contact the nearest
authorizedBendix parts outlet or Bendix representative for
additionalinformation.Note: ReservoirVolume-Totalvehicle
reservoir volume can impact the Charge and Purge Cycle
time.Thechartbelowcanbeusedasaguideindetermining
ifadditional help is required.
Total Vehicle Reservoir
Volume Requirement
Less than 9,000 cu. in. ..................StandardAD-IP™AirDryer
9,000 -12,500cu. in. ...........................ExtendedPurgeAD-IP™Air
Dryer
Greater than 12,500 cu. in. ............Contact Bendix Rep. or
Bendix Engineering
Air Compressor Size —Although theAD-IP™airdryer can
be used in conjunction with larger compressors, it was
designed primarily for units rated for up to 30 CFM. It is
recommended that when using theAD-IP™air dryer with a
compressorwhichhas a rated displacement exceeding 30

13
CFM that an authorized Bendix parts outlet or Bendix
marketingrepresentative be contacted for assistance.
Holset “E or QE” Type Air Compressors - In order for
theseHolsetcompressorstofunctionproperlywheninstalled
with anAD-IP™air dryer, the required Holset feedback line
andsingle check valvemust be used.The standardAD-IP™
air dryer can be used with a separate feedback line and
singlecheckOR theAD-IP™DI(DropIn)airdryermodelcan
beused.WithAD-IP™DIdropinairdryerinuse theseparate
feed back line and single check valve can be eliminated
since these components are part of the air dryer. Refer to
Figures 2 & 3.
VEHICLE PREPARATION
1. Parkthevehicleonalevelsurfaceandpreventmovement
by means other than the brakes.
2. Drain all reservoirs to 0 p.s.i.
LOCATING AD-IP™AIR DRYER ON VEHICLE
1. TheAD-IP™air dryer mustbemounted vertically (purge
exhaust toward road surface) outside the engine
compartmentin an areaofair flow whilethe vehicle is in
motion. The AD-IP™air dryer must not be exposed to
direct wheel splash. If the air dryer is located directly
behind the axle, a mud flap is required.
2. Maintain a minimum clearance of 12" between the air
dryerandanypotentialheatsource(e.g.vehicleexhaust).
If this is not feasible, a heat shield must be used.
3. Make certain that adequate clearance from moving
components(e.g.driveshaft,suspension, pitman arm,
etc.)is provided.
4. Locate the air dryer on vehicle so that a minimum of
1/2” clearance above the air dryer is available to allow
desiccantcartridgeremoval.Aminimumof8” clearance
below the air dryer is required to allow for desiccant
cartridgebolt removal.
5. Whenchoosing themountinglocation fortheAD-IP™air
dryer,notethedischargeline lengthrequirementsstated
underthe heading Connecting the AirLines, elsewhere
in this manual.
ImportantNote: Under normaloperatingconditions, the
maximum inlet air temperature for theAD-IP™air dryer
is160 degrees Fahrenheit.
6. Ifpossible, locate theAD-IP™air dryersothatthe purge
exhaust does not expel contaminants on vehicle
components. If this is not feasible, the purge exhaust
maybe redirectedaway fromthevehicle byinstalling an
optional special exhaust cover (pc. no. 112609). The
exhaust cover is available as a separate item from
authorized Bendix parts outlets. A 1” ID hose can be
clamped on this special exhaust cover to allow the
exhausttobe redirected.
MOUNTING THE AD-IP™AIR DRYER (Refer to
Figure10)
1. Install the lower mounting bracket on the AD-IP™air
dryer.Toaccomplish this, it will benecessaryto choose
two,of the four available,mountingholes.Todetermine
which two holes to utilize to attach the lower bracket,
takeinto consideration the piping connections required
to install the AD-IP™air dryer and use those that will
best position the unit for ease of installation. Utilizing
the two cap screws and washers provided with the
AD-IP™airdryerretrofitunit,attachthelowermounting
bracket and torque to 300-360 in. lbs.
Note:The bracketmounting holes inthe end covermay
not be pre-tapped. In this case the mounting bolt will
self tap the holes on initial installation.
2. Assemblethe mountingstrap(4) andsaddle bracket (5)
as illustrated, by utilizing the 5/16" cap screw (1) and
sleevenut (3)provided. Placetheupper bracketstrap in
the end cover channel provided for it, then install the
saddlebracketandsecurethestraptothesaddlebracket
using the cap screw (1) and sleeve nut (3) provided.
Install, but do not tighten the cap screw at this time.
Orient the strap and saddle bracket (5) so that it is in a
flatplane with the lowerbracket.Torque the5/16"nut to
60-100 in. lbs. to tighten strap onto the shell.
3. Componentsandlocation used to mounttheAD-IP™air
dryer on the vehicle must be rigid enough to minimize
airdryervibration.
4. Mount the AD-IP™air dryer on the vehicle using 3/8"
bolts (grade 5 min.) and washers. Torque to 25 ft. lbs.
(300in.lbs.)
CONNECTING THE AIR LINES
PURGECONTROLLINE
1. Install a purge control air line having a minimum inside
diameter of 3/16 inches between the AD-IP™air dryer
end cover control port and an unused unloader port on
thegovernor.Thecontrollinemustbeconnecteddirectly
to the governor and not in series with automatic drain
valves, lubrication systems, etc.
2. Thecontrol lineshould slopedownward totheendcover
withoutforming sharp bends or “dips”.
COMPRESSOR DISCHARGE LINE
GENERAL:
Refer to Appendix A, Table A for recommended discharge
line lengths and sizes for various vehicle applications and
vocations.

14
SUPPLY RES.
GOVERNOR PURGE CONTROL
LINE TO CON PORT
HEATER &
THERMOSTAT
LEAD TO
GROUND
DELIVERY LINE
FROM DEL PORT
ON AD-IP™AIR
DRYER
AD-IP™
AIR
DRYER
FUSE
10 AMP - 12 VOLT
5 AMP - 24 VOLT
HEATER &
THERMOSTAT
LEAD TO
IGNITION
SWITCH
DISCHARGE
LINE TO SUP
PORT
FIGURE 10 - AD-IP™AIR DRYER INSTALLATION
PURGE EXHAUST LINE
1. If it is necessary to direct AD-IP™air dryer discharge
contaminants away from vehicle components it will be
necessary to purchase a special exhaust cover for the
AD-IP™air dryer (Pc. No. 112609) and install on the
unit. A 1” (25.4 mm) I.D. hose can be clamped on the
specialAD-IP™airdryer exhaust cover.
WIRINGTHEHEATER/THERMOSTAT
1. Theairdryerisavailable witheithera12or 24voltheater
which uses 90 watts of power. Determine the vehicle’s
electrical system voltage and make certain that the air
dryer that is to be installed contains the same voltage
heater. The air dryer’s part number can be used to
determinetheairdryersheatervoltagerequirement.The
heater voltage can also be identified by the color of the
heater assembly connector as described in the table
below.
Air Dryer Heater Air Dryer Connector
Voltage Identification
12Volts White(Noothermarkings)
24Volts Gray,orWhitew/RedDot
2. Atwo lead,24inch, wire harnesswith attached weather
resistant connector is supplied with all retrofit and
replacementAD-IP™airdryers. Connect one of the two
leads of the wire harness to the engine kill or ignition
switch.The remaining lead of the wireharnessmust be
connectedto a good vehicle ground(notto the air dryer
or its mounting bracket).Afuse must be installed in the
power carrying wire; install a 10 amp fuse for 12 volt
heatersanda5 amp fuse for a 24 volt heater.
3. Use14 gauge wireifit is necessary tolengthenthe wire
harnessprovidedwith theAD-IP™air dryer.Make certain
all wire splices are waterproofed using the splice kit
providedwith all aftermarketAD-IP™airdryers.
4. Tie wrap or support all electrical wires leading to the
AD-IP™air dryer at 6 - 8 inch intervals.
Note: Wires should have sufficient slack and not
completelytaught.
INSTALLING AD-IP™AIR DRYER WITH HOLSET
COMPRESSOR
GENERAL
Thevehicleinstallationguidelines presentedin theprevious
section apply to allAD-IP™air dryer installations. Vehicles
equippedwith the HolsetType E or QE compressorrequire
thefollowing additional considerations.
Standard AD-IP™Air Dryer (Refer to Figure 3B)
IftheAD-IP™airdryeris being installedonavehicle that did
notpreviously have an air dryer or air system aftercooler, a
separate feedback line and single check valve must be
installed.
IftheAD-IP™air dryer is replacinganolder style air dryer or
air system aftercooler that did not incorporate an integral
“Turbo Cutoff” device, the Holset ECON valve must be
removed. The feedback line and single check valve must
remainin place.
AD-IP™DI “Drop In” Air Dryer Model (Referto Figure 3C)
If the AD-IP™DI “Drop In” air dryer is being installed on a
vehiclethatdid notpreviously haveanairdryeror airsystem
aftercooler, no additional considerations are necessary.
InstalltheAD-IP™DIdropinairdryerinthemannerdescribed
inthe previous section.
If the AD-IP™DI drop in air dryer is replacing a standard
AD-IP™airdryerorairsystemaftercoolerwhichincorporated
anintegral “Turbo Cutoff” device, the old feedbacklineand
singlecheck valve mustberemoved.
If theAD-IP™DI drop in air dryer is replacing an older style
airdryer orair systemaftercoolerthat didnot incorporatean
integral“Turbo Cutoff” device, the Holset ECON valveand
the old feedback line and single check valve must be
removed.

15
FIGURE 11 - WIRING - REMOTE POWER & LOCAL
GROUND
GROUND
LEAD
1/4" or 3/8"
EYELET
FRAME RAIL
STAR WASHER
NUT
14 GAGE POWER WIRE
FROM VEHICLE
WIRE HARNESS
CONNECTOR
(TO AIR DRYER)
WEATHERPROOF
POWER LEAD
SPLICE
TESTING THE AD-IP™AIR DRYER
Beforeplacingthevehicleinservice,performthefollowing
tests.
1. Closeall reservoir drain cocks.
2. Build up system pressure to governor cutout and note
thattheAD-IP™air dryer purgeswithan audible escape
ofair.
3. “Fan”the service brakes to reduce system air pressure
togovernorcut-in.Notethatthesystemonceagainbuilds
tofull pressure and isfollowedby a purge attheAD-IP™
airdryerexhaust.
4. Itis recommended that the followingitemsbe tested for
leakageto assurethattheAD-IP™airdryerwill notcycle
excessively.
(A) Total air system leakage (See Bendix publication
BW5057“Air Brake Handbook.”)
(B) Compressor unloadermechanism.
(C) Governor.
(D) Draincockand safetyvalve infirst (supply)reservoir.
(E) All air connections leading to and from the first
(supply)reservoir.
(F) Deliverycheckvalve.

16
AD-IP™AIR DRYER TROUBLESHOOTING CHART
SYMPTOMS
1. Dryer is constantly
“cycling”orpurging.
Dryerpurges frequently
(every 4 minutes or less
whilevehicle is idling).
A. If leakage IS SHOWN on gauges test for
excessiveservice brake system leakage.
Allowableleakage:
Singlevehicle - 1 psi/minute either service
reservoir.
Tractortrailer - 3 psi/minute either service
reservoir.Repairand retest as required.
A. Excessive system
leakage.
IMPORTANT: Notewhether
air pressure loss is shown
ondashgauge(s).Pressure
loss shown on gauges is
causedbyservicebrake
system or component
leakage.Pressure loss NOT
SHOWN on gauges is
caused by supply system or
componentleakage.
CAUSE REMEDY
B. If leakage is NOT SHOWN on gauges test for
excessive supply system leakage.
Removedrain cock or valve insupplyreservoir(wet
tank) and install air gauge. Build system pressure,
allowairdryertopurgeand observe air gauge in
supplyreservoir. Pressure drop should not exceed 1
psi per minute.
Perform tests 1 to 6 in the order presented.

17
AD-IP™AIR DRYER TROUBLESHOOTING CHART (Continued)
1. Test fittings, hoses, lines and connections.
Apply soap solution to detect excessive
leakage.Tightenorreplace as needed then
repeatthe air dryer charge-purge cycle and
observethe gauge installed in the supply
reservoir. If leakage is within limitsremove gauge
fromreservoir and replace drain cockorvalve. If
excessive leakage is detected, continue testing.
2. Test accessories connected to supply reservoir.
Drain all air pressure from system, disconnect
all air lines leading to accessories (fan clutch,
wipers, air seats, etc.) and plug the reservoir at
disconnection point. Build air system pressure
untilairdryer purges and observe supply
reservoirgauge. If leakage is no longer
excessive, repair or replace leaking accessory. If
excessive leakage is detected, continue testing.
3. Test governor leakage. Build system pressure to
governorcut-out, turn off engine and apply soap
solutionto governor exhaust port and around
cap. Leakage should not exceed a 1 in. bubble
in 5 seconds. Reduce system pressure to 80 psi
or less, and re-apply soap solution. Leakage
should not exceed a 1 in. bubble in 5 seconds. If
excessive leakage is detected in either test,
repairorreplace governor.
4. Test compressor unloader leakage. Drain all air
pressurefrom system and remove thegovernor
fromthecompressor.Temporarily plug the
governorunloaderportorairline that mated with,
or connected to, the compressor. Build air
system pressure until air dryer purges then
IMMEDIATELYSHUTOFFTHE ENGINE.
Observetheair gauge in the supply reservoir. If
leakage is within limits, replace the compressor
unloaders.Re-connect the governor to the
compressor(after removing plug installed in
governor)and retest whileobservingsupply
reservoirgauge. If excessive leakage is
detected, continue testing.
5. Test airdryerpurge valve and outlet (delivery)
check valve. Drain all air pressure from system,
remove the control line connection at the air
dryer and plug the end of the air line leading to
thegovernor(not the air dryer control port). Build
systempressure to governor cut-out and observe
airgauge. If little or no pressure drop is observed
replacetheairdryercheckvalve. If pressure
drop continues, apply soap solution to air dryer
purgeexhaustandpurgecontrolport (where the
controllinewasremoved).Leakageshouldnot
exceed a 1 in. bubble in 5 seconds. If leakage is
excessiverepair orreplacepurge valve
assembly.
REMEDY
CAUSE
SYMPTOMS
1. Dryer is constantly
“cycling”orpurging.
Dryerpurges frequently
(every 4 minutes or less
whilevehicle is idling)
(continued).

18
SYMPTOMS CAUSE REMEDY
AD-IP™AIR DRYER TROUBLESHOOTING CHART (Continued)
6. Withgauge installed at RES port of governor,
pressureshould not drop below ”Cut-In” pressure
atthe onset of the compressor “Unloaded”
cycle. If pressure drops, check for “kinks” or
restrictions in line connected to RES port. Line
connected to RES port on governor must be
samediameter, or preferably larger than, lines
connectedto UNLport(s) on governor.
B. Test the Holset E Compressor unloader system
withfeedback line and check valve for proper
operation. Make certain Holset ECON is not in
use with the drop-in version of the air dryer, if so,
removeand retest.
B. Holset “E” type
compressor.
When installing a Bendix Drop-In air dryer in a
system equipped with a Holset E or QE
compressor,removethe Holset ECON valvealong
withitsfeedback and governor control line.
2. Water and/or Oil in
Supplyor Service
Reservoir.
A. Improperdischargeline
lengthor improper line
material.Maximum air
dryerinlet temperature is
exceeded.
B. Air system charged from
outsideair source
(outsideair not passing
throughair dryer).
C. Air dryer not purging
(see Symptom #5).
A. Refer to section entitled Connecting the Air Lines
as well asAppendixA, TableA columns 1 & 2
then check line size and length.
B. If system must have outside air fill provision,
outside air should pass through air dryer. This
practice should be minimized.
C. See Symptom #5.
Typical Drop-InAir Dryer End Cover
1. Dryer is constantly
“cycling”orpurging.
Dryerpurges frequently
(every 4 minutes or less
whilevehicle is idling)
(continued).
Check Valve
Feedback Line

19
AD-IP™AIR DRYER TROUBLESHOOTING CHART (Continued)
SYMPTOMS
2. Water and/or Oil in
Supplyor Service
Reservoir(continued).
CAUSE REMEDY
E. Excessive airusage,
duty cycle too high - Air
dryernotcompatible
with vehicle air system
requirement(Improper air
dryer/vehicle
application).
NOTE: Duty Cycle is the
ratio of time the compressor
spends building air to total
enginerunningtime.Air
compressorsare designed
tobuildair(run“loaded”)up
to 25% of the time. Higher
duty cycles cause
conditions that affect air
brakecharging system
performancewhich may
requireadditional
maintenance. Factors that
add to the duty cycle are: air
suspension,additionalair
accessories, use of an
undersizedcompressor,
frequentstops,excessive
leakagefromfittings,
connections, lines,
chambersor valves, etc.
D. Check causes and remedies for Symptom #1.
E. SeeAppendixA, TableA, column 1, for
recommendedcompressor sizes. If the
compressoris “too small” for the vehicle vocation
(forexample, where a vehicle’s vocation has
changedorserviceconditions exceed the original
vehicleor engine OE spec’s) then upgrade the
compressor. Note: The costs incurred (e.g.
installing a larger capacity compressor, etc.) are
notcovered under original compressor warranty.
Charge CycleTime -The AD-IP™air dryer is
designedto provide clean, dry air for the brake
system. When a vehicle’s air system is used to
operate non-brake air accessories it is necessary
todetermine that; during normal, daily operation
thecompressor should recoverfrom governor
“cut-in”to governor “cut-out” (usually 100 psi to
120 psi) in 90 seconds or less at engine RPM’s
commensuratewiththevehiclevocation.Ifthe
recovery time consistently exceeds this limit, it
may be necessary to “bypass” the air accessory
responsible for the high air usage.An example of
where a by-pass system would be required is
when the compressor is used to pressurize a
tanktrailer for purposes of off-loading product.
Consult your local authorized Bendix parts outlet
orsales representative for additional information.
PurgeCycle Time - During normal vehicle
operation, the air compressor must remain
unloaded for a minimum of 30 seconds. This
minimum purge time is required to ensure
completeregenerationof the desiccant material.
If the purge time is consistently less than the
minimum, an accessory by-pass system must be
installed. Consult your local authorized Bendix
partsoutletorsalesrepresentativeforadditional
information.
Air Compressor Size -Although theAD-IP™air
dryer can be used in conjunction with larger
compressors, it was designed primarily for units
rated for up to 30 CFM. It is recommended that
when using theAD-IP™air dryer with a
compressor which has a rated displacement
exceeding 30 CFM that an authorized Bendix
partsoutletorBendixmarketingrepresentative
be contacted for assistance.
F. Restricted discharge line. SeeAppendixA, Table
A, column 1 & 2 for recommended sizes. If
discharge line is restricted or more than 1/16”
carbonbuild up is found, replace the discharge
line. Replace as necessary.
D. Purge (air exhaust) time
insufficient due to
excessive system
leakage (see causes for
Symptom #1).
F. Air compressor
dischargeand/or air
dryerinlet temperature
too high.

20
G. Compressor malfunction.
SYMPTOMS CAUSE REMEDY
AD-IP™AIR DRYER TROUBLESHOOTING CHART (Continued)
DischargeLineFreeze-Up.Thedischargelinemust
maintain a constant slope down from the
compressor to the air dryer inlet fitting to avoid low
points where ice may form and block the flow. If,
instead, ice blockages occur at the air dryer inlet,
insulation may be added here, or if the inlet fitting is
a typical 90 degree fitting, it may be changed to a
straightor45 degree fitting. For more information on
howtohelppreventdischargelinefreeze-ups,see
BendixBulletins TCH-08-21 andTCH-08-22. Shorter
dischargeline lengths or insulation may be required
in cold climates.
Insufficientcoolant flow through compressor. Inspect
coolant line. Replace as necessary (I.D. is 1/2”
min.). Inspect the coolant lines for kinks and
restrictions and fittings for restrictions. Replace as
necessary. Verify coolant lines go from engine block
to compressor and back to the water pump. Repair
as necessary.
Restricted air inlet (not enough air to compressor).
Check compressor air inlet line for restrictions,
brittleness, soft or sagging hose conditions etc.
Repair as necessary. Inlet line size is 3/4 ID.
Maximumrestriction requirement for compressors is
25 inches of water. Check the engine air filter and
service if necessary (if possible, check the air filter
usageindicator).
Poorly filtered inlet air (poor air quality to
compressor).Checkfor leaking, damaged or
malfunctioningcompressorairinlet components
(e.g. induction line, fittings, gaskets, filter bodies,
etc.). Repair inlet components as needed. Note: Dirt
ingestion will damage compressor and is not
coveredunderwarranty.
Ifyou found excessive oil present in the service
reservoirand you did not find any issues above, the
compressor may be passing oil.
Replacecompressor. If still under warranty,follow
normalwarranty process.
G. If you found excessive oil presentin the service
reservoirand you did not find any issues above,
the compressor may be passing oil. Test the
compressor using the BASIC cup method as
describedin the Bendix compressor service
manual and referred to inAppendixA,TableA,
column 5.
Replacecompressor. If still under warranty,follow
normalwarranty process.
H. If vehicle uses Holset compressor, inspect
feedbackcheck valve for proper installation and
operation.
H. Air by-passes desiccant
cartridgeassembly.
2. Water and/or Oil in
Supplyor Service
Reservoir(continued).
This manual suits for next models
1
Table of contents
Other BENDIX Dehumidifier manuals

BENDIX
BENDIX AD-9si Mounting instructions

BENDIX
BENDIX SD-08-2418 User manual

BENDIX
BENDIX AD-9 AIR DRYER User manual

BENDIX
BENDIX AD-SP SYSTEM PURGE AIR DRYER User manual

BENDIX
BENDIX AD-IS - Mounting instructions

BENDIX
BENDIX AD-IS - User manual

BENDIX
BENDIX AD-1 AIR DRYER User manual

BENDIX
BENDIX TRAILER SYSTEM GUARD AIR DRYER User manual

BENDIX
BENDIX AD-9 Mounting instructions

BENDIX
BENDIX AD-1 Mounting instructions