Benefit B425 91105 User manual
1
Benefit B425
Bike
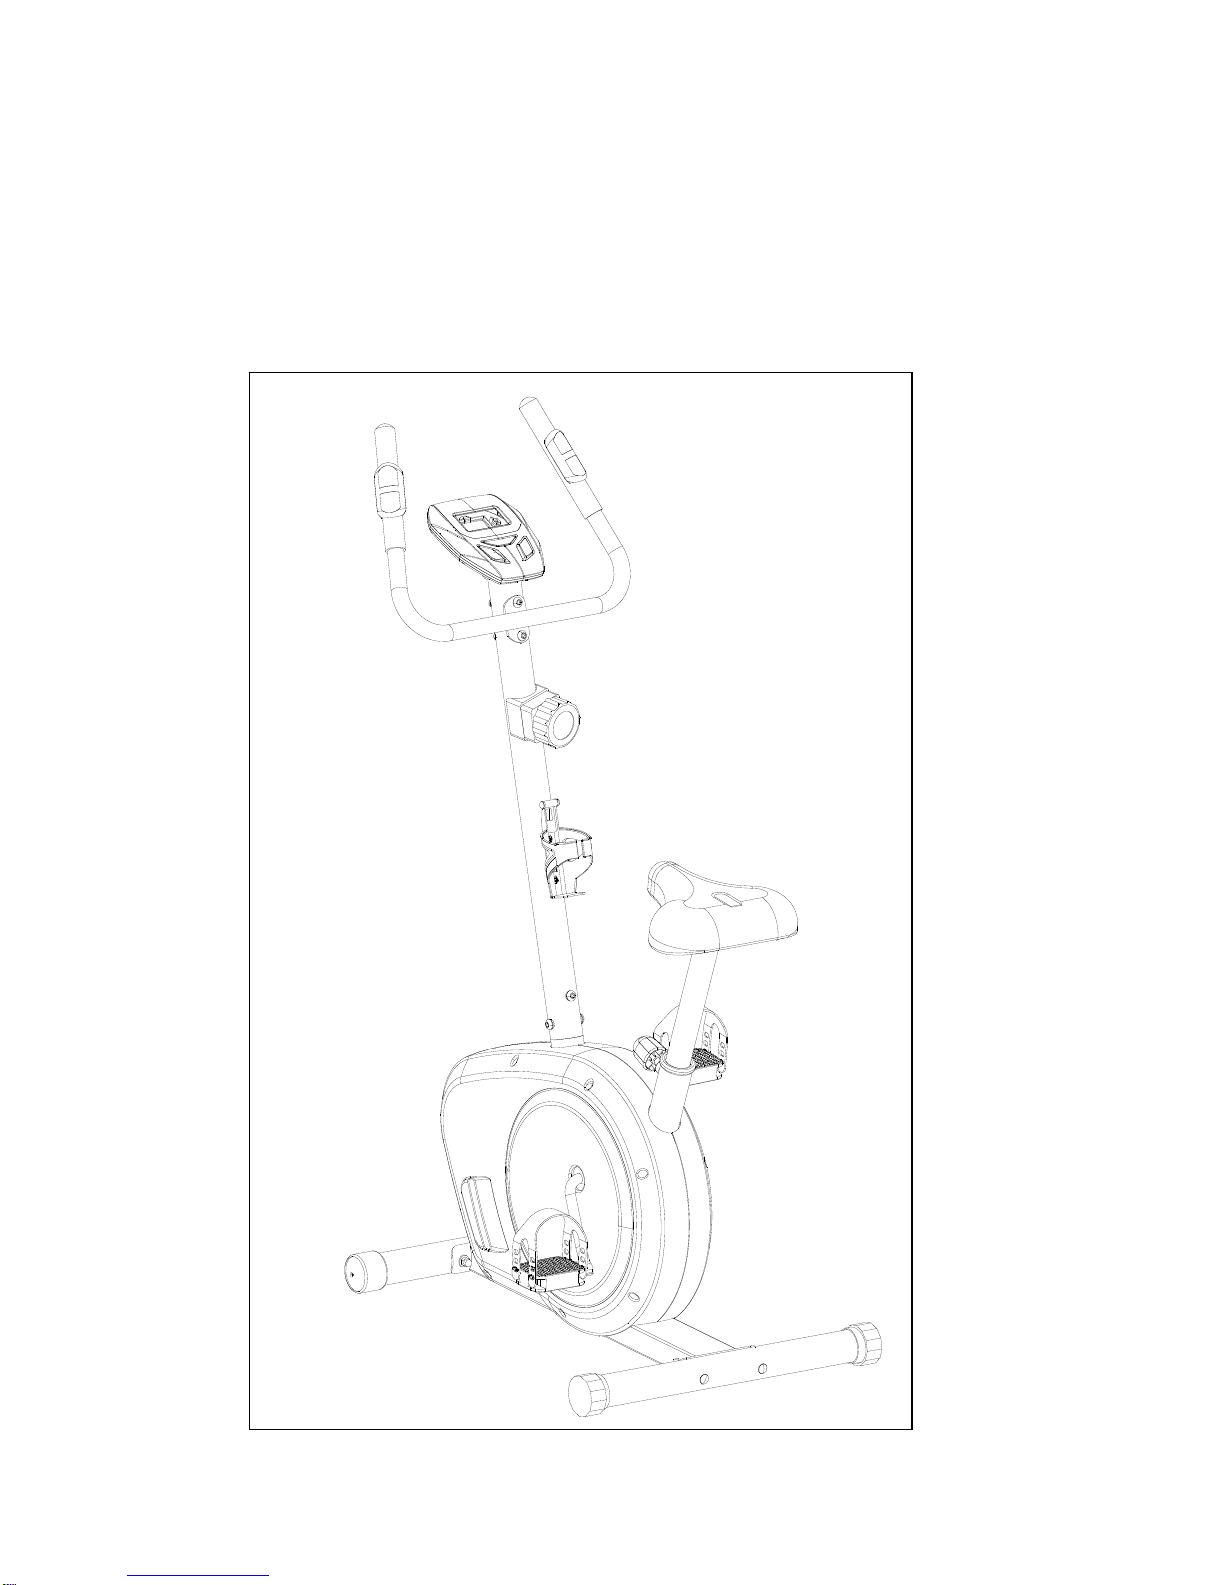
91105
2
(MM)
B 425
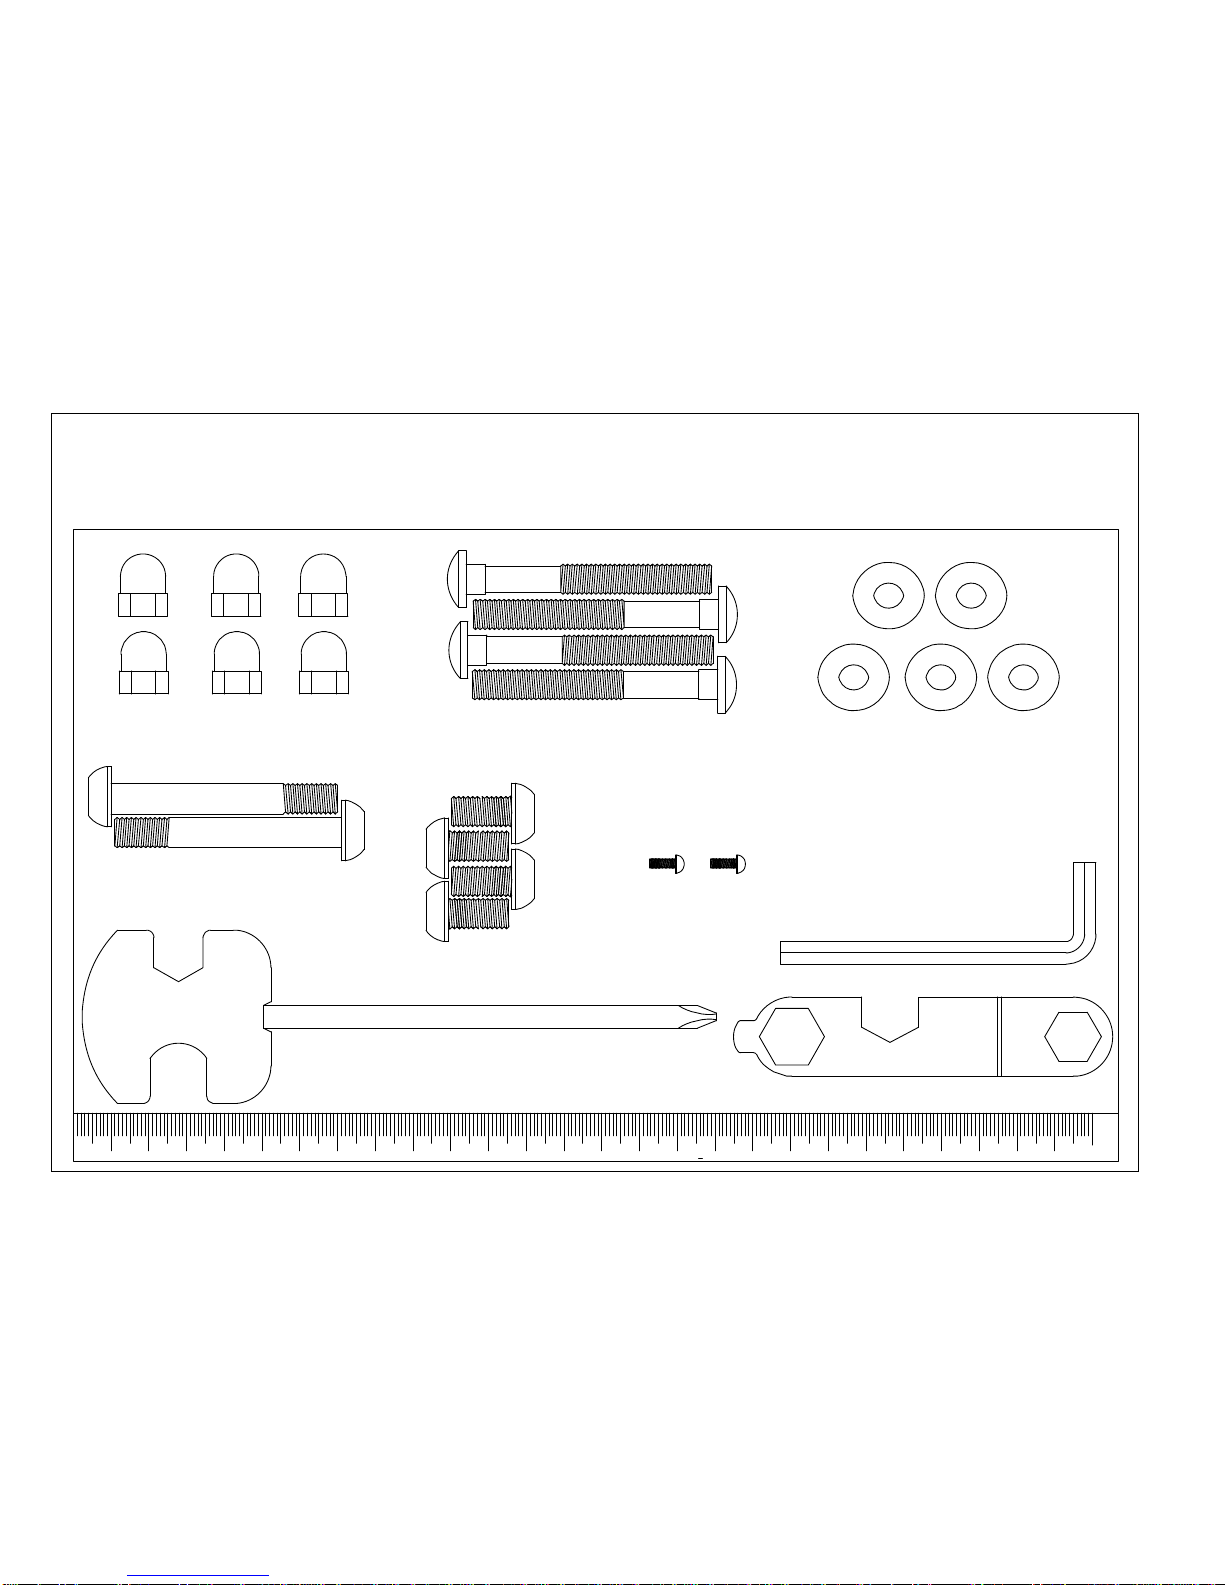
M8Acorn Nut (51)-6 Curved Washer(53)-10
Screwdriver (1)
Wrench(1)
Allen Key(1)
M8X65mmBolt(57)-2
M8X65mm Carriage Bolt(52)-4
M8X16mm Screw(19)-4
M5X20mm Screw(68)-2
3
Assembly Diagram
4
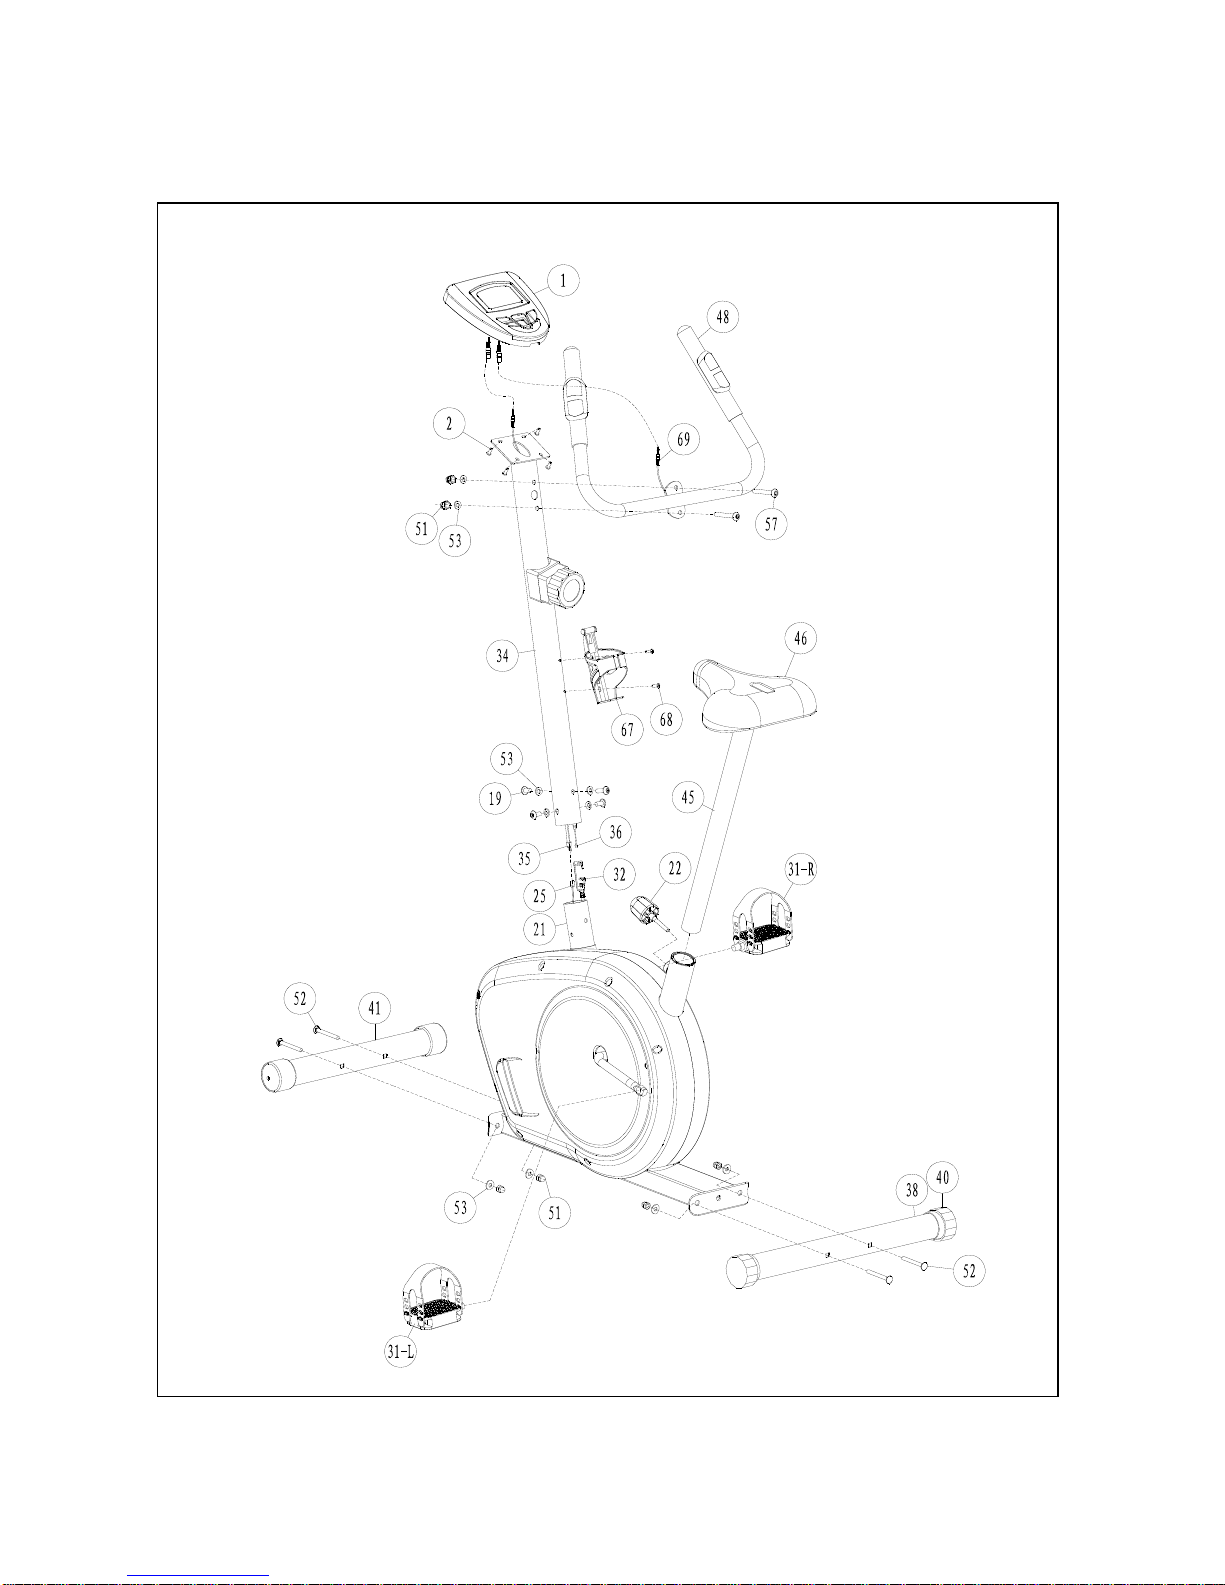
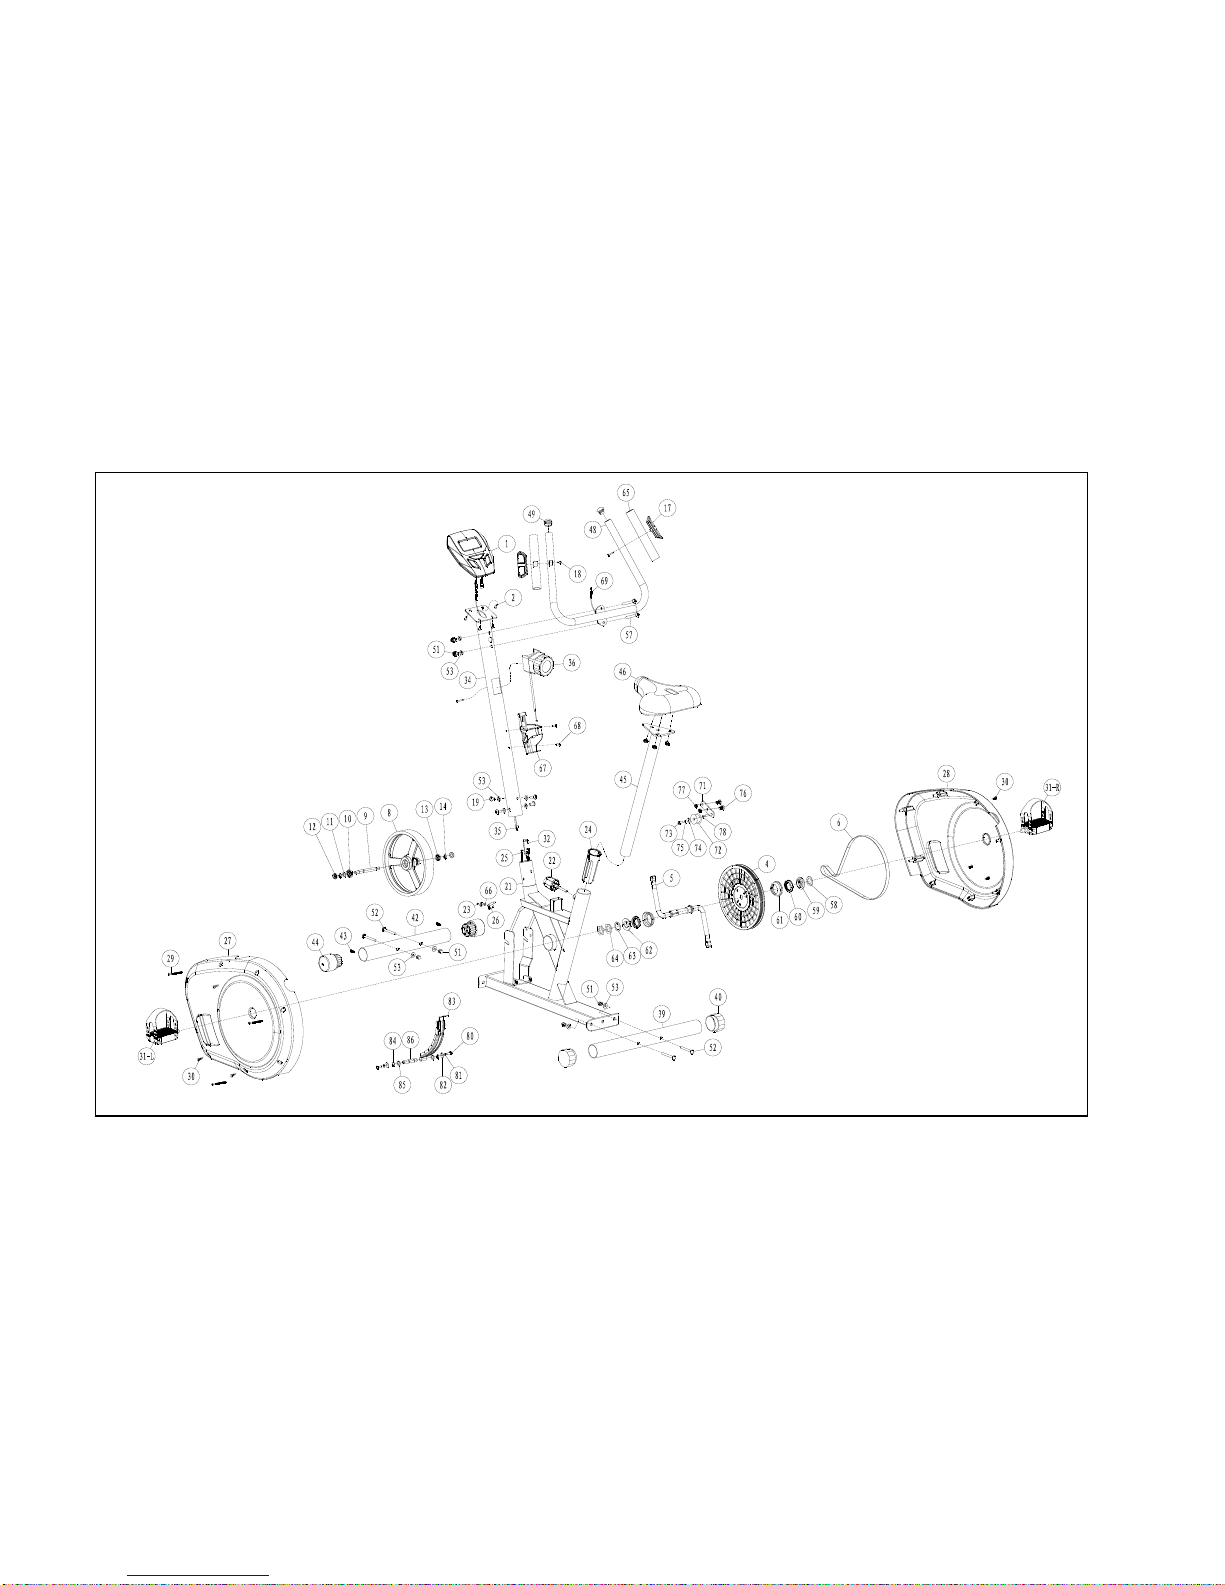
EXPLODED DIAGRAM

5
PARTS LIST
PARTS NO. DESCRIPTION Q'TY
1 & 2 Console & Screw 1PCS
4 Pulley wheel 1PCS
5 Crank 1PCS
6 Belt 1PCS
8~11,9~14 Flywheel set 1SET
12 Pattern nut 3/8” 2PCS
17 Hand pulse 2PCS
18 Screw M4x20 2PCS
19 Allen bolt M8xP1.25x16L 4PCS
21 Main Frame 1PCS
22 Knob for Seat post 1PCS
23 Screw M4xP1.5*16L 2PCS
24 Plastic bushing for main frame 1PCS
25 Sensor box 1PCS
26 Sensor holder 1PCS
27 Left chain cover 1PCS
28 Right chain cover 1PCS
29 Screw M4x50L 5PCS
30 Screw 3/16” 6PCS
31 Pedal (R/L) 1SET
32 Down tension control 1PCS
34 Handlebar post 1PCS
35 Sensor wire upper 1PCS
36 Upper tension control 1PCS
39 Rear stabilizer 1PCS
40 End cap for rear stabilizer 1SET

6
42 Front stabilizer 1PCS
43 Screw M3x8 2PCS
44 Transport wheel for front stabilizer 1SET
45 Seat post 1PCS
46 Seat 1PCS
48 Handlebar 1PCS
49 Cap for handlebar 2PCS
51~57 Bolt & nut part 1SET
58~64 B.B. SET 1SET
65 Foam grip 1SET
66 Flat washer φ5xφ10x1t 2PCS
67 Bottle holder 1PCS
68 Screw M5xP0.8x20L 2PCS
69 Wire for hand pulse 1SET
71~78 Idler wheel set 1SET
80~86 Magnet system 1SET
7
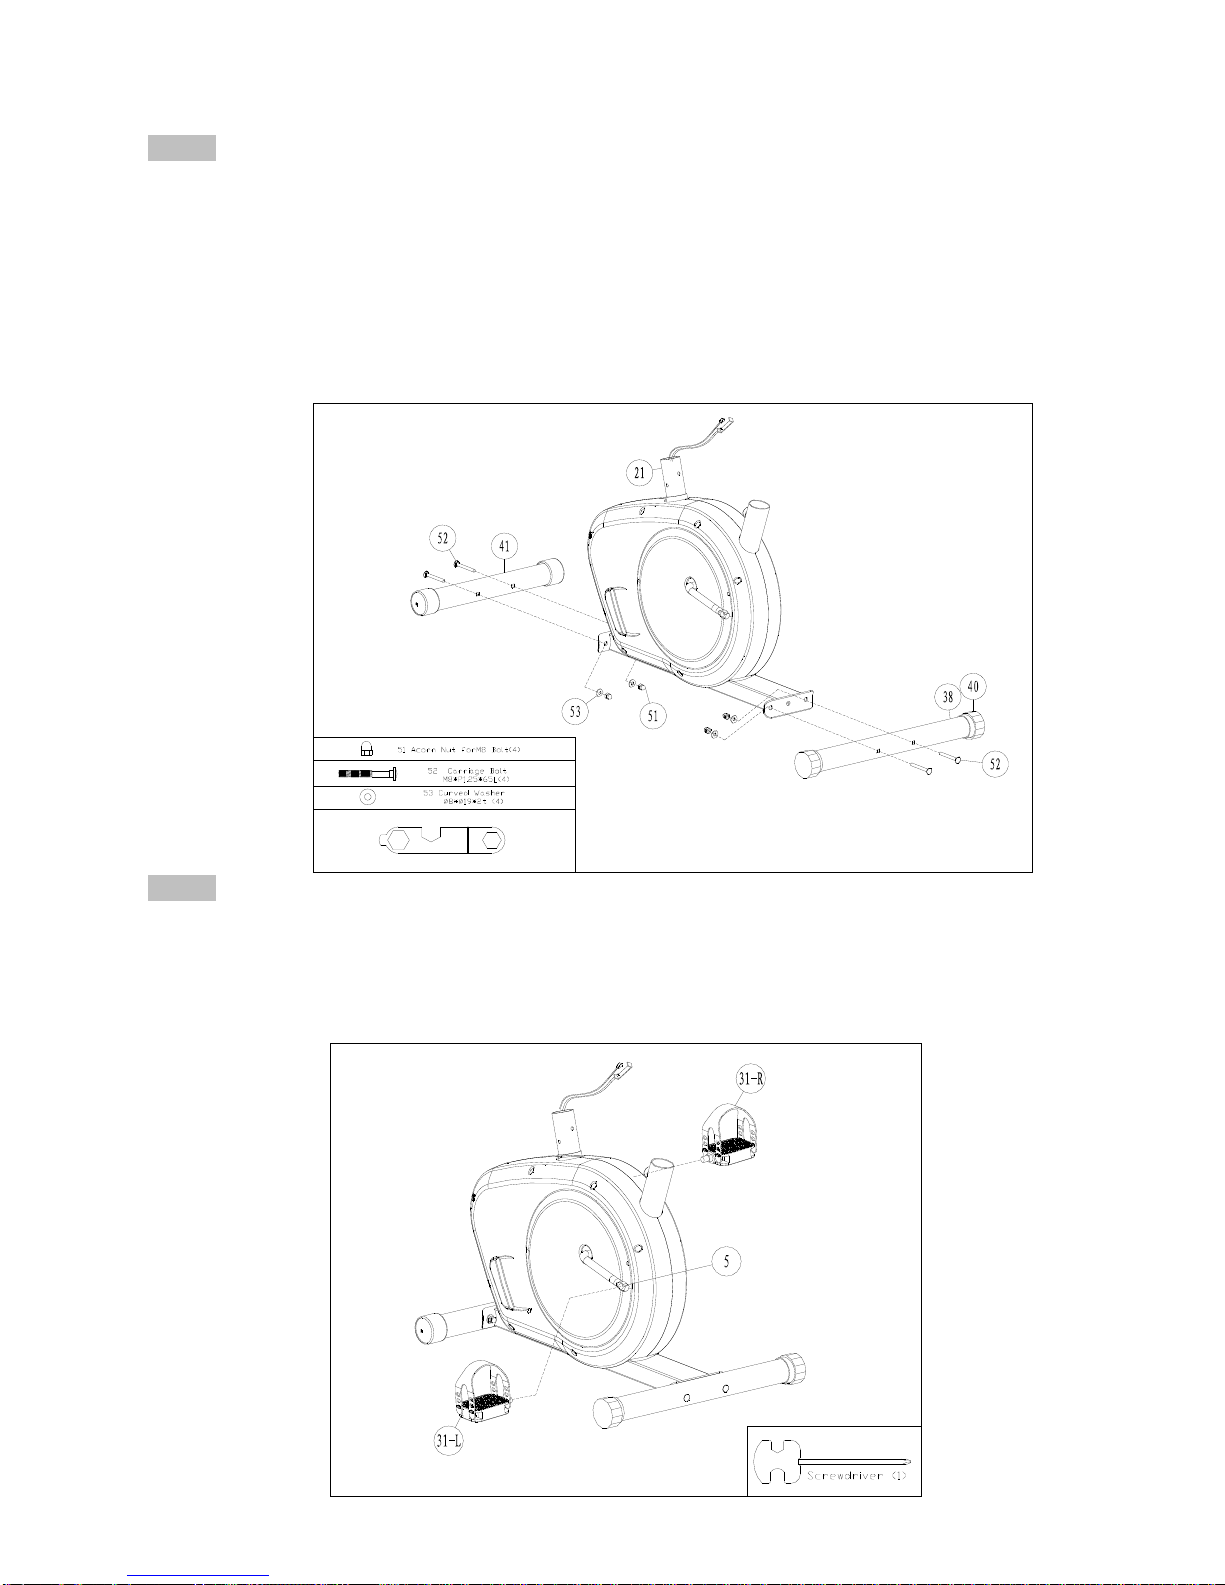
Step 1
1. Install the front stabilizer (41) with 2 carriage bolts(52), curved washers (53) and acorn nuts
(51) by using the hand tools. Make sure the transportation wheels are in correct direction.
2. Assemble the Rear Stabilizer (39) with 2 carriage bolts(52), curved washers (53) and acorn
nuts (51) by using the hand tools. Adjust the end caps on the rear stabilizer to set up a
stable, balanced position.
After assembling the bike, you can adjust to slightly uneven ground by adjusting the height of
the foot caps (40) in the back. The pre-assembled transportation wheels in the front allow
easy movement of the bike: The transportation-wheels need to point downwards and to the
front.
Step2
1. Assemble the straps onto the pedals as the sketches. Adjust the ideal length of the straps
according to your foot size.
2. Assemble the two pedals (31 L/R) onto the crank (5) with a screw driver.
Remarks: screw the left pedal’s spindle counter-clockwise and the right pedal’s spindle
clockwise. Use a wrench (or screwdriver) to screw the two spindles completely.
2
1
Wrench (1)

8
Step 3
1. Attach the seat (46) to the seat post (45) with three M8 locknuts and three M8 flat washers;
start all the locknuts, and then tighten them.
2. Loosen and remove the seat knob (22).
3. Insert the seat post (45) into the main frame, then choose the desired position and tighten
the knob. Be sure the seat knob (22) is always securely fastened.
Remarks: When you have chosen a desired position, tighten the Seat Post Knob until you
hear a “click”.
3
Wrench (1)

9
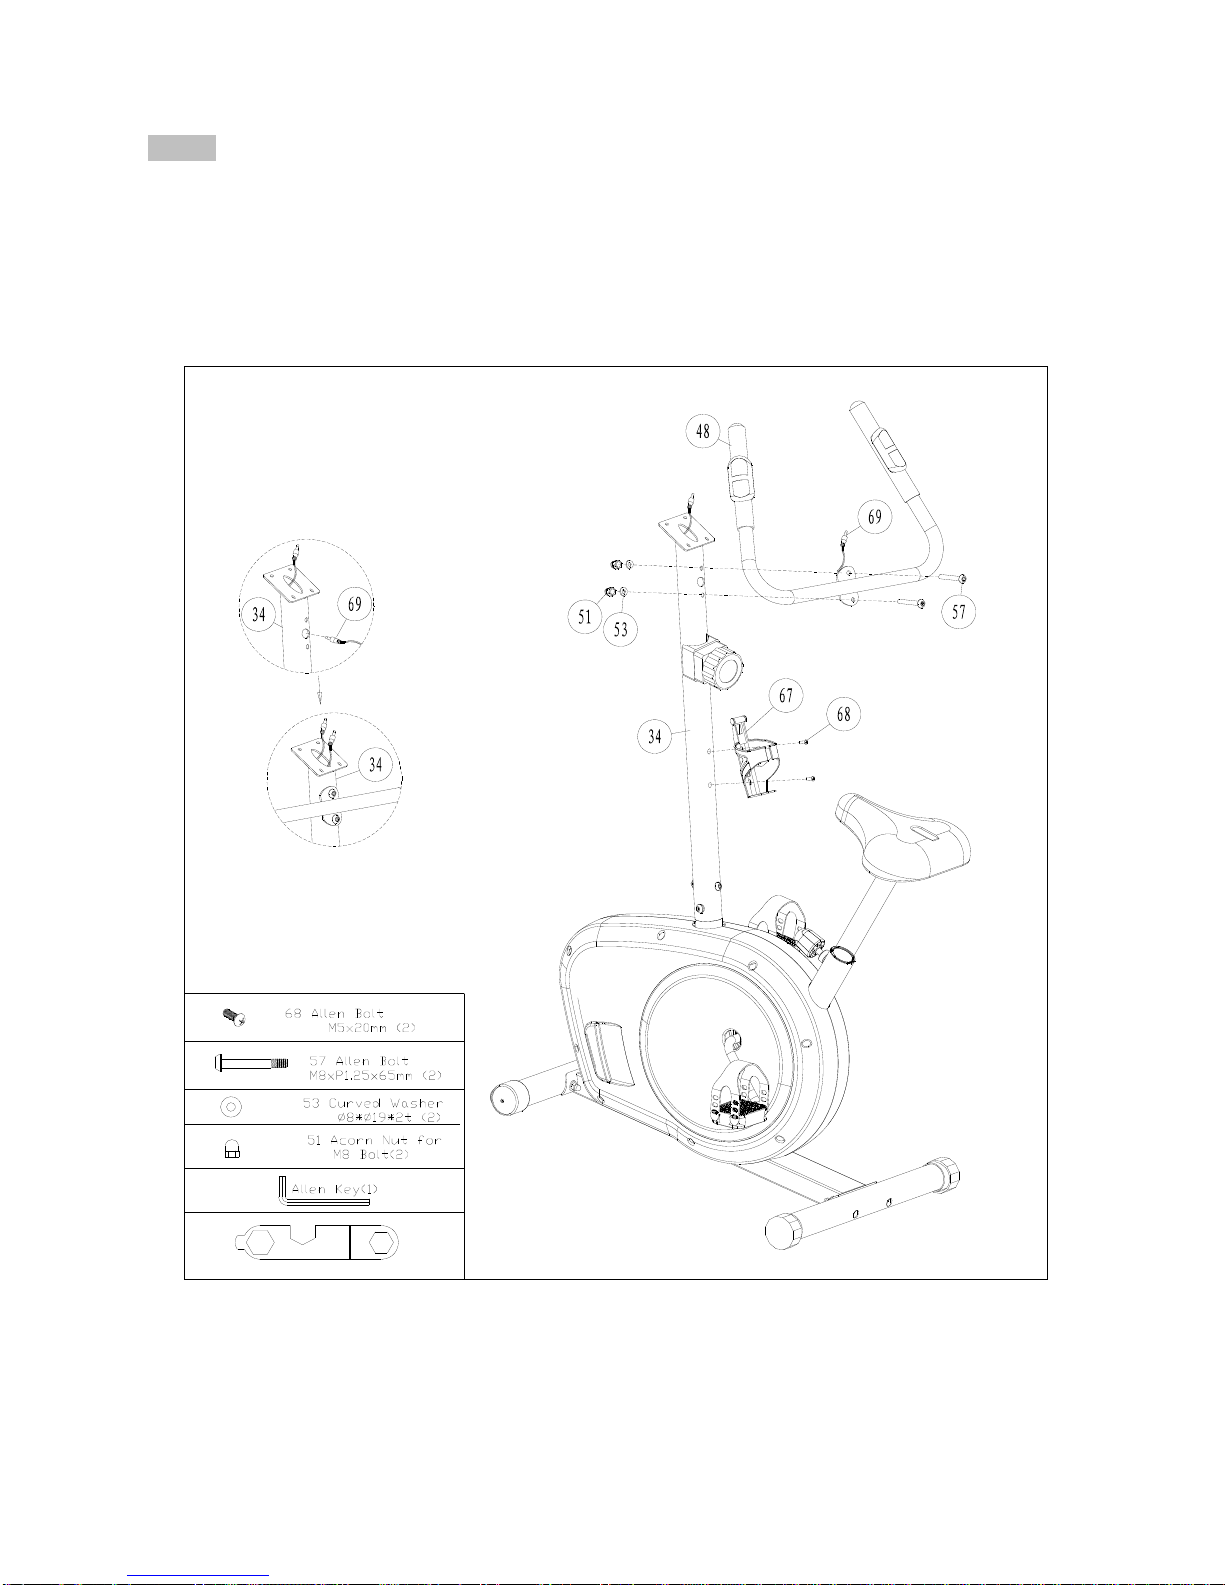
Step 4
1. Pull the upper tension control (36) of the handlebar post (34) and ensure the tension knob
is at the lightest position (minimum position)
2. Connect the upper tension control (36) and down tension control (32), then connect
the upper sensor wire (35) and down sensor wire (25).
3. Slide the Handlebar post (34) into the Main frame (21) then fix it with four sets of
M8*P1.25*16L Allen bolt (19) and semicircle washers (53).
Remarks: Do not screw one set of the M8*P1.25*16L Allen bolt and semicircle washers too
firm at one time. It is better to fix the four sets firmly at the same time because it helps you to
change angles and to fix more easily.
4
10
Step 5
1. Pass the hand-pulse wire (69) through the hand post hole.
2. Attach the handlebar (48) to the hand post (34) with two M8 x 65mm bolts (57), two M8
curved washers (53), and two M8 acorn nuts (51); start both bolts, and then tighten them.
2. Remove the pre-installed M5 x 20mm screws (68) on the handlebar post first, Attach the
water bottle holder ( 67) to the hand post (34) with two M5 x 20mm screws (68);
start both screws, and then tighten them.
5
Wrench (1)

11
Step 6
1. The console (1) can use two AA batteries (not 11 included); alkaline batteries are
recommended.
Do not use old and new batteries together or alkaline, standard, and rechargeable batteries
together. IMPORTANT: If the console has been exposed to cold temperatures, allow
it to warm to room temperature before you insert batteries. Otherwise, you may damage
the console displays or other electronic components.
Remove the battery cover from the back of the console (1), and insert batteries into the
battery
compartment. Make sure to orient the batteries as shown by the diagram inside the battery
compartment. Then, reattach the battery cover.
2. Connect the upper sensor wire (35) and hand pulse wire (69) by the console (1) , then
attach the console (1) to the console bracket with the enclosed screws (2).
6

12
Instruction Manual of ST3627-67
!!! For simple exercise, it is not always necessary to select a training program or manually
set the
TIME, DISTANCE, or other values. You can simply start pedaling.

13
As soon as user install batteries, computer will power on and LCD full display all segments
then enter into the SCAN function mode after one second. Press the MODE key to select
function.
When there is pedaling signal transmitted to the console without pressing any key, console
starts to work, all function TMR/SPD/DST/CAL will start to count up automatically.
If no buttons are pressed and the pedals have not been moved for 4 minutes, the computer
will switch to Idle mode.
【DISPLAY & BUTTON FUNCTIONS】
BUTTON FUNCTION
MODE -Confirm setting
-Select function
-Clear all values and reboot computer if hold on for 3 seconds
SET -To enter into selected function
-To adjust TIME/ DISTANCE/CALORIES value up when stop exercising
-Hold on this button will increase values fast as Hot key.
RESET -After stop exercising for 4 seconds, press it to clear all values to 0 except
SCAN & SPEED.
-Hold on for 3 seconds to reboot the computer.
Training Data
The computer calculates and displays all values automatically according to user training
status.
Operation Instruction
Press MODE button to select function to be set, the following function will be display in
sequence:
SCANÆTMRÆSPEEDÆDISTÆCALÆPULÆSCAN.
* TMR – Press the SET key to set target exercise time, each time it will increase by 1:00; If
TIME counts down to 0:00 from target value, computer will stop work and 0:00 is
flashing for reminder, press any key to stop it. Then TIME will start to count up from
0:00.
* SPD – This function cannot be preset. When user start to pedal with bike, LCD will display
current exercising speed.
* DST - Press SET key to set target exercise Distance, each time it will increase by 1.0 m. If
DISTANCE counts down to 0.0 from target value, console will stop work and 0.0 is flashing
for reminder, press any key to stop it. Then DISTANCE will start to count up.
Training Values Display Range Setting Range
TIME 00:00 ~99:59 min. 0:00~99:00 min.
SPEED 0 ~999.9 KM /
DISTANCE 0~999.9 KM 0:00~999.0 KM
CALORIES 0~999.9 Cal 0~999.0 Cal
PULSE 30~230 bpm 0-30~230 bpm

14
* CAL – Press SET key to set target CALORIES, each time it will increase by 1.0cl. If
CALORIE counts down to 0.0 from target value, console will stop work and
0.0 is flashing for reminder, press any key to stop it. Then CALORIE will start
to count up from 0.
* PUL - The computer will display user’s Heart rate while exercising. When you start
exercising, you have to hold on both grips with both hands. After 6-7
seconds, the PULSE figure will display. If you hold the grip with only one
hand, the Pulse figure will become unstable. To ensure the pulse figure
more accuracy, we suggest user to hold on both hands during exercising.
Take Note:
* When stop training for 4 minutes, the main screen will be off.
* STOP SIGNAL-STOP signal will light up when SCAN function is under executing.
* When the display of LCD is weak, it means the batteries need to be changed.
* If there is no signal when you exercise, please check if the cable is well connected.
* If the computer displays abnormally, please re-install the batteries and try again.
* Battery Spec: 1.5V UM-3 or AA (2PCS).
Table of contents
Other Benefit Exercise Bike manuals


Popular Exercise Bike manuals by other brands


CAPITAL SPORTS
CAPITAL SPORTS Azura M3 Pro Series instruction manual

Nautilus
Nautilus NB 3000 Assembly manual

TurboTronic
TurboTronic Sport-Tronic X-bike ST-X6 owner's manual
ICON Health & Fitness
ICON Health & Fitness Pro-Form Pro C10U user manual

Mellerware
Mellerware Loopy! Path manual

BLADEZ
BLADEZ Fusion GS owner's manual


