Beone CRD29 competition User manual

G
U
I
D
E
E
C
E
L
L
E
N
C
E
CERTIFIED
User’s Guide
MOUNTAINBIKE
2
manual
Pearl-Comp, Pearl-Pro, ... ...
Congratulations on the purchase of your
new quality bicycle. We have done our best
to ensure that you can fully rely on your
bike and safely enjoy its amazing perform-
ance.
Your BeOne team wishes you enjoyable
cycling.
Contents:
At a glance
Description of parts ... 3
Good habits
Check before every ride ... 4
The essentials
Brakes, gears, suspension ... 5
Make yourself comfortable
Adjusting the bike ... 9
Special situations
Care, luggage, kids, transport ...17
Troubleshooting / break-down help
Tyres, brakes, gears ...20
Dos and dont's about carbon ...27
Maintenance ...28
Index ...29
Handover receipt ...30
Bike licence ...31
Terms of warranty ...32
Service book ...33
Keep this manual for
future reference.
MOUNTAINBIKES
CRD29 competition
CRD29 sport
Ego pro
Ego competition
Ego sport
Karma competition
Karma sport
Spirit competition
Spirit sport
Moko - 160
Moko - 140
Moko – 120
You are much safer when
wearing a helmet.
Key to symbols
Models BEONE
Technical note
Warning
Info Hint
Part that is only valid
for listed models
Step one the
same as above
© GuideXpert, Dalibor Sevcik, www.guideXpert.net. Photos by Montone Cycling B.V. All rights reserved. Edition 03/2012
3
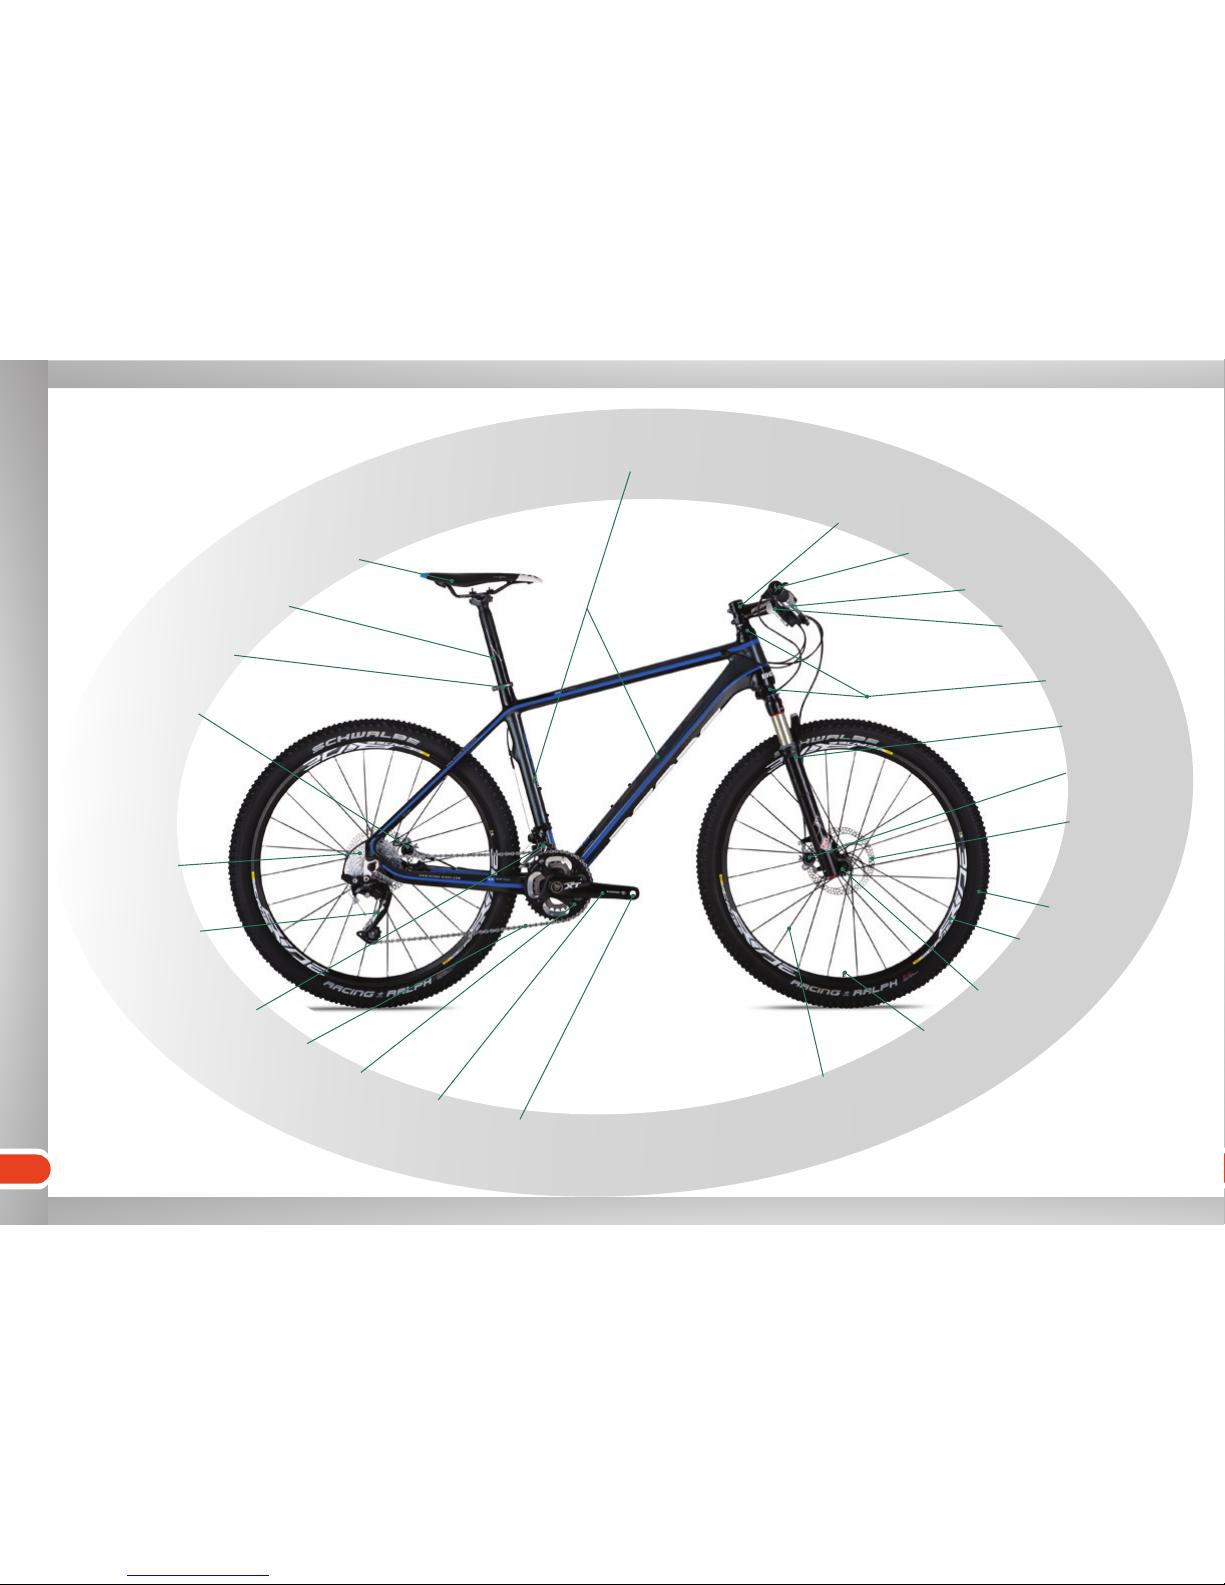
At a glance
Handlebar
Pedal
(not supplied)
Saddle
Frame
Shift lever
Brake lever
Tyre
Rim
Quick-release
Valve
Spoke
Crankset
Chainring
Chain
Seat post clamp
Rear brake
Seat post
Stem
Suspension fork
Headset
Front brake
Disc brake
rotor
Front derailleur
Rear derailleur
Sprockets
At a glance
4
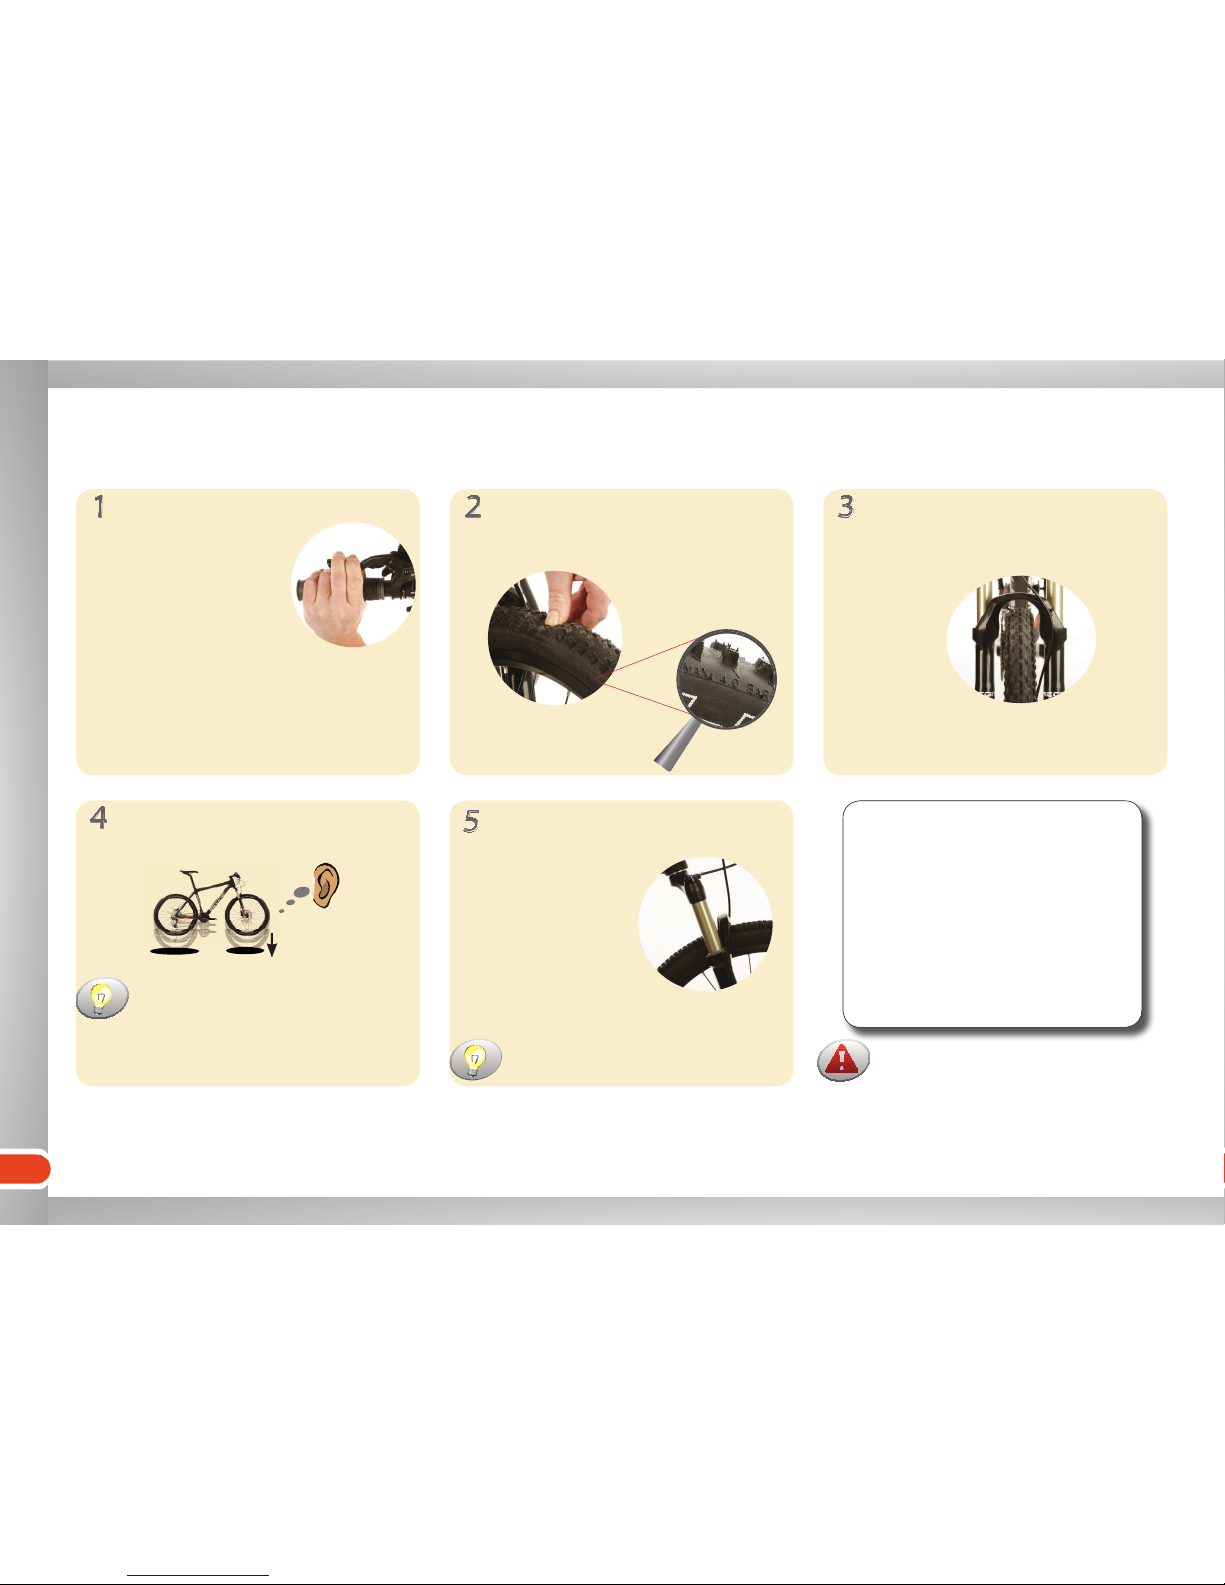
Good habits
Test the brakes
Good habits
... a short start-up check for greater safety and comfort
Check the tyres
Check for rattling
Check the wheels rotation
Test the suspension fork
Feels normal?
Smooth and regular?
At maximum pull the
lever doesn‘t touch
the handlebar
Checklist
1) Brakes OK ü
2) Tyres OK ü
3) Wheel rotation OK ü
4) No unusual noises ü
5) Suspension visibly OK ü
Don’t use your bike if any of these
points are in doubt - consult an
authorized dealer immediately. Using
a bicycle that is not in good working
order may result in serious injury.
Sit on the bike to test this.
Drop your bike from the height of a
few centimetres onto the floor and
listen for any clatter.
If you hear any, tighten all bolts and
nuts.
Right pressure?
5
The essentials
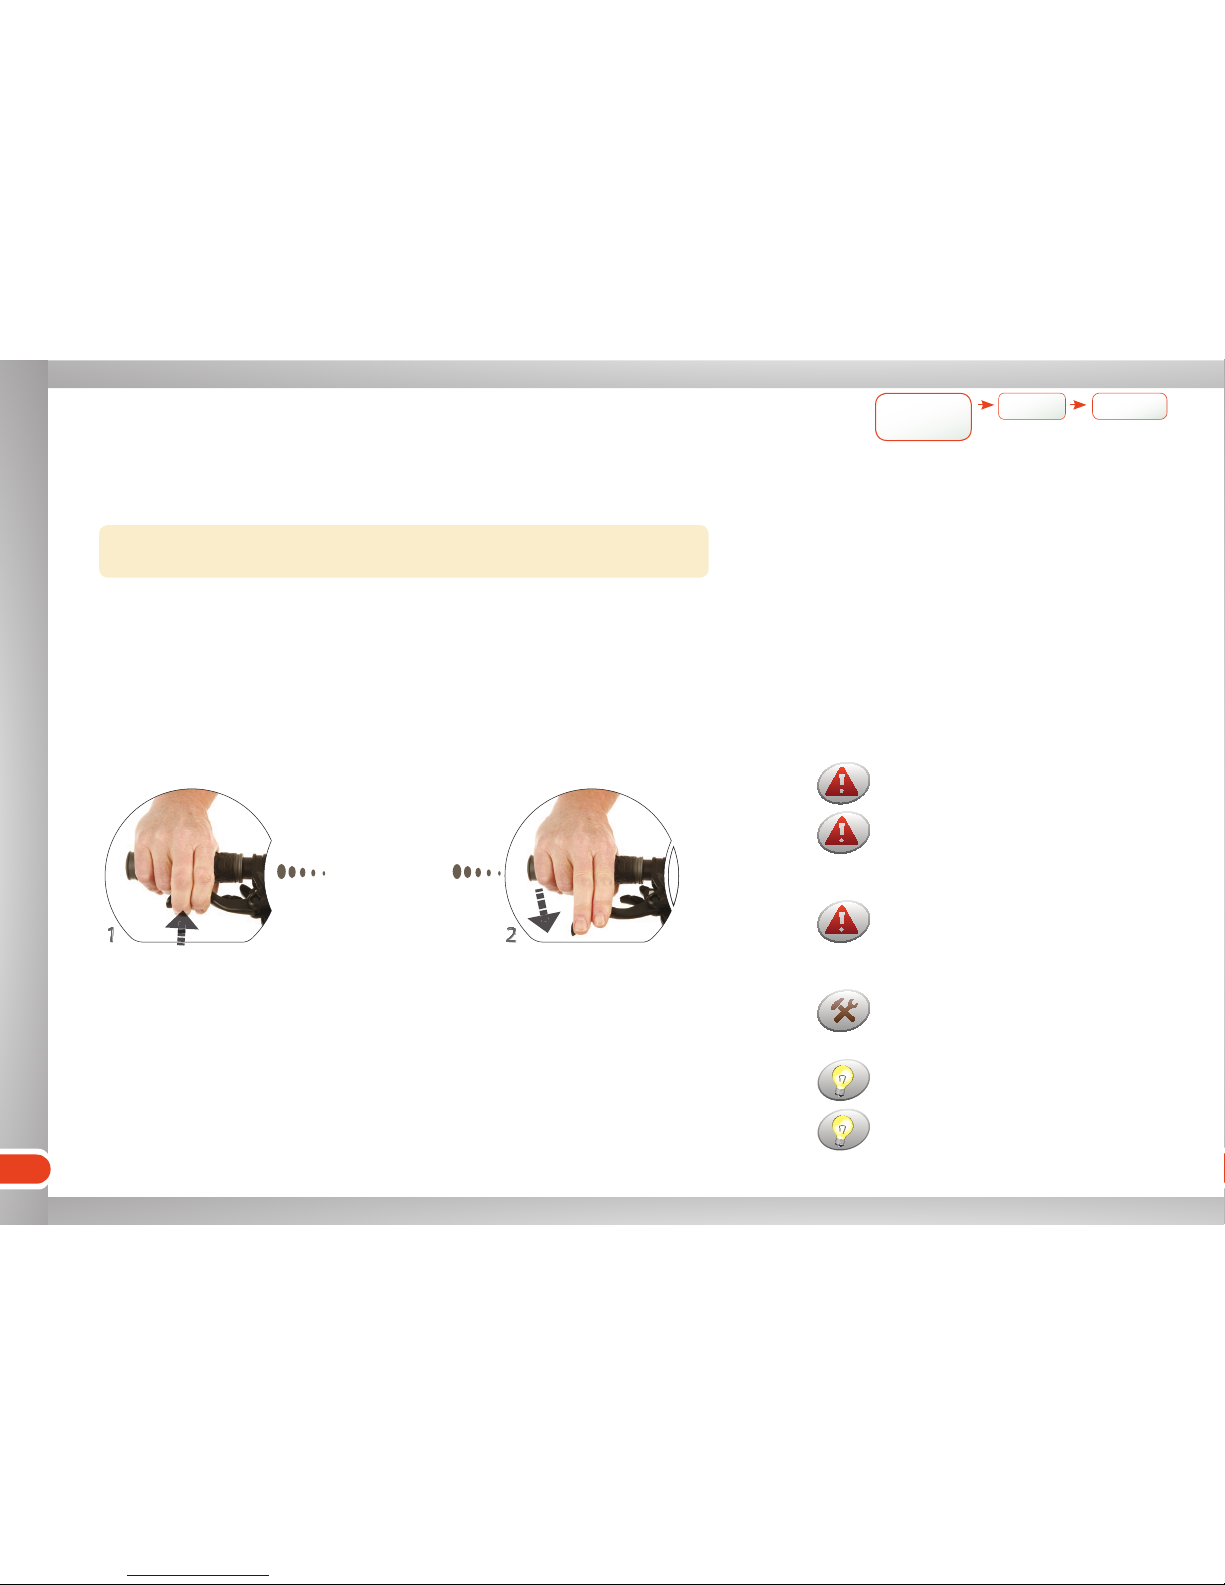
The essentials
Braking
... to pedal and stop correctly.
Front + rear
press the lever release the lever
Remember which lever operates the
front brake and which the rear brake.
Ideally use both front and rear brakes
simultaneously.
Make sure no grease, oil, silicone
spray or wax comes on the brake pads,
disc rotor or rim.
Brake short and hard instead of
continuously to prevent overheating of
the components.
Longer braking could cause the brakes
to overheat and fail. As soon as you
note the braking force weakening,
stop and let the brakes cool down.
Do NOT touch the brake pads or the
disc brake rotor, especially after use.
There is danger of cutting or burning
as the rotor gets very hot.
slow down or
stop
Braking Gear
shifting
Lock
Suspension
Permitted use
Mountainbikes: hard-surface roads and off-road use. No racing or jumping.

6
The essentials
û
û
CRD29 competition, CRD29 sport, Ego pro, Ego competition, Ego sport, Karma competi-
tion, Karma sport, Spirit competition, Spirit sport, Moko - 160, Moko - 140, Moko – 120
Gear shifting
Up
Down The most effective pedalling frequency
is about 60-70 revolutions per minute.
For racing cyclists this can be over 90
rpm (much less downhill/uphill).
The gear display shows the gear in
use.
You can also push the
lever instead of pulling
it, if you find this
more comfortable.
Push it through to
shift up to three
gears at once.
Avoid using extreme gear ratios i.e.
big in front:small in rear or small in
front: big in rear. These greatly
increase the wear on the chain.
Slow pedalling down
Slow pedalling down Pull the smaller lever
(up to a click) and
release
Push the bigger lever
(up to a click) and
release
Pedal lightly until the
gear shifts
Pedal lightly until the
gear shifts
Braking Gear
shifting
Locking
suspension
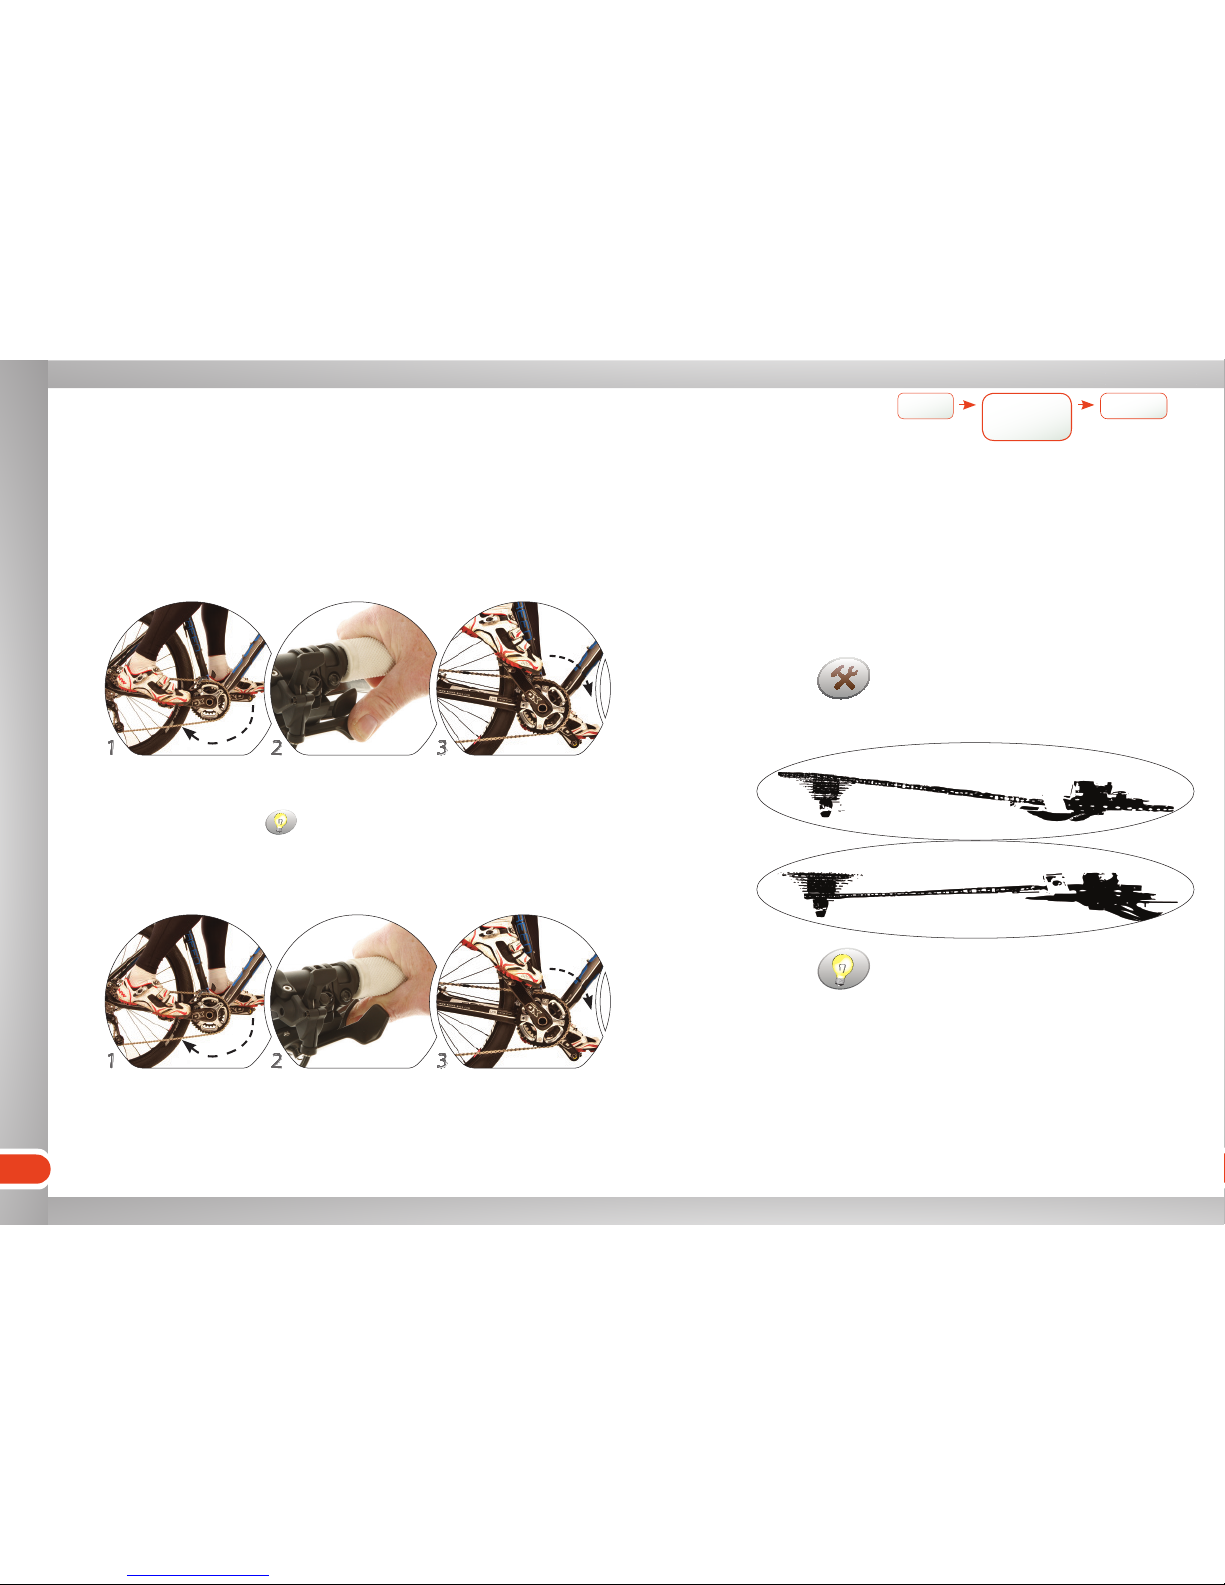
7
The essentials
û
û
CRD29 competition, CRD29 sport, Ego pro, Ego competition, Ego sport, Karma competition, Karma sport, Spirit competition, Spirit sport, Moko - 160, Moko - 140, Moko – 120
Up
Down
Avoid using extreme gear ratios i.e.
big in front:small in rear or small in
front: big in rear. These greatly
increase the wear on the chain.
Slow pedalling down
Slow pedalling down Push the smaller lever
(up to a click) and
release
Push the bigger lever
(up to a click) and
release
Pedal lightly until the
gear shifts
Pedal lightly until the
gear shifts
Push it through to
shift up to three
gears at once.
Braking Gear
shifting
Locking
suspension
The most effective pedalling frequency
is about 60-70 revolutions per minute.
For racing cyclists this can be over 90
rpm (much less downhill/uphill).
8
The essentials
CRD29 competition, CRD29 sport, Ego pro, Ego competition, Ego sport, Karma competition, Karma sport, Spirit competition, Spirit
sport, Moko - 160, Moko - 140, Moko - 120
CRD29 competition, CRD29 sport, Ego pro, Ego competition, Ego sport, Karma competition, Karma sport, Spirit competition, Spirit sport, Moko - 160, Moko - 140, Moko - 120
CRD29 competition, CRD29 sport, Ego pro, Ego competition, Ego sport, Karma competition, Karma sport, Spirit competition, Spirit sport, Moko - 160, Moko - 140, Moko - 120
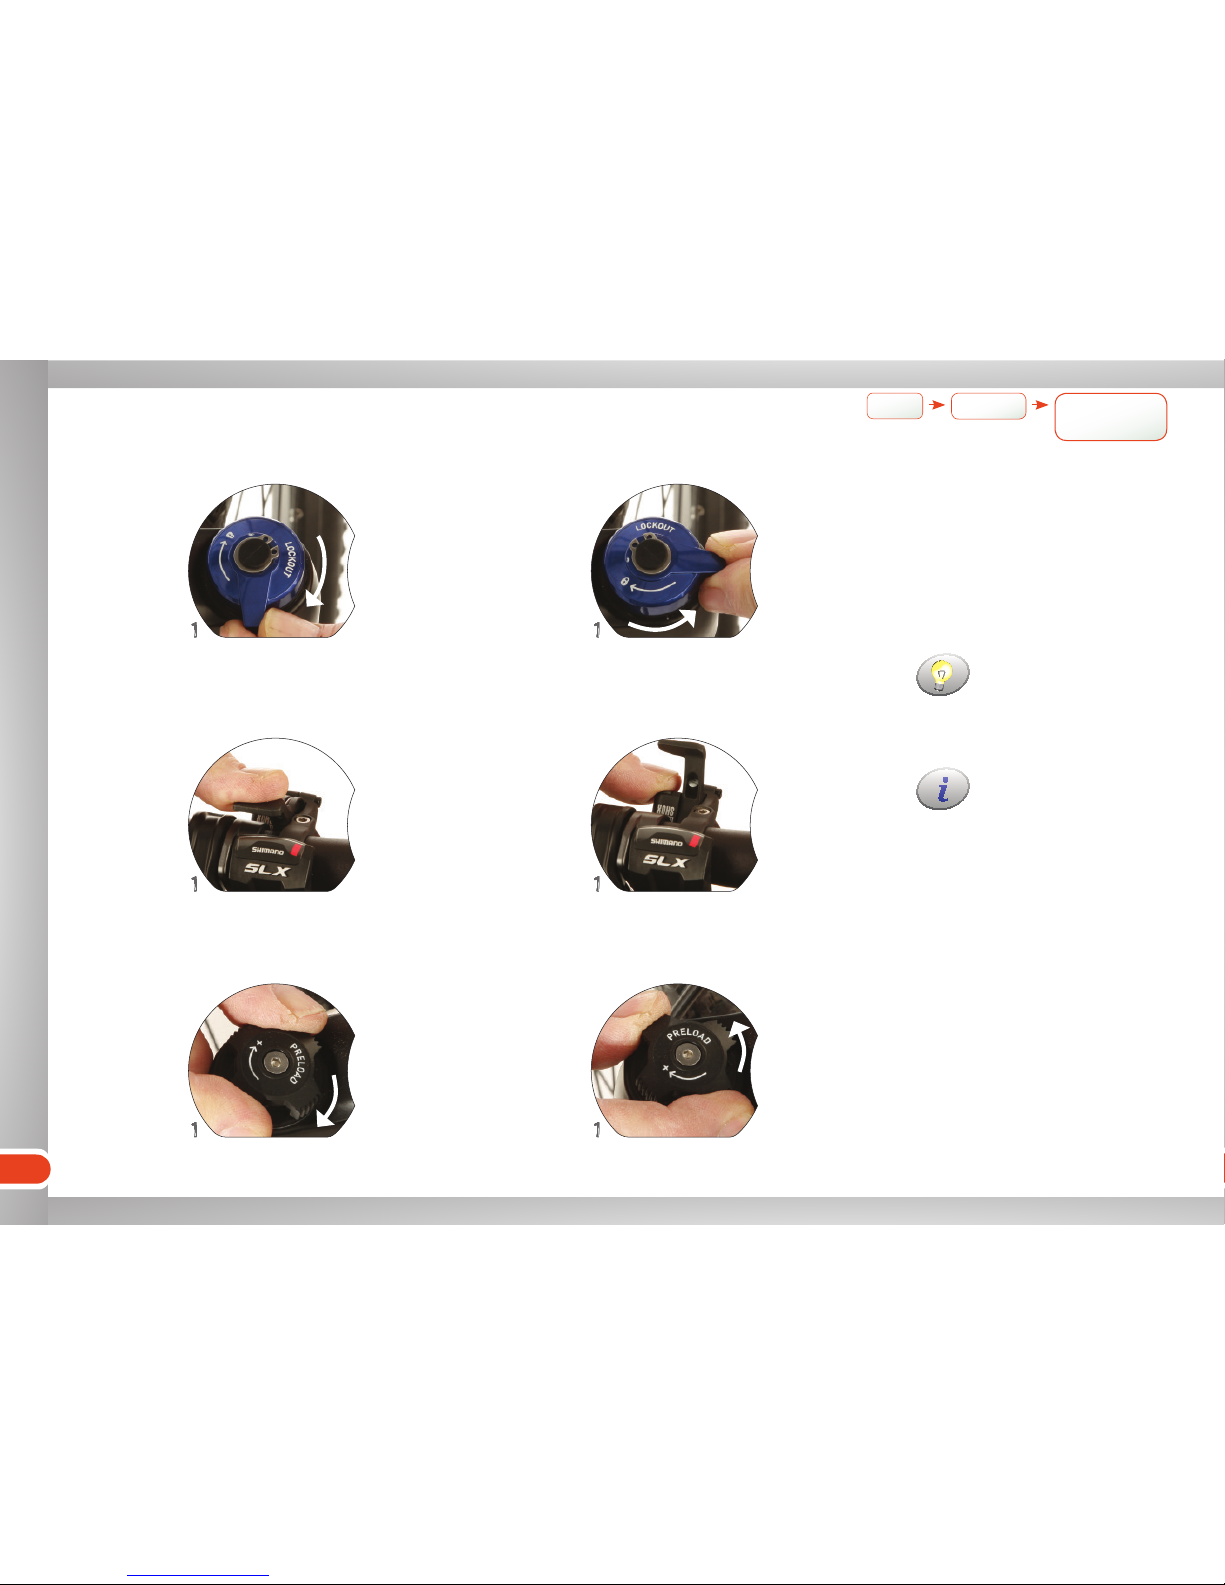
Locking the suspension fork
Turn the cap to posi-
tion "locked" (sign Ï)
Turn the cap maximally
towards +
Push the lever until
you hear a click
Turn the cap to the
position "open"
Turn the cap counter-
clockwise
Press the release
button
Locking
suspension
Gear
shifting
For more details refer to
the suspension fork
manual supplied with the
bike.
Lock the suspension on
smooth surfaces or for
long climbs to avoid
"bobbing". This will save
pedalling energy.
Braking
Lock
Lock
Harden
Unlock
Unlock
Soften
9
Make yourself comfortable
Make yourself comfortable
... adjustments for comfort, efficiency and safety.
Saddle height
It is more important to adjust your
bike for comfort than to rigidly follow
general rules.
Ideal height
(Knee slightly bent)
For long descents it is advisable to
lower the saddle height for better
control of the bike.
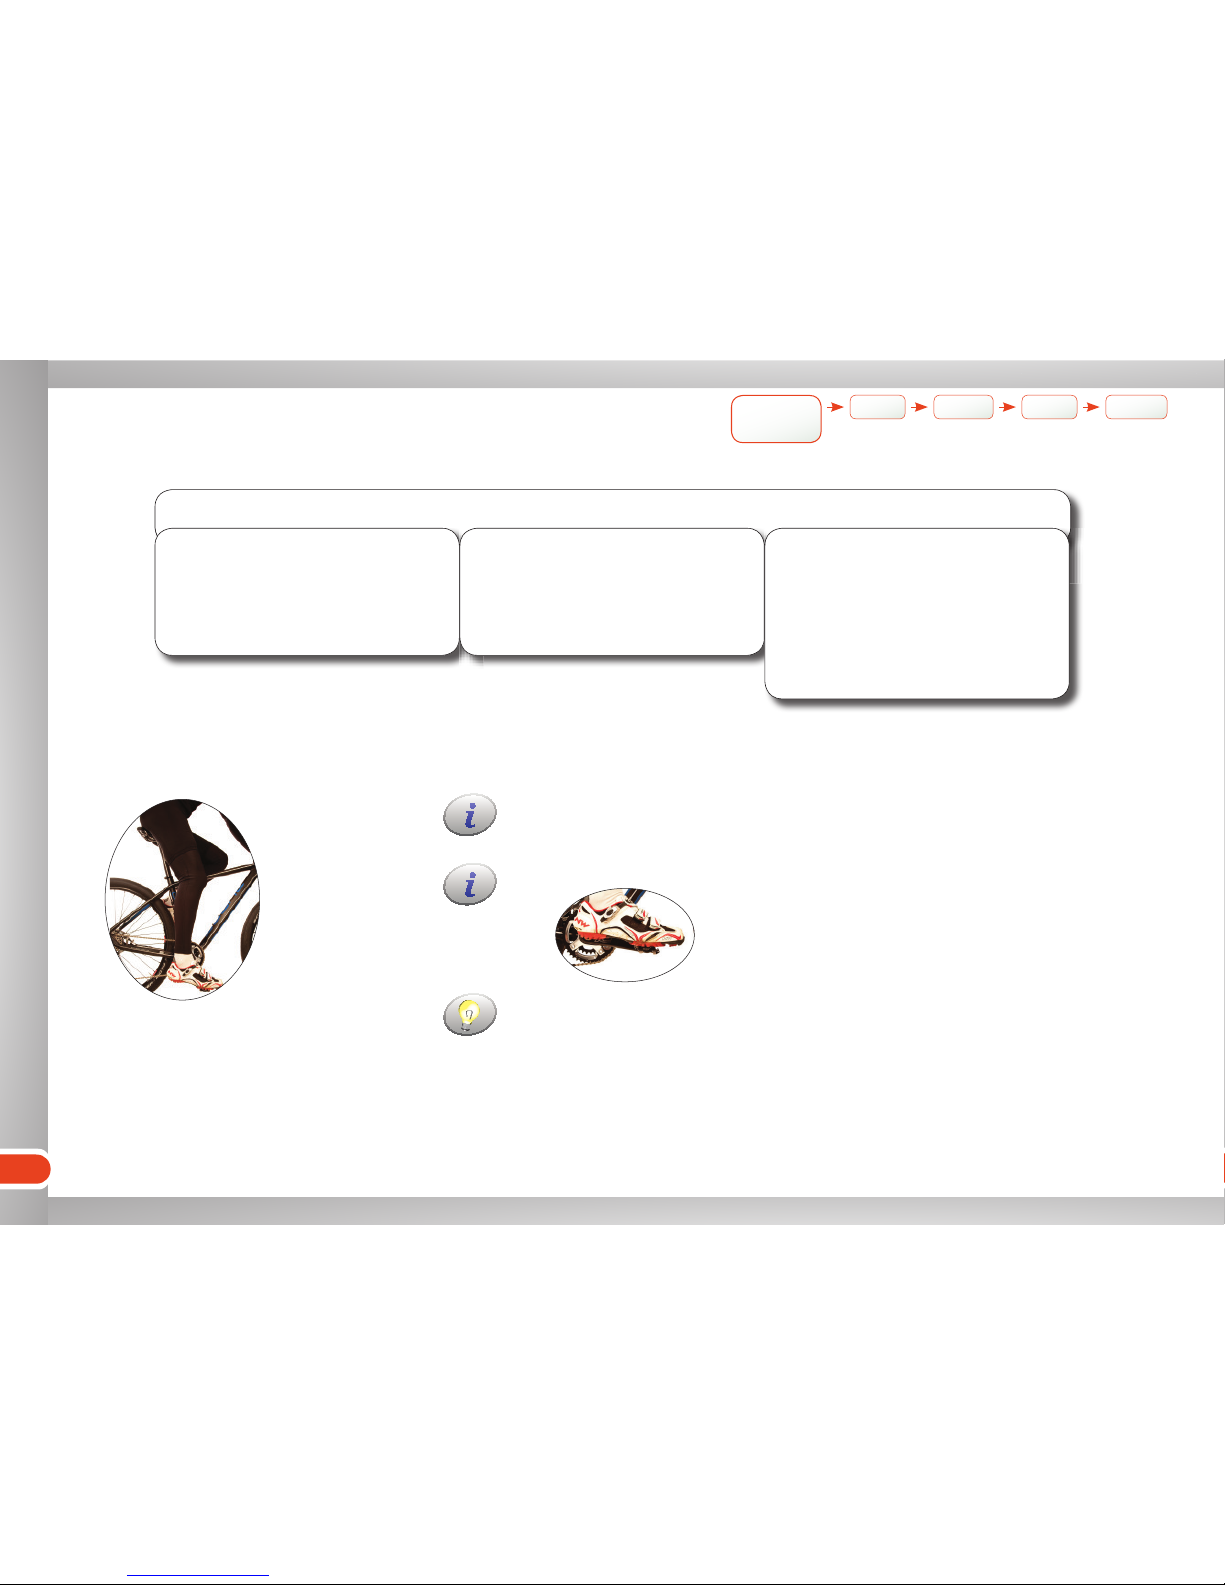
Optimum foot position on the pedal:
Saddle
height
Handlebar
height
Saddle
position
Brake
levers
Suspension
fork
Checklist: Adjustments
1) SADDLE
Height• ü
Tilt• ü
Horizontal position• ü
2) HANDLEBAR
Height• ü
Tilt• ü
3) BRAKE / SHIFT LEVERS
Tilt and position• ü
4) SUSPENSION
Rigidity•

10
Make yourself comfortable
û
CRD29 competition, CRD29 sport, Ego pro, Ego competition, Ego sport, Karma competition, Karma sport, Moko - 120
Spirit competition, Spirit sport, Moko - 160, Moko - 140
The quick-release
lever should be moving
firmly towards the
end. If it moves too
easily, tighten the
opposite nut a little.
Do not pull out the seat post beyond
the “Minimum insert” sign — it could
break or damage the frame!
Adjusting the saddle height
Loosen the nut
Pull open the quick-
release lever
Adjust the height
(twist the saddle a bit)
Adjust the height
(twist the saddle a bit)
Check the alignment
Check the alignment
Tighten the nut
Close the quick-release
Twist to check it is
tight
Twist to check it is
tight
Saddle
height
Handlebar
height
Saddle
position
Brake
levers
Suspension
fork
11
Make yourself comfortable
Spirit competition, Spirit sport, Karma competition, Karma sport
û
CRD29 competition, CRD29 sport, Ego pro, Ego competition, Ego sport, Moko - 160, Moko - 140, Moko - 120
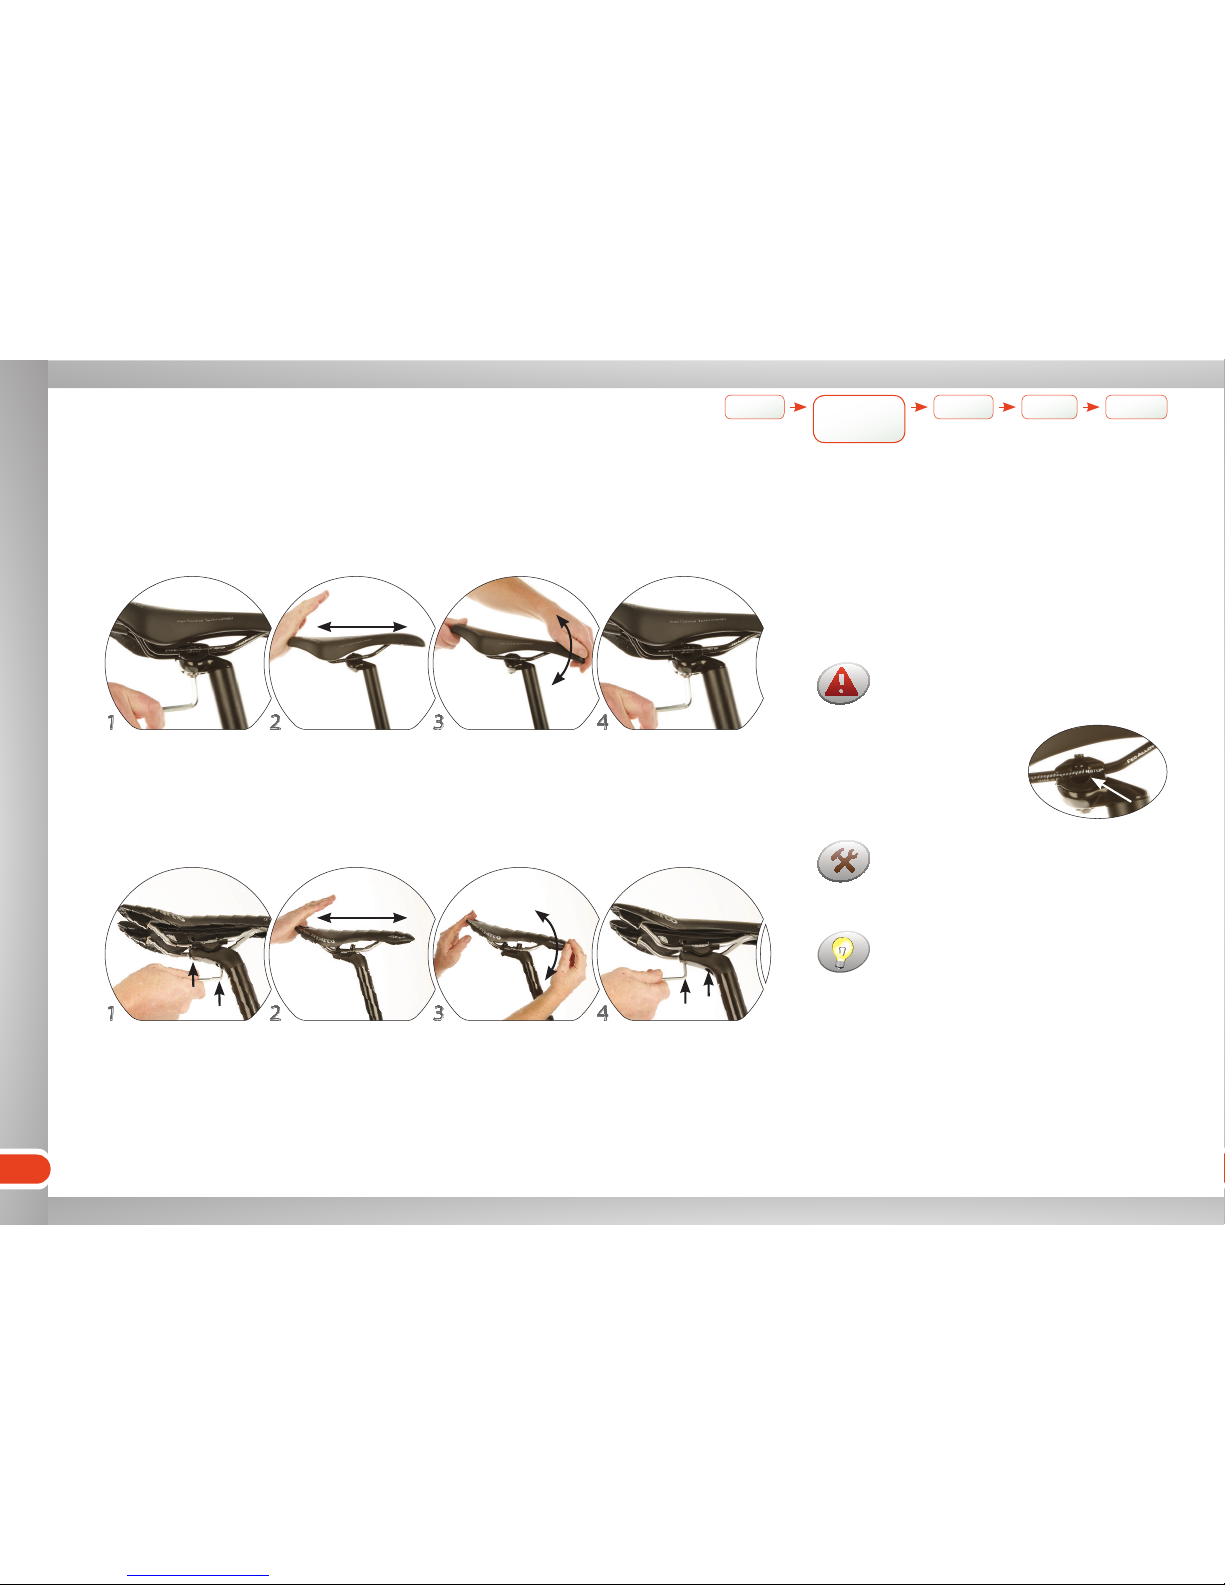
Saddle position
Adjusting horizontal position and tilt
Saddle
position
Saddle
height
Brake
levers
Suspension
fork
Handlebar
height
ü
Loosen the screw
Loosen both screws
Adjust the tilt
Adjust the tilt
Tighten the screw
(respect the allowed
torque)
Tighten both screws
(respect the allowed
torque)
Shift the saddle
Shift the saddle
Generally, the saddle should be
horizontal. However, your comfort is
more important than rigidly following
general rules.
Test if the saddle is fixed — it should
support your whole weight on the
front without tilting, as well as your
whole weight on the front.
Do not shift the saddle beyond the
limits marked on the saddle — the
saddle could break!
12
Make yourself comfortable
Handlebar
height
Saddle
height
Saddle
position
Brake
levers
Suspension
fork
ü ü
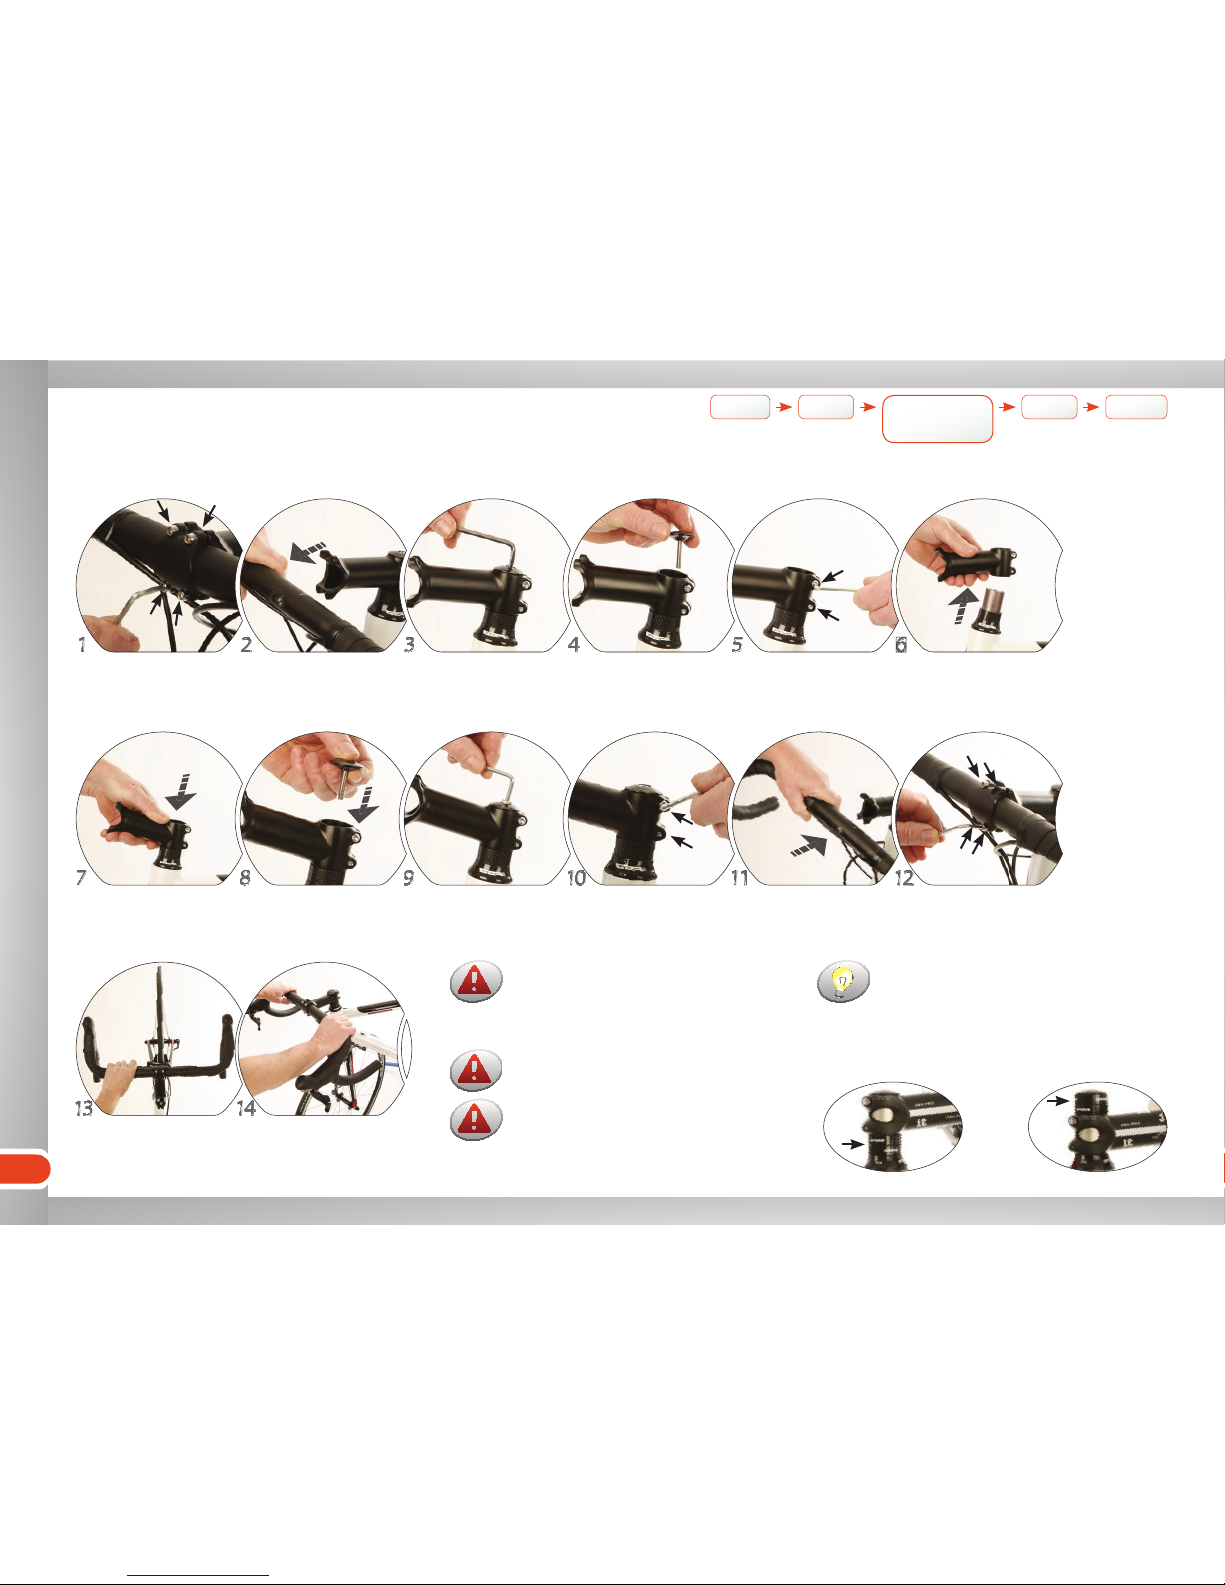
Handlebar height
Loosen the 4 bolts of
the stem clamp cap
Remove the clamp cap
(hold the handlebar to
prevent falling and set
it down)
Loosen the bolt Remove the cap Release both bolts Pull the stem off the
fork
Replace the cap on to
the stem clamp
Reposition the stem in
upside-down position
Centre and reposition
the handle-bar
Check that it is tight
(try twisting the
handlebars)
Tighten both side bolts
Check the alignment of
the handlebar
Carefully tighten the
top bolt until the play
is gone, but steering is
still possible
Tighten all 4 bolts of
the cap
Spacers beneath Spacers above
Turning stem upside-down
If the brake and shift cables are now
too short, ask your dealer for help.
Do not tighten the handlebar bolts
excessively (steps 10 and 12), as the
material could get damaged. Maximum
torque is written on the stem.
Changing the handlebar height by
cutting the fork tube is complex and
irreversible, and must be done by an
expert.
You can also change the height by
removing spacers and placing them
either above or below the stem.
(Useful when you need to test the
optimum position before cutting the
fork tube.)

13
Make yourself comfortable
Brake levers
Loosen the screw Turn / shift the lever Tighten the screw
Shifting / tilting the
remote suspension
lock-out
Shifting / tilting
shifters
Ideal tilt
Changing the tilt
(Forearm and lever are in one line)
Brake
levers
Suspension
fork
Remember to also adjust the position
of shifters and the remote suspension
lock-out (if available).
Saddle
height
Saddle
position
ü ü Handlebar
height
ü

14
Make yourself comfortable
Suspension
fork
Brake
levers
ü
fork model Measure sag Rebound speed Compression Air pressure
CRD29 competition Rockshox Reba 29QR DA100 BLKRB T RMT RL 100 mm X X X X
CRD29 sport Rockshox XC28 MTK29 CL80 Black X X X
Ego pro Rockshox REBA RL 26QR DA100 BLK X X X X
Ego competition Rockshox RECON GLDTK QR SA100 WHITE DSC TAP RRMT X X X X
Ego sport Rockshox RECON SLVTK QR SA100 BLACK DSC TPR RMT X X X X
Karma competition Rockshox REBA RL 26QR DA100 WHTRB T RMT X X X X
Karma sport Rockshox RECON SLVTK Q SA100 BLACK DSC TPR RMT X X X X
Spirit competition RST Blaze-RL PM BK DK-8010
Spirit sport RST Blaze-ML VB BK DK-8010
Moko - 160 Rock-Shox LYRK RC SA 160 WHTGL TAPER, tapered steerer X
Moko - 140 Rock-Shox REVALATION RL QR DA140 BLKRD T CRN, tapered
steerer X
Moko - 120 Rock-Shox SID RLT120mm RMT, tapered steerer PopLoc right X
Glossary:
Sag: the amount the fork compresses when you are sitting on your bike (with helmet, rucksack etc.). The front wheel better follows the
contours of the terrain if your sag is properly set. (Sag for MTB is usually between 20% and 30% of the maximum fork travel.)
Rebound (or rebound damping): the speed at which the fork returns up after a compression.
Compression (or compression damping): the speed at which the fork compresses (hard or soft fork).
Adjustable features for different models
Saddle
height
Saddle
position
ü ü Handlebar
height
ü
Suspension fork
15
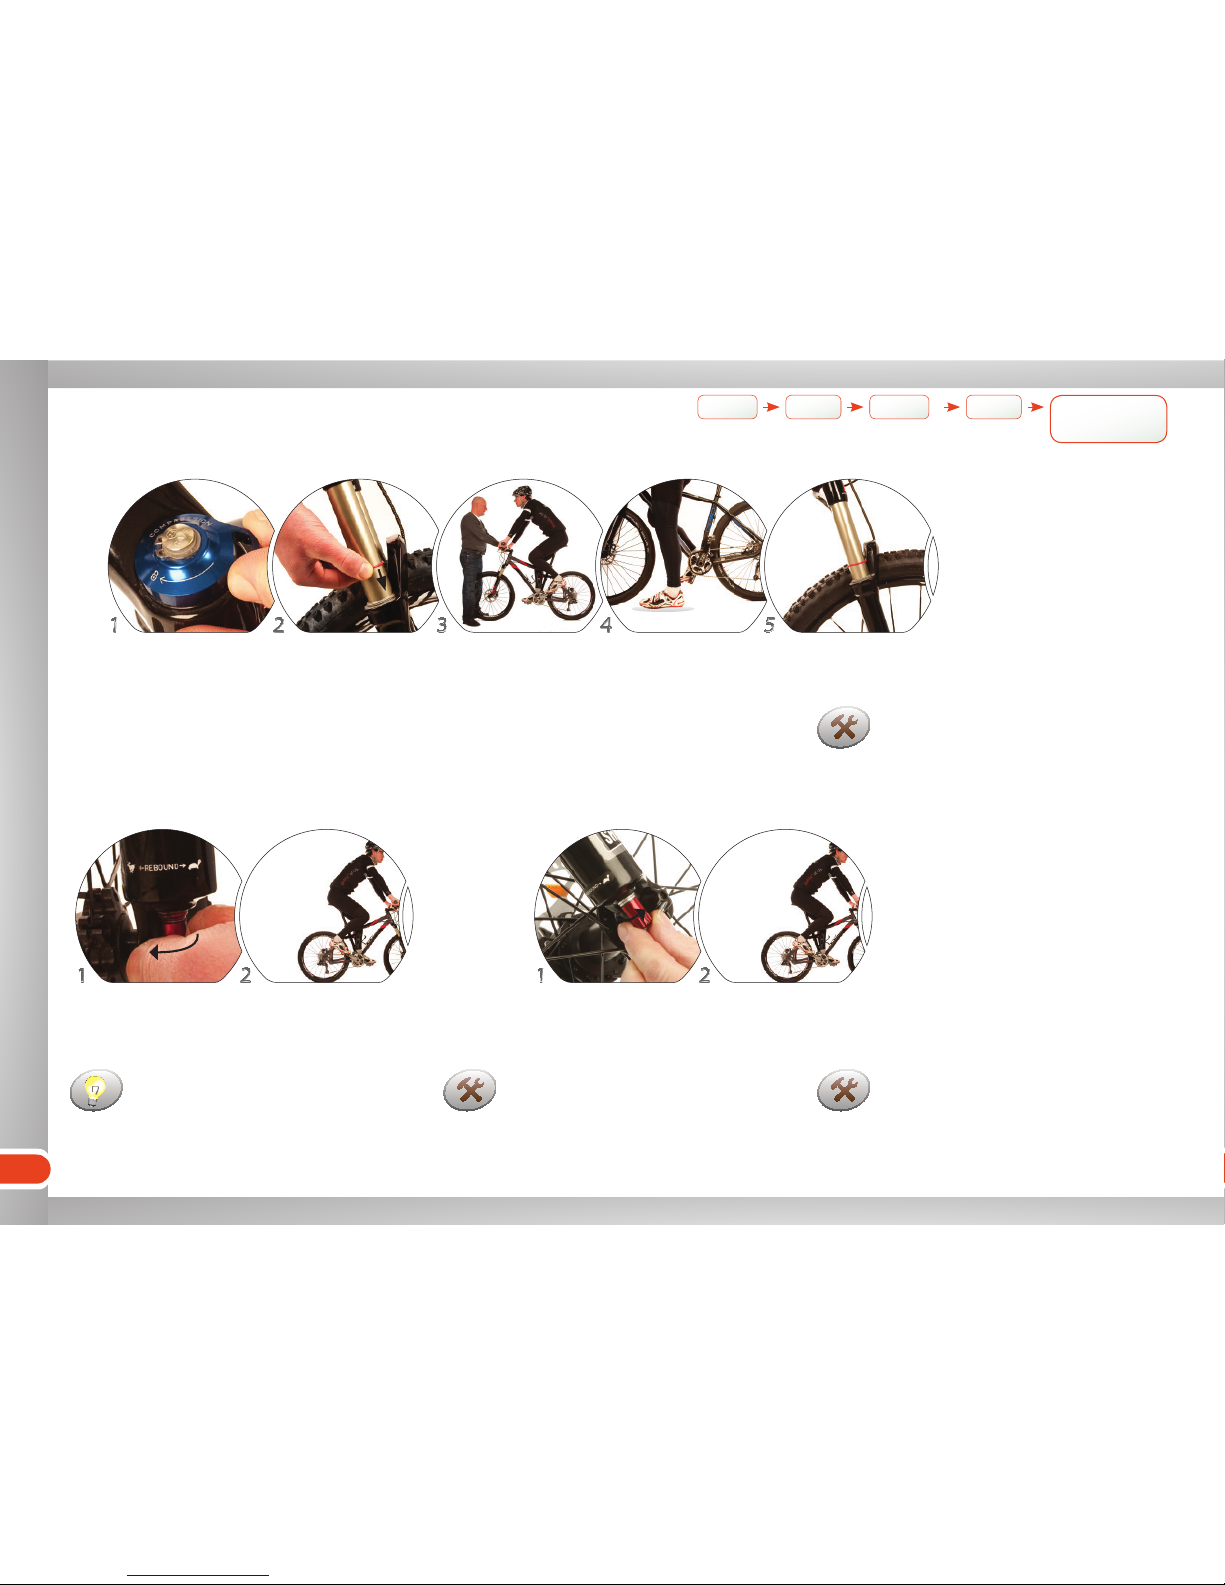
Make yourself comfortable
Set compression to
minimum (turn anti-
clockwise)
Turn in direction of
icon "rabbit"
Turn in direction of
icon "turtle"
Wearing your riding
gear, stand on the ped-
als and rock backwards
and forwards while a
2nd person holds the
bike steady.
Shift the measuring
ring to lowest position
Make a test ride Make a test ride
Carefully step off the
bike
Check if sag is within
recommended range
If the sag is out of the recommended
range, adjust the pressure in the fork.
See page 16.
Up to 18 different rebound speeds (18
clicks of the knob) are available,
depending on the fork type.
Rebound that is too rapid makes the
bike ‘kick back’ while rebound that is
too slow reduces fork travel over
successive bumps, as the fork doesn't
return in time to the full extension.
Measuring sag
Increasing rebound speed Decreasing rebound speed
Test several rebound speeds on a
familiar section of a bumpy trail and
choose the setting you like most.
Suspension
fork
Brake
levers
ü
Saddle
height
Saddle
position
ü ü Handlebar
height
ü

16
Make yourself comfortable
Less compression makes the fork soft,
more compression makes the fork
hard.
Turn the knob clock-
wise
Remove the cap
Turn the knob antick-
lockwise
Test the fork's rigidity
(riding or standing)
Fix the pump (Note:
A special pump is re-
quired; not supplied)
Adjust the pressure
(pump or release air)
Replace and close
the cap
Test the fork's rigidity
(riding or standing)
Making fork harder (high compression)
Making fork harder /softer
Making fork softer (low compression)
Up to 10 different compressions are
available (10 clicks of the knob),
depending on the fork type.
Suspension
fork
Brake
levers
Saddle
height
Saddle
position
Handlebar
height üü ü ü

17
Special situations
û
ûü
Pearl, Pearl-Comp, Pearl-Pro, Pearl-Race.
Special situations
... know what is needed.
This position could put excess
pressure on the handlebar and the
seat post and and result in damage.
Clamping on carbon could cause
invisible damage to the carbon fibres.
All carbon bikes carry this sticker:
Measure the total height of your car
including the bicycle to pass securely
through car-park gates or tunnels.
Adjust the car speed to the altered
aerodynamics of your car.
unsuitable position
upside down
incorrect clamping,
damaging carbon parts
correct clamping (non-
carbon parts)
Transporting bicycle by car
Not upside down
No clamping of carbon frame or parts
The best transport for your bike is inside the car•
Clamp your bike on the seat post or another rigid non-carbon part•
18
Special situations
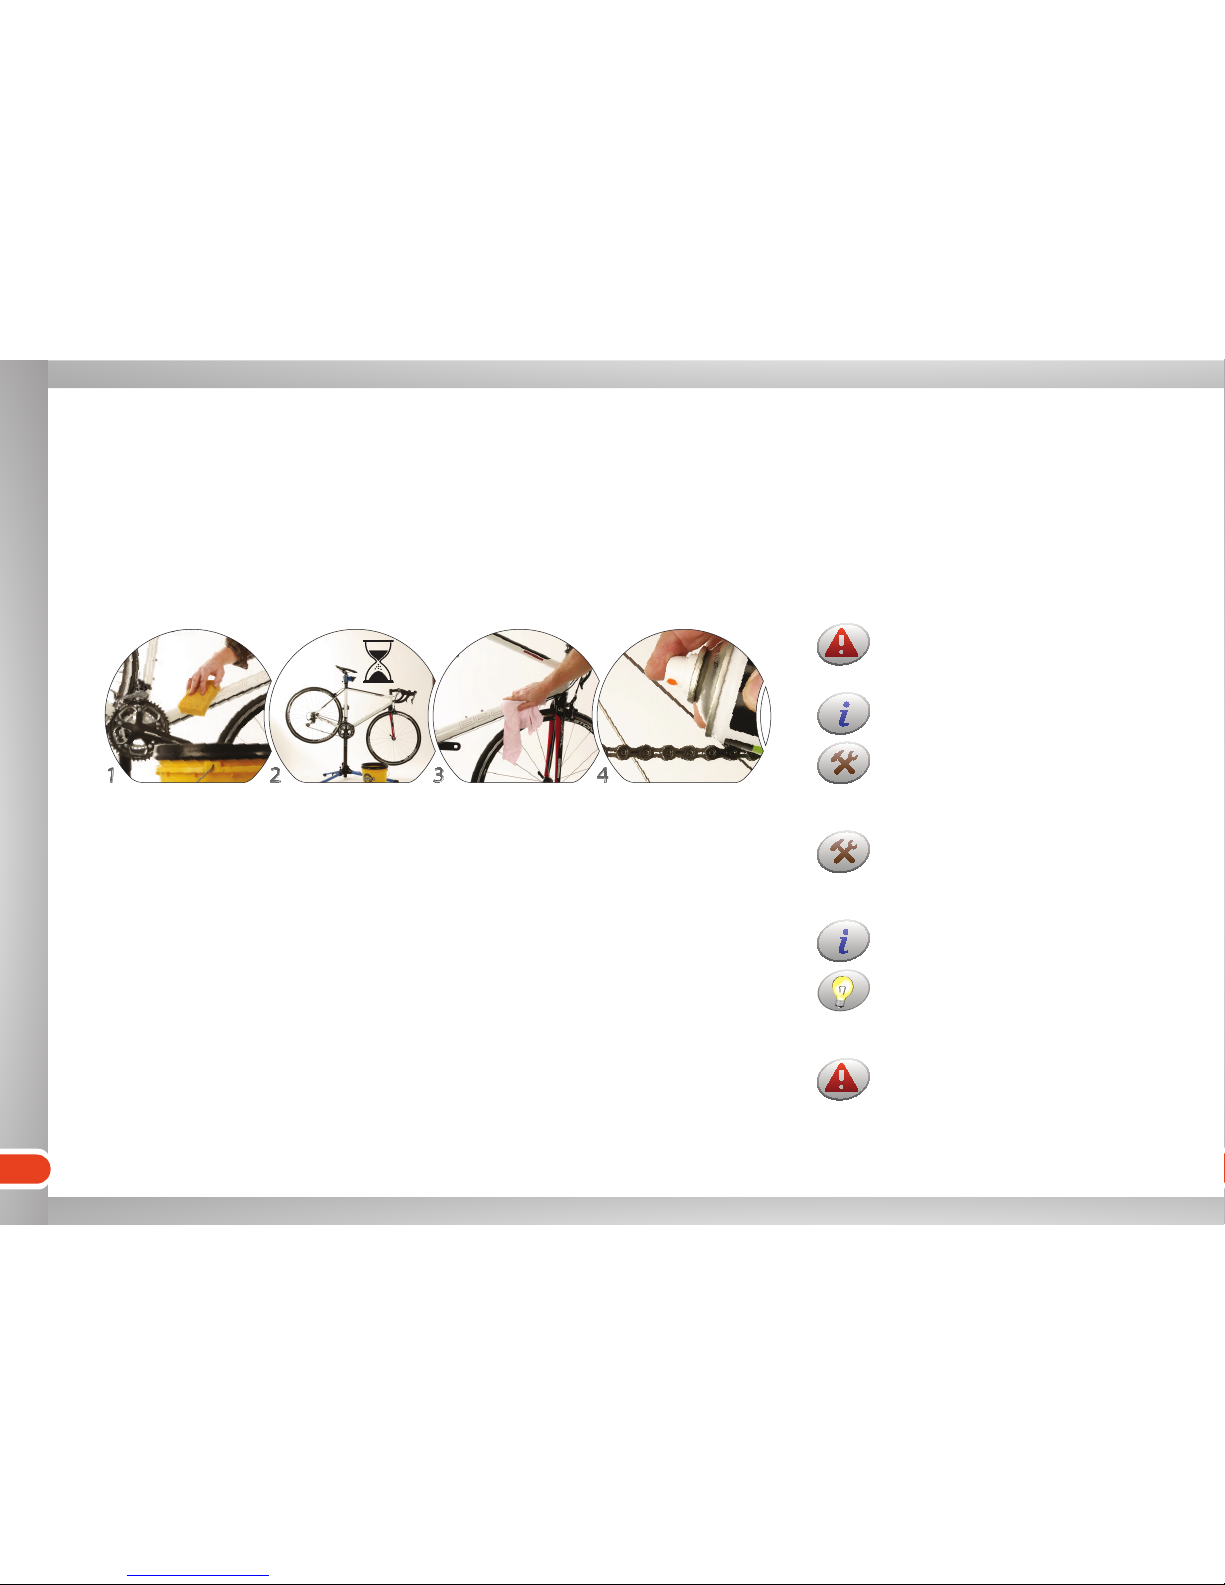
Cleaning the bicycle
Regular cleaning after every ride will prolong the lifetime of your bike.
Use a hose or a bucket of water•
Use a sponge or a soft brush•
Cleaning is also a good opportunity to
closely check for damage or scratches.
Salt from winter roads, dirt or mud
damage the materials and impair the
functionality of brakes and other
parts.
Don't get oil or chemicals on the brake
pads or rim sides. The brakes could
fail.
Don't use a high-pressure washer or a
steam jet as they could damage the
bike.
Clean and grease the chain especially
after rides on wet roads and in rain.
The chain is the part that needs the
most frequent care. A worn chain can
reduce the lifetime of chainrings and
sprockets.
Grease a cloth and rub the chain with
it. This is preferable to using sprays,
which could result in grease getting on
the frame, the rotor, rim or tyre.
Clean all parts Cover the frame with
protective wax
Grease the chainLet dry

19
Special situations
Storing the bicycle
If you hang the bike, the tyres will not
get damaged even if the air is lost.
Do NOT store the bike upside down.
This could damage the hydraulic
brakes and the suspension.
Clean, dry and polish the bicycle
before storing it for the winter or for
a longer period. Do NOT grease the
disc brake rotors.
Inflated tubes slowly lose air over
time. Long periods standing on flat
tyres could damage the tyres.
Check the air pressure monthly over
the storage period. If too low, inflate
the tyres to reach the recommended
pressure (as stated on the tyre).
Store in a dry and
ventilated place

20
Troubleshooting / break-down help
... ... ... ... ...
Troubleshooting / break-down help
... getting you back on your bike as soon as possible.
Higher air pressure means less rolling
resistance, but also less grip.
Lower air pressure means more rolling
resistance, but more grip.
Air-pumps designed for other valve
types will not work with this type.
An overinflated tyre could burst. This
is an accident risk!
Inflating a tyre
Deflating
Remove the cap InflateLoosen the valve nut Check if within the al-
lowed pressure limits
Tighten the valve nut Tighten the cap
Press the stem inside
This manual suits for next models
11
Table of contents


