berlinger Fridge-tag 2 User manual


User Manual Fridge-
tag
1 — Last update: Aug 20, 2021
Berlinger & Co. AG
Copyright © 2021 Berlinger & Co. AG

Table of Contents
1. Home .................................................................................................................................................. 1
2. Display explanations ......................................................................................................................... 3
3. State of delivery / sleep mode .......................................................................................................... 4
4. Read out information prior to activation (in sleep mode) ............................................................... 5
5. Placing the Fridge-tag ....................................................................................................................... 7
6. Activation process ............................................................................................................................ 8
6.1. Activation of the device .............................................................................................................. 9
6.2. Setting the calendar format ...................................................................................................... 10
6.3. Using the READ and the SET buttons ...................................................................................... 11
6.4. Setting the date........................................................................................................................ 12
6.5. Setting the time ........................................................................................................................ 14
6.6. Setting the alarm limits (not standard, only if preset by factory) ................................................ 16
6.7. LOC function (internal sensor only) .......................................................................................... 20
6.8. Connection error (external sensor only).................................................................................... 21
7. Read and change settings / How to correct setting mistakes....................................................... 22
7.1. Initial menu (read and change settings).................................................................................... 23
8. Screen displays during measurement mode.................................................................................. 25
9. Alarm trigger function ..................................................................................................................... 27
9.1. Alarm display and confirmation options .................................................................................... 29
9.2. Cumulative daily time above/below the limit ............................................................................. 32
10. Reading the history / Readout mode ............................................................................................ 33
10.1. Option 1: Read out day per day directly on the device (30-day history) .................................. 34
10.2. Option 2: Read out alarms directly on the device – use the Alarm Super Jump function (30-day
history) .................................................................................................................................................. 37
10.3. Option 3: Read out data from the files generated by the Fridge-tag by connecting it with a
computer ............................................................................................................................................... 39
10.4. PDF report explanation .......................................................................................................... 42
10.5. Temperature record duration (optional factory setting) ........................................................... 43
10.6. Verification process................................................................................................................ 44
11. Explanations of terms ................................................................................................................... 46
12. Expire code explanation................................................................................................................ 47
13. Important Information ................................................................................................................... 48
14. Firmware ........................................................................................................................................ 50
15. FAQ / Glossary .............................................................................................................................. 51

1. Home
Berlinger Fridge-tag 2
Berlinger Fridge-tag 2 E
Fridge-tag 2
The Intelligent Solution
The Fridge-tag 2 measures the ambient temperature every minute and immediately issues an alert when
your alarm limit is exceeded.
• Robust housing design
• Easily readable display
WHO PQS
E006/020
Technical Specification
Product Information Overview
Fridge-tag 2 E
The Extended Solution
The Fridge-tag 2 E measures the ambient temperature every minute and immediately issues an alert
when your alarm limit is exceeded.
Berlinger & Co. AG User Manual Fridge-tag - 1
Page 1 of 51


2. Display explanations
1. (OK symbol) or (alarm symbol)
2. Daily HIGH/LOW alarm indicators (showing the history of the last 30 days)
3. Power indicator (colon is flashing)
4. Battery indicator (indicates the remaining capacity of the battery)
5. Additional warning symbol
6. Time, duration and text display
7. Date and text display
8. Display of measured minimum/maximum temperature
9. Temperature display
10. Display of the temperature measurement unit (°F/°C)
11. Display of the activated sensor:
Int. = internal sensor
Ext. = external sensor (cable with temperature sensor)
Note: All illustrations in the User Manual refer to the Fridge-tag with internal sensor. Differences
between internal and external sensors are additionally described.
Berlinger & Co. AG User Manual Fridge-tag - 1
Page 3 of 51

3. State of delivery / sleep mode
The Fridge-tag is shipped in sleep mode.
The display (LCD) is blank.
Berlinger & Co. AG User Manual Fridge-tag - 1
Page 4 of 51

4. Read out information prior to activation
(in sleep mode)
The following page shows which information will be indicated on the screen upon successive READ
button pressings while in sleep mode.
Note: After approx. 60 seconds without pressing any button on the Fridge-tag the devices goes back into
sleep mode; the display is blank again.
Press repeatedly READ to gather information.
After 1st
pressing of
READ
Display test:
all segments activated
After 2nd
pressing of
READ
Indication of date and production test
result: 16 February 2018/PASS (quality check
passed)
After 3rd
pressing of
READ
Indication of the current temperature and which
sensor is activated (internal/external).
Display shows —.-°C if external sensor is not
connected.
After 4th
pressing of
READ
Indication of configuration ID
(e.g. 1234)
After 5th
pressing of
READ
Indication of upper alarm settings.
Example shows duration and temperature limits: 10
hours, >+8°C, high
After 6th
pressing of
READ
Indication of lower alarm settings. Example
shows duration and temperature limits: 1 hour,
<–0.5°C, low
After 7th
pressing of
READ
Serial number of the device
Berlinger & Co. AG User Manual Fridge-tag - 1
Page 5 of 51

After 8th
pressing of
READ
PCb number
(manufacturer information)
After 9th
pressing of
READ
Battery power:
3 bars = full (>70%)
2 bars = half-full (>30–70%)
1 bar = low (0–30%)** **Device should be replaced.
After 10th
pressing of
READ
Disable user clock adjust.
For more information, please see chapter Activation
process
After 11th
pressing of
READ
The display is blank again.
Berlinger & Co. AG User Manual Fridge-tag - 1
Page 6 of 51

5. Placing the Fridge-tag
Placing the Fridge-tag with an internal sensor
The activated Fridge-tag must be placed immediately after activation in its predetermined location. It is
recommended and important to place the device in the center of the refrigerator for an optimal
temperature observation.
Placing the Fridge-tag with an external sensor
Two hours before activating the Fridge-tag the external sensor must be placed in its predetermined
location. It is recommended and important to place the external sensor in the center of the refrigerator
for an optimal temperature observation and to avoid any incorrect measurements when starting the
device.
For the right positioning of the external sensor within the fridge, please follow the instructions of WHO,
CDC or any other governmental requirements of your country.
1. External Sensor
2. Flat cable
3. Fridge-tag
Please do not place the device into a freezer as the screen will freeze and the battery
will lose power prematurely.
!
Berlinger & Co. AG User Manual Fridge-tag - 1
Page 7 of 51

6. Activation process
Overview: sequences of activation
Note: As long as the activation process has not been completed, after approx. 60 seconds without any
button operation, the device will go back into sleep mode. The activation has to be started from the
beginning.
If you want to read or change settings (e.g. change °F to °C) after the activation has been completed,
proceed as described in chapter Read and change settings / How to correct setting mistakes.
Berlinger & Co. AG User Manual Fridge-tag - 1
Page 8 of 51

6.1. Activation of the device
To activate the device press, the SET and the READ button simultaneously during at least 3 seconds.
Note: Once the device is activated, it cannot be stopped anymore.
Activation has been successful when the following indication appears on the screen:
Berlinger & Co. AG User Manual Fridge-tag - 1
Page 9 of 51

6.2. Setting the calendar format
Option 1: Setting the calender format to: dd.mm.yyyy
Press SET to save the calendar format.
Option 2: Setting the calender format to: mm.dd.yyyy
1. Press READ to change the calendar format.
2. Then press SET to save the calendar format.
After setting the calendar format, the first digit of the date will start flashing.
Berlinger & Co. AG User Manual Fridge-tag - 1
Page 10 of 51
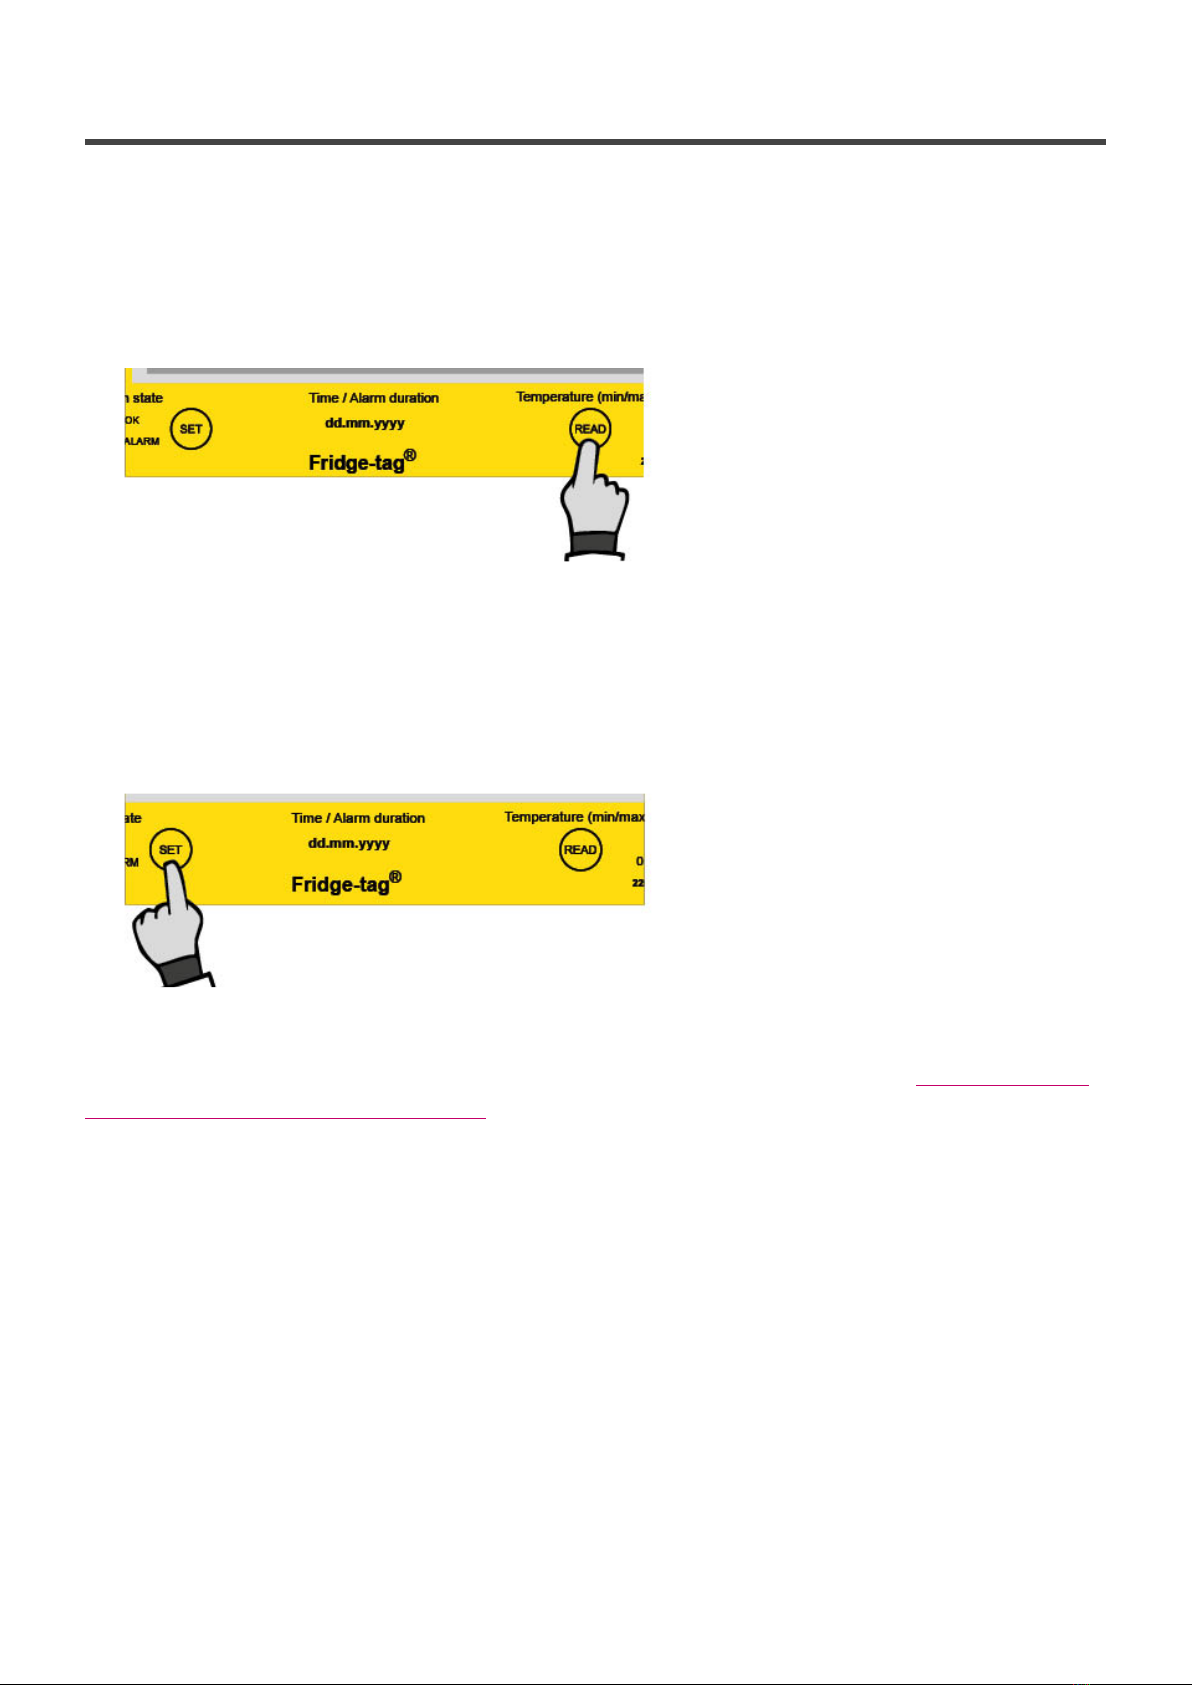
6.3. Using the READ and the SET buttons
READ button
The READ button is used to adjust the numbers. Each time you press the READ button, the number in
the flashing digit will increase by 1. If you press READ more than necessary, continue pressing the
READ button until you obtain the desired number.
Press READ to adjust the number
SET button
The SET button is used to save the number. After pressing the SET button, the next digit will start
flashing.
Press SET to confirm.
Note: If SET is pressed mistakenly, continue with the setup instructions. The chapter Read and change
settings / How to correct setting mistakes describes how to rectify the error.
Berlinger & Co. AG User Manual Fridge-tag - 1
Page 11 of 51

6.4. Setting the date
The following example shows how to set the date to:
16 February 2018 (16.02.2018) in European format.
The 1st
digit is
flashing.
1. Press READ until “1”
appears as the first
digit.
2. Press SET to save.
The 2nd
digit is
flashing.
1. Press READ until “6”
appears as the
second digit.
2. Press SET to save.
The 3rd
digit is
flashing.
1. Press READ until “0”
appears as the third
digit.
2. Press SET to save.
Berlinger & Co. AG User Manual Fridge-tag - 1
Page 12 of 51

The 4th
digit is
flashing.
1. Press READ until “2”
appears as the fourth
digit.
2. Press SET to save.
Note: The fifth and
the sixth digit are set
automatically.
The 7th
digit is
flashing.
1. Press READ until “1”
appears as the
seventh digit.
2. Press SET to save.
The 8th
digit is
flashing.
1. Press READ until “8”
appears as the eighth
digit.
2. Press SET to save.
The date is now set to: 16.02.2018.
Note: After setting the date, the first digit of the time will start flashing.
Berlinger & Co. AG User Manual Fridge-tag - 1
Page 13 of 51

6.5. Setting the time
This example shows how to set the time to 13:47.
Note: The clock operates as a 24-hour clock
(e.g. 1:47 pm = 13:47).
The 1st
digit is
flashing:
1. Press READ until “1”
appears as the first
digit.
2. Press SET to save.
The 2nd
digit is
flashing.
1. Press READ until “3”
appears as the
second digit.
2. Press SET to save.
Berlinger & Co. AG User Manual Fridge-tag - 1
Page 14 of 51

The 3rd
digit is
flashing.
1. Press READ until “4”
appears as the third
digit.
2. Press SET to save.
The 4th
digit is
flashing.
1. Press READ until “7”
appears as the
fourth digit.
2. Press SET to save.
The time is now set to 13:47.
Note: If the device is configured with self-programmable alarm limits proceed with the following chapter
Setting the alarm limits.
As soon as the last digit of the time setting is confirmed, the activation is completed.
Internal sensor: Now place the Fridge-tag according to this chapter Placing the Fridge-tag.
External sensor: Connect the device with the external sensor. During max. 1 minute after activation no
temperature is displayed on the screen.
Berlinger & Co. AG User Manual Fridge-tag - 1
Page 15 of 51

6.6. Setting the alarm limits (not standard,
only if preset by factory)
This adjustment is done in 4 steps:
1. Setting the duration of the upper alarm limit
2. Setting the temperature of the upper alarm limit
3. Setting the duration to the lower alarm limit
4. Setting the temperature of the lower alarm limit
1. and 3. Setting the HI and LO alarm durations, they are completed in the same manner
The 1st digit of the
duration of the alarm
limit is flashing.
1. Press
READ to
adjust the
number.
2. Press
SET to
confirm
the
number.
The 2nd digit of the
duration of the alarm
limit is flashing.
1. Press
READ to
adjust the
number.
2. Press
SET to
confirm
the
number.
Berlinger & Co. AG User Manual Fridge-tag - 1
Page 16 of 51

The 3rd digit of the
duration of the alarm
limit is flashing.
1. Press
READ to
adjust the
number.
2. Press
SET to
confirm
the
number.
The 4th digit of the
duration of the alarm
limit is flashing.
1. Press
READ to
adjust the
number.
2. Press
SET to
confirm
the
number.
The duration of the alarm limit is now set.
2. and 4. Setting the HI and LO alarm temperatures, they are completed in the same manner
First you have to choose the range of the desired temperature limit. You have the choice between
negative and positive temperatures. In case of a positive limit in Fahrenheit you may further choose if
the limit shall be equal or above +100°F. This choice is done by repeatedly pressing READ until the
desired range is indicated.
Note: The temperature measurement unit (°C/°F) can only be changed after the device is activated in
the menu. Learn more: Read and change settings / How to correct setting mistakes.
Instruction for setting a positive temperature limit between 0°C/0°F and +50°C/+122°F (internal
Internal sensor: Alarm temperature limits must be no lower than –20°C (–4°F) and no
higher than +50°C (+122°F).
External sensor: Alarm temperature limits must be no lower than –35°C (–31°F) and no
higher than +55°C (+131°F).
!
Berlinger & Co. AG User Manual Fridge-tag - 1
Page 17 of 51
Other manuals for Fridge-tag 2
9
This manual suits for next models
1
Table of contents
Other berlinger Measuring Instrument manuals

berlinger
berlinger SmartMonitor SITE L User manual

berlinger
berlinger Fridge-tag 2 User manual

berlinger
berlinger SmartMonitor SITE L User manual

berlinger
berlinger Mini-tag User manual

berlinger
berlinger Fridge-tag 3 User manual

berlinger
berlinger Q-tag Quad User manual

berlinger
berlinger Fridge-tag 3 User manual

berlinger
berlinger Freeze-tag User manual


