manuals.online logo
Brands
  1. Home
  2. •
  3. Brands
  4. •
  5. berlinger
  6. •
  7. Measuring Instrument
  8. •
  9. berlinger Fridge-tag 2 User manual

berlinger Fridge-tag 2 User manual

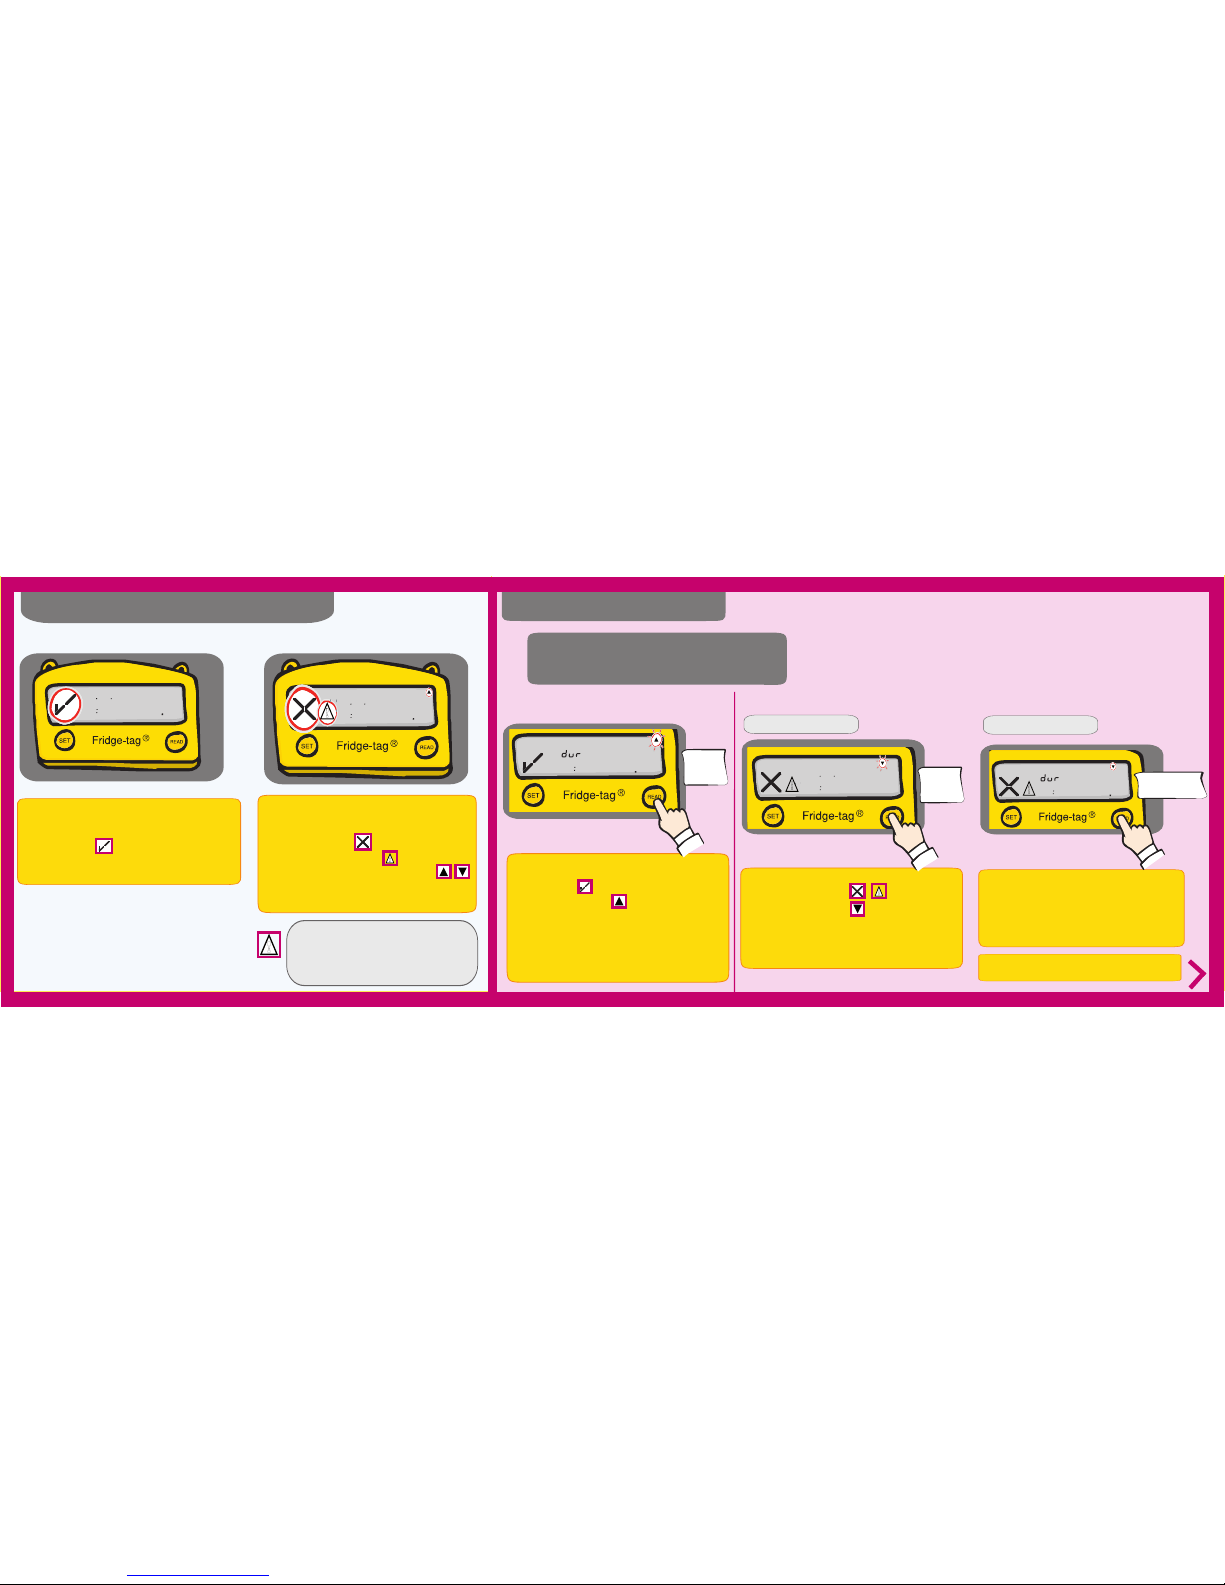
In measurement mode, when no ALARM has been
triggered, the following information is indicated on the
screen:
• The OK symbol
• The current date and time:16.09.2012 /13:47
• The current temperature: +5.6 °C
Indication of an OK display
2
2101 2096
056
1 473
°C
Int.Sensor
!
• In addition to the ALARM symbol each
newly triggered alarm is also indicated by the
warning symbol.
• It will last until the user reads the details of the
triggered alarm/s. After that it will disappear.
• the ALARM symbol
• an additional warning symbol
• the corresponding arrow: upper/lower alarm
• the current date and time:16.09.2012 /15:42
• the current temperature: +8.8 °C
In measurement mode, when an ALARM has been
triggered, the following information is indicated on the
screen:
Indication of an ALARM display
2
2101 2096
088
1 425
°C
Int.Sensor
!
!
!
!
!
!
2
55
0 000
max. °C
Int.Sensor
• the OK symbol
• the corresponding arrow
(example: high limit records of the current day today)
• the highest recorded temperature of that day:
+5.5°C
• the time duration out of the preset temperature
high limit: 00:00 (hrs: min)
The following information is indicated on the display:
Reading the history
Option 1:
Read out day-per-day directly on the
device (30 day history)
Example of an OK display
!
Press
READ
once
!
2
2101 2099
1 218
!
1st displayed screen
Press
READ
The following information is indicated on the display:
• the ALARM symbol
• the corresponding arrow
(example: Low limit records and the day ofALARM)
• the date of alarm:1 9.09.2012
• the time of alarm:18:21
Example of an ALARM display
!
!
Reading the display during measurement
2
-011
0 351
min.
Int.Sensor
!Press READ
a second time
The following additional information is indicated on
the display:
Note: Continue repetitively pressing the READ
button to read out the details of the past 30 days.
• Lowest recorded temperature of that day: -1. 1 °C
• The time duration out of the preset temperature
low limit: 01:35 (hrs:min)
2nd displayed screen
!
Option 2:
Read out only the alarms directly
on the device - use Alarm-Super-
Jump function (30 day history)
2
yyyd y__d
Press and hold
READ for
3 seconds
Option 3:
Read out data from the les
generated by the Fridge-tag®2 by
connecting it with a computer
(60 day history)
Connect the
Fridge-tag®2 via USB
with your PC / MAC
The Fridge-tag®2 will now generate a PDF and
ASCII report of the last 60 days.
Note: Press and hold the READ button again
for at least 3 seconds and the next alarm event
will appear on the screen
LOC function
The LOC function will be activated when
the following actions take place:
• When activation is completed
• After the last button operation
• The Fridge-tag®2 is connected
to a PC / Mac
2101 2093
2
loC
1 473
The display indicates the word LOC for a
10 minutes period, during this time the
Fridge-tag®2 does not measure the temperature
to avoid false readings.
For more information about the
Fridge-tag® 2 contact us or visit:
www.berlinger.com/Fridge-tag2
QUICK INFO
User guide of
Fridge-tag®2
Berlinger & Co. AG
Mitteldorfstrasse 2
9608 Ganterschwil
Switzerland
Tel.: +41 71 982 88 11
Fax: +41 71 982 88 39
info@berlinger.com
www.berlinger.com
20150706_V2

Other manuals for Fridge-tag 2

9

Other berlinger Measuring Instrument manuals

berlinger Freeze-tag User manual

berlinger

berlinger Freeze-tag User manual

berlinger Fridge-tag 3 User manual

berlinger

berlinger Fridge-tag 3 User manual

berlinger Q-tag Quad User manual

berlinger

berlinger Q-tag Quad User manual

berlinger Mini-tag User manual

berlinger

berlinger Mini-tag User manual

berlinger Fridge-tag 2 User manual

berlinger

berlinger Fridge-tag 2 User manual

berlinger SmartMonitor SITE L User manual

berlinger

berlinger SmartMonitor SITE L User manual

berlinger Fridge-tag 3 User manual

berlinger

berlinger Fridge-tag 3 User manual

berlinger SmartMonitor SITE L User manual

berlinger

berlinger SmartMonitor SITE L User manual

Popular Measuring Instrument manuals by other brands

DeFelsko PosiTest PC powder Cheker instruction manual

DeFelsko

DeFelsko PosiTest PC powder Cheker instruction manual

ZURN ZEMS6000AV Installation, operation, maintenance and parts manual

ZURN

ZURN ZEMS6000AV Installation, operation, maintenance and parts manual

METER GROUP WP4C Operator's manual

METER GROUP

METER GROUP WP4C Operator's manual

Onicon SeaMetrics AG90 quick start guide

Onicon

Onicon SeaMetrics AG90 quick start guide

ChloraTech Depolox 3 Plus quick start guide

ChloraTech

ChloraTech Depolox 3 Plus quick start guide

Avonic AV-REC200 user manual

Avonic

Avonic AV-REC200 user manual

Evolveo Omega II manual

Evolveo

Evolveo Omega II manual

TM Electronics ThermoBarScan MM7100-2D Instruction booklet

TM Electronics

TM Electronics ThermoBarScan MM7100-2D Instruction booklet

Kane 255 manual

Kane

Kane 255 manual

Dynojet Dynoware RT installation guide

Dynojet

Dynojet Dynoware RT installation guide

Huazheng PHS-2F manual

Huazheng

Huazheng PHS-2F manual

otometrics Madsen Xeta Reference manual

otometrics

otometrics Madsen Xeta Reference manual

Panasonic MKG1500-DE installation instructions

Panasonic

Panasonic MKG1500-DE installation instructions

Honeywell MiniRAE 3000+ user manual

Honeywell

Honeywell MiniRAE 3000+ user manual

Apogee MQ-500 owner's manual

Apogee

Apogee MQ-500 owner's manual

TIME MARK 2629 manual

TIME MARK

TIME MARK 2629 manual

Trotec BI20 operating manual

Trotec

Trotec BI20 operating manual

MULTISPAN MFM 14DC-M1 manual

MULTISPAN

MULTISPAN MFM 14DC-M1 manual

manuals.online logo
manuals.online logoBrands
  • About & Mission
  • Contact us
  • Privacy Policy
  • Terms and Conditions

Copyright 2025 Manuals.Online. All Rights Reserved.