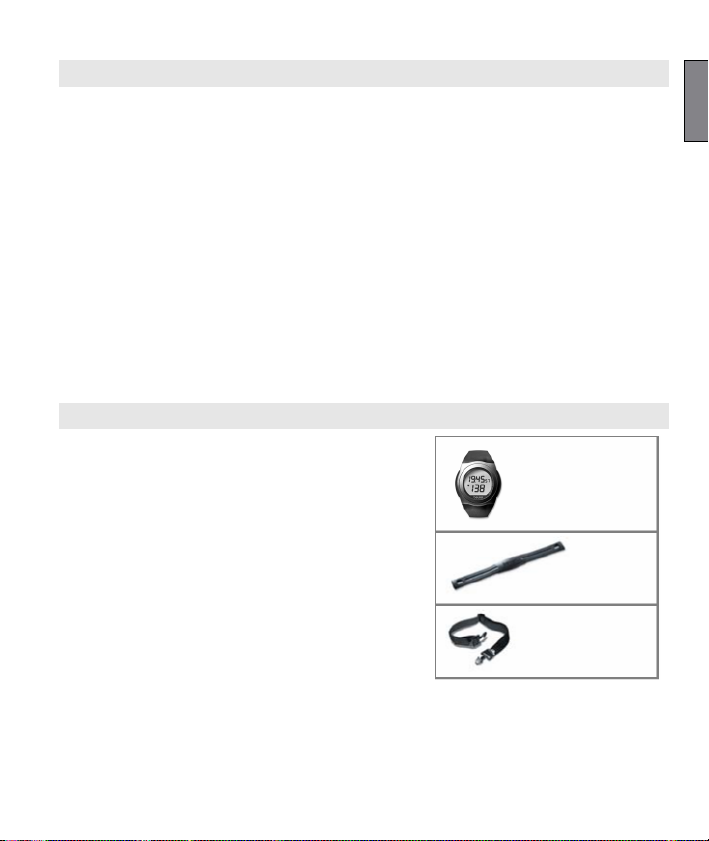
Beurer PM 20 User manual

hjartsláttartíðniskjár
hjartsláttartíðnispúlsúr
PM 20
Leiðbeiningar

2
INNIHALD
Hvað fylgir......................................................................................1
Áríðandi upplýsingar.....................................................................2
Almennar upplýsingar um þjálfun.................................................4
Yfirlit yfir aðgerðir..........................................................................5
Sending á boðum og aðferðir á mælingum................................5
Byrjað.............................................................................................6
Almenn notkun .............................................................................7
Stillingar á úrinu.............................................................................8
Skeiðklukka....................................................................................9
Tæknilegar upplýsingar, rafhlöður og ábyrgð.............................10
HVAÐ FYLGIR
G
B

3
Hjartsláttarúr með ól
Bringubelti
Teygjanleg og stillanleg ól
Til viðbótar:
Poki
Leiðbeiningar

4
ÁRÍÐANDI UPPLÝSINGAR
Það er áríðandi að þið lesið þessr leiðbeiningar, geymið þær og
gerið þær aðgengilegar fyrir aðra.
Þjálfun
Þetta tæki er ekki lækningatæki. Það er til þjálfunar og var hannað
til að mæla og sýna hjartsláttartíðni.
Vinsamlegast athugið að notkun þessa tækis við áhættusamar
íþróttagreinar geta haft í för með sér aukalega slysahættu.
Ef í vafa, eða þegar um veikindi er að ræða er nauðsynlegt að hafa
samband við læknir sinn í sambandi við þau gildi á efri og neðri
mörkum hjartsláttartíðni svo og um lengd og tíðni þjálfunar. Á þann
hátt getið þið náð bestum árangri við þj´ðalfun.
AÐVÖRUN: Einstaklingar sem þjást af hjarta eða kransæða
sjúkdómum eða þeir sem eru með gangráð ættu aðeins að nota
þetta tæki eftir að hafa ráðfært sig við lækni sinn.
Notkun
Tækið er eingöngu ætlað til einkanota.
Tækið má eingöngu nota í þeim tilgangi sem það var hannað fyrir og
á þann hátt sem lýst er í leiðbeiningum þess. Röng notkun í hvaða
formi sem er getur verið hættuleg. Framleiðandinn er ekki ábyrgur
fyrir skemmdum sem orsakast af rangri notkun.
Hjartsláttarskjárinn er vatnsþéttur (sjá kaflann “Tæknilegar
upplýsingar”).
Rafsegultruflanir geta komið fyrir (sjá kaflann “Tæknilegar
upplýsingar”).

5
Cleaning and care
From time to time, carefully clean your chest strap, elastic chest
strap and heart rate monitor with a soap and water solution. Then
rinse off all components with clean water. Carefully dry them with
a soft towel. You can wash the elastic chest strap in the washing
machine at 30° without fabric softener. The chest strap is not ma-
de for the dryer!
Store the chest strap in a clean and dry place. Dirt impairs the
elasticity and functioning of the transmitter. Sweat and moisture
can keep the electrodes wet and consequently activate the
transmitter, which shortens battery life.
Repair, Accessories and Disposal
Prior to use, it should be ensured that the device and accessories
are free of damage. If in doubt, do not use the device and consult
your sales representative or the customer service address pro-
vided.
Repairs may only be conducted by customer service or authorized
dealers. Please do not in any case attempt to repair the device!
Use the device only in combination with the accessories provided
with it.
Avoid contact with sunscreen or the like since these can cause
damage to the imprint or plastic components.
Please dispose of the device in accordance with Waste Electric
and Electronic Equipment 2002/96/EC - WEEE. For inquiries,
please contact the municipal authority responsible for disposal in
your area.
ÍS

6
GENERAL INFORMATION FOR TRAINING
This heart rate monitor serves to measure the human pulse. By
means of various settings, you can support your individual training
program and monitor your pulse. You should monitor your pulse
during exercise because you should prevent your heart from exces-
sive strain on the one hand and on the other in order to achieve the
optimal training results. The table provides you with some informa-
tion on the selection of your training zone. The maximum heart rate
reduces with advancing age. Information on the training heart rate
must therefore always be in relation to the maximum heart rate. The
following rule of thumb is used for the identification of the maximum
heart rate:
220 - aldur = hámarks hjartsláttartíðni
Eftirfarandi dæmi á við 40 ára einstakling: 220 - 40 = 180
hjarta/heilsu
kerfi
fitubrennsla
Líkams-
ræktar kerfi
Endurance trai-
ning programme
Anaerobic
training
Hám. hjart-
sláttarsvið
50 - 60%
60 - 70%
70 - 80%
80 –90%
90 - 100%
Áhrif
Styrkir hjartað og
blóðrásarkerfið
Líkaminn brennir
hæsta hlutfalli af
kaloríum úr fitu.
Styrkir hjartað og
blóðrásarkerfið,
enhancesfitness
Improves the
respiratory and
circulatory system.
Ideal to promote
the basic
endurance
Improves speed
maintenance and
increases basic
speed
Overloads specific
muscles. High
injury risk for
athletes at ama-
teur level, risk re-
lated to the heart
in caseof disease
Hentar fyrir
Hentar mjög vel
fyrirbyrjendur
Weight control
and loss
Athletes at
amateurlevel
Ambitious athletes
at amateur level,
professional
athletes
Onlyprofessional
athletes
Þjálfun
Regenerative
training
Fitness training
Endurance
training
Fitnesstraining
addressing
specific zones

7
OVERVIEW OF FUNCTIONS
HR functions
Exact ECG heart rate measurement
Transmission: analogue
Time functions
Time of day
Stop watch
Specifications
Illuminations of display
Pouch
TRANSMISSION OF SIGNAL AND METHODS OF DEVICES
MEASUREMENT
Receiving range of the heart rate monitor
Your heart rate monitor picks up the heart rate signals sent by the
chest strap transmitter within a range of 70 centimeters.
Sensors on the chest strap
The entire chest strap consists of two components: the actual chest
strap and an elastic tension belt. On the inside of the chest strap
contacting the body, there are two rectangular, corrugated sensors.
Both sensors determine your heart rate ECG exactly and transmit
this to the heart rate monitor.
G
B

8
GETTING STARTED
Putting on the heart rate monitor
You can wear your heart rate monitor like a wrist watch.
Activating the heart rate monitor from the power saving
mode
You can activate your heart rate monitor by pressing any key. If the
heart rate monitor has not received any signal for approx. five
minutes, it switches to the power saving mode. At that point, only the
current time will be displayed. Press any key in order to reactivate
the watch.
Putting on the chest strap
Tighten the chest strap with the elastic tension
belt. Adjust the length of the belt such that the
belt is snug, but neither too loose nor too tight.
Position the belt around the chest such that the
logo is facing outwards and in the correct posi-
tion directly over the breast bone. For men, the
chest belt should be located directly below the
pectoral muscles, for women, directly below the
breast.
Since optimal contact between the skin and the heart rate sensors
can not be created immediately, it may take some time until the
heart rate is measured and displayed. If necessary, alter the
position of the transmitter in order to achieve optimal contact.
Most of the time, sufficient contact is achieved through the
accumulation of sweat beneath the chest strap. You can,
however, also wet the contact points on the inside of the chest
strap. For this, lift the chest strap up from the skin slightly and wet

9
the two sensors with saliva, water or ECG gel (available at the
chemistry). The contact between the skin and chest strap may not
be interrupted also with greater movements of the thorax such as
during deep breathing. Significant chest chair can interfere with
and even prevent contact.
• Put on the chest strap a few minutes before starting in order to
warm it up to body temperature and establish optimal contact.
GENERAL OPERATION OF THE HR MONITOR
Buttons on the HR watch
1 M E N U Switches to the watch
s e t t i n g s . U s e t h e t i p o f a
pen to press the pin.
2 S T A R T / S T O P Starts and stops func-
t i o n s a n d a d j u s t s v a l -
ues.
P r e ss i n g a n d h o l d in g
a c c e l e r a t e s t h e e n t r y o f
values.
Display
1 Time [hh:mm:ss]
2 Heart rate
Heart rate signals are being
received.
G
B

10
Power saving mode
If your heart rate monitor has not received any
signal for approx. five minutes, the watch
switches to the power saving mode. At that point,
only the current time will be displayed. Press the
button START/STOP to reactivate the HR monitor.
WATCH SETTINGS
Activate your heart rate monitor
from the power saving mode.
The time of day and your cur-
rent heart rate are displayed.
STAR T/S TO P
Hold is displayed.
M E N U
The hour setting blinks.
M E N U
Press and
hold 2 sec
START/STOP Set the hour (0-24).
The minute setting blinks.
M E N U
START/STOP Set the minute (0-59).
Back to the main display.
M E N U

11
STOPWATCH
With the stopwatch function, you can:
Clock your run times and have your average training heart rate
displayed.
Reset recording to zero.
Clock run times
Activate your heart rate monitor from
the power saving mode.
The time of day and your current
heart rate are displayed.
STAR T/S TO P
Start the stopwatch. Your run time
and your training heart rate are dis-
played. You can interrupt and re-
sumeyourrecordingsatanytimeby
STAR T/S TO P
pressing the button START/STOP
.
Stop the stopwatch. The display on
the top line automatically alternates
every two seconds between the time
clocked...
STAR T/S TO P
... and your average training heart
rate during the elapsed time.
G
B

12
Reset recording
You have stopped the stop-
watch. The first line alternates
between displaying the time
clocked and the average training
heart
rate.
Reset the recording. After five
seconds the time resets to 0.
STAR T/S TO P
Press and
hold 5 sec
The display automatically switches
back to the main display.
TECHNICAL SPECIFICATIONS, BATTERIES AND WARRANTY
HR monitor Waterproof to 30 m (can be used in the rain)
Chest strap Waterproof (suitable for swimming)
Battery HR 3V lithium battery, type CR2032 battery life:
monitor approx. 15 months (daily use of approx. 1 hour)
Battery chest 3V lithium battery, type CR2032 battery life:
strap approx. 28 months (daily use of approx. 1 hour)
Replacing the batteries
The battery of the HR monitor may only be replaced by a specialized
dealer (any lock-maker's shop) and at the service address provided.
Otherwise, the claims to warranty become void.
You can replace the battery in the chest strap on your own. The
battery compartment is located on the inner side. Use a coin or the

13
battery to be used to open the compartment. The positive pole of the
battery inserted must face upwards. Carefully close the battery
compartment again.
Used batteries do not belong in the household gar-
bage. Dispose of these through your electronics
dealer or your local collecting point for recoverables.
You are legally required to do this. We will find this
symbol on batteries containing toxic chemicals:
Pb = battery contains lead, Cd = battery contains
cadmium, Hg = battery contains mercury.
Distortion and interference
In the HR monitor, a receivor for signals from the chest strap
transmitter is integrated. During use, it may arise that the HR
monitor receives signals other than those transmitted by the chest
strap.
How can I recognize interference?
Interference can be recognized in that the values displayed are
unrealistic. If your normal heart rate amounts to 130 bpm and it is
suddenly shown to be 200, then a short-term disturbance is present.
Once you have removed yourself from the vicinity of the source
causing the disturbance, the values will automatically resume being
accurate. Please note that distorted values can mildly influence the
training result displays and overall values.
What kind of causes for interference are there?
In some situations, short-range electromagnetic interference can
occur. In order to avoid these, keep well away from these sources.
Nearby power lines
Walking through security gates in airports.
Nearby overhead lines (tram)
G
B

14
Nearby traffic lights, television sets, car motors, bike computers
Nearby exercise equipment
Nearby mobile phones
Interference from other devices for measuring heart rates
The HR monitor as a receiver can react to interfering stray signals
such as other heart rate monitors within a vicinity of one metre. This
can result in incorrect measurements particularly when training in
groups. If you e.g. job next to one another, it can be beneficial to
wear the HR monitor on the other wrist or to increase the distance to
one's training partner.
Warranty
We provide a two-year warranty from the date of purchase for
material and manufacturing defects in the product.
The warranty is not valid:
in the event of damages due to improper use
for wearable parts such as batteries or the wrist band
for defects that are already known to the customer at the time of
purchase
due to fault on the customer's part
The warranty does not affect the customer's legal assurances. Proof
of purchase is to be provided by the customer for the assertion of a
warrant claim within the period of warranty. The warranty is to be
asserted within a time frame of two years from the date of purchase
vis-à-vis Beurer GmbH and Co. KG, 89077 Ulm, Germany. In the
event of warranty, the customer is entitled to the repair of the
product at our own workshops or at those authorized by us.

15
INHALTSVERZEICHNIS
Lieferumfang ...............................................................................13
Wichtige Hinweise.......................................................................14
Allgemeines zum Training...........................................................16
Übersicht der Funktionen............................................................17
Signalübertragung und Messprinzipien derGeräte....................17
Inbetriebnahme ...........................................................................18
Allgemeine Bedienung der Pulsuhr............................................19
Uhr-Einstellungen........................................................................20
Stoppuhr......................................................................................21
Technische Daten, Batterien und Garantie.................................22
LIEFERUMFANG
Herzfrequenz-Pulsuhr mit Armband
Brustgurt
Elastischer Spanngurt (verstellbar)
Zusätzlich:
Aufbewahrungsbeutel
Gebrauchsanleitung
D

16
WICHTIGE HINWEISE
Lesen Sie diese Gebrauchsanleitung sorgfältig durch, bewahren Sie
sie auf und machen sie diese auch anderen Personen zugänglich.
Training
Dieses Produkt ist kein medizinisches Gerät. Es ist ein Trainings-
instrument, welches für die Messung und Darstellung der mensch-
lichen Herzfrequenz entwickelt wurde.
Beachten Sie bei Risiko-Sportarten, dass die Verwendung der
Pulsuhr eine zusätzliche Verletzungsquelle darstellen kann.
Bitte erkundigen Sie sich im Zweifelsfall oder bei Krankheiten bei
Ihrem behandelnden Arzt über Ihre eigenen Werte bezüglich oberer
und unterer Trainings-Herzfrequenz, sowie Dauer und Häufigkeit
des Trainings. Somit können Sie optimale Ergebnisse beim Training
erzielen.
ACHTUNG: Personen mit Herz- und Kreislaufkrankheiten oder
Träger von Herzschrittmachern sollten diese Herzfrequenzmess-
uhr nur nach Rücksprache mit ihrem Arzt verwenden.
Verwendungszweck
Das Gerät ist nur für den privaten Gebrauch bestimmt.
Dieses Gerät darf nur für den Zweck verwendet werden, für den
es entwickelt wurde, und auf die in der Gebrauchsanleitung ange-
gebene Art und Weise. Jeder unsachgemäße Gebrauch kann ge-
fährlich sein. Der Hersteller haftet nicht für Schäden, die durch
unsachgemäßen oder falschen Gebrauch verursacht wurden.
Diese Pulsuhr ist wasserdicht. (siehe Kapitel ,,Technische Daten“)
Es können elektromagnetische Interferenzen auftreten. (siehe
Kapitel ,,Technische Daten“)

17
Reinigung und Pflege
Reinigen Sie Brustgurt, elastisches Brustband und Pulsuhr von
Zeit zu Zeit sorgfältig mit einer Seifenwasserlösung. Spülen Sie al-
le Teile dann mit klarem Wasser ab. Trocknen Sie sie sorgfältig
mit einem weichen Tuch ab. Das elastische Brustband können Sie
in der Waschmaschine bei 30° ohne Weichspüler waschen. Das
Brustband ist nicht für den Wäschetrockner geeignet!
Bewahren Sie den Brustgurt an einem sauberen und trockenen
Ort auf. Schmutz beeinträchtigt die Elastizität und die Funktion
des Senders. Schweiß und Feuchtigkeit können bewirken, dass
durch Feuchtigkeit der Elektroden der Sender aktiviert bleibt, wo-
durch sich die Lebensdauer der Batterie verkürzt.
Reparatur, Zubehör und Entsorgung
Vor dem Gebrauch ist sicherzustellen, dass das Gerät und Zube-
hör keine sichtbaren Schäden aufweisen. Benutzen Sie es im
Zweifelsfall nicht und wenden Sie sich an Ihren Händler oder an
die angegebene Kundendienstadresse.
Reparaturen dürfen nur vom Kundendienst oder autorisierten
Händlern durchgeführt werden. Versuchen Sie in keinem Fall, das
Gerät selbständig zu reparieren!
Benutzen Sie das Gerät nur mit den mitgelieferten Zubehörteilen.
Vermeiden Sie Kontakt mit Sonnencremes oder ähnlichem, da
diese den Aufdruck oder die Kunststoffteile beschädigen könnten.
Bitte entsorgen Sie das Gerät gemäß der Elektro- und Elektronik
Altgeräte Verordnung 2002/96/EC –WEEE (Waste Electrical and
Electronic Equipment). Bei Rückfragen wenden Sie sich bitte an
die für die Entsorgung zuständige kommunale Behörde.
D

18
ALLGEMEINES ZUM TRAINING
Diese Pulsuhr dient zur Erfassung des Pulses beim Menschen.
Durch die verschiedenen Einstellmöglichkeiten können Sie Ihr indi-
viduelles Trainingsprogramm unterstützen und den Puls überwa-
chen. Sie sollten Ihren Puls beim Training überwachen, weil Sie zum
einen Ihr Herz vor Überlastung schützen sollten und zum anderen,
um einen optimalen Trainingseffekt zu erzielen. Die Tabelle gibt
Ihnen einige Hinweise zur Auswahl Ihrer Trainingszone. Die maxi-
male Herzfrequenz verringert sich mit zunehmendem Alter. Angaben
zum Trainingspuls müssen deshalb immer in Abhängigkeit zur ma-
ximalen Herzfrequenz stehen. Zur Bestimmung der maximalen
Herzfrequenz gilt die Faustformel:
220 - Lebensalter = maximale Herzfrequenz
Folgendes Beispiel gilt für eine 40-jährige Person: 220 - 40 = 180
Herz-Gesund-
heitszone
Fettverbren-
nungszone
Fitnesszone
Kraftausdauer-
bereich
Anerobes
Training
Anteil der max.
Herzfrequenz
50 - 60%
60 - 70%
70 - 80%
80 - 90%
90 - 100%
Auswirkung
StärkungHerz-
Kreislaufsystem
Körper verbrennt
prozentual die
meisten Kalorien
aus Fett.
Trainiert Herz-
Kreislaufsystem,
verbessertFitness
Verbessert
Atmung und
Kreislauf.
Optimal zur
Steigerung der
Grundlagen-
Ausdauer.
Verbessert
Tempohärte und
steigertdieGrund-
geschwindigkeit.
Überlastet gezielt
Muskulatur.
Hohes Verlet-
zungsrisiko für
Freizeitsportler,
bei Erkrankung:
GefahrfürsHerz
Für wen
geeignet?
Ideal für Anfänger
Gewichtskontrolle,
-reduktion
Freizeitsportler
Ambitionierte
Freizeitsportler,
Leistungssportler
N u r
Leistungssportler
Training
Regeneratives
Training
Fitness-Training
Kraftausdauer-
Training
Entwicklungs-
bereichstraining

19
ÜBERSICHT DER FUNKTIONEN
Puls-Funktionen
EKG-genaue Herzfrequenz-Messung
Übertragung: analog
Zeit-Funktionen
Uhrzeit
Stoppuhr
Ausstattu ngs-Merkmale
Beleuchtung des Displays
Aufbewahrungsbeutel
SIGNALÜBERTRAGUNG UND MESSPRINZIPIEN DER GERÄTE
Empfangsbereich der Pulsuhr
Ihre Pulsuhr empfängt die Pulssignale des Brustgurt-Senders inner-
halb von 70 Zentimetern.
Sensoren des Brustgurtes
Der gesamte Brustgurt besteht aus zwei Teilen: dem eigentlichen
Brustgurt und einem elastischen Spanngurt. Auf der am Körper an-
liegenden Innenseite des Brustgurtes befinden sich in der Mitte zwei
rechteckige, gerippte Sensoren. Beide Sensoren erfassen Ihre Herz-
frequenz EKG-genau und senden diese an die Pulsuhr weiter.
D

20
INBETRIEBNAHME
Anlegen der Pulsuhr
Ihre Pulsuhr können Sie wie eine Armbanduhr tragen.
Aktivieren der Pulsuhr aus dem Stromsparmodus
Sie können Ihre Pulsuhr mit einem beliebigen Knopf aktivieren.
Wenn die Pulsuhr ca. 5 Minuten lang kein Signal empfängt, schaltet
die Uhr in den Stromsparmodus. Es wird dann nur die aktuelle Uhrzeit
angezeigt. Drücken Sie einen beliebigen Knopf, um die Uhr wieder
zu aktivieren.
Anlegen des Brustgurtes
Befestigen Sie den Brustgurt am elastischen
Spanngurt. Stellen Sie die Gurtlänge so ein,
dass der Gurt gut, jedoch nicht zu locker oder zu
eng anliegt. Legen Sie den Gurt so um die
Brust, dass das Logo nach außen zeigt und in
der richtigen Position direkt auf dem Brustbein
anliegt. Bei Männern sollte sich der Brustgurt di-
rekt unter dem Brustmuskel, bei Frauen direkt
unter dem Brustansatz befinden.
Da nicht sofort ein optimaler Kontakt zwischen Haut und Pulssen-
soren hergestellt werden kann, kann es einige Zeit dauern, bis der
Puls gemessen und angezeigt wird. Verändern Sie gegebenen-
falls die Position des Senders, um einen optimalen Kontakt zu er-
halten. Durch Schweißbildung unterhalb des Brustgurtes wird
meist ein ausreichend guter Kontakt erreicht. Sie können jedoch
auch die Kontaktstellen der Innenseite des Brustgurtes befeuchten.
Heben Sie dazu den Brustgurt leicht von der Haut ab und befeuchten
Sie die beiden Sensoren leicht mit Speichel, Wasser
Table of contents
Languages:
Other Beurer Watch manuals