Timex INDIGLO Series User manual

SECTION 3 – WATER-RESISTANCE
If your watch is water-resistant, it will be indicated ( ) on the watch face
or on the caseback.
• 30 Meter Water-Resistant watch withstands water pressure to 60 p.s.i.a.
(equals immersion to 98 feet or 30 meters below sea level).
• 50 Meter Water-Resistant watch withstands water pressure to 86 p.s.i.a.
(equals immersion to 164 feet or 50 meters below sea level).
• 100 Meter Water-Resistant watch withstands water pressure to 160
p.s.i.a. (equals immersion to 328 feet or 100 meters below sea level).
WARNING: TO MAINTAIN WATER-RESISTANCE, DO NOT PRESS ANY
BUTTONS OR PULL OUT THE CROWN UNDER WATER.
NOTES:
1. The watch is water-resistant only as long as crystal, push buttons/crown
and case remain intact.
2. Even though the watch may be water-resistant to a significant depth (100
or 200 meters), it is not a diver watch and should not be used for diving.
3. Timex strongly recommends rinsing your watch with fresh water after
exposure to salt water.
• Shock-Resistance: If your watch is shock-resistant, it will be indicated on
the watch face or caseback. Timex shock-resistant watches are designed
to pass the FTC test for shock-resistance. However, care should be taken
to avoid damaging the crystal.
The following illustrations show you the various buttons and their location
for operating and setting your watch.
SECTION 2 – NIGHT-MODE®OPTION
Your Timex watch is equipped with NIGHT-MODE®. This Timex patented
feature (U.S. Patent Number 4,912,688) enhances the benefits of the
INDIGLO®night-light. Once activated, any button pushed will cause the
INDIGLO night-light to stay on for 3 seconds. NIGHT-MODE is activated by
pressing and holding the INDIGLO night-light button for 3 seconds. The watch
will beep, indicating that NIGHT-MODE is activated. NIGHT-MODE will stay
activated for 3 hours or until you deactivate it by pressing and holding the
INDIGLO night-light button again for 3 seconds.
EXAMPLE: When running lap time in low light conditions, press
START/SPLIT. At this time, the INDIGLO night-light will automatically stay
on for 3 seconds, allowing you to read the lap or split time...all with one
simple push of a button.
930-095000 76 930-095000 76
INSTRUCTIONS
SPECIAL EXTENDED SPECIAL EXTENDED
WARRANTY OFFER WARRANTY OFFER
5 YEARS FOR 5 DOLLARS
For $5, Timex will extend the enclosed one year limited manufacturer's
warranty for an additional 4 years from date of purchase. This 5 year
warranty covers repairs on your watch under the same terms and
conditions as set forth in the manufacturer's warranty in this booklet.
Payment can be made with AMEX, Discover, Visa or MasterCard by calling
1-800-448-4639 during normal working hours or you can mail a check to:
Timex Extended Warranty, P.O. Box 1676, Dept. EF , Little Rock, AR 72203.
We will need your name, address, telephone number, date watch
purchased and 5 digit watch model number.
Payment must be made within 30 days after date of purchase.
PLEASE READ THIS BOOKLET CAREFULLY to familiarize yourself with the
operation and care of your Timex watch and with the Limited Warranty.
You are now the owner of a Timex Combination Watch with these
sophisticated timekeeping features:
• ANALOG (HANDS) PORTION - Hours, Minutes, Seconds
•DIGITAL PORTION - Normal Time/Second Time Zone, Alarm/Hourly
Chime, Chronograph (Stopwatch), Countdown Timer, Calendar.
SECTION 1 – INDIGLO®NIGHT-LIGHT
Your Timex watch with INDIGLO night-light contains a patented
electroluminescent technology (U.S. Patent Number4,527,096 and
4,775,964). The INDIGLO night-light illuminates the entire watch face (analog
and digital) with a uniform bright light that offers superior readability in all
low light and nighttime conditions. Simply press the INDIGLO night-light
button to activate.
INDIGLO is a registered trademark of Indiglo Corporation in the U.S. and other countries.
CORE #76 for CD 1/17/97 2:33 PM Page 1

SECTION 7 – HOW TO USE THE CHRONOGRAPH
From NORMAL TIME (or CALENDAR) display, press MODE three times.
You are now in CHRONOGRAPH mode.
SECTION 6 – HOW TO SET TIME AND CALENDAR
• Press MODE repeatedly until NORMAL TIME is
displayed.
NOTE: If the CALENDAR appears, press and
hold START/SPLIT until the watch beeps and
NORMAL TIME is displayed.
• Press and hold SET until SECONDS begin to flash.
Press START/SPLIT to reset SECONDS to zero.
• Press MODE to set HOURS. Press START/SPLIT
to advance hours.
• Press MODE to set TENS OF MINUTES. Press
START/SPLIT to advance tens of minutes.
•Press MODE to set MINUTES. Press
START/SPLIT to advance minutes.
• Press MODE to set YEAR. Press START/SPLIT to
advance year.
• Press MODE to set MONTH. Press START/SPLIT
to advance month.
• Press MODE to set DATE. Press START/SPLIT to
advance date.
• Press MODE to set DAY. Press START/SPLIT to
advance day.
•Press MODE to select NORMAL (12-hour) or
MILITARY (24-hour) time. Press START/SPLIT
to alternate between 12- and 24-hour time.
• Press MODE to begin the setting procedure again (make corrections) or
press SET to return to NORMAL TIME.
SELECTING CALENDAR DISPLAY
From NORMAL TIME, you can peek at or select the CALENDAR to appear in
your digital display.
1. To view the CALENDAR (for two seconds) press START/SPLIT.
2. To change the display to CALENDAR, press and hold START/SPLIT for
three seconds until the watch beeps.
NOTE: To view NORMAL TIME or to display it in the digital portion, repeat
either step above.
In the CHRONOGRAPH mode, select either LAP or SPLIT by pressing SET.
(Note: Chronograph must be reset to zero to switch between LAP and SPLIT.)
The LAP chronograph allows the user to view the elapsed time for an
interval but resets to zero to measure the discrete time of the next interval.
SECTION 4 – HOW TO SET THE ANALOG TIME
Remove plastic guard from setting crown and pull theCROWN to the “OUT”
postion. Rotate the CROWN (clockwise or counterclockwise) until the hands
indicate desired time. Push the CROWN to the “IN” position to start the watch.
The digital portion of your watch has five "modes".
Pressing and releasing the MODE button once changes the display to the
next mode in the order shown.
NOTE: ALARM TIME is dependent on NORMAL TIME, i.e., if NORMAL TIME
is in 24-hour time, then ALARM TIME will be displayed in 24-hour time.
SECTION 5 – FIVE DIGITAL MODES
INDIGLO
MODE
START/SPLIT
CROWN
“OUT” position
STOP/RESET
SET
INDIGLO
MODE
START/SPLIT
CROWN
“OUT” position
STOP/RESET
SET
CORE #76 for CD 1/17/97 2:33 PM Page 3

SECTION 9 – HOW SET AND USE THE SECOND TIME ZONE
1. From the NORMAL TIME (or CALENDAR) display,
press MODE four times.
NOTES:
A. SECOND TIME ZONE is shown in hours and minutes. The minutes are
the same as NORMAL TIME.
B. If an alarm has been set for T2, the alarm symbol ( ) will appear in
the left hand side of the display.
2. To view the CALENDAR information for the Second Time Zone for two
seconds, press START/SPLIT.
3. To change the display to CALENDAR, press and hold START/SPLIT for
three seconds until the watch beeps.
NOTE: The Day will be replaced by T2 to designate the CALENDAR for
the Second Time Zone.
4. Repeat either Steps 2 or 3 to view or display the Second Time Zone's
current time.
HOW TO SET THE SECOND TIME ZONE
1. From the Second Time Zone display, press and hold SET. The HOUR
and "AM" or "PM" will flash. Press START/SPLIT to advance HOURS.
NOTE: If 24-hour (Military) format has been previously selected, only
HOURS will flash.
2. Press MODE to set MONTH. Press START/SPLIT to advance MONTH.
3. Press MODE to set the DATE. Press START/SPLIT to advance DATE.
4. Press MODE to set DAY. Press START/SPLIT to advance DAY.
5. Press MODE to select NORMAL (12-hour) or MILITARY (24-hour) time.
Press START/SPLIT to alternate between 12- and 24-hour time.
6. Press MODE to begin the setting procedure again (make corrections) or
press SET to return to Second Time Zone display.
USING THE COUNTDOWN TIMER
1. Press START/SPLIT to start the timer countdown.
2. Press STOP/RESET to stop the countdown timer.
3. To reset the timer to the original countdown period, press STOP/RESET.
4. To zero-out the countdown timer, press STOP/RESET again.
5. To return to NORMAL TIME (or CALENDAR) display while the timer
counts down, press MODE once. A “T” will appear in lower right hand
corner of the display to designate that the countdown timer is running.
6. When timer has expired, the original timer setting will appear and the
watch will beep for 20 seconds. The beeping may be silenced by pressing
any button.
7. The countdown timer can be restarted by pressing START/SPLIT or the
countdown timer setting can be changed by pressing SET.
SECTION 8 – HOW TO SET AND USE THE COUNTDOWN TIMER
From NORMAL TIME press MODE twice. You are
now in TIMER mode. The display will show your
last timer setting and look like this:
SETTING THE COUNTDOWN TIMER
1. To set the countdown timer (up to 24 hours),
press and hold SET to begin. The HOURS will
be flashing.
2. Press START/SPLIT to select hours to be counted down.
3. Press MODE to set TENS OF MINUTES. Press START/SPLIT to advance
TENS OF MINUTES.
4. Press MODE to set MINUTES. Press START/SPLIT to advance MINUTES.
5. Press MODE to begin the setting process (revise settings), or press SET
to enter the desired countdown timer duration.
The SPLIT chronograph allows the user to view total
accumulated time at a particular interval while
continuing to accumulate total time.
Example: If a runner ran one mile in four equal one
minute intervals on a quarter mile track and the user
pressed SPLIT at the end of each quarter mile, the
display would show as illustrated.
CHRONOGRAPH OPERATION
In either LAP or SPLIT mode,
1. Press START/SPLIT to begin the timing session.
NOTE: An "L" or "S" will appear in the right hand side of the display to
designate the timing mode (Lap or Split).
2. Press START/SPLIT to record the first lap or split time.
3. The recorded time will remain frozen for 15 seconds while the next Lap
or Split time is being recorded in the background ("L" or "S" will flash to
confirm this). If you need to view the running display before the 15
seconds expire, press MODE.
NOTE: You can also take another Lap or Split time before the frozen
display releases by pressing START/SPLIT.
4. Continue to take Lap or Split times by pressing START/SPLIT, or
Pause/Stop the chronograph by pressing STOP/RESET.
5. You can resume timing by pressing START/SPLIT or reset the
chronograph by pressing STOP/RESET.
NOTES:
1. You can run the chronograph while viewing another watch mode by
pressing MODE.
2. The chronograph records Lap or Split times up to 24 hours (hours,
minutes, seconds) and will show 1/100 of seconds for the first hour.
LAP SPLIT
1/4 1:00 1:00
2/4 1:00 2:00
3/4 1:00 3:00
4/4 1:00 4:00
CORE #76 for CD 1/17/97 2:33 PM Page 5

Activating/Deactivating the Chime: The hourly chime ( ) can be
activated or deactivated while in ALARM mode. Press START/SPLIT until
the hourly chime symbol ( ) appears in the left side of the display. If you
do not want the alarm activated, press START/SPLIT until the hourly chime
symbol ( ) disappears.
When the Alarm Sounds: The watch beeps for 20 seconds. Press any
button to silence the alarm. You may press SET to set the alarm to a new
alarm time or START/SPLIT to deactivate the alarm. Otherwise, the alarm
will sound again in 24 hours.
SECTION 11 – HOW TO USE THE COMPASS DIRECTIONAL RING
If your watch is equipped with a compass directional ring, it gives
approximate compass readings. Locate the sun and then follow these
steps:
1. Point the hour hand at the sun (see diagram).
2.WHEN IN A.M. TIME - Rotate the compass directional ring until S
(South) is past the hour hand and halfway between the hour hand and
12:00.
WHEN IN P.M. TIME - Rotate the compass directional ring until S
(South) is before the hour hand and halfway between the hour hand and
12:00.
Adjust the compass directional ring every hour to reflect changes in the sun's
position. When reading the compass directional ring, make certain the hour
hand is always pointed towards the sun. When the hour hand is at 12:00
noon, S (South) should also be at 12:00.
SECTION 12 – ELAPSED TIME RING
If your watch is equipped with a rotatable outer dial with numbers and
indicators, this Elapsed Time Ring may be used to indicate the length of
time remaining for an activity or the starting time of an activity.
Time Remaining: Set the outer ring so that the triangle is pointing to the
time the activity is to end.
Starting Time: Set the triangle on the time the activity is to begin.
SECTION 10 – HOW SET AND USE THE ALARM/HOURLY CHIME
From NORMAL TIME, press MODE once.
NOTE: The ALARM mode symbol (AL) and the applicable Time Zone
symbol (T1 or T2) alternate to give complete information.
To activate the alarm for this setting, see below. To activate the hourly
chime, also see USING THE ALARM/HOURLY CHIME.
TO SET ALARM TIME
1. From the initial alarm display press SET. The Time Zone (T1 or T2) will
flash. Press START/SPLIT to select the Time Zone.
2. Press MODE to set HOUR of the alarm (the HOUR and "AM" or "PM" will
flash). NOTE: If the time zone is set to 24-hour (military) format, only the
hour will flash. Press START/SPLIT to advance HOUR.
NOTE: When any setting in the ALARM mode is changed from the initial
display, the alarm is automatically activated (as shown by the in the left
hand portion of the display).
3. Press MODE to set TENS of MINUTES (the display will change to show
the applicable Time Zone for the alarm). Press START/SPLIT to advance
TENS of MINUTES.
4. Press MODE to set MINUTES. Press START/SPLIT to advance MINUTES.
NOTE: To leave alarm set at any time during the procedure, press SET to
return to the ALARM display.
5. To return to NORMAL TIME (or CALENDAR) display (whichever has
been previously selected as the primary display), press MODE.
USING THE ALARM/HOURLY CHIME
ALARM mode is independent from the quartz analog portion of your watch
and is set to the digital time (NORMAL TIME or 2ND TIME ZONE mode).
When the alarm symbol ( ) is in the left side of display, the alarm is set.
NOTE: The Alarm Time format is dependent on the Digital Time format
(If Normal Time is in 24-hour (military) time, then the alarm will be set in
24-hour time).
Activating the Alarm: The alarm is activated when you press and release
START/SPLIT while in ALARM mode and the alarm symbol ( ) is
displayed in the left side of the display. If the alarm symbol does not
appear in the display, then the alarm is not active.
Deactivating the Alarm: Press and release START/SPLIT while in ALARM
mode until the alarm symbol ( ) disappears.
NOTE: The alarm will only sound if the digital time zone (T1 or T2) selected
in the Alarm Set mode is currently displayed, as confirmed by the alarm
symbol ( ).
CORE #76 for CD 1/17/97 2:33 PM Page 7

LIMITED WARRANTY
The Basic Coverage: This TIMEX Combination Quartz Analog/Digital L.C.D. (liquid
crystal display) watch (but not any battery, crystal, band or strap) is warranted to the
owner for a period of ONE YEAR from the date of purchase against defects in
manufacture by Timex Corporation - not by the dealer from whom the watch was
purchased.
What Timex Will Do: If this watch develops such a defect within the one year period,
it will be repaired (i.e., a new or thoroughly reconditioned and inspected module will
be installed) or replaced ( a watch of equal value and similar appearance will be
supplied) at our option, provided it is returned with a $5.00 check or money order to
cover costs of postage, handling and service, and you provide proof of purchase and
date of purchase.
This Limited Warranty Does Not Cover:
1) Timex will not repair defects related to servicing not performed by Timex
Corporation.
2) Timex will not provide any warranty service if your watch shows evidence that it
has been tampered with, misused, abused, or altered; for example:
•moisture damage sufficient to affect the proper function of the watch;
•damage to the case; or
•visible cracking of the crystal.
3) Timex reserves the right to charge you for a replacement battery, if the battery in
your watch is depleted. No additional charge will be made unless the one year
warranty period has expired or servicing is necessary for reasons beyond our
control, in which case a moderate charge will be made.
4) TIMEX IS NOT LIABLE FOR INCIDENTAL, SPECIAL OR CONSEQUENTIAL
DAMAGES. Some states do not allow the exclusion or limitation of incidental,
special or consequen-tial damages, so the above exclusion or limitation may not
apply to you.
Your Rights Under Implied Warranties and State Law: THIS LIMITED WARRANTY IS
IN LIEU OF ALL OTHER EXPRESSED WARRANTIES, OBLIGATIONS OR LIABILITIES.
TIMEX LIMITS THE DURATION OF ANY WARRANTY IMPLIED BY STATE LAW,
INCLUDING BUT NOT LIMITED TO THE IMPLIED WARRANTIES OF
MERCHANTABILITY AND FITNESS FOR A PARTICULAR PURPOSE, TO ONE YEAR
FROM THE DATE OF ORIGINAL PURCHASE. Some states do not allow limitations on
how long an implied warranty lasts, so the above limitation may not apply to you. This
warranty gives you specific legal rights, and you may also have other rights which
vary from state to state.
Care of Your Watch:
• Avoid exposing your watch to water, steam, or other forms of moisture if it is non-
water-resistant.
• If the crystal becomes damaged, have it replaced at once to avoid damage to the
module.
• When your battery is depleted, have it replaced promptly. The particular type of
battery required is indicated on your caseback. You can get them from your local
Timex retailer.
Service of Your Watch:
If your TIMEX watch should ever need servicing, send it to Timex addressed as
follows: HOTLINE WATCH SERVICE, P.O. Box 2740, Little Rock, AR 72203
Because of possible loss, we recommend insuring your watch, return receipt
requested, when using the mails. If you do not obtain a receipt within a reasonable
time, start a tracer through the originating post office. NEVER INCLUDE A SPECIAL
WATCHBAND OR ANY OTHER ARTICLE OF PERSONAL VALUE IN YOUR SHIPMENT.
PLEASE NOTE THAT WE MAY SUBSTITUTE A WATCH OF EQUAL VALUE AND
SIMILAR APPEARANCE FOR YOURS ON BOTH IN-WARRANTY AND OUT-OF-
WARRANTY REPAIRS.
For your convenience in obtaining factory service, participat-ing Timex retailers will be
pleased to provide you with a postage-paid, pre-addressed Watch Repair Mailer.
TIMEX is a trademark and a service mark of Timex Corporation.
REG. U.S. PAT. & TM. OFF.
SECTION 14 – BATTERY REPLACEMENT
One battery provides the power to operate your Timex watch. TIMEX
STRONGLY RECOMMENDS TAKING YOUR WATCH TO A LOCAL RETAILER
OR JEWELER TO HAVE THE BATTERY REPLACED. The battery type
required for your watch is indicated on the caseback.
IMPORTANT NOTE: After replacing the battery and before you close the
caseback, be sure to quickly press the reset button twice if indicated on the
battery clamp. If after you close the caseback and replace the battery, the
display does not go on, press all buttons simultaneously.
CAUTION: DO NOT DISPOSE OF OLD BATTERY IN FIRE OR ATTEMPT TO
RECHARGE. KEEP LOOSE BATTERIES AWAY FROM CHILDREN.
When installed at the factory, the battery life in this Timex watch is
estimated to last approximately 3.5 years. This estimate is based on the
alarm being used one time per day for ten seconds and the light being used
once per day for one second. Battery life may vary depending on your
actual usage experience. The use of NIGHT-MODE®, which causes the
INDIGLO®night-light to activate for three seconds with any button press,
may reduce battery life.
SECTION 15 – SERVICE
If your TIMEX watch should ever need servicing, send it to Timex
addressed as follows:
HOTLINE WATCH SERVICE
P.O. Box 2740
Little Rock, AR 72203
For service questions, call 1-800-448-4639.
For your convenience in obtaining factory service, participating Timex
Retailers can provide you with a pre-addressed Watch Repair Mailer.
See the Limited Warranty for specific instructions on the care and service
of your Timex watch.
Should you need a replacement strap or band, call 1-800-448-4639.
© 1996 Timex Corporation
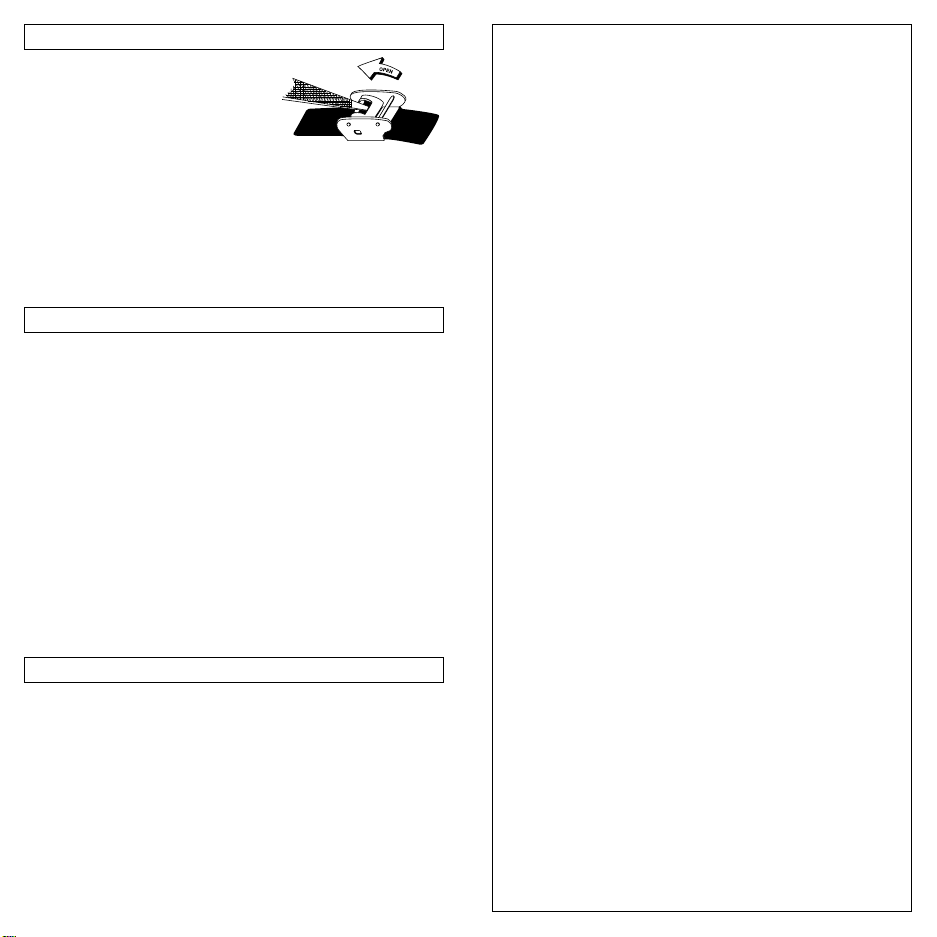
SECTION 13 – BAND ADJUSTMENT
If your watch has a band similar to the
photo, follow these instructions to adjust the
band since the clasp can be damaged if
excessive force is used.
1. Open locking plate using nail file, small
screwdriver or other blunt instrument.
2. Move clasp to desired band length.
3. While holding the locking plate with your finger and thumb, exert slight
pressure and slide the clasp back and forth until you feel the clasp
engage in one of the grooves on the underside of the band.
4. Firmly press the locking plate down until it snaps to closed position. If it
seems to be difficult to push closed, repeat Step 3 to ensure that you
have properly positioned the clasp.
CORE #76 for CD 1/17/97 2:33 PM Page 9
Table of contents
Other Timex Watch manuals

Timex
Timex INTELLIGENT QUARTZ User manual

Timex
Timex 766-095000 User manual

Timex
Timex Marathon User manual

Timex
Timex W-152-US User manual

Timex
Timex Global Trainer W260 User manual

Timex
Timex Metropolitan R User manual

Timex
Timex W-46 User manual

Timex
Timex IRONMAN Classic 50 Move+ User manual

Timex
Timex 696-095000 NA User manual

Timex
Timex T200 User manual