BEYES APEXPILOT ALL-IN-ONE Installation manual

Cordless Endodontic Handpiece, Built-in Apex Locator
ApexPilot All-In-One
Instruction for Use

2
Thank you for purchasing ApexPilot All-In-One (Built-in Apex Locator). Please read
this Operation Manual carefully before use for operation instructions and care and
maintenance guidelines, and keep this Operation Manual for future reference.
Please do not hesitate to contact Beyes Dental Canada Inc. for helps with any doubts or
problems that may arise during consultation of this manual.
Consult accompanying documents (user manual)
This symbol, found on the labels of the unit and accessories, reminds
the user to consult this User Manual.
Intended use
ApexPilot All-In-One is a cordless micro-motor used primarily for mechanical root
canal preparation with integrated apex locator for endodontic treatment. While root
canal preparation is made, the length determination can be simultaneously carried out.
Alternatively, the stand alone measurement is possible, using the separate le clamp for
measuring le.
User
Only qualied personnel is allowed to use the unit only in dentistry.
Prohibition
• Do not use ApexPilot Endo-Motor for formation of an extremely bent root canal.
• Do not use ApexPilot Endo-Motor for implants other than endodontic treatment
or other dental treatment.
Classication of Devices
• Classication by type of protection against electric shock
— Class II devices
• Classication by degree of protection against electric shock
— Applied part type B
• Classication by sterilization or disinfection method allowed by the manufacturer
— Refer to "5. Cleaning, desinfection, and sterilizing"
• Classication by mode of operation
— Continuously operating device

3
This conforms to CE European Directive of “Medical equipment directive
93/42/EEC.”
Follow the Waste Electrical and Electronic Equipment (WEEE) Directive
Class II equipment
Double insulated, fullling legal requirements of IEC-60601-1
Type B
Particular protections against electric shock
Refer to the Operation Manual
Consult accompanying documents (user manual)
Manufacturer
Serial Number
Date of manufacture
Direct current
Authorized representative in the European Community
0197
Symbols

4
Table of Contents
1. General Precautions ....................................................................................... P5-6
1.1. General Warnings and Conditions for Operation
1.2. Undesired Effects
2. Getting Started ................................................................................................ P-7-9
2.1. Description and installation of functions
2.2. Name of each part and its functions
2.3. Installation of contra angle
2.4. Mounting and Moving File
2.5. Battery
3. Description of user-interface ......................................................................... P10-12
3.1. Keypad and Display
4. Operations ....................................................................................................... P13-26
4.1. QS( Quick Start ON/OFF KEY function)
4.1.1. The QS quick start key uses
4.1.2. The QS quick start key setting
4.2. Integrated Apex Locator
4.2.1. Modes of Root apex locator Control Endo-motor mode
4.2.2. Useful tips for accurate length determination
4.2.3. Optional Apical Line
4.2.4. Operation
4.2.5. Root apex locator Demo and self-checking
4.3. Running in different modes of rotations and settings
4.4. Torque, Speed and Gear rate Settings
4.5. Convenient function
4.5.1. Program
4.5.2. Factory Default Parameters
4.5.3. Calibration
4.5.4. Alarm Sound Setting
4.5.5. Wireless Transmission Display (Optional)
5. Cleaning, Disinfection, Sterilizing ................................................................. P27
6. Maintenance..................................................................................................... P28
6.1. Changing Battery
6.2. Lubricating contra angle
7. Technical Specication .................................................................................. P29
8. Troubleshooting .............................................................................................. P29-31
9. Disposing Product .......................................................................................... P31
10. Certicates....................................................................................................... P31
11. Warranty........................................................................................................... P32
Appendix
Service Form
Declaration of Conformity
Electromagnetic emissions and immunity

5
1. General Precautions
Most operational and maintenance problems are resulted from insufcient attentions being
paid to basic safety precautions and not being able to foresee the possibilities of accidents.
Problems and accidents are best avoided by foreseeing the possibility of danger and operating
the unit in accordance with the manufacturer’s recommendations.
Warning
If the instructions are not being followed properly, operation may result in hazards
for the product or the user/patient.
Note
Additional information, explanation on operation and performance.
1.1. General Warnings and Conditions for Operation
Warning
CONTRAINDICATION
Use of ApexPilot is contraindicated in patients and in users with pacemaker!
General Warning
• Use the specied battery for this product. Never use any batteries other than
Beyes specied.
• High external pressure will cause a liquid leakage or explosion
• Keep the central unit away from water, high-temperature and chemical solution
which may cause short circuit, re, and other dangerous environment.
• Sterilize the motor by heat or steam which may cause a liquid leakage or
explosion.
• Do not disassemble the central unit.
• The product is being used for dental treatment only by qualied personnel.

6
Conditions for Operation
• This equipment is for indoor use only.
• Ambient temperature.
• Relative humidity.
• The accuracy of the torque, rotation speed and apical position are guaranteed only
when the original contra angle is used which is supplied by Beyes
• Do not sterilize the central unit, nor place it into autoclave or ultrasonic tank.
• Do not use the system in the presence of free oxygen or ammable gas mixtures.
• Portable and mobile RF communications equipment can affect Medical Electrical
equipment. Do not use RF equipment outskirts for the product.
• Follow the instructions to set the rotation and speed of the motor.
• If the Central unit has not been used for a long time, check it before uses.
• There is electric circuit that controls the torque (TORQUE LIMITER Function) to
prevent les from breaking; however, les may still break due to metal fatigue if the
torque is conditioned to be higher. Please check the working instructions of le before
use.
• The battery charger must be supplied at a voltage in the range: 100V-240V (+/-10%),
47-63Hz. Use only original parts.
• Should any anomalies arise during operation, suspend work and contact your technical
service center.
1.2. Undesired Effects
Except the contraindication of not using the unit on patients with a pacemaker, up to now
no serious adverse events have been reported during the correct clinical use in a clinical
setting.
7
2. Getting Started
2.1 Description of Functions and Installation (please refer picture 4.2 for detailed
operation)
• Collaborative working function of Apex locator and Endo motor
Automatically rotate when entering the root canal
Automatically slow down when approaching to the apical
Automatically reverse when reaching the apical
Automatically stop when exiting the root canal
• Automatically start of apex locator to control motor mode without user setting
• ApexPilot All-In-One automatically identies whether the measuring line is inserted
• Insertion of the measuring line and that means that the user needs to measure and
expand the length of the root canal at the same time
• Endo motor function
Quick start
User program
Auto reverse
Reciprocating
First press, the motor will forward rotate
For pen le and path le
Factory setting: 350PRM/3.0N.cm
Second press, the motor will be reciprocating
Factory setting: 350PRM/3.0N.cm
Power off
Third press:
Power off

8
Central Unit
2.2 Name of each part and its accessories
Charging base
(ALP 121)
Adaptor
(ALP 107)
Battery
(ALP 104)
Lip hook
(ALP 003)
Charging wire
(ALP 108)
Measuring line
(ALP 110)
16:1 contra angle
(ALP101)
Silicone Sleeve
(ALP 119)
Spray nozzle
(ALP 111)
The ApexPilot All-In-One (Code: AL2020)
system is made up of the components listed below:
• Central Unit and Battery-Built-In Central Unit
• Contra-angle
• Battery Charger
• Adaptor and USB cord
• Accessories:
Lip hook, Contra angle sleeve, Spray nozzle, adjust the font size
2.3 Installation contra angle
The contra angle can be connected with the
central unit at 6 adjustable head positions. Align the
positioning pins of the contra angle with the
positioning slots of the central unit and insert the
head until it click. When removing the contra
angle head, pull it out axially.
Warning
Turn off the power to remove or attach the contra angle
Do not use the contra angle other than Beyes'
Check that the contra angle is securely connected to the central unit

9
2.4 Mounting and Moving File
File Insertion:
Lightly turn the le until it engages with the
latch mechanism, then push inward until it click.
File Removal:
Depress the push key and pull out the le.
2.5 Battery
a) Insert the power cord jack into the inlet at the back of the battery charger. (Fig. a)
b) Insert the power cord and plug in. Make sure you have the correct model. (Fig. b)
c) Turn on the power switch. Meanwhile, check if the power lamp lights up.
d) Insert the central unit into the battery charge. Charging starts with the charge mark
ashing on LCD. (Fig. c) When the buzzer sounds and is played on the LCD, charging is
completed.
• The central unit can be charged directly by USB cable.
• Please ensure that the central unit and the battery charger are placed in dry and clean
condition.
• Never use the battery charger for anything other than ApexPilot All-In-One from
Beyes.
• The charging normally takes approx. 90 minutes, but it depends on battery use
conditions, battery freshness, and ambient temperature, etc.
• Under the charging condition, the central unit is not allowed to rotate.
• The completely discharging will cause damages of the battery. The user should
charge the battery completely once a month, or once bi-monthly, if the central unit will
not be used for a long term.
• Pull out the central unit from the charger base up straightly after the battery fully
charged.
Warning
When the central unit is charging, but the buzzer does not sound and the charging
animation is not displayed, please take the central unit out from the battery charger, and
check the“ERROR CODE” to nd out the problem.

10
3. Description of user-interface
3.1 Keypad and Display
ON/OFF KEY
LCD Panel
PROGRAM KEY
SELECT KEY
+ KEY
- KEY
POWER KEY
Program No. and
relative value
<LCD Panel>
Alarm Symbol
Battery Indicator
Canal length indicator bar
Speed
Wireless transmission
Torque
Gear ratio
Auto Reverse mode
*Speed=Rotation speed of the le
Select M model by POWER
KEY after power is on for
the use of independent
endo motor
Independent endo motor
Select MR model by POWER KEY
after power is on for the use of
apex locator to control endo motor
Apex locator control
motor how to rotations
POWER Key ( )
• The POWER key
• Apex locator controls motor working mode option (turn on the power, press this
key to circle options)
ON/OFF ( )
• Normal rotation: when the power is on.
— Press this key to rotate the motor and then release. Press this key again to stop
the motor.
• Temporary rotation: when the power is on.
— Press and hold down the key to rotate the motor. Release this key to stop the
motor.
ApexPilot
The measurement of root
canal combines with the
selection of motor model
11
• QS (Quick Start Key): when the power is off
SELECT Key ( ) (When the motor is running, the key is invalid, setting would be
saved automatically)
• Speed, torque and gear ratio setting.
• Rotation Mode selection setting.
• Apex locator DEMO and self-checking: when the power is off, long press this key to
enter apex locator DEMO, and start the self-checking at the same time. (The details to
see “4.2.4 Root apex locator Demo and self-checking”)
PROGRAM Key ( ) (When the motor is running, the key will be invalid, and the
setting will be auto-saved)
• A program can be selected
• QS (Quick Start Key) setting (The details to see “ 4.1.2 The QS quick start key setting”)
• Turn on the Bluetooth to connect the external display (For the product with wireless
display module only)
+/- Key ( )
• Use these keys to increase or reduce the speed of the motor.
• Adjust the values as other functions.
LCD panel
Root canal length measurement display: displayed as the picture on the right.
• Apex locator control motor working mode option: Turn on the power, press to select
— ‘M’ Motor only, apex locator will not work
— ‘MR’ Motor working for the root canal preparation and apex locator working for the
measurement of the root canal length at the same time, apex locator will control the
preparation of motor.
— ‘MR’ Motor working for the root canal preparation and apex locator working for the
measurement of the root canal length at the same time, apex locator will not control
the preparation of motor
— ‘R’ Apex locator only, motor will not work
• Root canal depth scale:
— displayed the les into the root canal narrow area, there are in a total of 8 scales,
full scale means that the apical is reached.
— APEX: "APEX" icon is appeared when the apical is reached, ashing of this icon
means it is beyond the apical.
— Digital display: Relative value of root canal length, 0 means the apical is reached,
-1 means it is beyond the apical.

12
• Auto Reverse
: If the load is removed after auto-reverse rotation, it returns to the normal
rotation again.
: If the load is removed after auto-reverse rotation, it stops.
: Auto-reverse rotation is not activated. (There will be no symbol displayed)
: Rotation is in anti-clockwise motion.
: Rotation in reciprocating mode
• Battery Symbol
The symbol indicates the capacity of battery. The symbol will be animated
when the battery is being charged
: The battery is full or nearly full
: About 30-80 % remaining
: Less than about 30% remaining
: Battery are drained or the symbol ashing with alarm. Please charge the
battery at once
The symbol indicates the remaining capacity of the battery. When load is
applied to the le, the symbol that indicates the remaining capacity of the battery
appears to become lower.
• Alarm Symbol (The details to see “4.5.4 Alarm Sound Setting”)
: MAX
: MIDDIUM
: OFF

13
4. Operations
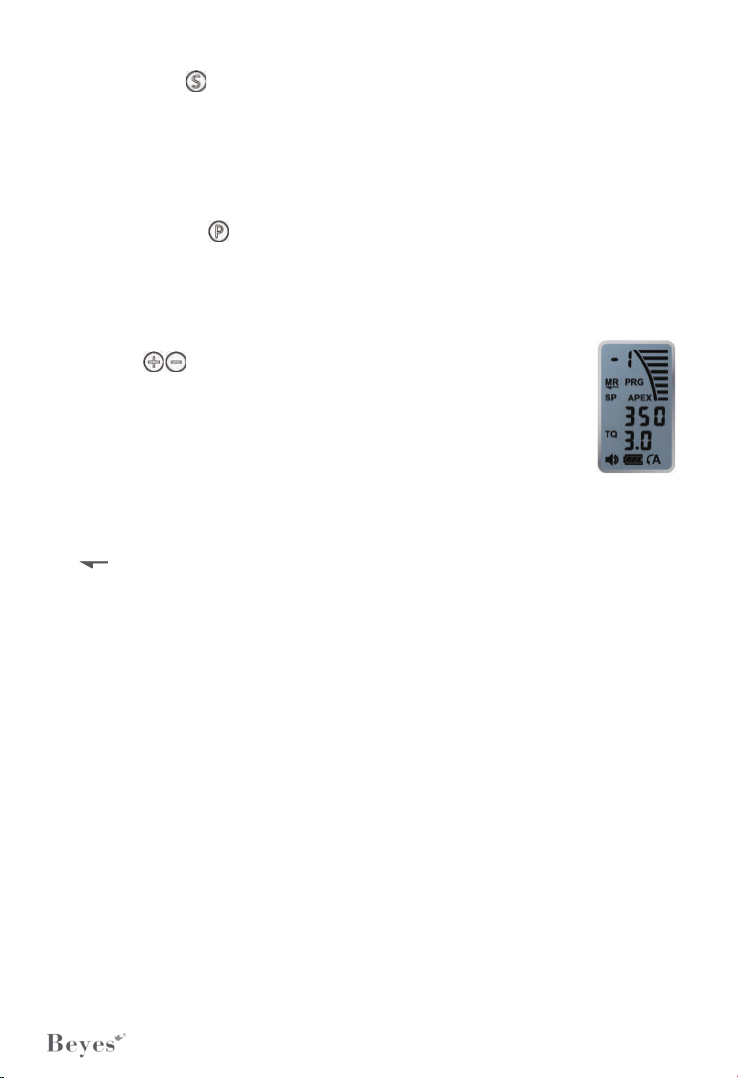
4.1 QS (Quick Start ON/OFF KEY function)
4.1.1 QS quick start key using
In order to make maximum imitation of dentists’ operation habits, we develop this quick
start function, The doctor can set the most commonly used parameters to this function.
Such as speed, torque, and rotation mode.
There are 3 steps cycle:
1. Forward rotate 350PRM/3.0N.cm
2. Reciprocating 350PRM/3.0N.cm
3. Off
First press, the motor will forward rotate
For pen le and path le
Factory setting: 350PRM/3.0N.cm
Second press, the motor will be reciprocating
Factory setting: 350PRM/3.0N.cm
Power off
Third press:
Power off
Quick Start factory setting:
Rotation speed: 350PRM ( forward rotate and reciprocating)
torque: 3.0N.cm (forward rotate and reciprocating)
Auto Reverse: Factory setting auto-reverse mode
Reciprocating mode rotation direction: forward (forward about 270 degrees,
reverse about 30 degrees)
Working mode: apex locator controls working mode (connect the measurement cable
and lip hook le, when the le approaches the apical foramen, the motor will automatically
slow down, when it reaches the apical foramen, the motor will auto-reverse. Working as
independent motor without measurement cable)
14
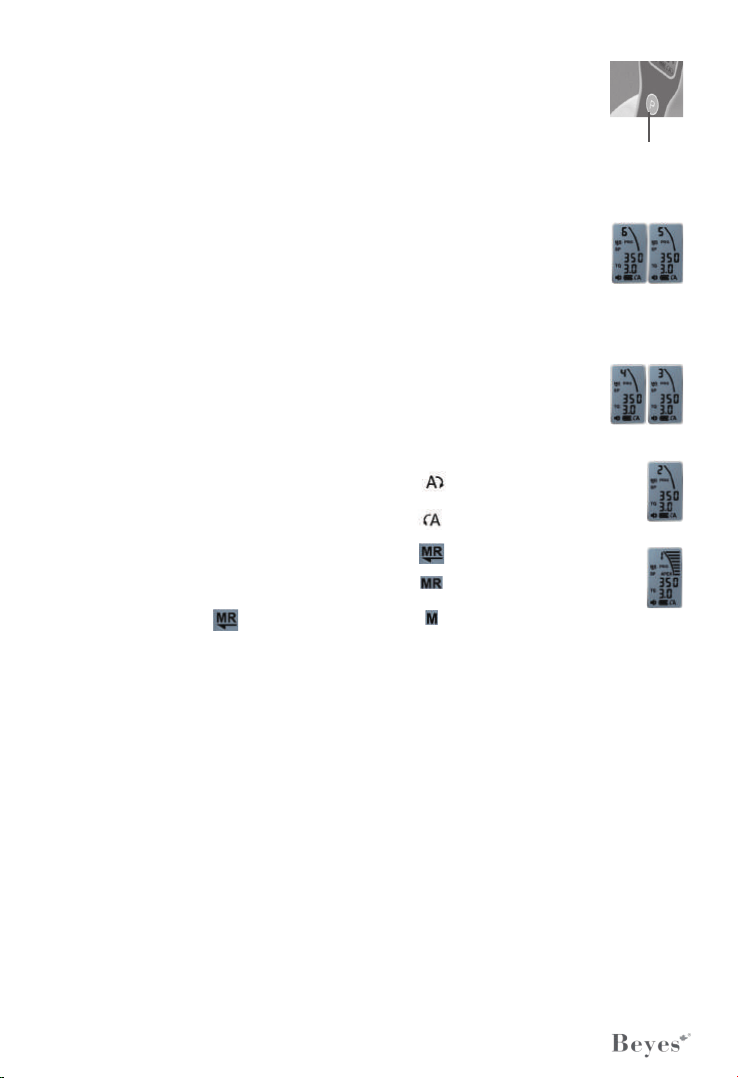
4.1.2 QS quick start key setting
First step: Enter the setting:
• Long press “P” to enter Quick Start Key mode setting when the power
is off.
— There are 6 parameters for setting, to press “P” can change the
parameters from 6 to 1, and cycle
Second step: set the speed and torque for the forward rotate
• Press “P” to select parameters 6, speed coruscate, press +/- to select
clockwise rotation speed
• Press “P” to select parameters 5, torque coruscate, press +/- to select
clockwise torque
Third step: set the speed and torque for reciprocating
• Press “P” to select parameters 4, speed coruscate, press +/- to select
reciprocating rotation speed
• Press “P” to select parameters 3, torque coruscate, press +/- to select
reciprocating torque
Forth step: set direction of reciprocating mode
• Press “P” to select parameters 2
• Press +/- to select arrow direction
Fifth step: apex locator control motor
• Press “P” to select parameters 1
• press +/- to select
Exit setup: Setting parameters will be saved automatically
When setting, Press ON/OFF to enter Quick Start mode, and work with
parameter settings above: Press POWER to enter traditional working
mode.
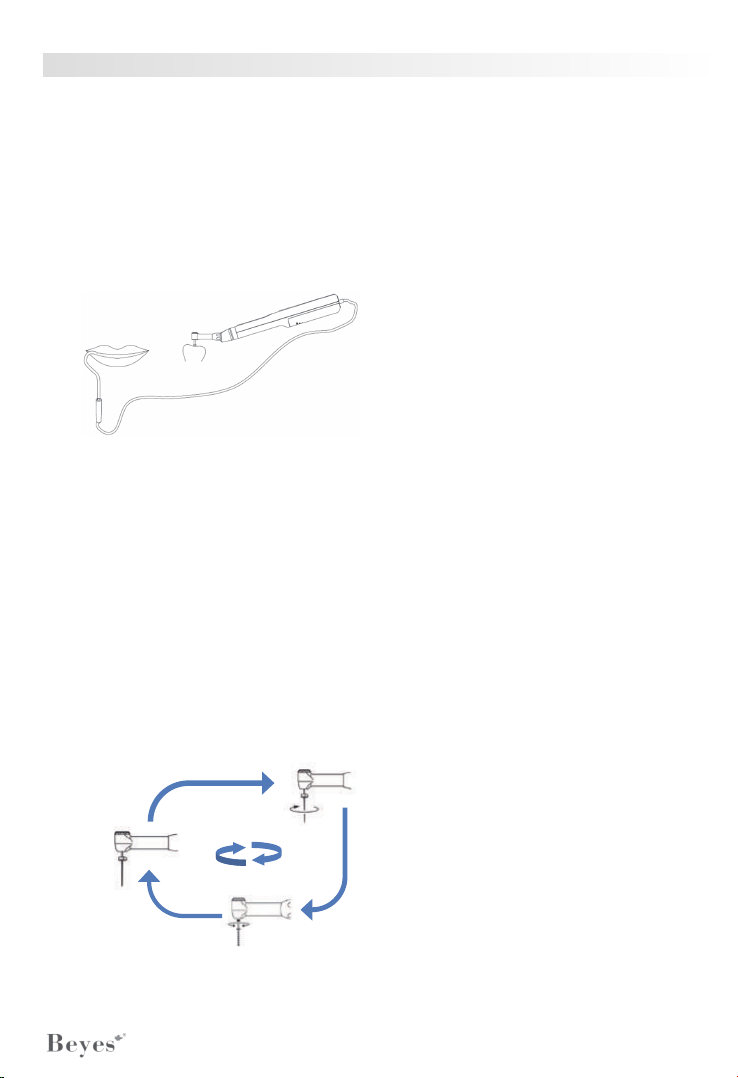
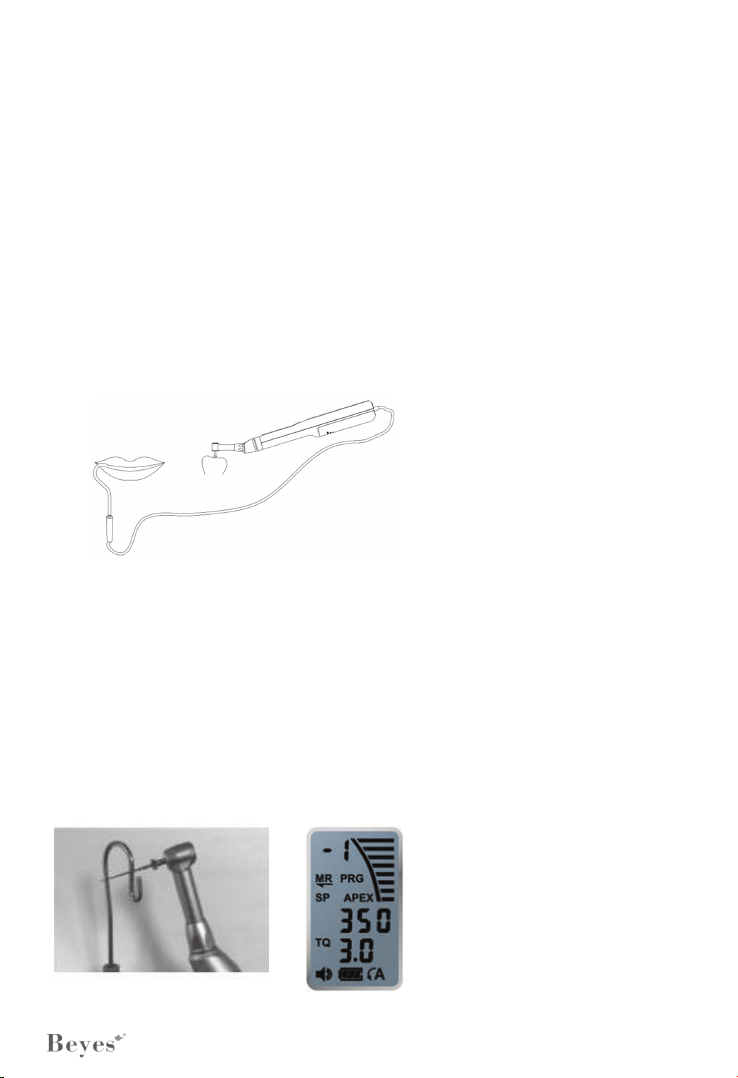
4.2 Integrated Apex Locator
ApexPilot All-In-One is equipped with an integrated apex locator. It can
be used in the following two ways: Combined length determination by
using the contra angle and lip clip (determination with the rotating le)
and the stand alone determination using the separate le clamp and lip
clip, which excludes the contra angle and is recommended with manual
les.
Press this key
for long time
Reciprocating mode, rotate
clockwise 300°,anti-clockwise 30
Reciprocating mode, rotate
anti-clockwise 300°, clockwise 30
Apex locator control motor
Apex locator and motor working
independently
Only motor
15
Warning
• Combined length determination by using the given contra angle and lip clip only
accurate results when using the original contra angle by Beyes supplied
• Use only endodontic NiTi les with a metal handle for this type of length determination.
• In some clinical cases accurate length determination is impossible! ( for details see
chapter x “Troubleshooting”)
• Electrical length determination uses minimal auxiliary current. The values used in the
ApexPilot All-In-One are far below the values required in IEC 60601-1-1. Nevertheless,
in rare cases electrical sensation during the length determination can occur. In this
case, do not continue the treatment with this patient.
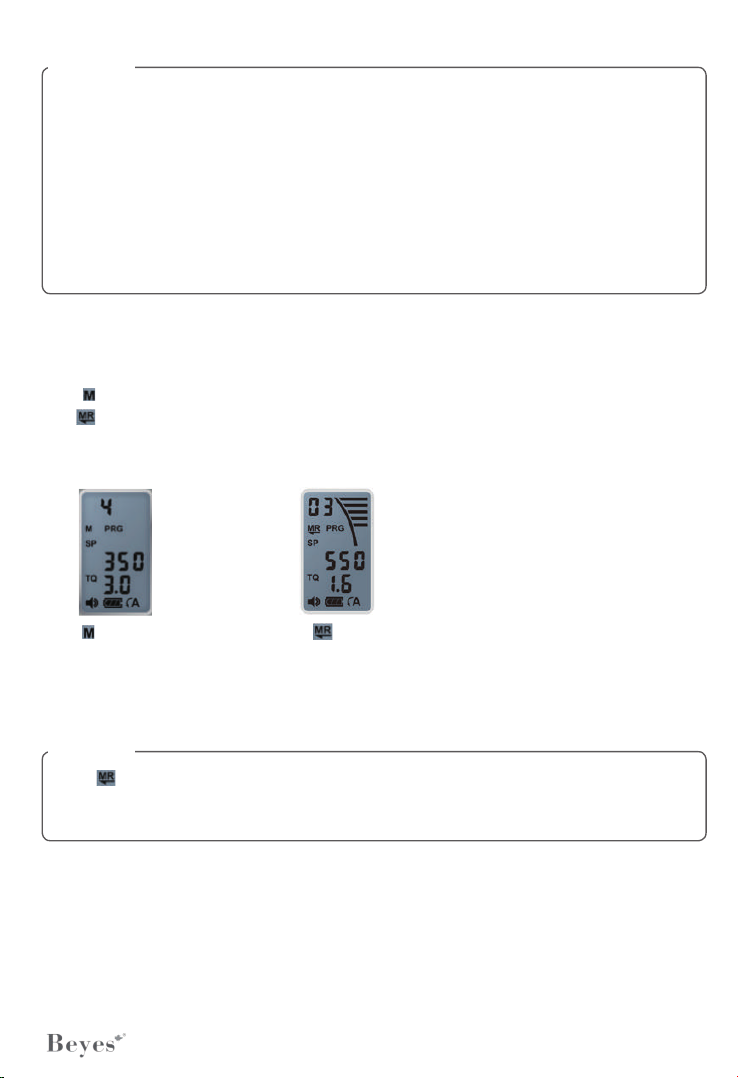
4.2.1 Modes of Root apex locator Control Endo-motor mode
• There are two types of work mode related to Root Apex Locator.
Mode, Independent Endo motor, Apex locator is invalid.
Mode, Apex locator controls motor for rotations
• Can be made by the Power key to select one of the above work mode after power on.
Mode Mode
Independent
Endo motor
Apex locator controls
motor for rotations
NOTICE
• In working mode, the motor will automatically rotate, stop, reverse depends on the
length of the root canal measured by the apex locator.

16
4.2.2 Useful tips for accurate length determination
• Gloves and rubber dam are recommended in order to isolate the tooth.
• Dry the access cavity with the suction pump or a cotton-pellet.
• Avoid any direct contact between the contra angle le and mucosa. Use the silicone
sleeve for the contra angle.
Notice
• Save settings automatically
• This mark for the apical is available in all working modes, including QS mode and the
working mode of motor controlled by the apex locator once set.
• Sound cue prompts all apical lines as vertices
4.2.3 Optional Apical Line
• This feature is convenient for users to make marks of the
relative distance from apical point
• The range of markers is 5 scales, from 0.0 to 0.5
According to user-labeled apical scale, when reaching marker
position, better visual and sound cues
Complete the following steps to change the marks of apical
point
• Turn on the power of main unit
• Choose apex locator only for the working mode
• Press “+/-“ to change the marks
Set the apical line to 0.3
As shown on the right, when it is in use, at the relative value
of 0.3 from the point of the root tip, it has been displayed as
the point of root tip and it would be automatically reversed
and exited.
17
4.2.4 Operation of Apex Locator—Auto-Start, Auto-Stop, and Auto-Exit
We are committed to produce safe and reliable medical equipment for the doctors, so
we recommend doctors to use the apex locator to control the motor mode.
4.2.4.1 Connecting
Use the contra angle that covered by the silicone sleeves for combined length
determination.
• Connect the lip clip cable to the Micro USB port at the bottom of the central unit.
Insert the lip clip into the connector at the end of the cable. Ensure the connection is
solid.
• Put the pip clip in the patient’s mouth (we recommend positioning it on the opposite
side of the tooth undergoing therapy).
For combined length determination
4.2.4.2 Application steps
• Press “POWER” to turn on the machine
• Press POWER key to select the mode of endo motor controlled by the
Root Apex Locator or stand-alone Apex Locator
*The relative parameters can be changed in accordance to the user’s
manual, such as speed and torque
• Measurement loop detection:
For combined length determination

18
For combined length determination
Contact with the lip clip and le
• File will rotate in anti-clockwise
• The warning will sound rapidly
• Display on the screen: Root canal indicator scale full grid, the root canal indicator
data: APEX, -1 non-stop ashing
The apex locator cannot be worked on due to malfunction as the above state.
Possible causes are:
• One of the connecting cables might be damaged or improperly connected.
• Unsolid connection between the apex locator cable and the unit.
• Too quick or improper contact between either the lip clip and le inserted into the
contra angle or between lip clip and le in the le clamp.
• Operation: After setting the above parameters, connecting measuring line, detecting
measurement loop, hang the lip hook on the patient’s lip, the treatment can be
started
The response of motor:
• Putting the le into the root canal, the le will self-acting rotate as setting speed,
torque. Or press ON/OFF to drive the le to rotate
• when the le approaching the apical foramen, the root canal relative value will be
shown as 0.2, then the motor will automatically slow down, the root canal relative
value which will be slower and the minimum speed will be 140 PRM. When it
reaches to the apical foramen, the motor will be auto-reversed.
• When the le reverse and the root canal relative value will be shown as 0.5, the
motor will rotate as the setting speed, torque, direction and cycle.
Response of alarm:
With the le depth, alarm sound from slow to fast, and then to APEX. The alarm sound
remain constant, however, the alarm sounds rapidly when it is over the apical, over
apical the alarm sound rapidly changes
Screen display:
The root canal relative value changes with the le depth.
APEX icon will appear when it reaches the apical, the root canal scale will be full, and
the root canal relative value will be 0;
APEX icon will ash when it reaches over the apical, the root canal scale will be full, and
the root canal relative value will be -1.

19
The le is entering
the root canal
Close to the arrow
area, The relative
value to the apical is 0.5
Reached the APEX
The motor auto-stops
Over the APEX
auto-exit when the le
tip reaches APEX
4.2.5 Root apex locator Demo and self-checking
• In order to reduce the user’s key operation, DEMO and the internal detective apex
locator will be processed in parallel.
• ApexPilot All-In-One embedded calibration circuit, and there is no need to ration
calibration modules.
• Demo animation is the whole process to measure the length of Apex Pilot All-In-One
apex locator. Simulation shows that the le enters the root canal, reaches the apical,
beyond the apical, the change of display and warning of ApexPilot All-In-One at
each stage.

20
Steps for DEMO and internal detection:
• Turn off power of ApexPilot All-In-One
• Connect measuring line with the main unit
• Put the le clamp into two interfaces of measuring line
• Insert the le into the contra angle
• Connect the two le clamps with the le
• Long press "S" to enter DEMO and internal detection, then wait for the test results
After the test result is produced:
a. If there is no operation, it will shutdown in 10 minutes
b. Press“ON/OFF” to enter QS quick start mode
c. Press“POWER” to enter normal mode
Instructions of test and calibration results:
• The number above represent (from left to right)
Self-checking result: apex locator testing result, apex
locator combined with motor testing results
• Self-checking result: 1 represent internal detecting
result normal, 0 represent error, (please contact with
local dealer)
• apex locator testing result: 1 represent normal, 0
represent error
• apex locator combined with motor testing results: 1
represent normal, 0 represent error
4.3 Running in different modes of rotations and settings
4.3.1 Running in different modes of rotations
Auto Reverse
When it continues on a load and it exceeds the torque limit value, it will automatically turn to
AUTO-REVERSE mode, the le will rotate reversely.
Load lower than the
set torque limit value
Load higher than the
set torque limit value,
anti-clockwise
It will reversely rotates when
the load continues; it will stop
and return to clockwise rotation
when the load is removed.
Other manuals for APEXPILOT ALL-IN-ONE
1
Table of contents
Other BEYES Medical Equipment manuals


