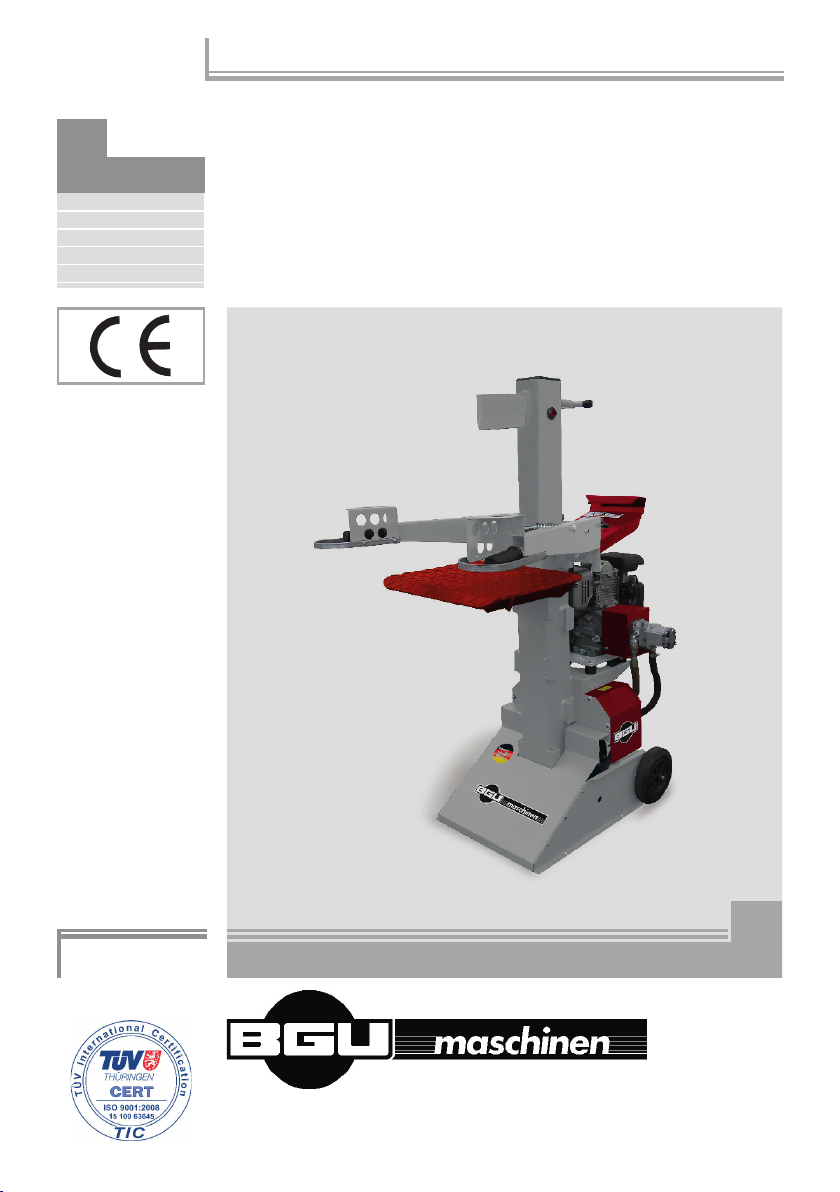
BGU HS 80-2 B User manual
Südharzer Maschinenbau GmbH
Helmestraße 94 ∙ 99734 Nordhausen/Harz
Zentrale: +49(0)3631/6297-0 ∙ 7-111
Internet: www.bgu-maschinen.de
e-mail: [email protected]
-Set-up & instal
lation
-Use
-Maintenance
-Accessories
HYDRAULIC
LOG SPLITTER
HS 80-2 B
Made in
Germany
Operator's Manual
Carefully read these instructions
before starting and using your splitter!!

2
CONTENT
1. Introduction 3
1.1 About the manual 3
1.2 Delivery and transport claims 3
2. Product overview 5
3. Safety labels and warning signs 6
4. Safety 8
4.1 Mandatory application field 9
5. Operating instructions 10
5.1 Safety 10
5.2 Initial Check-ups 10
5.3 Assembling the safety brackets on the hand guards 10
5.4 Functional controls before start up 11
5.5 Adjusting the height of the pressure plate (table) 11
5.6 Installing the log clamps 12
5.7 Adjusting the ram stroke 12
5.8 Operating instruction 13
5.9 Clearing logs jammed on the wedge 13
5.10 Gasoline engine specifications 14
6. Handling and transportation 14
7. 4-ways wedge and splay wedge (accessory) 15
8. Repairs and maintenance 16
8.1 Ordinary periodic maintenance 16
8.2 Hydraulic oil 16
8.3 Sliding pads 17
8.4 Consumables 17
9. Dismounting and discarding an obsolete machine 18
10. Technical data 19
10.1 Noise emissions 19
11. Other areas of possible hazard 20
11.1 Mechanical dangers 20
12. Troubleshooting chart 20
13. Legal warranty 21
14. Extended warranty 21
16. EC Statement of Compliance 22
17. Spare parts list for HS 80 - B 23

3
1. INTRODUCTION
Dear customer,
thank you very much for your trust and preference in buying this
log splitter! You have now joined the BGU worldwide family. We are
confident that our equipment will be up to all your expectations and
assure you a long lasting quality and performance.
This log splitter model is available in various versions with different
splitting force.
HS 80-2 B , 8 t Splitting force
1.1 About the manual
Please take time to read this manual and learn to how operate and
maintain the splitter safely. For your easier reading this manual is
laid out in several sections. The sections are progressively numbe-
red and listed on the “content” page. The information, pictures and
technical data in this document reflect current or planned product
features, functions, and characteristics as of the publication date.
Because of on-going product improvements and feature additions,
information in this document is subject to change without notice. If
you are experiencing a problem or functional trouble on your ma-
chine, please read the “trouble-shooting” section to identify possible
causes and remedies. If the problem or functional trouble is not lis-
ted in the troubleshooting chart contained in this manual, ask your
Authorized Service Centre for service. When you have checked all
the possible causes listed and you are still experiencing the pro-
blem, ask your Service Centre for help.When you order parts main-
tenance or repair services, your Authorized Service Centre, your
dealer or eventually the manufacturer need your machine serial
number and engine serial number. These are the numbers that you
have recorded on the product identification label of the manufactu-
rer on the machine.
1.2 Delivery and transport claims
Upon delivery of the machine please check for visual machine da-
mages such as damaged packing or scratched buckled parts. If so,
make
a remark on all copies of the delivery bill before signing for accep-
tance.

4
Also have the truck driver sign al copies of the delivery bill.
Should your shipper or the truck driver refuse to accept your claim,
fully reject delivery and make sure to inform us (the manufacturer)
immediately. No claims shall be taken into account by the shipper or
by the insurance company, if a reservation note is not made on the
delivery bill.
All transport damages must be notified within latest 2 days from de-
livery. Therefore delivery must be collected and inspected within this
term. Later claims shall be disregarded. In case of assumed but not
visually clear transport damages make sure to mark the following
sentence on the delivery bill: „Reserved delivery due to assumed
transportation damages.“
Insurance and shipping companies act with extreme caution in case
of transport damages and sometimes refuse to accept responsibility.
Please make sure to provide clear and exhaustive evidence (photos)
of the claimed damages. Thank you in advance for your help and un-
derstanding in this matter.

5
Construction stand
2. PRODUCT OVERVIEW HS 80-2 B
Splitting wedge
Control levers
Intermediate table
Casters
Handle grip
Gasoline engine
Hand guard
Wedge riser
Tank

6
1. Machine safety label
„Before setting-up, servicing, maintaining and
cleanig the machine, disengage power and stop
the engine. Lock the tool and secure against ac-
cidental start.“
Keep your hands away from all moving parts! Pinched hands danger!
2. Machine safety label
„Read, understand, and follow all instructions in
this manual and on the splitter before starting“
Keep at safety distance from the dangerous zone!!
3. Machine safety label
„DANGER! Moving Parts!“
„One-man operating only!“
Possible dangers can arise from moving parts on the machine.
The machine is to be strictly operated by one man at a time only.
4. Warning label „p max 245 bar“
The label shows the max admissible operating pressure.
5. Warning label „Pinched Hands danger“
Never place hands or feet between log and splitting wedge or between
log and ram during the forward or reverse stroke.
6. Operation safety label
„IMPORTANT! Mind for correct table installation“
Make sure the pressure table is properly hooked up and installed on
the splitter. Please carefully read the instruction manual.
3. SAFETY LABELS AND WARNING SIGNS
p max 245 bar
7
7. Identification label „BGU-Maschinen“ logo“
8. Identification label „Product identifi cation“
This label shows the company details of the manufacturer and the
main technical data of the machine.
9. Machine safety label
“Wear suitable protective gloves!“
10. Machine safety label
“Wear suitable protective boots!“
11. Machine safety label
„Wear earplugs and googles“
12. Operation safety label
Read, understand, and follow all instructions in
this manual before starting.
13. Machine safety label “DANGER! Moving parts!“
14. Safety-alert symbol
„Read and recognize safety information. Be alert to
the potential for personal injury when you see this
safety-alert symbol“
15. Warning label “DANGER! hot parts”
Hot parts!
Burning Danger

8
Strictly perform installation, set-up, maintenance, cleaning
and transportation with the motor switched off and the tool
firmly secured against accidental operation.
The user shall strictly comply with these operation, set-up, maintenance, repair
and troubleshooting instructions in order to assure safe operation and no dama-
ges to the equipment. Moreover we recommend to let the machine be run only
and strictly by trained and skilled staff who must be familiar with the applicable
occupational safety and health administration rules as well as applicable transpor-
tation rules. Incorrect use of the splitter can cause serious injury or death. Make
sure that full compliance is assured at all times with the general safety and health
rules on the workplace as well as the applicable local traffic rules.
No person under school leaving age of 18 should operate a circular saw. Ho-
wever, young people in age of 16 or slightly more may work on the machine
providing that they received adequate training, that they carry all due perso-
nal protection safeties and that an adult supervisor keeps standing nearby.
Machine instability can result in injury or severe damages. To ensure stability
during operation make sure to choose a flat, dry floor free from any tall grass,
brush or other interferences.
The working area around the machine must be kept as clear as possible
from surrounding tripping obstacles and slippery foundation floors should
be duly treated (do not use saw dust or wood ash for this purpose).
Make sure that the equipment stands on a safe stable foundation.
Following precautions must be taken at all times
• NEVER use your log splitter at night or without sufficient illumination.
• NEVER operate your log splitter on slippery, wet, muddy, or icy sur-
faces and ensure that a wide but confined area is available around the
machine and assure maximum working freedom.
• NEVER operate the machine without wearing steel-toed shoes, tight-
fitting gloves and tear-resistant work cloths.
• NEVER remove from your log splitters the safety tools and devices
mounted on the machine by the manufacturer.
• NEVER leave the splitter unattended while the engine is running.
Always assure compliance with safety, protection and accident pre-
vention rules as well as general road and traffic rules in the country
of use.
Operators should always wear personal protection cloths, steel-to-
ed safety shoes, snug-fitting tear-resistant work cloths, safety gloves
earplugs and safety goggles. Site must be free of slippery surfaces
and tripping obstacles. Make sure that all access ways are properly
maintained so that wood can be safely delivered, loaded and shipped.
4. SAFETY

9
4.1 Mandatory application field
The log splitter is strictly designed for one-man operation. Never al-
low more than one person approach and work on the machine at the
same time.
This splitter „HS 80-2 B“ is conceived for splitting short and long logs
for firewood preparation only.
BEWARE: no cross-grain splitting is permitted. Always split grain-wise
and never split one log on top of the other. When loading logs on the
log splitter make sure that the chunk rests entirely and safely on the
riffle-plate table and avoid unsafe methods or splitting other materials
than firewood.
Any other use or splitting method is considered by the manufacturer
as “misuse”. In case of misuse the manufacturer will not be liable for
any injuries or damages and the operator will be held entirely respon-
sible. Please make sure to comply with these set-up, operation and
maintenance/repair instructions in order to avoid happening of any
injury or dangerous condition.
BEWARE: this unit has a log capacity of min 70 mm and max 450 mm
diameter.
Lack of compliance with these instructions may lead to dange-
rous risks and situations and will void all warranty claims, in
which case the manufacturer will not be responsible for custo-
mers’ claims or resulting damages and/or injuries.

10
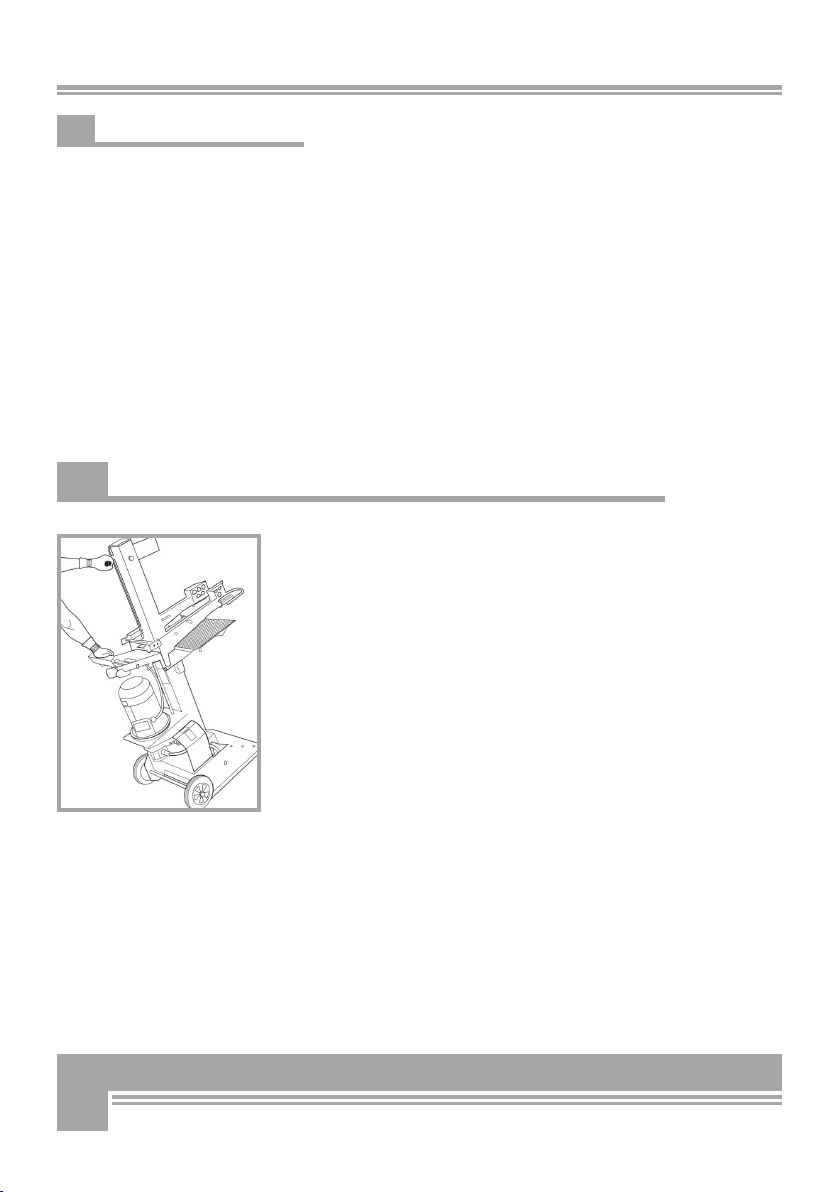
5.3 Assembling the safety brackets on the hand guards
Uncrate the machine and assemble the special U-guards on the
control handles before first use and installation.
For packing reasons, the hand-brackets (1) are pre-assembled by the
factory but not secured to control levers. After uncrating, they are to
be simply tightened in their position on the control levers using the
two screws (2) available for each lever (see figure 1).
Make sure to tight all screws (2) firmly in place before starting your
log splitter!
5. OPERATING INSTRUCTION
Fig. 1
1
2
5.1 Safety
Install the splitter on flat, clear working surface. The wor-
king area around the machine must be kept as clear as possib-
le from surrounding obstacles and slippery foundation floors
should be duly treated. Never reach with your hands with the
wedge sliding zone while the splitter is operated!
5.2 Initial check-ups
Before first use, make sure that the log splitter is in good conditions
and that no visual damages are there.
Check all hydraulic hoses, fittings and couplings and to detect and re-
pair eventual oil leaks.
Make sure that all safeties and protections are duly assembled on the
machine. Do not attempt to remove or by-pass these safeties.
Should any trouble or unusual behaviour be detected, do not
start splitting wood until these have been fixed.

11
5.4 Functional controls before start up
The log splitter is equipped with safety two-hands mechanical controls
designed for the operator to keep both hands free from danger and
from infringing the moving ram zone during the entire splitting cycle
(see fi gure
.2).
It is strongly recommended to check the operation of the two-
hand control every time before a new use.
To do so, engage both hand levers and hold them down at the same
time until the ram slides all the way down.
If your system is duly set, the wedge stops upon releasing of just
one of the two levers while the ram stops completing its up/down
stroke at once.
On the other hand, the ram must recommence its upwards travel to
the initial start position (all the way up) as soon as the other le-
ver is also released.
Make sure that the ram does not travel down when operating only one
single lever. Check that both levers spring back into their normal posi-
tion when the hand pressure is released.
5.5 Adjusting of the pressure table
The log splitter is equipped with an intermediate hang-up table
(Pos.4) for splitting short logs up in length of 550, 750 and 1080 mm.
Setting-up/removing the short-logs table can be easily performed wit-
hout any additional tool or help.
To remove it: release the wing-nut (Pos. 3 on Fig. 3) on the table
mount, remove the safety lock pin on one side, now slightly lift the ta-
ble up and pull it out towards you.
To fi t it on: slip the table onto the lower level mount, grip the front
rim of the table and slightly lift it lightly up.
Now push it down to the stops on the construction stand and release
grip on the front rim and let the table settle down making sure that
the rear table hooks are well and fi rmly settled on the mounts (see
picture 4 on the side).
Finally slip the clevis back into the special fi xation holes on the table
mounts and tighten them by means of the special wing-nuts.
(if the table is duly settled the clevis will fi t easily and effortless into
the holes)
Remove the short-logs table off the machine, if you need to split full
cord logs.
Fig. 2
3
Fig. 3
Fig. 4
4

12
5.6 Setting the log clamps
In order to hold the log firmly under the wedge during the entire split-
ting cycle, use the special log-clamps located on each control handle.
Both log clamps will automatically adjust to your log diameter thanks
to the spring force.
5.7 Adjusting the ram stroke length
The ram travel is factory set to the maximum log capacity before
shipment.
As you start the motor, the ram slides automatically up to the maxi-
mum travel stroke.
Should your chunks be much shorter than your capacity adjustment
on the machine, it is possible to adjust the ram stroke accordingly.
Stepless ram stroke adjustment is possible at all times.
Ram stroke adjustment procedure:
Let the ram slide down to the desired stroke length and shut the mo-
tor off. When you do this, make sure to keep engaging one of the con-
trol levers in order to prevent the ram from returning back to its up-
per start position.
Now release the wing-nut on the rear grip-handle and pull up the con-
trol rod as much as possible. The ram travel is reduced by an equiva-
lent stroke length as the pulled-up rod length. Once the rod is pulled
sufficiently up to obtain the desired ram stroke, tighten the wind-nut
back to the original torque.
Now you start the splitter motor again and check the ram that should
be now completing a shorter travel than the original full-stroke.
Later ram travel adjustments to the original full-stroke length can be
repeated as many times as wanted by simply releasing the wing-nut,
pushing the rod back in and tightening the wing-nut again.

13
5.8 Operating instructions
Start the gasoline motor following the instructions of Honda Motor
supplied with your splitter.
Now switch the splitter on.
Load a chunk on the short-logs table, close the control handles until
firmly securing the log by means of the clamps located on the handles.
Now push both handles down at the same time to start the cycle and
engage the ram that will immediately start travelling down.
DO NOT RELEASE THE CONTROL HANDLES UNTIL THE CYCLE IS
COMPLETELY OVER AND THE LOG IS SPLIT.
A split chunk will tend to fall apart increasing its original mass. It may be
recommendable to push both control handles slightly towards the outside.
Should any emergency arise and stopping be required, simply set the
control handles free from your grip. When doing this, the ram will
immediately travel all the way back up. As soon as the log is com-
pletely split, release both control handles and let the ram travel back
to start position (B) and be ready for a new cycle. Do not attempt to
catch the split wood or remove wood sticks from the table by hand
until the cylinder rod stops at its maximum travel position. Clear the
table and remove chips and wood debris from the machine before
starting a new cycle.
When loading chunks, make sure that logs sits central and
firmly with its sawn end on the table. Do not split wood chunks
with lots of branches, first clean it and remove all branches.
DANGER: crooked trunk pieces with green/dry branches may
burst under wedge pressure! Make sure to shut the motor off
before leaving the area at work end.
5.9 Clearing logs sticking to the wedge
Depending on the type of wood being split, a log may not always
break into two pieces and fall to the ground.
If a log sticks to the wedge, place the valve handle in the neu-
tral position (stop the wedge from travelling), switch the split-
ter off and carefully remove or hammer the log off the wedge.
Allowing the log to remain attached to the wedge when it is fully re-
tracted could lead to possible injury and/or damage to the log splitter.
14
Before handling, moving or transporting the splitter:
1. make sure to cut the power off (unplug the machine).
2. slide the ram down and to tie up the two control handles together
to prevent them from swinging out and accidentally injure/damage
persons or other equipment standing nearby.
3. leaned the splitter back on the wheels while firmly holding it with
one hand on the rear upper grip and the other hand on the cover pla-
te above the motor. (Fig. 5)
6. HANDLING AND TRANSPORTATION
Fig. 5
5.10 About the gasoline engine
Before starting your machine, make sure that a visual control of the
engine conditions is successfully performed.
Check the level of the feuel and of the lubrication oil in the tank (using
the special motor gauges) andmake sure there are no visible mechanical
defects or damages on the engine and on the machine.
To avoid damaging your splitter and/or the engine, take some time to
carefully read the attached HONDA POWER PRODUCTS instructions and
to make yourself familiar with all tips and instructions given therein.
The engine manufacturer’s manual contains useful information about
safe and correct start-up, use, service, transport and troubleshooting
procedures as well as all technical data and specifications of the engine.

15
7. 4-WAYS WEDGE AND
SPLAY-WEDGE (ACCESSORIES)
Fig. 6
On request, the log splitter can be factory equipped with a 4-ways
wedge and/or a splay wedge.
The 4-ways wedge is designed for splitting each log in 4 sticks in one cycle.
The splay wedge can be used for cleaving big, hardwood logs and
facilitates breaking through the log.
4-ways wedge and splay wedge are simply slipped on the permanent
wedge of the machine and secured by means of a special star knob.
BEFORE STARTING THE CYCLE make sure that wedge is fully
slipped-on the permanent wedge and secured in position with
the star knob.
Before strating the cycle make sure that wedge is fully slipped-on
the permanent wedge and secured in position with the blade wings
facing the operator side.
Do not work with a loosened wedge to avoid falling off during split-
ting!! This is a very UNSAFE method and could result in major injuries
to the operator and permanent machine damages.
Preferably avoid using a 4-way wedge for splitting of hard wood (fruit
trees, beech etc...) likely of imparting excessive pressure against the
wedge.
When using a 4-ways wedge the log clamps on the control
handles must be pulled out of the splitting area below wedge.
4-way wedge
Splay wedge

16
8. REPAIRS AND MAINTENANCE
Make sure that the machine is fully disconnected and all mo-
ving parts are secured before performing any maintenance/re-
pair work on the machine. In the event of any malfunctioning,
switch the machine off before trouble-shooting.
8.1 Regular maintenance
Make maintenance a regular part of daily operation. The daily mainte-
nance routine needs to include:
• Cleaning of the machine and clearing of all parts from residual wood
debris, chips, dust, bark pieces and eventual other waste.
• Greasing of the sliding pads inside the splitter stand.
• Hydraulic oil check and (in case of leakage) hydraulic hose and fit-
tings check-up to detect eventual oil leaks.
• Lubrication of all moving parts.
8.2 Hydraulic oil
Recommended oil types:
DEA HD B 46, Shell Tellus 10-46, Esso Nuto H 46
Periodically check the oil level inside the hydraulic oil tank. When do-
ing so, accurately avoid contaminating the tank with dirt, wood chips,
sow dust etc... Make sure that the splitter never runs without oil or
with a low oil level.
When this happens, air is likely to reach inside the hydraulic loop.
Failure to maintain due oil level may cause poor running and irregular split-
ter operation (very rough, jerky motions) as well as major pump damages.
Please schedule your first oil change after approximately 25-30 operati-
on hours and later ones after each 50 operation hours or once a year.
The oil drain plug is located on the bottom tank side. When changing
the oil, never let used oil drop down on the ground, rather collect
whole of it in a sealed container for due disposal. Oil disposal contai-
ners should be of at least 7 l capacity. If you are using smaller con-
tainers, make sure to drain the tank in more than one round to avoid
spilling old oil out on the ground.
The fillercap is on the upper right hand side of the tank. After refilling
the tank with new oil (approx 7 l), let the splitter cycle three or four
times and let the air blow out of the hydraulic loop before closing the
cap.
Used oil is very polluting and should be disposed in accordance
with local rules!

17
8.3 Sliding Pads
Should irregular noisy knocks be heard while the ram is sliding up and
down, grease the plastic sliding pads located inside the splitter stand.
Preferably use commercial grease available in your country.
The noisy knocks should disappear after greasing.
Should you detect an unusually larger gap between the wedge riser
and the stand, sliding pads are likely to be worn out. If so, replace
them with brand new ones.
8.4 Consumables
• Plastic sliding pads
• Hydraulic hosed (replace them all every 4-5 years)
• Hydraulic oil (provide a complete oil change approx. every 50 opera-
ting hours or once a year)

18
When the splitter is fully obsolete and cannot be of any longer use, it
should be duly dismounted ahead od discarding. Certain components
need deactivation and dismantling in order to assure that no further
use is made by other parties and that no worn out parts are recycled
for other applications.
During dismantle be alert for possible recyclable materials and compo-
nents that belong to differentiated waste collection procedures applica-
ble in your country.
The manufacturer is not liable and undertakes no responsibilities for
personal injuries or damages that may result from the recycling of
worn out machine parts for eventual re-use in other applications diffe-
rent than the originally stated in this manual.
Dismantling procedure:
Take good note please: each and every dismantling task must be per-
formed by authorized service centers or trained skilled staff only!
● Lock and clamp all moving machine parts and pull the machine into
single components
● Deliver each single component only to authorized waste manage-
ment facilities
● Drain oil and fuel out of respective tanks and lines before disposal of
the machine
● Remove rubber and plastic parts from the machine that must be se-
parately disposed
Deactivated, clamped moving/driving parts and components are of no
further risk and danger.
Electric components must be separately disposed to avoid substantial
environmental threat. In the event of the fire on the electric deploy-
ment system of the machine, use an explosion-proof extinguish sys-
tem is required (for example powder fire extinguishers).
9. DISMOUNTING AND DISCARDING AN
OBSOLETE MACHINE

19
10. TECHNICAL DATA
* The actual splitting force may vary ± 10% of nominal rating.
10.1 Noise emissions
Noise emissions were measured in accordance with the European di-
rectives for the measurement of noise emissions on the workplace.
The measurement was performed by external authorized certification
bodies in compliance with the applicable standards based on applica-
ble rules for agricultural and forestry equipment.
Noise levels were detected and measured at 1600mm height both in
front of the machine and 1000mm far from it.
The detected noise level was:
LpA = 75 dB(A).
Technical Data Unit of Meas. HS 80-2 B
Log capacity mm 580/750/1080
Splitting power* t 8
Max. Operating Pressure bar 245
Motor Power PS 5,0
Speed: ram down travel cm/s 8,3
Speed: ram up travel cm/s 14,3
Total machine height (riser up) mm 1600
Total machine height (riser down) mm 1100
Lenght mm 600
Width mm 1150
Weight kg 134
Oil capacity (Tank) l 7,0

20
11. OTHER AREAS OF POSSIBLE RISK
Type of malfunction Possible origins of the problem Solutions
No ram travel UP - Oil level is too low - Fill new oil in
No ram travel DOWN - as above - as above
Wedge moves slowly or will
not extend completely on nor-
mal log
- Oil level is too low
- Wrong valve détente
- Pump is broken
- Cylinder gaskets are damaged
- Fill oil in
- Adjust valve
- Replace pump
- Replace gaskets
Ram stops during splitting - Log is too big, crogged or with lots
of branches
- Turn/adjust log position
Hydraulic hoses heat-up ex-
cessively
- Oil level is too low
- Pump is damaged
- Wrong valve détente
- Fill oil in
- Replace pump
- Adjust valve
The gasoline engine cannot
start
- Fuel is missing - Fill up
12. TROUBLE SHOOTING CHART
11.1 Mechanical dangers
The special two-hands control mechanisms minimises risks and dan-
gers related to moving parts on the machine (wedge). An additional
safety is provided on the machine in order to prevent working with
only one handle while the other one is being engaged (held down) by
some mechanical tool or system.
DO NOT EVER ATTEMPT to remove or by-pass the two-hands control!
Danger: operating the splitter without the safety two-hands control
will increase your risk of having your hands pinched during the split-
ting cycle. Do not remove any other safety and protection device from
the machine.
Warning: Splitting without due safety devices will void the warranty
and might result into serious injures to the operator or the other per-
son around the workplace. Keep hands and fingers clear at all times.
Table of contents
Other BGU Log Splitter manuals


Popular Log Splitter manuals by other brands

Scheppach
Scheppach Compact 8t Translation of original instruction manual

BE
BE LS5TELL Operation manual

Hakki Pilke
Hakki Pilke 50 Easy Instructions for assembly, operation and maintenance

Zipper Mowers
Zipper Mowers ZI-HS10TN user manual

Draper
Draper LS4T Instructions for

Powerhorse
Powerhorse M1165E owner's manual


Clarke
Clarke LOGBUSTER P8 Operation & maintenance instructions

Scheppach
Scheppach HL1450 Translation of original instruction manual

Swisher
Swisher LS11528HPF owner's manual

Meec
Meec 380-040 operating instructions

EarthQuake
EarthQuake W2265 Assembly and operating instructions

IKH
IKH AWD7000A instruction manual