Bianco di Puro rapido User manual

EN
1
Contents
DESCRIPTION................................................................................................................................................................................. 2
FOREWORD .................................................................................................................................................................................... 3
INFORMATION ABOUT THIS MANUAL .......................................................................................................................................... 3
UNPACKING AND COMPONENTS ................................................................................................................................................. 4
INSTALLATION REQUIREMENTS ................................................................................................................................................... 5
ELECTRICITY CONNECTION.......................................................................................................................................................... 5
SAFETY PRECAUTIONS ................................................................................................................................................................. 6
OPERATIONS .................................................................................................................................................................................. 6
SAFETY INSTRUCTIONS ................................................................................................................................................................ 7
OPERATING INSTRUCTIONS ......................................................................................................................................................... 9
OVEN ASSEMBLY ........................................................................................................................................................................... 9
USE OF COOKING TRAYS............................................................................................................................................................ 10
COOKING TIMES .......................................................................................................................................................................... 11
RICE COOKER .............................................................................................................................................................................. 11
OVEN INSTRUCTIONS.................................................................................................................................................................. 12
ADDITIONAL TIPS THE STEAMER ...............................................................................................................................................13
REFILL WATER.............................................................................................................................................................................. 13
AFTER STEAMING ....................................................................................................................................................................... 13
CLEANING INSTRUCTIONS ......................................................................................................................................................... 14
DEEP CLEANSE ............................................................................................................................................................................ 15
STORAGE...................................................................................................................................................................................... 15
RECIPES ....................................................................................................................................................................................... 16
DISPOSAL INSTRUCTIONS.......................................................................................................................................................... 31
TROUBLESHOOTING ................................................................................................................................................................... 32
CONTACT AND SERVICING ............................................................................................................................... 33
SPECIFICATIONS .......................................................................................................................................................................... 33
WARRANTY................................................................................................................................................................................... 34
EN
2
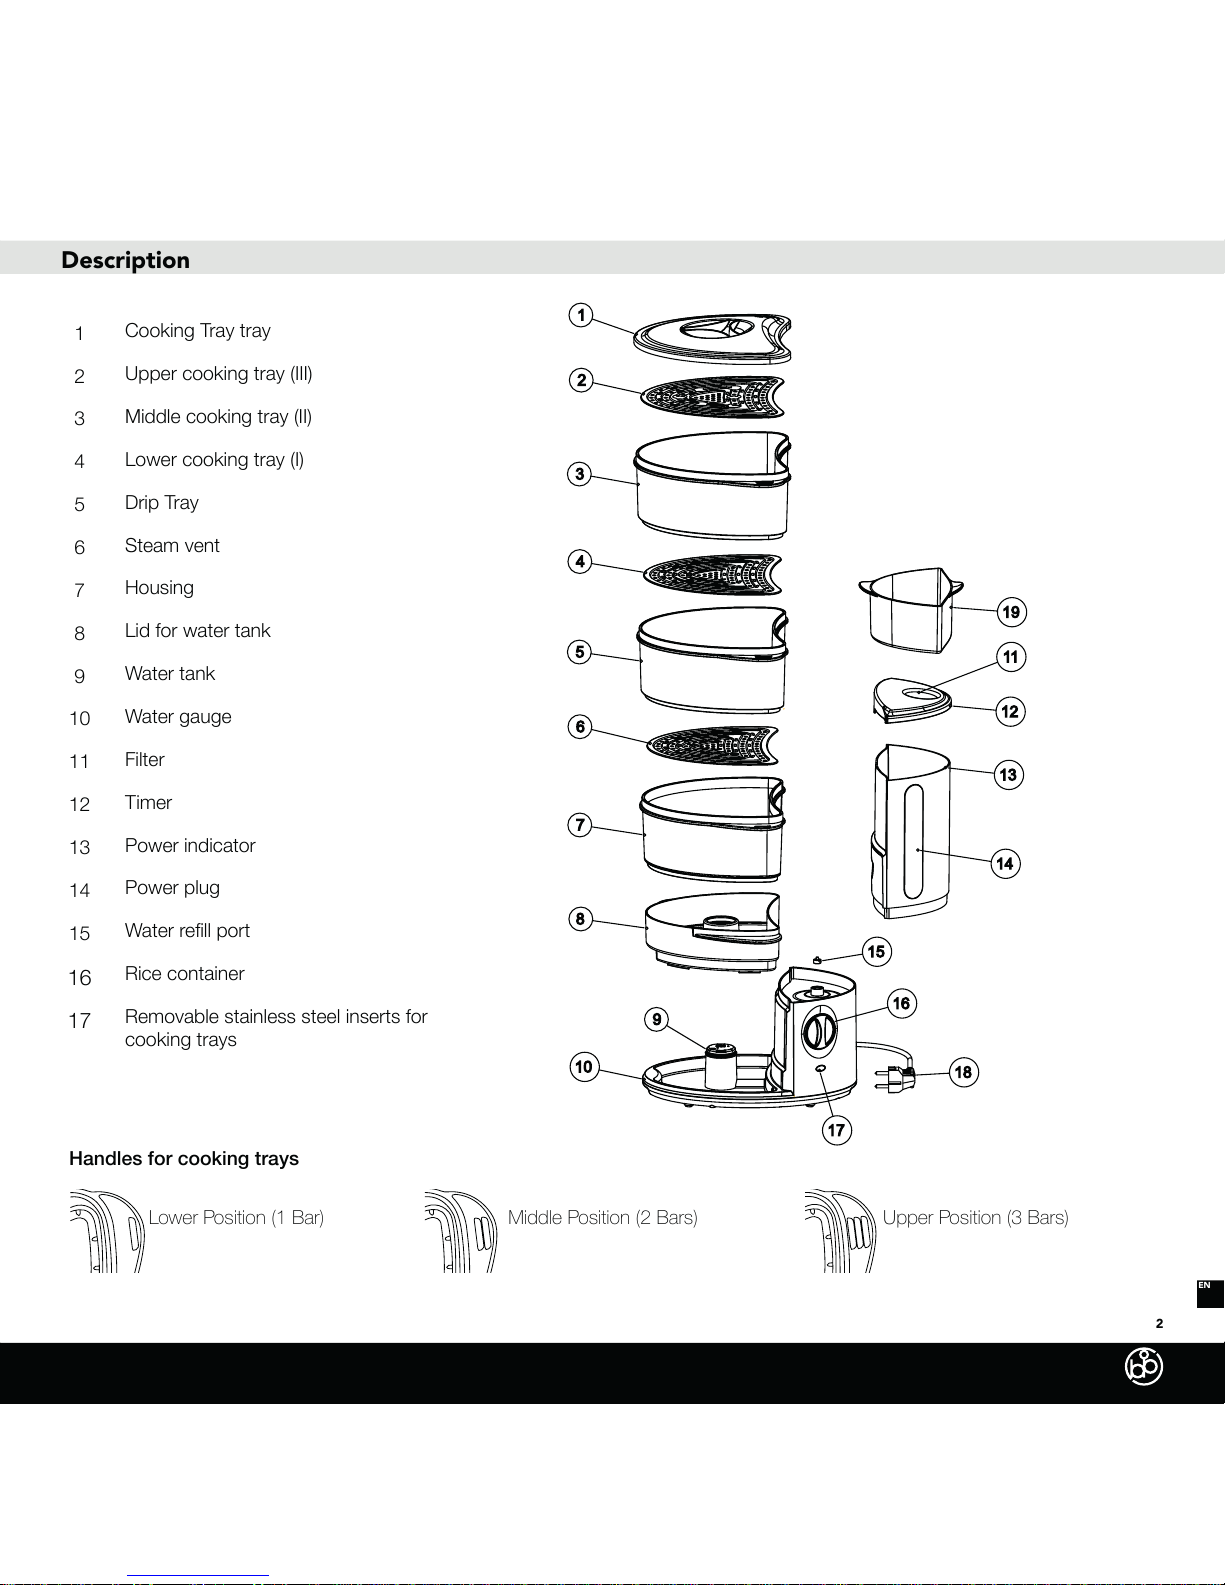
Description
1Cooking Tray tray
2Upper cooking tray (III)
3Middle cooking tray (II)
4Lower cooking tray (I)
5Drip Tray
6Steam vent
7Housing
8Lid for water tank
9Water tank
10 Water gauge
11 Filter
12 Timer
13 Power indicator
14 Power plug
15
16 Rice container
17 Removable stainless steel inserts for
cooking trays
Handles for cooking trays
Lower Position (1 Bar) Middle Position (2 Bars) Upper Position (3 Bars)
EN
3
Dear customer,
Thank you for selecting rapido Steamer to be a part of your home.
Your new oven is the patented STRIX steam technology, improving productivity by 50% more than other systems. This is an
especially outstanding feature for a gentle and nutrient-preserving preparation of your food.
With 3 steam containers, you can adjust the cooking volume up to 9 liters.
This will assist you with a healthy diet and can help you create numerous nutritious meals.
Stay healthy!
Foreword
Information about this manual
This manual included with your Rapido and provides important information for you learn how to safely use and care for your
steamer.
The manual must be readily available when you are using the device. It should be read by anyone who operates, cleans or
maintains it.

EN
4
Unpacking
Equipment
To unpack the steamer, please proceed as follows:
Remove the device and all accessories out of the box.
Remove all packaging from the appliance and the accessories.
Lift steamer from box, if possible, keep the packaging during the warranty period in order repack the steamer in case there
are any issues with the steamer.
Note on the stickers on the device
Do not remove any labels, as these have been applied for safety reasons and are required for any warranty.
Included in this box
Steam housing
3 BPA-Free steam containers from TritanTM plastic
3 stainless steel inserts for the cooking trays
Separate rice bowl
Cooking tray lid (1 piece)
Removable water tank incl. Cover
drip tray
This manual
Optional Accessories: Extra large cooking tray * for asparagus (etc.)
* not included in this box
Caution:
If misused, personal injury and damage may occur.
Please read page 7 onwards for safety instructions.
!

EN
5
On-site requirements
Electricity connection
For safe and trouble-free operation of your Rapido, please ensure the installation site meets the following requirements:
Make sure that the device will not fall over.
Do not place cloth under the unit.
Choose the installation location so that it is out of reach from children, including all electricity cables.
Only operate the device indoors.
For safe and trouble-free operation of the device, the following electricity connection instructions must be observed:
Before connecting the device, ensure that the voltage is 220-240 volts AC 50-60 Hz. This data must match to avoid damage
to the device. If in doubt ask your electrician.
Connect your steamer to an electrical outlet with the appropriate electricity values. These can be found on the rating plate
located on the down side and in the “Technical data” on page 22. Make sure that the power cord is plugged into the wall
outlet.
If the power cord is damaged, it must be replaced by the manufacturer or its service agent in order to avoid a hazard for the
user and third parties.
Electricity safety is only guaranteed when the device is connected to a protective conductor system and is properly installed.
The manufacturer assumes no responsibility for damages caused by an inadequate protective conductor.
Make sure that the power cord is undamaged and is not laid on hot surfaces or sharp edges.
The power cable must not be pulled too tightly.
Make sure that the plug is properly inserted in the socket. A loose plug can lead to overheating of the device or an electric
shock.
EN
6
Safety Precautions
steamer immediately after, follow these steps:
After 60 minutes of use, you will have to empty the drip tray.
Operations
Carefully read all instructions in this manual before use.
Our steamers are carefully inspected at our factories prior to shipment. We ask you nevertheless to double-check everything.
Do not use a damaged device.
If damaged, the power cable, the device must not be put into operation.
The steam cooker should not be placed next to a gas or electric burner, or placed on top of heated furnaces or hot surfaces.
Do not operate the device in direct sunlight or close to other heat sources.
accessories with a soft cloth.
Unplug the steamer always from the power supply when it is unattended, before disassembling, cleaning or installation of
accessories (see Safety instructions).

EN
7
Safety Instructions
Note for the safe handling of your steamer, please take the following precautions:
for use with cold water, never use warm or hot water or other liquids.
Fill the water tank to at least up to 10 min. Make sure it is at that level even if you use a shorter cooking time.
To avoid burns, touching the surfaces of appliances (lid, cooking tray, cooking tray inserts) during or immediately after the
operation is not advised.
Always use the drip tray, which collects all liquids from the cooking tray.
placed in the center of the cooking container.
Depending on the amount of your food to be cooked, you can split them up into 3 cooking trays.
Operate the only steamer with the lid on the cooking tray.
Never remove the water tank during the steamer is in use.
Do not leave the steamer unattended.
Use your steamer only for its intended use.
Make sure that the power cable is undamaged and is not laid on hot surfaces or sharp edges.
The oven must not be operated by children. Make sure that the steamer and the cable are out of reach of children.
Children, elderly persons or persons with restricted with physical, sensory or mental disabilities or lack experience and
knowledge, must be continuously monitored by a person responsible for their safety when handling the steam cooker.
Children may not play with the device.
When the steamer is operated near children, Special supervision is needed to ensure that children are not injured.
Use only the accessories supplied with your steamer.

EN
8
Safety Instructions
Be careful when cleaning: Let the individual parts of the steam oven cool down after use!
Do not remove any parts of your oven, if the plug is still connected.
Before cleaning the steamer or taking it apart, make sure that the power has been disconnected.
Do not clean the steamer houing under running water, use a damp cloth to clean this.
Clean the components of your steamer immediately after each use with a mild detergent (dishwashing liquid).
Do not use aggressive or abrasive cleaning agents and solvents.
Rinse the components of your steamer with clean water and dry with a soft cloth.
Never place the connection cable in water or other liquids. Wipe the power plug with a wet or damp cloth. Never touch the
power plug with wet hands.
Pull out the main connector from the socket, not the power cord.
Should water or other liquids come in contact with the motor base, conduct a timely customer service. Pull the cord out of
the socket and no longer operate the instrument until it has been serviced
Make sure that the power cord is kept tidy, so the unit does not fall over and cause bodily injuries.
Repairs within the warranty period may only be carried out by customer service. Any improper repairs may cause considerable
danger to the user, this may also invalidate the warranty.
Defective components may only be replaced by original spare parts. Only when the original parts ensures that the safety
requirements are met.
EN
9
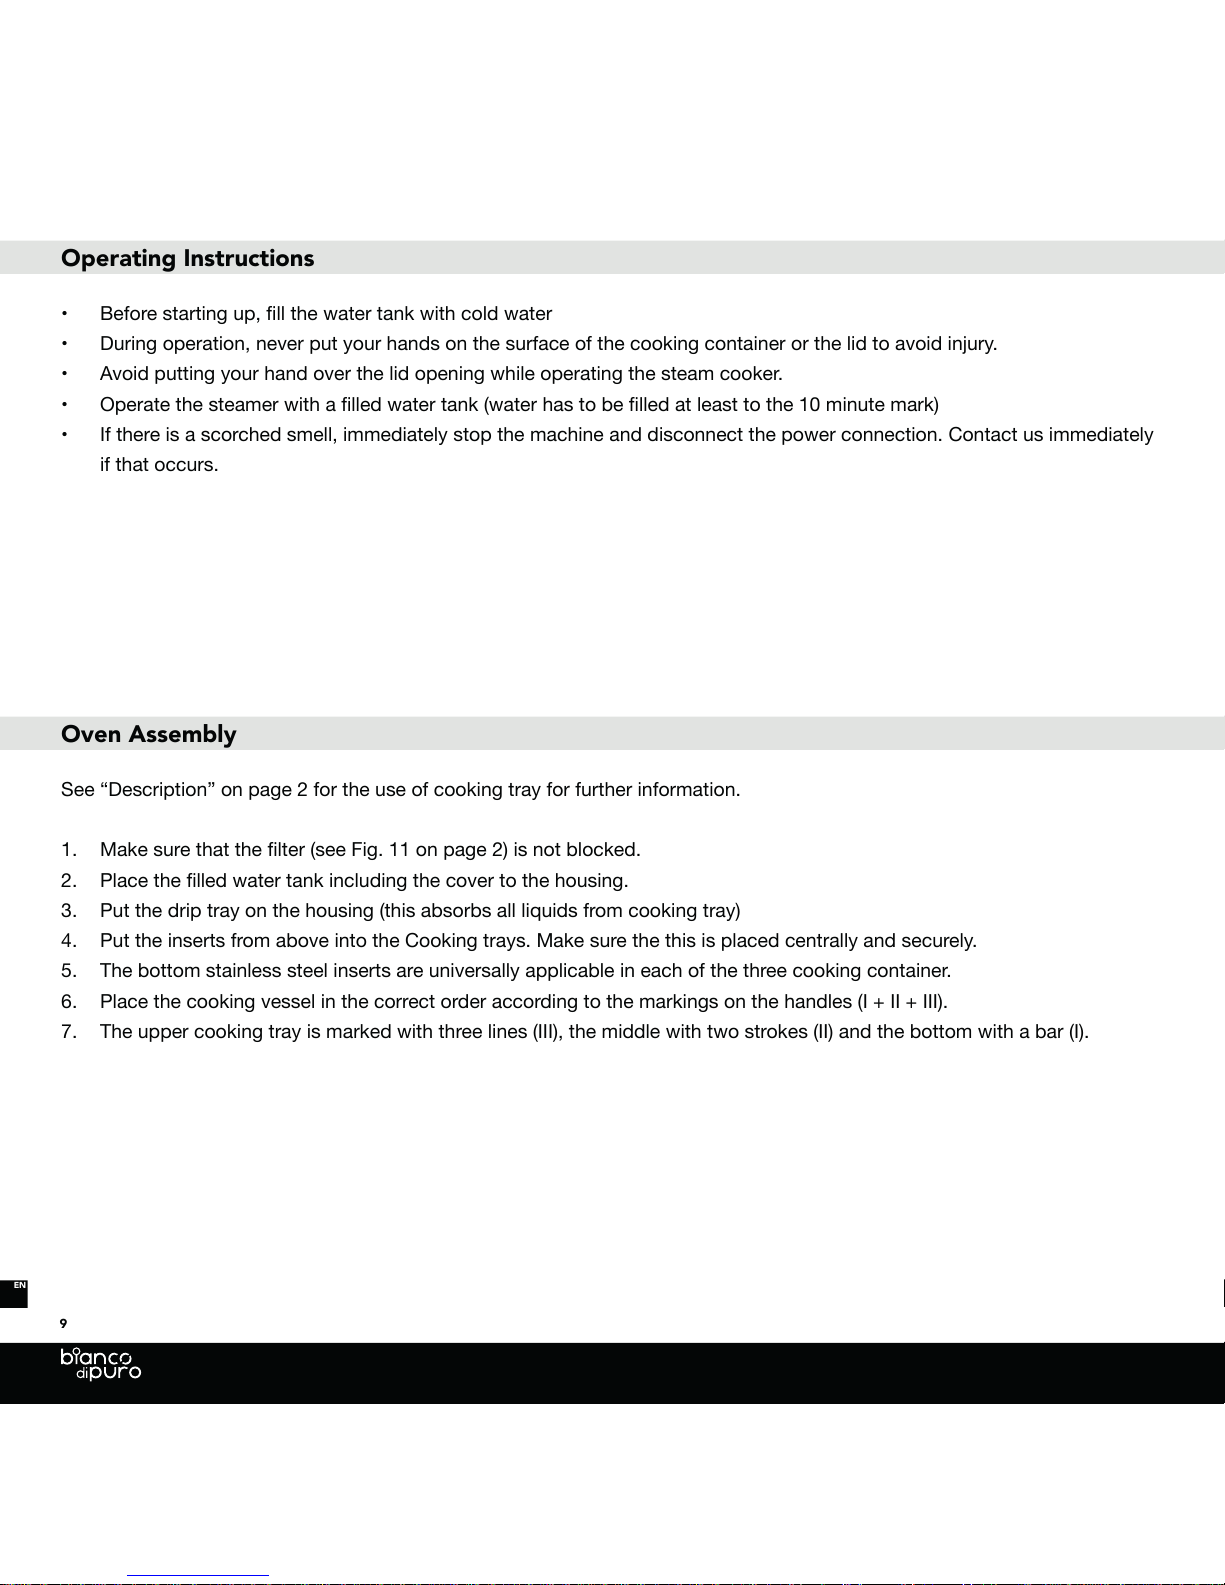
Operating Instructions
During operation, never put your hands on the surface of the cooking container or the lid to avoid injury.
Avoid putting your hand over the lid opening while operating the steam cooker.
If there is a scorched smell, immediately stop the machine and disconnect the power connection. Contact us immediately
if that occurs.
Oven Assembly
See “Description” on page 2 for the use of cooking tray for further information.
1.
2.
3. Put the drip tray on the housing (this absorbs all liquids from cooking tray)
4. Put the inserts from above into the Cooking trays. Make sure the this is placed centrally and securely.
5. The bottom stainless steel inserts are universally applicable in each of the three cooking container.
6.
7. The upper cooking tray is marked with three lines (III), the middle with two strokes (II) and the bottom with a bar (I).
EN
10
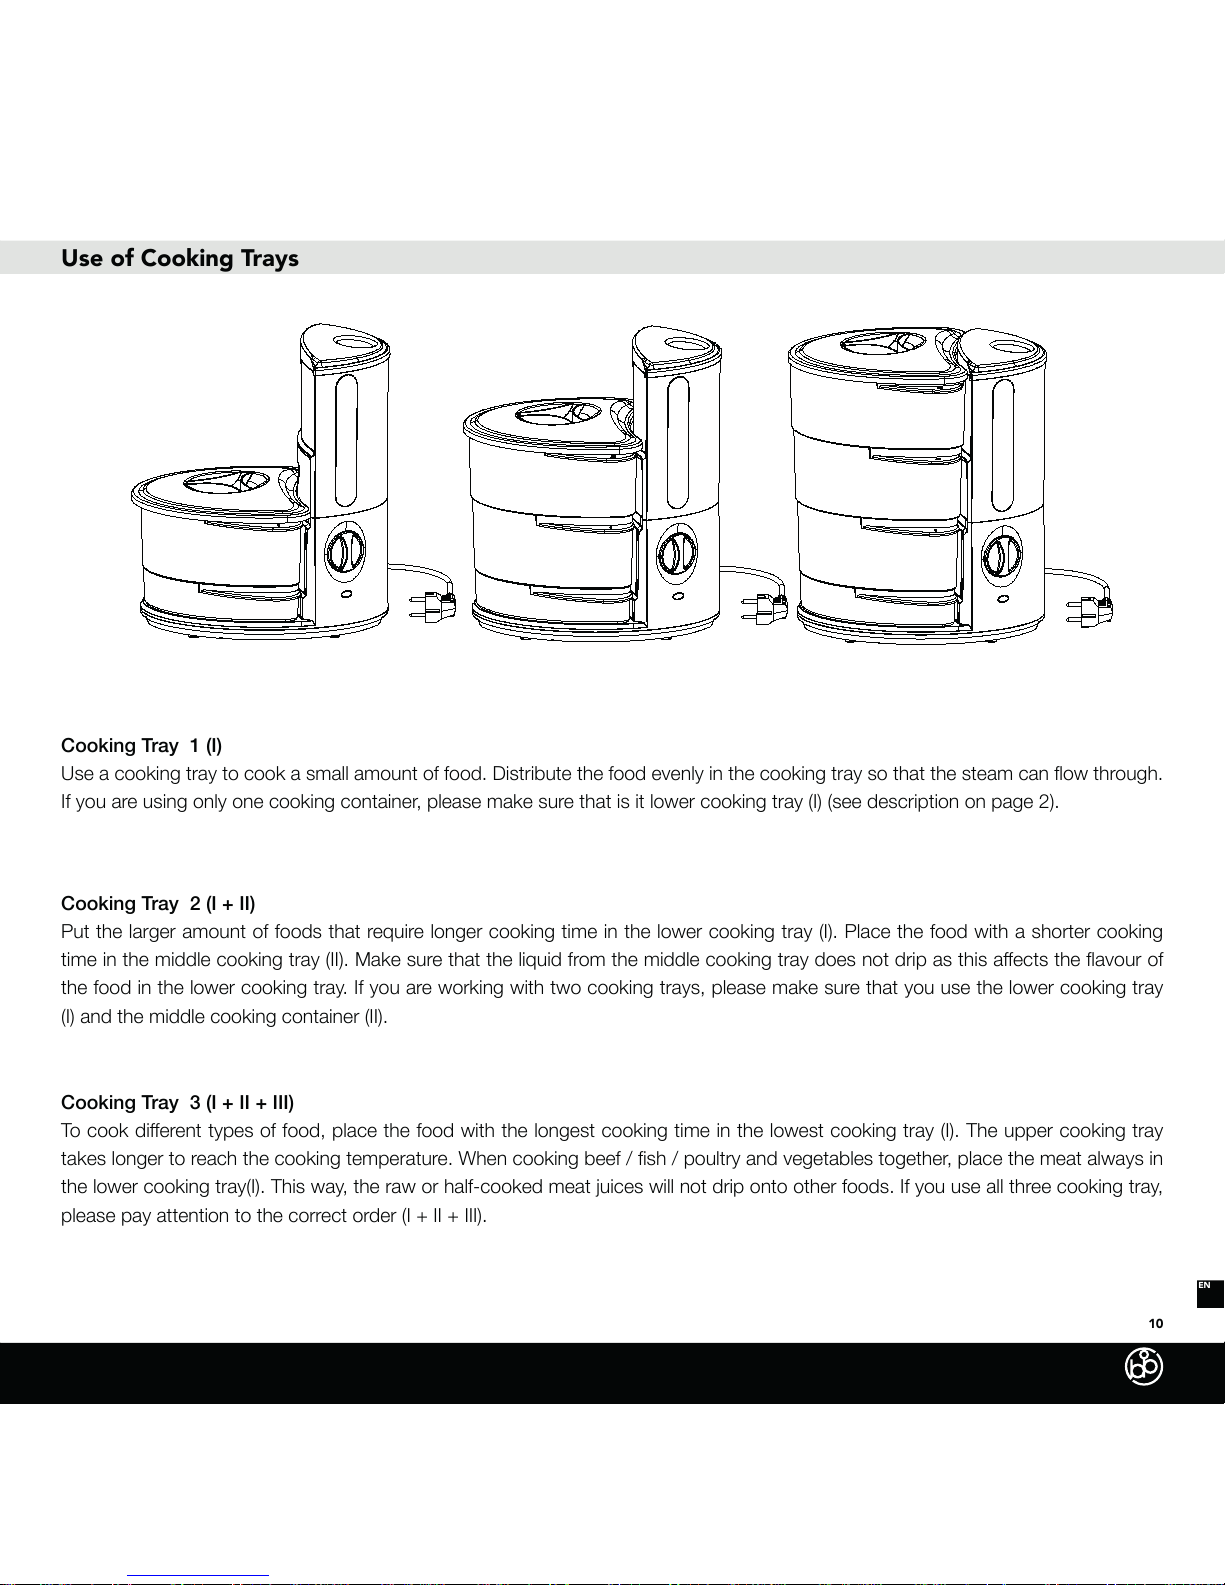
Use of Cooking Trays
Cooking Tray 1 (I)
If you are using only one cooking container, please make sure that is it lower cooking tray (I) (see description on page 2).
Cooking Tray 2 (I + II)
Put the larger amount of foods that require longer cooking time in the lower cooking tray (I). Place the food with a shorter cooking
the food in the lower cooking tray. If you are working with two cooking trays, please make sure that you use the lower cooking tray
(I) and the middle cooking container (II).
Cooking Tray 3 (I + II + III)
the lower cooking tray(I). This way, the raw or half-cooked meat juices will not drip onto other foods. If you use all three cooking tray,
please pay attention to the correct order (I + II + III).
EN
11
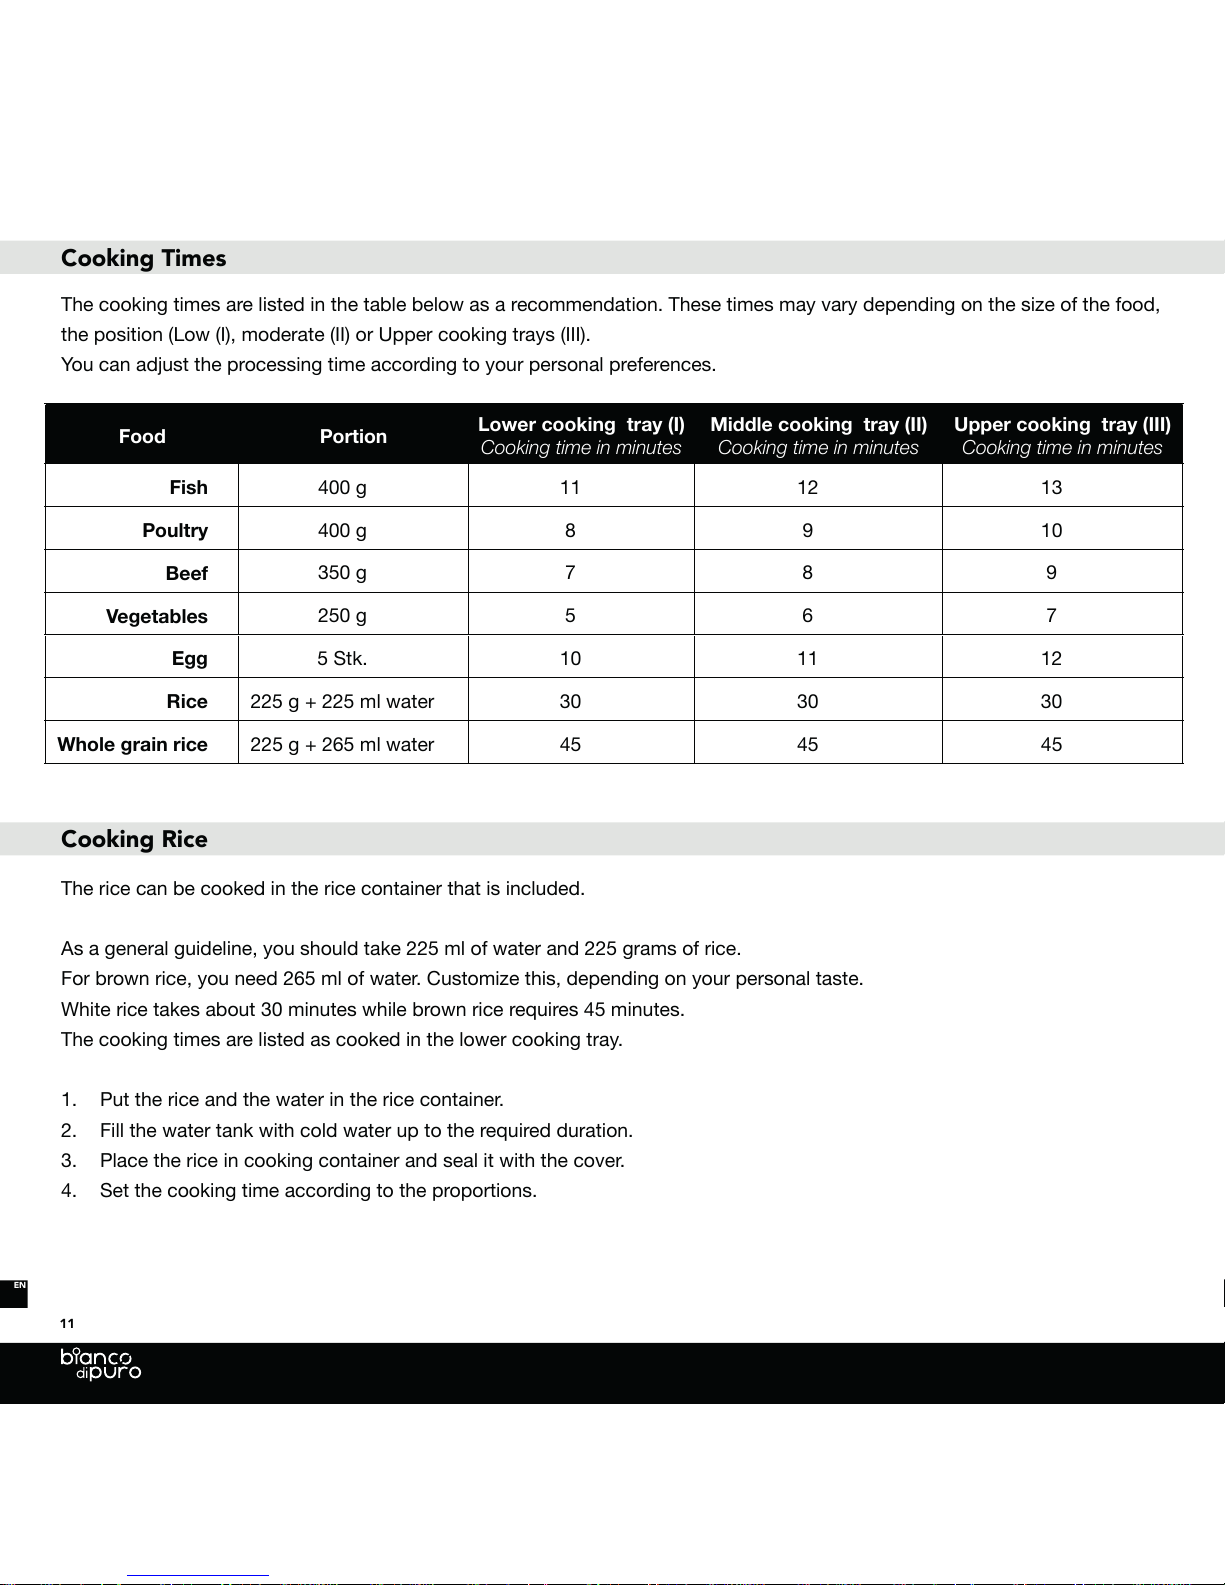
Cooking Times
Food Portion
Cooking time in minutes
Cooking time in minutes
Cooking time in minutes
Fish 400 g 11 12 13
400 g 8 9 10
350 g 7 8 9
250 g 5 6 7
5 Stk. 10 11 12
Rice 30 30 30
45 45 45
The cooking times are listed in the table below as a recommendation. These times may vary depending on the size of the food,
the position (Low (I), moderate (II) or Upper cooking trays (III).
You can adjust the processing time according to your personal preferences.
The rice can be cooked in the rice container that is included.
As a general guideline, you should take 225 ml of water and 225 grams of rice.
For brown rice, you need 265 ml of water. Customize this, depending on your personal taste.
White rice takes about 30 minutes while brown rice requires 45 minutes.
The cooking times are listed as cooked in the lower cooking tray.
1. Put the rice and the water in the rice container.
2. Fill the water tank with cold water up to the required duration.
3. Place the rice in cooking container and seal it with the cover.
4. Set the cooking time according to the proportions.
Cooking Rice

EN
12
Using your steamer
Fill the water tank to at least the 10-minute mark with clean and cold water, as indicated on the water tank, in order to
avoid damaging the device.
Fill the water tank with cold water until the maximum mark (max 2.0l).
Place the food in the cooking container. Use one, two or all three cooking containers and the rice container as needed.
Set the timer by turning to the desired duration.
The power indicator lights up when the duration has been selected.
The steamer starts immediately. During operation, the power indicator is on.
Unplug the steamer from the electric socket. Wait 2-3 minutes to allow the steam cooker and the cooking container cool
down. Carefully open the lid and let all remaining steam escape.
The hot water from the steam may cause injury.
Caution:
The cooking tray, the lid and inserts are hot after operation. To prevent burns, always work with an oven mitt or heat
protection, such as a dry towel.
!
EN
13
Additional tips for the steamer
Always place meat in the lower cooking tray (I).
cooking time is needed.
pieces in the upper cooking tray and larger pieces in the lower cooking trays.
Never
After Operating the steamer
Disconnect the Rapido Steamer from the electricity socket immediately after using it.
Please take caution that all surfaces may be hot, and thereby cause injuries.
EN
14
Cleaning Instructions
Caution while cleaning: All electricity sockets must be disconnected prior to cleaning.
The steamer housing may not be cleaned in a dishwasher.
Clean the components of your steamer immediately after each use.
Before cleaning, disconnect the electricity plug from the socket.
Remove the lid, the cooking container, the bottom inserts and the drip tray.
Clean the components of your steam oven with mild detergent (dishwashing liquid).
Never use bleach or an abrasive sponge for cleaning. Do not use aggressive or abrasive cleaning agents and solvents.
Rinse the components of your steamer with clear water and dry with a soft cloth.
You can clean the cooking trays and inserts in a dishwasher. Dry after rinsing the cleansed parts with a dry cloth.
When assembling ensure that the cooking trays used are placed in the correct order.
Cleaning the water tank
You do not need to drain the water tank after each use.
Do not use abrasive cleaning agents or solvents.
Cleaning the steamer
Clean the steamer with a soft, damp cloth. Dry this with a soft dry cloth.
Do not use abrasive cleaning agents and solvents.
Do not immerse the housing in water or other liquids (danger of short circuit).
Never rinse the steamer housing under running water (danger of short circuit).
If water enters the housing, immediately unplug the power cord from the
Electricity outlet and contact us for service.
!!
EN
15
Deep Cleanse
If you suspect or notice that your device needs longer to cook than normal, you should deep cleanse your steamer.
To do this, follow these steps:
1. Fill the water tank half full with white vinegar (Do not use vinegar or citric acid!).
2. Put the drip tray, the lower cooking container incl. Cover the housing.
3. Set the timer to 5 minutes.
4. Once the time is up, allow the steamer to cool completely.
5. Pour White vinegar from the drip tray and out of the water tank
6.
7. Rinse the water tank, the cooking tray and cover several times with cold water.
8. Dry all parts before you stow.
Storage
1. Start with the upper cooking tray (III).
2. Place the middle cooking container (II) on top.
3. Now you can stow the lower cooking tray (I) in this.
4. You can now store the lower cooking tray (I).
5. The rice container can be stored also in the cooking tray (I).

EN
16
Vegan
Recipe Ideas for Your
Steamer
EN
17
Recipe
Serves 4 as a side dish
600 g asparagus spears, peeled
1 tsp fresh orange zest
3 tbsp fresh orange juice
2 tbsp Dijon mustard
2 tbsp olive oil
1 tbsp fresh lemon juice
Coarse salt and freshly ground pepper to taste
We recommend our XL steam bowl, available as an optional accessory, for the preparation of asparagus dishes.
1. Fill the water reservoir with water.
2. Place the asparagus in the steam bowl.
3. Steam for 8 minutes or until the asparagus is tender.
4. Mix the ingredients in a bowl with a whisk.
5. Transfer the asparagus to a serving plate
6. Drizzle the vinaigrette over the asparagus and serve.

EN
18
Recipe
Serves 8
270 g cornmeal
75 g unsalted vegan spread, melted
1 tsp granulated sugar
1 tsp baking powder
1 tsp baking soda
1 tsp coarse salt
2 large organic eggs
1. Grease eight mini loaf pans or silicone moulds.
2. Mix all ingredients together in a bowl until smooth.
3.
4. Cover moulds with little pieces of non-stick aluminium foil.
5. If necessary, split the moulds between the steam bowls.
6. Fill the water reservoir with cold water and set the timer to 15 minutes.
7.
8. Serve warm.
EN
19
Recipe
Serves 4
4 baking apples
2 tbsp raisins
4 tbsp cane sugar or agave nectar
2 tsp cinnamon
1 pinch of salt
1 tsp vanilla (Bourbon vanilla or scraped vanilla beans)
1. Remove the apple cores and stems. It is best to use a melon baller. Take care not to cut all the way through to the bottom
of the apples.
2. Mix the remaining ingredients in a bowl.
3.
4.
5. Close the steamer and set it to 18 minutes.
6. Steam the apples for 18 minutes, then check with a fork to see if they are done.
7. When the apples are done, remove them carefully.
8. Serve them hot or warm.
Table of contents


