Bibene W20 User manual

WIFI+GSM Wireless Security Alarm System Kit
User Manual
Model:W20

Table of Contents
Chapter 1 Foreword
Chapter 2 Features
Chapter 3 Overview of the Host
Chapter 4 Keypad Operation
4.1 Power On
4.2 Armed the Host
4.3 Disarmed the Host
4.4 Home Armed
4.5 One-button SOS Call
4.6 Contacts Numbers
4.6.1 How to Add Contacts Numbers
4.6.2 How to Delete Contacts Numbers
4.7 Sensors Management
4.7.1 Remote
4.7.1.1 How to Add Remote
4.7.1.2 How to Delete Remote
4.7.1.3 Edit Remote Sound
4.7.2 Sensor
4.7.2.1 How to Add Sensor
4.7.2.2 How to Delete Sensor
4.7.2.3 Edit Sensor Mode
4.7.2.4 Attribute Mode Chart
4.7.3 RFID
4.7.3.1 How to Add RFID Card
4.7.3.2 How to Delete RFID Card
4.7.3.3 RFID Disarm
4.7.3.4 RFID SMS Notice
4.7.4 Wireless Siren
4.7.4.1 How to Add Wireless Siren
4.7.4.2 Overview of Wireless Siren
4.7.4.3 Add Strobe Siren into System
.................................................
1
2
5
7
8
9
10
11
.................................................
.................................................
.................................................
.................................................
.................................................
.................................................
.................................................
.................................................
.................................................
.................................................
.................................................
.................................................
.................................................
.................................................
.................................................
.................................................
.................................................
.................................................
.................................................
.................................................
.................................................
.................................................
.................................................
.................................................
.................................................
.................................................
.................................................
.................................................
.................................................
.................................................
3
5
5
5
5
6
6
6
8
8
8
9
9
10
12
12
12
13
13
13
13
13
14

Chapter 1-Foreword
Thanks for purchasing BIBENE W20 WIFI+GS M alarm system. The
system use s 2.4-inch T F T col or scree n and touch buon s,
embedded powerful CPU control, which it’s already paired out of
box, customers can directly mount it on when they get it! This
alarm system is perfect for homes, factories, schools and other
places that need protecon! Customer who wants to add up more
sensors and wants to know more, please follow the instrucon.
For more informaon or product query, please contact us at:
lhxing@hotmail.com
4.7.4.4 Output with Alarm
4.7.4.5 Wireless Outlet
4.7.5.1 How to Add Smart Socket
4.7.5.2 Overview of Wireless Smart Socket
4.7.5.3 Output with Alarm
4.7.5.4 Overview of Wireless Smart Socket
4.7.6 Illegal Arm
4.7.7 Tamper Alarm
4.8 Recording
4.9 Appliance
4.9.1 Outlet Timer
4.9.2 Outlet List
4.10 System
4.11 Phone
4.12 WIFI
4.13 More
4.13.1 Alarm Log(Black Box Function)
4.13.2 About Us
Chapter 5 APP Operation
5.1 Download APP
5.1.1 Register Account
5.2 APP Function Introduction
5.2.1 Setting
5.3 Add and Delete Accessories
5.3.1 Add /Delete Remote
5.3.2 Add /Delete Door/window Sensor
5.3.3 Door/window Sensor Installation
5.3.4 Add /Delete PIR Motion Sensor
5.3.5 PIR Sensor Installation
5.3.6 PIR Sensor Installation Notices
Chapter 6 Specification
Chapter 7 Troubleshooting
1
.................................................
.................................................
.................................................
.................................................
.................................................
.................................................
.................................................
.................................................
.................................................
.................................................
.................................................
.................................................
.................................................
.................................................
.................................................
.................................................
.................................................
.................................................
.................................................
.................................................
.................................................
.................................................
.................................................
.................................................
.................................................
.................................................
.................................................
.................................................
.................................................
.................................................
.................................................
.................................................
16
16
16
16
17
18
18
18
18
19
19
19
20
22
22
22
22
22
22
22
23
26
28
29
29
31
32
33
35
36
38
39

Chapter 2-Features
2.4-inch TF T color display keypad, simple menu design, easy
operaon.
Support 2.4G WIF I wireless network, simple and convenient
network configuraon.
Support real-me status feedback, real-me feedback of host
status to APP.
Super large alarm system: Available to add 99 remotes and
sensors, 20 smart sockets.
Support WIFI+GSM Instant Push Noficaon for Real-me Alert
Support RFID armed and disarmed funcon, available to add 20
cards.
8 Groups of Auto Arm/ Disarm Seng(Can be set up by days or
weeks)
Support GPRS networking funcon, available to upload the host
status to the network alarm system and arm or disarm the
system.
Equipped with 99 defense zone. Each defense zone has 8 types
of defense zones to choose, each zone can be separate control.
The host can be used as an ordinary mobile phone and directly
dial out the phone set on the host computer.
The unique black box feature displays the latest 99 arm and
disarm records, 99 recent alarm records, and 99 RFID records.
Built-in rechargeable high-capacity lithium baery, automac
switching to backup baery when out of electricity.
10 seconds message recording funcon. Available to record the
message in advance, when the alarm was trigger, user can know
the locaon of the alarm.
Chapter 3-Overview of the Host
Keypad
Arm/ Page Up
Disarm/Page Down
Return Key/Keypad
Lock
Enter Key/One-
buon SOS Call
Menu Key/Delete
Key
Wired Siren Entrance
Power Port
ON/OFF Buon
SIM Card Holder
32

Chapter 4-Keypad Operaon
4.1 Power on
Insert the SIM card into the card holder and then insert adapter
into the power port. The host will emit “Welcome!” means
successfully power on.
4.2 Armed the Host
Remote Operaon: Press the arming buon on the remote
control once.
Keyboard Operaon: Click the arming buon on the keyboard
once.
Please Note: All sensors in each defense zone will under armed
status when you armed the system, if customer wants to
separately control the defense zone, please control it on the
keypad.
4.3 Disarmed the Host
Remote Operaon: Press the disarming buon on the remote
control once.
Keyboard Operaon: Click the disarming buon on the
keyboard once.
Please Note: All sensors in each defense zone will under disarmed
status when you disarmed the system, if customer set up the
sensor into emergency mode, the sensor will alert even the
system is disarmed.
4.4 Home Armed
Remote Operaon: Press the home arming buon on the
remote control once.
Keyboard Operaon: Click the arming buon on the keyboard
twice.
Icon Descripon Operaon
Arm/ Page Up
Disarm/Page Down
Return Key/Keypad Lock
Enter Key/One-buon SO S Call
Menu Key/Delete Key
Contacts
Call/S MS/RFID/C I D
Sensors
99 Sensors and 99 Remotes
Addable
Recording
10 Seconds Recording Time
Appliance
Available to add up 20 smart
socket
System
Phone
WIF I Configuraon
MOR E
Click once to arm or page up
Click once to disarm or page down
Click once to return/ Long press to
lock the keypad
Click once to enter/ Long press to
access emergency call
Click once to enter menu or delete
Emergency Contacts, available to
set up 8 contacts, each contacts has
4 contact ways
Click to set up the sensor modes
and remote and more.
Click to record the S O S record,
click digit 1 to record, click 2 to play
Click to add the smart socket
and set up the operaon me
Click to set up the delay arm or
disarm me and more
Click to dial
Click to connect WIFI
About this product
45
RFI D Sensing Area Put your RFID card on this area to
disarm the system

Please Note: Home armed funcon is ONLY works for PI R sensors,
when under home armed status, PIR sensor will not alert when
triggered, but door sensor will sll alert.
4.5 One-buon SOS Call
When emergency happens, press the Emergency buon on
the remote or long press the “√” on the keypad to acve the SOS
call.
4.6 Contacts Numbers
Click the menu buon to enter main menu, click page up/down
buon to choose the Contacts icon, then click “√” enter the page.
4.6.1 How to Add Contacts Numbers
There are 8 emergency contacts available, please follow the way
below to enter the numbers.
1.Click “√” to enter “Contacts”
2.Click “√” again to enter the phone call digits
3.Input the telephone numbers (Click * to enter *, long press
to enter #)
4.Click “ ” to delete if enter wrong number
5.Click “ ”to choose the noficaon receiving choice
6.Click “ ” to determine or delete the choice
7.Click “√” again to save the phone numbers
Please Note: The factory default funcon from 1 to 6 contacts are
CALL, while 7-8 is CID funcon. CID funcon CANNOT be used
with other three funcons.
4.6.2 How to Delete Contacts Numbers
1.Click “√” to enter “Contacts”
2.Click “ ” or “ ” to page up or down to the number you
want to delete or edit
3.Click “√” again to enter ADD/EDIT funcon
4.Page down to “Delete” then click “√” to delete the number
5.Page down to “All Delete” you can delete all the contacts
numbers
67

4.7 Sensors
Click the menu buon to enter main menu, click page up/down
buon to choose the Sensors icon, then click “√” enter the page.
4.7.1 How to Add Remote
There are 99 remote zones, each is allows to add ONE remote.
Customer can input exact digit number on the pad for quick seng.
For example: If you wan to control 98 remote zone, click 9 and 8 on
the pad, then it will go to 98 zone.
1. Click “√” to enter “Sensors”
2. Click “√” to choose “Remote”
3. Click “√” again to Add/ Edit or Delete choose “Remote”
4. Click “√” to enter remote adding page
5. Trigger the remote by press any buon of it
6. System will emit “Successfully Programmed”
7. Click “ ” or “ ” to set up the Sound and the Remote Sound
4.7.1.2 How to Delete Remotes
Delete One Sensor. When entering Remote Control Page, page
down or up buon to find out the Zone you want to control. Or you
can input the digit on the keypad to find out the zone in a second.
Then Click “√” , a window will pop out, you can delete the remote
on this zone.
Delete All Sensors. When entering Remote Control Page, page
down or up buon to go to the the boom of the sensors zone.
“Delete All” to delete all remotes.
4.7.1.3 Edit Remote Sound
Funcon Operaon ON/OF F Status Screen
Sound
(Must Added
Wireless Siren)
Panel Sound
(Must Added
Wireless Siren)
1. ON
2. OF F
1. ON
2. OF F
Wireless Siren will/
will not emit an
alarm when arm/
disarm on the remote.
Wireless Siren will/
will not emit an
alarm when arm/
disarm on the panel.
4.7.2 Sensor
4.7.2.1 How to Add Sensor
There are 99 sensor zones, each is allows to add ONE sensor.
Customer can input exact digit number on the pad for quick seng.
For example. If you wan to control 98 zone, 9 and 8 on the pad,
then it will go to 98 zone.
1. Click “√” to enter “Sensors”
2. Click“√” to choose “Sensor”
3. Click“ ” or “ ” to choose sensor zone
4. Click“√” to enter sensor adding page
5. Trigger the sensor by separate the magnet and the stripe
6. System will emit “Successfully Programmed”
7. Click “ ” or “ ” to set up the sensor sound
89
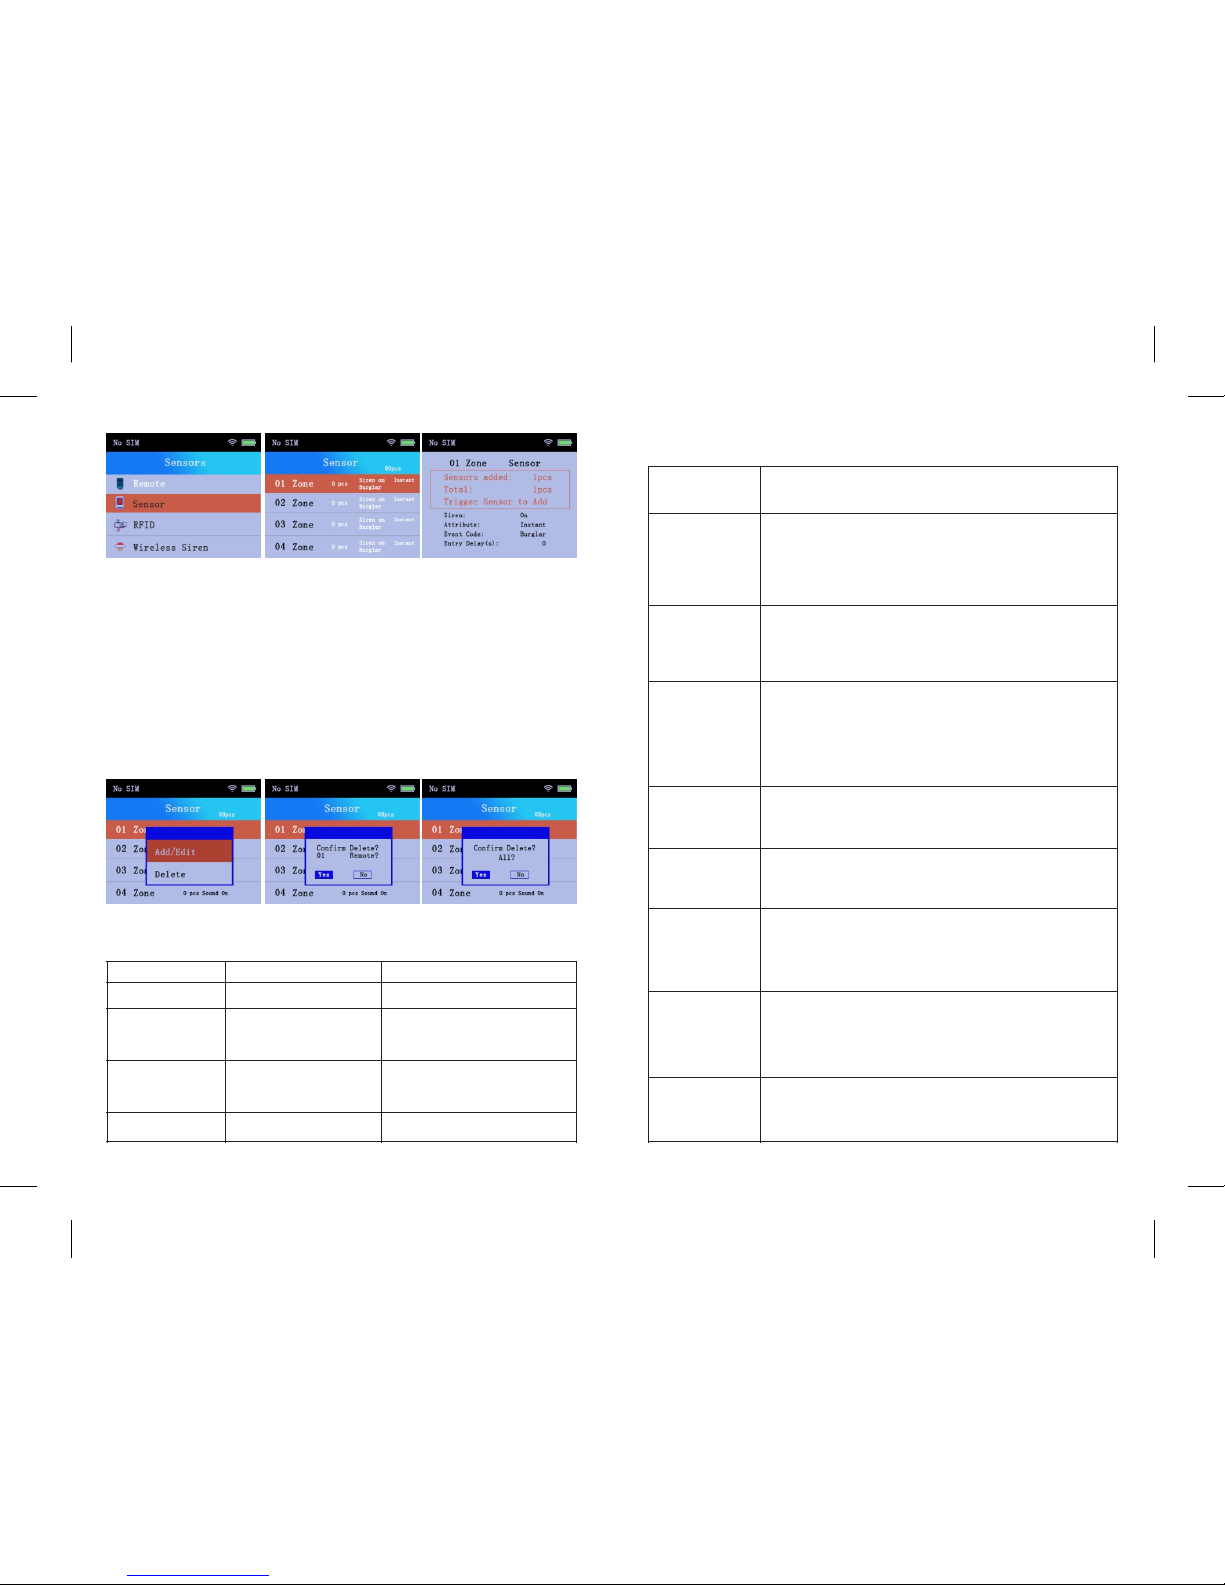
4.7.2.2 How to Delete Sensor
Delete One Sensor. When entering Sensor Control Page, click page
down or up buon to find out the Zone you want to control. Or you
can input the digit on the keypad to find out the zone in a second.
Then Click “√” , a window will pop out, you can delete the sensor on
this zone.
Delete All Sensors. When entering Sensor Control Page, click page
down or up buon to go to the boom of the sensors zone.
Click“Delete All” to delete all sensors.
4.7.2.3 Edit Sensor Mode
Function Operation ON/OFF Status
Siren
Aribute
Event Code
Entry Delay(s)
1. ON 2. O FF
1. Instant 2. Home
3. Smart 4. Emergency
5. Disable 6. Doorbell
7. Chime 8. Medical
1. Ambulance 2. Fire
3. Panic 4. Silent
5. Burglar 6. Perimiter
7.Gas
Click to enter delay me
Wireless Siren will/will not emit an
alarm when the sensor was triggered.
Each mode will emit different alarm.
(Below will elaborate each mode)
ON LY works for special alarm
plaorm. (Like CI D) Will not affect
normal usage.
Longest delay me: 255 seconds
ON LY works for 1-10 Zones
4.7.2.4 Aribute Mode
Aribute
Instant
Home
Smart
Emergency
Disable
Doorbell
Chime
Medical
Descripon
Arm/ Home Arm: Panel send alarm noficaon
when triggered.
Disarm: Panel will not send alarm noficaon
when triggered.
Arm/ Home Arm: No noficaon when PIR sensor
is triggered; There is noficaon, when door sensor
is acvated.
Arm/ Home Arm: When sensors are acvated once,
panel will not send alarm noficaon. It will send
noficaon at the second me alarm is triggered
(around 30s aer the first trigger) The purpose for
this property will reduce false alarm.
Panel will send alarm noficaon whatever system
is under Arm or Disarm status.
Panel will not send alarm noficaon
whatever system under Arm or Disarm status.
Whatever system is under Arm or Disarm status,
when sensors are acvated, panel will goes off
"Ding Dong" ring. You can treat it as doorbell for
this funcon.
Panel under disarmed state: when sensors are
triggered, panel will goes off "Welcome" voice;
Panel under armed state: when sensors are
triggered, panel will goes off ordinary alarm ring.
Panel will send alarm noficaon whatever system
under Arm or Disarm status. It's beer to setup this
property for elder or paent zone.
10 11

4.7.3 RFID
4.7.3.1 How to Add RFID Card
There are 20 RFID cards addable, each R FID zone can only add one
card. RFI D card can be used to disarm your system.
1. Click “√” to enter “Sensors”
2. Click “√” to choose “RFI D”
3. Click “√” again to Add/ Edit or Delete choose “RFID”
4. Click“√” to enter RFID card adding page
5. Trigger the RFID card by pung it on “RFID zone” on the panel
6. Panel will shows “Added” when successfully added. “Configured
or Need Not Add” means the card has added to other zone.
7.Click “ ” or “ ” to set up the funcon of this RFI D card.
4.7.3.2 How to Delete RFID Card
Delete One RFID Card.
When entering RFID Control Page, click page down or up buon to
find out the Zone you want to control. Then click “√” , a window will
pop out, you can delete the RFI D card on this zone.
Delete All RFID Cards.
When entering RFID Control Page, page down or up buon to go to
the the boom of the sensors zone. Click “Delete All” to delete all
RFID Cards.
4.7.3.3 RFID Disarm
RFID Disarm ON: Customer can disarm the system by using this
RFID card.
4.7.3.4 RFID SMS Noce
RFID SMS Noce O N: Customer will receive the message “01 back
home” when using RFID card to disarm the system.
4.7.4 Wireless Siren
4.7.4.1 How to Add Wireless Siren(Not included)
4.7.4.2 Overview of Wireless Siren
J009 wireless strobe siren is a plug &play wireless home security
soluon. Not only can work as accessory but also as standalone
alarm panel.When an alarm is triggered, it will make warning sound
and strobe light will flash to deter intruders. It’s suitable for
wireless alarm systems,working frequency at 433M Hz. (Sell
separately on our store)
12 13

Set Buon
Switch On/Off Buon
Power Light
Strobe Light
Total Clear
For pairing with accessories or panel, adjust
siren volume, and restore to factory seng.
For DC power on/ off. Plug the siren into a
power outlet,siren beeps once and power
light flash once, indicang power on
successfully; Then, toggle switch buon to
"on", keep siren in charging at the same me
For charging status,when power light change
from red to green, indicang full charge;
Built-in baery support around 8 hours stand
by working aer power outage.
Strobe light will flash to deter intruders
Long press the SET buon and plug it into the
socket, you will hear 10 beeping and flashing,
release the set buon unl the beeping and the
flashing stop, and the light will stop.
Siren and Strobe Light:
Status
Arm
Disarm
Strobe Light
Beep Once and Flash Once
Beep Twice and Flash Twice
4.7.4.3 Add Strobe Siren into System
1) Press SET buon on siren and hold for 3s, beep once ,L ED light in
siren will be on and enter into pairing mode.
2) Click “ ” to turn on the “Wireless Siren” on the panel and
send signals.
3) The Wireless siren will beep three mes means successfully
configured.
PLEASE NOTE: Customers are available to add limitless wireless
siren into this system, but this system only has one entrance to add
wireless siren and each siren CAN NOT control separately, when the
sensor is triggered, all sirens will alarm it also connect to the sensor
siren seng, please check the following chart:
14 15

Wireless Siren Sensor Siren Buon Alarm Status
ON
OFF
ON
OFF
OFF
ON ALL Siren Alarm
Sensor Zone with Siren ON
will Alarm
Sensor Zone with Siren OFF
will NOT Alarm
NO Siren Alarm
Sensor Zone with Siren ON
will Alarm
Sensor Zone with Siren OFF
will NOT Alarm
4.7.4.4 Output with Alarm
Click “ ” to turn on the buon, when the system was triggered,
the wireless siren will alarm, we suggest our customer to turn it on.
4.7.5 Wireless Outlet
4.7.5.1 How to Add Smart Socket (Not included)
4.7.5.2 Overview of Wireless Smart Socket
S71 adopts internaonal advanced digital RF technology and is
with stabl e per formance , very stabl e memo ry and storage
capability and intelligent studying funcon, Compable with
remote control of full range of protocol 1527/2262 with frequency
43 3,92 M H z, c ap able to study 6 0p cs remote control. (S ell
separately on our store)
4.7.5.3 Add Smart Socket into System
1) Plug the socket in and then press SET buon on socket and hold
for 5s, LED light will TURN OFF and pairing mode.
2) Click “ ” to turn on the “Wireless Outlet” on the panel and
send signals.
3) The socket will flash twice means successfully added into the
system.
Please Note: If you cannot add the socket into the system, please
total clear the socket by press the seng buon and the plug it in,
the LE D light will flash from slow to fast, release the buon when
the flash stop, and then press the buon for 5 seconds and enter
pairing mode.
16 17
4.7.5.3 Output with Alarm
Output with Alarm
ON
OFF
Status Socket Status
Panel was armed
and triggered
Smart Socket will AUTO
cut off when disarmed
the system for safety
Smart Socket will NOT
cut off
4.7.6 Illegal Arm
Click “ ” to turn on this funcon, when it is on, customer
CANNOT armed the system if one of the sensor is opened. The
system will emit “01 Zone Error” to remind you to check the sensor
and unl all the sensor is correctly set up, customer can armed the
system, which greatly enhance the home safety. ON LY works for
an-tamper sensor, D025 is not an an-tamper sensor.
4.7.7 Tamper Alarm
Click “ ” to turn on this funcon, when this funcon is on,
system will send the message to inform you if the sensor is
tampered. ONLY works for an-tamper sensor, D025 is not an
an-tamper sensor.
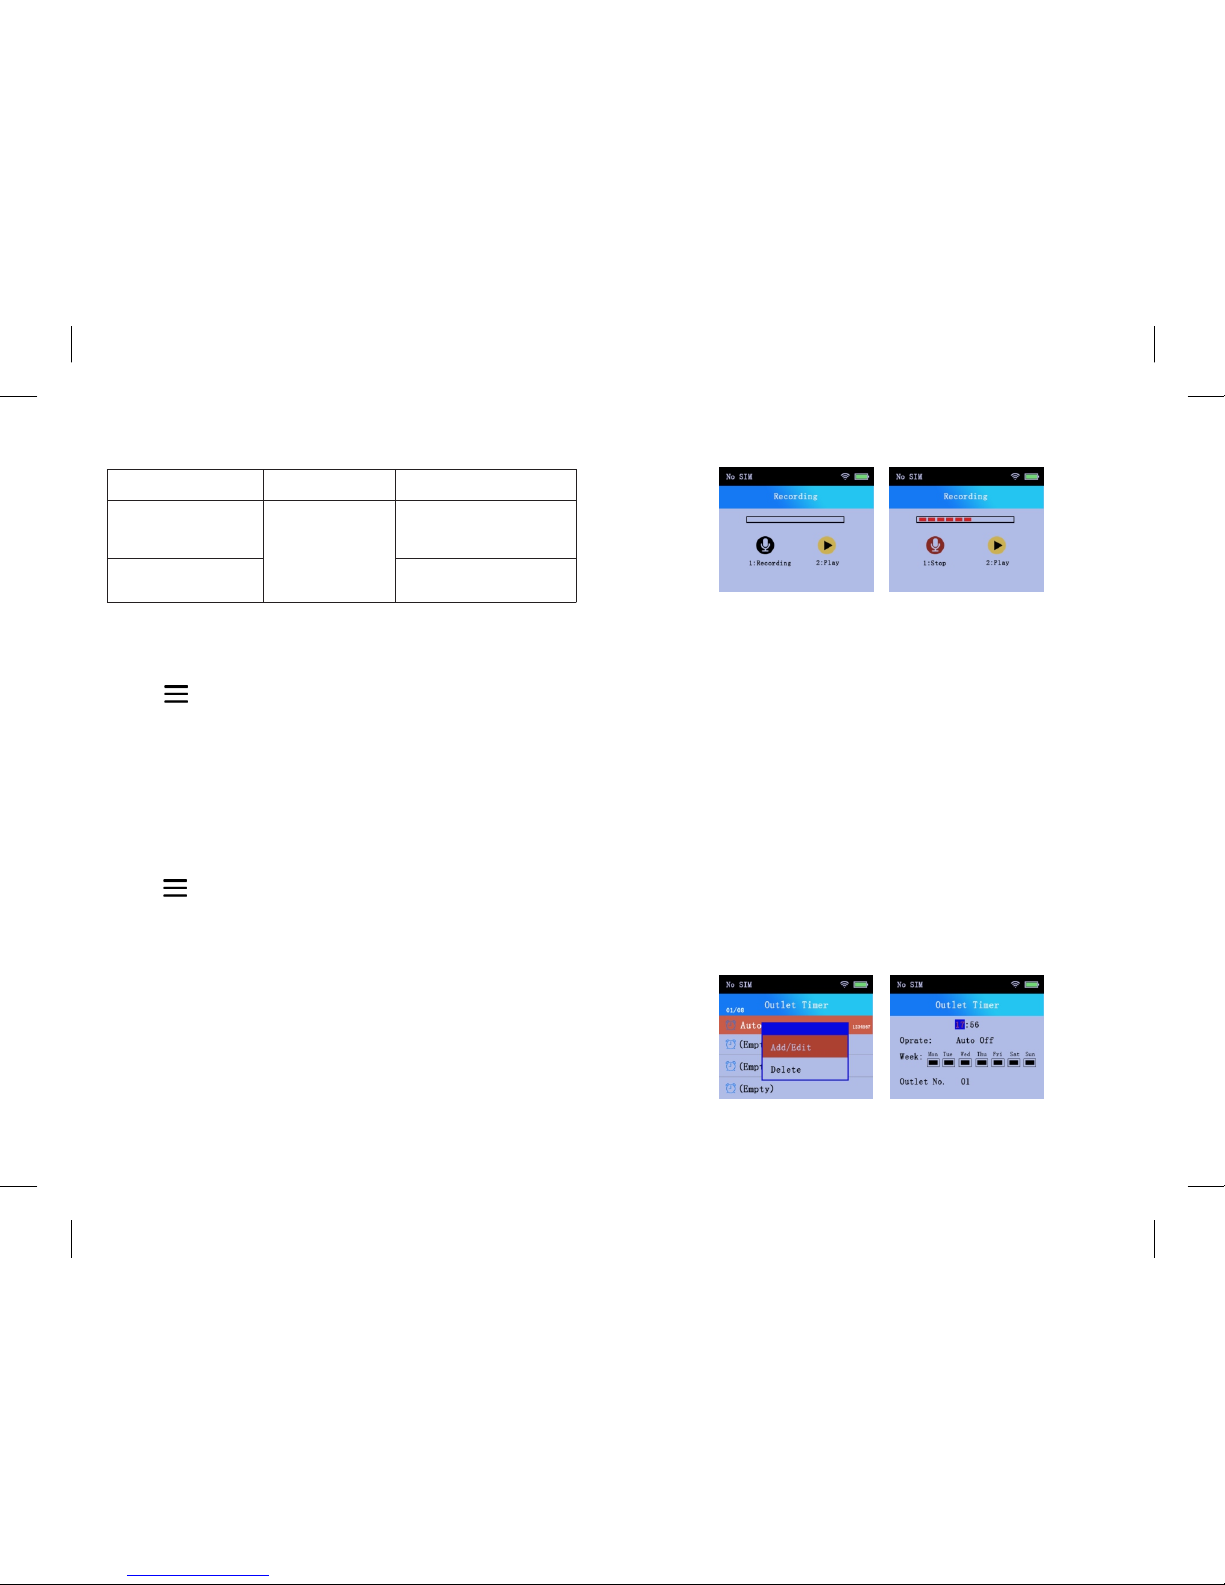
4.8 Recording
Available to record 10 seconds SOS record, when the system is
intruded, it can call the reset number and play the SOS record. We
re co mme nd o u r cu st ome r to reco rd t hei r ad d re ss as for
emergency.
4.9 Appliance
4.9.1 Outlet List
Available to add 20 smart sockets, please check 4.7.5.1 How to Add
Smart Socket to figure out the adding process.
Please Note: The difference between this funcon and 4.7.5
Wireless Outlet is the Wireless Outlet from Sensor part is the Main
Switch while others in this part are sub-switch. If the sub-switch is
on, socket will work even the main switch is turn off. Meanwhile, if
the main switch is off, the socket in sub-switch will work but WILL
NOT auto cut off when disarmed.
4.9.2 Outlet Timer
There are 8 groups of outlet mers. Customer can set up auto on or
off me by days and weeks.
18 19
Time
Operate
Week
Outlet
Enter digit to enter the me
Click “ ” to choose Auto ON/OFF
Click “ ” to choose the auto on or off day
Enter the digit to control exact socket, max input digit is 20
4.10 System
Click page up or down or enter digit 5 on the keypad to enter
system control pages.
Delay
Auto Arm/Disarm
Date& Time
Volume
Siren&Ring
GPRS
Setup the Arming delay me and Entry
delay me, each me are available to
set up from 1-255 seconds.
Setup the the auto arm or disarm me
by days or week. 8 groups available.
Auto update to the real me.
Customer can also change it
by entering the me.
Change the Voice Volume and the
Alarm Volume, available change
from level 1-9.
Siren Time: Available change from 0-20 minutes.
0 means no siren when the system is triggered.
GSM Ring: Available change from 0-20 mes.
GSM ring means the panel will wait for exact
rings me then pick up the phone.
Opening funcon, not available yet.
Key Tone
Screen-saver
Language
Security
Contact ID
Arm/Disarm SMS
SMS Reply
Wallpaper
Power Failure Seng
Restore Factory Defaults
Enter to turn on or off the key pad
clicking tone.
Enter to choose the screen save me.
30s/60s/2min/5min/10min/Never
Simplify Chinese/English/German/
Italian/Russian/Spanish
Set up password of the keypad or lock
the keypad.
Default Password: 123456 (ON LY available to
set up in digits)
NOTE: When locked the panel, customer
should enter password before any operaon.
Set up the CID code.
Opening funcon, not available yet.
Set up to receive the SMS noce
Panel will reply to you phone when
you using phone to control the panel.
Four Choices
Set up the noficaon recepon way when
the panel is on low baery or power off.
Voice/Siren/SMS/Call
Enter to restore the system into
factory defaults
20 21

4.11 Phone
Enter the phone digit on the keypad to make the phone call. (Need
to work by inserng the S IM card.)
4.12 WIFI
Please use W20 APP to connect to WI FI.
4.13 More
4.13.1 Alarm Log(Black Box Funcon)
Auto record 99 mes Arm/Disarm history, 35 mes of Alarm
history, 12 mes of RFID history.
4.13.2 About Us
This page shows the MAC number of the machine and other
informaon. Scan the Qr code to download our APP or search W20
on A PP store.
Chapter 5-APP Operaon
5.1 Download APP
Scan the QR code or search "W20" in App Store to download and
install it.
Warm Tips:Tap "Allow" to allow receiving noficaon from "W20"
W20
5.1.1Register Account
Register one account if you are first to use the app. Type into Email
and password,then click "Confirm", register finished. You can share
your login account with your family members.
22 23
IOS Android

5.1.2Wi-Fi Configuraon
Step 1: Connect W20 control panel with power socket,the panel
will be power on automacally and emit "Welcome".
Step2: Make sure that your smart phone is connected to your WIF I
network.
PLEASE NOTE:W20 doesn't support WIFI
of 5Ghz band. If you use dual-band (5Ghz
and 2.4Ghz) router, please make sure to
connect this system with the 2.4Ghz
instead of the 5Ghz.
Step3: Aer account registraon,enter into device list,click“+”to
choose "W20" device, then input Wi-Fi password, click "NE XT
STEP ”to go to configuraon page. APP will start the 60 seconds of
countdown.
Step4: Make sure your W20 has access to power in this step, and go
to WIFI session on the panel, press 1 to enter WIFI configuraon
process.
24 25

Step5: When 60s countdown finished, the panel will show on the
“L A N U NBO U N D D EVIC E ”. Then click the “L A N U N B O U N D
DEVICE” to bound it into “ONLINE D EVIC E”.
5.2 APP Funcon Introducon
Icon Descripon
Back to device list or user management.
Tap "Seng" for alarm panel sengs
Tap “Arm” icon, the sensors synchronized
with the alarm panel will be armed.
Tap "Disarm" icon, the sensors synchronized
with alarm panel will be disarmed.
Tap "Home arm" icon, the sensors synchronized
with alarm panel will be home armed.
Panel baery volume display.
Tap "Outlets" icon to add or delete outlets.
Tap "Contacts" icon to add or delete contacts.
Tap "Auto Switch" icon to edit auto on/off me
of the outlets
Tap “Arm Timing” icon to set up the auto Arm/
Disarm me.
Tap “Arm Delay” icon to set up the delay me
from 0-255 seconds.
Tap “Push Noficaon” icon to receive noficaon.
Tap “Alarm Time” icon to set up the alarm me from
1 to 20 mes.
Tap “Alarm Delay” icon to set up the alarm delay me
from 0-255 seconds.
26 27

5.2.1 Seng
Click “ ” for more seng.
Icon
Password
Device Volume
Volume
Ringer Num
Siren
Reply
SMS Reply
Descripon
Click to change the admin password.
Change from level 1-9
Change alarm volume from level 1-9
Set up the ring mes from 1-20 mes
Turn on/off the siren when system was triggered
Turn on/off the reply send to the phone
Turn on/off the SMS reply send to the phone
Lock Key
Remote Num
Sensor Num
Zone Type
Arm S MS
Arm C ID
Push Noficaon
Network Sengs
User Password
Push Text
Push Sound
Turn on/off to lock/unlock the panel
Add or delete remotes and set up zones.
Add or delete sensors and set up zones.
Set up the zone type of each sensor zone.
Receive the SMS when arm/disarm/home arm
Receive CI D noficaon when arm/disarm/home arm
Tap “Push Noficaon” icon to receive noficaon.
Check network status
Click to change the user password.
Edit the text content of the noficaon
Edit the push sound when arm/disarm/home arm
5.3 Add and Delete Accessories
5.3.1 Add /Delete Remote
Important: Please keep panel under "Disarm" status when you add
accessories.
28 29

Rc352 remote control is delicate and easy to carry. It can be
aached to your key ring, or put into your pockets or purses. When
you are about to exit or enter the house, you can use the remote
control to arm or disarm the system. Or press SOS buon to
acvate the alarm immediately.
Overview
2. Tap "Remotes Num" to enter adding remote page. Click “Add”,
then the main panel will emit “Add 01 Zone”, then click any buon
on the remote, the main panel will emit “Add successfully
programmed”. The AP P will show 1 on “Have Remote Numbers”.
Click “Delete” to delete remotes.
Please Note: Each Zone is O NLY AVA ILABL E TO AD D UP 1
REMOTE. Customer can choose other zone to add remote.
5.3.2 Add /Delete Door/window Sensor
The contact sensor contains a transmier and a magnet,which can
be mounted on a door, window or any entry places can be opened
or closed. When the transmier and magnet are separated, the
contact sensor will send a signal to the control panel and the panel
will trigger an alarm.
1. There are triangle marks on the side of the transmier and
magnet. Make sure the triangle marks is close to each other at the
first step.
30 31

2. Tap "Sensor Num" to enter adding remote page. Click “Add”, then
the main panel will emit “Add 01 Zone”, then separate the magnet
from transmier around 2cm, LED light in transmier will flash in
Red. The main panel will emit “Add successfully programmed”. The
APP will show 1 on “Have Sensor Numbers”. Click “Delete” to
delete remotes.
Please Note: Each Zone is ONLY AVAILABL E TO ADD UP 1 Sensor.
Customer can choose other zone to add remote.
5.3.3 Door/window Sensor Installaon
Make sure the contact works properly before installing it. There are
triangle marks on the side of the transmier and magnet. Make
sure the triangle marks is close to each other. Once the transmier
and magnet is separated around 2cm by intruder,the LED light in
transmier will flash in Red. Alarm will be acvated.
Paste the transmier and magnet on doors and windows or any
other open/close places with provided double-sided tapes.
5.3.4 Add /Delete PIR Moon Sensor
1. With intelligent processing technology, the detector can detect
infrared rays released from human body, and idenfy interfering
signals and human movement signals, thus prevenng false
alarm.Being able to detect human movement within 8m space,
suitable for installaon in any place of your house that can't be
cover by contact access sensor,without opening door or window.
32 33

Detecon Lens
LED Indicator
Overview
3. Tap "Sensor Num" to enter adding remote page. Click “Add”, then
the main panel will emit “Add 01 Zone”, then wave your hand
before the moon sensor to trigger the sensor, LED light of the
sensor will flash in Red. The main panel will emit “Add successfully
programmed”. The AP P will show 1 on “Have Sensor Numbers”.
Click “Delete” to delete remotes.
Please Note: Each Zone is ONLY AVAILABLE TO AD D UP 1 Sensor.
Customer can choose other zone to add remote.
5.3.5 PIR Sensor Installaon
Make sure the PIR Sensor works properly before installing it.
1. Choose a suitable place for installaon.
2. Fix the PIR sensor
Fix the installaon bracket on the wall with screws, then fit the
groove at the back of the sensor on the bracket. You can adjust
bracket angle to achieve the best detecon effect.
34 35
Table of contents
Other Bibene Security System manuals


Popular Security System manuals by other brands


Philips
Philips Lifeline FD100 Instructions for use

Motorola
Motorola MOC4600i Installation and programming instructions

Honeywell
Honeywell LYNX Touch Series Guide

Swann
Swann PRO-580 Specifications

Kingdun Electronic
Kingdun Electronic KD-122LA user manual

Surefire
Surefire iBURNER BMS-100 Installation & operation manual

Lorex
Lorex SG21FD3044-161 Quick installaion guide

DAITEM
DAITEM Espace range user guide

Eaton
Eaton i-on Series Administration and User Manual

smartvue
smartvue S8 user guide

ZIGBEE
ZIGBEE 206 quick start guide

Alderon Industries
Alderon Industries Versa'larm 8124 Operation, maintenance and installation manual