Bibene DW9 User manual
BIBENE DW9 Smart Driveway Alarm
User Manual

1. Introduction ................................................
2. Product Features .........................................
3. Product Diagram ..........................................
3.1 Sensor Overview ......................................
3.2 Receiver Overview .....................................
4. Get Started ..................................................
4.1 Powering your Receiver ...........................
4.2 Powering your Sensor ..............................
4.3 Pairing your Sensor and Receiver ..............
4.4 Installing your Sensor ...............................
4.5 Adjust Sensor Field of View .......................
5. Low battery Indication .................................
5.1 Sensor Low battery Indication ...................
5.2 Host Low battery Indication ......................
6. Factory Reset .............................................
7. Total Clear ..................................................
8. Specification ..............................................
Table of Contents:
1
1
1
1
1
4
5
6
7
9
10
5
10
10
11
11
11
12

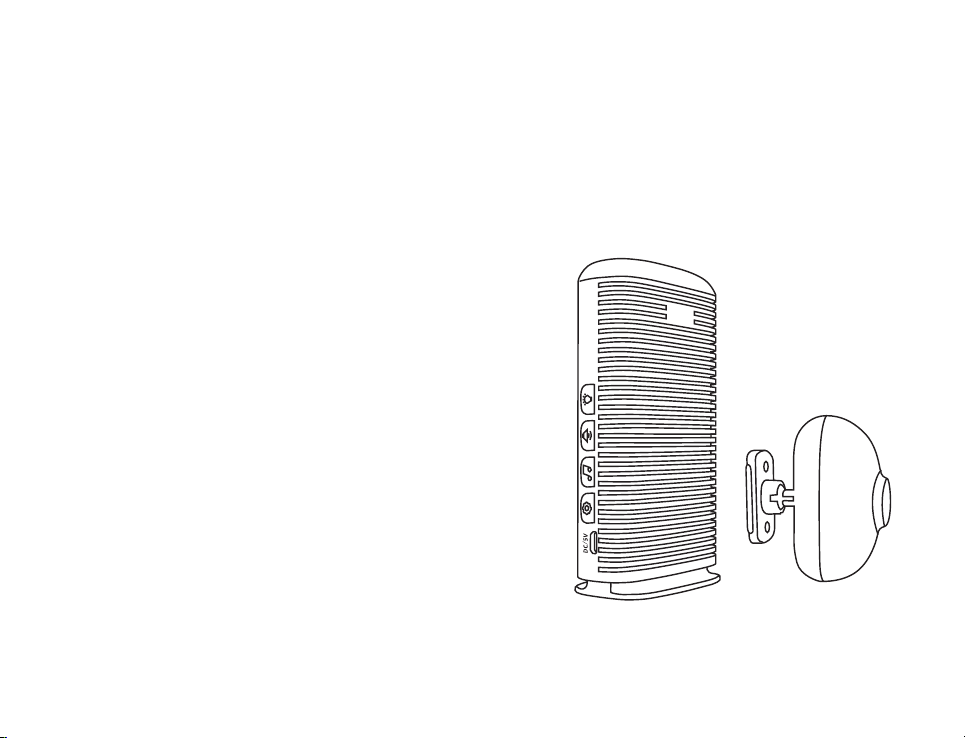
Mounting
Plate
Ball-joint
Adjustment
Screw
Sensor Eye
Field-of-view
Adjustment
Cover
Distance
Sensitivity
Switch
Anti-dismantle
Switch
LED Indicator
Switch
Battery
Compartment
(2 AA Batteries)
SWITCH#1
6m Detection Range
12 Detection Range (Default)
SWITCH#2
LED Indicator OFF
LED Indicator ON (Default)
SWITCH#3
Anti-Break Button
1 2
3
OFF
ON
OFF
ON
OFF
ON
1. Introduction
Thanks for purchasing BIBENE DW9 Driveway Alarm.
Please read this user manual carefully before use, we
w il l u pd at e t hi s m an ua l o n a r e gu la r b as is i n
accordance with the addition or upgrade of the product
features. If you need any assistance, please contact
our support team, we will contact you within 24 hours.
Customer Service Email Address:
loylovcustomerservice@hotmail.com
2. Product Features
The DW9 Wireless Driveway Alarm uses a Passive
Infra-Red (PIR) Motion Sensor to detect movement of
people and vehicles.
The Base Station is powered by the DC adapter or USB
cable and 3 AA batteries to supply power in case of a
power outage.
NOTE: The Base Station is intended for indoor use
only.
•Alerting you when visitors enter your driveway
•Deterring trespassers and thieves from entering your
property or building
•Alerting you to wildlife on your land
•Using in drive-thrus to signal that a customer has
pulled in, and more!
3. Product Diagram
3.1 Sensor Overview
You can pair up to 8 sensors to your receiver (2 Per
Zone). Each zone can have its own unique melody
reminder.
32

4. Getting Started
The basic steps for installing and setting up your
BIBENE alarm are:
4.1 Powering your Receiver
4.2 Powering your Sensor
4.3 Pairing your Sensor and Receiver
4.4 Installing your Sensor
4.5 Adjusting Sensor Field of View
***Before Installation***
DW9 Smart Driveway Alarm comes with one receiver
and one sensor whi le the sensor has pair ed to
receiver’s defense zone 1 when you received it.
Customer can plug and use the alarm when out-of-box.
No need to pair the sensor again and if customer wants
to add more sensor or the sensor doesn’t work, he can
follow step 4.3 Pairing your Sensor and Receiver to
add or delete sensor.
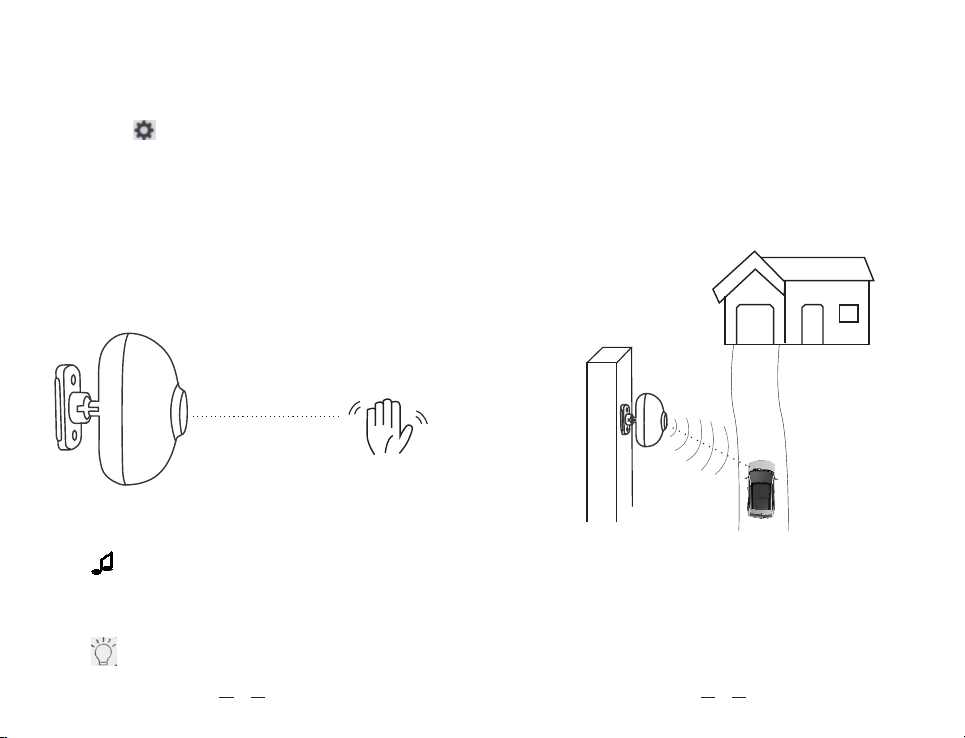
Hence, we suggest our customer to test the sensor to
by waving hand before it after power the receiver and
sensor on. About how to power your receiver and
se ns or, p lea se f ol lo w st ep 4 .1 P ow eri ng y ou r
Receiver and 4.2 Powering your Sensor.
If the sensor works correctly, customer can install the
sensor on the tree or the place he/she wants to detect.
Please go to 4.4 Installing your Sensor for more
steps.
4.1 Powering your Receiver
The main power source for the receiver is the included
12v/500mA AC/DC power adapter. Simply plug the
3.2 Receiver Overview
The receiver has up to four zones that you can use to
cover a variety of locations. You can also have multiple
receiv ers in different loca tions in you r hom e or
business, so you can hear the alarm chimes.
Basic Operation
Long press【 】Turn ON/OFF the Device
( Volume will change from loud to quiet when turning
off, and vice versa )
Short press【 】Circularly check from Zone 1to Zone
4 whether there is sensor is low power
( Indicator will flash when in low battery )
Short press【 】Circularly adjust the volume
Short press【 】Circularly music Audition
LED Indicator
Volume Up/Down
Music Audition
Setting
Charging Port
Battery
Compartment
5
4

4.3 Pairing Your Sensor and Receiver
The senor have paired to the Defense Zone 1 of the
receiver when you receive it. Customer can add other
sensors to the receiver by following steps.
A. Enter Defense Zone Learning Status
To pair the sensor and the receiver, you should enter
the defense zone first. Have the sensor and receiver
nearby and ensure the sensor is turned away from you
or other people, in case of detecting wrong IR and
influence the pairing. There’s 4 defense zones, and
different zone shows different color indicator.
Please Note: Only after enter defense zone 1,
customer can continue to set up other zones.
Press【 】to enter defense zone learning status and
add sensors, please check the chart below:
ZONE SETTING OPERATION LED INDICATOR
Defense Zone 1
Defense Zone 2
Defense Zone 3
Defense Zone 4
Quite Defense Zone
Long Press【 】
Short Press【 】ONCE
Short Press【 】TWICE
Short Press【 】THREE TIMES
Short Press【 】FOUR TIMES
RED
GREEN
BLUE
PURPLE
NONE
B. Add or Delete sensors
Take Defense Zone 1 as an example:
When under defense zone 1 learning status, wave your
hand before the sensor to trigger the sensor, the host
will "BEEP" twice and flash twice, indicating the sensor
is successfully bound to the defense zone 1;
adapter into a wall outlet, then into the side of your
receiver, near Zone 1.
We also recommend putting backup batteries into your
receiver, to ensure you maintain coverage in the event
of a power outage.
4.2 Powering your Sensor
The sensor runs on 2 AA batteries and operates
wirelessly at a maximum distance from the receiver of
1050 ft (350m).
To insert batteries into the remote sensor:
1. Remove the holder on the back of the sensor and
the n uns cr ew t he se ns or t o a cc es s t he b at te ry
compartment. (Be careful the screws are very small,
don’t lose them.)
2. Install 2 AA batteries, replace the cover and secure
the screws.
12V/500mA
7
6
flashes once mean host will remind once, and flash
twice means remind twice, and so on.
4.4 Installing your Sensor
We recommend mounting the motion sensor at least 3
to 4 ft (1 m) above the ground and (6-8m) away from the
driveway on a sturdy, non-metal surface (i.e. a wall,
wooden post or tree). This will decrease or eliminate
false alarms from small animals, give you a longer area
to pick up movement, and avoid unwanted alarms from
nearby lawns/roads.
Please Note: Alway s test that your se nsor is
working in your desired location before installing
it. Avoid placing your sensor in a location where
sunlight will shine directly into the sensor eye.
Direct sunlight may cause false alarms and/or
damage to the PIR sensor.
If the host "BEEP" and flash once, indicating that this
sensor has been bound into other zones;
If the host "BEEP" and flash three times, indicating that
defense zone 1 is full.
Long press【 】, the host will "BEEP" and flash four
times, indicating that you have deleted the sensor of
this zone.
Please Note: Learn mode has a time-out feature
after 20 seconds of inactivity. If you didn’t hear a
beep confirming that your sensor was paired,
repeat the pairing process and make sure that your
selected zone is still flashing when you activate the
sensor.
C . Set up the Alarm Music
When under learning status of the defense zone,
press【 】to set up the music of this zone, each
defense zone can ONLY set up one type of music, no
matter how much sensors have bound.
When under learning status of the defense zone,
press【 】to set up the reminder time, alarm music
can set up to remind from once to four times. The LED
1 foot away
98
5.2 Host Low Battery Indication
When the host is in low battery, it will enter the
hibernation state. The host will blink four times every
60 seconds or each time it is triggered. Customer can
change the battery or use USB as power supply.
6. Factory Reset
Long press the 【 】 and 【 】at the same time
after the host is powered on, the host will "BEEP" once
and the LED will flash red once, then release the
button, the music will return to the original setting.
Please note, the sensor is still bound to the host.
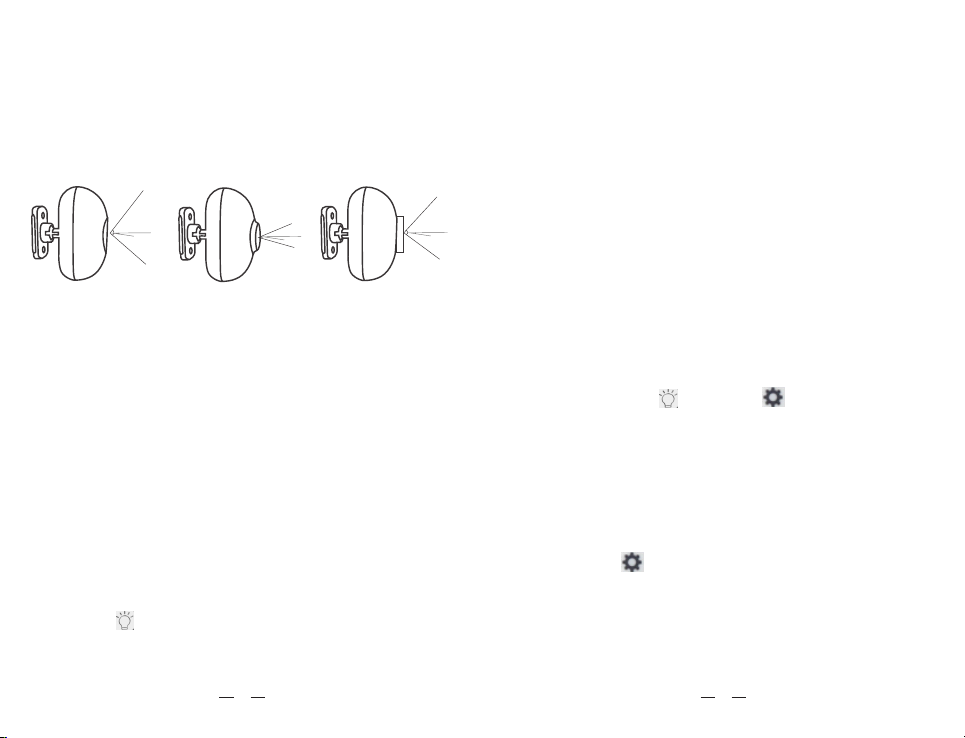
4.5 Adjusting Sensor Field of View
Expect for the adjustable detecting distance, customer
can also adjust the view degree by changing the cover.
5. Low Battery Indication
5.1 Sensor Low battery Indication
When the sensor is in low battery, it will send a low
signal to the host, while the host receives the signal
from corresponding defense zone, the LED will flash 3
times suggesting that the sensor of this Zone is in low
power, customer should replace battery.
Cus tome r can c he ck l ow b at te ry o f sen so rs b y
pressing【】. When switching to a certain zone, the
5°
10°
110°
15°90°
5°
7. Total Clear
Long press【 】after the host is powered on, wait
until the slow "BEEP" sound and green light flashing 10
times, when the green LED flashing fast means the
host has total clear and delete all the sensors, the host
will return to the factory state.
LED will flash 3 times to indicate that sensor in this
defense zone is in battery low status.
After changing the battery, please trigger the sensor
and the host will “BEEP” once and will automatically
clear the low power reminder of this sensor.
1110

8.Specification
Operating voltage: External USB-5V DC power supply /
3 AA batteries
Shutdown Current: <10uA
Working Current: <80mA
Receiving Frequency: 433MHz
Receiving Distance: 350m (Open Area)
12
Table of contents
Other Bibene Security System manuals


