Big Daishowa TOOL MASTER User manual
電池の方向を逆に入れるとブザーやLEDが反応しません。
ご注意CAUTION
Buzzer and LED do not react if the batteries are set in reverse direction.
①測定子とストッパー間の保護クッションを取り外してください。
Remove protective cushion between the probe and the stopper.
取扱説明書OPERATION MANUAL
ツールマスター
TOOL MASTER
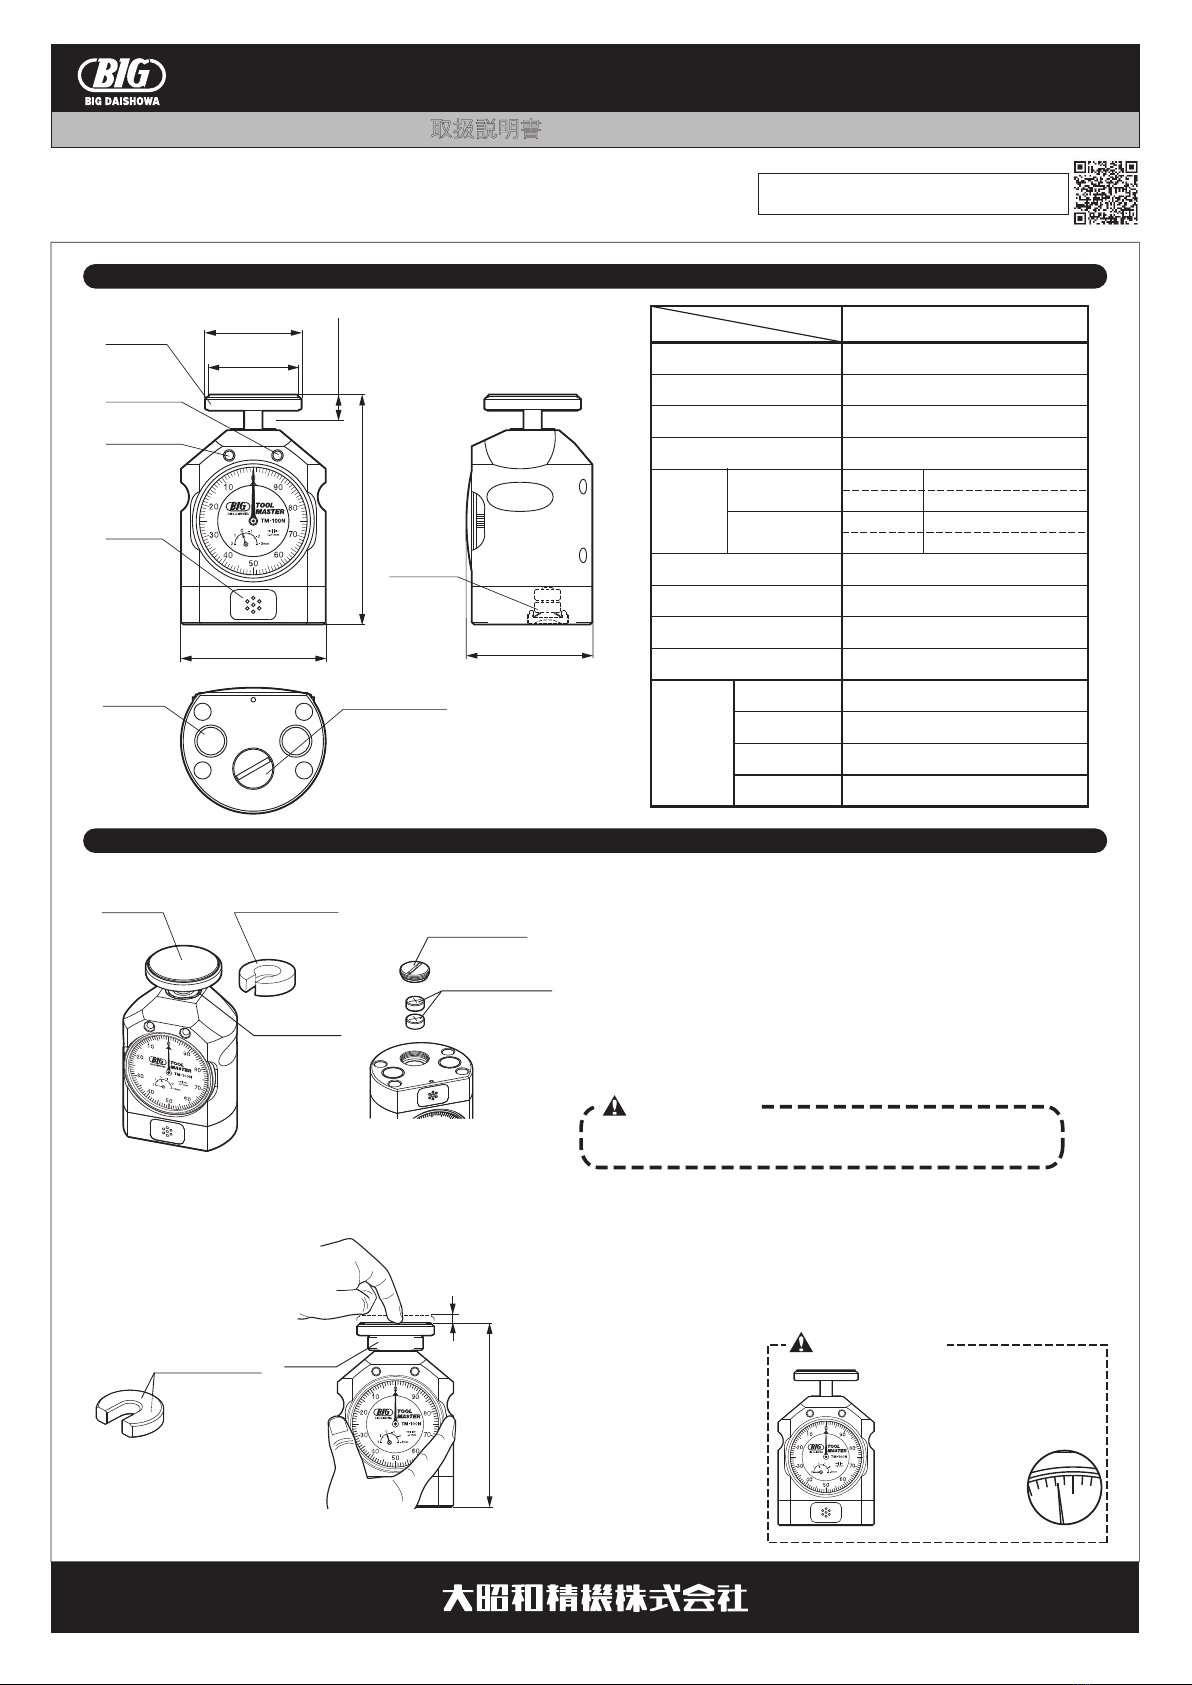
寸法及び主な仕様 DIMENSIONS AND MAJOR SPECIFICATIONS
基準高さ位置設定 REFERENCE HIGHT POSITION SETTING
■本社
東大阪市西石切町3丁目3-39〒579-8013
TEL.072(982)2312(
代)
FAX.072(980)2231
●位置設定の前に
●基準高さ設定
②電池のセット方法
③測定子の裏面と基準面の油分・埃等を取り除いてください。
Setting of batteries
バッテリ−キャップ
マ グ ネ ット
MAGNET
測定子
SENSOR
PLATE
測定子
SENSOR
PLATE
BATTERY CAP
φ3 9
92〜102
φ6 3 54.8
ストローク1 0
STORKE
φ4 2
ブザ−
バッテリ−
LED(red)
BATTERY
BUZZER
LED(赤)
LED(green)
LED(緑)
保 護 クッション
PROTECTIVE
CUSHION
基準面
セ ッ テ ィン グ ゲ − ジ
両面
セ ッ テ ィン グ
ゲ−ジ
Turn and remove the battery cap using a coin or similar and load the 2 batteries (SR44)
as illustrated left and then tighten the cap. If set reversely, the LED does not turn on.
底面のバッテリ−キャップをコイン等で取り外し、付属のバッテリ−(SR44)2個を左図
のように入れバッテリ−キャップを締め込んでください。方向を逆に入れるとLED
が点灯しません。
バッテリー キャップ
電池SR44×2
BATTERY 2×SR44
BATTERY CAP
付属のセッティングゲ−ジ
の両面の油分・埃等を取
り除いてください。
測定子裏面と基準面の間にセッティン
グゲ−ジを装着後、測定子の中心を指
でゆっくりと押し、測定子裏面とセッテ
ィングゲージ表面を密着させてくださ
い。密着させた状態で、でダイヤルを
回し目盛板のゼロを長針に合わせます。
密着時の高さが100mmです。
セッティングゲ−ジをつけたまま使用すると工具の破損に繋
がります。必ず取り外してご使用ください。高さ100mm位
置は、長針0短針0(約2mm圧縮時)の位置です。
約2mm圧縮
100
+0.02
0
+0.02
0
+0.02
0
Press down the
probe by about
2mm.
① ②
③
0
100mm位置は約2mm圧縮時な
ので、高さ設定が終わった後、指を
離して測定子が原点に戻った時、必
ずしも長針は0には戻りません。
The height is 100 mmwhen the
probe is pressed down by about
2 mm. The long hand does not
always return, therefore, to "0"
when the probe has returned to
the initial point after the probe
was released.
SETTING
GAUGE
BEFORE SETTING
REFERENCE
PLANE
Remove oil and dirt on bottom side of the sensor plate and top side of the reference plane.
REFERENCE HEIGHT SETTING
Remove oil and dirt on
both sides of the setting
gauge provided.
Setting gauge
(clean both sides)
Place the setting gauge between the
sensor plate and the reference plane.
Slowly press down the center of the
probe until it contacts closely with
the setting gauge.
While holding the sensor plate,
adjust “0” of the dial to the long
hand. The height is 100 mm when
the probe is in close contact with the
setting gauge.
Be sure to remove the setting gauge before use. Otherwise
tool will be damaged. The height is 100mm when the long
hand is on “0” and the short hand is on “0” (the probe is
pressed down by about 2mm).
OPERATION MANUAL DOWNLOAD SITE
http://big-daishowa.com/manual_index.php
・
ご使用前に必ず本書をお読みいただき、ご使用される方がいつでも見ることができる場所に必ず保管してください。
・本商品は、弊社の厳密なる品質および精度検査に合格した事を証明致します。
・
Pleasereadtheseinstructionsbeforeuseandkeepthemwheretheoperatormayrefertothemwhenevernecessary.
・Wecertifythisproducthaspassedourrigorousinspectionsofqualityandaccuracy.
バッテリ−
質量
最小測定工具
付属品
高さ精度
スト ロ − ク
スト ロ − ク 範 囲
測定圧
Height accuracy
Stroke
Stroke range
Measuring pressure
Battery
Weight
Min. measurable tool diameter
Included items
100 m m
10 m m
92 〜 1 02 m m
TM-100N
ダイ ヤ ルゲ−ジ
精度
3N(100mm時)
SR44×2P
1.0kg
φ1 m m
セ ッ テ ィン グ ゲ − ジ (Seetting gauge)×1P
お知らせ
信 号
+0.02
0
99.5mm 付近
100.5mm 付近
ブザ−
LED 点滅(赤・緑)
ピッピッピッ
ピッ
Signaling
(Around 100.5mm)
(Around 99.5mm)
BUZZER
ブザ−
LED
BUZZER
点灯(緑)
Lighting(green)
Flashing(red・green)
Blipping
Blipping
SR44×2P
最小目盛
指示誤差
繰返し精密度
戻り誤差
Graduations
Indication tolerance
Repeatability
Return tolerance
JISB7503:1997
に準ずる
Dial gauge accuracy
in accordance with
JIS B 7503:1997
0 .0 1 m m
±15μ m
5μ m
5μ m
型式 Model
項目 Items
ご注意CAUTION
TM-100N

使用上の注意 CAUTIONS IN USE
使用方法 HOW TO USE
No. 1218PA
ご注意 CAUTION
+0.02
0
本器の精度は、高さ調整時の密着高さ100 mmの精度とダイヤルゲー
ジの精度に影響されます。測定誤差により機械・ワーク・工具等が破損する恐
れがありますので密着時の高さ公差・ダイヤルゲージの誤差(仕様一覧表に
明記)を考慮のうえご使用ください。
+0.02
0
本器の100mm位置は、ダイヤルの長針が0短針が0(約2mm圧縮時)の位
置です。ご使用前に必ず高さ調整を実施してください。高さ調整を実施しなかった
場合には、大きな測定誤差が発生し、機械・ワーク・工具が破損する恐れがあります。
精密測定器ですので落下させたり、3G以上の衝撃を与えたり、切削水をか
けたりしないでください。破損の原因になります。本体に落下や衝突等の大
きな衝撃が加わった場合は、本体部が歪み修理出来ないことがあります。
測定子を指で弾いたり、急激に動かさないでください。ダイヤルゲージにダメージを
与え長針が曲がったり、ギヤが外れたりする可能性があります。
機械テーブル上やワーク上にセットする場合にはそっと設置してください。衝撃
が加わった場合には、本器底面の基準面および機械テーブル・ワーク表面にキズ
等のダメージを与えると共に、ダイヤルゲージにも損傷の可能性があります。
ご注意 CAUTION
100mm position is reached when the long hand of the dial is set to “0” and
the short hand to “0” (probe pressed down by approx. 2mm). Be sure to
perform height adjustment before use. Otherwise, a large measurement error
may occur and machine, work and tool may be damaged.
・
・
・
・
・
・
・
・
・
・
・
The precision electronic parts are contained with the head. Take care not to
splash any coolant and avoid any accidental collisions. Do not to leave it on
the machine table and the jig, when not in use.
・
・
・
The accuracy of Tool Master depends on the preciseness of close-contact height of
100 mm at height adjustment and on the dial gauge accuracy.
Use Tool Master in consideration of the close-contact height tolerance as well as
the dial gauge tolerance (given in the table of specications) to avoid any damage
to machine, work, tool, etc.
危険DANGER
Tool Master is a precision instrument. Do not expose it to any shock over 3G
or cutting liquid to avoid breakage. In case of a large shock to it by fall,
collision, etc., the instrument body may suffer from distortion beyond repair.
Neither ip the probe nor move it abruptly. Otherwise the dial gage may be
damaged resulting that the long hand is bent or gears are disengaged.
Set Tool Master on machine table or workpiece gently and carefully. Otherwise,
damage such as aws may be caused to reference surface at the bottom of Tool
Master, surface of machine table or workpiece. Dial gage may be damaged by
the excessive blow.
仕様および高さは、測定環境が温度20℃±0.5℃/湿度55%±5%時での
値です。前記環境以外でより正確な測定を行う場合はゲ−ジブロックと比較
測定し、高さを補正してください。
・精密電子部品を使用しておりますので、クーラントをかけたり、衝撃を
与えたりしないでください。また、ご使用後は機械テーブル上や治具上
に放置しないでください。
Specications and height are the gures under measurement environment
at a temperature of 20℃±0.5℃(equivalent to 68° F) and at a humidity of
55%±5%. For precise mesurement under different environment, compare
the height with a block gage and compensate the difference.
約2mm圧縮
Press down the
probe by about
2mm.
本器の測定面・底面および機械テ−ブル面・ワ−ク取付
け面の油分・埃等を取り除いてください。
機械テーブル面・ワ−ク取付
け面にツールマスターを置
き、工具刃先を測定面に接
触させます。
測定面 本体底面 ワ−ク 取 付け 面 機 械 テ −ブル 面
工具を送って行き、工具刃
先位置が100.5mm付近
でLED(緑)が点灯し、ブザー
が鳴り刃先位置が100mm
に近い事を知らせます。
工具刃先位置が基準位置
100mmを超えた場合、
99.5mm付近でLED(緑)・
LED(赤)が点滅し、ブザー
が鳴り、刃先位置が
100mmを超えた事をお
知らせします。
その位置より微少送りでダイヤ
ル の 長 針 が0短 針 が0に 合
わせると工具刃先位置が機械テ
ー ブ ル 面・ワ − ク 上 面 か ら
100mmの位置となります。
測定圧の関係で極小径工具(最小測定工具径φ1mm未満)は、測定できません。また、工具の
測定は、必ず測定子の中心にて行ってください。工具破損及び測定精度への影響につながる
恐 れが ありま す 。
寒冷地や長期休止後ご使用になる場合、内部の精密スライド部やシール部潤滑油が硬化して
測定子のストロークが不安定な場合がありますので、数回指で測定子をストロークさせてか
らご使用ください。
Remove oil and dust from the measuring plane and
body undersurface of Tool Master as well as from
machine table surface and work mounting surface.
Measuring plane
Body undersurface
Work mounting surface
Machine table surface
Set Tool Master on work
mounting surface /
machine table surface and
bring tool tip into contact
with the measuring plane.
While the tool is advanced,
the LED goes on and the
buzzer sounds at a height
of approx. 100.5mm to
inform that 100mm height
will soon be reached.
Feed the tool further from
this position by inching
until the long hand and the
short hand of the dial
point, respectively, to "0".
Now, the tool tip is just
100 mm away from the
machine table surface /
work upper surface.
Tools of any extremely small diameter do not allow measurement due to the measuring
pressure (min. diameter of measurable tool : 1 mm). Make measurement for any tool
always at the sensor plate center. Otherwise, there is a fear of tool damage.
When using Tool Master in cold climates or after a long idle period, move the probe several
strokes by nger in advance. Lubricant in precision slide and sealing on the inside may
have become hard to cause instable probe stroke.
・
・
・
100
+0.02
0
③ ④
When the tool tip exceeds
the reference position
(100mm), it emits beep
sounds and noties the
excess. Green and red
LED lights ash around
99.5mm on the setting
gauge.
・
セッティングゲ−ジは、高さ設定時の基準ゲ−ジとなりますので使用後は、
油分・埃等を取り除き専用ケースに入れ大切に保管してください。
The provided setting gauge is necessary to set the reference height.
Handle it with great care. Remove oil and dirt after use. Store in
dedicated box.
①
②
⑤
・
This manual suits for next models
1
Other Big Daishowa Power Tools Accessories manuals

Big Daishowa
Big Daishowa BASE MASTER MICRO User manual

Big Daishowa
Big Daishowa Mega Synchro MGT 6-d Series User manual

Big Daishowa
Big Daishowa PULLSTUD User manual

Big Daishowa
Big Daishowa SMART DAMPER User manual

Big Daishowa
Big Daishowa BBT40-AG90-13-120 User manual

Big Daishowa
Big Daishowa ST LOCK User manual

Big Daishowa
Big Daishowa HYDRAULIC CHUCK User manual


