Bigben RR45 User manual
RR45
MANUEL D’INSTRUCTIONS
Lisez attentivement ce manuel avant votre première utilisation
puis rangez dans un endroit où vous le retrouvez pour toute
référence ultérieure.
E-1
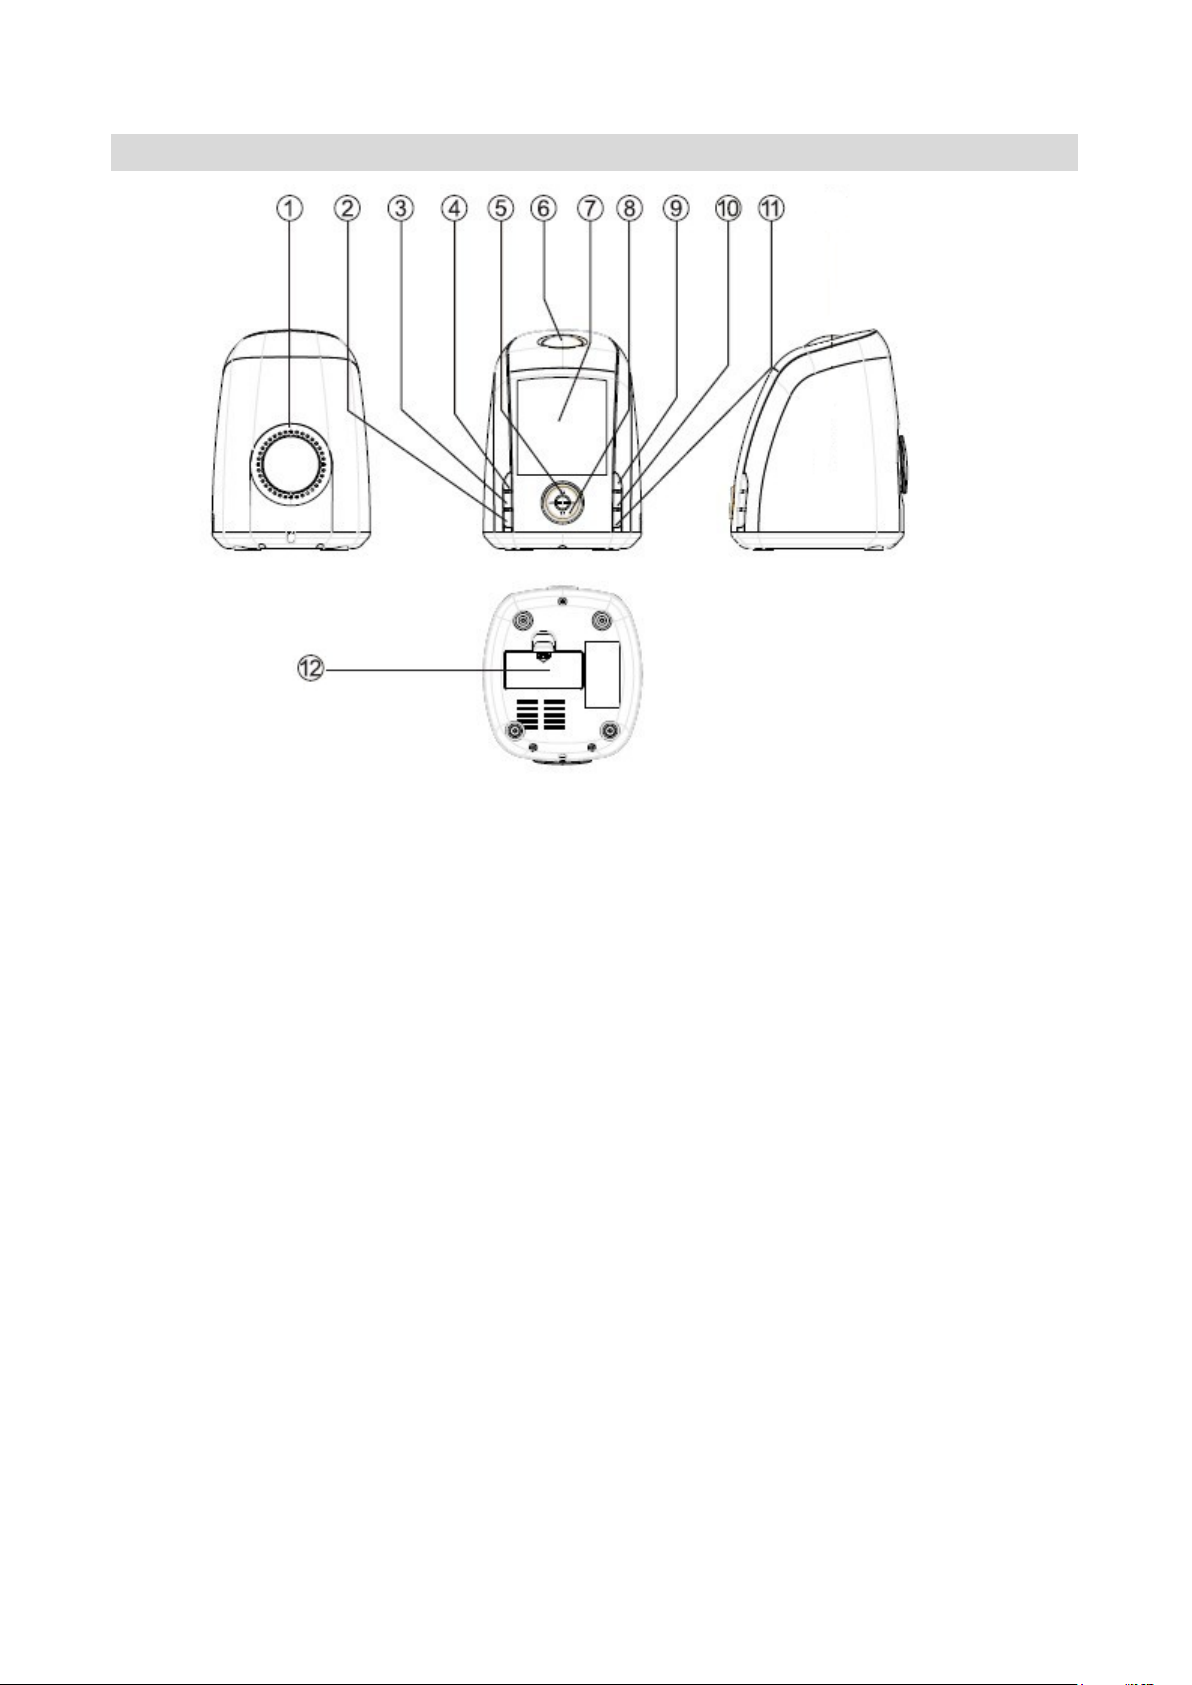
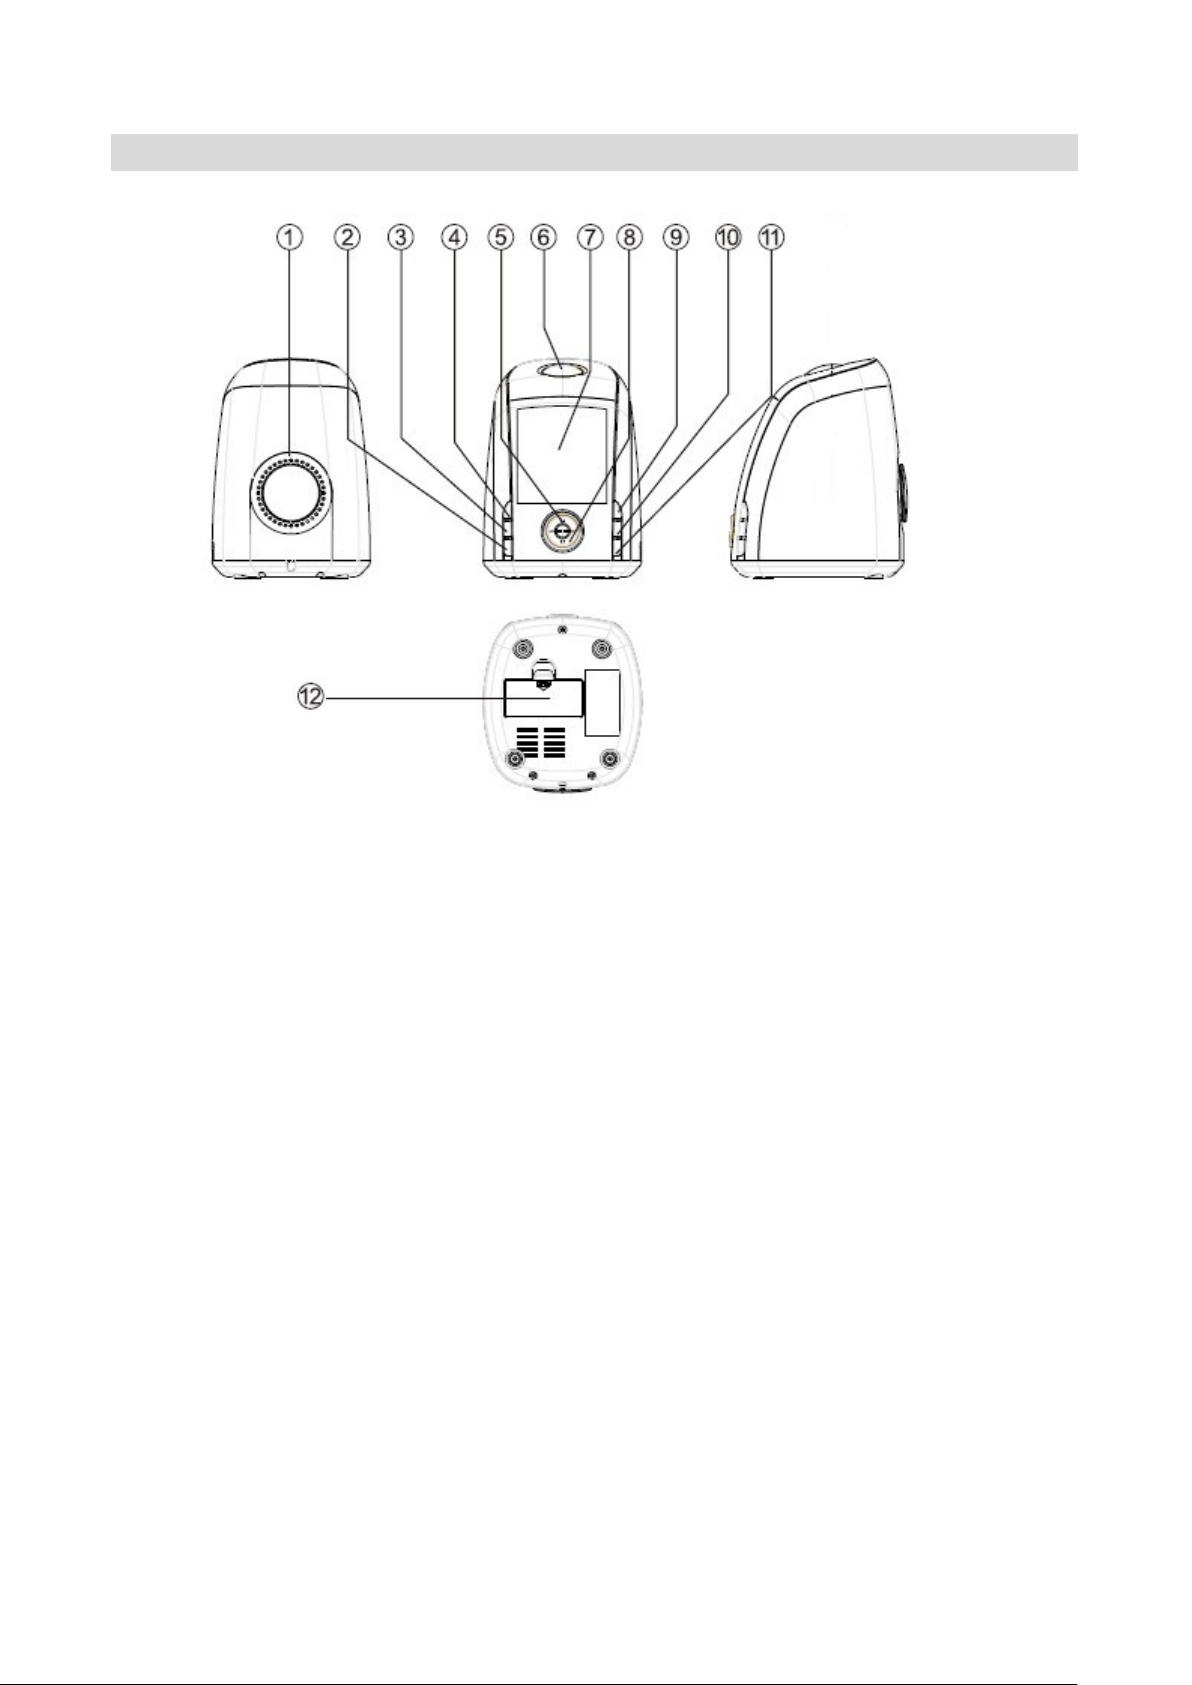
TOUCHES DE CONTROLE
1. HAUT-PARLEUR 8. VOLUME- / ALARM 2
2. SLEEP / 12/24 9. SET / PLAY/PAUSE
3. CH+ / MEMO 10. SCAN +/-
4. FONCTIONS 11. SCAN +/-
5. VOLUME+ / ALARM 1 12. COMPARTIMENT A PILES
6. SNOOZE / LIGHT
7. AFFICHAGE LCD
ALIMENTATION
Branchez la prise sur votre secteur (230V). Le réveil est en fonctionnement et 00:00 s'affiche.
UTILISATION
1. REGLAGE DE LA DATE
Appuyez sur SET durant 3 secondes pour régler l'année. Utilisez les touches SCAN+ / SCAN –
pour ajouter ou diminuer les années. Appuyez à nouveau sur SET pour régler le mois.
Procédez de la même façon pour le jour, les heures et les minutes.
2. REGLAGE DU FORMAT DE L'HEURE
Appuyez sur la touche 12/24 pour passer du format 12 heures au format 24 heures.
3. REGLAGE DE L'ALARME
Appuyez sur la touche ALARM durant 3 secondes pour afficher le symbole de l'alarme. Vous
pouvez régler l'heure en appuyant sur ALARM une fois et les minutes en appuyant sur ALARM
deux fois. A chaque fois, vous pouvez utiliser les touches SCAN+ / SCAN –. Si vous voulez
désactiver l'alarme, appuyez sur ALARM durant 3 secondes.
Pour l'alarme 2, procédez de la même façon que pour l'alarme 1.

E-2
4. SNOOZE
Si la sonnerie retentit mais que vous voulez dormir encore quelques minutes, appuyez sur la
touche SNOOZE, la sonnerie sera reportée de 9 minutes. Pour désactiver la sonnerie, appuyez
sur la touche de sélection des fonctions FUNC.
5. SLEEP
Si vous souhaitez vous endormir avec la radio, appuyez sur SLEEP pour régler la durée avant
extinction de la radio. L'affichage indique 90 minutes. C'est la durée maximale. Pour une durée
plus courte, appuyez plusieurs fois sur SLEEP pour passer sur les différentes durées possible: 80,
70, 60……le minimum est de 10 minutes.
6. FM
Appuyez sur FUNC pour allumer l'unité. La radio FM s'active automatiquement. Vous pouvez
régler le volume avec les touches VOL+ / VOL –.
Si vous voulez mémoriser une station de radio, appuyez sur la touche MEMO durant 3
secondes lorsque vous avez trouvé votre fréquence. MEM s'affiche. Confirmez en appuyant àà
nouveau sur la touche MEM.
7. DIMMER
Appuyez sur la touche LIGHT durant 3 secondes, la luminosité de l'afficheur s'intensifie ou
diminue.
8. TIME MEMORY SET
Ce réveil a une sauvegarde qui permet de maintenir votre heure de réveil en cas de coupure de
courant. Branchez l'appareil, réglez l'heure et la date, insérez 2 piles de type AAA (piles non
fournies), débranchez la prise d'alimentation, l'heure reste mémorisée. Vous n'aurez plus besoin
de de régler l'heure et la date la prochaine fois.
9. INSTRUCTIONS CONCERNANT LES PILES…
1. Utilisez des piles de même type et de même taille que celles requises ( 2 x AAA).
2. Respectez la polarité lorsque vous installez les piles.
3. Si vous n'utilisez pas le produit durant un certain temps, enlevez les piles afin d'éviter
d'éventuelles fuites.
4. Ne rechargez pas une pile si elle n'est pas rechargeable.
INFORMATIONS TECHNIQUES
Alimentation: Secteur 230V ~ 50 Hz
Pile de sauvegarde: 2 x AAA, 1.5V
Fréquences FM: 88 - 108 MHz
Comsommation: 5W
•Ne pas jeter les appareils électriques et électroniques à la poubelle.
•Les remettre au centre de collecte dont vous dépendez.
•Certains éléments contenus dans ces appareils peuvent nuire à la santé et à l’environnement.
Importé par Bigben Interactive SA
CRT2 – Rue de la Voyette
59818 Lesquin Cedex
www.bigben.eu Made in China
RR45
PLEASE READ THIS USER MANUAL COMPLETELY BEFORE
OPERATING THIS UNIT AND RETAIN THIS BOOKLET FOR
FUTURE REFERENCE.
E-1
E-2
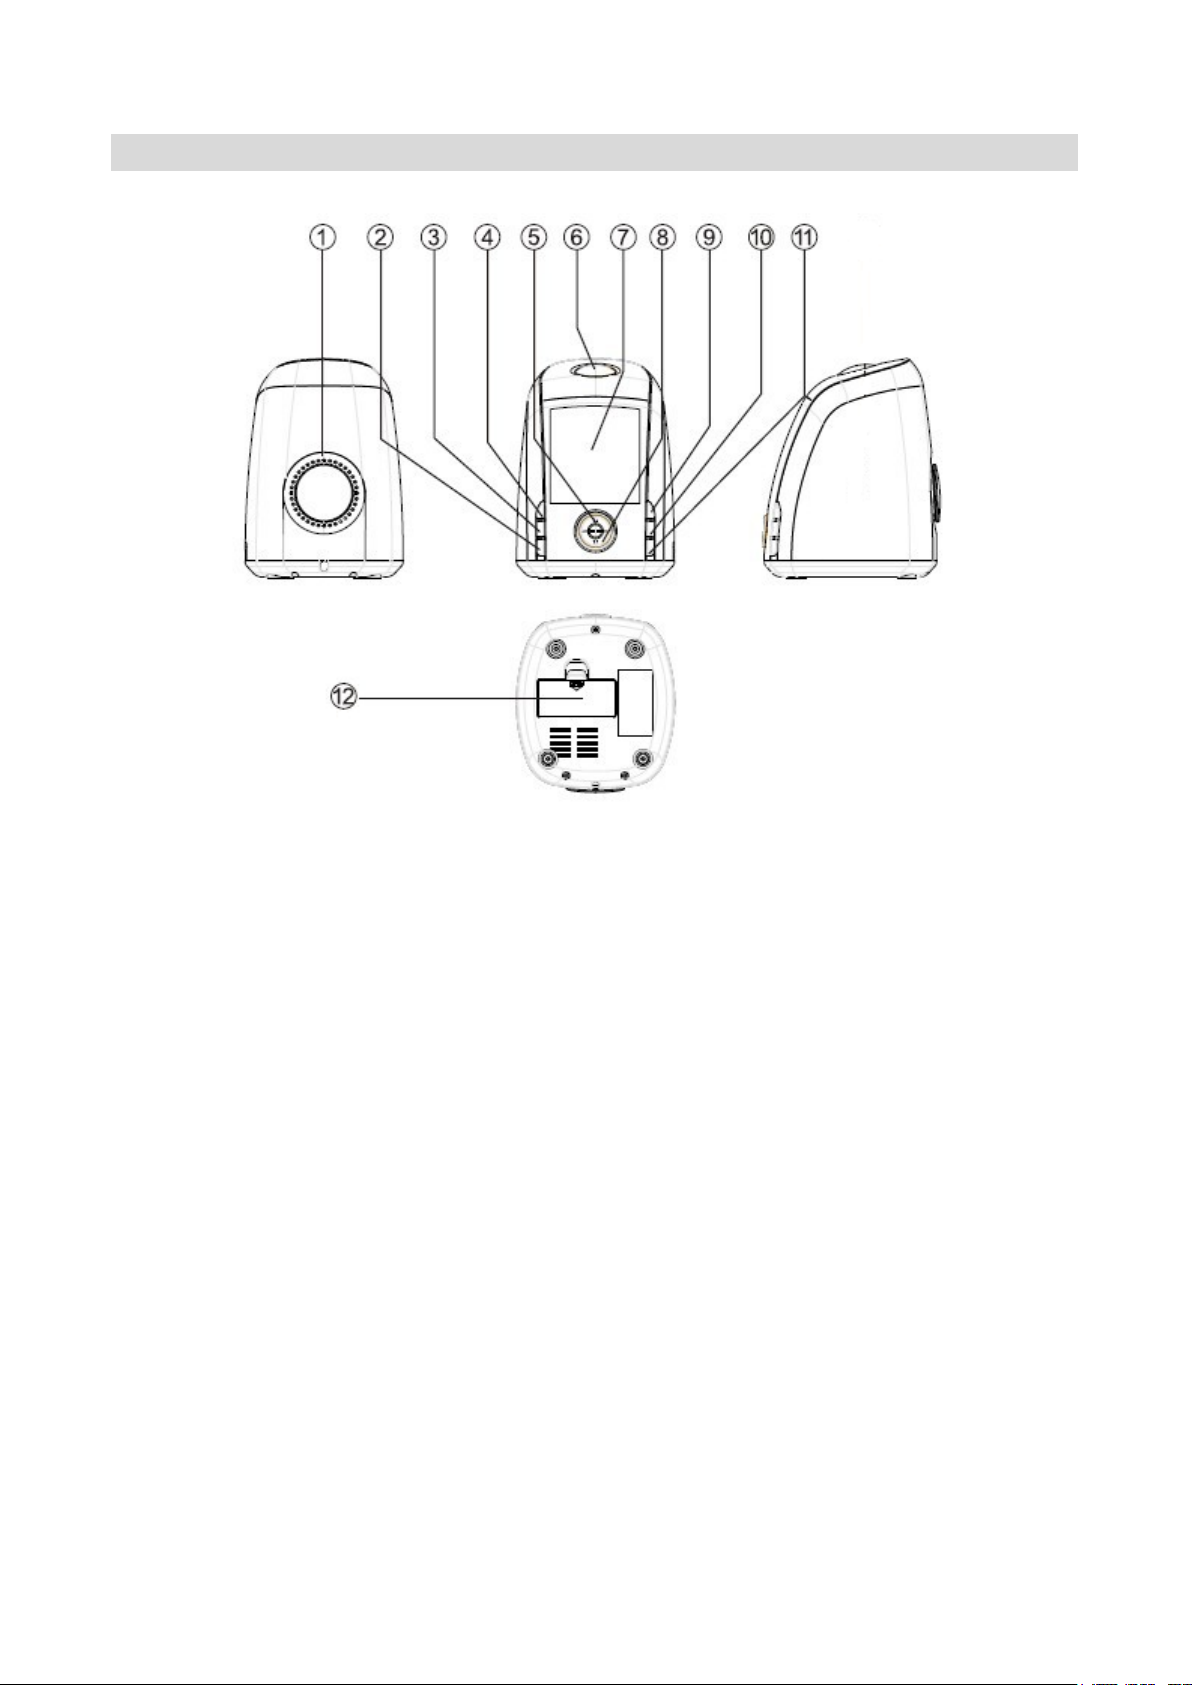
LOCATION OF CONTROLS
1. BUILT–IN SPEAKER 8. VOLUME- / ALARM 2
2. SLEEP / 12/24 HOUR BUTTON 9. SET BUTTON / PLAY/PAUSE
3. CH+ / MEMORY BUTTON 10. SCAN +/-
4. FUNCTION SWITCH 11. SCAN +/-
5. VOLUME+ / ALARM 1 12. BATTERY COMPARTMENT
6. SNOOZE / LIGHT BUTTON
7. LCD DISPLAY
POWER SOURCE
Plug the AC line cord into AC 230V 50Hz power outlet. The unit is now working and show you it is
operating with displaying 00:00, 1 1, but not yet set the time.
OPERATING INSTRUCTIONS
1. DATE SET
Press the SET button for 3 seconds to set the year. Use SCAN+ and SCAN – button to add or
decrease year display. Press one more time to set the month. Repeat pressing the SET button
for 3 times, you can set the date, hour and minutes consecutively.
2. TIME MODE SET
Press the 12/24, HOUR button to select twelve hour clock or twenty four hour clock.
3 . ALARM SET
Press the ALARM button for 3 seconds to display the Alarm symbol. You can set the hour with
pressing one time of the button and the minutes with pressing it two times. When you press
SCAN+ and SCAN – button, the alarm time will add numeral or decrease numeral. If you want to
turn of f the alarm set,press ALARM button for 3 seconds. The operating prosess of ALARM 2 is
the same as the ALARM 1.

E-3
4. SNOOZE BUTTON
When you are awakened by alarm clock but wish to sleep a few minutes more, simply touch
the “snooze” button and it will shut off the clock for approximately 9minutes before the clock
sounds again. If you want to turn off the clock just press FUNC button.
5. SLEEP CONTROL
Press the SLEEP button to display the sleep time. The display will indicate 90 minutes. This is
the maximun sleep time you can set. If you want shorter sleep time ,just press the SLEEP button
continuously to select 80, 70, 60……with the minimun sleep time 10 minutes.
6. FM SET
Press the FUNC button to turn on the unit ,it will switch to FM position automatically. You can
set the volume with VOL+ and VOL – button to a desired position.
If you want to make a memory of the radio station, press the MEMO button. Press it for 3
seconds when find a favorite channel, the unit will display MEM to indicate you can has a memory
of this channel and then press MEMO button one more time for confirm.
7. BRIGHT OR DIM SET
Press LIGHT button for 3 seconds , the displayer can switch to dim or bright mutually.
8. TIME MEMORY SET
Your clock has a battery back up feature in case of power failure. After plug the AC line cord into
power outlet, set time and date in a correct position, then put in 2x “AAA” batteries ( the battery is
not included), cut off the power, you don’t need to set time and date again next time.
If you want to turn off the unit , press the FUNC button for 3 seconds.
9. BATTERY PRECAUTIONS
Follow these precautions when using a battery in this device:
1. Use only the size and type of battery specified.
2. Be sure to follow the correct polarity when installing the battery as indicated in the battery
compartment. A reversed battery may cause damage to the device.
3. If the device is not to be used for a long period of time, remove the battery to prevent damage or
injury from possible battery leakage.
4. Do not try to recharge a battery not intended to be recharged; it can overheat and rupture.
(Follow battery manufacturer's directions.)

E-4
IMPORTANT NOTES
Avoid installing the unit in locations described below:
•Places exposed to direct sunlight or close to heat radiating appliances such as electric heaters.
•Dusty places.
•Places subject to constant vibration.
•Humid or moist places.
SPECIFICATIONS
Power supply: AC 230V ~ 50 Hz
Backup battery : 2 x AAA, 1.5V batteries
FM Frequency Range: 88 - 108 MHz
Power consumption: 5W
•Don’t throw the electrical and electronic appliances into the usual dustbin.
•Bring them to a collecting point.
•Some parts contained in these appliances may be dangerous for health and
environment.
Imported by Bigben Interactive SA
CRT2 – Rue de la Voyette
59818 Lesquin Cedex
www.bigben.eu
Made in China

RR45
MANUAL DE INSTRUCCIONES
ATENCIÓN
RIESGO DE DESCARGA ELÉCTRICA
NO ABRIR
ADVERTENCIA: Para evitar el riesgo de descarga eléctrica, no intente abrir el aparato. En caso de
funcionamiento incorrecto, acuda a un técnico cualificado.
No exponga este aparato al agua ni a la humedad.
El símbolo del punto de exclamación dentro de un triángulo equilátero constituye una advertencia
destinada a avisar al usuario de la presencia de instrucciones de uso y mantenimiento importantes
en la documentación que acompaña al producto.
El símbolo del relámpago con punta de flecha dentro de un triángulo equilátero constituye una
advertencia destinada a avisar al usuario de la presencia de tensiones eléctricas dentro del
producto, que pueden provocar un riesgo de electrocución.
Para minimizar los peligros, no abra nunca la caja o la parte posterior de ésta. En caso de
funcionamiento incorrecto, recurra a los servicios de un técnico cualificado para su reparación.
Este aparato no contiene piezas intercambiables por el usuario.
Este aparato ha sido diseñado para una alimentación eléctrica de 230 voltios / 50 Hertz. Conecte el
cable de alimentación si no se utiliza este aparato durante un período prolongado.
Este aparato no deberá estar expuesto en ningún caso a condiciones húmedas o a la lluvia.
El interruptor On/Off de este aparato actúa en el circuito secundario del aparato y por tanto, sólo
desconectará totalmente el aparato cuando esté en posición Stop. Basta con desconectar el aparato
para detenerlo completamente.
Encienda el aparato sólo después de haber comprobado que todas las conexiones son correctas.
Este aparato deberá estar colocado en un lugar bien ventilado. Por ejemplo, no deberá estar nunca
colocado cerca de cortinas, sobre la moqueta o en un mueble que cree un encofrado, como por
ejemplo en una librería.
El aparato no deberá estar expuesto en ningún caso a los rayos directos del sol o a fuentes de
calor.
E-1
UBICACIÓN DE LOS CONTROLES
1. ALTAVOZ INTEGRADO 8. VOLUMEN- /ALARM 2
2. BOTÓN SLEEP / 12/24 HORAS 9. BOTÓN SET / PLAY/PAUSE
3. BOTÓN CH+ / MEMO 10. SCAN +/-
4. BOTÓN FUNC 11. SCAN +/-
5. VOLUMEN+ / ALARM 1 12. COMPARTIMENTO DE LAS PILAS
6. BOTÓN SNOOZE / LUZ
7. PANTALLA LCD
FUENTE DE ALIMENTACIÓN
Conecte el enchufe del cable eléctrico a una toma de corriente alterna de 230 V 50 Hz. El equipo
está ahora encendido y en la pantalla podrá ver 00:00, 1 1, aunque todavía no estará puesto en
hora.
INSTRUCCIONES DE FUNCIONAMIENTO
1. AJUSTE DE FECHA
Pulse el botón SET durante 3 segundos para introducir el año. Utilice el botón SCAN+ o
SCAN– para mostrar una fecha superior o inferior hasta llegar a la fecha deseada. Pulse una
vez más el botón SET para introducir el mes. Pulsando el botón SET 3 veces, puede introducir
consecutivamente la fecha, la hora y los minutos.
2. AJUSTE DEL FORMATO DE LA HORA
Pulse el botón 12/24 horas pasa seleccionar el formato de veinticuatro o de doce horas.
3. AJUSTE DE LA ALARMA

E-2
Pulse el botón ALARM durante 3 segundos para que aparezca el símbolo Alarm. Puede
establecer la hora de la alarma pulsando una vez el botón ALARM para introducir la hora y
pulsándolo dos veces para introducir los minutos. Pulsando los botones SCAN+ o SCAN –, podrá
aumentar o disminuir el número de las horas y de los minutos. Para cancelar la programación de
la alarma, pulse el botón ALARM durante 3 segundos. El proceso de programación de ALARM 2
es el mismo que en ALARM 1.
4. BOTÓN SNOOZE (REPETICIÓN DE ALARMA)
Si suena la alarma y desea dormir unos minutos más, sólo tiene que pulsar el botón “snooze”
para que la alarma se apague y vuelva a sonar unos 9 minutos más tarde. Si quiere apagar la
alarma, sólo tiene que pulsar el botón FUNC.
5. BOTÓN SLEEP (APAGADO AUTOMÁTICO)
Pulse el botón SLEEP para seleccionar el tiempo de apagado automático. La pantalla mostrará
90 minutos. Ésta es la cantidad máxima de tiempo que se puede seleccionar. Si quiere que el
equipo se apague antes, pulse el botón SLEEP varias veces para ir pasando a 80, 70, 60... siendo
10 minutos el tiempo mínimo.
6. FUNCIONAMIENTO DE LA FM
Pulse el botón FUNC para encender el equipo, que pasará automáticamente a la función de FM.
Puede ajustar el volumen al nivel que desee mediante los botones VOL+ o VOL–.
Si quiere memorizar una emisora de radio, pulse el botón MEMO. Una vez haya encontrado un
canal que desee guardar, pulse el botón MEMO durante 3 segundos. En la pantalla aparecerá
MEM para indicar que puede memorizar esa emisora y sólo tendrá que volver a pulsar el botón
MEMO para confirmarlo.
7. INTENSIDAD DE LA ILUMINACIÓN DE LA PANTALLA
Pulse el botón LIGHT durante 3 segundos y podrá elegir entre una iluminación de la pantalla
tenue o brillante.
8. PILAS PARA LA MEMORIA DE FECHA Y HORA
Su reloj puede seguir funcionando en caso de fallo del suministro eléctrico. Después de haber
conectado el cable eléctrico a una toma de corriente e introducido la hora y la fecha, coloque 2
pilas tipo “AAA” (no incluidas) en el compartimento correspondiente. En caso de corte del
suministro eléctrico, no tendrá que volver a introducir la hora ni la fecha.
Si desea apagar el equipo, pulse el botón FUNC durante 3 segundos.
9. PRECAUCIONES CON LAS PILAS
Si utiliza pilas con este aparato, observe las siguientes precauciones:
1. Utilice exclusivamente pilas del tamaño y el tipo especificados.
2. Asegúrese de colocar las pilas de acuerdo con la polaridad que se muestra en el
compartimento de las pilas. No respetar dicha polaridad podría provocar daños al aparato.
3. Cuando no vaya a utilizar el equipo durante mucho tiempo, retire las pilas para evitar daños o
lesiones por una posible fuga de las pilas.
4. No intente recargar las pilas si éstas no indican que son recargables, ya que podrían
sobrecalentarse y romperse (siga la instrucciones del fabricante de las pilas).
NOTAS IMPORTANTES
No coloque el aparato en los siguientes sitios:
•Lugares expuestos a la luz directa del sol o próximas a aparatos de calefacción, como los radiadores
eléctricos.
•Lugares con polvo.
•Lugares sometidos a vibración constante.
•Lugares con humedad.

E-3
CARACTERÍSTICAS TÉCNICAS
Suministro eléctrico: CA 230 V ~ 50 Hz
Pilas de reserva: 2 pilas AAA de 1,5 V
Gama de frecuencias de FM: 88 - 108 MHz
Consumo de energía: 5 W
- No tire los aparatos eléctricos ni electrónicos a la basura.
- Entréguelos en el centro de recogida del que dependen.
- Algunos elementos contenidos en estos aparatos pueden perjudicar la salud y el medio
ambiente.
Importado por BIGBEN INTERACTIVE SA
CRT2 – Rue de la Voyette
59818 Lesquin Cedex
France
www.bigben.eu
MADE IN CHINA
RR45
MANUALE D'ISTRUZIONI
ATTENZIONE
RISCHIO DI SCOSSE ELETTRICHE
NON APRIRE
AVVERTENZA: Per evitare rischi di scosse elettriche, non tentare di aprire l'apparecchio. In caso di
cattivo funzionamento, fare appello a un riparatore professionista.
Non esporre l'apparecchio all'acqua e all'umidità.
PRECAUZIONI PER L'USO
Il simbolo con il punto esclamativo all'interno di un triangolo equilatero costituisce un'avvertenza
destinata ad avvisare l'utilizzatore della presenza di istruzioni importanti per l'uso e la
manutenzione nella documentazione che accompagna il prodotto.
Il simbolo con il lampo e la freccia all'interno di un triangolo equilatero costituisce un'avvertenza
destinata ad avvisare l'utilizzatore della presenza di tensioni elettriche all'interno del prodotto, che
possono provocare scosse elettriche.
Per ridurre al minimo i rischi, non aprire mai l'involucro o il suo lato posteriore. In caso di cattivo
funzionamento, fare appello a un tecnico abilitato per le riparazioni. Questo apparecchio non
contiene pezzi che possano essere sostituiti dall'utilizzatore.
Questo apparecchio funziona con un raggio laser. Tenuto conto del pericolo che questo raggio può
rappresentare per gli occhi, solo un tecnico qualificato potrà aprire il coperchio per una
riparazione.
E' presente un raggio laser invisibile quando si apre l'apparecchio o se il blocco di sicurezza non
funziona. Evitare qualsiasi esposizione diretta al raggio laser. Il ricorso a comandi, regolazioni o
procedimenti diversi da quelli indicati nel presente manuale è pericoloso.
Questo apparecchio è stato progettato per un'alimentazione elettrica a 230 volt / 50 Hertz. Staccare
il cavo di alimentazione se l'apparecchio non viene utilizzato per un lungo periodo.
PRIMA DI UTILIZZARE L'APPARECCHIO, LEGGERE PER
INTERO IL PRESENTE MANUALE E CONSERVARLO PER
CONSULTAZIONI FUTURE.

I-1
Questo apparecchio non deve essere esposto in nessun caso a situazioni umide o alla pioggia.
L'interruttore On/Off di questo apparecchio agisce sul circuito secondario dell'apparecchio e non
lo mette quindi completamente fuori tensione quando è in posizione Off. Per disattivare
completamente l'apparecchio, basta scollegarlo dalla presa di corrente.
Mettere l'apparecchio in funzione solo dopo aver controllato che tutti i collegamenti siano corretti.
Questo apparecchio deve essere riposto imperativamente in un luogo correttamente ventilato. Ad
esempio, non deve essere mai essere messo vicino a tende, sulla moquette o in un mobile che
funga da copertura, come ad esempio in una libreria.
L'apparecchio non deve essere assolutamente esposto ai raggi diretti del sole o a fonti di calore.
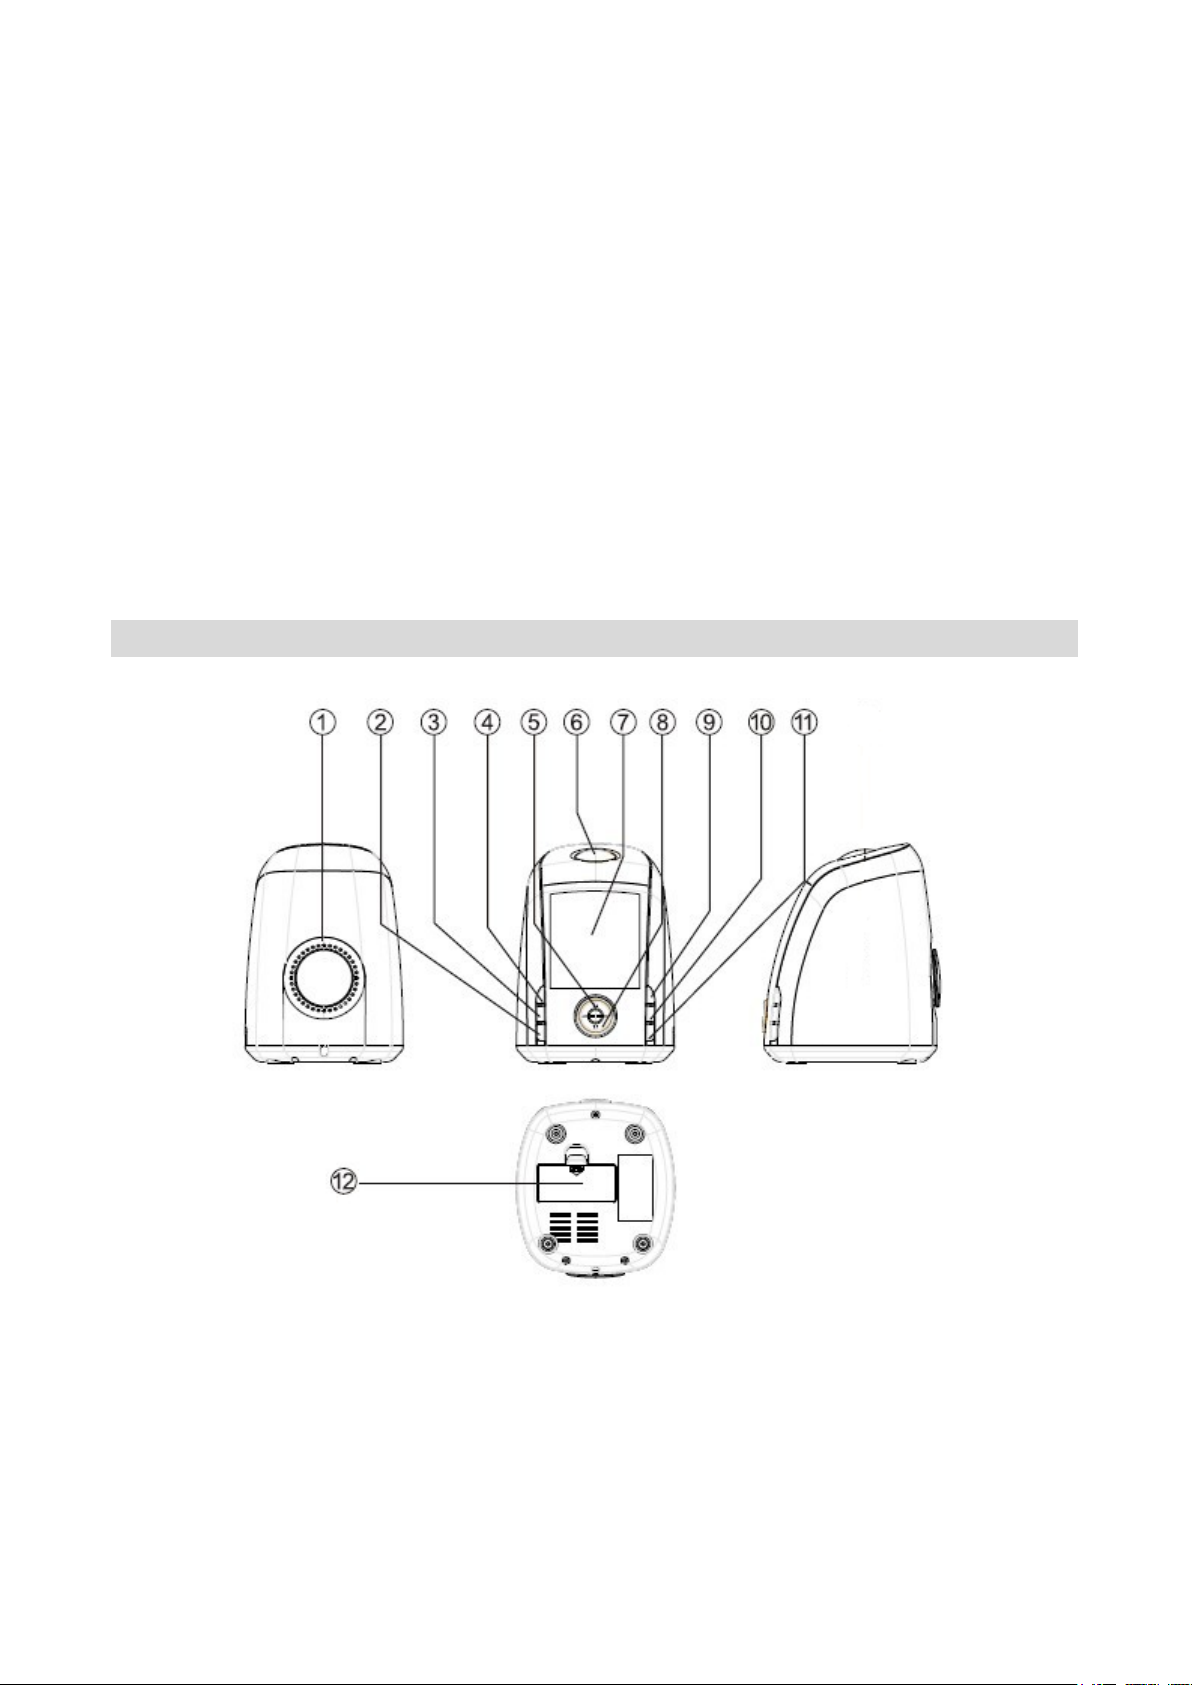
POSIZIONE DEI COMANDI
1. ALTOPARLANTE INTEGRATO 8. VOLUME- 、ALARM 2
2. TASTO SLEEP、12/24 HOUR 9. TASTO SET, PLAY/PAUSE
3. TASTO CH+、MEMORY 10. SCAN+,
4. INTERRUTTORE FUNCTION 11. SCAN -,
5. VOLUME+、ALARM 1 12. VANO BATTERIA
6.TASTO SNOOZE、LIGHT 13.
7. DISPLAY LCD

I-2
SORGENTE DI ALIMENTAZIONE
Collegare il cavo di alimentazione CA nella presa di corrente CA da 230 V 50 Hz. L'apparecchio
entra in funzione e sul display viene visualizzato 00:00, 1 1; l'ora, tuttavia, non è ancora impostata.
ISTRUZIONI D’USO
1. IMPOSTAZIONE DELLA DATA
Tenere premuto il tasto SET per 3 secondi per impostare l'anno. Utilizzare i tasti SCAN+ e
SCAN – per aumentare o diminuire il numero dell'anno sul display. Premere nuovamente il
tasto per impostare il mese. Premere il tasto SET per altre 3 volte: sarà possibile impostare in
modo sequenziale la data, l'ora e i minuti.
2. IMPOSTAZIONE DEL FORMATO DELL'ORA
Premere il tasto 12/24 HOUR per selezionare il formato 12 ore o il formato 24 ore.
3. IMPOSTAZIONE ALLARME
Tenere premuto il tasto ALARM per 3 secondi per visualizzare il simbolo dell'allarme. Premendo
il tasto una volta, è possibile impostare l'ora, mentre premendo il tasto due volte si impostano i
minuti. Quando si premono i tasti SCAN+ e SCAN – , le cifre dell'orario dell'allarme aumentano e
diminuiscono rispettivamente. Se si desidera annullare l'impostazione dell'allarme, tenere premuto
il tasto ALARM per 3 secondi. Il processo di funzionamento di ALARM 2 è identico a quello di
ALARM 1.
4. TASTO SNOOZE
Se ci si sveglia mediante l'allarme ma si desidera dormire qualche minuto in più, toccare il tasto
“snooze”: la sveglia si disattiva per 9 minuti, quindi riprende a suonare. Per spegnere la sveglia,
premere il tasto FUNC.
5. SOSPENSIONE
Premere il tasto SLEEP per visualizzare il tempo di sospensione. Sul display vengono
visualizzati 90 minuti, ovvero il tempo massimo di sospensione impostabile. Se si desidera un
tempo di sospensione più breve, premere ripetutamente il tasto SLEEP per selezionare 80, 70, 60,
ecc. fino al tempo di sospensione minimo di 10 minuti.
6. IMPOSTAZIONE FM
Premere il tasto FUNC per accendere l'apparecchio. Viene impostata automaticamente la
posizione FM. È possibile regolare il volume al livello desiderato tramite i tasti VOL+ e VOL –.
Se si desidera memorizzare la stazione radio, premere il tasto MEMO. Quando si trova un
canale preferito, tenere premuto questo tasto per 3 secondi: sul display viene visualizzato MEM
che indica la possibilità di memorizzazione del canale. Premere nuovamente il tasto MEMO per
confermare.
7. REGOLAZIONE DELLA LUMINOSITÀ
Tenere premuto il tasto LIGHT per 3 secondi, la luminosità del display si intensifica o si attenua.
8. IMPOSTAZIONE DELLA MEMORIZZAZIONE DELL'ORA
L'apparecchio è dotato della funzione batteria di backup, utile in caso di interruzioni di corrente.
Dopo aver collegato il cavo di alimentazione CA alla presa di corrente, impostare correttamente la
data e l'ora, quindi inserire 2 batterie tipo “AAA” (batterie non incluse). In caso di interruzione di
corrente, all'accensione successiva non sarà necessario impostare nuovamente la data e l'ora.
Se si desidera spegnere l'apparecchio, tenere premuto per 3 secondi il tasto FUNC.
9. PRECAUZIONI RELATIVE ALLE BATTERIE
Quando si utilizza una batteria nel dispositivo, rispettare le precauzioni riportate di seguito.
1. Utilizzare esclusivamente batterie di dimensione e tipo raccomandati.

I-3
2. Quando si inseriscono le batterie, accertarsi di rispettare la polarità corretta come indicato nel
vano. Una batteria posizionata nella direzione inversa può danneggiare l'apparecchio.
3.Se si prevede di non utilizzare l'apparecchio per un periodo di tempo prolungato, rimuovere la
batteria per impedire eventuali danneggiamenti o lesioni dovute alla possibile fuoriuscita di liquido.
4. Non tentare di ricaricare una batteria di tipo non ricaricabile poiché potrebbe surriscaldarsi e
rompersi. (Attenersi alle indicazioni del produttore della batteria.)
NOTE IMPORTANTI
Evitare di collocare l'apparecchio nei luoghi indicati di seguito.
•Luoghi esposti alla luce solare diretta o in prossimità di apparecchi diffusori di calore, quali radiatori
elettrici.
•Luoghi polverosi.
•Luoghi soggetti a vibrazioni costanti.
•Luoghi umidi.
SPECIFICHE TECNICHE
Alimentazione : CA 230V ~ 50 Hz
Batteria di backup : 2 batterie AAA da 1,5 V
Gamma di frequenza FM: 88 - 108 MHz
Consumo energetico : 5 W
-Non gettare gli apparecchi elettrici ed elettronici fra i rifiuti domestici.
- Depositarli in un apposito centro di raccolta.
- Alcuni elementi contenuti in questi apparecchi possono essere nocivi per la salute e l'ambiente.
Importato da BIGBEN INTERACTIVE SA
CRT2 – Rue de la Voyette
59818 LESQUIN Cedex
www.bigben.eu
MADE IN CHINA

RR45
HANDLEIDING
WAARSCHUWING
NIET OPENEN
KANS OP ELEKTRISCHE SCHOK
SYMBOOL VAN BLIKSEMSCHICHT MET PIJLKOP –in een gelijkzijdige driehoek - Waarschuwt de
gebruiker voor de aanwezigheid van niet-geïsoleerde gevaarlijke spanning in de productbehuizing, die hoog genoeg kan
zijn om elektrische schokken teweeg te brengen.
UITROEPTEKEN – in een gelijkzijdige driehoek - Geeft aan dat een specifiek onderdeel om
veiligheidsredenen alleen vervangen mag worden door het onderdeel dat in de documentatie wordt gespecificeerd.
VEILIGHEIDSINSTRUCTIES
1. LEES DE INSTRUCTIES - U dient alle veiligheids- en bedieningsinstructies te lezen alvorens de apparatuur te
bedienen.
2. BEWAAR DE INSTRUCTIES - U dient de veiligheids- en bedieningsinstructies te bewaren voor uw administratie.
3. VOLG DE WAARSCHUWINGEN OP - U dient alle waarschuwingen op de apparatuur en in de
bedieningsinstructies op te volgen.
4. VOLG DE INSTRUCTIES - U dient alle bedieningsinstructies op te volgen.
5. WATER EN VOCHT - De apparatuur mag niet worden gebruikt in de buurt van water (denk aan een bad, een
wasbak, een gootsteen, een wastobbe, een zwembad of een natte kelder).
6. VENTILATIE - De apparatuur moet zodanig worden geplaatst dat de locatie of positie een goede ventilatie niet
verhindert. Plaats de apparatuur niet op bed, op een bank of op een gelijksoortig oppervlak dat de ventilatieopeningen
kan blokkeren; plaats de apparatuur ook niet in een inbouwmeubel, zoals een (boeken)kast die de luchtstroom door de
ventilatieopeningen kan hinderen.
7. WARMTE - Houd de apparatuur uit de buurt van warmtebronnen, zoals radiators, fornuizen of andere apparaten
(met inbegrip van versterkers) die warmte produceren.
8. VOEDING - De apparatuur mag uitsluitend worden aangesloten op voeding van het type dat in de
bedieningsinstructies wordt beschreven of op de apparatuur wordt gemarkeerd.
9. BESCHERMING NETSNOER - Het netsnoer dient zodanig te worden gelegd dat er niet op kan worden gelopen
en dat het snoer niet bekneld raakt door voorwerpen die erop of ertegen worden geplaatst.
10. ELEKTRICITEITSSNOEREN -Buitenantennes mogen zich niet in de buurt van elektriciteitssnoeren bevinden.
LEES DEZE GEBRUIKSAANWIJZING VOLLEDIG DOOR
ALVORENS DEZE EENHEID TE BEDIENEN EN BEWAAR DIT
BOEKJE VOOR UW ADMINISTRATIE.
N-1
11. VOORWERPEN EN VLOEISTOFFEN IN DE APPARATUUR -Zorg ervoor dat voorwerpen niet via de
openingen in de behuizing kunnen vallen en dat vloeistoffen niet via dezelfde openingen kunnen worden gemorst..
12. WAARSCHUWING VOOR ELEKTROSTATISCHE ONTLADINGEN -Door elektrostatische ontladingen
kan het voorkomen dat het scherm niet juist functioneert of dat de bediening niet meer reageert. Schakel de set uit en
haal de stekker uit het stopcontact. Sluit de set na een paar seconden weer aan.
13. SCHADE DIE REPARATIE VEREIST -De apparatuur moet worden gerepareerd door erkend
onderhoudspersoneel als:
a. Het netsnoer of de stekker is beschadigd.
b. Er voorwerpen in de behuizing van de apparatuur zijn gevallen of vloeistof in de behuizing van de apparatuur is
gemorst.
c. De apparatuur is blootgesteld aan regen.
d. De apparatuur is gevallen of de behuizing is beschadigd.
e. De apparatuur niet normaal lijkt te werken.
14. ONDERHOUD - De gebruiker moet buiten hetgeen in de bedieningsinstructies wordt beschreven niet proberen om
de apparatuur te repareren. Alle andere reparaties dienen te worden verricht door erkend onderhoudspersoneel.
LOCATIE VAN DE BEDIENINGSELEMENTEN
1. INGEBOUWDE LUIDSPREKER 8. VOLUME- , ALARM 2
2. SLAAP-, 12/24-UURSKNOP 9. INSTELKNOP, START/PAUZE
3. CH+, GEHEUGENKNOP 10. SCAN +/-
4. FUNCTIESCHAKELAAR 11. SCAN +/-
5. VOLUME+, ALARM 1 12. BATTERIJCOMPARTIMENT
6. SLUIMER-, LICHTKNOP
7. LCD-SCHERM

N-2
VOEDINGSBRON
Steek de stekker in het stopcontact (AC 230 V 50 Hz). De eenheid is in bedrijf, maar de tijd is nog
niet ingesteld. De eenheid geeft dit aan met de melding 00:00, 1 1.
VEILIGHEIDSINSTRUCTIES
1. DATUM INSTELLEN
Druk 3 seconden op de INSTELKNOP om het jaar in te stellen. Verhoog of verlaag het jaar
met de SCAN + en SCAN – knop Druk nog een keer om de maand in te stellen. Als u de
INSTELKNOP tot 3 keer achter elkaar indrukt, kunt u achtereenvolgens de datum, de uren en
de minuten instellen.
2. TIJDMODUS INSTELLEN
Druk op de 12/24-UURSKNOP om te kiezen tussen de twaalf- en vierentwintiguursklok.
3. ALARM INSTELLEN
Druk 3 seconden op de ALARMKNOP om het alarmsymbool weer te geven. U kunt het uur
instellen door één keer op de knop te drukken; u kunt de minuten instellen door twee keer op de
knop te drukken. Als u op de SCAN + en SCAN – knop drukt, gaat de alarmtijd één stap omhoog
of omlaag. Als u de alarminstelling wilt uitschakelen, drukt u 3 seconden op de ALARMKNOP.
ALARM 2 wordt op dezelfde manier ingesteld als ALARM 1.
4. SLUIMERKNOP
Als u wordt gewekt door de alarmklok, maar nog een paar minuutjes wilt slapen, drukt u op de
sluimerknop om de klok ongeveer 9 minuten uit te schakelen. Daarna gaat het alarm opnieuw. Als
u de klok helemaal wilt uitschakelen, drukt u op de FUNCTIEKNOP.
5. SLAAPINSTELLINGEN
Druk op de SLAAPKNOP om de slaaptijd weer te geven. Het scherm geeft 90 minuten aan. Dit
is de maximale slaaptijd die u kunt instellen. Als u een kortere slaaptijd wilt, drukt u continu op de
SLAAPKNOP om 80, 70, 60... in te stellen. De minimale slaaptijd is 10 minuten.
6. FM INSTELLEN
Druk op de FUNCTIEKNOP om de eenheid in te schakelen. De eenheid schakelt automatisch
naar FM-positie. U kunt het volume naar wens instellen met de VOL + en VOL – knop.
Als u het radiostation in het geheugen wilt opslaan, drukt u op de MEMOKNOP. Als u deze knop
3 seconden vasthoudt nadat u een favoriet kanaal heeft gevonden, geeft de eenheid de melding
MEM weer. Dit geeft aan dat het kanaal wordt opgeslagen. Druk vervolgens nog één keer op de
MEMOKNOP om te bevestigen.
7. HELDERHEID LICHT INSTELLEN
Als u 3 seconden op de LICHTKNOP drukt, kunt u de verlichting van het scherm dimmen of
helderder maken.
8. GEHEUGEN VOOR TIJD
De klok heeft reservebatterijen voor het geval de stroom uitvalt. Nadat u de stekker in het
stopcontact heeft gestoken, stelt u de tijd en datum in. Daarna plaatst u 2 AAA-batterijen (niet
meegeleverd). Als de stroom nu uitvalt, hoeft u de tijd en datum niet opnieuw in te stellen.
Als u de eenheid wilt uitschakelen, houdt u 3 seconden de FUNCTIEKNOP vast.
9. VOORZORGSMAATREGELEN BATTERIJEN
Volg deze voorzorgsmaatregelen bij het gebruik van batterijen in dit apparaat:
1. Gebruik alleen batterijen met het aangegeven type en de aangegeven grootte.
2. Richt de polen van de batterijen de juiste kant op tijdens het installeren, zoals wordt
aangegeven in het batterijcompartiment. Een omgekeerde batterij kan het apparaat beschadigen.

N-3
3. Als u het apparaat lange tijd niet gebruikt, verwijdert u de batterijen om mogelijke schade door
lekkages te voorkomen.
4. Laad batterijen alleen op als deze oplaadbaar zijn; anders kan de batterij oververhitten en
openscheuren. (Volg de aanwijzingen van de fabrikant op.)
BELANGRIJKE OPMERKINGEN
Installeer de eenheid niet op de onderstaande locaties:
•Plekken met direct zonlicht of in de buurt van apparatuur die warmte uitstraalt, zoals elektrische kachels.
•Stoffige plekken.
•Plekken die onderhevig zijn aan constante trillingen.
•Vochtige plekken.
SPECIFICATIES
Voeding: AC 230 V ~ 50 Hz
Reservebatterij: 2 x AAA, 1,5 V-batterijen
FM-frequentiebereik: 88 - 108 MHz
Energieverbruik: 5 W
Als u uw toestel in de toekomst wilt wegwerpen, let er dan op dat elektronische apparatuur
niet samen met huishoudelijk afval weggegooid wordt.
Recycleer op de voorziene plaasten.
Ga naar uw locale verdeler voor informatie ivm recyclage (richtlijn afval elektrische
apparaten).
Geïmporteerd door
BIGBEN INTERACTIVE SA
CRT2 – Rue de la Voyette
59818 LESQUIN Cedex
www.bigben.eu
MADE IN CHINA
Table of contents
Languages:
Other Bigben Clock Radio manuals


