Bilanciai SELECTA INTEGRA User manual
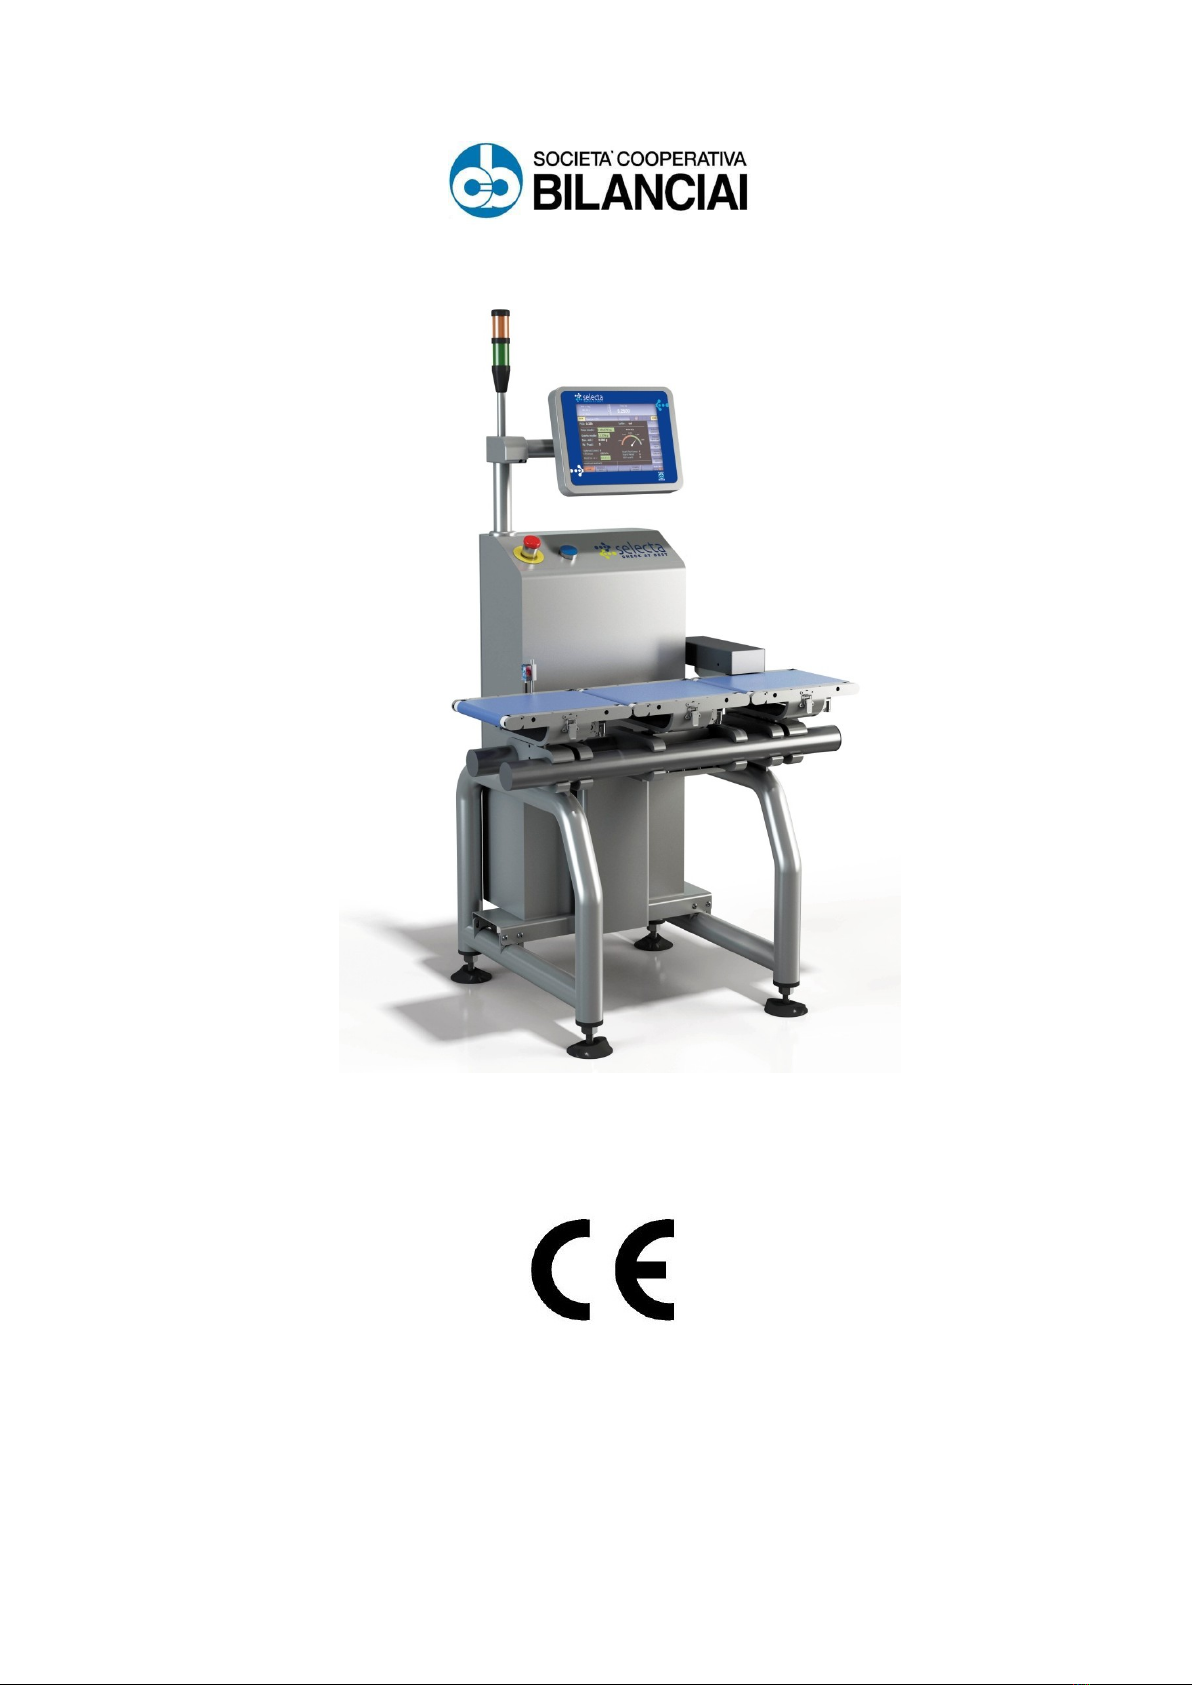
SELECTA
User Manual
Code 81320497 Ver.1.0 April 2014

Selecta: User Manual_______________
2
List of Contents
1GET TO KNOW THE USER INTERFACE............................................................... 4
1.1 Organization of Displayed Screens.................................................................... 4
1.1.1 Path............................................................................................................. 4
1.1.2 Selecting Lines in a Grid ............................................................................. 5
1.1.3 Accessing a Record of a Grid or Modifying a Field ..................................... 5
1.1.4 Scrolling the Records of a Grid ................................................................... 5
1.1.5 Accessing Contextual Functions ................................................................. 5
1.1.6 Entering Texts ............................................................................................. 5
1.1.7 Entering Texts in Different Languages ........................................................ 5
1.2 Calibrating the Touch Screen ............................................................................ 6
1.3 Displaying the Firmware Version ....................................................................... 6
1.4 Online Help........................................................................................................ 6
1.5 Criteria to Access Data (Operative Levels)........................................................ 6
2WEIGHING AND CHECKING PRODUCTION LOTS .............................................. 8
2.1 Applications ....................................................................................................... 8
2.2 Defining the List of Products with the Relevant Weighing Guide
Information .................................................................................................................. 8
2.3 Carrying a Product Dynamic Calibration Out ................................................... 12
2.3.1 Copying a Calibration................................................................................ 13
2.3.2 Validity Interval of Dynamic Calibration..................................................... 13
2.4 Displaying the Logger of Dynamic Calibrations ............................................... 13
2.5 Defining Macros for Quick Modifications of Plu Data ....................................... 14
2.6 Zeroing the Scale............................................................................................. 15
2.7 Selecting the Product to be Processed............................................................ 15
2.8 Giving a Name to the Production Lot ............................................................... 15
2.9 Displaying Process Data.................................................................................. 16
2.9.1 Main Page ................................................................................................. 16
2.9.2 Graph Page............................................................................................... 17
2.9.3 Process Page............................................................................................ 17
2.9.4 Page Weights............................................................................................ 17
2.10 Properly Adjusting the Product Handling ......................................................... 17
2.11 Quickly Modifying Data in Process .................................................................. 18
2.11.1 Modifying Data .......................................................................................... 18
2.11.2 Macro ........................................................................................................ 18
2.12 Interrupting a Process...................................................................................... 18
2.13 Closing a Process............................................................................................ 18
2.14 Closing a Lot.................................................................................................... 19
2.15 Displaying Processed Lots .............................................................................. 19
2.16 Deleting Closed Lots........................................................................................ 19
2.17 Printing Statistical Reports............................................................................... 20
2.17.1 Sample Report .......................................................................................... 21
2.18 Ejecting Accepted Products............................................................................. 22
2.18.1 TABLE OF OUTPUTS............................................................................... 22

Selecta: User Manual_______________
3
2.18.2 Notes......................................................................................................... 22
2.19 Adjusting Dosage Via Feedback...................................................................... 22
2.19.1 Notes about the Parameters ..................................................................... 24
2.20 Exporting Lot Data in CSV Format................................................................... 24
2.21 Managing Multiple Weight Ranges .................................................................. 26
2.21.1 Weight Bounding: Introduction .................................................................. 26
2.21.2 3 Way Selector.......................................................................................... 26
2.22 Export the individual weighing operations in CSV format ................................ 27
2.22.1 Description ................................................................................................ 27
2.22.2 Technical Specifications............................................................................ 27
2.22.3 Structure of Weighing Operations ............................................................. 28
3THE LINE AS A CONVEYOR BELT ...................................................................... 30
4METAL DETECTOR .............................................................................................. 31

Selecta: User Manual_______________
4
1 GET TO KNOW THE USER INTERFACE
1.1 Organization of Displayed Screens
Main page:
Upper part, weight and metrological plate
Centre, list of the products currently configured in the instrument
Lower left corner, a set of buttons to access all the functions of the machine.
Top left corner, “BACK” button to go back to the previous page while surfing the
interface.
Top right corner, “HOME” button to go to the home page from any positions inside
the interface.
On the left of the path area, there is the incremental search area to enter and
display a PLU name for the short recall (see below)
Bottom right corner, a rectangular unmarked area for current date and time and
the operative level (see below), granting access to the menu of contextual
functions, that is a page displaying, with lists of buttons, the functions linked to the
current position in the interface.
Access to the programming of products and to all settings is carried out tapping
the “Archives” button and then the buttons related to the kind of settings required
(see below).
The structure of the screens is the same in all pages; the differences are:
Content of the central area
Function of buttons
Contextual functions
From every page, it is possible to use the “ESC” key to get to the previous
page, and the “HOME” key to get to the main page.
1.1.1 Path
Each page is characterized by a position in a tree of screens.
On the right of the “BACK” button, there is an information area with a path to spot
easily the current position in the interface; in particular, each page has a name and
the sequence of the crossed pages to the current one is made of the names of
such pages separated by the “/” character; for example, a user has first pressed
the “ARCHIVES” button to access the archives page, then the “PLU” button to
access the list of PLUs, finds the following information:
Home\Arch.\Plu
Such representation can prove very useful during remote service.

Selecta: User Manual_______________
5
1.1.2 Selecting Lines in a Grid
To select a line in a grid, just tap it anywhere in the line. In the main window, as simply
selecting a line is aimless, tapping starts the process straight away.
1.1.3 Accessing a Record of a Grid or Modifying a Field
Keep the line pressed or tap twice.
1.1.4 Scrolling the Records of a Grid
There are two possible ways to scroll the records of a grid:
Use the supplied buttons on the right of the grid; they get to the top of the list (first
button on the top, same as HOME key in a traditional keyboard), the bottom of the
list (last button on the bottom, same as END key), scroll pages up and down.
Move your finger up and down the list without losing contact with the display.
1.1.5 Accessing Contextual Functions
Tapping the date/time area on the bottom right corner of the screen, you access a page
displaying, with keys, all the available accessory functions in the currently shown page.
Some functions are available in all pages (see below).
In addition, there is a button to modify the complexity of the user interface: it is possible to select
a BASIC mode and an ADVANCED mode. In the latter, all the controls for labelling and
advanced data management are displayed.
1.1.6 Entering Texts
Whenever the machine expects the operator to enter a (numeric, textual) value, a touch keyboard
appears in the lower half of the display. Every time a key is pressed, it flashes; to get the key
repeated, keep it pressed.
In the keyboard there are special keys “@#!” and “2nd”.
The “@#!” key grants access to a second keyboard where all the most frequent symbols are
gathered.
The “2nd” key, instead, grants access to a second keyboard with all the characters of the
currently selected language which did not fit in the “main” keyboard; all the letters with accent,
for example, belong to this group.
When the “symbols” keyboard is displayed, the “2nd” key does not work.
1.1.7 Entering Texts in Different Languages
This machine offers the user interface in all the languages of the European Countries.

Selecta: User Manual_______________
6
Every textual element that can be modified in the archives (e.g. lot names and the button custom
texts, plu names and so on) can be entered selecting a different language from the current set
language for the interface.
Thus, whenever it is possible to enter a text, the relevant window shows two additional buttons
to select the language concerning such text (PgUp), and to add to the text possible
symbols which are not in the keyboard (PgDn), picking them from a special dropdown field.
It is not possible to enter textual elements identifying also the element of the
bound archive (e.g. plu names, traceability lots, and so on) in different languages
which are made of the same sequence of ASCII characters. So, for example, if in
the PLU archive there is a plu in Greek which code is “αβδ” (ascii characters 225
226 228 shown according to the Greek alphabet), it is not possible to enter a plu in
Italian which code is “áâä” (ascii characters 225 226 228 shown according to the
Italian alphabet).This is important food for thought for the alphabets (Greek and
Cyrillic) which, with ASCII characters above 128 describe the whole of proper
symbols.
1.2 Calibrating the Touch Screen
To have the touch screen work properly, it may be necessary to carry the calibration
procedure out. To activate such procedure, keep the touch screen pressed during the
starting procedure, until the calibration screen appears. In the top left corner of this
screen, there is a cross; keep something rounded pressed in the centre of the cross
until it moves to the top right corner and so on in the bottom right corner and eventually
in the bottom left corner. At the end of the calibrating procedure, the screen turns light
blue and writes "TOUCH CALIBRATED", then the system regularly restart the booting
procedure.
1.3 Displaying the Firmware Version
The page of the contextual functions always comes with the “SW Ver.”button, to
display a window where all the versions of the firmware being executed onboard
machine are gathered.
1.4 Online Help
The page of the contextual functions always comes with the “HELP” button, to
display a window with a description of the currently displayed page.
1.5 Criteria to Access Data (Operative Levels)
Operative levels are different access levels to the instrument. They go from
0 to 6 and are characterized by a different visibility of function buttons and
archive fields.
They have been designed to protect the company from parameter
modifications which could damage the correctness of operations.
Levels can be selected pressing some buttons always displayed in the
contextual window.
Each level is password protected upon pressing the relevant button.

Selecta: User Manual_______________
7
Passwords are set in the page ARCHIVES/SETTINGS/PASSWORD
SETTING and is naturally allowed only for the own level and lower. It is
allowed only starting from the 5th level.

Selecta: User Manual_______________
8
2 WEIGHING AND CHECKING PRODUCTION LOTS
2.1 Applications
This checkweigher can be used both in legal-for-trade mode and in not-legal-for-
trade mode.
The legal-for-trade version produces prepacked lots meeting the European norms
in force, that is directive 76/11/CEE.
In general, this checkweigher applies a set of modifiable thresholds to select
products meeting the following criteria:
Discard of products above threshold and below threshold. Thresholds can
match those in the norm together with two additional thresholds working upstream.
Discards can be differentiated on the basis of the position of the product above or
below threshold.
Digital warning of weight range of the product on the basis of 4 weight
programmable thresholds.
Discard of products on the basis o fan external warning of “product to be
discarded”, received by the metal detector or another checking device before the
checkweigher.
In addition, this checkweigher gives in real time information about descriptive
parameters of the production process generating weighed products in terms of
average weight value and standard deviation, other than providing information
about the production rate and about the numerosity and nature of discards.
Eventually the following displayed pages in process are available:
Detailed data of the process and process progressive data
List of the last 60 weighing operations
Histogram showing the production process and detailing the product numerosity
on the basis of the weight slot.
2.2 Defining the List of Products with the Relevant Weighing Guide
Information
Each product in the machine is a PLU.
Each PLU is marked by a 15 character numeric code and keeps all the information
about the product weighing criteria.
To add a new PLU, from the main page, follow the procedure below:
Access the “ARCHIVES” menu

Selecta: User Manual_______________
9
Access the “PLU” menu
Press the “NEW”button
Enter a PLU name (brand new)
The instrument creates a new line in the grid.
To modify data in an existing PLU, select the PLU and access data keeping the
PLU line pressed or tapping twice.
The parameters defining a PLU are the following:
WEIGHTS
Unit of measurement: to express all weight data in kg or pounds.
Tare: Product tare. The following are the permitted max tare values for products
not to be discarded:
From 50 to 80 g: T <= 35% of gross weight
From 80 to 100 g: T <= 55% of gross weight
Above 100 g: T <= 70% of gross weight
Tare %: percent tare of the product.
Nominal weight: when this parameter is modified, the thresholds defined in the
CTRL group are processed again.
RANGE
Upper range: upper threshold of weight used to discard products upstream the
check on the basis of the logic of prepacked products
Lower range: lower threshold of weight used to discard products upstream check
on the basis of prepacked products
CTRL:
Limit - -: threshold –T2 by law for batches of prepacked products: modifiable
Limit –: threshold –T1 by law for batches of prepacked products: modifiable
Limit +: threshold T1 defined by symmetry: modifiable

Selecta: User Manual_______________
10
Limit ++: threshold T2 defined by symmetry: modifiable
Options CTRL: to select the acceptance range of weights among the following
options:
From - to ++ with threshold %: all products which weight is between limit –and
limit ++ are accepted; also products between limit –and limit - - are accepted if the
fraction % does not exceed the limit expressed by parameter “% Pieces between –
and - -“.
From - to + with threshold %: all products which weight is between limit –and
limit + are accepted; also products between limit –and limit - - are accepted if the
fraction % does not exceed the limit expressed by parameter “% Pieces between –
and - -“.
From - - on with threshold %: all products which weight is above limit –are
accepted; also products between limit –and limit - - are accepted if the fraction %
does not exceed the limit expressed by parameter “% Pieces between –and - -“.
From - to ++ without threshold %: all products which weight is between limit –
and limit ++ are accepted.
From - to + without threshold %: all products which weight is between limit –and
limit + are accepted.
From - - on without threshold %: all products which weight is above limit –are
accepted.
% Pieces between - and - -: acceptance threshold of products which weight is
above limit - - and below limit -, when active.
Enable negative range: to accept products which weight would lower the average
below the nominal weight, even if respecting the constraints required by thresholds
–and - -. In this case, if when the lot is closed the average is lower than the
nominal weight, the loti s not accepted and the statistic report is marked with “LOT
NOT ACCEPTED”; so the user is in charge of checking regularly and periodically
that the average keeps a level for the lot to be accepted.
Dynamic Calibration: it is the dynamic calibration value detected by the last
dynamic calibration procedure; for new PLUs, such value is 0.
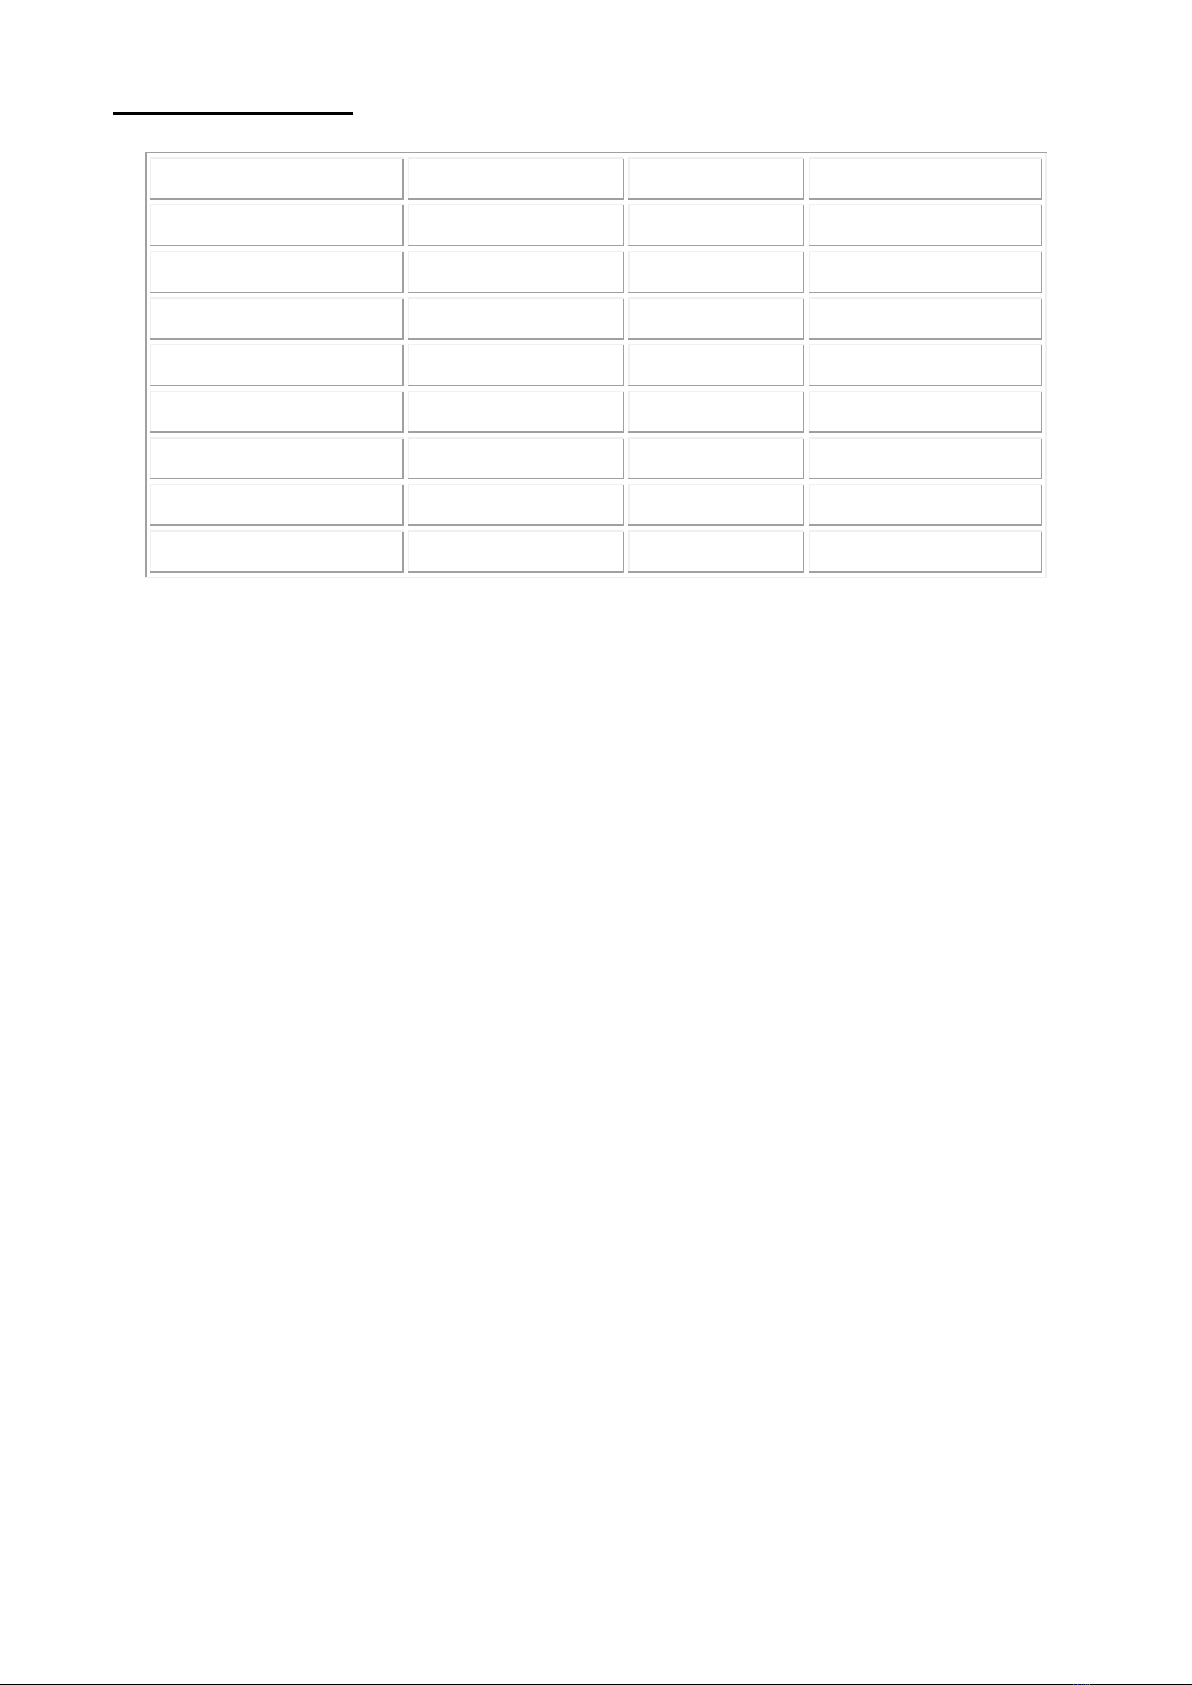
Thresholds are automatically calculated by the machine on the basis of the table
by law below:
Selecta: User Manual_______________
11
WEIGHT_FROM
WEIGHT_TO
ERR_%
WEIGHT_ERR
5
49
9
50
99
4.5
100
199
4.5
200
299
9
300
499
3
500
999
15
1000
9999
1.5
10000
14999
150
MOVEMENTS:
Rate: It is the max supposed operating rate of the line and determines the relevant
speed of the transport system making sure just one item is on the scale.
Entry belt speed: If the machine is equipped with the first little belt for separating
items, its speed can be separately adjusted thanks to this parameter; in this case,
speed is in percentage with respect to the max allowed speed for motors.
Ejector 1 position: This parameter adjusts the position of the product where the
first ejector shall be activated. The value is in millimetres starting from the reading
position of the photoelectric cell. If this value is 0, the value set in configuration is
valid.
Ejector 2 position: This parameter adjusts the position of the product where the
second ejector shall be activated (if applicable). The value is in millimetres starting
from the reading position of the photoelectric cell. If this value is 0, the value set in
configuration is valid.
Piece length: It is the length of the piece in mm. This value avoids double
readings when the item passes by the photoelectric cell and, at the same time,
drives the dynamic weighing algorithm.
To get a proper dynamic weighing, it is basic to set correctly this parameter.
Nevertheless, not always the actual length of the product is the best value; if the
weighing is poor after previously setting the real value, try setting greater and
greater values starting from the mid of the length of the weighing belt.
Selector: This parameter is used in the Weight Bounding mode (see par. 2.21)
and for the ejecting function of accepted products 2.18).

Selecta: User Manual_______________
12
Note: an already processed PLU cannot be modified, if its bound process (see
below) has not been previously closed.
2.3 Carrying a Product Dynamic Calibration Out
Before processing a new PLU, the operation of DYNAMIC CALIBRATION needs
to be carried out. It is a learning process through which the machine compensates
the lack of accuracy inherent in the mechanic detection system of the item in
motion.
To carry a dynamic calibration of a product out, follow the procedure below:
Access the “ARCHIVES”menu
Access the “PLU” menu
Select the product object of dynamic calibration. If the product has not been
created yet, create the product as in the previous item.
Press “CALIBRATION DYNAMIC”.
Enter the product actual weight and confirm pressing ENTER
Now the instrument starts the conveying system and shows a red writing in the
path area meaning the number of detections to go to go through with the
operation.
Let the product pass the needed times. If once while passing by the product
cannot be weighed, the number of detections to go does not decrement.
At the end of the operation, the dynamic calibration value is stored in the selected
PLU and opening the “CTRL” parameters under item “CALIBRATION DYNAMIC”.
The procedure can be deleted anytime tapping “STOP. CALIBRAT.”.
In the moment of dynamic calibration, the parameters which variation interval can
limit the validity of the dynamic calibration value are stored in the PLU.
In particular, NOMINAL WEIGHT and TEMPERATURE are stored.
At the beginning of a process, the machine carries a check out to make sure the
current value of said parameters is between the validity interval of dynamic
calibration. If it is not, the PLU process is prevented and the dynamic calibration
procedure is required again.
For new PLUs the dynamic calibration procedure is always required.
Note: it is also possible to execute again the dynamic calibration procedure on a
PLU already processed, with a bound process; the process is updated with the
new value of dynamic calibration. In this case, as it is not possible to access the
PLU, the new dynamic calibration value can be read only accessing the area
“MODIFY DATA” from the process page.

Selecta: User Manual_______________
13
2.3.1 Copying a Calibration
If two PLUs refer to the same product, when a PLU is copied, the relevant
calibration value is copied too.
If the PLU is loaded on the machine remotely, it is possible to copy only the
calibration value from an existing PLU pressing the button CALIB COPY, provided
that the speed value set in the destination PLU is the same as the origin PLU.
2.3.2 Validity Interval of Dynamic Calibration
In legal-for-trade mode, the validity of a weighing operation for the products in
process is limited in a weight interval around the calibration weight, on the basis of
the table below:
From 50 g to 300 g = ± 20% of calibration weight
From 300 g to 500 g = ± 10% of calibration weight
From 500 g to 1200 g = ± 20% of calibration weight
From 1200 g to 3000g = ± 240g of calibration weight
Possible products which weight is out of that range are rejected and marked OUT
OF CALIBRATION RANGE
2.4 Displaying the Logger of Dynamic Calibrations
To display the chronology of dynamic calibration on PLUs:
Access the “ARCHIVES”menu
Access the “PLU” menu
Press the “LOGGER CALIBRATION”button
The instrument shows a window where all the executed procedures are listed;
every procedure comes with date, time, PLU name, temperature and fixed weight.
Press OK to close the window.
The same content can be downloaded via FTP connecting to the instrument IP
address with a CLIENT FTP and downloading the file
CALIB.TXT
from position
\hd0\root\archives\ver\logger
The file is for reading only to meet the metrological restraint required by MID
directive.

Selecta: User Manual_______________
14
2.5 Defining Macros for Quick Modifications of Plu Data
If the modification of one or more PLU fields is a frequent operation, it is possible
to speed it up defining one or more MACRO, that is the storage of sequences of
fields to be modified in succession to be bound to a free button of the window.
The procedure of use of a macro goes through two different steps, that is the
definition of the macro itself, that is of the sequence of fields characterizing it, and
the bond of the macro to a free button in the process page.
Not all macros must necessarily be bound to a button.
Normally, first all the macros are defined, and then they are bound to the buttons
of the window.
To define a macro for a process you need to:
Access the data page of a PLU
Access the contextual window tapping the bottom right corner of the del display
Press the “START RECORD MACRO” button
The system asks for the name to give the macro. Such name is not the one on the
button, but it identifies the macro during the binding procedure.
Press, in sequence, on the fields to be modified recalling the macro which is being
defined.
Once the sequence of fields is completed, tap again the bottom right corner and
the button “STOP. RECORD MACRO”.
To bind a macro to a button, during a process, go through the following steps:
Tap the bottom right corner of the display.
Press the “MACRO ALLOCATION”button
The instrument lists all the recorded macros. Select a macro.
Enter the text to be displayed in the first line of the button.
Enter the text to be displayed in the second line of the button; if the writing is just
one line long, let the second line blank and the system centres the writing in the
button.
Press the button to assign to the macro (there must be no writings on such
button).
The macro is assigned and the writing appears on the button; the process restarts
automatically.
To set a macro free from a button, during a process, go through the following
steps:
Tap the bottom right corner of the display.
Press the “CANCEL MACRO” button
Press the button bound to the macro
The button is free and the process restarts.

Selecta: User Manual_______________
15
Note: this operation does not physically cancel the macro, which is still available to
be bound to a button in process, but simply sets free the button bound to it.
There is no procedure to physically cancel already defined macro. The operation,
which is only useful to keep the macro archive of the instrument clean, is always
available for the service technicians.
2.6 Zeroing the Scale
To set the scale at zero, press the button marked with “-> 0 <-“.
2.7 Selecting the Product to be Processed
The main page lists all the PLUs in the machine.
When a PLU is sent to process, it is univocally associated with:
a CTRL LOT, which name is assigned on the basis of the criteria chosen by the
user and keeping all information statistically relevant for the control of prepacked
products (e.g. average, standard deviation, and so on);
a PROCESS, that is a temporary copy of the PLU which can be independently
modified and which keeps all the relevant elements of totalization for the
production (numerosity and weight of pieces, carton boxes, pallets, progressive
numbers, and so on).
Here are the ways to send a PLU to process:
Tap the line on the grid
Press the “START”button
Tap the area for “Search”, then, when the keyboard appears, enter the PLU name;
in this case while some letters are keyed, the machine starts a process of
incremental search selecting the plu starting with such letters; pressing ENTER
the PLU is sent to process; or, after 2 seconds, the keyboard hides and the PLU is
selected in the grid.
2.8 Giving a Name to the Production Lot
It is possible to identify a lot in three different ways which can be set thanks to the LOT
IDENTIFICATION in MACHINE configuration, in the CTRL group:
Manual: the operator gives a name to the new lot at the first opening, which
occurs at the start of the process and when the loti s closed when the option to get
out from the process upon closing the lot is not selected.
Manual + sequence: In this case, a sequence number is added (at the bottom) to
the manually entered lot code. Such number is incremented at every closing,
actually generating a new lot. In this case, if the machine is programmed to go on
with the process after the loti s closed, the sequence number is automatically

Selecta: User Manual_______________
16
increate without asking the operator the new lot. Sequence numbers are the
machine global data, which can be modified anytime accessing machine
configuration (ctrl MENU, parameter NO. CTRL SEQUENCE)
Date + sequence: the lot code is the date when it is generated (in the format
ddmmyyyy), and the sequence number. The sequence number is automatically
incremented at the opening of every new lot.
Every process is univocally bound to a weight check lot. Such lot must be entered
when creating the process (as a consequence of the start of the process with PLU
not already open or of the start command sent via network on a PLU not already
open). It is not possible to use a lot which has already been created and not yet
deleted. If upon request no lots are entered (pressing the BACK button), the
process is activated in normal mode (without the checkweigher function). The
process page is different from the single product and crateweighing operations (in
all their configurations), showing the graph and statistical data relevant to the lot
bound to the PLU in progress, updated in real time during the process.
2.9 Displaying Process Data
During a process several screens are available displaying several groups of data
concerning the production process.
All the pages can be accessed thanks to the buttons on the right of the display.
In every page there is the name of the PLU and the LOT of the checkweigher.
2.9.1 Main Page
The main page is displayed every time a process starts and it is recalled pressing
the MAIN PAGE button.
Here you can find statistical data about average weight, mean deviation
(difference between average weight and nominal weight) and standard deviation
concerning the products that have been accepted until the current moment of the
production.
In addition, it includes the number of rejected products, grouped by category
(sorted by weight, sorted by metal –in case a metal detector is connected –or
other rejections including all the cases where a product cannot be weighed,
minimum weight, overload, external rejection).
This page shows also the average rate calculated processing the last 10 pieces
(and compared with the nominal rate set in the PLU, determining the speed of the
belts), efficiency (meaning the ratio between the rejected products and the
products passed on the line) and the percentage of pieces which weight is
between the thresholds –T1 and –T2 compared with the maximum allowed
percentage for the PLU, if applicable.
Average weight and mean deviation data are highlighted in green when the
average weight exceeds the nominal weight and in red should the case be the
opposite.
In addition, in the main page, a dashboard informs about weight thresholds, the
PLU name and the name of the LOT of the checkweigher function.

Selecta: User Manual_______________
17
2.9.2 Graph Page
The graph page, accessible from the PAG GRAPHIC button, draws the histogram
of the occurrence of the weights between thresholds –T2 and +T2.
Where, at every frequency the interval is divided in, there can be both accepted
and rejected weights (if in the presence of the option always granting the average
greater than the nominal weight), two overlapping bars are drawn, one is green for
the numerosity of accepted weights, the other, for the rejected pieces, is red.
Otherwise, if not in the presence of the option always granting the average greater
than the nominal weight, the bars identifying accepted pieces are red, while those
identifying the rejected pieces are yellow.
In addition, on the top of the graph, the numerosities of all the totalized pieces in
the weight slots lower than –T1, between –T1 and +T1, and greater than +T1 are
shown.
2.9.3 Process Page
The process data page, accessible thanks to the PAGE WORK DATA button,
displays a series of accessory data, usually not meaningful in the applications of
selection, which nevertheless have a specific value when working with a printer
(this item is not dealt with in this section of the manual).
In particular, if set in the PLU, along with the codes and expiry dates, also the
filling level (in pieces and weight) of boxes and pallets being a fraction of the
production is displayed.
2.9.4 Page Weights
The page of last weights, accessible thanks to the PAGE WEIGHTS button,
displays the weight of the last 60 weighing operations, where the weighing
operation 1 is the most recent.
Please note that going out and then in process with the same PLU without closing
the lot, just the last 20 weighing operations are displayed.
2.10 Properly Adjusting the Product Handling
Every single piece on the line is tracked since the photoelectric cell at the belt
before the scale is covered to the full exit from the conveying system.
Pieces must be properly spaced in order to exclusively cover the scale.
To avoid that possible photoelectric cell flickering while a product is passing by the
line catches a single item as several very close items, it is possible to use the
PIECE LENGTH parameter in the PLU to set a length the machine considers the
area where just one reading is valid.
Once the photoelectric cell is reenabled, if a following product reaches the cell
before the previous product has gone throughout the whole belt from the photocell
position, the first product is rejected and marked PIECES ADJACENT. Note: the
rejected piece is the first one as the weighing operation occurs in the last part of
the belt.

Selecta: User Manual_______________
18
2.11 Quickly Modifying Data in Process
There are two ways to modify the process temporary data, accessing the
“MODIFY DATA” page or with MACROs, that is thanks to the available buttons in
the process pages properly customized.
2.11.1 Modifying Data
Press the “MODIFY DATA” button during a process to stop it. A grid is displayed
showing all the process characteristic data.
Such data are the fields marking PLUs out, together with the process progressive
totals.
In this page all displayed data can be modified, but NOMIN.WGT and CTRL
LIMITS; DYNAMIC CALIBRATION can only be read.
Once finished with the modifications, it is possible to make the new data
permanent pressing the button SAVE CHANGES: in this case the data are copied
“backwards” in the PLU giving origin to the process.
To resume the process, press the “START” button.
2.11.2 Macro
Similarly to a PLU data modification, it is also possible to record some macro
sequences for the quick modification of process fields.
In addition to the above instructions relevant to macros for PLUs, please not the
following as for processes:
The macro definition is carried out in the MODIFY DATA window, while it is
bound to a button (or cancelled) in the process window.
A reference must be entered in every field of a macro which can replace the
original field name during modification; moreover, it is possible to decide
whether the modification affecting the field when the macro is recalled shall
be permanent in the PLU originating it or keeps being temporary to it.
2.12 Interrupting a Process
A process can be interrupted any time pressing STOP; the instrument shows
again the home page.
It is possible to resume the same process after an interruption, or to start a
different one. There is no limit to the PLUs being processed at the same time.
2.13 Closing a Process
A process can be closed any time, that is deleting the PLU temporary copy and
get the machine ready to create a new process when the same PLU will be
processed at a later stage. This operation entails the zeroing of all the totals linked
to the process and the automatic closing of the statistic lot.
Follow the procedure below to close a process:

Selecta: User Manual_______________
19
From main page, access the “LIST PLU OPEN”menu.
A grid lists the PLUs linked to a process, that is which have been processed at
least once but not closed.
Now it is possible to close a single PLU (“CLOSE PLU”button) or the whole PLU
list (“CLOSE ALL”button).
Note: it is not possible to modify a PLU data when its linked process is still open.
2.14 Closing a Lot
Closing a lot entails storing its statistical data, and their possible transfer to a host.
Closed lots are available in a special screen (see below).
Closing a lot does not entail closing its process; in this way it is possible to
manage separately the production information of a single product even if it is
processed in several statistic lots.
According to what specified in the PLU parameters (see Defining the List of
Products with the Relevant Weighing Guide Information), there are three modes to
close a lot:
Manually: in the process page, the operator presses the “CLOSE BATCH”button
Automatically when the number of pieces set in the PLU is reached
Automatically when the time (set in the PLU) from the process start runs out.
As for installation, the process automatic exit when closing a lot can be requested.
2.15 Displaying Processed Lots
Accessing the ARCHIVE BCHES page from the ARCHIVES page, the list of all
processed lots can be displayed, including both interrupted and closed lots.
Every lot comes with start date/time, total number of pieces, overall weight, finish
time and the amount of rejected products.
2.16 Deleting Closed Lots
In the ARCHIVE BCHES page a single lot can be deleted tapping the lot to be
deleted and pressing the DELETE button; the operation fails in case the selected
lot is not closed.
Press the DELETE CLOSED button to delete all the closed lots in just one step.
There is also an automatic mechanism to delete lots, storing closed lots in the
system over a programmable amount of days. Such parameter is programmable in
machine configuration, DATA REGISTER group, item “MEMORIZING DAYS”.
Such mechanism does not affect open lots.

Selecta: User Manual_______________
20
2.17 Printing Statistical Reports
Reports are automatically printed by default whenever a lot is closed. Such
function can be disabled pressing both the ALT and L keys in process. At power
up, the printing is nevertheless enabled. If also the packing list function is enabled,
every time ALT-L are pressed at the same time, printing options are
enabled/disabled; the available combinations are: no printing, checkweigher,
packing list, packing list + checkweigher; please note that the enabling of the
printing of the packing list is stored depending on the following power up, unlike
the enabling of the printing of the checkweigher.
Reports can be printed by a parallel printer directly connected to the line, a
network printer (in both cases the printer model must be compatible) or, it is
possible to produce a PDF file using special software on PC (PrintReport).
Table of contents
Other Bilanciai Industrial Equipment manuals


Popular Industrial Equipment manuals by other brands

AAT
AAT MEGA II CLEANER operating manual

STS
STS M2-D922 Operator's manual

IRO
IRO Laser operating instructions

OKADA
OKADA TOP Series Owners and Operators Instruction Manual & Parts List

SMC Networks
SMC Networks 55 Series instruction manual

Web Tech
Web Tech AutoWeigh Masterweigh Novus Installation and operation manual

ABB
ABB HT578832 Operation manual

MBW
MBW ScreeDemon Operation

Emerson
Emerson Fisher Enviro-Seal Series instruction manual

COREMO OCMEA
COREMO OCMEA ID 800 User and maintenance manual

Rotofluid
Rotofluid 50 Series DISASSEMBLY & MAINTENANCE INSTRUCTIONS

BIFFI
BIFFI ICON3000 Series Installation, operation and maintenance manual


