bintec elmeg H2 Auto Compact Series User manual

bintec H2 Auto Compact
Installation Manual
Copyright© bintec Dm1004-I Version 1.0 07/2020 bintec elmeg GmbH
bintec elmeg GmbH Manual
bintec H2 Auto Compact 1

Legal Notice
Warranty
This publication is subject to change.
bintec elmeg GmbH offers no warranty whatsoever for information contained in this manual.
bintec elmeg GmbH is not liable for any direct, indirect, collateral, consequential or any other damage connected to
the delivery, supply or use of this manual.
Manual bintec elmeg GmbH
2bintec H2 Auto Compact

Table of Contents
Chapter1 Aboutthismanual ................................. 1
1.1 Supporteddevices................................... 1
1.2 Who should read this manual? . . . . . . . . . . . . . . . . . . . . . . . . . . . . . . 1
1.3 When should you read this manual?. . . . . . . . . . . . . . . . . . . . . . . . . . . . 1
1.4 Whatisinthismanual?................................. 1
1.5 Whatisnotinthismanual? ............................... 1
1.6 How is the information organized? . . . . . . . . . . . . . . . . . . . . . . . . . . . . 1
1.6.1 Safetyinstructions................................... 1
1.7 Technicalsupport.................................... 2
1.8 Relateddocumentation................................. 2
Chapter 2 bintec H2 Auto Compact . . . . . . . . . . . . . . . . . . . . . . . . . . . . . . 3
2.1 Introduction...................................... 3
2.1.1 Powersupply ..................................... 3
2.1.2 Hardwaremonitoring.................................. 3
Chapter 3 Components and power supply . . . . . . . . . . . . . . . . . . . . . . . . . . 4
3.1 Components...................................... 4
3.1.1 Frontpanel ...................................... 4
3.1.2 Rearpanel....................................... 6
3.2 Mountingoptions.................................... 6
3.2.1 Assembly: Recommendations . . . . . . . . . . . . . . . . . . . . . . . . . . . . . . 7
3.2.2 Outlinedrawing..................................... 7
3.3 PowerSource..................................... 8
3.3.1 Connecting the power cable to the vehicle . . . . . . . . . . . . . . . . . . . . . . . . . 9
3.3.2 Connecting the power cable to the device . . . . . . . . . . . . . . . . . . . . . . . . . 9
3.3.3 Cablefeatures.................................... 10
3.3.4 PowerManagement.................................. 10
3.4 RESETButton.................................... 11
3.4.1 Restartingthedevice................................. 11
3.4.2 Defaultconfiguration................................. 11
3.5 Connectingthedata.................................. 12
3.5.1 2-portEthernetSwitch................................. 12
3.5.2 Connecting to a WLAN antenna . . . . . . . . . . . . . . . . . . . . . . . . . . . . 12
3.5.3 Connecting to a WWAN antenna . . . . . . . . . . . . . . . . . . . . . . . . . . . . 13
3.5.4 Positioningtheantennas................................ 15
3.5.5 Connecting the GPS antenna . . . . . . . . . . . . . . . . . . . . . . . . . . . . . 15
bintec elmeg GmbH Table of Contents
bintec H2 Auto Compact i

3.5.6 Configuration connection . . . . . . . . . . . . . . . . . . . . . . . . . . . . . . . 16
3.6 SIMcardinstallation ................................. 16
3.6.1 InstallingtheSIM................................... 16
Chapter4 Compliance.................................... 19
4.1 Manufacturerinformation ............................... 19
4.2 Riskidentification................................... 19
4.3 Safetyinstructions.................................. 19
4.4 WEEEinformation.................................. 22
4.5 REACH....................................... 22
4.6 EC declaration of conformity . . . . . . . . . . . . . . . . . . . . . . . . . . . . . . 22
4.7 Nationalrestrictions.................................. 22
4.8 Operatingfrequency ................................. 23
Appendix A Technical information. . . . . . . . . . . . . . . . . . . . . . . . . . . . . . . 24
A.1 Troubleshooting................................... 24
A.2 Maintenance..................................... 24
A.2.1 Softwareupdates................................... 24
A.2.2 Connectingtothedevice ............................... 24
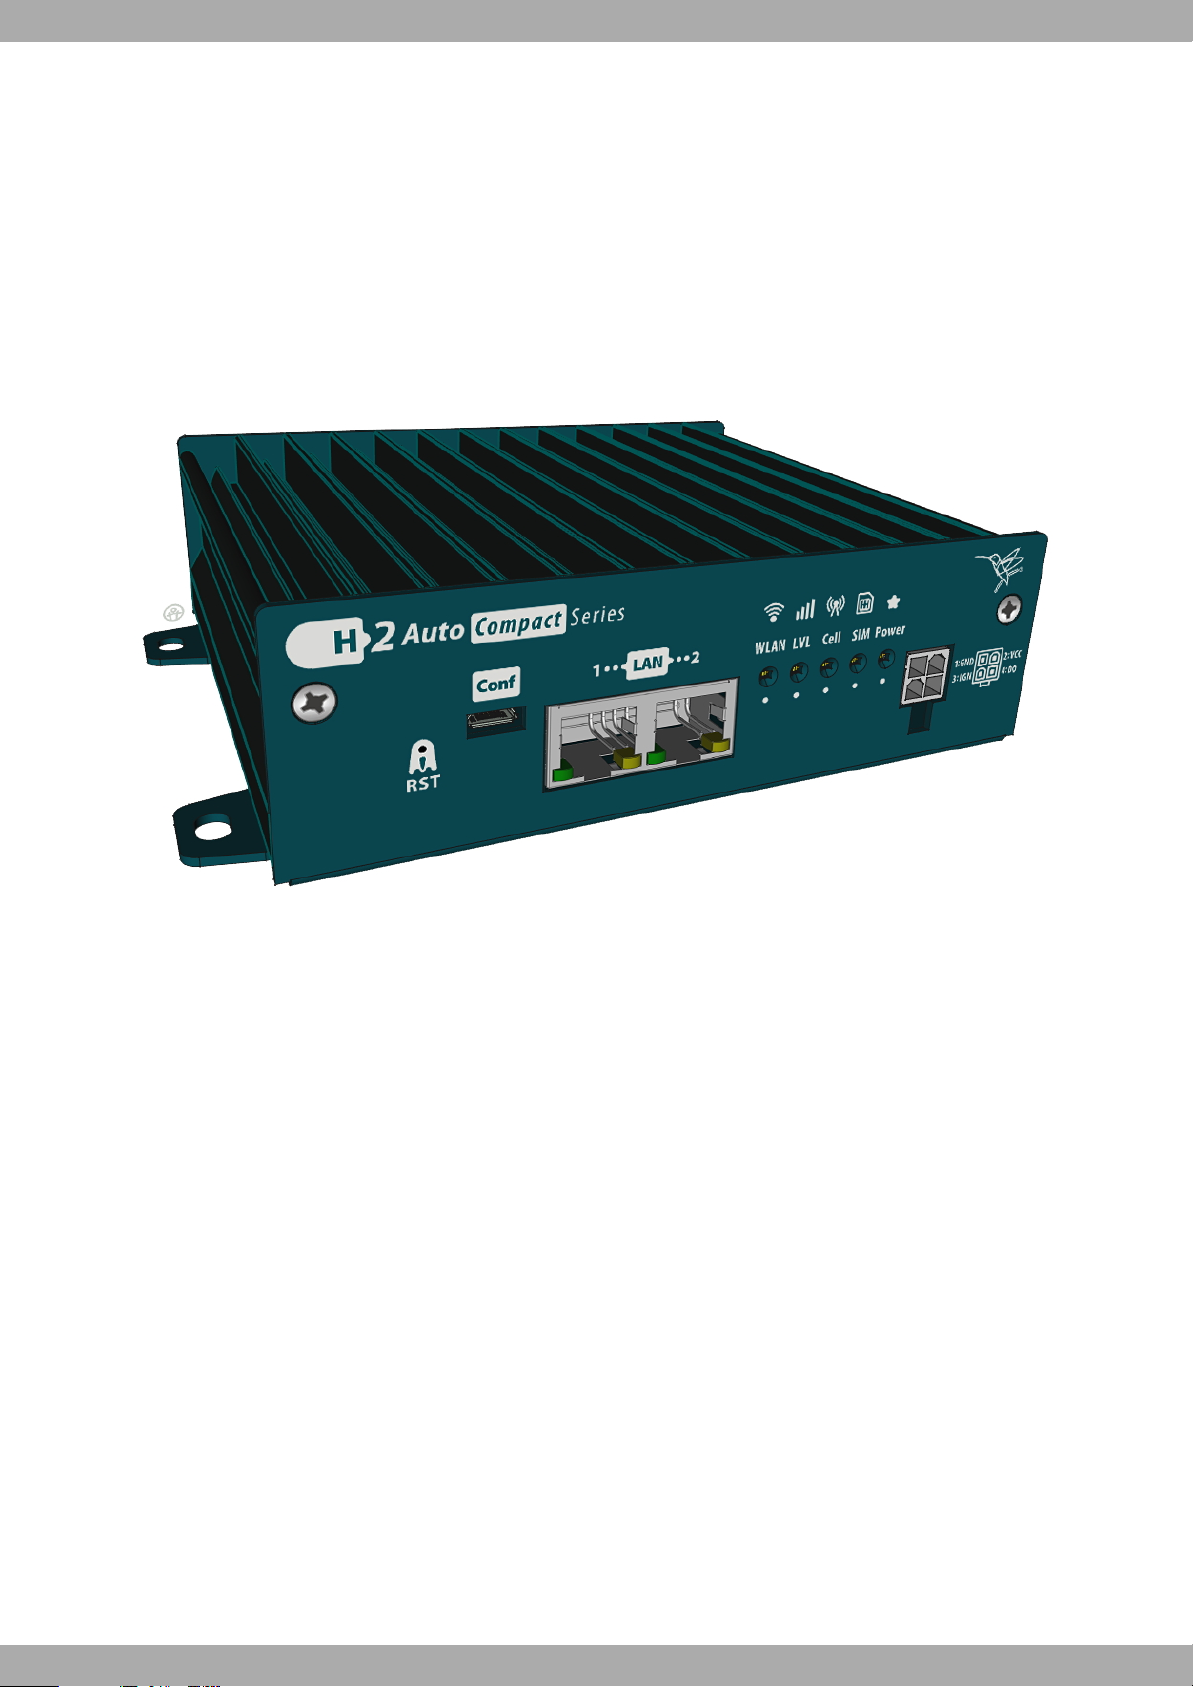
A.3 Connectors ..................................... 26
A.3.1 POWERconnector.................................. 26
A.3.2 LANConnector.................................... 26
A.3.3 WWANConnector.................................. 26
A.3.4 WLANConnector................................... 27
A.3.5 GPSConnector ................................... 27
A.3.6 Configurationconnector................................ 27
A.4 Technicalspecifications................................ 27
A.4.1 Hardwarearchitecture................................. 27
A.4.2 LANinterface .................................... 28
A.4.3 WirelessWANinterface................................ 28
A.4.4 WirelessLANinterface................................ 30
A.4.5 GPSinterface.................................... 30
A.4.6 Configurationinterface ................................ 31
A.4.7 Power........................................ 31
A.4.8 Dimensionsandweight................................ 32
A.4.9 Environmental specifications . . . . . . . . . . . . . . . . . . . . . . . . . . . . . . 32
Appendix B CE Radio information. . . . . . . . . . . . . . . . . . . . . . . . . . . . . . . 33
B.1 RFWANspecifications................................ 33
Table of Contents bintec elmeg GmbH
ii bintec H2 Auto Compact

Table of Contents bintec elmeg GmbH
iv bintec H2 Auto Compact

Chapter 1 About this manual
This is the installation manual for the bintec H2 Auto Compact router. It contains instructions on how to install the
device in a working environment. It provides technical parameters and safety instructions.
1.1 Supported devices
The information in this manual only applies to the bintec H2 Auto Compact router.
1.2 Who should read this manual?
This manual should be read by support personnel who need to install, configure, maintain and monitor the device.
1.3 When should you read this manual?
Read this guide as soon as you are ready to familiarize yourself with the device and its components.
The information contained in this manual will help you operate your device and understand its capabilities.
1.4 What is in this manual?
This installation guide contains the following:
• A description of the features available on the bintec H2 Auto Compact router.
• A description of the technical specifications.
• A detailed description of the power supply requirements.
• A description of the LEDs and connectors on the device.
• Troubleshooting information.
1.5 What is not in this manual?
This manual does not contain information on the device's software and configuration. For information on how to con-
figure the device, please read the relevant protocol manuals found at http://www.bintec-elmeg.com.
1.6 How is the information organized?
Each chapter focuses on a specific hardware component or part thereof. All the information on a particular compon-
ent (such as its technical specification, description, etc.) can be found in its relevant section.
Note
Additional product documentation covering the latest software and hardware features can be accessed
here: support.teldat.com
1.6.1 Safety instructions
To reduce the risk of personal injury and damage to property, this manual contains some safety instructions. They
are classified by symbols and signal words. Please read and follow them carefully.
To reduce the risk of personal injury, the following symbols and signal words are used:
bintec elmeg GmbH 1 About this manual
bintec H2 Auto Compact 1

Warning: Signal word used to designate a potentially dangerous situation that may
cause severe injuries or death if not avoided.
Caution: Signal word used to indicate a potentially hazardous situation that could
result in minor or moderate injury if not avoided.
The following symbol and signal word warns about impending damage to property:
Important: Signal word used to indicate potential risks of damaging the supported
product.
Furthermore, there is a symbol for additional information:
Note: This symbol indicates general notes.
1.7 Technical support
bintec elmeg GmbH offers a technical support service. Regular software upgrades are available for maintenance and
new features.
Contact information:
Web: http://www.bintec-elmeg.com
Tel. Nº: +49 - 911 - 9673 0
Fax: +49 - 911 - 688 0725
Email: support@bintec-elmeg.com
1.8 Related documentation
bintec Dm704-I Configuration and Monitoring.
bintec Dm709-I LAN Interfaces.
bintec Dm748-I Software Updating.
bintec Dm771-I Wireless LAN Interface.
bintec Dm781-I Cellular Interface.
bintec Dm812-I GPS.
Note
The safety instructions are delivered with this product. Read them carefully and store the document for
later reuse.
Note
The manufacturer reserves the right to change and/or improve the software and hardware of this
product or change the specifications in this manual without notice.
The images showing the front and rear panels of the device are included for information purposes only.
The actual device may differ slightly from what is shown.
1 About this manual bintec elmeg GmbH
2bintec H2 Auto Compact

Chapter 2 bintec H2 Auto Compact
2.1 Introduction
The bintec H2 Auto Compact is a multiservice communications platform for vehicles. It provides 4G broadband ac-
cess and location tracking capabilities to WI-fi and LAN devices, including advanced network security mechanisms
and an extended operating temperature range.
This manual explains how to install and connect the bintec H2 Auto Compact router.
Fig. 1: bintec H2 Auto Compact
2.1.1 Power supply
For further information on the bintec H2 Auto Compact power supply, please see Power Source on page 8.
2.1.2 Hardware monitoring
The LEDs on the front panel are used to monitor the hardware in the bintec H2 Auto Compact router. These LEDs
provide visual status information on the hardware components, indicating whether there is connectivity, data flow,
etc.
For further information on said panel, please see LEDs on page 4.
bintec elmeg GmbH 2 bintec H2 Auto Compact
bintec H2 Auto Compact 3

Chapter 3 Components and power supply
This chapter describes the chassis and components of the bintec H2 Auto Compact. The following topics are
covered:
• Components
• Assembly instructions
• Power supply
• Reset button
• Data connection
• SIM card installation
3.1 Components
3.1.1 Front panel
The following image shows the front panel of the device.
Fig. 2: bintec H2 Auto Compact: Front panel
The following table describes the front panel components:
Table 1: Front panel components
Item Description
A Power connection. For further information on the power connection, please see Power
Source on page 8.
B LAN1 or LAN2 connector for Ethernet.
C Conf. Micro USB connector providing access to the device's local console for configuration
and monitoring purposes.
D LED panel.
E RST. Hidden reset button. For further information on how the reset button works, please see
RESET Button on page 11.
3.1.1.1 LEDs
The LED panel provides status information on the components (showing whether they are enabled or disabled) and
on network activity.
The following image shows the position of the LED indicators on the front panel of the device:
3 Components and power supply bintec elmeg GmbH
4bintec H2 Auto Compact

Fig. 3: bintec H2 Auto Compact: LEDs
The following table describes the meaning of each LED indicator:
WLAN WLAN status
Green -> interface up. Blinking: data activity.
Red -> interface disabled or down.
LVL Coverage of the current selected SIM
Green: > - 90 dBm
Yellow: Between - 90 dBm and -100 dBm
Red: < -100 dBm
Cell Cellular status. Status of the current selected SIM.
Green -> active connection. Blinking: data activity.
Yellow: Registered but connection not established.
Red -> Unavailable and not registered.
SIM Active SIM
Green -> SIM 1 active
Yellow -> SIM 2 active
Red -> SIM error (No PIN, no SIM, etc.)
Power Power
Green -> device working normally.
Red -> device powered below 3°C.
Yellow -> device working normally in a temperature range from 3°C to 8°C.
The following figure shows the router's Ethernet switch LED indicators:
Fig. 4: Switch LEDs
Switch LED indicator table
bintec elmeg GmbH 3 Components and power supply
bintec H2 Auto Compact 5

The Ethernet switch speed/state depends on the yellow and green LEDs combination:
Green LED Yellow LED STATUS
OFF OFF The interface is either unavailable, not installed or not re-
gistered.
OFF ON Connected to 10 M:
- Yellow steady: Not transferring data.
- Yellow blinking: Transferring data.
ON ON Connected to 100 M:
- Yellow and green steady: Not transferring data.
- Yellow and green blinking: Transferring data.
ON OFF Connected to 1000 M:
- Green steady: Not transferring data.
- Green blinking: Transferring data.
3.1.2 Rear panel
The following image shows the remaining connectors on the rear panel of the bintec H2 Auto Compact.
Fig. 5: bintec H2 Auto Compact: Rear panel
The rear panel components include:
Table 3: Rear panel components
Item Description
A WLAN 1 and WLAN 2 antenna connectors.
B GPS antenna connector.
C Cell 1 and Cell 2 antenna connectors.
D SIM trays 1 and 2. For more information on how to install SIM cards, see SIM card installation
on page 16.
3.2 Mounting options
The bintec H2 Auto Compact device can be vehicle-mounted or placed on a wall, ceiling or horizontal surface.
3 Components and power supply bintec elmeg GmbH
6bintec H2 Auto Compact

Fig. 6: bintec H2 Auto Compact: Device with fixing holes on both sides
3.2.1 Assembly: Recommendations
We recommend securing the device to a horizontal surface by means of a mounting bracket.
We recommend using the following screws to secure the device:
• For sheet metal installation, use #8 self-drilling screws.
• For tapped holes, use M4 machine screws.
Important
If the screws are not properly anchored, the strain of the cables connected to the router could pull the
router out.
Note
Mounting screws are not provided with the router and must be purchased separately.
Note
Do not mount the router higher than two meters.
Warning
This device is designed to operate in a wide range of temperatures (up to 70ºC or 158ºF). At high tem-
peratures, the metal surface can get dangerously hot and cause injuries.
3.2.2 Outline drawing
Here is a simple outline drawing of the unit with useful data for proper installation.
bintec elmeg GmbH 3 Components and power supply
bintec H2 Auto Compact 7

Fig. 7: Outline drawing
3.3 Power Source
The bintec H2 Auto Compact is powered through direct current (DC).
Fig. 8: Power connector
Workplace Conditions. Main Characteristics
• Avoid moist and/or dusty locations.
• Avoid direct exposure to sunlight and any other heat sources. Do not place the device among papers, magazines
or other items that could hinder natural air circulation.
• Do not place the device near strong electromagnetic fields such as those produced by speakers, motors, etc.
• Avoid knocks and/or strong vibrations during operation, storage and transport.
• The device should be mounted in accordance with accepted after-sales practices and materials.
Warning
Power cables, telephone lines and communication cables are current-carrying. To prevent fire or injury,
make sure to connect and disconnect the cables following the instructions provided in Connecting on
page 9 and Disconnecting on page 9 before installing, handling or opening any of the device's cov-
ers.
3 Components and power supply bintec elmeg GmbH
8bintec H2 Auto Compact

3.3.1 Connecting the power cable to the vehicle
The device's power supply cable must be connected to the vehicle’s fuse box. When connecting electrical accessor-
ies, always follow the recommendations of the vehicle's manufacturer.
Here are some general tips:
• Disconnect the positive battery cable from the vehicle’s battery post.
• Find an empty fuse slot with 5 A - 10 A fuse ratings.
• Seal the cable conductors with suitable crimp connectors, fuse tap or bare wires (depending on the fuse box con-
nectors).
• Connect the BATTERY (+) conductor to the fuse connector.
• Connect the GND conductor to a battery ground connector (-).
• Alternatively, the IGNITION conductor can be connected to the vehicle's ignition switch (if available). If this feature
is not going to be used or there is another device controlling the system's power, connect the IGNITION signal to
the BATTERY (+).
• We recommended installing an approved vehicle circuit breaker.
• Insert the new fuse into the fuse box's fuse slot.
• Connect the positive battery cable to the vehicle’s battery post.
Fig. 9: Cable Connection to vehicle power source
All components used in the connection to the vehicle should be UL listed and comply with the regulations applicable
in the country where they are installed.
The cabling should be separated from other vehicle wiring and should not rest against any sharp edges.
The power supply cable goes from the fuse panel to the router along the vehicle wall (ALWAYS inside the vehicle
cabin and NOT crossing the vehicle’s firewall protection).
3.3.2 Connecting the power cable to the device
3.3.2.1 Connecting
• Verify the power supply cable is disconnected from the device.
• Connect the data cables.
• Locate the power connector on the front of the device.
• Insert the power cable connector.
3.3.2.2 Disconnecting
• Disconnect the power supply cable from the device.
• Disconnect the data cables.
bintec elmeg GmbH 3 Components and power supply
bintec H2 Auto Compact 9

3.3.2.3 Power connector pinout
PIN Signal Description
1 GND GND
2 VCC Battery. +12V to +24V
3 ACC / IGNITION Ignition control. Input signal.
4 DO (Digital Output) Maximum: 60V DC, 1 A
3.3.3 Cable features
In the United States and Canada, the cable should be a UL listed, SAE type GPT cable (min. 18 AWG). In Europe,
the minimum recommended cable values are 1.0 mm diameter and 0.8 mm 2area.
Note
The cable features may vary depending on the recommendations in the country in which the equipment
is installed. The cable must always be 18 AWG / 1.0 mm diameter, 0.8 mm 2area minimum.
3.3.3.1 Power cord pinout
bintec elmeg GmbH provides a 100 cm power cord with the following pin assignment.
PIN Color Signal
1 Black GND / BATTERY (-)
2 Red VCC / BATTERY (+)
3 Yellow ACC / IGNITION
4 Green DO (Digital Output)
3.3.4 Power Management
The power management system in the bintec H2 Auto Compact is always ON.
In this operating mode, the device expects to be constantly powered and the ACC / IGNITION signal operates as a
switch. When power is applied to the device (BATTERY (+) /VCC), the device remains off. It will not turn on until the
ignition pin (ACC / IGNITION) sends a signal (+12 V or +24 V).
Similarly, if the ignition signal deactivates after the device has been turned on, the device will remain on for the peri-
od of time configured through the “set ignition-off-powerdown-timer <value>” command.
*
*p 4
Config>set ?
application-active Permits you to select the code used to boot the router
console Set console configuration
contact-person Assign a name or identification to the contact-person
data-link Type of data link for a WAN line
default-conf Restores the default configuration
file-cfg Configure a configuration file as active
ftp Permits you to access the FTP configuration menu
host-location Physical location of the router
3 Components and power supply bintec elmeg GmbH
10 bintec H2 Auto Compact

hostname Assign a name to a device
ignition-off-powerdown-timer Configure the time to router power down after car
ignition off
inactivity-timer Configure the maximum inactivity time
login Configure login options
password Configure the device access password
pool Number of bytes assigned to each memory pool
schedule-restart Allows to configure router reset schedule
telnet Access the TELNET protocol configuration
web-probe Access the Web probe configuration
Config>set ignition-off-powerdown-timer ?
<1..1440> Power down timeout in minutes
disabled Disable ignition off power down timer
Config>set ignition-off-powerdown-timer 10
Config>
For further information on this command, please see the following manual: bintec Dm704-I Configuration and Monit-
oring.
Note
The Power Management feature is always enabled.
In order to disable the Power Management feature, connect the IGNITION signal to the VCC / BAT-
TERY (+). For further information see Connecting the power cable to the vehicle on page 9 and Power
cord pinout on page 10
3.4 RESET Button
The following sections describe the RESET button features.
Fig. 10: Reset button
3.4.1 Restarting the device
Once the device is operating normally, you can restart it.
To trigger a restart, follow these steps:
• Press, and quickly release, the hidden RST button using a pin or a needle.
When the device restarts, the WLAN LED flashes once green.
• The device will restart switching on the LVL, Cell and SIM LEDs and after a while will switch them off again.
3.4.2 Default configuration
The RST button allows you to reboot your router with its default configuration. Follow these steps:
bintec elmeg GmbH 3 Components and power supply
bintec H2 Auto Compact 11

• Press the hidden RST button using a pin or a needle until the WLAN LED flashes in yellow.
This indicates the configuration has switched to the default configuration.
• Stop pressing the RST button to trigger the restart of the device.
The device will restart by switching on the LVL, Cell and SIM LEDs. After a while, it will switch them off again.
The default configuration sets up the device with the following IP address and access mask, accessible from any
switch port:
• IP address: 192.168.1.1
• IP mask: 255.255.255.0
Note
Bear in mind that some devices come with customized settings, so your router's default configuration
may be different from the one shown above.
3.5 Connecting the data
The bintec H2 Auto Compact router has the following data connections.
3.5.1 2-port Ethernet Switch
The bintec H2 Auto Compact incorporates a 2-port 10/100/1000 BaseT switch with automatic MDI/MDIX support to
connect to a local area network (LAN).
Fig. 11: LAN Switch ports (2)
Note
During booting and in BIOS mode, only the LAN 1 connector is available.
Important
The equipment is meant to be installed and handled by qualified service personnel only. Failure to fol-
low this advice could cause the device to become damaged or malfunction.
3.5.2 Connecting to a WLAN antenna
The bintec H2 Auto Compact is equipped with two SMA-RP connectors for WLAN (Wi-Fi) antennas.
Name Antenna Function
WLAN 1 CH0 antenna connector
3 Components and power supply bintec elmeg GmbH
12 bintec H2 Auto Compact

WLAN 2 CH1 antenna connector
Since the router doesn't have any internal antennas, external antennas must be installed on the bintec H2 Auto
Compact to improve WLAN signal quality.
The cable used to connect the antennas must be valid for RF signal communications of up to 2.4 GHz (5.7 GHz for
802.11a) frequencies and impedances of 50 Ohm. Please note, the quality and length of an antenna cable can affect
the RF signal quality (transmitted and received), which, in turn, will affect the device coverage and data exchange
rates.
Note
Depending on the model, a WLAN interface is available.
For optimum performance, always install the WLAN antennas.
The WLAN module has two antenna connectors, labeled WLAN 1 (CH0) and WLAN 2 (CH1).
The following image shows the position of the WLAN antenna connectors.
Fig. 12: WLAN antenna connectors
WLAN antenna requirements
The antennas used by the WLAN transmitter must not be co-located or operated in conjunction with any other an-
tenna or transmitter. The device is tested with antenna gain 2dBi to evaluate its conformity with CE Radio standards.
Only the antennas with a gain lesser or equal to 5dBi for 2.4GHz, 7dBi for 5.15~5.35GHz & 5.47~5725GHz and
10dBi for 5.725~5.85GHz may be used with this transmitter to comply with RF exposure limits.
For further information on WLAN interfaces, please see the bintec-Dm771-I Wireless LAN Interface manual.
3.5.3 Connecting to a WWAN antenna
The bintec H2 Auto Compact is equipped with two SMA connectors for WWAN antennas.
Name Antenna Function
Cell 1 Main antenna connector
Cell 2 Diversity antenna connector
The router does not have any internal antennas. Antennas must be installed on the bintec H2 Auto Compact to im-
prove the quality of the signal received and transmitted by the Wireless WAN module.
The cable used to connect the antennas must be valid for radio frequency (RF) signal communications of up to 2.6
GHz and an impedance of 50 Ohms. Please note that the quality and length (loss) of an antenna cable can affect the
RF signal quality (transmitted and received), which, in turn, will affect device coverage and data exchange rates.
bintec elmeg GmbH 3 Components and power supply
bintec H2 Auto Compact 13

Note
For optimum performance, always install the WWAN antennas.
Note
Make sure a minimum distance of at least 20 cm is kept between people and the WWAN antennas in-
stalled.
The WWAN module has two antenna connectors, labeled Cell 1 (Main) and Cell 2 (Diversity).
Depending on the technology used, you can either use one antenna connector (e.g., for GPRS connection) or both
(e.g., for LTE).
Installing an antenna in the Cell 1 (Main) connector is mandatory. The second connector Cell 2 (Diversity) may not
need one. If you are not planning on using the second connector, disable the antenna (through configuration) for op-
timum performance.
If you install both the Main and Diversity antennas, they must be at least 7 cm apart. The maximum recommended
distance is 25 cm.
For optimum performance, please use the radio frequency accessories (antennas and cables) recommended by
bintec elmeg GmbH
bintec elmeg GmbH has a range of accessories that allow bintec H2 Auto Compact routers to be installed at differ-
ent locations.
Note
Antennas must not be directly connected to the bintec H2 Auto Compact router. They should be at
least 50 cm away.
The following image shows the position of the WWAN antenna connectors.
Fig. 13: WWAN antenna connectors
WWAN antenna requirements
This device is restricted to mobile and fixed applications and must not be co-located or operated in conjunction with
any other antenna or transmitter. The device is tested with antenna gain 3dBi to evaluate its conformity with CE Ra-
dio standards.
Antenna gains exceeding the ERP and EIRP power limits should not be used under any circumstances. For mobile
and fixed operating configurations, the WWAN antenna gain (including cable loss) must not exceed 6 dBi at 700
MHz, 850 MHz, 1700 MHz and 1900 MHz, 9 dBi at 2500/2600 MHz, and 1 dBi at 2300 MHz, in order to comply with
RF exposure limits.
For further information on WWAN interfaces, please see the following manual: bintec Dm781-I Cellular Interface.
3 Components and power supply bintec elmeg GmbH
14 bintec H2 Auto Compact
Table of contents