Binzel Neutrix User manual

Page 1
NEUTRIX INSTRUCTION MANUAL

Page 2
Contents
1. Manufacturers recommended use
1.1 Safety
2. Drawings & parts description
3. Application
4. Technical data & contents of standard package
5. Before use :-
5.1 Selection of grinding position
5.2 Selection of electrode diameter
5.3 Selection of grinding angle
6. Using the Neutrix
6.1 Operating the Neutrix
6.2 How to grind the electrode
7. Maintenance: -
7.1 Replacing the filter.
7.2 Replacing the diamond wheel
8. Parts diagram
9. Parts list
Supplied in Australia and New Zealand by:
Binzel Pty Ltd.
ACN: 13 006 341 297
42 Hinkler Road
Mordialloc
VIC 3195
Australia
Phone:+61 (0)3 9580 6500
Fax: +61 (0)3 9580 8796
http://www.Binzel.com.au/

Page 3
Manufacturers recommended use
Neutrix has been designed for the sole purpose of grinding tungsten
electrodes. Any use, which is not described in this manual, is strictly
prohibited.
It is very important that the user reads and understands the contents of
this instruction manual.
1.1 Safety: -
!Check that the machine is undamaged.
!Do not use the machine without the filter.
!Change the filter in accordance with the instruction manual.
!Only turn the machine on when the electrode holder is in the grinding
chamber.
!Do not remove the electrode holder before the motor has come to a
complete stop.
!Repairs and maintenance must only be carried out by authorised
personnel.
!Do not use the machine in humid places.
!Only use original replacement parts.
!Unplug the machine from the mains supply before any maintenance work
is undertaken.

Page 4
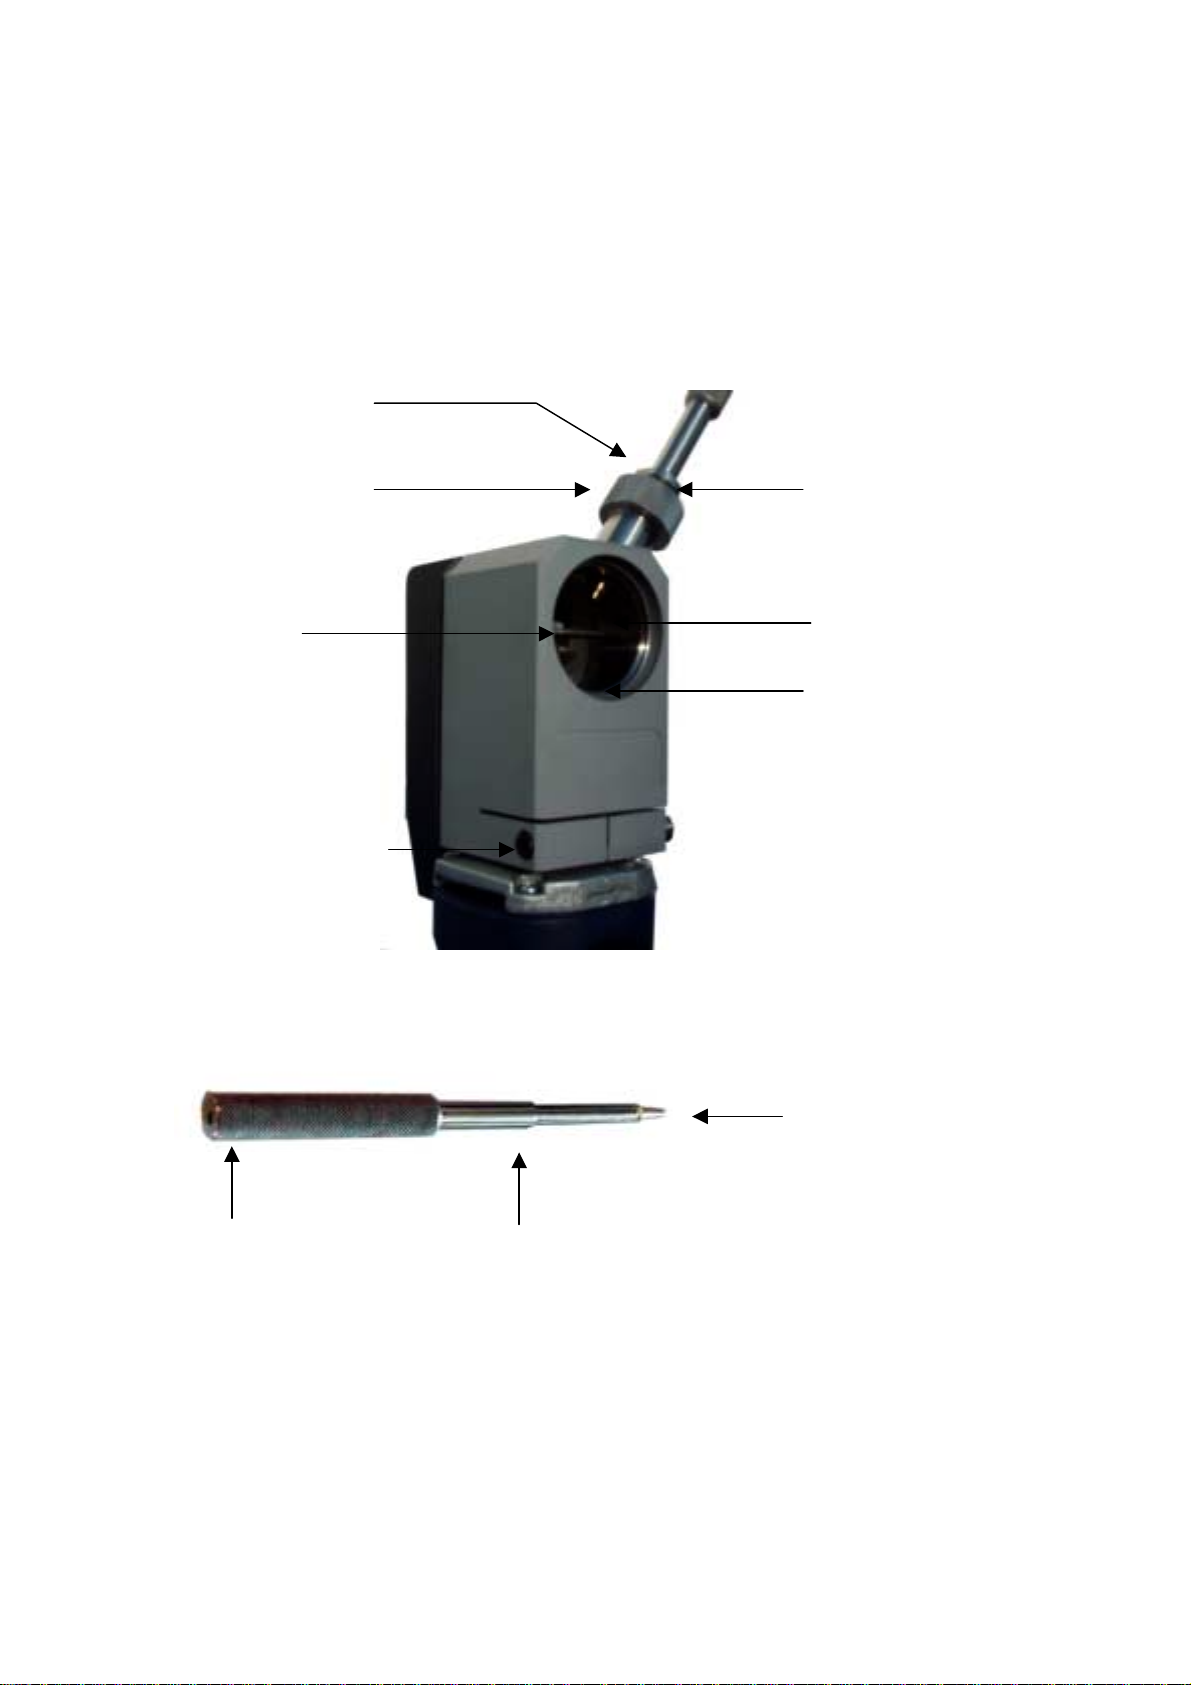
2. Drawing & parts description
6
20
2
12
15
1.1
1.2
Electrode holder guide
Eccentric plate to select
grinding position
Grinding head
Depth setting gauge.
Allen screw to tighten
the grinding head
On/Off switch
Mains cable
25
26
25.2
25.3
1
Filter housing
Angle degree
scale
(1 step= 5 °)
Filter cassette
Machine
number
Filter cover
Allen screw to
fix the filter
cover
Motor
Adjustment of
turning speed
Page 5
6
22
29
19
Electrode holder
guide
Knurled wheel
Inspection
cover
Allen screw
14
3
5
Grinding stop
Diamond wheel
Spindle for
diamond
wheel
Electrode clamp
5 Electrode holder Stop
Part Nos for electrode clamps
16.1 for 1.0 mm
16.2 for 1.6 mm
16.3 for 2.0 mm
16.4 for 2.4 mm
16.5 for 3.2 mm
16.6 for 4.0 mm

Page 6
3. Application
Neutrix is manufactured to offer the following options:
!Grinding of oxidated or pure tungsten electrodes.
!Grinding electrodes with diameters from 1,0 – 4,0 mm.
!Variable angle adjustment from 15° to 180°.
!If it is necessary to grind electrodes shorter in length than 15mm–
a special electrode clamp can be supplied.
!Integrated filter to remove the grinding dust.
!To be able to grind tungsten electrodes on site.
!To achieve an exact and longitudinal ground tip.
4. Technical data & contents of standard package
Motor: 850 Watt
Power: 230V, 50 Hz. Insulation according to EEC 50144.
Rpm: Adjustable between 7000 and 32000
Weight: 2.5 kg
Filter: Inhalation filter.
Diamond wheel: Ø 40 mm
•NEUTRIX
Containing: - Motor Type 850E
-Grinding head with filter housing and filter
-Diamond wheel Ø 40 mm
-Electrode holder
-Electrode clamps 1.6, 2.4, 3.2 mm
•Tools -Allen key 8 mm
-Allen key 4 mm
-Spanner 13/17 mm
-Spanner 13/14 mm
•Plastic bag to remove the filter

Page 7
5. Before use
Note: Ensure that the grinding head (2) is centred and tightly fixed
with the allen screw (15) to the motor.
5.1 How to select grinding position
With the Neutrix it is possible to select 3 different grinding positions
!Unscrew the knurled wheel (22)
!Lift the eccentric plate (20) and turn through 90° to the next position,
place the eccentric plate back in the slide of the angle adjustment.
!Tighten the knurled wheel (22)
Eccentric plate to select the grinding position
1
(left mark) 2
(centre mark) 3
(right mark)
Inside grinding
position Centre grinding
position Outside grinding
position

Page 8
5.2 Selection of electrode diameter
There are 3 different electrode clamps (1.6, 2.4, 3.2 mm) supplied with the
machine.
Unscrew the electrode clamp from the electrode holder and replace with the
required size.
5.3 Selection of angle
!Loosen slightly the knurled wheel (22).
!Place the degree sign of the guide (20) at the selected angle.
!Tighten the knurled screw (22).
Note: 15° is the smallest included angle of the electrode, that can be
ground.
180° position makes a flat on the electrode point.
(1 step = 5°)
6. Using the Neutrix
!Connect the machine to the power supply.
!Adjust the machine speed according to the recommendations on page 8.
!Select the electrode clamp to suit the tungsten to be ground.
6.1 How to operate Neutrix
!Place the tungsten electrode in the electrode holder (5) with
approximately 35 mm protruding.
!Push the electrode clamp into the depth setting gauge (12) until the clamp
is located into the allen screw (15), turn clockwise to tighten.
!Put the electrode holder through the electrode holder guide (6) until the
tungsten is touching the diamond wheel, this operation can be observed
through the inspection cover (29).
!Start the motor (11).

Page 9
6.2 How to grind the electrode
!Turn the electrode holder, whilst pushing the electrode against the
diamond wheel. Do not push too hard in order to avoid blueing of the
electrode. This can be viewed through the inspection cover
!The grinding is completed when the stop of the electrode holder (14)
touches the end face of the electrode holder guide (6).
!Switch off the motor and remove the electrode holder when the motor has
come to a complete stop.
!Place the electrode holder in the depth setting gauge. Turn anti clockwise
and the electrode can be removed.
Recommended turning speed
Diam. of the electrode 1.0 mm 1.6 mm 2.0 mm 2.4 mm 3.2 mm 4.0 mm
Speedadjustment 665544
Note: Do not press too hard at the electrode holder before the stop (14)
has been reached.
Remember to put the electrode holder into the grinding chamber
before you start the machine and to keep it there until the motor
has stopped. (Otherwise grinding dust may come out of the
chamber).

Page 10
7. Maintenance
Remove the plug from the power supply before carrying out any
maintenance or repairs.
7.1 Replacing the filter
The filter has to be changed when the amount of dust makes it difficult to
watch the grinding process through the inspection cover (29).
1. Loosen the allen screw (25.3) at the filter housing (25).
2. Remove the filter cover (25.2).
3. Remove the filter cassette (26) and put it into the plastic bag for
disposal.
4. Insert a new filter cassette so that the rubber seal is sitting tight to the
grinding head (2).
5. Mount the filter cover and tighten the screw.
7.2 Replacing the diamond wheel
1. Remove the electrode holder (5).
2. Loosen the knurled screw (22)
3. Unscrew the electrode holder guide (14) using the spanner (SW 17)
4. Remove the grinding chamber (10) including the inspection cover
(29).
5. Unscrew the nut retaining the diamond wheel, using the spanners
(SW14 & SW13), two flats are located on the motor spindle behind
the diamond wheel for this purpose.
6. Remove the diamond wheel.
7. Insert a new diamond wheel and replace the retaining nut.
8. Replace the grinding chamber and inspection cover
Replace the electrode holder guide
9. If the grinding head chamber is too dirty it can be cleaned with an
alkalised solution and rinsed with water. If doing so remember to
remove the filter first

Page 11
8. Parts diagram:-

Page 12
9. Parts list
Pos. Description Part No.
0 Neutrix 1 piece N-88896022
1 Motor 1 piece N-44510010
1.1 On/Off switch 1 piece N-44510011
1.2 Power cable 1 piece N-44510012
1.3 Brush for motor 2 pieces N-44510013
2 Grinding head 1 piece N-44510020
3 Diamond wheel Ø 40 mm 1 piece N-44510030
5 Electrode holder 1 piece N-44510050
8 Spindle for diamond wheel (SW 13) 1 piece N-44510080
10 Grinding chamber 1 piece N-44510100
14 Guide for electrode holder (SW 17) 1 piece N-44510140
15 Allen key to tighten the grinding head 1 piece N-44510150
16 See below
16.2 Electrode clamp Ø 1,6 mm 1 piece N-44510162
16.4 Electrode clamp Ø 2,4 mm 1 piece N-44510164
16.5 Electrode clamp Ø 3,2 mm 1 piece N-44510165
19 Allen screw (M5 x 30) 1 piece N-44510190
20 Eccentric plate to select grinding position 1 piece N-44510200
22 Screw 1 piece N-44510220
25 Filter housing 1 piece N-44510250
25.2 Filter cover 1 piece N-44510252
25.3 Allen key to fix the filter cover (M 5 x 6) 1 piece N-44510253
26 Filter cassette 1 piece N-44510260
29 Inspection cover 1 piece N-44510290
31 Spring 1 piece N-44510310
32 Rubber seal big 1 piece N-44510320
33 Screw to fix filter cassette 4 pieces N-44510330
34 Sticker „Neutrix“ 1 piece N-44510340
35 Safety sticker 1 piece N-44510350
36 Degree scale 1 piece N-44510360
37 Screw to fix diamond wheel (M 8, SW 13) 1 piece N-44510370
38 Rubber seal small 1 piece N-44510380
Accessories
39 Case for machine with foam 1 piece N-44510390
40 Spanner (SW 13, SW 17) 1 piece N-44510400
41 Spanner (SW 13, SW 14) 1 piece N-44510410
42 Allen key 8 mm 1 piece N-44510420
43 Allen key 4 mm 1 piece N-44510430
44 Plastic bag for disposal of filter 1 piece N-99140003
16.1 Electrode clamp Ø 1,0 1 piece N-44510171
16.3 Electrode clamp Ø 2,0 1 piece N-44510172
16.6 Electrode clamp Ø 4,0 1 piece N-44510174
Table of contents


