Biocontrol Assurance GDS PPMX User manual

55240.R001102015
ASSURANCEGDS®PPMX
USERMANUAL
12822SE32ndStreet
Bellevue,WA,USA98005
Phone425.603.1123
Fax425.603.0070
www.biocontrolsys.com

ASSURANCEGDS®PPMXUSERMANUAL 1
TableofContents
I. Safety .................................................................................................................... 3
Voltage
SafetyInterlock
PipetteHeads
TipWasteContainer
Tray
Liquids
ReplacementParts
II. Introduction .......................................................................................................... 5
StandardEquipment
Documentation
Protocols
Disposables
TechnicalSpecifications
III. Setup/Operation................................................................................................... 8
Unpacking
RemovableTray
RearPanelConnections
FrontPanelConnections
PowerOnandStartUp
TouchscreenTabletOverview
AlignmentProtocol
LogIn
AddPipetteHead(s)
SetDate&Time
CreateUsers
RunaProtocol
Step‐by‐stepWizard
PauseorStopaRunningProtocol
ViewResults

ASSURANCEGDS®PPMXUSERMANUAL 2
RunReport
ImportProtocol
ExportProtocol
ChangeSerialNumberinTabletSoftware
IV. Troubleshooting.................................................................................................. 20
CommunicationLoss
Re‐startingaProtocolafterCommunicationLoss
HoodOpen
RefillTipRack
TechnicalServices
V. Maintenance....................................................................................................... 22
Cleaning
PipetteHeadCalibration
AlignmentCalibration
Warranty
InstrumentReturnProcedure
VI. AppendixA.......................................................................................................... 24
PartsList
VII. AppendixB.......................................................................................................... 26
BeforeYouCallUs
VIII. AppendixC.......................................................................................................... 27
MaintenanceLog
IX. AppendixD.......................................................................................................... 28
WarrantyTerms
X. AppendixE.......................................................................................................... 29
PipetteVerification
XI. AppendixF.......................................................................................................... 30
PackUp

ASSURANCEGDS®PPMXUSERMANUAL3
Safety
ReadthissectionbeforeinstallingandoperatingtheAssuranceGDS®PPMX.
Thisinstrumentisintendedtobeusedinalaboratoryenvironmentbytrainedtechnicalpersonnel.
Forsafeandproperuseofthisinstrument,itisrequiredthatbothoperatingandservicepersonnelfollowthe
instructions
containedinthisguidewheninstalling,operating,cleaning,andmaintainingtheinstrument.
Thefollowingsafetyprecautionsmustbeobservedduringallphasesofoperation,service,andrepairofthe
instrument.Failure
tocomplywiththeseprecautionsorwithspecificwarningselsewhereinthisuser’sguide
violatessafetystandardsofdesign,
manufacture,andintendeduseoftheinstrument.BioControlSystems
assumesnoliabilityforthecustomer’sfailuretocomplywiththese
requirements.
ThePPMXhasbeencertifiedtosafetystandardsrequiredinCanada,Europe,andtheUnitedStates.Refertothe
instrumentrearpanellabelandtheDeclarationofConformitydocumentforthecurrentstandardstowhichthe
instrumenthas
beenfoundcompliant.
Thefollowingelectronicandhazardsymbolsmayappearontheinstrument:
Thefollowingsafetynoticesmayappearinthisdocument:
Voltage
Accesstotherearpanelisnecessarybecausetheinstrumentmustbedetachedfromallvoltagesourcesbefore
service,repair,
orexchangeofparts.
Operatetheinstrumentusingtheapprovedpowersupplyprovidedandonlyatthevoltagespecifiedontherear
panellabelof
theinstrument.

ASSURANCEGDS®PPMXUSERMANUAL4
SafetyInterlock
ThePPMXisconfiguredwithasafetyinterlock,whichisusedwhentherotatingcoverisinstalledonthe
instrument.
Thesafetyinterlockpreventstheinstrumentfromoperatingwhentherotatingcoverisopen.
PipetteHeads
Theinstrumentiscapableofgeneratingsignificantforcesthatcouldcausepotentialinjurytotheuser.Foran
instrumentwith
therotatingcoverinstalled,thesafetyinterlockinthecoverwilldisabletheinstrumentmovement
ifthecoverontheinstrument
isopen.Foraninstrumentinstalledinahood,theexternalsafetyinterlocksensor
mountedontheinstrumentwilldisablethe
instrumentmovementifthehooddoorisopen.
TipWasteContainer
Thetipwastecontainershouldbeemptiedinaccordancewithnationalandlocalsafetyregulations.
Tray
Themovingtrayiscapableofcausinginjurybypinching.Foraninstrumentwiththerotatingcoverinstalled,the
safetyinterlock
inthecoverwilldisabletheinstrumentmovementifthecoverontheinstrumentisopen.
Liquids
Observesafelaboratorypracticeswhenhandlingliquids.Ifworkingwithbiologicalsamplesorchemicalsubstances,
ensurethat
thereisproperventilation,andwearpersonalprotectiveequipment(PPE),suchassafetyglasses,
gloves,andprotectiveclothing
atalltimes.
RefertotheSafetyDataSheetsforsolventsbeforeuse.
ReplacementParts
Besuretouseonlyreplacementpartsspecifiedinthisusermanual.Donotrepairorchangepartswhicharenot
listedinthis
usermanual.Ifitisnecessarytochangepartsnotlisted,pleasecontactBioControlSystems
technicalservices.

ASSURANCEGDS®PPMXUSERMANUAL5
Introduction
TheAssuranceGDS®PPMX®isanautomatedmagneticparticlesandliquidhandler.Itiscapableofdispensing
AssuranceGDSreagentswhichinclude,ConcentrationReagent,WashSolution,ResuspensionBufferandselect
media(BHI/DFB).ReagentdispenseprotocolshavebeencreatedforallAssuranceGDSassays.Inaddition,the
PPMXhasalsobeenprogrammedtoautomateAssuranceGDSPickPen®ImmunomagneticSeparation(IMS)
procedures.ThisusermanualisintendedtoassistPPMXuserswithsystemstart‐up,basicoperation,maintenance
andservice.
StandardEquipment
AfterthePPMXandaccessoriesareunpacked,thefollowingitemsshouldbepresent:
•
PPMXInstrumentwithattachedAlignmentHead,Half8‐channelTipEjectorFootandrotatingcover
•
ControlTabletwithTRILUTIONmicrosoftwareandAssuranceGDSprotocolspre‐loaded
•
ControlTabletHolder
•
RemovableTray96well(x2)
•
MAX8x200PipetteHead
•
TipReloadRack(x3)
•
TipDisposalBin(x2)
•
AssuranceGDSReagentHolder
•
AssuranceGDSPickPenMagneticHead
•
AssuranceGDSPickPenTipPuck
•
AssuranceGDSPickPenStand
•
PPMXGelCoolingBlock
•
USBCable
•
PowerSupply(110V/220V)
•
PowerCords(USandEU)
•
AllenWrench,5mm
•
BlackPlugforOutletontheRearPanel
Forpartnumbers,refertoAppendixA,PartsList.

ASSURANCEGDS®PPMXUSERMANUAL6
Documentation
ThefollowingdocumentsareincludedwiththePPMX:
•
UserManual
•
QuickSetupGuide
•
Installation/Operation/PerformanceQualification(IQ/OQ/PQ)Procedures
•
DeclarationofConformity
•
ValidationCertificateforTRILUTIONmicro
•
GilsonQualityControlReportPipetteHead
Protocols
•
AlignmentProtocol
•
AssuranceGDSReagentDispenseprotocols(R‐)
•
AssuranceGDSPickPenIMSprotocols(IMS‐)
Disposables
Theitemsbelowaresoldseparatelybutarerequiredforuse:
•
200µLBlisterTipPacks
•
ReagentReservoirs
•
AssuranceGDSPickPenTips
•
AdhesiveFilmSheets&Strips
•
AssuranceGDSSampleWells&Bases
•
ResuspensionPlates
Forpartnumbers,refertoAppendixA,PartsList.

ASSURANCEGDS®PPMXUSERMANUAL7
TechnicalSpecifications
PleasebeawareofthefollowingbeforeoperatingthePPMX.
ChangesormodificationstothisdevicenotexpresslyapprovedbyBioControlSystems
couldvoidthewarranty.
Theinstrumentcomplieswithpart15oftheFCCRules.Operationissubjecttothefollowingtwoconditions:(1)
Thisinstrument
maynotcauseharmfulinterference,and(2)thisinstrumentmustacceptanyinterference
received,includinginterferencethat
maycauseundesiredoperation.
ShieldedcablesmustbeusedwiththeinstrumenttoensurecompliancewiththeFCCClassAlimits.
TechnicalSpecificationDefinition
CommunicationsUSB
ConnectionsThreeUSBhostportsandoneUSBdeviceport
Twoinputs(contactclosure,TTL),tworelayoutputs,andoneswitched+12VDC1Aoutput
NOTICE:Switchingvoltageshigherthan30Vorgreaterthan1Aofcurrentmaydamagethe
instrument
Dimensions54.4X65.5X53.1cm(21.4X25.8X20.9in)
EnvironmentalConditionsIndooruse
Altitude:upto2000m
Temperaturerange:5°C–40°C
Humidity:Maximumrelativehumidity80%fortemperaturesupto31°C,decreasinglinearity
to50%relativehumidityat40°C
PowerRequirementsExternalPowerSupply
VoltageInput
Frequency:50to60Hz
Voltage:100‐240VAC
VoltageOutput
Voltage:24VDC
CurrentRating:6.25A,150W
FrontPanel
TwoUSBhostportsandSTOPbutton
XYZMotion500mm/secinXdimension
1‐550mm/sec(350mm/secdefault)inYdimension(tray)
140m/secinZdimension
IMS(Immunomagnetic
Separation)head
PickPen®Magnetichead
IMS(Immunomagnetic
Separation)tips
PickPen®tipcovers
Liquidhandlinghead
MAX8x200
LiquidhandlingtipsDIAMONDfiltertips,DFL10
RemovabletrayCapacity
9‐position
SafetyandComplianceCertifiedtosafetystandardsspecifiedforCanada,EuropeandtheUnitedStates.Refertothe
instrumentrearpanellabelandtheDeclarationofConformitydocumentforthecurrent
standardstowhichtheinstrumenthasbeenfoundcompliant.

ASSURANCEGDS®PPMXUSERMANUAL8
Setup/Operation
TheAssuranceGDS®PPMX®anditscomponentsshouldbesetupintheorderdescribedinthissection.Gilson
TRILUTION®micro
providessoftwarecontrolofthePPMXduringsetupandoperationasdescribedinthissection.
Formoreinformation
aboutTRILUTION®micro,viewthehelpinformationinthesoftware,accessiblefromthe
button.
Unpacking
ThePPMXisdeliveredwithmostmajorcomponentsalreadyassembled.Keeptheoriginalpackagingincasethe
PPMX
mustbereturnedtoBioControlSystemsforrepair.
Itisrecommendedthattwo
peopleliftthePPMXout
ofthe
box,asitweighsapproximately55
lbs.(24.9kg).
1
Opentopofprintedcardboardbox.
2
Removetheopen‐endedcardboardbox.
3
Removetheboxofaccessoriesandopenit.
4
Lifttheprinted,outercardboardboxuptoremove.
5
GripthePPMXattherecessesnearthebase.Thereis
onerecessin
thefront,oneintheback,andoneon
eachside.Usetheserecesses
whenliftingthePPMX
outofthefoam‐lined,cardboardtray.
DonotattempttoliftthePPMXfromthecoveror
fromtheX‐arm(thehorizontalarm).Alwayslifttheinstrumentfromitsbase.
6
PlacethePPMXonastable,levelsurfacesuchasalabbench,labcart.RefertoSection1:Safety.
7
RemovethebagcoveringthePPMX.Youmayneedtoliftthefrontandthebackslightly.
8
Removethefilmprotectingtherotatingcover.
9
Removetheshippingbracefromtherearof
theinstrument.
Loosenthethumbscrews
securingtheshippingbracetothe
PPMX.
Afterremovingtheshippingbrace,replace
andtightenthe
thumbscrews.
10
Removetheshippingbracketthatattachesthearmtotheinsideoftheunit
usingtheallenwrenchprovided.
11
Removethewhitefoamblockpreventingthetrayfrom
movingandsecuring
thealignmentcablecord.
Keeptheshippingbrace,shippingbracket,allenwrench
andfoamblockwithpackaging.

ASSURANCEGDS®PPMXUSERMANUAL9
RemovableTray
Aremovabletrayforplacementoflabwareandtipracksisrequired.Whileholdingthehandlesonthesidesof
thetray,lowerthetrayonto
themetalcarrier.Itiskeyedandwillonlymountoneway.Observethat
thetrayis
levelandfullyseatedonthemetalcarrier.
RearPanelConnections
Refertothediagramsonthenextpagewhenmakingthe
connectionsdescribedinthissection.
Theinput/outputcontactsontherearpanelareusedfor
communicationbetweenthealignmentheadandTRILUTION
micro
andforcommunicationbetweentheexternalsafety
interlocksensorandTRILUTIONmicro.Thecontactscanalsobe
usedto
controlperipheraldevices.Refertothediagramforthe
locationoftheinput/outputports.
ContactInputs–ThebottomterminalblockonthePPMXhas
twopairedinputcontactsthatarelabeled4and5.Never
connectvoltageshigherthan5VDCtoaninput.Whenusing
TTLsignals,besuretomatchGROUNDconnections.
ContactOutputs–ThebottomterminalblockonthePPMXhastwopaired,isolated‐relaycontactclosuresthat
arelabeled1and2.
DCPowerOutput–Thetopterminalblockhasone+12VDCoutput,whichislabeled.
ThePPMXhasonefunctionalUSBhostport(themiddleport)ontherearpanel.Thetopportontherearpanelis
not
supported.TheUSBportscanbeusedtoconnectUSBdrives(whichcanalsobeseenbythetabletwhen
pluggedintothePPMX),
keyboard,mouse,oranyothercompatibledevice(heater/chiller,barcodescanner,or
shaker,forexample).
TheUSBdeviceportisusedforcommunicationbetweenthePPMXandthetabletorcomputer.AUSBcableis
providedasastandardaccessory.RefertothediagramforthelocationoftheUSBdeviceport.
TheEthernetPort,RS‐232andHDMIarenotsupported.

ASSURANCEGDS®PPMXUSERMANUAL10
1
Input/Output
2
USBhost(NotSupported)
3
USBhost
4
Ethernet(NotSupported)
5
USBdevice
6
RS‐232(NotSupported)
7
HDMI(NotSupported)
8
Powerreceptacle
9
Powerswitch(MAINS)
Usethepowercordontheexternalpower
supplytomaketheconnectionbetweenthe
powerreceptacleonthe
PPMXandthe
externalpowersupply.Theconnectionfromtheexternalpower
supplytothePPMXusesa
connectorwith
alockingcollar.Checkthealignmentofthe
pinsandthenpushitinuntilitclicksandlocks
in
place.Todisconnect,pullbackonthe
lockingcollarandthendisconnectthecable
fromtherearpanelofthe
PPMX.Locatetheappropriatepowercordforyourlinevoltageandthenmaketheconnectionbetweenthe
externalpowersupplyand
theACpowersource.
ASSURANCEGDS®PPMXUSERMANUAL11
FrontPanelConnections
ThePPMXhastwofunctionalUSBhostportsonthefrontpanel.TheUSBportscanbeusedtoconnectUSB
drives(whichcanalsobeseenbythetabletwhenpluggedintothePPMX),
keyboard,mouse,oranyother
compatibledevice(heater/chiller,barcodescanner,orshaker,forexample).
Inasituationwhereanemergencystopisrequired,pressingtheSTOPbuttonstopsthePPMXimmediately.The
protocol
stopsandresultsaredisplayed(aftertouchingOKonthenotification).
1
USBhost
2
STOP
PowerOnandStartUp
TostartthePPMX:
1
MakesurethatthePPMXisconnectedtotheexternalpowersupplyandthattheexternalpowersupplyis
connected
toapowersource.
2
Turnpoweronattheexternalpowersupply.
3
TurnthePPMXpoweronusingtheMAINSpowerswitchlocatedontherearpanel.Theindicatorlighton
thefrontpanel
will
illuminategreen.
4
ConnectthecontroltablettothePPMXandpoweriton.
5
Closetherotatingcoverdoor.ThePPMXwillnotoperatewiththecoverorhoodopen.
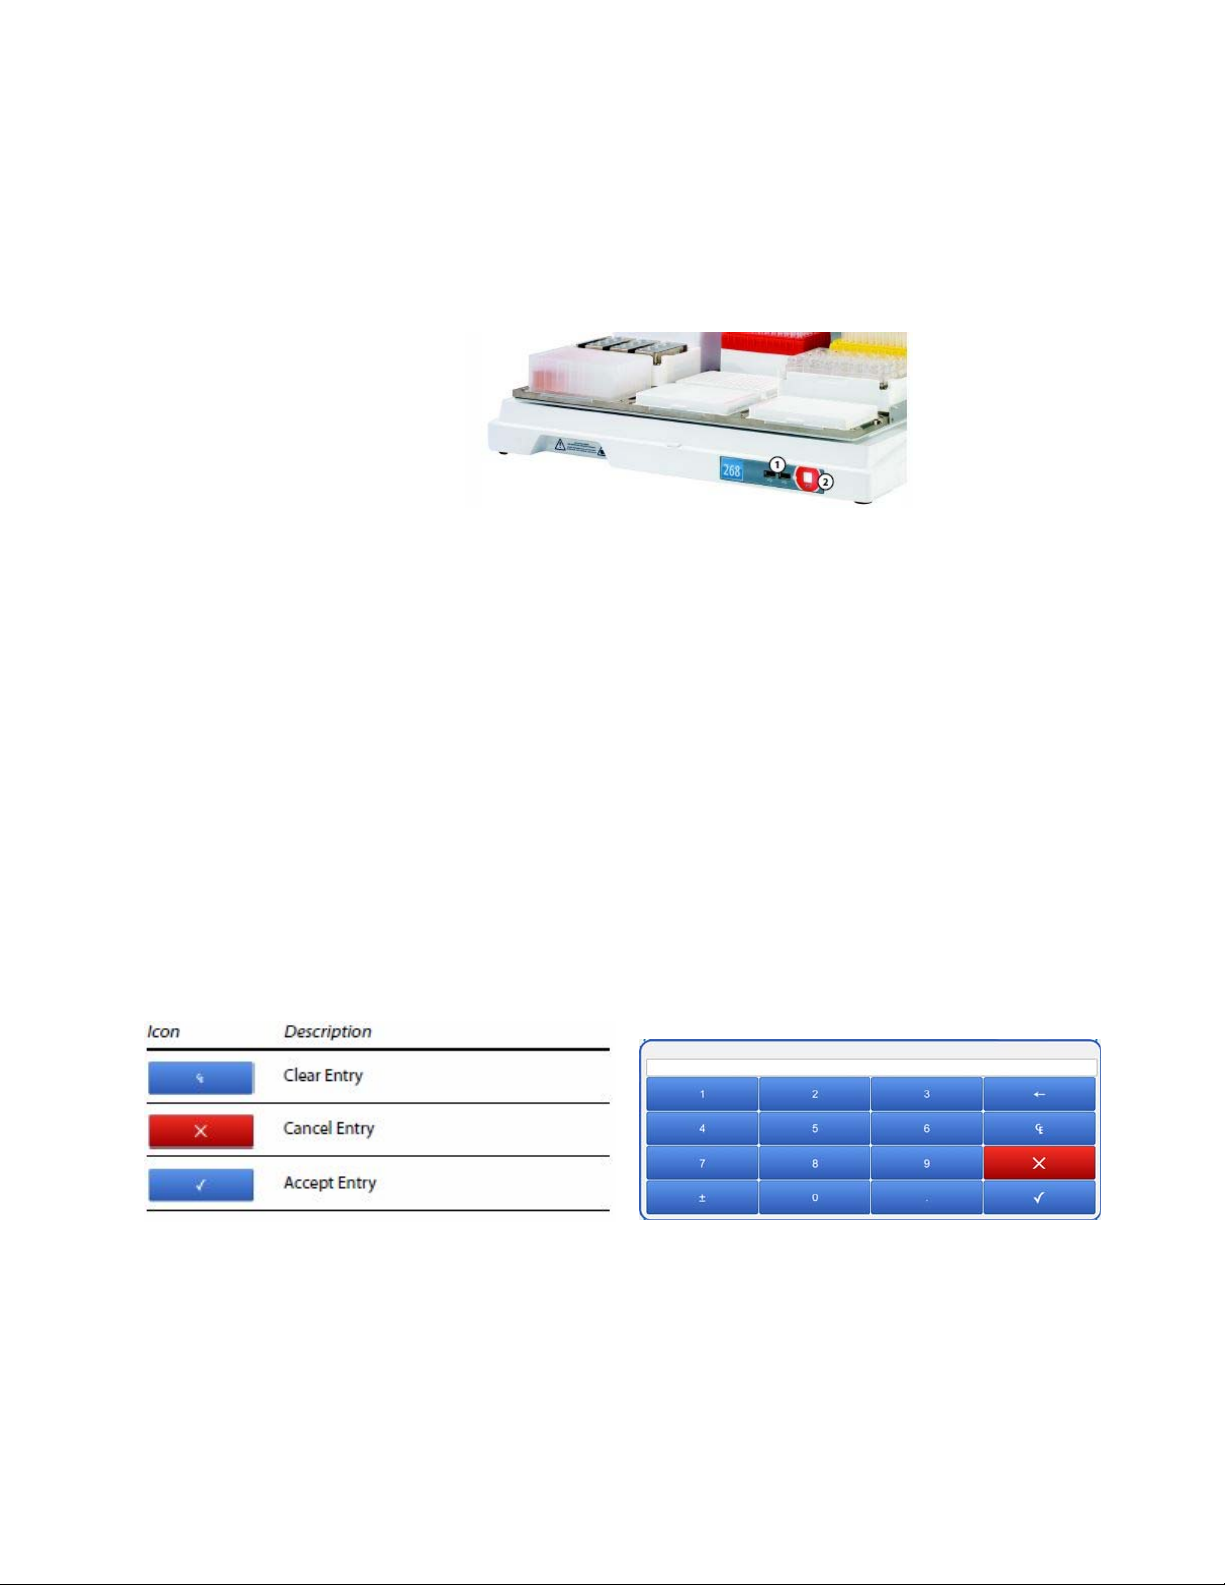
TouchscreenTabletOverview
ThefollowinginformationprovidesanexplanationofuniquesoftwareinteractionswhenrunningTRILUTION
microonthe
suppliedtouchscreencontroltablet.Itisrecommendedtokeepthetabletpluggedintoapower
sourcewheneverpossible.CommunicationerrorscanoccurbetweenthePPMXandcontroltabletifthetablet
batteryistoolow.
Refertothetablebelowforadescriptionoftheiconsusedinthe
on‐screenkeyboard.

ASSURANCEGDS®PPMXUSERMANUAL12
ThefollowingiconsappearonseveralscreensinTRILUTIONmicro.
Toviewtheoptionstoshutdownthecontroltabletand/orTRILUTIONmicro,touchonthemainmenu:
•
TouchShutdowntocloseTRILUTIONmicroandshutdownthecontroltablet.
•
TouchRestartTRILUTIONmicrotorestartonlythesoftware,andnotthecontroltablet.
•
TouchCanceltogobacktothemainmenu.
AlignmentProtocol
RuntheAlignmentProtocoltoensureproperalignmentofthePPMX.Itisonlynecessarytorunthisprotocol
whensetting
uptheinstrumentforthefirsttimeorifanalignmentissueissuspected.
1
Passtheendofthealignmentcablecordwithpre‐wired
connectorthroughthe
outletatthebackofthePPMX.
2
TheconnectorislabeledBOTTOMbecauseitconnectstothe
bottomsetof
input/outputportsontherearpanelofthe
PPMX.Maketheconnection.
3
Theclipstosecurethetipracksonthetraycaninterferewiththealignment.Ensure
thattheclips()arepositionedasshowninthediagram
below,andthatthe
thumbscrewshavebeentightened.
4
Closetherotatingcoverorthefumehooddoor.
5
ThetabletstartsTRILUTIONmicroautomaticallyonpowerup.
6
TouchRunaprotocol.
7
SelectAlignmentProtocolandthentouchNext.
ASSURANCEGDS®PPMXUSERMANUAL13
8
TheScanningdialogappearswhilethesoftwarechecksthat the
PPMXis
connected.Ifconnected,thesoftwaregoestothenext
screen.Ifnotconnected,a
messagewillappearsuggesting
possiblesolutions.
9
TouchSkipsetuponLabwaresetupguide.
10
TouchRunprotocol.
11
Waitapproximately3minuteswhiletheAlignmentProtocolruns.
12
AnotificationappearswhentheAlignmentProtocoliscomplete.
TouchContinue.
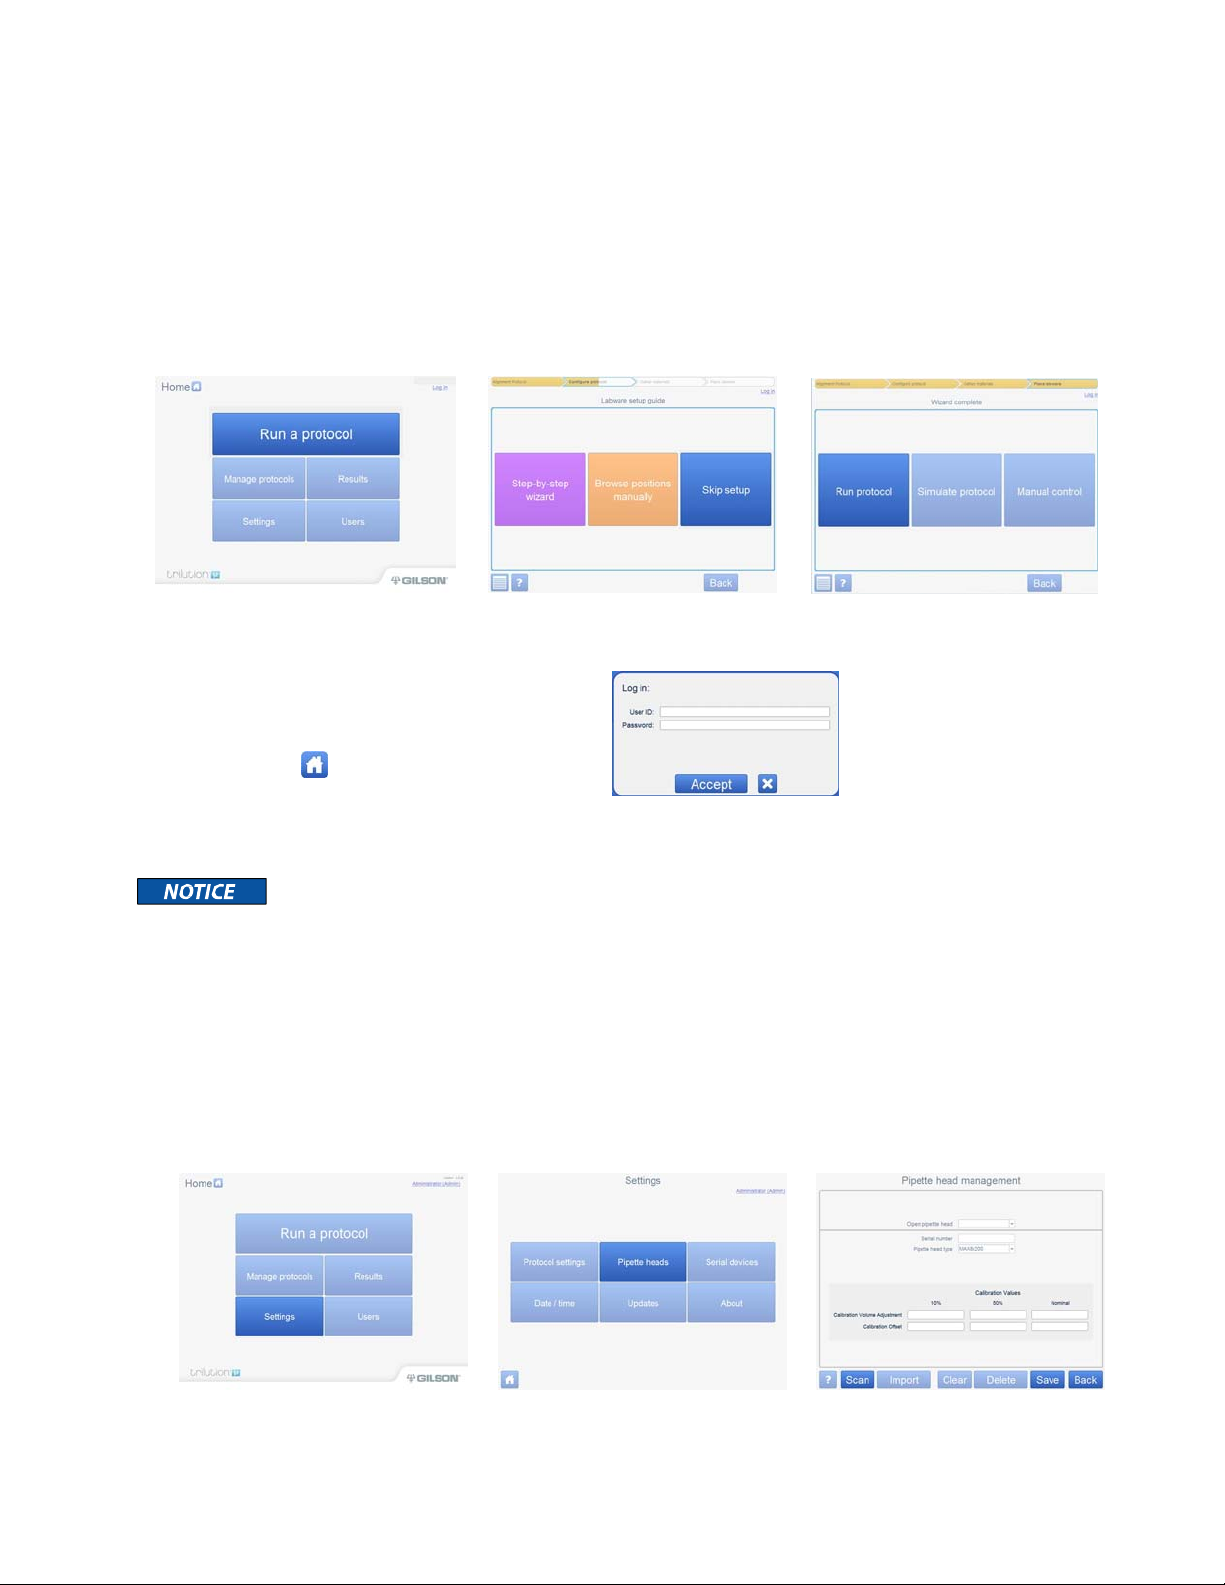
LogIn
1
TouchHometogotothemainmenu.
2
TouchLogin.
3
EntertheUserIDandpasswordandaftereachentryusingtheon‐screenkeyboardon
thetablet,andthen
touchAccept(ortheXtocancel).
TheUserIDis
AdminandthepasswordisGilson268
AddPipetteHead(s)
Eachpipetteheadthatmaybeusednow,orinthefuture,mustbeaddedpertheinstructionsthatfollow.
1
OntheTRILUTIONmicromainmenu,touchSettings.
2
OntheSettingsmenu,touchPipetteheads.
3
TouchScanandthenfollowtheon‐screendirectionstousethetabletcameratoscan
thebarcodeonthe
pipettehead,orenterthevaluesfromthedocumentation
suppliedwitheachpipettehead.
4
TouchSave.
5
Repeatsteps3and4foradditionalpipetteheads.Whenfinishedaddingheads,
touchBack.
ASSURANCEGDS®PPMXUSERMANUAL14
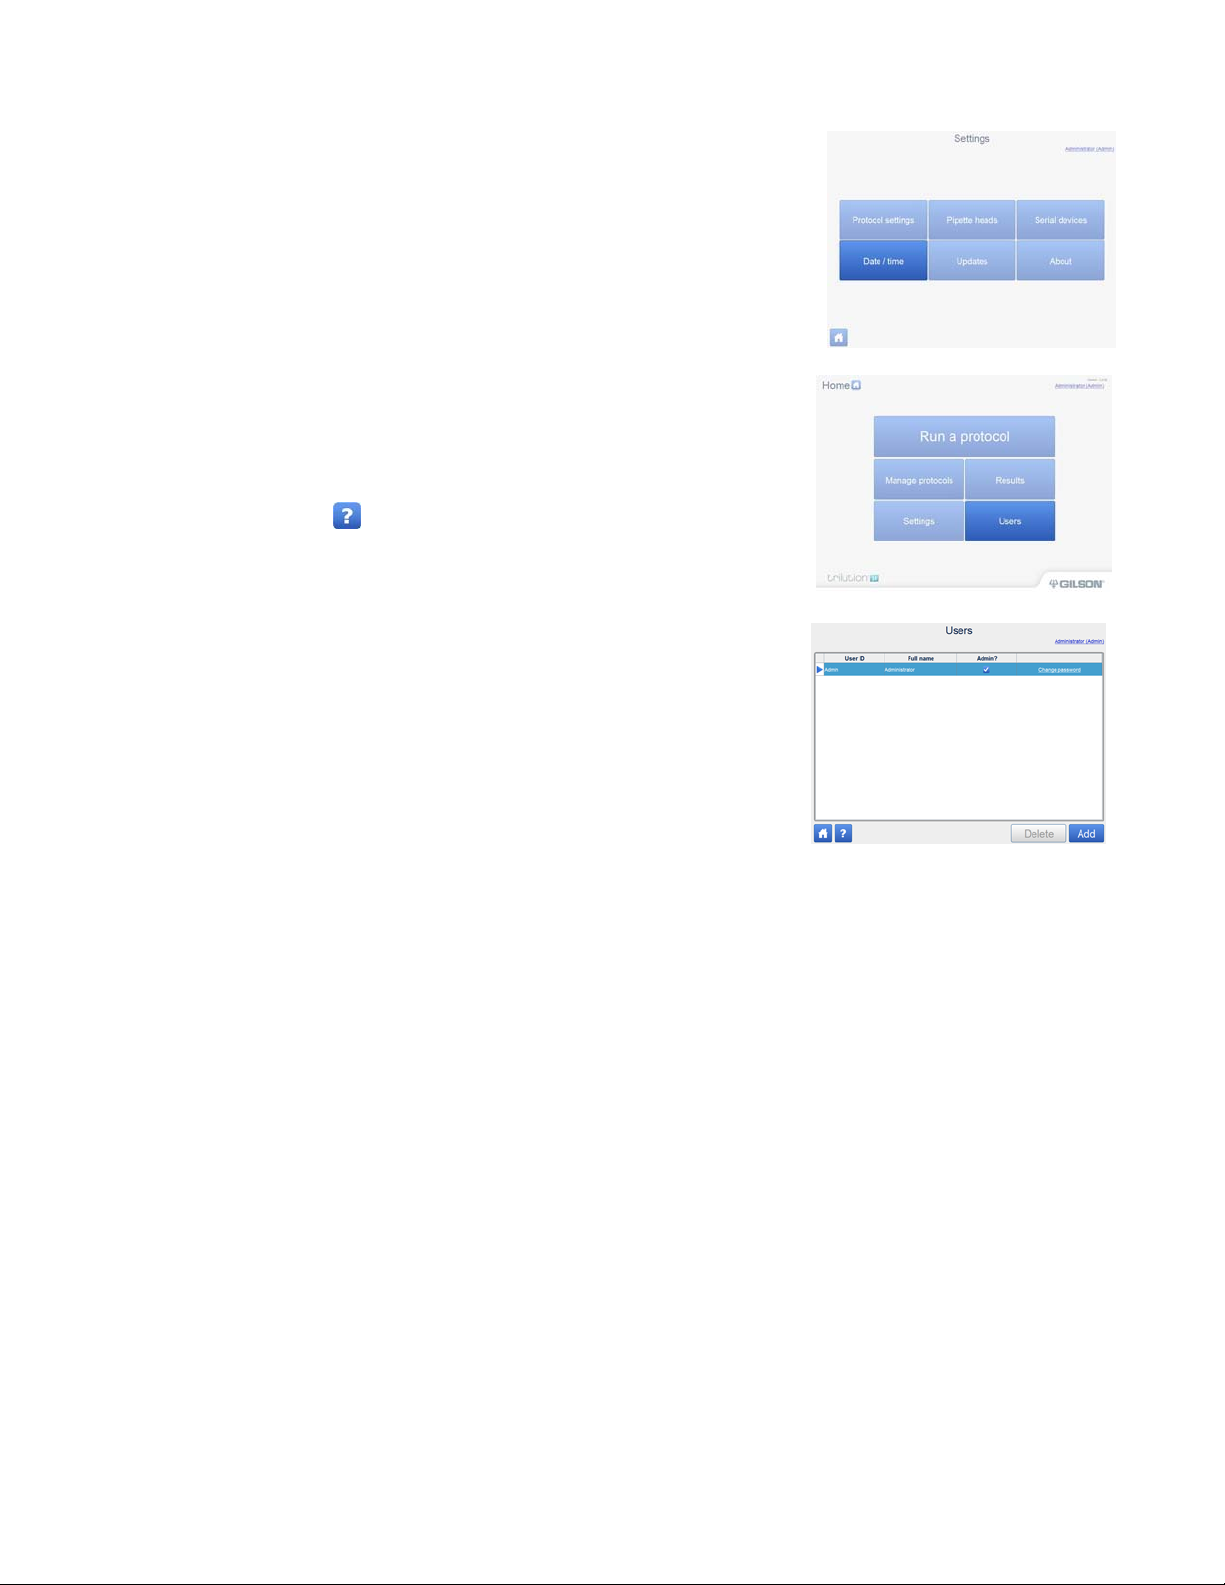
SetDate&Time
Setthedateandtimetoensureacorrectdate/timestamponprotocol
runs.Thisshould
onlyhavetobedoneonce.OntheSettingsmenu,touch
Date/time,andthensetthedate,time,andtimezone.
CreateUsers
Createuserstocontrolaccesstodifferentareasofthesoftware.
Togoto
theUsersscreen,touchUsersonthemainmenu.TheUsersscreen
displaysalistofusers.Onthisscreen,auserwhoisanadministratorcan
create,view,edit,anddeleteusers.
Refertotheinformationbelowtoaddusers.Forinformationabouthow
todeleteusersor
modifyuserinformation,viewthehelpinformationin
thesoftware,fromtheaccessiblebutton.
UserIDisusedwhentheuserlogsin.
Fullnameisthefullnameoftheuser.
Admin?isusedtoassignadministrativeaccesstoauser.AnAdmincan
add,delete,and
modifyusers,deleteorreplaceprotocols,deleteresults,
changepipetteheads,andaccess
thesettingsoptions.
Changepasswordisusedtochangeorassignthepasswordthatis
requiredwhenthe
userlogsin.
Toaddauser,touchAddandanewrowwillappear.
1
TouchintheUserIDfieldtoassignauserID.Theonscreenkeyboardwillappear.
a)
UsetheonscreenkeyboardtotypetheUserID.
•
TheUserIDcannotbethesameasanyotherUserID.
•
TheUserIDcanbefrom1to24characters.
•
TheUserIDcanuseanycharacterthatappearsontheonscreenkeyboard.
b)
TouchthecheckmarktoaccepttheUserIDandclosethekeyboardortouchXtoclosethekeyboard
withoutmakingany
changes.
2
TouchintheFullnamefieldtoassignafullnamefortheuser.Theonscreenkeyboardwillappear.
a)
UsetheonscreenkeyboardtotypetheFullname.
•
TheFullnamecanbefrom1to80characters.
•
TheFullnamecanuseanycharacterthatappearsontheonscreenkeyboard.
b)
TouchthecheckmarktoaccepttheFullnameandclosethekeyboardortouchXtoclosethe
keyboardwithoutmaking
anychanges.
3
TouchintheAdmin?fieldtotoggleadministrativeaccessonoroff.Acheckindicatestheuserisan
administrator.

ASSURANCEGDS®PPMXUSERMANUAL15
4
TouchChangepasswordtoassignapasswordfortheuser.Thechangepasswordscreenwillappear.
a)
TouchintheEnterpasswordfield.Theonscreenkeyboardwillappear.
b)
Usetheonscreenkeyboardtotypethepassword.
•
Thepasswordcanbeanylength.
•
Thepasswordcanuseanycharacterthatappearsontheonscreenkeyboard.
•
Thepasswordiscase‐sensitive.
•
Thepasswordisrequiredandcannotbeblank.
c)
TouchthecheckmarktoacceptthepasswordandclosethekeyboardortouchXtoclosethe
keyboardwithoutmaking
anychanges.
d)
TouchintheRe‐enterpasswordfieldandre‐typethepassword.
e)
TouchAccepttoacceptthepasswordandclosethechangepasswordscreen.Bothpasswordsmust
matchtobeaccepted.
Or,touchXtoclosethechangepasswordscreenwithoutmakinganychanges.
RunaProtocol
TheLabwaresetupguidescreendisplaystheoptionsforconfirmingtheinstrumentsetup.
SelectStep‐by‐stepwizardtodoallofthefollowing(intheordershown):
•
Reviewalistofthematerials.
•
Reviewthelayoutofthetrayandsetuppipettehead.
•
Setupthepipette,tiprackandadditionallabware.
•
Reviewprotocol/deck.
Fordetails,refertoStep‐by‐stepWizardonthenextpage.
SelectBrowsepositionsmanuallytodoanyofthefollowing:
•
Reviewthelayoutofthetrayandreviewpipettehead.
•
Selectandsetupspecificlabware.
•
Reviewprotocol/deck.
SelectSkipsetuptoskipsetupinstructionsandgototheWizardcompletescreen.Protocolwillbesettothe
default
valuesorthevaluesusedthelasttimetheprotocolwasrun.Thisincludesthenumberofsamplesand
tipsinthereloadblock.

ASSURANCEGDS®PPMXUSERMANUAL16
Step‐by‐stepWizard
1
Touchtogotothemainmenu.
2
TouchRunaprotocol.
3
Touchtoselectyourprotocol,andthentouchNext.
4
TheScanningdialogappearswhilethesoftwarechecksthatthe
PPMXis
connected.Ifconnected,thesoftwaregoestothenext
screen.Ifnotconnected,a
messagewillappearsuggesting
possiblesolutions.
5
Entersamplenumber,kitlotnumber,andreagentlotnumbersand
thentouchNext.
6
TouchStep‐by‐stepwizard.
7
GatherthematerialsintheMaterialsListandthen
touchNext.
8
Waitforthesoftwaretofinish“Preparingpipettehead”andthen
opentherotatingcover
orthehooddoor.
Steps9–11onlyneedtobecompletedduringinstallationorafter
runningthealignmentprotocol.
9
Removethealignmentheadbydisconnectingtheterminalblock
connectorfromtherear
panel,andthenremovingthethumbnuts
securingittotheupperpipetteheadassembly.
10
Installthepipetteheadontheleftupperpipetteheadassembly
usingthe
thumbnuts.Ensureproperalignmentofthepipettehead
againsttheupper
pipetteheadassemblybeforetighteningthe
thumbnuts
11
Selecttheserialnumberthatmatchestheinstalledpipettehead
fromthedrop‐downlist,close
therotatingcover,andthentouch
Next.
12
ProceedthroughtheTipsetupandLabwaresetupscreensbyreviewingtheinformation,makingany
desired
changes,andthentouchingNext.Thescreensindicatethelabwaretouseandwheretoplaceiton
thetray.
Eachtiprackconsistsofatippackandatipreloadblock.
To
assemblethetiprack:
1
Openthesealedblisterpack.
2
Liftthetippackoutoftheblisterpack.
3
Setthetippackonthetipreloadblock.Ensurethatthe
tippackisfullyseatedon
thetipreloadblock.
4
Removetheclearcover.
13
Toinstallthetiprack:
1
Loosenthethumbscrewforeachclip.
2
Placethetiprackontheremovabletraywiththebeveledcornerinthe
backleftcorner.
3
Rotateeachclipsothatitwilleffectivelysecurethetiprackonthetrayasshown
intheimage
below.
4
Tightenthethumbscrewforeachclip.

ASSURANCEGDS®PPMXUSERMANUAL17
14
Reviewprotocol/deckandthentouchNext.
15
TouchRunprotocol.
16
Whenprompted,itisrecommendedtosimulateifthisisthefirsttimerunningthe
selectedprotocol.
PauseorStopaRunningProtocol
WhilerunningaprotocolfromTRILUTIONmicro,touchanywhereonthePIPETSTATUS
imagetopause
therun.Therunwillstopwhenitfinishesitscurrentaction.Theprotocol
runtimerkeepsadvancing
duringthepause.Whenprompted,touchContinueto
resumetherun,orStoptoendtherunandview
theresults.
Donotpausetheprotocolwhilepipettetipsarebeingpickeduporejected.
TostopthePPMXinanemergency,presstheredSTOPbuttononthefrontofthePPMX.
ViewResults
Duringandafteraprotocolrun,informationisavailableaboutreagentdispensevolumes.Afteraprotocolrun,
resultsforthatrunareautomaticallydisplayed.Toviewresults:
1
Touchtogotothemainmenu.
2
TouchResults.
3
Touchtoselectaprotocol,andthentouchResults.
4
Touchtoselectaprotocolrun,andthentouchView.Simulatedrunsare
identified
by.

ASSURANCEGDS®PPMXUSERMANUAL18
5
ThefirstscreendisplayedwhenviewingresultsistheTrayviewscreen.Thecolorsindicatethefollowing
information:
Red–Negativevolume
Green–Volumeinthetubeorwell
Blue–Emptytubeorwell
Pink–Tips
6
Thetopofthescreenshowsthestatus,thenameoftheprotocol,thetimeittooktorunorsimulatethe
protocolandgenerate
theresults,andthetimeofexecutionforthelaststep.
7
TheVolumeviewscreendisplaysinformationaboutthevolumeintheselectedwellorreservoir.
8
Thetopofthescreenshowsthestatus,thenameoftheprotocol,thetimeittooktorunorsimulatethe
protocolandgenerate
theresults,andthetimeofexecutionforthelaststep.
9
Thetextabovethetableliststhebedelementname,thewelllocationandlabel,andthecurrentvolumein
thewell.Thetableliststheactionsthatoccurredinthewellorreservoirinthefollowingorder:
Initialvolume(ifany)
Volumeaddedandthesourceofthevolumeadded(bedelementnameandplateindexorreservoir
number)
Volumeremoved
10
TheStepsviewscreendisplaysthestepsthatwererunintheprotocolintheorderof
execution.
11
Thetopofthescreenshowsthestatus,thenameoftheprotocol,thetimeittooktorunor
simulatethe
protocolandgeneratetheresults,andthetimeofexecutionforthelaststep.
RunReport
TheRunReportisasubsetoftheresultsandcanbeexportedfor
viewing.Itcannotbeviewedfromwithinthe
softwareoronthetablet.Itincludesbasicinformationabouttheprotocolrun,thebedlayout,
andwelltracking.It
doesnotincludetheinformationaboutvolumetracking.
1
Touchtogotothemainmenu.
2
TouchResults.
3
Touchtoselectaprotocol,andthentouchResults.
4
Touchtoselectaprotocolrun,andthentouchExport.
5
Selectthefiletypefortheexportedfile:.htm(default),.xmlor.csv.
6
BrowseforandselecttheUSBdrive,namethefile(oracceptthe
defaultname,which
isthenameoftheprotocol),andthentouch
Save.TheRunReportissavedtothelocation.
7
Openthefileonacomputer.

ASSURANCEGDS®PPMXUSERMANUAL19
ImportProtocol
Toimportaprotocol:
1
Touchtogotothemainmenu.
2
ConnectaUSBdrivecontainingtheprotocolfiletooneoftheUSBports
onthefrontofthePPMXorthemiddleUSBhost
portontherearpanel
(thetopUSBportontherearpanelisnotsupported).
3
TouchManageprotocolstogotothelistingofprotocols.
4
TouchImportandthenbrowseforyourapplicationprotocol
file(.sqlite)onthe
USBdrive.
5
SelectthefileandthentouchOpentoimporttheprotocolfile.
ExportProtocol
Toexportaprotocol(anditsresults):
1
Touchtogotothemainmenu.
2
TouchManageprotocolstogotothelistingofprotocols.
3
Touchaprotocolinthelist.Itwillhighlightwhenselected.
4
TouchExport.
5
Browseforandselectthedestination(USBdrive)fortheprotocolfile,andthentouchOpen.
Theprotocolis
savedtothelocationwitha.SQLITEextension.
ChangeSerialNumberinTabletSoftware
TocontrolaPPMXfromTRILUTIONmicro,theserialnumberofPPMXmustbeenteredintoTRILUTIONmicro
software.WhenTRILUTIONmicroisfactory‐installedonthesuppliedtablet,theserialnumberofthe
correspondingPPMXisenteredintothesoftware.Ifinstallingareplacementtablet,followtheinstructionsbelow.
1
GototheHOMEscreen.
2
ClickSettings.
3
EnterAdminUserIDandPassword.
4
ClickProtocolsettings.
5
EntertheSerialnumberforPPMX.
6
ClickBackandreturntotheHOMEscreen.
Other manuals for Assurance GDS PPMX
1
This manual suits for next models
1
Table of contents
Other Biocontrol Laboratory Equipment manuals


