BioMax X990 User manual

User Manual
Applicable Model : X990
www.biomaxsecurity.com

3 inches Facial & Fingerprint Recognition
Series Product User Manual
Version: 3.3
About This Manual
This document introduces the user interface and menu operations
of 3 inches Facial & Fingerprint Recognition Series product. For
installation, please refer to the Installation Guide or Quick
Guide.


Important Claim
Firstly thank you for purchasing this facial and fingerprint hybrid
terminal, before use, please read this manual carefully to avoid
the unnecessary damage! The company reminds you that the
proper user will improve the use affect and authentication speed.
No written consent by our company, any unit or individual isn’t
allowed to excerpt, copy the content of this manual in part or in full,
also spread in any form.
The product described in the manual maybe includes the software
which copyrights are shared by the licensors including our
company, Except for the permission of the relevant holder, any
person can’t copy, distribute, revise, modify, extract, decompile,
disassemble, decrypt, reverse engineering, leasing, transfer,
sub-license the software, other acts of copyright infringement, but
the limitations applied to the law is excluded.
Due to the constant renewal of products, the company can not
undertake the actual product in consistence with the information
in the document, also any dispu
te caused by the difference
between the actual technical parameters and the information in
this document. Please forgive any change without notice.

About this manual
Not all the devices have the function with. The real product prevails.
The photograph in this manual may be different from that of the real
product. The real product prevails.

Contents
Table of Contents
1. Instructions for Use ................................................................1
1.1 Standing Position, Posture and Face Expressions.............1
1.2 Enrollment Face Expressions..............................................2
1.3 Finger Placement.............................................................3
1.4 Use of the Touch Screen.....................................................4
1.5 Touch Operations................................................................5
1.6 Appearance of Device.........................................................7
1.7 Main Interface....................................................................10
1.8 Verification Modes.............................................................12
1.8.1 Fingerprint Verification.............................................12
1.8.2 Face Verification .........................................................14
1.8.3 Password Verification..................................................16
1.8.4 ID Card Verification..................................................17
1.8.5 Combination Verification..........................................18
2. Main Menu..............................................................................21
3. Add User.................................................................................24
3.1 Entering a User ID.............................................................25
3.2 Entering a Name................................................................26
3.3 Enrolling a Fingerprint....................................................27
3.4 Enrolling a Password.........................................................29
3.5 Enrolling an ID card........................................................30
3.6 Enrolling a Face.................................................................31
3.7 Entering a Group No......................................................32
3.8 Modifying User Rights .......................................................33
3.9 Enroll Photo....................................................................34
I

Contents
3.10 User Access Settings...................................................35
4. User Management .................................................................38
4.1 Edit a User.........................................................................39
4.2 Delete a User.....................................................................40
4.3 Query a User .....................................................................41
5. Communication Settings......................................................42
5.1 Communication Settings....................................................43
5.2 WIFI Configuration.........................................................45
5.3 Wiegand Output..............................................................49
5.3.1 Wiegand 26-bits Output Description...........................49
5.3.2 Wiegand 34-bits Output Description........................... 51
5.3.3 Customized Format.....................................................52
5.4 Wiegand Input................................................................57
6. System Settings ....................................................................58
6.1 General Parameters..........................................................59
6.2 Interface Parameters.........................................................60
6.3 Fingerprint Parameters...................................................61
6.4 Face Parameters...............................................................63
6.5 Log Settings.......................................................................65
6.6 Shortcut Definitions ...........................................................66
6.7 Access Settings..............................................................69
6.7.1 Time zone setting........................................................69
6.7.2 Holiday setting.............................................................70
6.7.3 Group time zone setting..............................................72
6.7.4 Unlock Combination Setting .......................................74
6.7.5 Access control parameter ...........................................76
II

Contents
6.7.6 Duress Alarm Parameters...........................................77
6.7.7 Anti-Pass back setting.................................................78
6.8 Update ...............................................................................79
7. Data Management..................................................................80
7.1 Query Record ....................................................................82
7.2 SMS................................................................................84
7.2.1 Set a Short Message ..................................................84
7.2.2 View a Short Message................................................88
7.3 Work Code.........................................................................90
7.3.1Add a work code .........................................................90
7.3.2 Edit and delete a work code .......................................91
7.3.3. Edit and delete a work code ......................................91
8. Date/Time Setting..................................................................92
8.1 Set Date/Time....................................................................92
8.2 Bell Setting.....................................................................93
8.3 Daylight Saving Time (DLST).........................................95
9. Auto Test ................................................................................97
10. USB Disk Management.......................................................99
11. System Information...........................................................100
12. Appendix ............................................................................101
12.1 T9 Input Instructions......................................................101
12.2 USB................................................................................103
12.3 Introduction of Wiegand.............................................104
12.4 Photo ID Function.......................................................106
12.5 Work Code..................................................................107
III

Contents
12.6 Print function...............................................................108
12.7 Multi-combination Authentication Mode..................... 113
12.8 Anti-Pass Back........................................................... 117
12.9 Statement on Human Rights and Privacy.....................120
12.10 Environment-Friendly Use Description........................122
IV
Error! Use the Home tab to apply 标题 1 to the text that you want to appear
here.
1. Instructions for Use
1.1 Standing Position, Posture and Face
Expressions
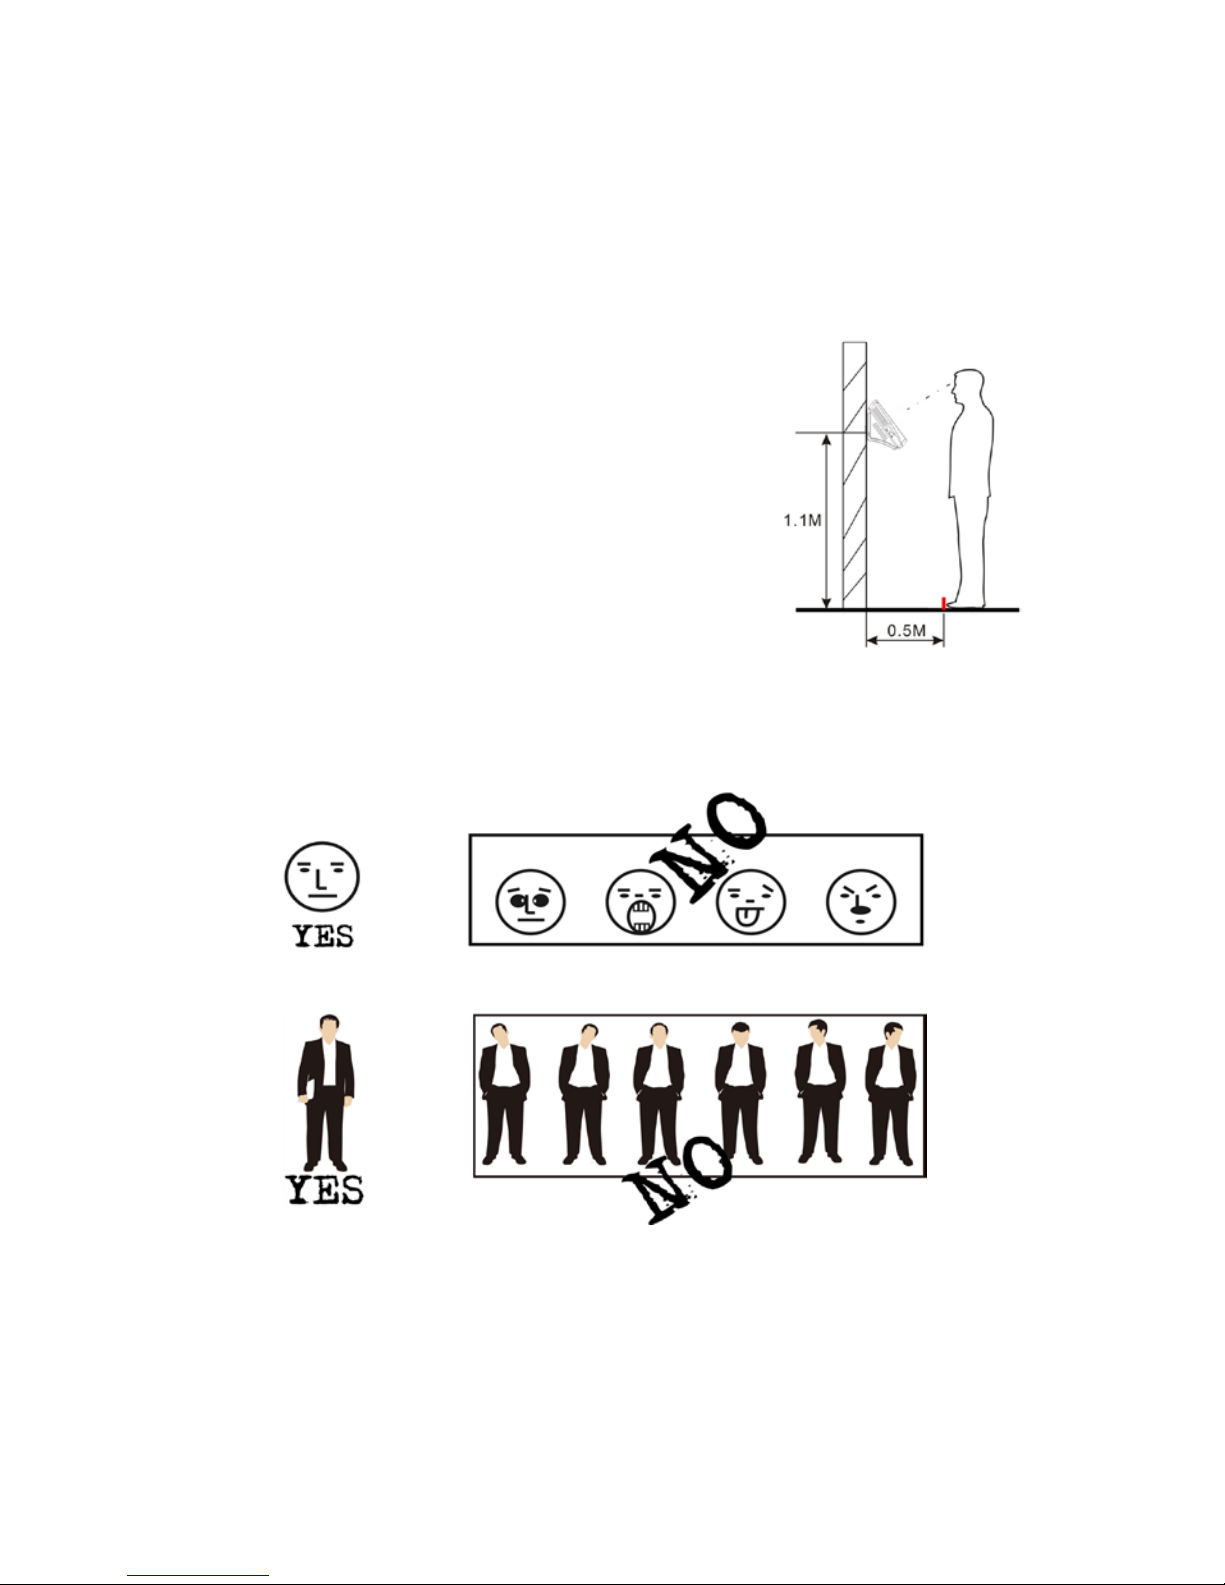
1. Recommended standing-distance from device:
For users 5-6 feet tall (1.55m-1.85m) we recommend
users stand about 2 feet (0.5m) from the wall.
When viewing your image on the device display
window, step away if your image appears too bright.
Step closer if your image appears too dark.
2. Recommended face Expressions vs. poor Expressions:
3. Recommended Posture (pose) vs. poor Posture (pose):
Note: During enrollment and verification, try to have a relaxed
unstrained face expression and stand upright.
1

3 inches Facial & Fingerprint Recognition Series Product User Manual
1.2 Enrollment Face Expressions
During the enrollment, position your head such way that your face appears in
the center of the device display window, and follow the voice prompts "Focus
eyes inside the green box". The user needs to move forward and backward to
adjust the eyes position during the face registration. The enrollment face
expressions as follows:
2
Error! Use the Home tab to apply 标题 1 to the text that you want to appear
here.
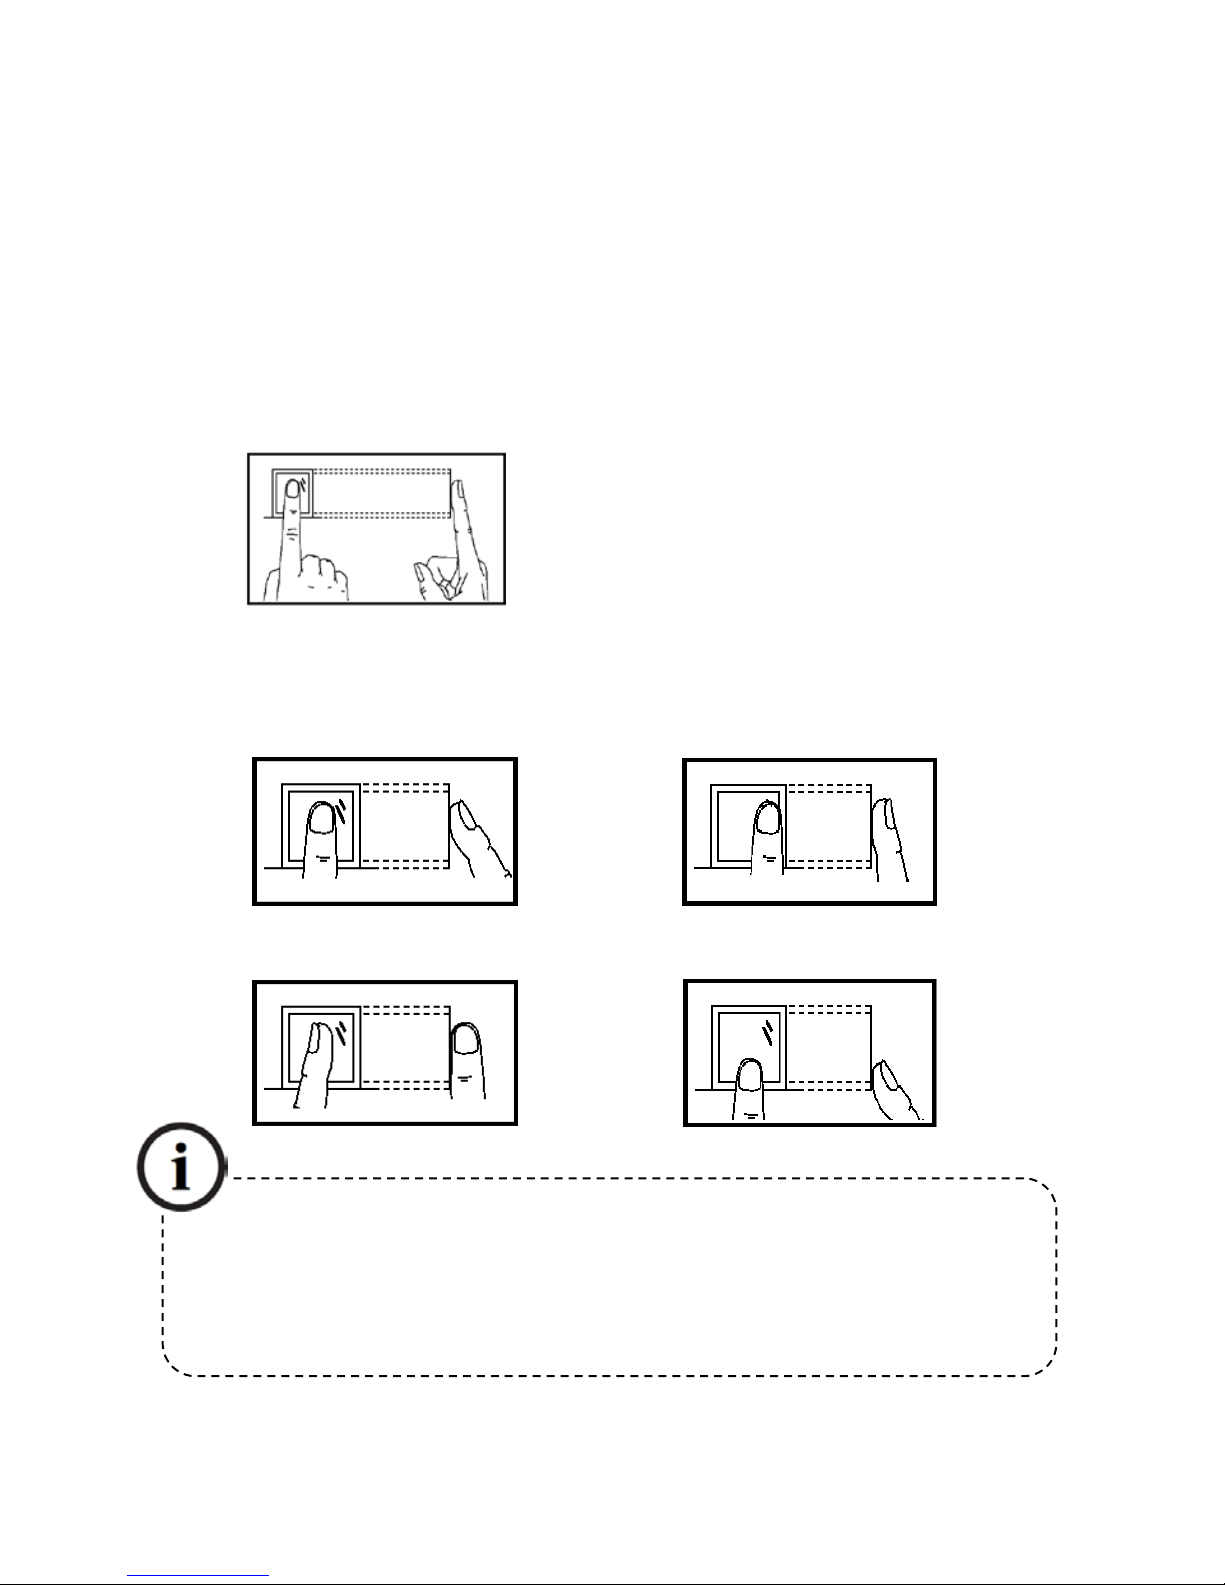
1.3 Finger Placement
Recommended fingers: The index finger, middle finger or the ring finger is
recommended; the thumb and little finger are not recommended (because
they are usually clumsy when pressing on the fingerprint collection screen).
1. Proper finger placement
2. Improper finger placement
Slanting
Off-center
Not flat to the surface
Off-center
The finger must be flat to the surface
and centered on the fingerprint
sensor.
Please enroll and verify your fingerprint by using the proper finger placement
mode. We shall not be held accountable for any consequences arising out of the
degradation in v
erification performance due to improper user operations. We shall
reserve the right of final interpretation and revision of this document.
3

3 inches Facial & Fingerprint Recognition Series Product User Manual
1.4 Use of the Touch Screen
Touch the screen with one of your fingertips or the edge of a fingernail, as
shown in the following figure. Abroad point of contact may lead to inaccurate
pointing.
When the touch screen is less sensitive to the touch, you can perform a
screen calibration through the following menu operations. Press [Menu] ->
[Auto Test] -> [Calibration] on the screen and a cross icon will be displayed.
After you touch the center of the cross at five locations on the screen correctly,
the system will automatically returns to the Auto Test menu. Press [Exit] to
return to the Menu interface. For details, see the description in 9. Auto Test.
Smear or dust on the touch screen may affect the performance of the touch
screen. Therefore, try to keep the screen clean and dust-free.
4
Error! Use the Home tab to apply 标题 1 to the text that you want to appear
here.
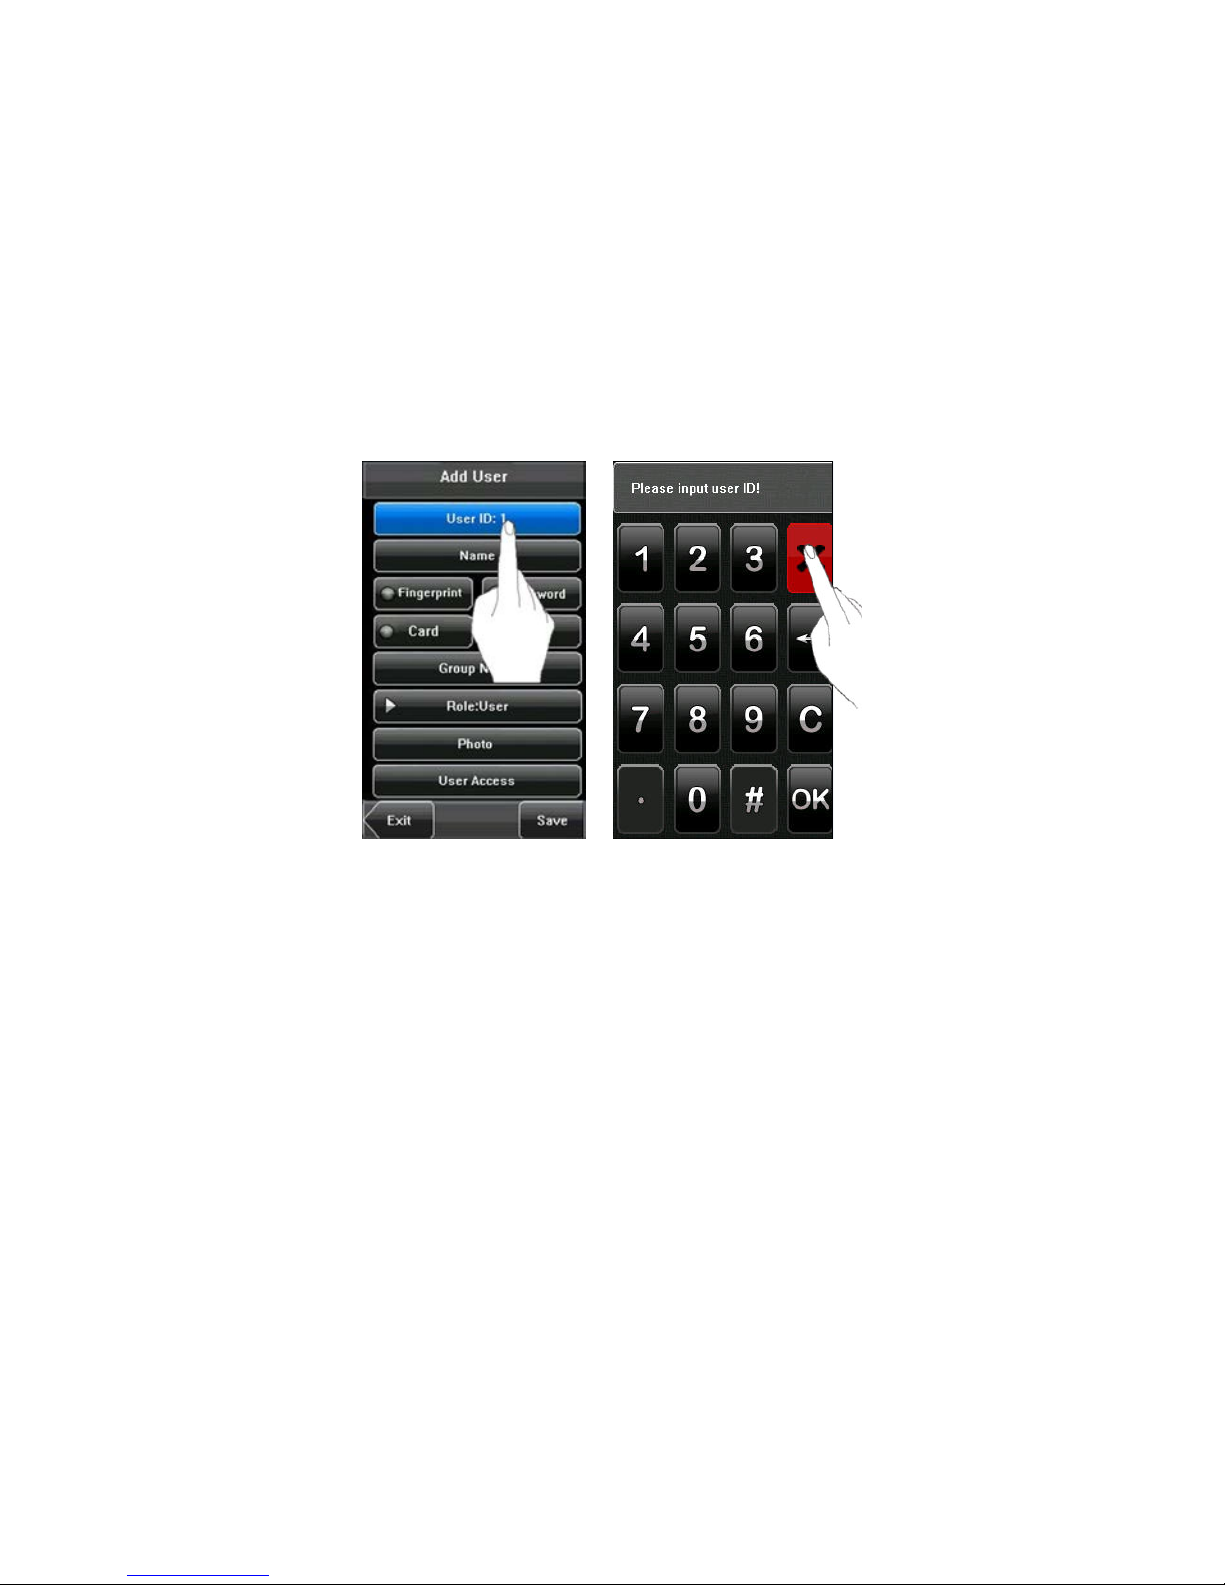
1.5 Touch Operations
1. Enter numbers: Press the [User ID] key. The system will automatically
display the number input interface. After entering the user ID, press [OK] to
save or press [X] to cancel and return to the previous interface.
2. Enter Text: Press the [Name] key. The system will automatically display
the text input interface. After entering the user name, press [X] to save and
return to the previous interface.
5

3 inches Facial & Fingerprint Recognition Series Product User Manual
3. Modify parameters: Press the default value of a parameter and the
system will automatically switch to another value of this parameter.
Note: The Enroll Fingerprint, User Access and 1: G is optional function,
only some machines have.
6

Error! Use the Home tab to apply 标题 1 to the text that you want to appear
here.
LED
Indicator
Touch Screen
Touch
keys
Camera
Push Buttons
Fingerprint Sensor
ID Card Swipe Area
1.6 Appearance of Device
1. Type 1
(1) Front View
(2) Side View
Reset Button
USB Port
7

3 inches Facial & Fingerprint Recognition Series Product User Manual
LED Indicator
Touch Screen
Touch keys
Camera
ID Card Swipe Area
2. Type 2
(1) Front View
(2) Side View
USB Port
8

Error! Use the Home tab to apply 标题 1 to the text that you want to appear
here.
LED Indicator
Touch Screen
Touch Keys
Camera
Push Buttons
ID Card Swipe Area
3. Type 3
(1) Front View
(2) Side View
Reset Button
USB Port
9
3 inches Facial & Fingerprint Recognition Series Product User Manual
1.7 Main Interface
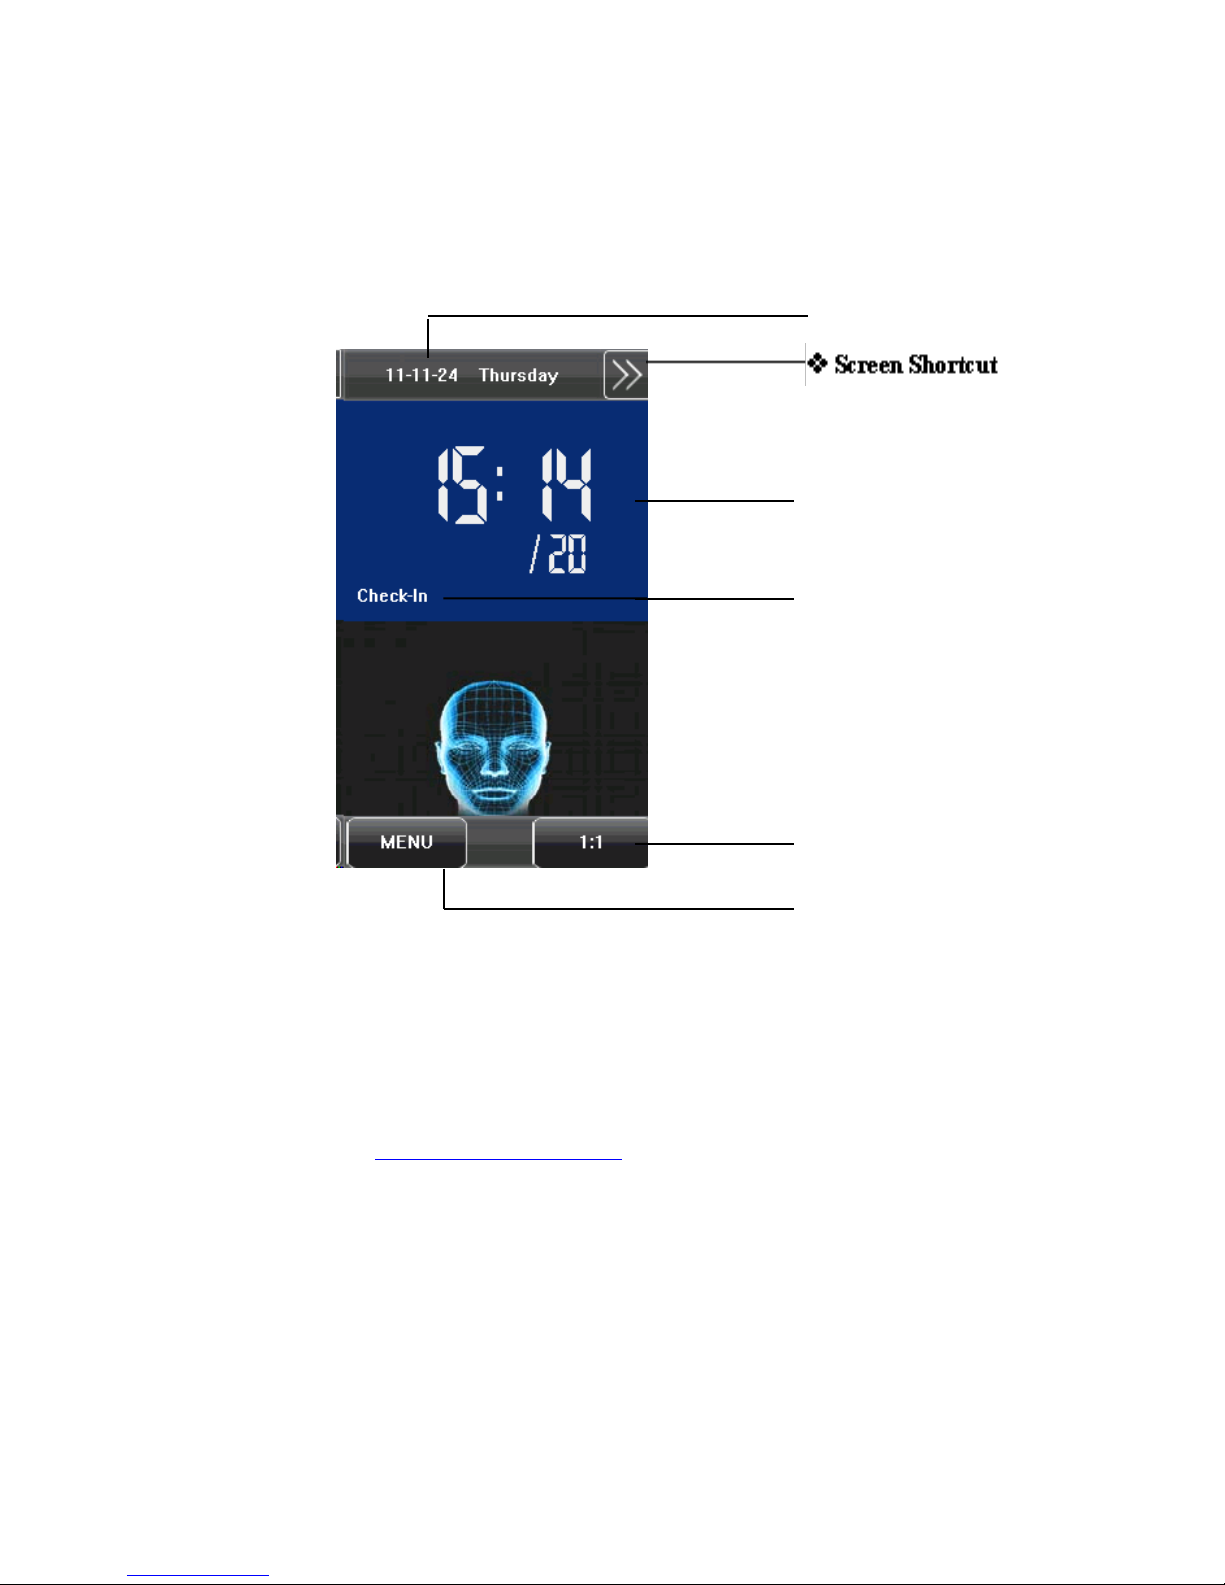
①
Date: The current date is displayed.
②
Screen Shortcut Keys: Press these shortcut keys to display the
attendance status. Users can customize the function of each shortcut key.
For details, see 6.6 Shortcut Definitions.
③
Time: The current time is displayed. Both 12-hour and 24-hour time
systems are supported.
④
Attendance Status: The current attendance status is displayed.
⑤
1:1Switch Key: By pressing this key, you can switch to the 1:1verification
modes, and enter the digital input interface.
Time
Menu
1:1 Switch Key
Attendance Status
Date
10

Error! Use the Home tab to apply 标题 1 to the text that you want to appear
here.
⑥
Menu: You can enter the main menu by pressing this key.
Note: 1. The Enroll Fingerprint, User Access, Door Bell Button and 1:1
Switch Button is an optional function, some machines have
these function.
2. The 1: G is an optional function. If you need this function,
please consult our commercial representatives or fore-sale
technical support personal.
11
Table of contents


