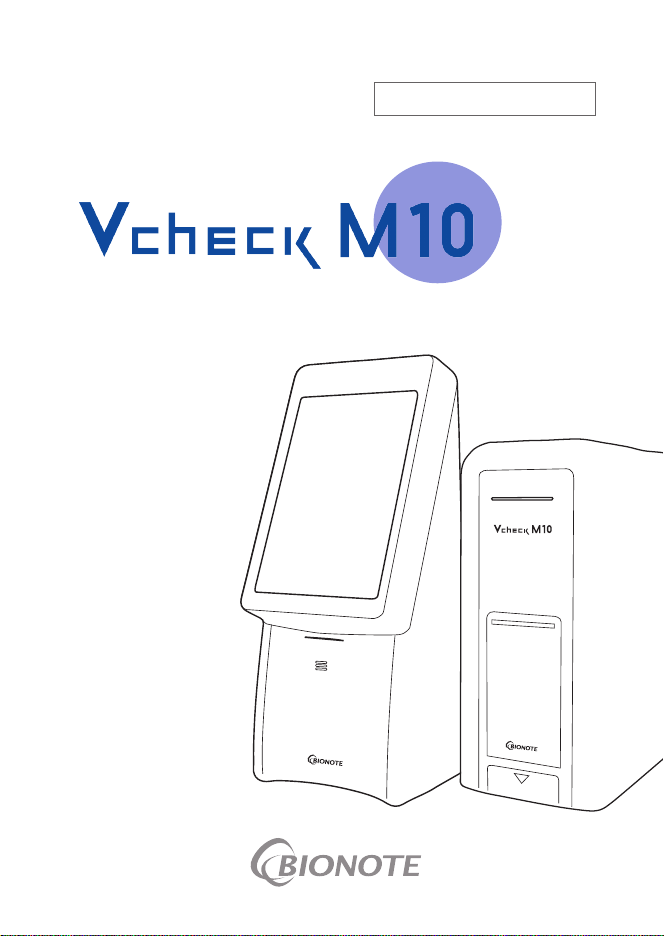
BioNote Vcheck M10 User manual

FOR VETERINARY USE ONLY
USER MANUAL

VCM751EA
VCM752EA
VCM753EA
Doc. No.: IM751-1E(CE)
Issued date : 2022-11-21
Authorized Representative
Altenhofstrasse 80 D-66386 St. Ingbert Germany
Tel: +49-6894-581020 l Fax: +49-6894-581021
Manufactured by
Head oce
C-4th&5th, 16, Deogyeong-daero 1556beon-gil, Yeongtong-gu, Suwon-si,
Gyeonggi-do, 16690, Republic of Korea
Manufacturing site
74, Osongsaengmyeong 4-ro, Osong-eup, Heungdeok-gu, Cheongju-si,
Chungcheongbuk-do, 28161, Republic of Korea
Tel: +82-31-300-0400 l Fax: +82-31-300-0499
www.sdbiosensor.com
Distributed by
22, Samsung 1-ro 4-gil, Hwaseong-si, Gyeonggi-do, 18449, Republic of Korea
Tel: +82-31-211-0516 l Fax: +82-31-8003-0618
www.bionote.co.kr

Thank you for purchasing Vcheck M10.
This user manual contains all information about the analyzer. Please carefully read this user
manual and the instructions included in each test cartridge package before using the analyzer. In
addition, please familiarize yourself with the necessary preparation and the procedures.
For further inquiries about the analyzer, please contact your local dealer.
Product demonstrations can be found at www.bionote.co.kr

General Information
1. Main Menu Structure 06
2. Symbols and Abbreviations 07
3. Precautions 09
4. Warranty and Free Warranty Period Service Policy 10
Overview
1. Intended Use 11
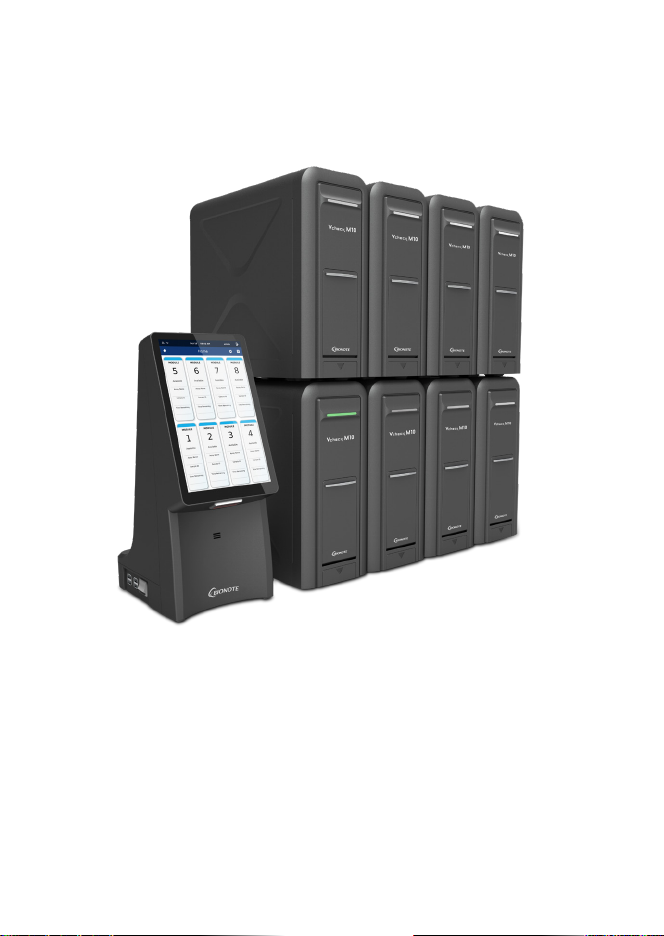
2. Product Overview 11
3. Components of Vcheck M10 12
4. Software GUI Description 14
5. Components 15
6. Specications 16
7. Unpacking 16
8. Precautions Before Measurement 17
Log On and Setting
1. Initial Setup 18
1.1 Installation
1.2 Analyzer LogIn
1.3 Analyzer Status Light
1.4 Analyzer Settings
CHAPTER 1
CHAPTER 2
CHAPTER 3
TABLE OF CONTENTS

Run Test Mode
1. Run Test 35
2. Result 40
3. Review 41
CHAPTER 4
QC
1. QC Test 42
Cleaning and Maintenance
1. Analyzer Cleaning 45
2. Maintenance and Transportation 45
Warning/Info/Error Messages
1. Warning Messages 46
2. Info Messages 47
3. Error Messages 49
CHAPTER 5
CHAPTER 6
CHAPTER 7

6
CHAPTER 1
General Information
1. Main Menu Structure
Login
ReviewTest Settings
Add New
Edit
Delete
QC Mode
Select
Cartridge
Scam
Patient
Scan
Apply
Sample
Patient
Scan
Apply
Sample
Sample
Scan
Insert
Cartridge
Sample
Scan
Insert
Cartridge
Cartridge
Check
Cartridge
Scan
Cartridge
Check
Scan
Scan
Select
Summary
Summary
Amplication
Amplication
Details
Details
General
Date/Time
Volume
Install
Laguage
Patient
Registration
Brigthness
Auto
Logout
Early Call
Update
Result
List Network
HIS/LISLogin
User
Module
Select

7
2. Symbols and Abbreviations
The symbols and abbreviations presented below are stated in the user manual, labels, and
external packages of Vcheck M10 System.
Symbols
Electrical Symbols on analyzer
Symbols Description
Indicates the ON position of the main power switch.
Indicates the OFF position of the main power switch.
Indicates the ON/OFF position of the main power switch.
Safety Symbols
Symbols Description
Caution
Indicates a situation, which if not avoided, could result in damage to the analyzer or
incorrect results.
Indicates the presence of a laser inside the analyzer and to proceed with appropriate
caution.
Environmental Symbols
Symbols Description
WEEE; crossed-out wheeled bin
Discard separately from other disposal wastes

8
Symbols
Symbols Description
Manufacturer
Consult instructions for use
Reference number
Date of manufacture
Indicates the date of manufacture
Serial number
Note
Indicates that the analyzer is fragile, and must therefore be handled with care
Fullls the requirements of Electro Magnetic Compatibility Directive 2014/30/EU, Low
Voltage Directive 2014/35/EU
Indicates to keep the analyzer dry that you should keep the analyzer dry
EU Representative
Temperature limit
Humidity limitation
Abbreviations
Abbreviations Description
Comm Communication
LIS Laboratory Information Systems
HIS Hospital Information System
GUI Graphic User Interface
S/W Software
F/W Firmware

9
3. Precautions
1. If the error message occurs repeatedly, do not use it.
2. Do not use the barcode for any purposes other than inputting the sample and cartridge
barcode.
3. Be careful as the barcode light may damage your eyes.
4. Do not use the analyzer screen with sharp tools. Please note that it may cause malfunction
due to a damaged screen.
5. Only designated technicians can perform related repairs and service activities.
6. Do not touch the switch button or the power supply with your wet hands.
7. Do not apply other products manufactured by the third party.
8. Before use, check the latest software with your dealer or BIONOTE. Then, start your updating.
9. It must be installed where the power supply and power switch are easily accessible, and
easily disconnectable. (Installing the analyzer in an inappropriate location, such as where
the system cannot be easily disconnected from the power supply, may cause re or lead to a
serious damage to the system.)
10. Use an approved adapter.
11. For accurate result, please refer to the instruction manual provided with each cartridge, on
precautions to take for each measurement item.
To Reduce the Risk of Damaging the Analyzer
• Use only for in vitro veterinary diagnostic.
• Store in a at, dry place and avoid direct sunlight.
• Avoid extremely strong light as it can seriously interfere with test
results.
• Do not move the analyzer during the test.
• Do not drop the analyzer as it may damage the analyzer.
• Do not disassemble the analyzer.
• Do not immerse the analyzer in water or cleaning solution.

10
To Reduce the Risk of Inaccurate Results
• Do not use if error messages occur repeatedly.
• Refer to the instructions included in each test cartridge package for
precautions to ensure accurate results for each assay.
• Do not use any expired Vcheck M cartridges. Please make sure to read
the instruction manual for each cartridge before use.
To Reduce the Risk of Biological Risk
• Used specimens must be properly disposed in accordance with the
methods established by the 'Personal Information Protection Act'
and hospital regulations. Specimens must be considered as potential
biohazards.
• If you have no experience in specimen collection and handling
procedures, you must receive appropriate training or guidance.
• Nitrile latex gloves are recommended when handling specimens.
4. Warranty and Free Warranty Period Service Policy
1. The free warranty period of Vcheck M10 System is 2 years from the date of product installation.
In the case of consumable parts, a separate warranty period is not provided.
2. In order to receive the free warranty period, installation information must be provided to the
manufacturer. (Inquiry separately)
3. During the free warranty period, the agency or corporation is responsible for handling the
service for the products sold.

11
CHAPTER 2
Overview
1. Intended Use
The Vcheck M10 analyzer measures quantitative or qualitative biomarkers of specimens such as
blood, feces, and nasal mucus in a laboratory or POCT environment.
Vcheck M10 consists of Vcheck M10 Console and Vcheck M10 Module (Cartridge analysis
function). The Vcheck M10 Console is a analyzer that operates the Vcheck M10 Module based on
the information obtained by scanning the 2D barcode of the cartridge.
The Vcheck M10 Console displays the results of monitoring and diagnosis of the inserted
specimen. It must be used with designated test cartridges produced by BIONOTE Inc. For details
on specic tests, refer to the instructions included in each of test cartridge packages.
2. Product Overview
The Vcheck M10 is a real-time PCR analyzer which automatically performs nucleic acid extraction
and amplication, and detection of the target sequences in various specimens. Vcheck M10 is a
closed system which is only used with BIONOTE Vcheck M cartridge. This Vcheck M10 analyzer
consists of the Vcheck M10 Module and the Vcheck M10 Console. The entire PCR process is carried
out inside the Module, and the Console controls the process and shows the results.
The cartridge is inserted into the Module to be nucleic acid extracted and thermo-cycled to
achieve target amplication. In each cycle of the PCR, uorescence intensity is measured and
analyzed by the Console software to determine the presence of target pathogen in the specimen.
The result is displayed on the Console screen and data is recorded in the memory.
[Vcheck M Cartridge]
Vcheck M
Assay Cartridge

12
3. Components of Vcheck M10
1) Vcheck M10 Console
Front Side Back
A
B
C
D E F G H
Item Name Description
A Color TFT LCD screen Displaying test screen and interacting with the graphic user
interface.
B Barcode reader Used for scanning specimen IDs and cartridges barcodes.
C Speaker Audio output location.
D USB port Used for connecting with keyboard, printer and USB memory.
E Power switch Used for turning on/o the Console.
F D-sub cable port Used for connecting console and module using D-sub cable.
G LAN port Used for communicating through the local area network.
H AC power port Used for connecting AC Power cord.

13
2) Vcheck M10 Module
Front Side Back
A
B
C
D
E
F
G
I
J K L
AStatus notication LED LED for indicating Module status.
B Door Insert or remove the cartridge from the chamber inside the
door.
C Repair Cover Cover for manual rotation of the rotating motor.
D Fan Filter Cover Cover for replacing the fan lter mounted on the vent that
discharges heat to the outside.
E Air Intake Filter Cover Cover for replacing the lter mounted on the external air
intake.
F Mini-USB port USB port for developers for FW update (not for users).
H D-sub cable port Used for connecting console and module using D-sub cable.
J AC power port Input port to connect power.
K Power switch Used to turn the Module on/o.
L AC power port Output port to connect power.
* G(USB port) and I(LAN port) functions are not provided to user.
H

14
4. Software GUI Description
CAL
CAL
No Item Name Description
1 LAN Indicate the status of wired LAN connection
2 USB Indicate the status of USB connection
3CAL CAL Indication alarm recommending calibration
4 Home Move to the Home screen
5 Setting User setting
6 Review Check accumulated results
7 User Indicate user’s name
8 Log-Out User Log-out
1 2 3 4
5
7
6
8

15
5. Components
1) Vcheck M10 Console
Item Appearance Description
D-sub cable
Connect D-sub between
console and module
AC power cable Connect AC power of console
2) Vcheck M10 Module
Item Appearance Description
Gender Connect AC power/
D-sub between modules
AC cover Terminate AC power of module
(block the user contact)
Bracket Connect upper side of the
modules
AC power cable Connect AC power of module
3) Accessory
Item Appearance Description
D-sub cable
Connect D-sub between
console and module
Side Bracket Connect modules which
located up and down

16
6. Specications
Item Description
Input voltage AC100~240V, 50/60Hz
Display control Graphic User Interface (TFT LCD)
Power consumption
- Vcheck M10 Console : 84W
- Vcheck M10 Module : 84W
(Maximum 700VA when connecting 8 modules)
Number of memory 5,000
Communication Ethernet, USB, d-sub
Number of cartridge per test 1 cartridge per test
Fluorescent channel 3 Channel (FAM, HEX, Cy5)
Nucleic acid
extraction
Sample type Liquid media
Technology Silica technology
Operation Syringe air pressure
Temperature
control
Temperature
rise speed ≥ 3.5 ℃/sec (From 60 ℃ to 95 ℃)
Temperature
drop speed ≥ 3.0 ℃/sec (From 95 °C to 60 °C)
Accuracy ± 0.5 ℃
Uniformity ± 0.3 ℃
7. Unpacking
Unpack the analyzer on a clean, level, and stable surface. The air vents on the analyzer are on the
back. These vents must not be blocked when installing the analyzer. Avoid placing the analyzer
in direct sunlight. Inspect for any obvious signs of damage. Report any damages immediately
to BIONOTE. Allow the analyzer to equilibrate to room temperature at least 30 minutes before
operating.

17
8. Precautions Before Measurement
Carefully read and follow this user manual and the instructions for the test
cartridge and controls, so you can prevent inaccurate results and handle the
analyzer safely. No modication of this analyzer is allowed.
Specimen
The Vcheck M10 must be used with a test cartridge suitable for particular tests. In addition, since
dierent specimens are applied to each test, you must follow the instructions provided with each
test cartridge.
Safety Information
There is the risk of infection. When professional veterinary personnel examines patients with the
Vcheck M10 system, it is recommended to always wear gloves and follow other relevant health
and safety regulations.
Operating Conditions
To correctly operate the Vcheck M10, please follow the guidelines below. The Vcheck M10 system
must be operated in the permitted temperature range. Since the range is dierent for each test,
please refer to the manual of the test cartridge suitable for the specic test. To perform a test on
the Vcheck M10 system, place the system on a at surface. Do not use the Vcheck M10 system
near strong sources of electromagnetic radiation, because the strong electromagnetic elds may
impair the function of the analyzer. There must be no foreign objects in the vents of the analyzer.
(Do not block the vents.) If analyzer malfunction suddenly occurred, please unplug the power
cable from the outlet. The power adapter must be IEC 60950-1 and IEC 60601-1 approved.

18
CHAPTER 3
Log On and Setting
1. Initial Setup
1.1 Installation
1) M10 Console - M10 Module
• Place the analyzer in a suitable environment.
• Connect the supplied communication cable (D-sub cable) at the back of the Vcheck M10
Console and Vcheck M10 Module to link them together.
• Connect the supplied AC power cable to the Vcheck M10 Console and the Vcheck M10 Module
respectively.
• Connect the power cord of AC cable to a power outlet
B
A
C
A. Vcheck M10 Module power cable (AC power cable)
B. Vcheck M10 Console power cable (AC power cable)
C. Communication cable (D-Sub cable)

19
2-1) Installing additional M10 Modules
• Connect the M10 Modules using the bracket and screws supplied with M10 Module.
Bracket
• Connect the supplied gender at the back of the M10 Module (#1) and M10 Module (#2) to
link them together.
#2 #1
Gender

20
2-2) Installing additional M10 Modules
• Connect multiple modules using bracket and side bracket.
Bracket
Side Bracket
Table of contents
Other BioNote Medical Equipment manuals
Popular Medical Equipment manuals by other brands

Braun
Braun Infusomat Space Instructions for use

Conair
Conair True Glow Instruction & styling guide

Roche
Roche CoaguChek Vantus Quick reference guide

Integra
Integra CUSA NXT Operator's manual

Tecnomed Italia
Tecnomed Italia Skudo Installation, operation and maintenance manual

DGH
DGH PACHETTE 4 Quick reference guide