BIOS BD215 User manual

PRECISION SERIES
PREMIUM
Blood Pressure
Monitor
Instruction Manual
Model : BD215
www.biosdiagnostics.com
Go to biosdiagnostics.com for a FREE Log Book!

Marque de confiance des Canadiens depuis 3 générations
Chez BIOS Diagnotics, nous sommes fiers de notre legs dans la surveillance de la tension
artérielle à travers le Canada. Au début des années 1930 jusqu’en 1987, nous fabriquions
des dispositifs de tension artérielle professionnels Tycos pour les médecins et les hôpitaux du
Canada.
Dans les années 1970, nous étions à l’avant-garde des premiers dispositifs pour la prise de
tension artérielle à domicile, puis dans les années 1980, nous avons lancé la technologie
numérique au Canada. Nous n’avons pas fait le décompte, mais nous savons que des
millions de nos tensiomètres domestiques ont été utilisés par les Canadiens depuis les 25
dernières années.
Tous les dispositifs BIOS Diagnostics sont développés en collaboration avec des physiciens et
des essais cliniques afin de prouver leur précision de mesure. Pour plus de renseignements
sur les essais cliniques et autres produits médicaux BIOS, visitez notre site Web
www.biosdiagnostics.com
Si vous avez des questions concernant cet instrument ou en ce qui concerne la surveillance
Où appelez la ligne d’assistance BIOS Diagnostics au 1.866.536.2289
Bureau et usine de fabrication sur Church Street, Toronto, en 1934

Table of Contents
1. Introduction
1.1 Features
1.2 Important Information
1.2A Safety Information
1.2B Care of the Device
1.3 About Blood Pressure
1.4 Normal Blood Pressure Values
1.5 Common Blood Pressure Questions and Answers
2. Getting Started
2.1 About the BD215
2.2 About the LCD Screen
2.3 Inserting the Batteries
2.4 Using the USB Power Adapter
3. Using the Device
3.1 Setting the Time and Date
3.2 Select the User
3.3 Obtaining Accurate Measurements
3.3A Before Measuring
3.3B Common Sources of Error
3.3C Fitting the Wide Range Cuff
3.4 Measuring your Blood Pressure
3.5 Discontinuing a Measurement
3.6 Irregular Heartbeat Detection
3.7 BP Assessment Indicator
3.8 Viewing Previously Recorded Values
3.9 AM Averaging (Morning)
3.10 Clearing All Values
4. Error Messages / Malfunctions
5. Care and Maintenance
6. 10 Year Warranty
7. Technical Specifications
Premium Blood Pressure Monitor
Instruction Manual

1. Introduction
Thank you for purchasing the BIOS Diagnostics™Premium Blood Pressure Monitor. Designed for convenient and
easy operation,this device provides a simple, yet accurate method to measure your blood pressure.
Your blood pressure is an important parameter that can be used to monitor your health.This device enables you to
monitor your blood pressure regularly, and maintain a record of your blood pressure measurements.You can then
use this record to assist your physician in diagnosing and maintaining a healthy blood pressure level.
1.1 Features
The BD215 uses oscillometric technology to measure the arterial blood pressure and pulse rate.The cuff is wrapped
around the arm and automatically inflated by the air pump.The sensor in the device senses weak fluctuation of the
pressure in the cuff produced by extension and contraction of the artery of the arm in response to each heartbeat.
The amplitude of the pressure waves is measured,converted in millimeters of the mercury column, and is shown on
the display.
• MemoryFeatures2 users, 90 blood pressure readings each with time and date.
• BPAssessmentIndicator displays the range between which your blood pressure values lie, according to the
WHO (World Health Organization).
• Detectsirregularheartbeat
• BIOSAveraging:averages last 3 readings
• AMAveraging:averages morning readings to identify morning hypertension
• Time and date
This device is easy to use and has been proven in clinical studies to provide excellent accuracy. Before using the
BD215, read this instruction manual carefully and keep it in a safe place.
The blood pressure monitor meets the accuracy requirements of Hypertension Canada and has been tested for
clinical accuracy.
1.2 Important Information
Refer to the following sections to learn about important safety instructions and how to take care of the
BIOS Diagnostics™Premium Blood Pressure Monitor.
1.2A Safety Information
• Self-measurementmeanscontrol,notdiagnosisortreatment.Yourvaluesmustalwaysbediscussedwithyour
doctor or a physician who is familiar with your family history.
• Ifyouareundergoingmedicaltreatmentandreceivingmedication,consultyourdoctortodeterminethemost
appropriate time to measure your blood pressure. Never alter the dosages of any medication without direction
from your doctor.
• Yourbloodpressuredependsonseveralfactors,suchasage,gender,weight,andphysicalcondition.Italso
depends on the environment and your state of mind at the time of measurement. In general, your blood
pressure is lower when you are asleep and higher when you are active.Your blood pressure may be higher
when recorded at a hospital or a clinic and may be lower when measured in the relaxing comfort of your home.
Due to these variations, we recommend that you record your blood pressure regularly at home as well as at
your doctor’s clinic.

• Trytorecordyourbloodpressureregularlyatthesametimeofthedayandunderthesameconditions.This
will help your physician detect any extreme variations in your blood pressure and thus treat you accordingly.
• MorningHypertension(>135/85mmHg):Recently,severalstudieshaveidentiedelevatedcardiovascular
risks (heart failure,stroke,angina) associated with “morning hypertension”. There is a typical rise in blood
pressure during the physiological changes from sleep to arising for the day. (see section 3.9)
• Theidealtimetomeasureyourbloodpressureisinthemorningjustafteryouwakeup,beforebreakfast
and any physical activity, and in the absence of the urge to urinate. If this is not possible, try to take the
measurements later in the morning,before you start any physical activity. Relax for a few minutes before you
record your blood pressure.
• Yourbloodpressureincreasesordecreasesunderthefollowingcircumstances:
Blood pressure is higher than normal:
— when you are excited,nervous, or tense
— while taking a bath
— during and after exercise or strenuous physical activity
— when it is cold
— within one hour after meals
— after drinking tea,coffee,or other caffeinated drinks
— after smoking tobacco
— when your bladder is full
Blood pressure is lower than normal:
— after consuming alcohol
— after taking a bath
• Thepulsedisplayisnotsuitableforcheckingthefrequencyofheartpacemakers.
• Ifyouhavebeendiagnosed with a severe arrhythmia or irregular heartbeat, vascular constriction,liver
disorders, or diabetes, have a cardiac pacemaker, or are pregnant, measurements made with this instrument
should only be evaluated after consultation with your doctor.
• Takecarewhilehandlingthebatteriesinthedevice.Incorrectusagemaycausebatteryuidleakage.
To prevent such accidents, refer to the following instructions:
— Insert batteries with the correct polarity.
— Turn off power after use. Remove and store the batteries if you are not planning to use the device for an
extended period of time.
— Do not mix different types,brands, or size of batteries.This may cause damage to the product.
— Do not mix old and new batteries.
— Remove batteries and dispose of them according to the proper regulations in your area.
— Do not disassemble batteries or expose them to heat or fire.
— Do not short-circuit the batteries.
— Do not use rechargeable batteries.
1.2B Care of the Device
For prolonged life of your blood pressure monitor,note the following instructions:
• Donotdroporbangtheunit.Preventsuddenjerks,jars,orshockstothedevicetopreventdamage.
• Donotinsertanyforeignobjectsinanydeviceopeningsorvents.
• Donotdisassembletheunit.
• Iftheunithasbeenstoredatveryloworfreezingtemperatures,allowtoreachroomtemperaturebeforeusingit.

• Donotstoretheunitindirectsunlight,highhumidity,orinplaceswithalotofdust.
• Cleanthedevicewithasoftdrycloth.Donotusegasoline,thinnerorsimilarsolvents.Carefullyremovespots
on the cuff with a damp cloth and soap. Do not wash the cuff.
1.3 About Blood Pressure
Your blood pressure level is determined in the circulatory center of your brain.Your nervous system allows your body
to adapt or alter blood pressure in response to different situations.Your body alters your pulse or heart rate and the
width of blood vessels through changes in muscles in the walls of blood vessels.
Your blood pressure reading is highest when your heart pumps or ejects blood.This stage is called your systolic
blood pressure.
Your blood pressure is lowest when the heart rests (in-between beats).This is called your diastolic blood pressure.
It is critical to maintain blood pressure values within a “normal” range in order to prevent cardiovascular diseases.
Increased blood pressure values (various forms of hypertension) have associated long and medium term health
risks.These risks concern the arterial blood vessels of your body, which are endangered due to constriction caused by
deposits in the vessel walls (arteriosclerosis).A deficient supply of blood to important organs (heart, brain, muscles)
can be the result. Furthermore,with long-term increased blood pressure values, the heart will become structurally
damaged.
There are many different causes of the appearance of high blood pressure. We differentiate between common
primary (essential) hypertension, and secondary hypertension.The latter group can be ascribed to specific organic
malfunctions. Please consult your doctor for information about the possible origins of your own increased blood
pressure values.
1.4 Normal Blood Pressure Values
Blood pressure is too high when,at rest, the diastolic pressure is above 90 mmHg or the systolic blood pressure is
over 140 mmHg.
If you obtain readings in this range, consult your doctor immediately. High blood pressure values over time can
damage blood vessels, vital organs such as the kidney, and your heart.
Should the systolic blood pressure values lie between 140 mmHg and 160 mmHg or the diastolic blood pressure
values lie between 90 mmHg and 95 mmHg, consult your doctor. Regular self-checks will be necessary.
With blood pressure values that are too low (i.e., systolic values under 105 mmHg or diastolic values under
60 mmHg), consult with your doctor.
Even with normal blood pressure values, a regular self-check with your blood pressure monitor is recommended.
This way you can detect possible changes in your values early and react appropriately.
Refer to the following table for classifying blood pressure values (units: mmHg) according to the World Health
Organization (WHO):

Category Systolic Blood Pressure Diastolic Blood Pressure
Optimal < 120 < 80
Normal < 130 < 85
High Normal 130 - 139 85 - 89
Hypertension
•Stage1:Mild 140 - 159 90 - 99
•Stage2:Moderate 160 - 179 100 - 109
•Stage3:Severe >180 >110
Isolated Systolic Hypertension >140 < 90
Important for Canadians:TheCanadianHypertensionEducationProgram(CHEP)recommendsthat
patients with average measurements of 135mmHg(systolic)or 85mgHg(diastolic)athomebe
considered hypertensive. Should your average readings be in this range, consult your physician.
For further information, see our website www.biosdiagnostics.com.
Further information
If your values are mostly “normal” under resting conditions but exceptionally high under conditions of physical or
psychological stress,it is possible that you are suffering from so-called ”labile hypertension”. In any case,please
discuss the values with your doctor.
Correctly measured diastolic blood pressure values above 120mmHg require immediate medical treatment.
1.5 Common Blood Pressure Questions and Answers
a)Why is my blood pressure reading always different?
Your blood pressure changes constantly. It is quite normal for blood pressure to fluctuate significantly (50 mmHg
to 60 mmHg) throughout the day. Blood pressure is normally lowest at night, but increases during waking hours
when the stress and activities of everyday life are highest.
mmHg
AM Time PM

Your blood pressure also increases and decreases under the following circumstances
Bloodpressureishigherthannormal:
•whenyouareexcited,nervous,ortense
•whiletakingabath
•duringandafterexerciseorstrenuousphysicalactivity
•whenitiscold
•withinonehouraftermeals
•afterdrinkingtea,coffee,orothercaffeinateddrinks
•aftersmokingtobacco
•whenyourbladderisfull
Bloodpressureislowerthannormal:
•afterconsumingalcohol
•aftertakingabath
b)Why is the doctor’s reading different from the reading taken at home?
Your blood pressure can vary due to the environment (temperature,nervous condition).When measuring
blood pressure at the doctor’s office, it is possible for blood pressure to increase due to anxiety and tension.
c)Why should I monitor blood pressure at home?
One or two readings will not provide a true indication of your normal blood pressure.It is important to take
regular, daily measurements and to keep records over a period of time. This information can be used to
assist your physician in diagnosing and preventing potential health problems.
2. Getting Started
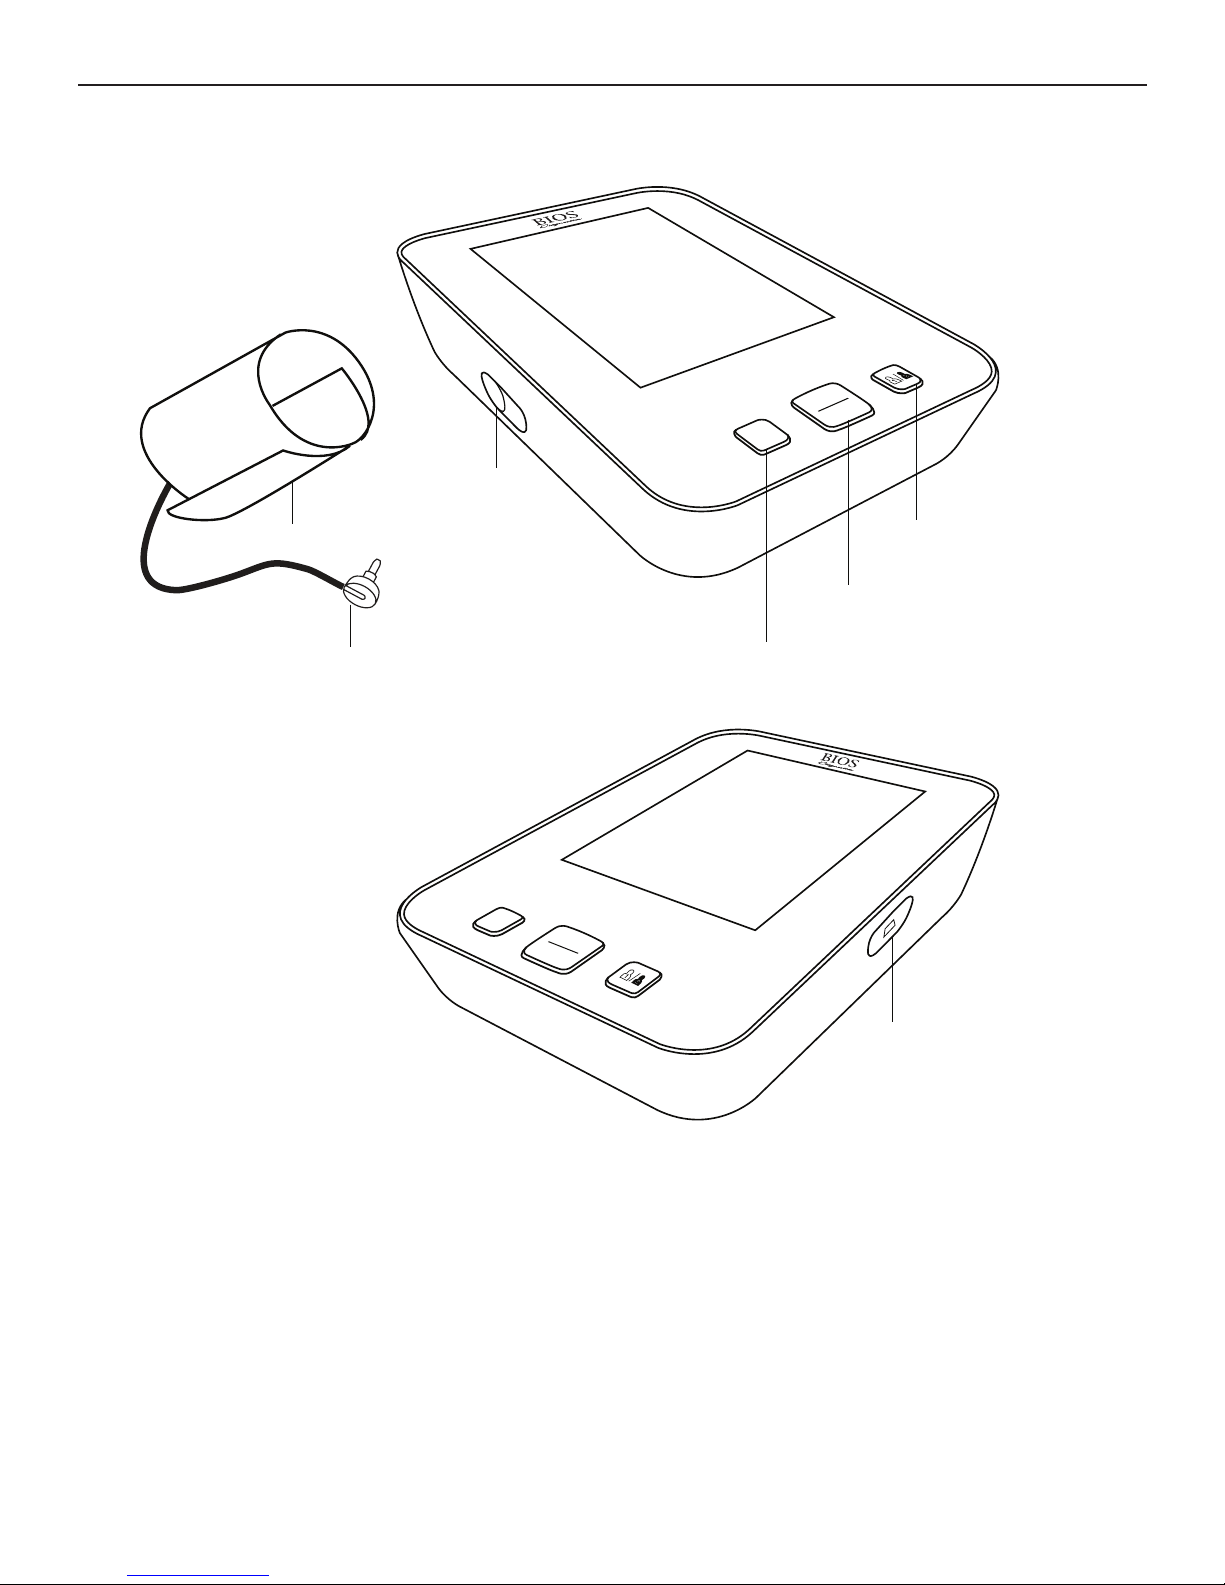
2.1 About the BD215
a) This section describes the various components of the Blood Pressure Monitor.
M
START
STOP
M
START
STOP
Cuff Connection
Cuff Connector
Wide Range Cuff
Memory Button
USB / Adapter
Port
Start / Stop
Button
User Switch /
Select Button
b) Upperarmcuff:
Wide range cuff for arm circumference 24-43 cm or 9.4” - 16.9”.
Cuffconnection:
Insert the cuff connector into the opening provided on the left side of the monitor as shown in the diagram.

2.2 About the LCD Screen
The LCD screen displays the systolic and diastolic blood pressure measurements along with your heart rate.It also
displays previously recorded measurements and the date and time, when the appropriate button is pressed.
START
MSTOP
PUL
Symbol Guide
User
AM averaging
Irregular Heartbeat Icon
Heartbeat detection
during measurement
Low battery
Memory
2.3 Inserting the Batteries
Follow these steps to insert four “AAA” batteries in the device.
1. Open the battery compartment cover in the direction shown.
2. Insert four “AAA” batteries with the correct polarity as indicated.
3. Replace the battery compartment cover.
Attention!
• Afterthebatterywarningappears,the
device is blocked until the batteries have been replaced.
• Pleaseuse“AAA”Long-LifeorAlkaline1.5Vbatteries.
• Ifthebloodpressuremonitorisleftunusedforlongperiods,pleaseremovethebatteries
from the device.
• Donotmixoldandnewbatteries.Donotmixalkaline,standard(carbon-zinc)or
rechargeable batteries.

2.4 Using a USB Power Adapter
You may also operate this monitor using a USB adapter.
Please contact the manufacturer for detail.
1. Ensure that the USB adapter and cable are not damaged.
2. Plug the adapter cable into the USB / Adapter port on
the blood pressure monitor.
3. Plug the adapter into your electrical outlet.When
the USB adapter is connected, no battery current is
consumed.
3. Using the Device
This section describes how to get the maximum benefit from your BD215 blood pressure monitor.Follow the
instructions carefully to get an accurate measurement of your blood pressure and pulse rate.
3.1 Setting the Time and Date
When you insert the batteries or USB adapter for the first time the LCD screen will show all
the display elements for 2 seconds.Afterwards it will prompt you to set the current date
and time.You can also adjust the date and time at any time by pressing and holding the
START
STOP
M
button for over 3 seconds.Follow these steps to set the date and time settings:
1. When you press the
START
STOP
M
button for over 3 seconds,the year will start flashing. Press the
START
STOP
Mbutton to adjust the year and press the
START
STOP
M
button to confirm setting.
2. Next, the screen starts flashing the month setting. Press the
START
STOP
Mbutton repeatedly to
set the month and then press the
START
STOP
M
button to confirm the settings. Follow the same
steps to set the date setting.
3. Lastly, the screen starts flashing the hour format values, 12/24 hr. Press the
START
STOP
Mbutton
to set the format and then press the
START
STOP
M
button to confirm the settings. Follow the
same steps to set the hour and minute values.
NOTE: When no button is pressed for 1 minute the monitor will return to regular mode
and after 3 seconds turn off.
M
START
STOP
START
MSTOP
PUL

3.2 Select the User
This blood pressure monitor is designed to store 90 measurements for each of two users. Before
taking a measurement,be certain that the correct user has been selected.
1. Press the
START
STOP
M
button to toggle between User 1 and User 2.
3.3 Obtaining Accurate Measurements
Your blood pressure can vary based on numerous factors, physiological conditions, and your surroundings. Follow
these guidelines to obtain accurate and error-free measurements of your blood pressure and pulse rate.
3.3A Before Measuring
• Avoideating,smokingaswellasallformsofexertiondirectlybeforethemeasurement.Allthesefactors
influence the measurement result.Relax by sitting in an armchair in a quiet atmosphere for about 5 minutes
before the measurement.
• Alwaystakemeasurementsonthesamearm(normallyleft)andinthesameposture.Donotswitchbetween
right and left arms while recording your blood pressure as there may be a difference of up to 10mmHg
pressure between the two arms.
• Attempttocarryoutthemeasurementsregularlyatthesametimeofday,sincebloodpressurechangesduring
the course of the day. The ideal time to measure your blood pressure is in the morning after you wake up,
before breakfast and physical activity,and in the absence of the urge to urinate.
• Restfor5minutessittingquietlyandreleaseallthetensioninyourbody—especiallythearmmuscles—before
beginning with the measurement.Remain calm and quiet when the measurement is in process. Do not speak
or move your arm (as well as other body) muscles during the process.
3.3B Common Sources of Error
All efforts by the patient to support the arm can increase the blood pressure. Make sure you are in a comfortable,
relaxed position and do not activate any of the muscles in the measurement arm during the measurement.Use a
cushion for support if necessary.
ATTENTION!
Comparable blood pressure measurements always require the same conditions with a peaceful and
calm environment. Ensure that you take measurements under the same conditions to obtain an
accurate estimate of blood pressure variation patterns.
• Ifthearmarteryliesconsiderablylowerorhigherthantheheart,anerroneousvalueofbloodpressureis
measured.Each 15 cm difference in height results in a measurement error of 10 mmHg.
• Aloosecuffcausesfalsemeasurementvalues.
• Withrepeatedmeasurements,bloodaccumulatesinthearm,whichcanleadtofalseresults.Consecutive
blood pressure measurements should be repeated after at least a 15 second pause or after the arm has been
held up in order to allow the accumulated blood to flow away.
START
MSTOP
PUL

3.3C Fitting the Wide Range Cuff
a) Put the end of the cuff (with fastener) through the metal ring,
making the cuff a cylinder.(Ignore this step if your cuff is already
set up.) Proper assembly allows the Velcro®to match up properly.
b) Place the cuff around your arm.Make sure the bottom edge of
the cuff is about 1” above the elbow joint. Adjust the cuff so that
the rubber tubing under the cuff lies over the brachial artery,
which runs on the inside of the arm (see Fig. B).
c) Pull the cuff and tighten it by attaching the Velcro®fastener.
Normally, the left arm is used, unless there is a physical reason
for using the right arm.
d) The cuff should fit snugly around the arm, but not too tight.You
should be able to fit two fingers under the cuff.
e) Place the arm on the table (palm facing upwards) so that the cuff
is at the same level as the heart. Make sure there is no kink in the
hose.
f) You can adjust the level of your arm by putting a cushion under
your arm.
a)
b)
c)
d)
e)
f)

g) Remain seated in a comfortable room temperature for at least 5
minutes, then start the measurement.
h) For those who cannot put the cuff on the left arm, put it on the
right arm as shown.
i) Consecutive measurements will cause blood accumulation in
the lower arm which will affect the measuring results.To improve
reading accuracy,raise the arm being measured,squeeze and relax
your hand several times, then take another measurement.Another
option is to take the cuff off and wait at least 10 minutes before
repeating measurement.
j) If this device was stored in low temperature, it is necessary to leave it
in room temperature for at least 1 hour, otherwise the measurement
can be inaccurate.
Comment:
If it is not possible to fit the cuff to your left arm, it can also be placed on the right arm. However all measurements
should be made using the same arm.
Comparable blood pressure measurements always require the same conditions (Relax for several minutes before
taking a measurement).
ATTENTION:Donotusecuffotherthantheoriginalcuffcontainedinthiskit!
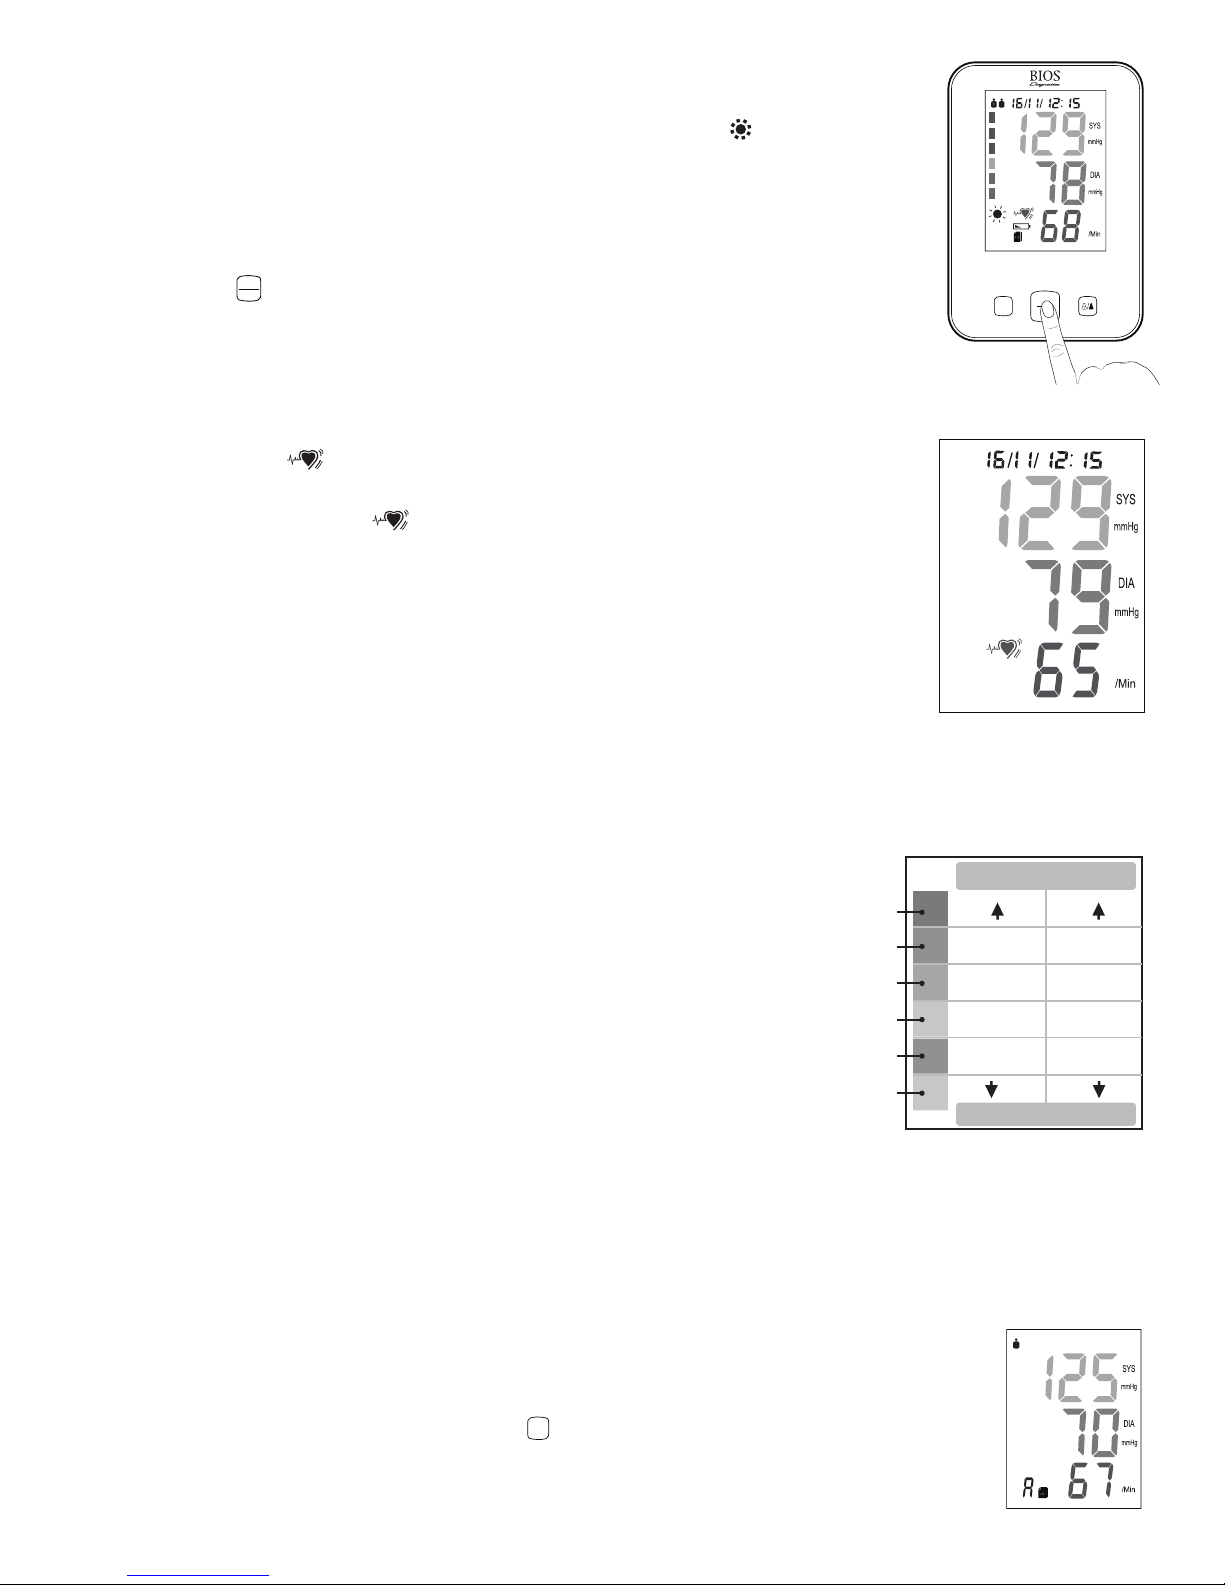
3.4 Measuring Your Blood Pressure
1. Press the START
STOP
M
button to turn on the device and start measurement.The LCD screen
is turned on.The cuff begins to inflate while the increasing cuff pressure is
displayed on the screen.After the suitable inflation pressure is reached, the cuff
stops inflating and the pressure gradually falls.The screen will show the icon
once a pulse is detected.When the pulse signal becomes strong, the icon will
begin to flash.Three short beeps sound when the measurement is completed.
The systolic and diastolic blood pressure values along with the pulse rate are
displayed on the screen.The measurement is displayed for approximately 1.5
minutes.
g)
h)
i)
2.The device will switch off after 1.5 minutes when no button is pressed.
NOTE: When the measurement is taken between 4am and 12pm the “ ” icon will be
displayed
3.5 Discontinuing a Measurement
If it is necessary to interrupt a blood pressure measurement for any reason (e.g. the patient
feels unwell) the START
STOP
M
button can be pressed at any time.The device then immediately lowers
the cuff pressure automatically.
3.6 Irregular Heartbeat Detection
When the device detects an irregular heartbeat,or any excessive body movement during
the measurement, the symbol will appear and flash when the blood pressure
measurement is displayed.It is important that you be relaxed, remain still and do not talk
during the measurement.If the symbol appears frequently (e.g. several times a week), it
may be an indication of a more serious heart problem, and you should consult your doctor.
3.7 Blood Pressure Assessment Indicator
The bars on the left hand side of the display show you the range within which the indicated
blood pressure values lies.Depending on the height of the bar, the readout value is either
within the normal (green), borderline (yellow/orange) or danger (red) range.
The classification is based on standards adopted from WHO (World Health Organization); which is recognized by
Hypertension Canada.
The indicator bar rises according to your measurement.
• Ifyourmeasurementhasonlyoneortwobars,yourmeasurementisin
the green zone, or “Normal” according to the WHO classification.
• Ifyourmeasurementhasthreebars,itisintheyellowzone,orhigh
normal according to the WHO classification.
• Ifyourmeasurementhasfourbars,itisintheorange“Stage1
Hypertension” zone.
• Ifyourmeasurementhasvebars,itisinthered“Stage2Hypertension”zone.
• Ifyourmeasurementhassixbars,itisinthered“Stage3Hypertension”zone.
3.8 Viewing Previously Recorded Values
The blood pressure monitor automatically stores your measurements. It can store up to 90 measurements per user
and it will automatically calculate the average value of the last 3 readings and the average value of the morning
readings for both users.
When the memory is full (90 sets of readings are stored), the oldest reading will be
replaced by a new one. Memory will not clear away even if power supply is removed.
1.To view the previously stored values, press the
START
STOP
Mbutton.The blood pressure monitor will
show the average value of the last 3 readings.
START
MSTOP
PUL
PUL
SYS
WHOWorld Health Organization 2003
180
160-180
110
100-110
90-100
85-90
80-85
80
140-160
130-140
120-130
120
(mmHg) DIA
Red
Red
Orange
Yellow
Green
Green
START
MSTOP
PUL
1)
2.Press the
START
STOP
Mbutton again,the display will show the average value of the morning readings
(see Section 3.9).
3. Press the
START
STOP
Mbutton again,the display will show the last measurement taken with the date
and time. Press the
START
STOP
Mbutton repeatedly to view all the measurements that are recorded on
the device.
3.9AMAveraging(Morning)
This feature averages the morning readings between 4am and 12pm to identify morning hypertension. Several
studies have shown elevated cardiovascular risks,heart attacks,and strokes occur in the morning as the body is
waking up from sleep.See Section 3.8 on how to view the average value of the morning readings.
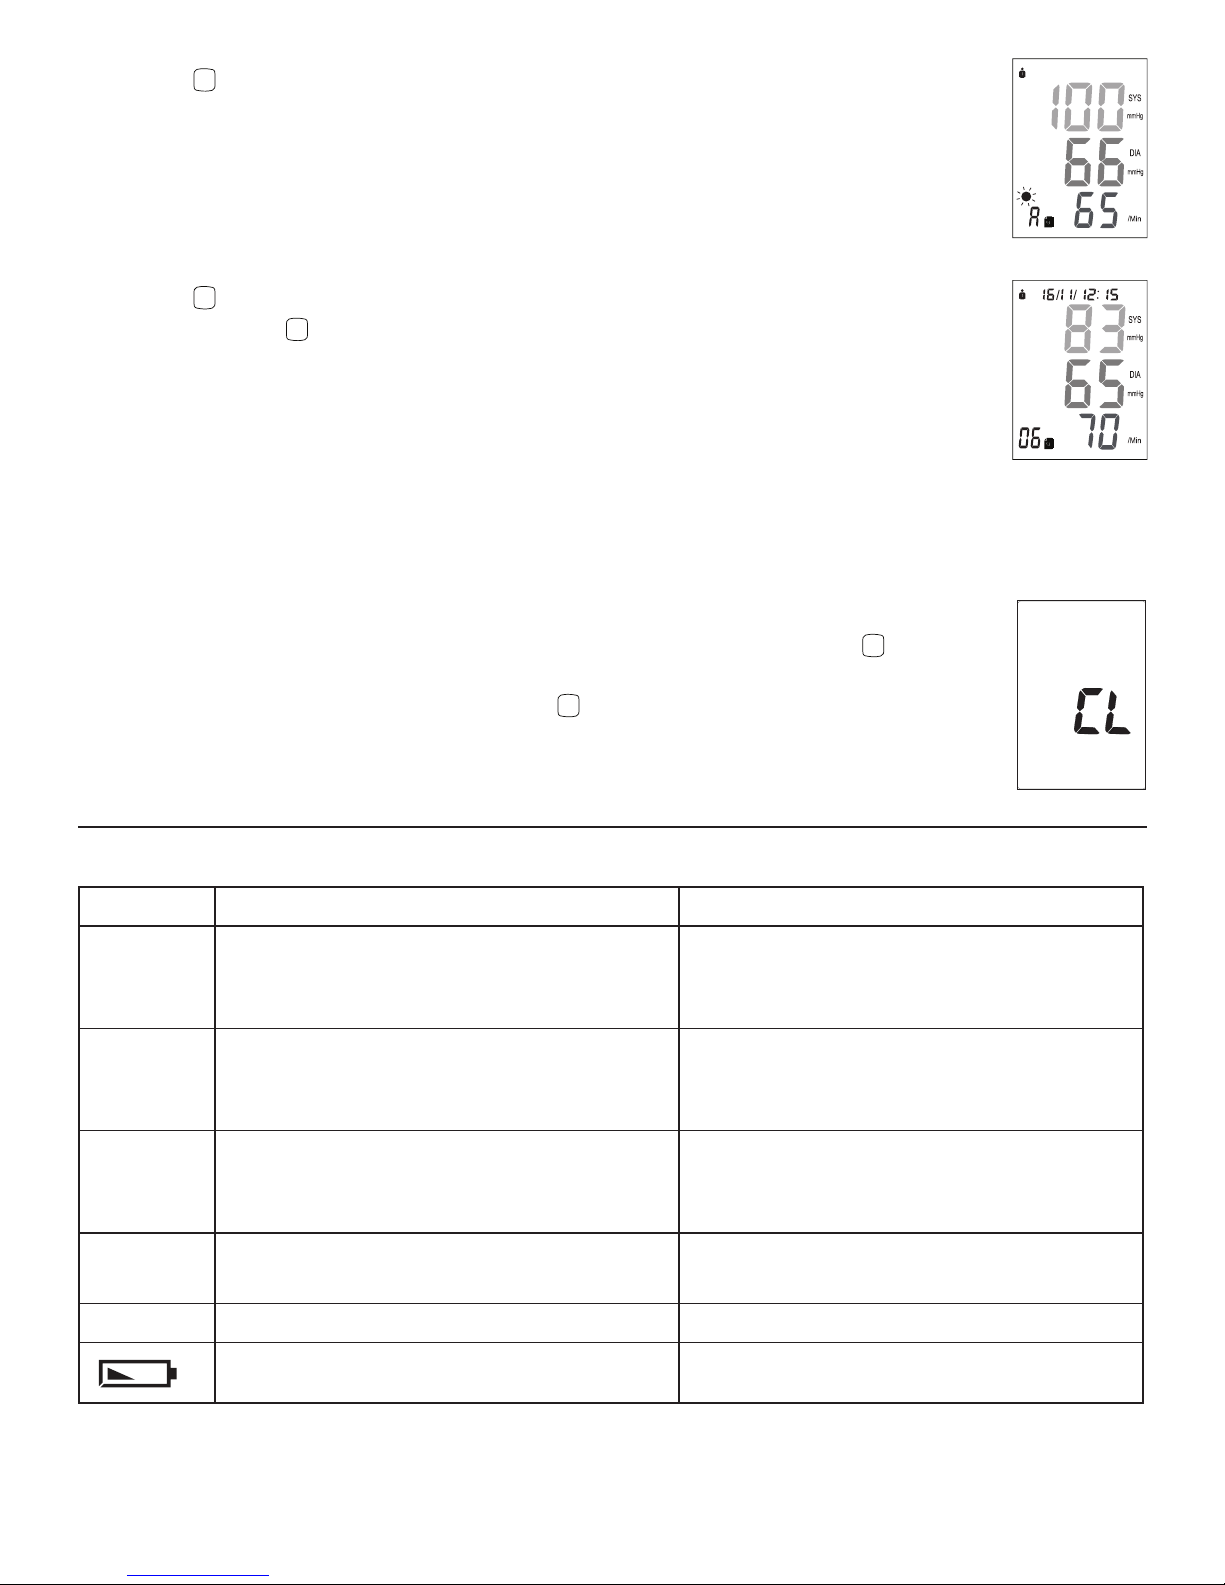
3.10 Clearing All Values
If you are sure that you want to permanently remove all stored values, hold down the
START
STOP
Mbutton
when in standby (nothing is displayed on the screen) until the “CL” appears and then release the
button.To permanently clear the memory, press the
START
STOP
Mbutton while “CL” is flashing.
4. Error Messages / Malfunctions
If an error occurs during a measurement the LCD displays the corresponding error code.
Error Possible Cause Remedy
EE 1 Cuff pressure is more than 300 mmHg or the
inflation of the cuff takes too long.
Ensure that the cuff is worn correctly and mea-
sure again.Avoid movement or talking when
the cuff is being inflated.
EE 2 The difference between systolic and diastolic
pressure readings are out of reasonable range.
Ensure that the cuff is being worn correctly and
that you have been inactive for a sufficient time
before making the measurement.
EE 3 Unnatural pressure impulses influence the mea-
surement result.Reason: the arm was moved
during the measurement.
Avoid unnecessary movement or talking.
Err 5 No pulse has been detected. Ensure the cuff is being worn correctly, and that
you have your arm at the heart level.
EE E Memory record.
START
MSTOP
PUL
Low battery Replace batteries.
If problems occur when using the device the following points should be checked, and if necessary, the
corresponding measures should be taken.
START
MSTOP
PUL
2)
START
MSTOP
PUL
3)

Malfunction Remedy
The display remains empty when the device is switched
on.The batteries are inserted.
1. Check batteries for correct polarity.
2. If the display is unusual, re-insert the batteries or
exchange them for new ones.
The pressure does not rise even though the pump is
running.
Check the connection of the cuff tube and connect
properly if necessary.
The device frequently fails to measure the blood
pressure values,or the values measured are too low
or too high.
1. Check the positioning of the cuff.
2. Measure the blood pressure again,ensuring that
you have remained motionless for a sufficient
amount of time to ensure an accurate reading.
Every measurement produces varying results although
the instrument functions normally and the values
displayed are normal.
Note that blood pressure fluctuates continuously;
therefore measurements will show some variability.
Blood pressure values measured differ from those
measured by the doctor.
Record the daily developement of the values and
consult your doctor.
Note:Individualsvisitingtheirdoctorfre-
quently experience anxiety which can result in
a higher blood pressure reading than at home.
5. Care and Maintenance
a) Do not expose the device to either extreme temperatures, humidity,dust or
direct sunlight.
b) The cuff contains a sensitive air-tight bubble. Handle this carefully and avoid
all types of stress through twisting or buckling.
c) Clean the device with a soft,dry cloth. Do not use gas, thinners or similar
solvents. Spots on the cuff can be removed carefully with a damp cloth and
soapsuds. The cuff with bladder must not be washed in a dishwasher,
clothes washer, or submerged in water.
d) Handle the tube carefully. Do not pull on it.Do not allow the tubing to kink
and keep it away from sharp edges.
e) Do not drop the monitor or treat it roughly in any way.Avoid strong vibrations.
M
START
STOP
M
START
STOP
M
START
STOP

f) Never open the monitor. This invalidates the manufacturer’s warranty.
g) Batteries and electronic instruments must be disposed of in accordance with the
locally applicable regulations, not with domestic waste.
6. 10 Year Warranty
BIOS Diagnostics™blood pressure monitor has a 10 year warranty to be free of manufacturing defects for the life of
the original owner.This warranty does not include the inflation system including the cuff and inflation bladder. The
cuff is warranted for two years.The warranty does not cover damage from misuse or tampering.
100% Satisfaction Guarantee
If at any time, you are not completely satisfied with the performance of this device, call our BP Hotline and speak
with a customer service person, who will make arrangements to have the device tested and repaired or replaced to
your full satisfaction.
If you have questions regarding the operation of your monitor call the BIOS Diagnostics™Blood Pressure
Hotline:
1-866-536-2289
Should repair be necessary,return the unit with all component pieces. Enclose proof of purchase and $5.00 for
return shipping and insurance.Ship the unit prepaid and insured (at owners option) to:
Thermor Ltd.
Repair Department
16975 Leslie Street
Newmarket, ON L3Y 9A1
www.biosdiagnostics.com
Email: [email protected]
Please include your name, return address, phone number,and email address.Thermor will repair or replace (at
Thermor’s option) free of charge any parts necessary to correct the defect in material or workmanship.
Please allow 10 days for repair and return shipping.
M
START
STOP

7. Technical Specifications
Operatingtemperature: 10 to 40°C / 50 to 104°F
Storagetemperature: -20 to 55°C / -4 to 131°F
Weight: 425 g (including batteries)
Dimensions: 102 x 140 x 40 mm
Measuringprocedure: Oscillometric during deflation
Measurementrange: Systolic50–250mmHg
Diastolic30–180mmHg
Pulse40–199beatsperminute
Resolution: 1 mmHg
Staticaccuracy: pressure within ± 3 mmHg or ± 2% of reading
Pulseaccuracy: ± 4 % of the reading
Voltagesource: 4 x 1.5 V Batteries; size AAA
SPS type (5V micro USB) CUL adapter
Other manuals for BD215
1
Table of contents
Other BIOS Blood Pressure Monitor manuals


