BIOSENCY BORA Band BB-100 User manual

VERSION 6.0
June 2023 1
Connected oximeter &
heart / respiratory rate smart
band monitor
Bora band® Model BB100
User manual
BORA-Band_IFU-6.0 – DATE : June 2023
Pulse Oximeter
BIOSENCY
1137 A Avenue des champs blancs
35510 Cesson Sévigné
+ 33 (0)9 73 24 88 10
BB100
AxxZZZ
™
mm/yyyy
Do not use if the
packaging is damaged
-20°C
+35°C 95%
5%
Storage
temperature
Relative humidity limitation,
non -condensing
Keep Dry
A changer
2797

VERSION 6.0
June 2023 1
TABLE OF CONTENTS
Introduction..........................................................................................................4
About this user manual......................................................................................................................4
Intented use ...........................................................................................................................................4
Target population.................................................................................................................................5
Contraindications .................................................................................................................................5
Side eects .............................................................................................................................................6
About Bora band® technology......................................................................................................6
Bora band® Model BB-100 presentation......................................................7
Standard Bora band®kit ...................................................................................................................8
Equipment...............................................................................................................................................8
Bora band® identication................................................................................................................8
Pairing the Bora band® with the mobile application.................................9
Bora connect for home......................................................................................................................9
Bora connect®......................................................................................................................................9
Partner mobile application .............................................................................................................10
Wearing the Bora band® ................................................................................10
Fastening the BB100S fabric wristband .....................................................................................10
Fabric wristband adjustment .........................................................................................................11
Positioning the Bora band®..........................................................................................................11
Taking o the Bora band®.............................................................................................................13
How the Bora band® works ...........................................................................13
Starting the Bora band®.................................................................................................................13
Turning off the Bora band®..........................................................................................................15
Malfunction ..........................................................................................................................................15
Battery charging .................................................................................................................................15
Indicator light signication.............................................................................................................18
Bora band® software update.........................................................................18
Data access for health professionals .............................................................19
Cleaning ...............................................................................................................19
Cleaning the case...............................................................................................................................19
BB100S fabric wristband cleaning ...............................................................................................19

VERSION 6.0
June 2023 2
Cleaning and disinfection between patients...............................................20
Disinfecting the casing.....................................................................................................................20
Storage.................................................................................................................20
Repair....................................................................................................................21
Bora band® default status.............................................................................................................21
When to consult a healthcare professional .................................................21
Guarantee and Support....................................................................................21
Guarantee exclusions........................................................................................................................22
Guarantee disclaimer/exclusivity..................................................................................................22
Incidents ................................................................................................................................................22
Disposal..................................................................................................................................................22
Cybersecurity ......................................................................................................23
Technical Information .........................................................................................24
Specications.......................................................................................................................................24
Performance at rest............................................................................................................................... 24
Equipment response time ..................................................................................................................... 25
System .................................................................................................................................................. 25
Electrical information............................................................................................................................. 25
Physical characteristics......................................................................................................................... 25
Environmental conditions...................................................................................................................... 26
Conformity............................................................................................................................................. 26
Wireless transmission ........................................................................................................................... 27
Operating principles .........................................................................................................................27
Clinical benets ..................................................................................................27
Manufacturer’s declarations ...........................................................................29
Copyrights and Trademarks............................................................................32
Symbols................................................................................................................32
Manufacturer’s contact details.......................................................................33

VERSION 6.0
June 2023 3
Table of gures
Figure 1 : Bora band® presentation.............................................................................................7
Figure 2 : Bora band® identification number ..........................................................................8
Figure 3 : Pair a Bora band® ...........................................................................................................9
Figure 4 : Fastening the fabric wristband ................................................................................ 10
Figure 5 : Adjusting the length of the fabric wristband..................................................... 11
Figure 6 : Wearing the Bora band® .......................................................................................... 11
Figure 7 : Removing the Bora band®....................................................................................... 13
Figure 8 : Turning on the Bora band® ..................................................................................... 13
Figure 9 : Battery charging............................................................................................................ 16

VERSION 6.0
June 2023 4
Introduction
About this user manual
This manual is a user guide for the Bora band® Model BB100 wearable device, designed by Biosency.
sWARNINGS
INSTRUCTIONS FOR USE
the instructions contained within.
Please always use the Bora band® in accordance with the instructions contained within this manual, which in-
cludes where to locate and place the oximeter. Failure to follow the instructions in this manual may result in mal-
functions, including inaccurate readings.
The Bora band® device should only be used with the equipement supplied by Biosency and the applications de-
veloped by Biosency or its partners.
To ensure safe and optimal use of the device, please carefully read the precautions for use marked with an s
symbol.
Intended use
Bora band® is a wearable device used for measuring (intermittent data collection), recording, processing and
storing physiological parameters that will later be transmitted to a web platform for remote review to support the
follow-up of patient’s care. There is no display on Bora band®. Bora band® measures, records and processes:
Efunctional oxygen saturation of arterial hemoglobin (%SpO),
Eheart rate (HR),
Erespiratory rate (RR),
Eskin temperature (T°C).
Bora band® is suitable for use with adult with chronic respiratory diseases and satisfactory perfusion.
It is intended for use at home, outdoors, and within medical settings.
Bora band® is intended to be used in combination with one of the following platforms: Bora connect®, EPOCA
(EIIS), Dom’air Santé.
MAGNETIC RESONANCE IMAGING
Do not use the Bora band® during surgery or in a magnetic resonance imaging (MRI) setting.
DEFIBRILLATION
accordance with IEC 60601-1).
sWARNINGS

VERSION 6.0
June 2023 5
Contraindications
Target population
The Bora band® does not trigger an alarm and does not allow for continuous readings.
The Bora band® is not designed to continuously monitor patient vital signs.
The Bora band® is not intended for use in patients with low perfusion.
The device, which is prescribed by a doctor, is intended to measure the cardio-respiratory parameters of
The Bora device is intended for use by several types of users:
1. Patients wear the Bora band® bracelet. They can consult their data on a mobile version of Bora connect®
(except with Bora Connect for Research / Bora Connect for Home).
3. The client structure (e.g. home care provider) has access to Bora band® status information (device in use
or available for use, battery level, etc.) using the Bora connect® web version.
ELECTROSURGERY
Do not use the Bora band® during electrosurgery.
FLAMMABLE SUBSTANCES
-
COMPLEMENTARY DEVICE FOR PATIENT DIAGNOSIS
This device should be used in conjunction with other methods for the assessment of symptoms
and clinical evidence.

VERSION 6.0
June 2023 6
ALARM
Do not use the device when alarms are required.
CONTINUOUS MONITORING
Do not use the Bora band® for continuous monitoring purposes. The Bora band® is intended to
periodically record physiological parameters (SpO, respiratory rate, heart rate, temperature). No
alarm is provided to allow continuous monitoring.
About Bora band® technology
The Bora band® pulse oximeter is a communication device designed to be worn on the wrist and acquire
real-time readings several times a day, while maintaining user comfort at all times.
The Bora band® has three sensors :
EA photoplethysmography (PPG) sensor, for measuring SpOand heart rate
EA 6-axis inertial measuring unit, to count steps, monitor physical activity and measure respiratory rate
EA thermal sensor, to measure skin temperature
The Bora band® stores data in an internal memory. The data is then transmitted using Bluetooth® Low En-
ergy technology.
sWARNINGS
Side eects
When not used as intended, a delay in patient care may occur.

VERSION 6.0
June 2023 7
Bora band® Model BB-100 presentation
1 Case
2 Fabric wristband
3 Button
4 Indicator light
5
sensor window
6 Temperature sensor
7 Micro-USB B Port
Figure 1 : Bora band ® presentation
1/ Provided accessories 2/ First step, plug one end of the micro USB
cable into the USB port of the AC adaptor
3/ Plug the other end of the micro USB cable into the micro
USB AB port of your BORA Band Model BB100 as
illustrated Figure 2
Lorsque le bracelet est séparé du boitier, il faut insérer le scratch de part et d’autre du boitier
4/ Connect to AC
Figure 2 Charging the BORA Band Figure 3 Attach the watch band
Figure 1 Hardware overview
1
1
7
4
7
3
1. BORA Band™ Model BB100 case
2. Wristband
3. Push button
4. LED indicator
5. SpO2 sensor Port
6. Thermal sensor Port
5
3
6
2
1
41
4
3
2
1/ Provided accessories 2/ First step, plug one end of the micro USB
cable into the USB port of the AC adaptor
3/ Plug the other end of the micro USB cable into the micro
USB AB port of your BORA Band Model BB100 as
illustrated Figure 2
Lorsque le bracelet est séparé du boitier, il faut insérer le scratch de part et d’autre du boitier
4/ Connect to AC
Figure 2 Charging the BORA Band Figure 3 Attach the watch band
Figure 1 Hardware overview
1
1
7
4
73
1. BORA Band™ Model BB100 case
2. Wristband
3. Push button
4. LED indicator
5. SpO2 sensor Port
6. Thermal sensor Port
5
3
6
2
1
41
4
3
2
1/ Provided accessories 2/ First step, plug one end of the micro USB
cable into the USB port of the AC adaptor
3/ Plug the other end of the micro USB cable into the micro
USB AB port of your BORA Band Model BB100 as
illustrated Figure 2
Lorsque le bracelet est séparé du boitier, il faut insérer le scratch de part et d’autre du boitier
4/ Connect to AC
Figure 2 Charging the BORA Band Figure 3 Attach the watch band
Figure 1 Hardware overview
1
1
7
4
7
3
1. BORA Band™ Model BB100 case
2. Wristband
3. Push button
4. LED indicator
5. SpO2 sensor Port
6. Thermal sensor Port
5
3
6
2
1
41
4
3
2
VERSION 6.0
June 2023 8
Standard Bora band® kit
Upon delivery, please ensure that the following parts and elements are present. Please contact the carrier
immediately if the package is damaged.
Kit equipment :
E1 Bora band®, smart bracelet, oximeter and heart and respiratory rate sensor
E1 BB100S fabric bracelet
E1 BB100DC, AC adaptor conforming IEC 60601-1-2
E1 BB100UC, micro USB cable
E1 BB100IFU, User manual (this document)
E1 BB100QUG, Quick user guide (patient)
Equipment
The Bora band® cannot be used with elements other than those supplied by Biosency.
Model number Description
BB100DC AC adaptor, IEC 60601-1-2 compliant
BB100UC Micro USB cable
BB100S Fabric wristband
sWARNING
ELECTROMAGNETIC INTERFERENCE
The use of AC adaptor and cables other than those listed in this manual, may result in increased
electromagnetic emissions and / or decreased immunity of this device. As a result, this may lead
to malfunction.
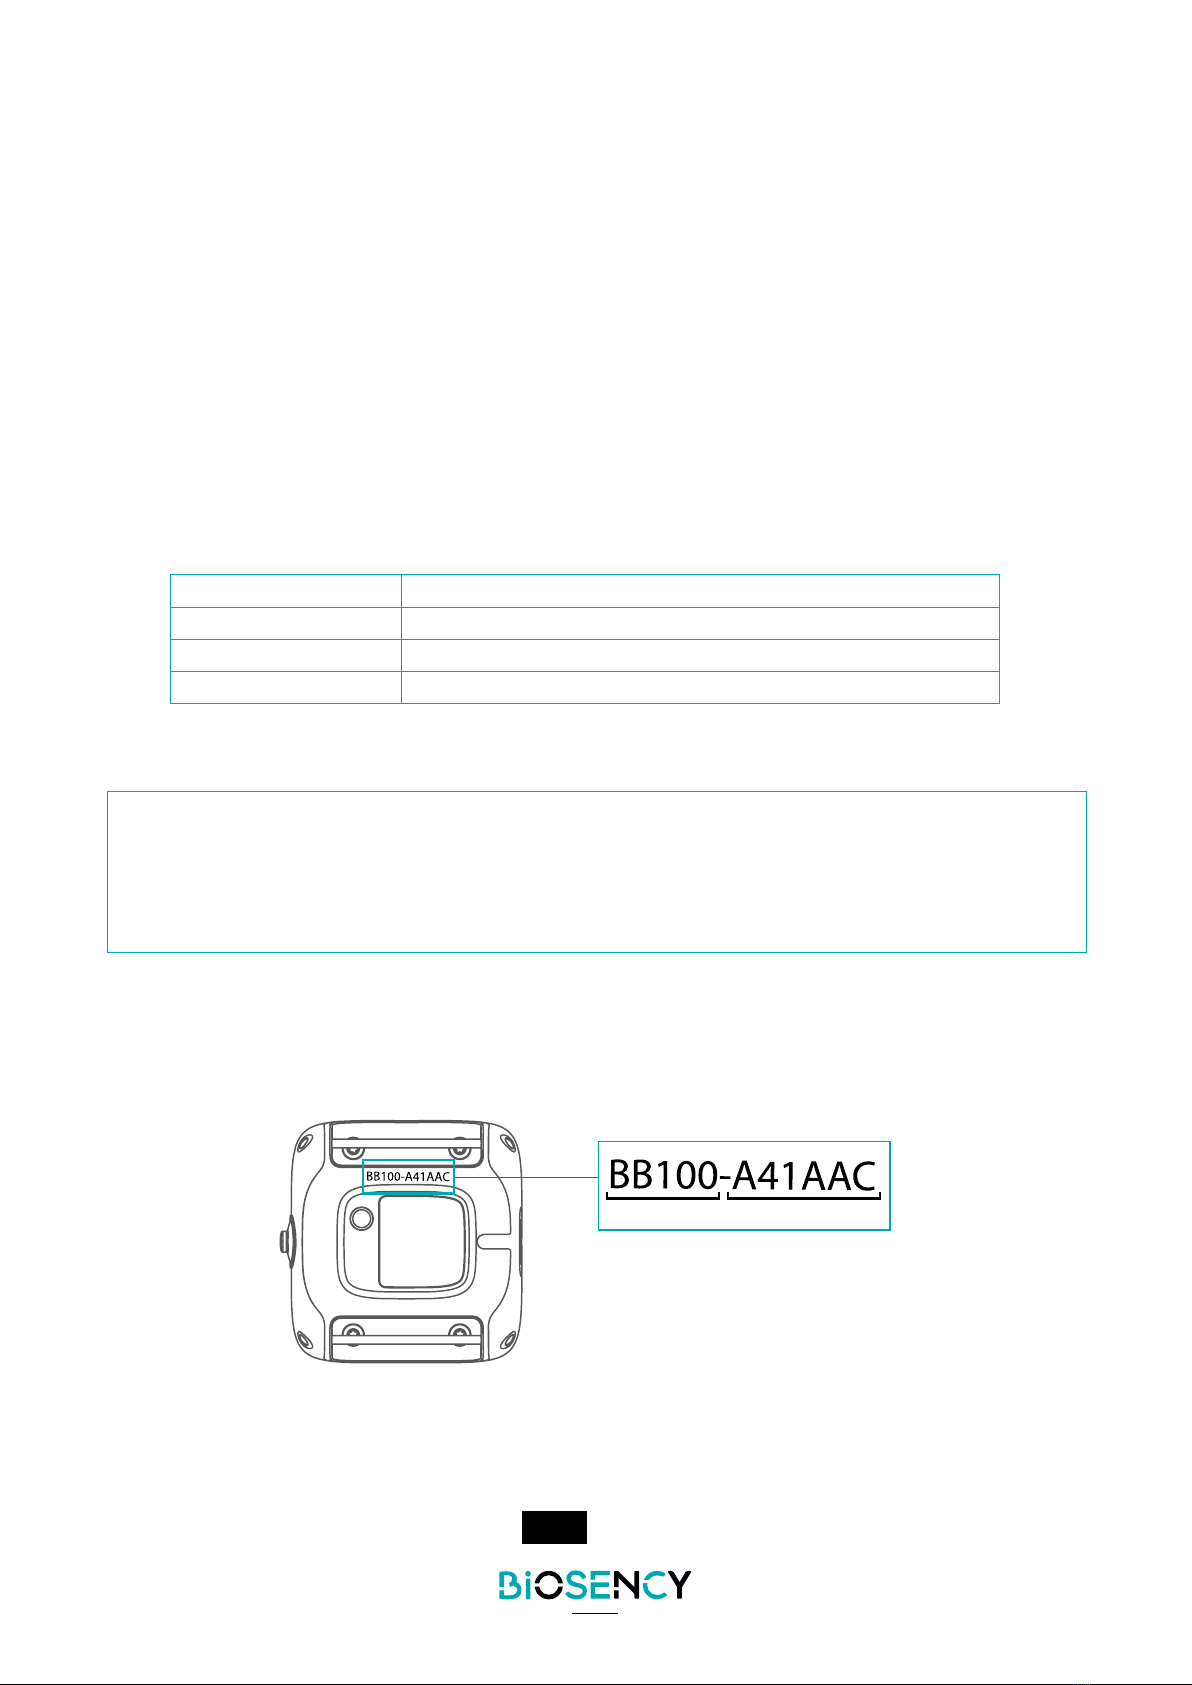
Bora band® identication
The serial number is listed on the base of your device as indicated in Figure 2.
Figure 2 : Bora band ® identication number
4
3
Modell Seriennummer
Model Serial Number
readable alphanumerique sequence, after the symbol.

VERSION 6.0
June 2023 9
Pairing Bora band® with the mobile application
The data’s transmission stored in Bora band® is done through a mobile application. This operation requires
the installation of the mobile application on a phone or a tablet and the pairing of Bora band® with it.
The installation and pairing procedure varies depending on the mobile application used:
- The Bora connect for home application
- The Bora connect® application
- Partner mobile application
Bora connect for home
The installation of the application and pairing of Bora band® are already done by your healthcare provider
-
rehand by Biosency.
Bora connect ®
Installation of the application
The user should install the application on their mobile phone (the use of the Samsung Galaxy A20e phone
is recommended) or on a tablet. The app is available on the Google Play Store. Type Bora connect ® in the
store search bar. Make sure that the application found is indeed published by BIOSENCY. Follow the store
instructions to install the app.
In order to ensure the application works correctly, the mobile phone on which Bora connect ® is installed must
have the following minimum technical characteristics:
E1,4 GHz processor
ERAM : 2GB
EResolution : 360 x 640 pixels
EBluetooth ® : 4.2 (BLE)
EOperating system: Android version N-5 ou iOS version N-3 where N is the last version
EAccess to a WiFi network or a cellular network with mobile data (3G/4G/5G)
Pairing of the Bora band ®
Figure 3 : Pair a Bora band ®

VERSION 6.0
June 2023 10
Wearing the Bora band®
Fastening the BB100S fabric wristband
Figure 4 shows how to attach the wristband to the Bora band® case.
1/ Provided accessories 2/ First step, plug one end of the micro USB
cable into the USB port of the AC adaptor
3/ Plug the other end of the micro USB cable into the micro
USB AB port of your BORA Band Model BB100 as
illustrated Figure 2
Lorsque le bracelet est séparé du boitier, il faut insérer le scratch de part et d’autre du boitier
4/ Connect to AC
Figure 2 Charging the BORA Band Figure 3 Attach the watch band
Figure 1 Hardware overview
1
1
7
4
73
1. BORA Band™ Model BB100 case
2. Wristband
3. Push button
4. LED indicator
5. SpO2 sensor Port
6. Thermal sensor Port
5
3
6
2
1
41
4
3
2
Figure 4 : Fastening the fabric wristband
1/ Provided accessories 2/ First step, plug one end of the micro USB
cable into the USB port of the AC adaptor
3/ Plug the other end of the micro USB cable into the micro
USB AB port of your BORA Band Model BB100 as
illustrated Figure 2
Lorsque le bracelet est séparé du boitier, il faut insérer le scratch de part et d’autre du boitier
4/ Connect to AC
Figure 2 Charging the BORA Band Figure 3 Attach the watch band
Figure 1 Hardware overview
1
1
7
4
73
1. BORA Band™ Model BB100 case
2. Wristband
3. Push button
4. LED indicator
5. SpO2 sensor Port
6. Thermal sensor Port
5
3
6
2
1
41
4
3
2
In order for data transfer to take place, make sure that Bora band® is in the same room and close to (less
than 10 metres) the laptop or tablet to which it is connected.
Data access for patient
It is possible to check the correct functioning of the service thanks to the mobile application: it must indicate
that Bora band® is connected. This mobile application allows you to consult your physiological data.
For more information on the installation and use of the application, refer to the Bora connect® user manual.
Partner mobile application
Bora band® can be paired with mobile applications designed by partners. Please refer to the instruction for
use of these applications for a safe combination with Bora band®.

VERSION 6.0
June 2023 11
Fabric wristband adjustment
Adjust the size of the wristband as illustrated in Figure 5 below.
EUndo the fabric strap’s Velcro fastening and adjust to the size of your wrist, then simply secure back
in place.
E
(neither too tight nor too loose).
Vue du dessus
Figure 5 Wearing the BORA Band
Figure 4 Adjust the wristband length
Vue du dessous
Figure 6 - Taking off the BORA Band
Enfiler le bracelet
2/ Resserrer les deux scratchs pour que le bracelet soit ni trop serré ni trop lâche
1
3
4
2
1
4
2
3
Modelo Número de série
Vue du dessus
Figure 5 Wearing the BORA Band
Figure 4 Adjust the wristband length
Vue du dessous
Figure 6 - Taking off the BORA Band
Enfiler le bracelet
2/ Resserrer les deux scratchs pour que le bracelet soit ni trop serré ni trop lâche
1
3
4
2
1
4
2
3
Modelo Número de série
Vue du dessus
Figure 5 Wearing the BORA Band
Figure 4 Adjust the wristband length
Vue du dessous
Figure 6 - Taking off the BORA Band
Enfiler le bracelet
2/ Resserrer les deux scratchs pour que le bracelet soit ni trop serré ni trop lâche
1
3
4
2
1
4
2
3
Modelo Número de série
Figure 5 : Adjusting the length of the fabric wristband
Positioning the Bora band®
The Bora band® is worn on the back of the forearm, slightly below the wrist bone, as illustrated below in
Figure 6. This placement ensures optimal comfort and reading accuracy.
The Bora band® can be worn on the left or right wrist.
Vue du dessus
Figure 5 Wearing the BORA Band
Figure 4 Adjust the wristband length
Vue du dessous
Figure 6 - Taking off the BORA Band
Enfiler le bracelet
2/ Resserrer les deux scratchs pour que le bracelet soit ni trop serré ni trop lâche
1
3
4
2
1
4
2
3
Modelo Número de série
Figure 6 : Wearing the Bora band®
1 cm

VERSION 6.0
June 2023 12
sPRECAUTIONS
FACTORS THAT MAY NEGATIVELY EFFECT PULSE OXIMETER READINGS:
INCORRECT PLACEMENT OF STRAP
Ensure the device is placed 1 cm from the wrist bone.
ALLERGIES
This device should not be used by people with known allergies to the fabric strap material (polya-
mide) or case (Polycarbonate / ABS - SEBS).
SKIN SENSITIVITY
Monitor the skin contact area closely to ensure no sensitivity occurs. If irritation occurs, check the
cleanliness of the sensor, and clean the device if necessary. Should the problem persist, please
contact a sales representative.
FASTENING TOO TIGHT ON THE WRIST
Do not over tighten the device on the wrist. Fastening the device too tightly can cause discomfort.
FACTORS THAT MAY NEGATIVELY EFFECT DEVICE PERFORMANCE: INCORRECT
FASTENING TO THE WRIST
The wristband must be tight enough so that it does not slide on the skin but should not cause any
-
mance.
FACTORS THAT MAY NEGATIVELY AFFECT THE PERFORMANCE OF THE PULSE
OXIMETER: SIGNIFICANT TATTOOS OR EXCESS HAIR
can cause inaccurate readings.
PRESENCE OF BRUISING ON THE WRIST
Should bruising appear where the device has been placed, move to the other wrist.
sWARNINGS
VERSION 6.0
June 2023 13
Taking o the Bora band®
To release, undo the Velcro fastenings on both sides of the fabric strap (as shown in Figure 7).
Figure 7 : Removing the Bora band ®
Vue du dessus
Figure 5 Wearing the BORA Band
Figure 4 Adjust the wristband length
Vue du dessous
Figure 6 - Taking off the BORA Band
Enfiler le bracelet
2/ Resserrer les deux scratchs pour que le bracelet soit ni trop serré ni trop lâche
1
3
4
2
1
4
2
3
Modelo Número de série
Vue du dessus
Figure 5 Wearing the BORA Band
Figure 4 Adjust the wristband length
Vue du dessous
Figure 6 - Taking off the BORA Band
Enfiler le bracelet
2/ Resserrer les deux scratchs pour que le bracelet soit ni trop serré ni trop lâche
1
3
4
2
1
4
2
3
Modelo Número de série
4
3
Modell Seriennummer
Model Serial Number
Vue du dessus
Figure 5 Wearing the BORA Band
Figure 4 Adjust the wristband length
Vue du dessous
Figure 6 - Taking off the BORA Band
Enfiler le bracelet
2/ Resserrer les deux scratchs pour que le bracelet soit ni trop serré ni trop lâche
1
3
4
2
1
4
2
3
Modelo Número de série
How the Bora band® works
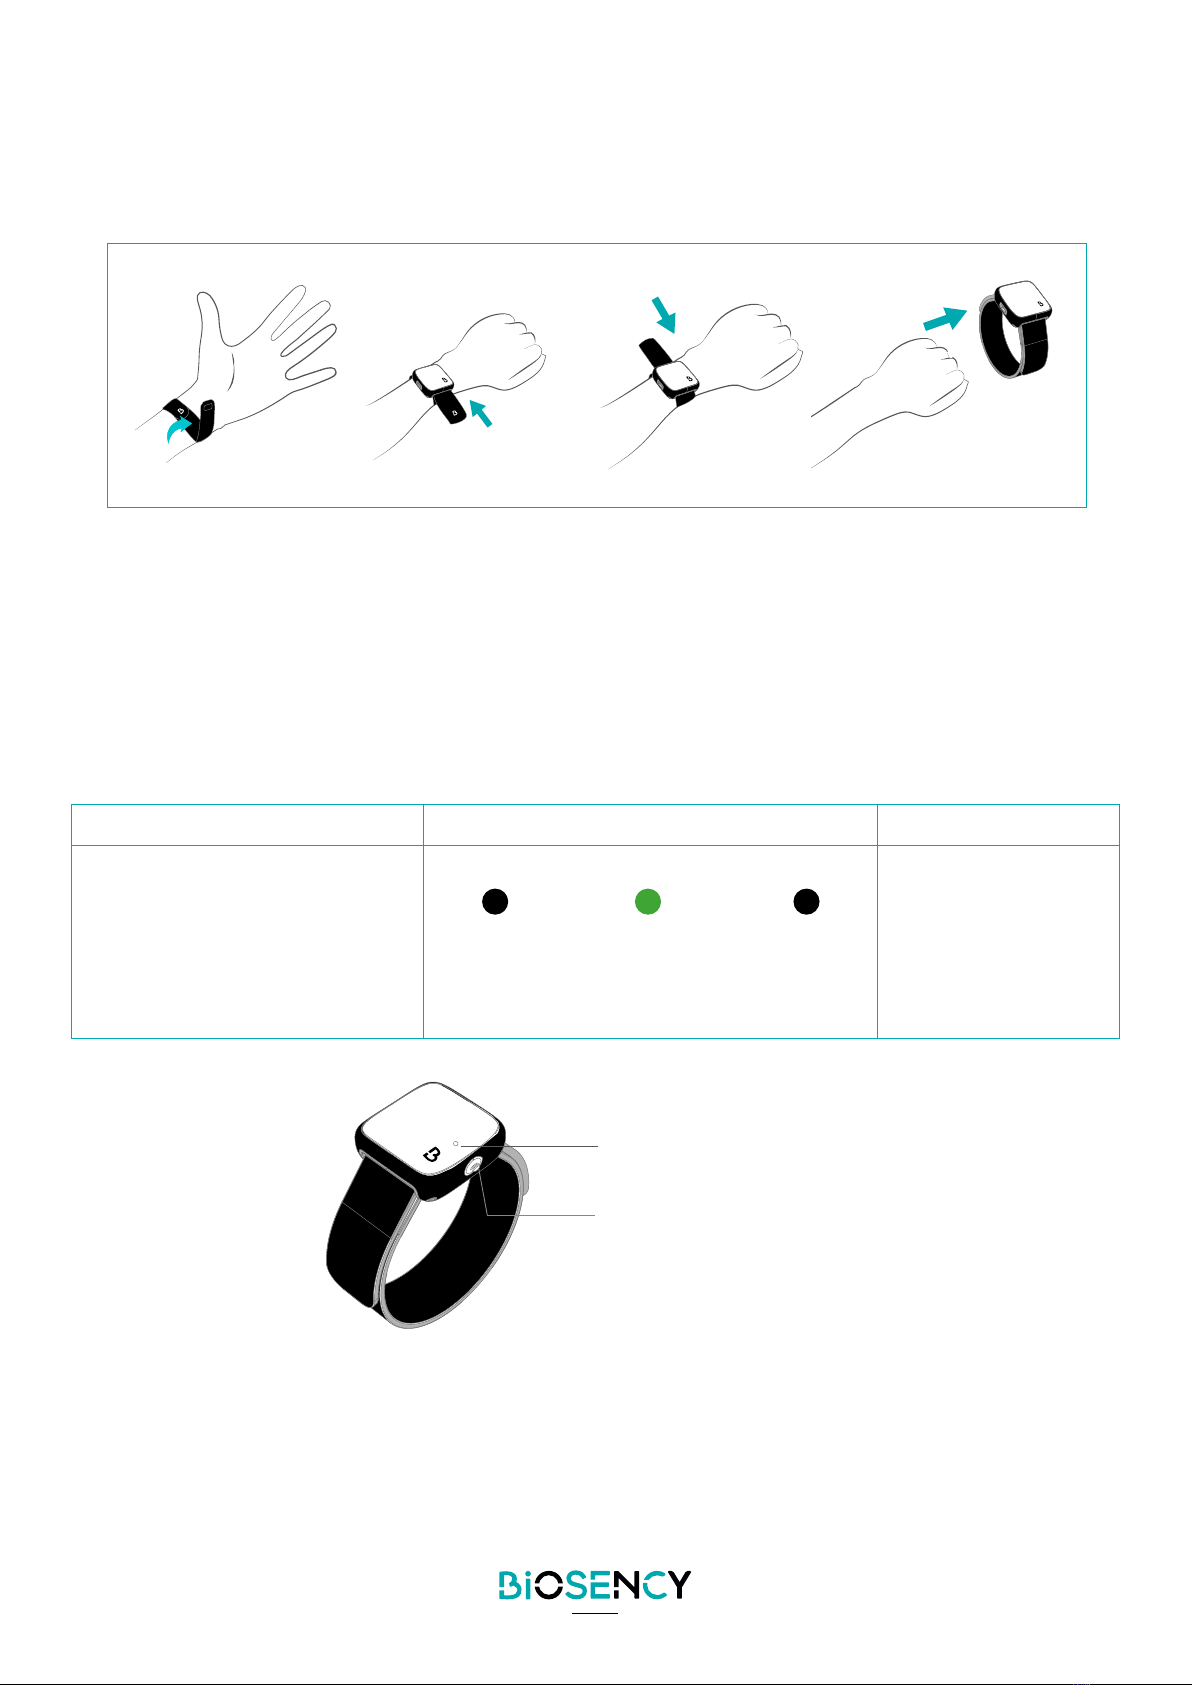
Starting the Bora band®
Make sure that the device is not connected to the mains, then simply start by pressing button (3). The indicator
light (4) turns green for 5 seconds, indicating that the Bora band® is starting up.
What you should do What you will see What it means
Press button (3)
$$
Bora band®
has started.
Figure 8 : Switch on the Bora band ®
Fixed GREEN (4)
Indicator light
Button
Off
Once switched on, the Bora band® automatically collects and records readings for oxygen saturation (SpO)
levels, heart rate, respiratory rate, skin temperature, number of steps and activity.
In order to be as discreet as possible, the Bora band® indicator light (4) goes out once it has started up.
Please note that if the battery charge is less than 10%, Bora band® does not start.
Off
4
3
Modell Seriennummer
Model Serial Number

VERSION 6.0
June 2023 14
EXPOSURE TO LIQUIDS
Do not submerge the device in water or any other liquid solution as this will cause permanent damage.
SKIN TEMPERATURE
The Bora band® pulse oximeter may not work if the skin temperature is too low. Make sure that
the skin temperature at the area of application is 24°C or above.
FACTORS THAT MAY NEGATIVELY EFFECT PULSE OXIMETER READINGS
This device is intended to determine the amount of oxygen-carrying haemoglobin in the blood. Some
• Movement
• Moisture in the sensor
• Electrosurgical interference
• Anaemia or low haemoglobin levels
• Weakened pulse rate
• Indocyanine green or other intravascular dyes
• Carboxyhaemoglobin
• Methaemoglobin
• Dysfunctional haemoglobin
• Venous pulsations
• Residue on the sensor window (5)
TROUBLESHOOTING
If the device does not perform as expected, refer to the Repair section or discontinue use and contact
a sales representative.
sWARNING
sPRECAUTIONS

VERSION 6.0
June 2023 15
Turning o the Bora band ®
Malfunction
In the event of malfunction:
EStop using the device immediately.
ETry to identify or eliminate the cause using this document (see Repair section).
E
a sales representative.
Battery charging
Low battery indicator
What you will see What it means What you should do
Flashing orange
indicator light
The battery is low. Charge the device as
described below.

VERSION 6.0
June 2023 16
Device charging
1/ Provided accessories 2/ First step, plug one end of the micro USB
cable into the USB port of the AC adaptor
3/ Plug the other end of the micro USB cable into the micro
USB AB port of your BORA Band Model BB100 as
illustrated Figure 2
Lorsque le bracelet est séparé du boitier, il faut insérer le scratch de part et d’autre du boitier
4/ Connect to AC
Figure 2 Charging the BORA Band Figure 3 Attach the watch band
Figure 1 Hardware overview
1
1
7
4
73
1. BORA Band™ Model BB100 case
2. Wristband
3. Push button
4. LED indicator
5. SpO2 sensor Port
6. Thermal sensor Port
5
3
6
2
1
41
4
3
2
1/ Take the items out of the packaging 2/ Connect one end of the micro-USB
cable to the power adapter
3/ Connect the other end of the mi-
cro-USB cable to the Bora band’s ®
USB port
4/ Connect to the power supply
1/ Provided accessories 2/ First step, plug one end of the micro USB
cable into the USB port of the AC adaptor
3/ Plug the other end of the micro USB cable into the micro
USB AB port of your BORA Band Model BB100 as
illustrated Figure 2
Lorsque le bracelet est séparé du boitier, il faut insérer le scratch de part et d’autre du boitier
4/ Connect to AC
Figure 2 Charging the BORA Band Figure 3 Attach the watch band
Figure 1 Hardware overview
1
1
7
4
73
1. BORA Band™ Model BB100 case
2. Wristband
3. Push button
4. LED indicator
5. SpO2 sensor Port
6. Thermal sensor Port
5
3
6
2
1
41
4
3
2
Figure 9 : Battery charging
What you will see What it means What you should do
Flashing WHITE indicator light
The device is charging. Leave the device connected
to the power supply
The device is fully charged. Disconnect from
the power supply
Charging the Bora band® takes approximately 2 hours.
The autonomy of the Bora band® battery is more than 3 days.

VERSION 6.0
June 2023 17
NOTE :
1.
to charge it for at least 2 hours.
2. This product should not be used in an environment which may cause electromagnetic interference.
3. During charging, the reading functions are disabled as a safety precaution.
BATTERY CHARGING
Before charging the device, check that the micro-USB cable is not damaged. Use only the mi-
cro-USB cable supplied by Biosency. If the micro-USB cable is faulty, contact a sales representative.
BATTERY CHARGING
Do not wear the device while charging.
CHARGER
Use only the BB100DC AC adapter supplied by Biosency. The use of an unauthorised charger may
cause an electric shock. If the AC adapter is damaged, contact a sales representative.
BATTERY
The battery may leak or explode if not used or disposed of in accordance with regulations. Do not
remove the battery.
sWARNINGS
VERSION 6.0
June 2023 18
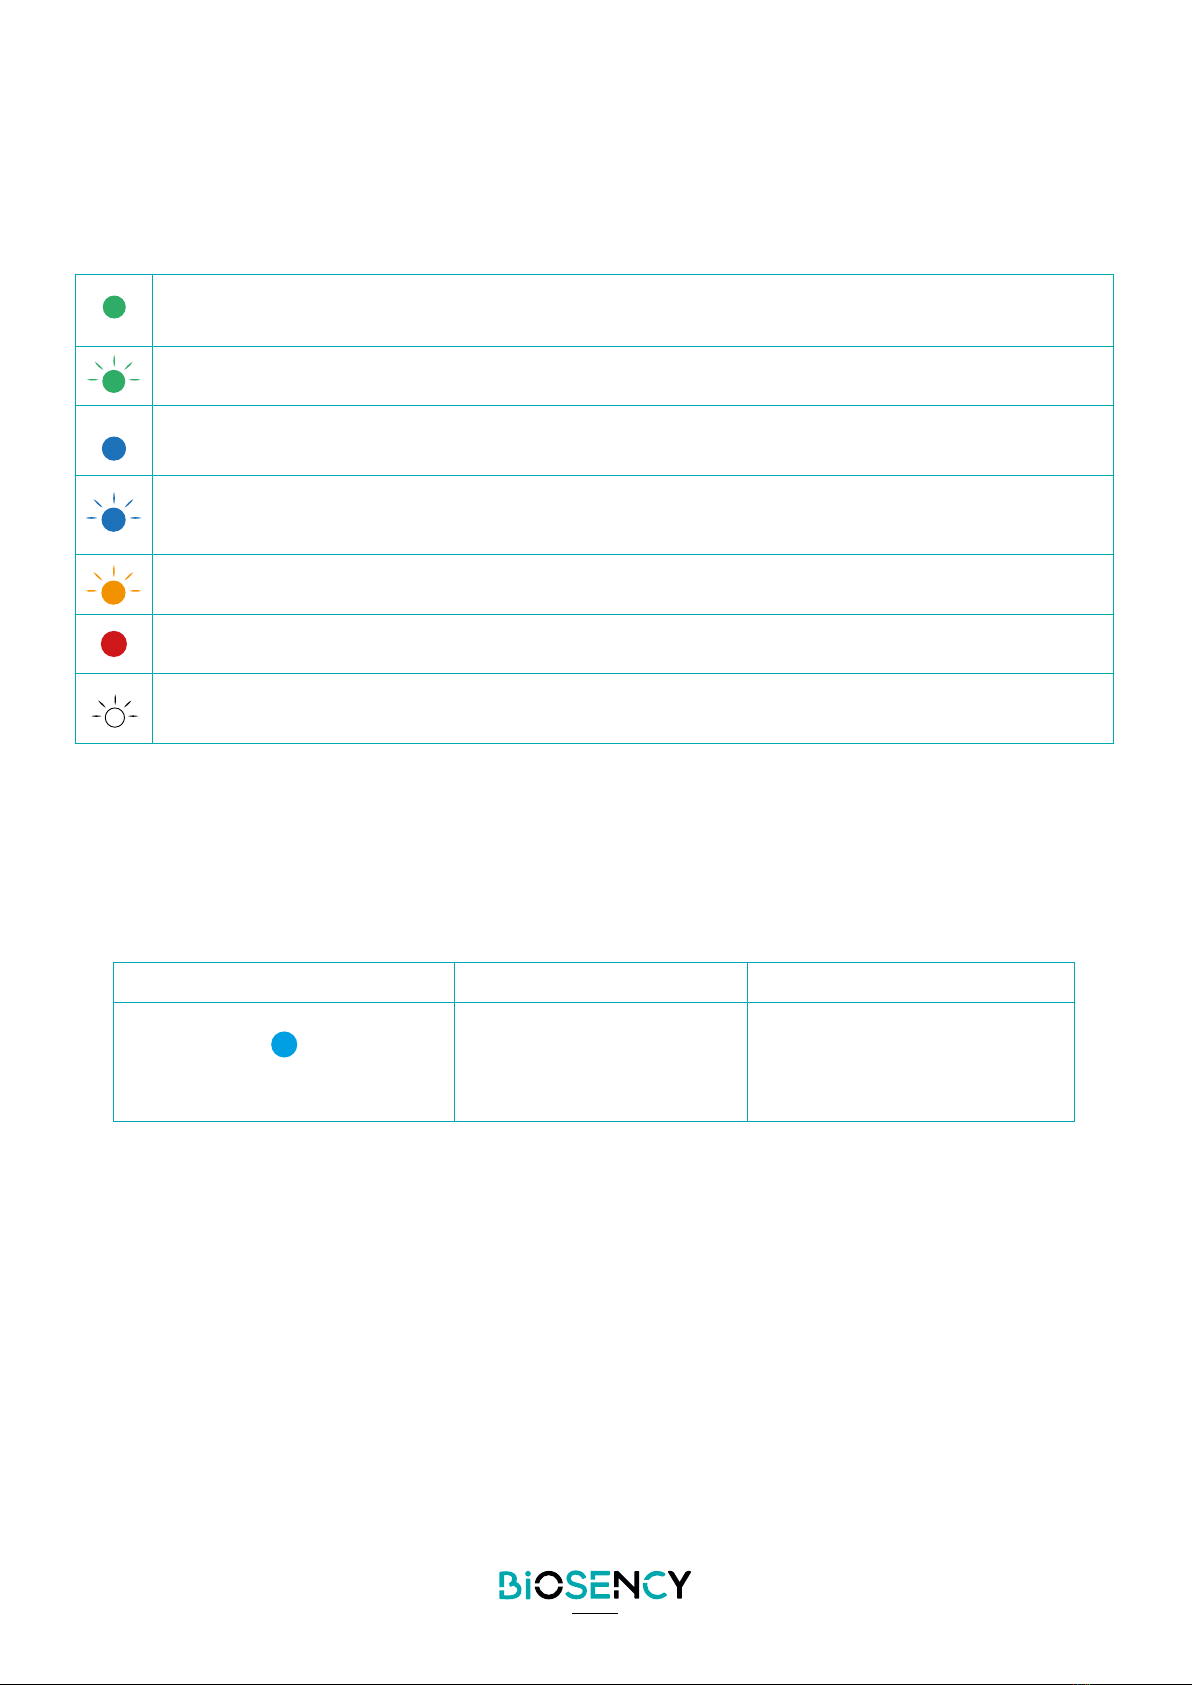
Indicator light signication
In order to be as discreet as possible, the Bora band® indicator light goes out once it has started up.
A RED light indicates that the device is faulty.
Bora band® software update
The Bora band® updates automatically when it is switched on; during the update, the indicator light will be blue.
What you will see What it means What you should do
Fixed BLUE light
The device is installing
a software update.
Bora band®.

VERSION 6.0
June 2023 19
Data access for health professionnals
The mobile application, once installed on a mobile phone or a tablet, and connected to your Bora band®,
allows you to send data to healthcare professionals on a Bora connect® web platform or a partner’s platform.
To learn more about the visualization of physiological data and the setting of accounts as well as alert
thresholds, please refer to the user manual of the Bora connect® platform for health professionals.
Cleaning
Cleaning the case
Wipe the device case with a soft cloth moistened with soapy water.
To avoid irreversible damage, do not use undiluted products such as bleach, or any other cleaning solution
Wipe with a soft cloth and allow to air dry. The surface cleaner should be used between individual patients
and as often as needed.
BB100S fabric wristband cleaning
To clean the fabric wristband, put it in the washing machine at 30°C. It is recommended to fold back the ends
of the wristband to protect the Velcro hooks. Allow to air dry.
NOTE: Detergents such as hand soaps and washing-up liquid dissolve dirt and grease. You can clean the
bracelet using these products (diluted in hot water).
Other manuals for BORA Band BB-100
3
Table of contents
Other BIOSENCY Personal Care Product manuals


