Biotech Sequence Precision Series User manual
Accelerate Liquid Transfers
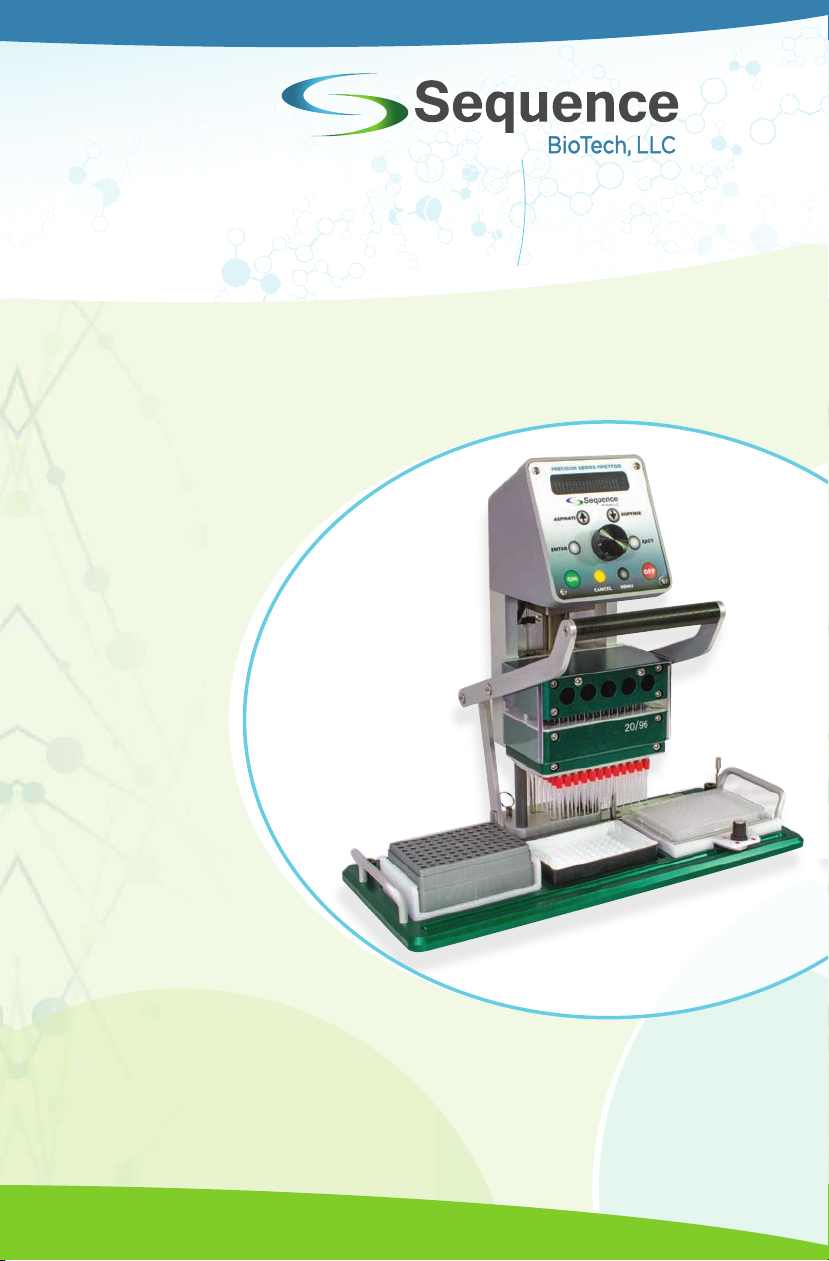
96/384 BenchTop Pipettor
www.sequencebiotech.com
Instruction Manual
PRECISION SERIES PIPETTOR
PRECISION SERIES Pipettor

New 2020!
• 2-Year warranty
• Improved accuracy
and precision
• Free lifetime
electronics updates
• Extended menu
features
The Precision Series Pipettor is
an intuitive
multichannel pipettor
capable of 96 and 384
well formats.
Plate stamping, plate reformatting,
mixing, and serial dilute have
never been so easy and quick.
2
2
2
Improved accuracy
2
Improved accuracy
electronics updates
2
electronics updates

Sequence BioTech, LLC
Table of Contents
TWO-YEAR WARRANTY................................................................ 1
SAFEGUARDS..................................................................................... 3
GENERAL INFORMATION
..................................................................... 4
UNPACKING THE PIPETTOR......................................................... 4
PRODUCT OVERVIEW .................................................................... 5
PARTS OF THE PIPETTOR ............................................................. 6
RECOMMENDED PIPETTE TIPS................................................... 7
SET UP AND INSTALLATION
............................................................... 8
INSTALLING THE PIPETTOR ......................................................... 8
ADJUSTING PIPETTOR HEAD ASSEMBLY .............................. 9
ADJUSTING ASPIRATION AND DISPENSING SPEEDS....... 10
ADJUSTING TIP RACK HOLDER.................................................. 11
USE OF 384 WELL MICROTITER PLATES............................... 12
BASIC OPERATION
................................................................................. 13
BASIC OPERATION BUTTONS..................................................... 13
GENERAL PIPETTING SET-UP...................................................... 15
BASIC PROGRAMMING INSTRUCTIONS.................................. 17
MAINTENANCE
......................................................................................... 19
REGULAR MAINTENANCE ............................................................ 19
CLEANING AND DECONTAMINATION ..................................... 20
HANDLING AND ENVIRONMENTAL CONDITIONS
................... 21
HANDLING THE PIPETTOR ........................................................... 21
ENVIRONMENTAL............................................................................. 22
APPENDIX
................................................................................................... 23
SPECIFICATIONS............................................................................... 23
DECLARATION OF CONFORMITY.............................................. 24
PROGRAMMING COMMANDS AND ACTIONS....................... 25
PROGRAMMING EXAMPLES......................................................... 26
SERVICE PLANS
....................................................................................... 29
PLANS A–C .......................................................................................... 29
PLAN D.................................................................................................. 30
PLAN SPECIFICS ............................................................................... 31
MANUAL 54652

www.sequencebiotech.com
1
LIMITED TWO-YEAR PRODUCT WARRANTY
This Sequence BioTech, LLC instrument is warranted to be free
of defects in materials and workmanship for a period of TWO (2)
YEARS from the date of delivery. At its discretion, Sequence
BioTech’s manufacturer will repair or replace all defective components
during this warranty period. Sequence BioTech reserves the right
to use new, repaired, or refurbished instruments or components
for warranty replacements. Repair or replacement of products
or components under warranty does not extend the original
warranty period.
WARRANTY EXCEPTIONS
The above warranty does not apply to defects resulting from
misuse, neglect, or accident, including without limitation:
operation with incompatible solvents or samples aspirated beyond
the volume of the disposable pipette tips; operation outside
of the environmental or use specifications; failure to follow
recommended operating instructions; failure to use compatible
accessories; improper or inadequate maintenance by the user;
installation of the instrument or use of products not authorized
by Sequence BioTech; use with incompatible liquids or other
materials; and modification or repair of the instrument not
authorized by Sequence BioTech. In addition, the warranty is
void if the serial number has been altered or defaced.
Maintenance is the owner’s responsibility. Promptly wipe and
remove any chemicals, solutions or samples when spilled on this
instrument. Keep the Bearing Rail clean of spills and debris to
ensure easy side-to-side motion.
WARRANTY CLAIMS
Warranty claims must be submitted during the warranty period.
Submit claims promptly to Sequence BioTech Technical Support
at (603)769-0963 or email service@sequencebiotech.com. Upon
approval, you will be supplied with the name and address of an
authorized service center as to where to ship the instrument.
A repaired or replaced instrument will be returned as promptly as
feasible. Proper shipping, packaging, and handling charges to the
service center are the responsibility of the owner. Shipping charges
back to the owner are the responsibility of the service center.
Warranty

Sequence BioTech, LLC
2
EXTENDED WARRANTY AND MAINTENANCE AGREEMENT
An extended warranty or service and maintenance agreements
are available through your account manager. Please see the Service
Plans Section of this manual or call for details.
GENERAL SERVICE
If your instrument has exceeded the warranty period, or repairs
are not covered due to warranty exclusions or exceptions, contact
Sequence BioTech Technical Support at (603)769-0963 or email
service@sequencebiotech.com. An authorized service center will
reply with a non-binding good faith estimate and a shipping address.
THE FOREGOING PROVISIONS SET FORTH SELLER’S SOLE AND EXCLUSIVE
REPRESENTATIONS, WARRANTIES, AND OBLIGATIONS WITH RESPECT TO
ITS PRODUCTS, AND SELLER MAKES NO OTHER WARRANTY OF ANY KIND
WHATSOEVER, EXPRESSED OR IMPLIED, INCLUDING WITHOUT LIMITATION,
WARRANTIES OF MERCHANTABILITY, FITNESS FOR A PARTICULAR PURPOSE, OR
OF NON-INFRINGEMENT, WHETHER ARISING FROM A STATUTE OR OTHERWISE IN
LAW OR FROM A COURSE OF DEALING OR USAGE OF TRADE, OR OTHERWISE, ALL
OF WHICH ARE EXPRESSLY DISCLAIMED. THE REMEDIES PROVIDED HEREIN ARE
THE BUYER’S SOLE AND EXCLUSIVE REMEDIES FOR BREACH OF WARRANTY.
NO AGENT, EMPLOYEE, OR REPRESENTATIVE OF SELLER HAS ANY AUTHORITY
TO MODIFY THE TERMS OF THIS LIMITED WARRANTY STATEMENT OR TO BIND
SELLER TO ANY AFFIRMATION, REPRESENTATION, OR WARRANTY CONCERNING
ANY PRODUCT THAT IS NOT CONTAINED IN THIS LIMITED WARRANTY STATEMENT,
AND ANY SUCH MODIFICATION, AFFIRMATION, REPRESENTATION, OR WARRANTY
MADE BY ANY AGENT, EMPLOYEE, OR REPRESENTATIVE OF SELLER WILL NOT BE
BINDING ON SELLER, UNLESS IN A WRITING SIGNED BY AN EXECUTIVE OFFICER
OF SELLER. THIS WARRANTY IS LIMITED TO THE BUYER OF THE INSTRUMENT
FROM SELLER OR, IF THE FIRST BUYER IS A DISTRIBUTOR OR RESELLER, TO
THE FIRST PURCHASER WHO IS A USER OF THE INSTRUMENT, AND IS NOT
TRANSFERABLE TO ANY OTHER PERSON OR ENTITY.

www.sequencebiotech.com
3
Important Safeguards
READ ALL INSTRUCTIONS BEFORE USING INSTRUMENT.
SAVE THIS INSTRUCTION MANUAL.
The Precision Series Pipettor has been engineered for maximum
functionality as well as safety; however, basic safety precautions
and common sense must always be demonstrated when using
any electrical product. Do not attempt to modify any part of the
Precision Series Pipettor. If you experience problems with or have
questions about your Precision Series Pipettor, contact Technical
Support at Sequence BioTech at (603)769-0963 or email
service@sequencebiotech.com.
DANGER
•
DO NOT allow the instrument to be submerged in any liquid.
•
DO NOT use in any environment other than an indoor
laboratory.
WARNING
To reduce the risk of burns, electrocution, fire, injury or damage
to the instrument:
•
Use only for its intended purpose as described in this manual.
Do not use attachments and accessories not recommended
by the manufacturer.
•
DO NOT operate this instrument if it is damaged in any way.
•
Keep this instrument away from heated surfaces.
•
DO NOT turn the unit upside down: the Precision Series
Pipettor must always rest on its Base to avoid damaging
internal components or breaking the housing.
NOTE:
SAVE ALL PACKAGING INCLUDED WITH THE SHIPPING CONTAINER
TO USE IF A RETURN IS NECESSARY. THE PRECISION SERIES PIPETTOR MUST
BE SHIPPED IN AN APPROVED CONTAINER TO AVOID DAMAGE WHICH MAY
INVALIDATE THE WARRANTY. ADDITIONAL PACKAGING CONTAINERS MAY BE
PURCHASED FOR A MINIMAL CHARGE. ALTERNATIVELY, THE PRECISION
SERIES PIPETTOR MAY BE PURCHASED WITH A PROTECTIVE HARD SHELL
SHIPPING CASE TO PREVENT DAMAGE DURING SUBSEQUENT
TRANSPORTATIONS. FOR SHIPPING INQUIRIES, CONTACT SEQUENCE BIOTECH
PRODUCTS AT (603)769-0963 OR EMAIL INFO@SEQUENCEBIOTECH.COM.
Safeguards

4
General Information
RISK OF ELECTRIC SHOCK:
ALTHOUGH THIS EQUIPMENT IS FULLY
INSULATED AND GROUNDED, IT IS IMPORTANT FOR ALL USERS TO BE AWARE
OF THE POTENTIAL HAZARD OF USING LIQUIDS CLOSE TO ELECTRICAL
EQUIPMENT. IF ANY LIQUIDS ARE SPILLED, IMMEDIATELY DISCONNECT THE
INSTRUMENT FROM THE MAIN POWER SOURCE AND CLEAN THE EQUIPMENT
AND THE SURROUNDING AREA. DO NOT RECONNECT THE EQUIPMENT UNTIL
IT HAS BEEN FULLY INSPECTED. INSULATED AND GROUNDED, IT IS IMPORTANT
FOR ALL USERS TO BE AWARE OF THE POTENTIAL HAZARD OF USING
LIQUIDS CLOSE TO ELECTRICAL EQUIPMENT. IF ANY LIQUIDS ARE SPILLED,
IMMEDIATELY DISCONNECT THE INSTRUMENT FROM THE MAIN POWER SOURCE
AND CLEAN THE EQUIPMENT AND THE SURROUNDING AREA. DO NOT
RECONNECT THE EQUIPMENT UNTIL IT HAS BEEN FULLY INSPECTED.
CAUTION:
THE PROTECTION AFFORDED BY THIS EQUIPMENT MAY BE
IMPAIRED IF USED IN A MANNER NOT SPECIFIED BY THE MANUFACTURER.
USE ONLY ACCESSORIES AND DISPOSABLES RECOMMENDED BY THE
MANUFACTURER. ACCURACY AND OPERATING LIFETIME MAY BE AFFECTED
IF ALTERNATIVE PRODUCTS ARE USED. ANY DAMAGE CAUSED BY NON-
RECOMMENDED PRODUCTS ARE NOT COVERED BY THE MANUFACTURER’S
WARRANTY.
This instruction manual includes all required information regarding
unpacking, installing, operating, programming, and maintaining
the Precision Series Pipettor.
This instrument is UL compliant and CE certified. For compliance
certification, see The DECLARATION OF CONFORMITY in the
APPENDIX.
Unpacking the Precision Series Pipettor
Prior to operation, carefully remove instrument and accessories
from the shipping container and inspect for damaged or missing
items. If any parts are found to be damaged or missing, contact
Sequence BioTech Technical Support at (603)769-0963 or email
service@sequencebiotech.com.
Included instrument and accessories:
1
Precision Series Pipettor
2
24 VDC Power Supply
3
Power Cord
4
5
This Instruction Manual
6
Certificate of Performance
Warranty Card
www.sequencebiotech.com
5
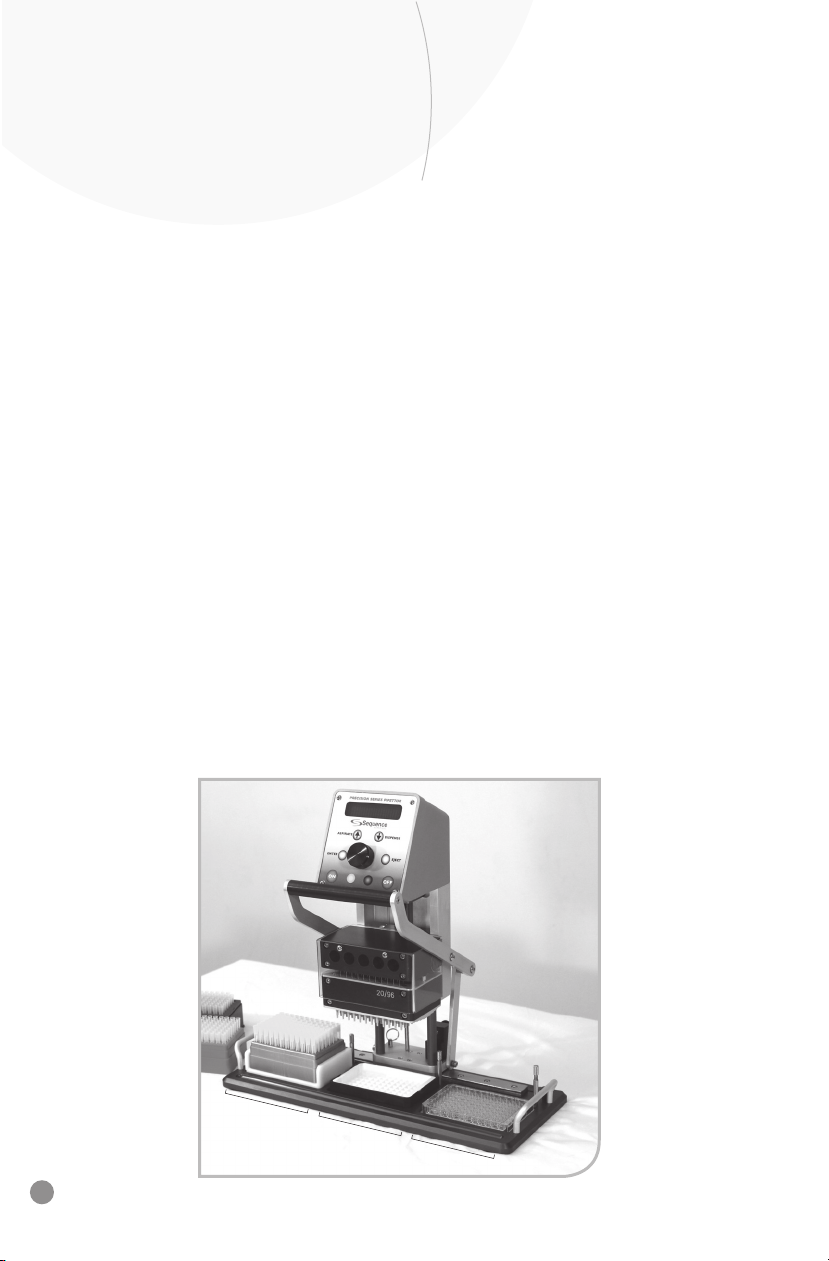
Product Overview
The Precision Series Pipettor is a highly precise and accurate,
96/384 well pipettor designed to conveniently process an entire
microplate on a laboratory bench top. Supplied with a high
performing electric motor and circuit unit, the Precision Series
Pipettor ensures precise control in aspirating and dispensing
volumes with the touch of a button. Tips are effortlessly picked
up and ejected using uniquely designed pipette tips. Three
work positions (illustrated below) are available to conveniently
perform multiple combinations of processing. Each position is
automatically centered by manually sliding the pipette Head
Assembly horizontally. Raising and lowering pipette tips into
the microplates is performed by simply moving the Levered
Handle vertically. The head and tip assembly is precisely counter-
balanced to make vertical motion effortless. The entire process,
including picking up tips, aspirating from one location, and
dispensing to another is accomplished without the hassles
associated with adding and removing items from the pipetting
platform. The 3-position workstation is light enough to carry
from one bench top to another and can accommodate work at
any location. Advantages of the Precision Series Pipettor include:
•
Portable bench top processing
•
User-friendly operation
•
Accurate and precise liquid handling
General Information cont.
Position 1 Position 2 Position 3
6
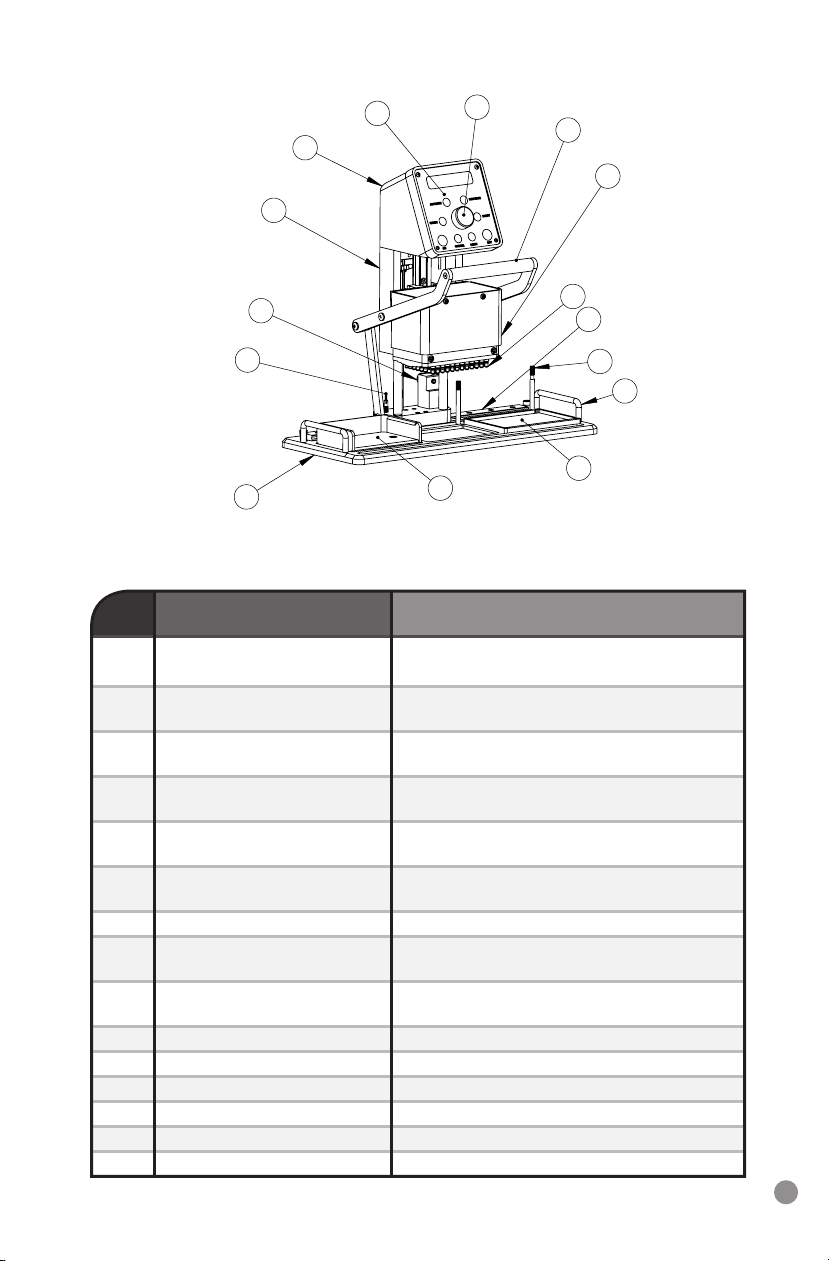
Parts of the Pipettor
# Description Function
1Control Knob Rotate clockwise and counter
clockwise to select values
2Control Panel Contains the keypad and
display screen
3Electronics Enclosure Enclosure houses the 24 VDC electronic
components
4 Chassis Assembly Couples the electromechanical linear
actuator to Head Assembly
5 Locking Thumb Screw Use to lock Head Assembly in low position
when shipping or transporting
6 Locking Key Ring Spring-loaded plunger engages for shipping
and/or transporting
7 Height Adjustment Posts (2) Sets depth of pipettor Head Assembly
8 Side Handles (2) Use to pick up the instrument (located on
each side of the Base)
9 384 Plate Adaptor Use when pipetting into 384 well plates.
Otherwise, remove from platform.
10 Tip Rack Holder Secures pipette tip rack
11 Base Three-position Base
12 Bearing Rail For easy horizontal positioning
13 Tip Fittings Engages with pipette tips
14 Head Assembly 96 channel pipettor Head Assembly shown
15 Levered Handle Use to raise and lower the Head Assembly
BMS-54000-itemized manual
1
13
12
7
8
9
14
15
2
3
4
5
6
11 10

www.sequencebiotech.com
7
General Information cont.
Recommended Pipette Tips
SORENSON BIOSCIENCE BRAND
The Precision Series Pipettor has been designed for use with
Sorenson OneTouch pipette tips.
A variety of Sorenson pipette tips create a leak-proof seal and
requiring less force to insert than standard tips, making them ideal
for sealing 96 tips at once while achieving optimal performance.
The following BenchTop and OneTouch tips are compatible with
the Precision Series Pipettor and may be purchased from an
authorized distributor of Sorenson BioScience, Inc. products:
For further information email info@sequencebiotech.com, refer to
the product specification sheet, visit www.sequencebiotech.com
or contact your local representative.
Cat # Description Vol* Quantity
10330
OneTouch—Non-Sterile, 250 uL 960/pk; 5 packs per case
200 uL Pipette Tip
10340
OneTouch—Sterile, 250 uL 960/pk; 5 packs per case
200 uL Pipette Tip
10350
OneTouch—Sterile, 250 uL 960/pk; 5 packs per case
Barrier 200 uL Pipette Tip
10300
OneTouch—Natural,
20 uL
960/pk; 5 packs per case
Polypropylene
10310
OneTouch—Natural, 20 uL 960/pk; 5 packs per case
Polypropylene, Sterile
10310
OneTouch—Barrier Natural, 20 uL 960/pk; 5 packs per case
Polypropylene, Sterile
* The maximum volume for the BenchTop Pipettor is 250 uL. The actual tip volume range is 1–330 uL.

Sequence BioTech, LLC
8
Set-Up and Installation
Installing the Precision Series Pipettor
The Precision Series Pipettor has been shipped in the locked
horizontal and vertical positions.
To unlock and power up the instrument, follow these steps and
1
Unlock Vertical Motion
Place the instrument on a clean, horizontal, and stable bench
top. Loosen the black Locking Thumb Screw (a) until it stops
turning. The upper assembly of the instrument is now free
to move up and down, with minimal effort, using the front
Levered Handle.
2
Unlock Horizontal Motion
Pull up on the Locking Key Ring (b) and rotate it 90°. This
places the spring-loaded plunger in the unlocked position.
The instrument is now free to move side-to-side.
3
Power Up
Plug the 24 VDC power supply into an AC electrical outlet.
Insert the plug on the back of the instrument (c) and screw
the plug collar onto the threaded jack for positive engagement.
The instrument will immediately “home” itself. The instrument
is now ready for use.
(a) (c)
Screw Power Cord
on to Pipettor
and Power Up
Unlock
Horizontal
Motion
Unlock
Vertical
Motion
(b)
refer to the indicated diagram below:

www.sequencebiotech.com
Adjusting Pipettor Head Assembly
The Precision Series Pipettor Head Assembly is easily positioned
vertically and horizontally by adjusting the Thumb Screws and
sliding the Levered Handle.
•
Vertical Height Adjustment
Set the height that stops the Head Assembly when lowered
with the Levered Handle by adjusting the two Height
Adjustment Posts located under the Chassis Assembly. Place
a microtiter plate in either the center or right plate position
and lower the Head Assembly using the Levered Handle until
the desired height is achieved. Rotate the Height Adjustment
Posts until they touch the Chassis Assembly.
•
Horizontal Motion
The Chassis Assembly is automatically aligned and perfectly
centered over each well position. Grab the Levered Handle and
gently move left or right. Motion is effortless.
Height
Adjustment Posts
used to set lower
Head Assembly
height
Chassis Assembly
Levered
Handle
Set-Up and Installation cont.
9
Sequence BioTech, LLC
10
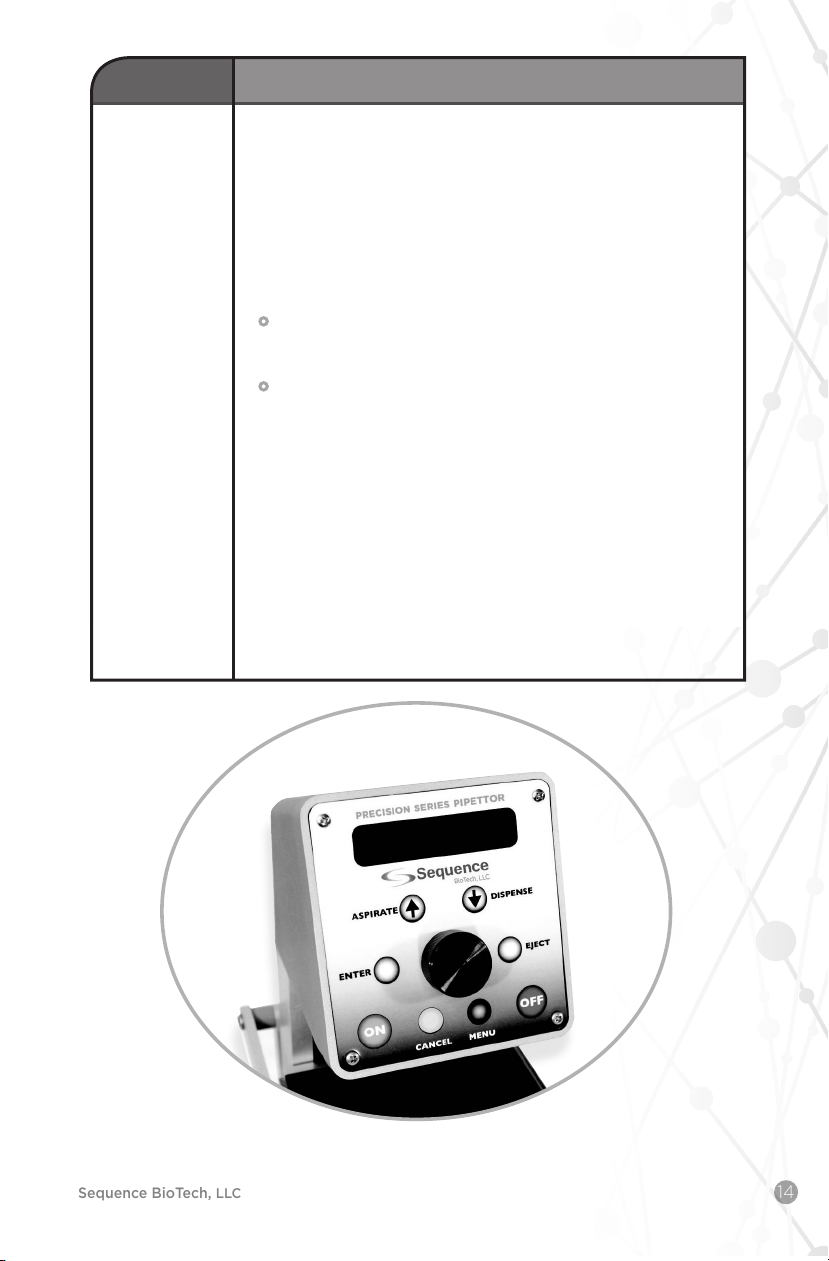
Adjusting Aspiration and Dispensing Speeds
To choose the aspiration and dispensing speed on the Precision
Series Pipettor:
•
Select
MENU
on the Control Panel.
•
Rotate the center black Control Wheel until “Options” appears
on the display screen, then select
ENTER
.
•
Rotate the Control Wheel to “Motor Speed,”and then select
ENTER.
•
Rotate the Control Wheel to select one of the three speeds
(“Fast,”“Medium,”or “Slow”), then select ENTER to activate
the selected speed.
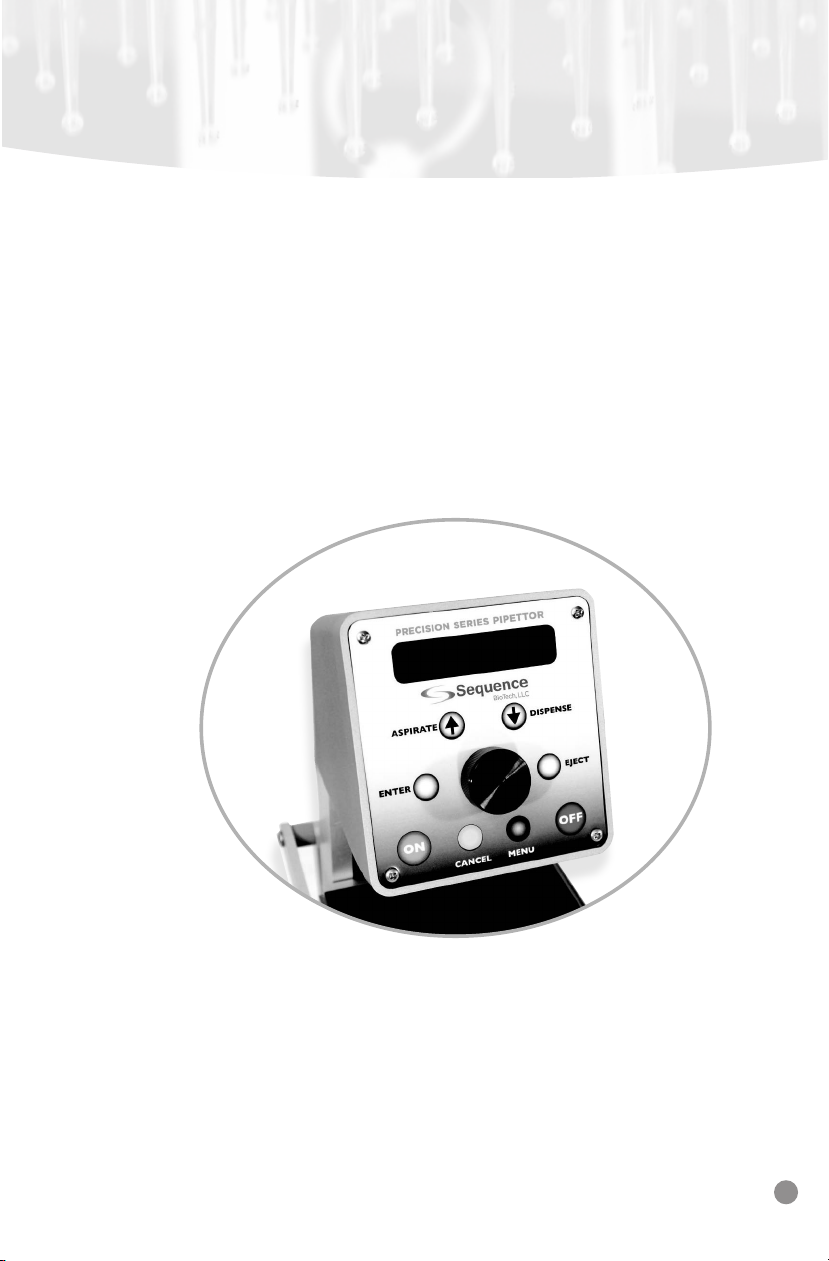
PRECISION SERIES Pipettor Control Panel
www.sequencebiotech.com
11
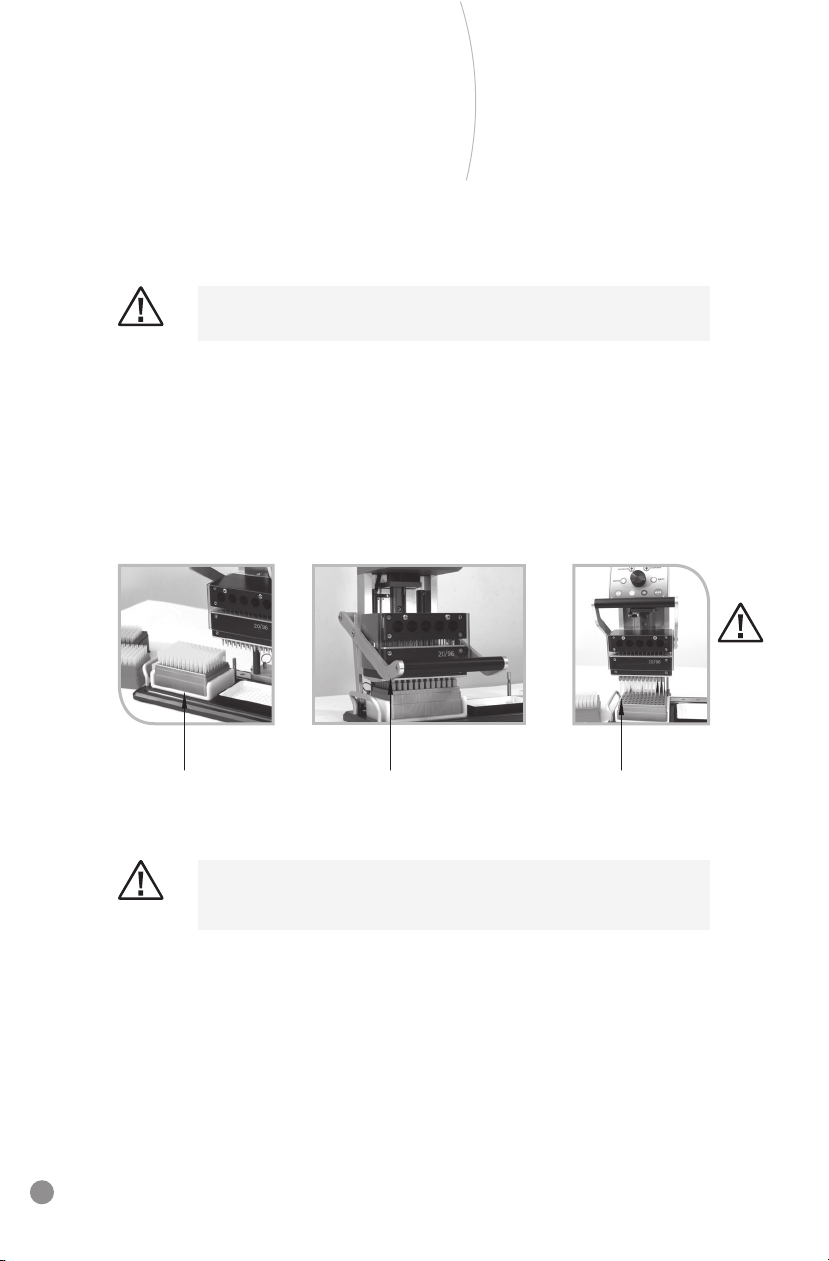
Adjusting Tip Rack Holder
1
Slide a rack of pipette tips into the Tip Rack Holder and push it
all the way back (a).
2
Using the Levered Handle, slide the Head Assembly over
the rack of tips. The Head Assembly will automatically center
itself. Pull the Levered Handle down to engage with the tips (b).
3
Lift the tips up and out of the rack (c) and continue processing.
(a) (c)
Lift Tips from RackPull Lever downSlide in Rack
(b)
Set-Up and Installation cont.
To place and pick up tips follow these instructions and refer to the indicated
diagram below. Note the cautionary guideline below to avoid personal injury.
CAUTION:
FOR YOUR SAFETY, KEEP BOTH HANDS ON THE LEVERED
HANDLE WHEN MOVING THE HEAD ASSEMBLY TO AVOID ACCIDENTAL
PINCHING AND INJURY.

Sequence BioTech, LLC
12
384 Well Plate Adaptor Optional 384 Well Plate
Adaptor Accessory
384 PLATE ADAPTOR
The 384 Plate Adaptor allows use of this 96 channel pipettor with
384 well microtiter plates. Simply place the 384 Plate Adaptor
into one of the three plate positions on the Base. Insert a 384 well
microtiter plate into the 384 Plate Adaptor, aligning two edges
of the plate marked with a single dot. Aspirating and dispensing
are performed using four manual “passes” of the pipettor in order
to accommodate all 384 wells. For the first pass, aspirate and/
or dispense as usual. For the second pass, slide the microplate to
the side with two dots and continue aspirating and/or dispensing.
Repeat aspirating and/or dispensing for the third and fourth
passes at the three- and four-dot locations respectively.
An advanced 384 Well Adaptor Accessory is available. A front knob
is used to align the four well positions without touching the plate.
Each position is numbered and clicks in place for perfect alignment.
Contact Sequence BioTech or visit the website for more information.
Use of 384 Well Microtiter Plates
Part # 54563

www.sequencebiotech.com
13
Basic Operation
Operation Action
ON Powers up instrument and begins a “homing” sequence
OFF Stops all motion, anytime. Acts as an emergency
shut-o button.
ASPIRATE Requires user to enter a liquid aspirating volume (uL).
Turn black Control Wheel to select a value between 5 and
250. Adjust volumes slowly using 1uL increments or more
quickly using 5uL increments up to 250uL maximum. Press
ENTER to store the value.
ENTER Performs the following:
Use to enter ASPIRATE and DISPENSE volumes dialed in
Activates the last command while displaying the total
volume of liquid/air inside the OneTouch pipette tips. For
example, if multiple 20uL dispenses are necessary, pressing
ENTER will repeat the last 20uL dispense. This will continue
until all of the aspirated liquid has been dispensed.
Clears the display screen when an error message appears
Saves programs created in the program menu
Saves options selected in the “Options” menu, such as
“Motor Speed”
DISPENSE Requires user to enter a liquid dispensing volume (uL).
Turn black Control Wheel to select a value between 5 and
250. Adjust volumes slowly using 1uL increments or more
quickly using 5uL increments up to 250uL maximum. Press
ENTER to store the value.
EJECT Ejects tips from Head Assembly. This action is terminated
when there is liquid in the pipette tips; display screen
instructs user to dispense liquid before ejecting pipette tips.
CANCEL Performs the following:
Use as a go-back button to bring user to previous
command.
Press repeatedly to go back several steps,
one step at a time as necessary when programming.
Pauses an action
Basic Operation Buttons
Sequence BioTech, LLC
14
Operation Action
MENU When pressed, displays the following actions (select action
by turning black Control Wheel):
“Mix”
Requires user to enter a mixing volume (5-250uL) and
number of mixing cycles (0-25). Turn black Control Wheel
to select the desired value. Adjust value slowly using 1uL
increments or more quickly using 5uL increments. Press
ENTER to store the value.
“Options”
“Motor Speed” — Press ENTER to adjust speed to “Slow
,”
“Normal,”or “Fast.”Press ENTER once again to save
option.
“Pipettor Operating System”—Select to view the current
software version.
“Service”
Hidden service menu used for calibrating volume and
speed. Use only when working with a certified Sequence
BioTech technician. For more information, contact Sequence
BioTech Products Technical Support at 800-767-0665 or
email info@sequencebiotech.com.
“Program”
Use to create and save an individual pipetting program
into memory. A maximum of 100 individual steps can be
stored in the program. Further programming information
is located under BASIC PROGRAMMING INSTRUCTIONS
.
PRECISION SERIES Pipettor Control Panel

www.sequencebiotech.com
15
General Pipetting Set-Up
To ensure safe and accurate liquid handling, follow these simple
instructions to operate the Precision Series Pipettor:
GENERAL PIPETTING SETUP
•
Ensure Levered Handle is in the upright vertical position.
•
Slide tip rack into secure Tip Rack Holder and push completely
back.
•
Using the Levered Handle, adjust the horizontal slide to
position the pipettor Head Assembly over the tip rack.
•
Using the Levered Handle, fully engage 96 pipette tips onto
nozzles using firm downward pressure. Raise the Levered
Handle to the highest position.
•
Set the tip depth for the reservoir using the Height Adjustment
Posts. Refer to vertical Height Adjustment in the Set-Up and
Installation section. Set the tip depth for the plate/block
loading position using the Height Adjustment Posts.
•
Place the desired reservoir into position two.
•
Move the pipettor Head Assembly to the second position.
The instrument will self-center directly over this position.
ASPIRATING LIQUID INTO THE PIPETTE TIPS
•
Select the ASPIRATE button on the Control Panel. Rotate the
Control Wheel (in 1 or 5uL increments) to the desired volume.
The display screen will display:
“Aspirate” —The desired aspirating volume
“Current Volume” vTracks the volume of liquid aspirated and/or
dispensed in each of the OneTouch tips
•
Using the Levered Handle, lower the tips into the vessel.
The tips automatically stop at a depth defined by the Height
Adjustment Post setting. Tips should immerse into liquid at
a depth of 2mm.
•
Press the ENTER button on the Control Panel to aspirate the
selected volume.
“Current Volume” appears on the display screen to indicate
the selected volume.
•
Once the pipette tips contain the aspirated sample volume,
raise the pipettor Head Assembly to the highest position using
the Levered Handle.
•
Slowly slide the pipettor Head Assembly into the notched guide
at position three so that it “seats” over the target plate.
•
Slowly and carefully lower the pipettor Head Assembly so
that the ends of the tips do not touch the bottom of the wells
(the Height Adjustment Post settings prevent bottoming out).
Basic Operation cont.

Sequence BioTech, LLC
16
DISPENSING LIQUID FROM THE PIPETTE TIPS
•
Select the DISPENSE button on Control Panel. Rotate the
Control Wheel to the desired dispensing volume. Press ENTER
on the Control Panel to begin dispensing. The display screen
will display:
“Dispense Volume” —The amount to be dispensed from each tip
“Current Volume” —The volume remaining in each tip
•
Once all liquid has been dispensed from the pipette tips and
“Current Volume” reaches zero, “Raise Tips” will appear on the
display screen.
•
Using the Levered Handle, raise the pipettor Head Assembly
upward to the highest position. Press ENTER once again to
return the instrument to the “ready position.” “Ready” appears
on the display screen.
MIXING LIQUIDS
•
Ensure pipette tips are empty. Fully submerse tips into liquid
by lowering the pipettor Head Assembly until the tips are deep
within the wells of the microplate (or other vessel). Using MENU
on the Control Panel, select “Mix” and press ENTER. Rotate the
Control Wheel to the desired mixing volume (approximately
half the volume in the wells) and press ENTER. Next, rotate the
Control Wheel to the desired number of mixing cycles (0-25
cycles). The display screen will display:
“uL” —
The mixing volume or the amount of liquid to be mixed
by each tip
“Cycles”—The number of desired mixing cycles
•
Press ENTER to begin the mixing cycles. While the pipettor
is mixing, the display screen will indicate the action until all
mixing cycles have completed.
•
Once mixing has finished, press ENTER to return the instrument
to the “ready position.” “Ready” appears on the display screen.
•
Repeat aspiration, dispensing, and mixing steps as necessary.
EJECTING PIPETTE TIPS
•
With the pipettor raised to the highest position, slide the pipettor
Head Assembly into the notched guide in position one above
the empty tip rack. Lower the tips so they are positioned half
way into the holes of the rack. Press EJECT on the Control Panel.
•
Once the pipette tips have been ejected, lift the pipettor Head
Assembly to the highest position.
This ends the basic pipetting operation. To adjust the aspiration and
dispensing speeds on the Precision Series Pipettor, see ADJUSTING
ASPIRATION AND DISPENSING SPEEDS.

www.sequencebiotech.com
17
Basic Programming Instructions
The Precision Series Pipettor is easily programmed. A program
containing up to 100 individual steps can be created and saved
into the internal flash memory. The program may be stored and
retrieved by pressing MENU on the Control Panel, then choosing
“Program” using the Control Wheel as shown here:
•
“Run” —Press ENTER to run the program stored in memory.
Program: Run
Select and press Enter
•
“Delete” —Use this command to remove the stored program.
Program: Delete
Select and press Enter
•
“Edit” —Modify or view the existing program, one line at a time.
Program: Edit
Select and press Enter
For further details on creating and running programs, see additional
PROGRAMMING COMMANDS AND ACTIONS in the APPENDIX.
VIEW, EDIT, AND SAVE A PROGRAM
The Precision Series Pipettor is easily programmed. A program
containing up to 100 individual steps can be created and saved
into the internal flash memory. The program may be stored and
retrieved by pressing MENU on the Control Panel, then choosing
“Program” using the Control Wheel as shown here:
•
From the “Program” menu, select “Edit” and press ENTER.
Line “0” displays the command previously entered for that line.
0 Cls
•
Press ENTER again and a blinking cursor appears under line
“0” indicating that the entry may be modified. Turn the black
Control Wheel to view the line numbers. Preprogrammed
lower level commands (such as “Print” below) are also
displayed. For additional lower level commands, see
APPENDIX page 24.
4 Print Line 1
Dispense:
Basic Operation cont.
Table of contents
Other Biotech Laboratory Equipment manuals

Popular Laboratory Equipment manuals by other brands


Sartorius
Sartorius cubis MPS Quick reference guide

Endress+Hauser
Endress+Hauser Analytik Jena Automatic Boat Drive operating manual

Thermo Scientific
Thermo Scientific invitrogen EVOS XL Core quick reference

jbc
jbc RWS-B manual

tecan
tecan GENios operating manual

Altronix
Altronix NetWay112 installation guide


