BITREK BI 810 TREK User manual

DYSCOVI SYSTEMS RPE LIMITED
Company code 16303375, account №260075014037759
in «UKREXIMBANK» in Kyiv
MFI 380333, tax number 163033726585
95-S Vidradniy avenue, Kyiv, Ukraine, 03061. Phone +38044 507 02 07. Fax +38044 507 02 02. www.bitrek.eu, sale[email protected]
USER MANUAL
GPS TRACKER
BI 810 TREK
Version 2015.9.1.
Kyiv, 2015

www.bitrek.eu
support@bitrek.eu
+380 44 507 02 07
Contents
1. Introduction..........................................................................................3
2. Purpose................................................................................................4
3. Appearance ..........................................................................................5
4. Package contents ..................................................................................6
5. Technical characteristics.........................................................................7
6. Pin assignment......................................................................................8
7. Device configuration ..............................................................................9
8. LED description ................................................................................... 14
9. Tracker installation .............................................................................. 15
10. Important points during equipment configuration ................................. 16
11. Conclusion ....................................................................................... 17

www.bitrek.eu
support@bitrek.eu
+380 44 507 02 07
1.Introduction
Dear Partners!
Congratulations on your choice of products manufactured under the trademark
BITREKTM. Our team does everything possible to make you satisfied with your
choice, and make every effort for your comfortable work with our equipment.
We present to your attention the user manual of the BI 810 TREK device
(“tracker” on further). Here you will find information about the whole operation
process of the tracker –its technical characteristics, first configuration and after-
sales service, important points during equipment configuration. We hope that
you will be satisfied with the quality, reliability and stability of not only the
tracker BI 810 TREK, but also you will become our regular partner with other
models of equipment BITREKTM.
Actual equipment information and documentation is always available on our
official websites –www.bitrek.eu and www.bitrek.com.ua.
Enjoy!
www.bitrek.eu
support@bitrek.eu
+380 44 507 02 07
2.Purpose
The tracker is used for online vehicle tracking and control using different
satellite tracking systems and transmission the data via mobile communication
with the support of additional sensors connection.
BI 810 TREK is using on moving and stationary objects, which have the
power supply.
BI 810 TREK is using for:
Geographical coordinates, speed and direction of movement definition;
Collection data from external devices and fixing signals from additional
sensors;
Remote control of executive devices;
Data transfer to server for the further processing by specialized software.
BI 810 TREK is recommended for monitoring:
Cars and minibuses
Trucks
Construction machinery
Agricultural machinery
Passenger transport
Railway transport
BI 810 TREK is not recommended for monitoring water
transport and the objects of observation with the placement in
the environment without special additional sealed boxes.
www.bitrek.eu
support@bitrek.eu
+380 44 507 02 07
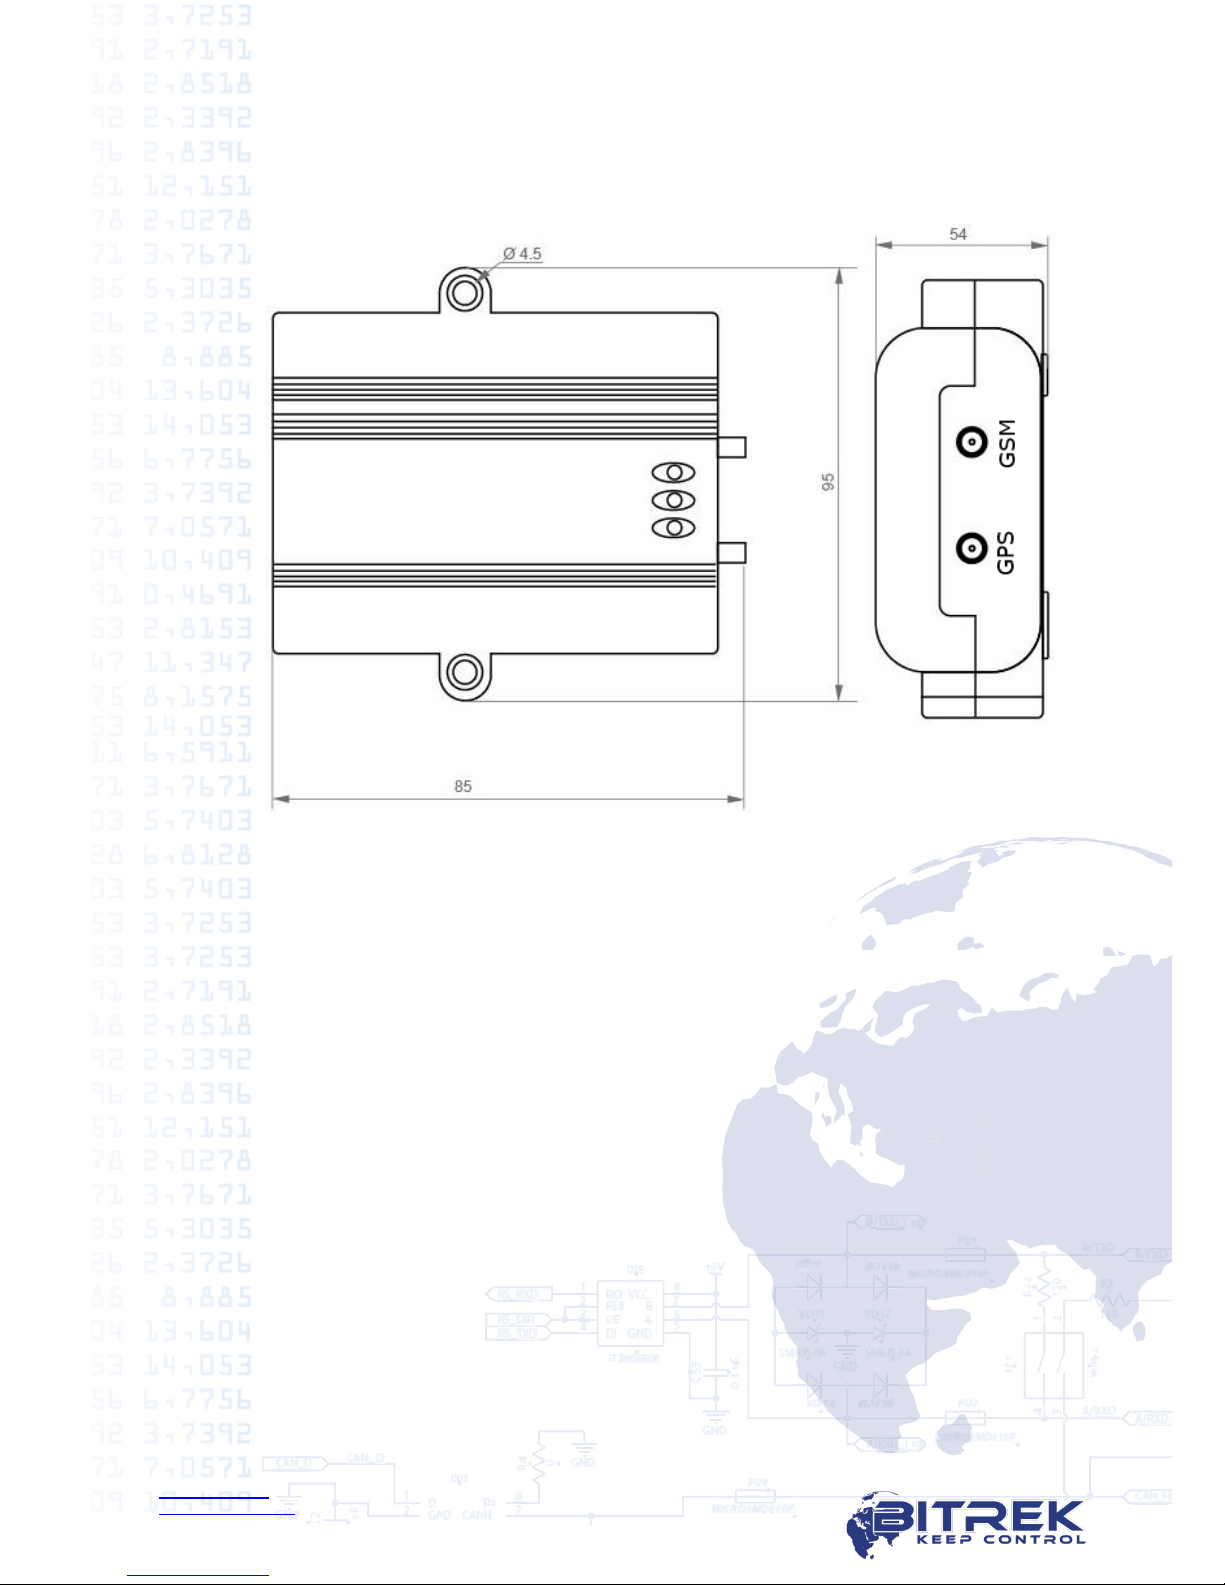
3. Appearance
Appearance of BI 810 TREK and antennas connectors is shown in figure 3.1:
Picture 3.1. BI 810 TREK appearance

www.bitrek.eu
support@bitrek.eu
+380 44 507 02 07
4.Package contents
BI 910 TREK has the following package contents:
GPS tracker for moving objects BI 910 TREK –1 pc.
GSM-antenna (2 meters cable) –1 pc.
GPS-antenna for internal use (2 meters cable) - 1 pc.
Technical passport–1 pc.
Guarantee card –1 pc.
Packing box –1 pc.

www.bitrek.eu
support@bitrek.eu
+380 44 507 02 07
5.Technical characteristics
Parameter
Characteristics
Data transfer
GSM 900/1800
Communication methods
GPRS, SMS for settings, voice
GPRS class
10
GPS and GSM antennas
External
Navigation system type
GPS/GLONASS/GALILEO/BEI
DOU
Digital interfaces
RS 485 –1 pc.
Accelerometer
+
Protected power circuit
+
SIM-cards
1
Digital inputs
2 (3 optional)
Digital outputs
1
Analog inputs
2
Digital inputs voltage range
from 0V to 40V
Supply voltage
12/24V
Typical current consumption (12V)
60mA
Maximum current consumption (12V)
350mA
Internal nonvolatile memory
2MB (65 000 records)
Built-in battery
1 000mA
Operating battery
from -30 °С to +80 °С
Dimensions (W х L х H)
125 х 95 х 29 mm
Weight
175 g.
Ingress Protection
IP65
www.bitrek.eu
support@bitrek.eu
+380 44 507 02 07
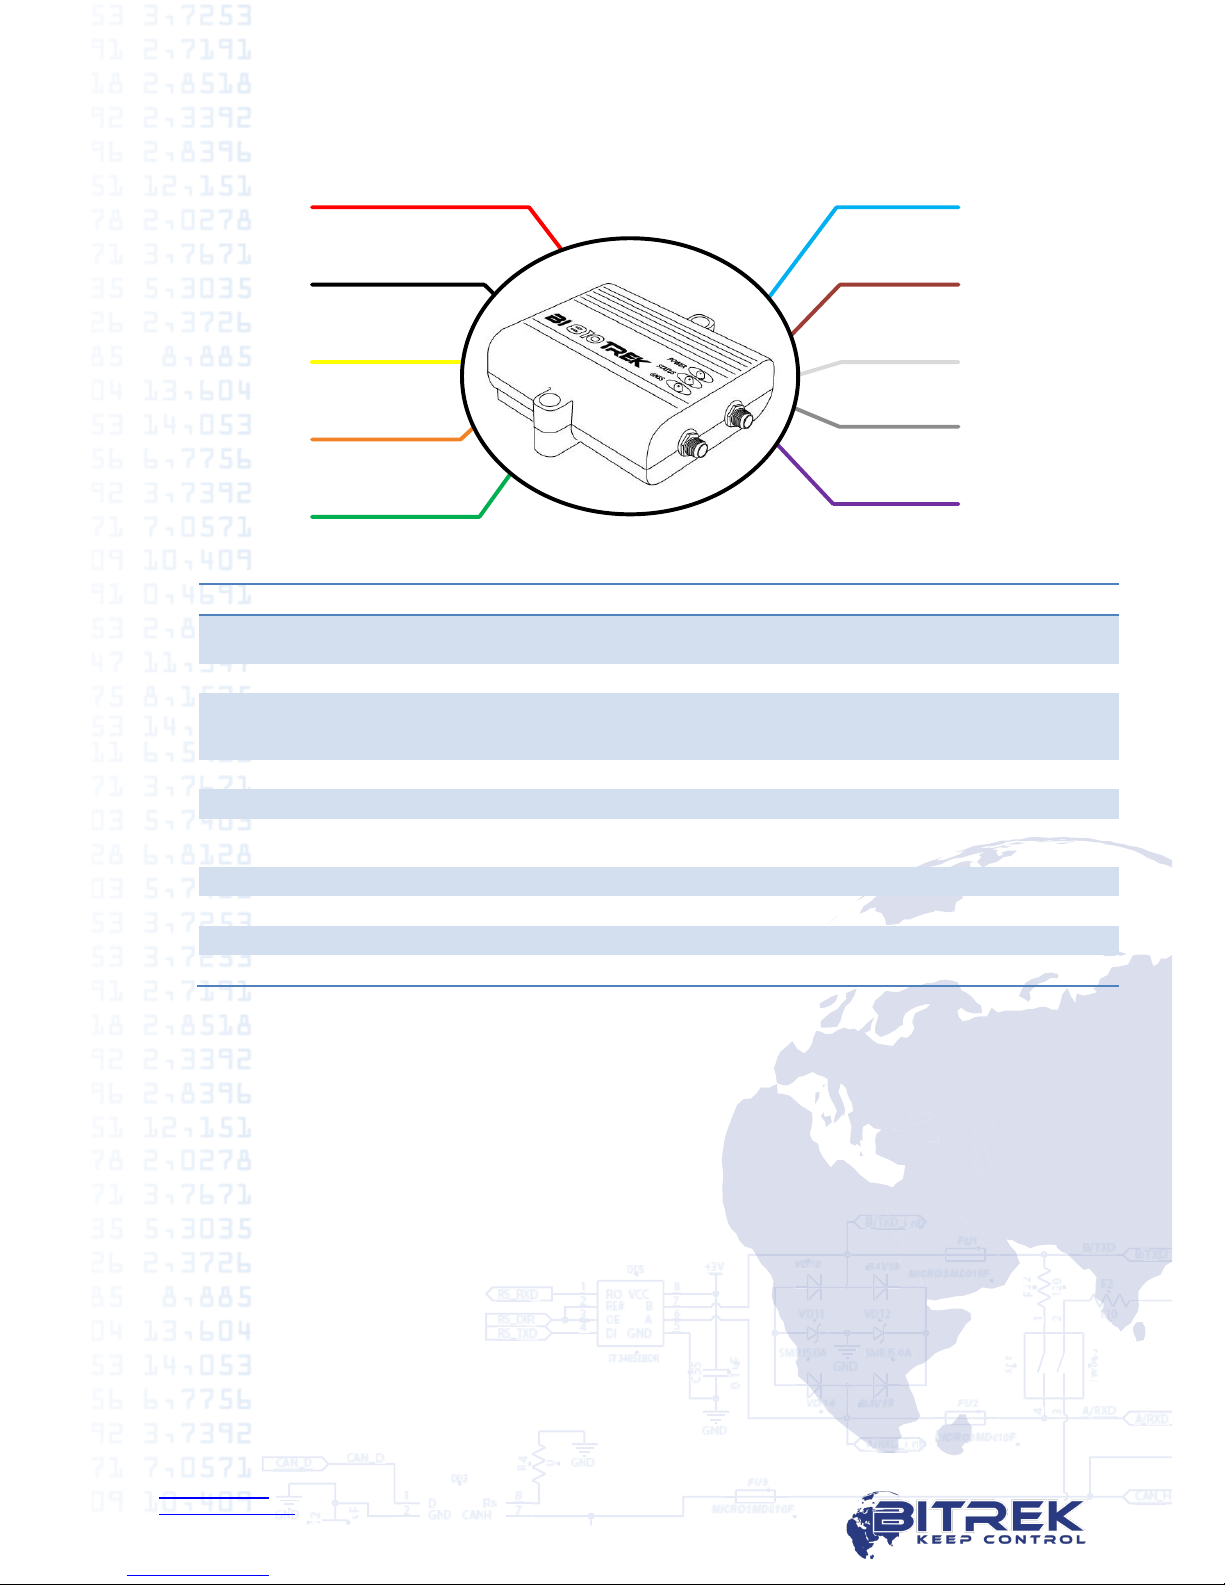
6.Pin assignment
RS-485 “A”
RS-485 “B”
+Vin
GND
+Vout
Out1
DAT_high 1
An_in 1
DAT_low 1
Red
Black
Yellow
Blue
Orange
Green
An_in 2
Gray
White
Brown
Purple
Picture 6.1. BI 910 TREK pin assignment
№
Color
Contact name
Type of signal
Contact purpose
1
Red
+ Vin
Power supply
«+» On-board power supply (nominal
voltage 12 V or 24 V)
2
Black
GND
Power supply
Common wire (GND)
3
Yellow
+ Vout
Power supply
Protected input for additional sensors power
supply. Voltage equals + Vin. Maximum
current 350 mA.
4
Orange
A
Input / Output
Signal «А» RS-485
5
Green
B
Input / Output
Signal «B» RS-485
6
Blue
Ignition
Input
Active digital input «1» Reserved for
ignition signal.
7
Brown
DAT_low 1
Input
Active digital input «0»
8
White
An_in 1
Input
Analog input
9
Gray
An_in 2
Input
Analog input
10
Purple
Out 1
Output
Digital output

www.bitrek.eu
support@bitrek.eu
+380 44 507 02 07
7.Device configuration
To configure the device you need to have BITREK CONFIGURATOR software,
which is available for free download from official BITREKTM websites
www.bitrek.eu or www.bitrek.com.ua.
System requirements:
Windows XP and newer;
Framework 4 and newer*;
From 1024 MB of random access memory;
From 50 MB of free disk space (including logs).
* How to check your current version of Framework:
https://support.microsoft.com/en-us/kb/318785/en-us.
How to update Framework:
https://www.microsoft.com/en-US/download/details.aspx?id=30653
How to update Framework on Windows XP:
https://www.microsoft.com/en-US/download/details.aspx?id=17851
7.1. Tracker to PC connection
To connect tracker to PC you need to have:
12-24 V power source.
BITREK programmer (USB-UART)
1
2
3
4
5
6
1
2
3
4
5
6
Picture 7.1. USB-
UART –top view
Picture 7.2. USB-
UART –bottom view
USB-A –USB-B cable to connect programmer
Picture 7.3. USB-A –USB-B cable
Special cable for tracker configuration
BI 810 TREK
BI 820 TREK
BI 820 TREK (OBD)
BI 310 CICADA
BI 868 TREK
Picture 7.4. Cable for tracker configuration
www.bitrek.eu
support@bitrek.eu
+380 44 507 02 07
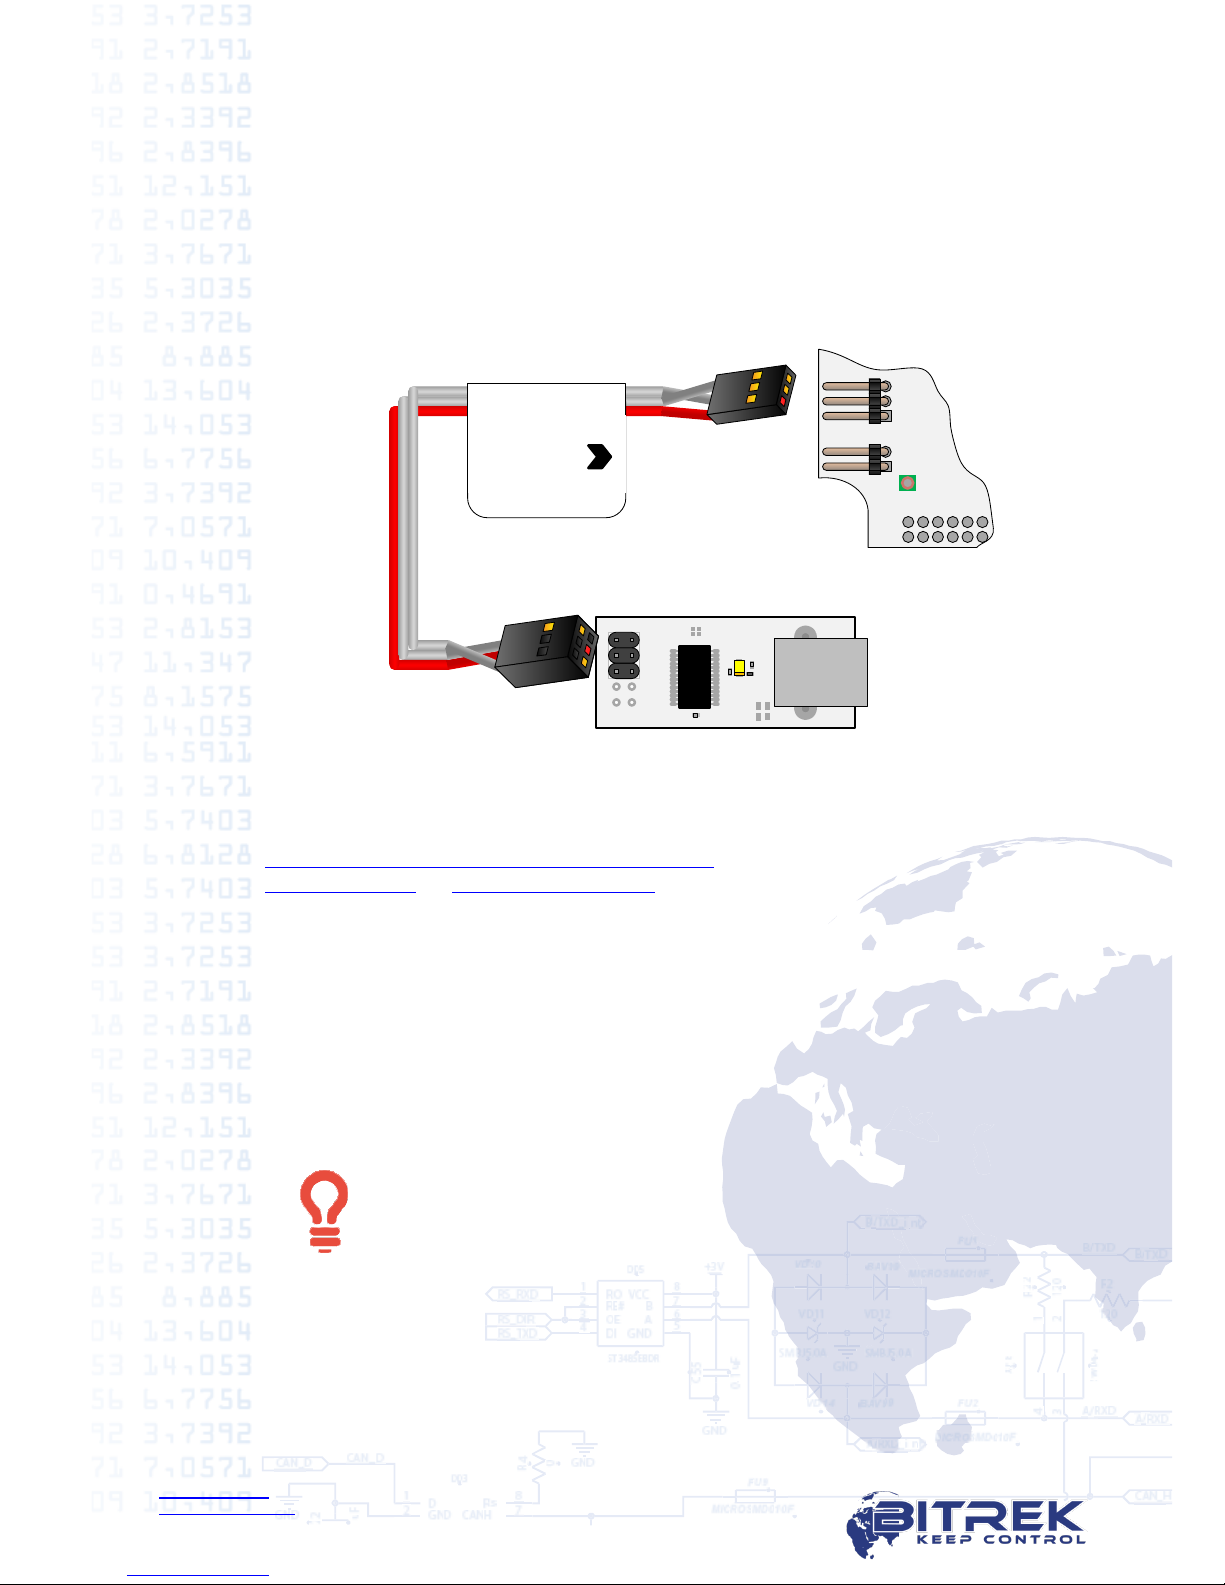
To establish the connection you need:
7.1.1. Remove the tracker’s 4 screws on the bottom cover, and then remove the
top cover.
7.1.2. Connect cable for configuration to XP7 jack on the top chip. Red cable
must be connected to pins 1 both on tracker and programmer (picture 7.5).
7.1.3. Connect USB-A –USB-B cable with the narrow connector to
programmer, and with wide connector to any free USB-port of your PC.
7.1.4. Apply 12-24V power on tracker’s appropriate contacts (picture 6.1.).
BI 810 TREK
BI 820 TREK
BI 820 TREK (OBD)
BI 310 CICADA
XP7XP8
1
2
3
4
5
6
BI 868 TREK
3
2
1
Picture 7.5. Tracker to programmer connection
After tracker connection to PC is successful, your operating system will
automatically install driver for programmer. If the automatic driver installation
has not occurred, download it from the link
http://www.ftdichip.com/Drivers/VCP.htm or from BITREKTM corporate websites
www.bitrek.eu or www.bitrek.com.ua.
7.2. Remote tracker configuration
For remote configuration, you need to have a power source 12-24V and a GSM
modem with an activated SIM-card with available SMS service inserted in.
GSM-modems supported models *:
BITREK GSM-modem
Cinterion MC35i
*GSM-modems, which were tested with BITREK CONFIGURATOR.BITREK CONFIGURATOR
can work with any GSM-modem, connected to the COM-port of PC.
Activated SIM-card with available SMS and GPRS services must
be inserted in tracker. On SIM-card PIN-code verification needs
to be removed and the phone book needs to be empty. If you
are going to use voice communication, voice services also needs
to be activated on the SIM-card.
www.bitrek.eu
support@bitrek.eu
+380 44 507 02 07
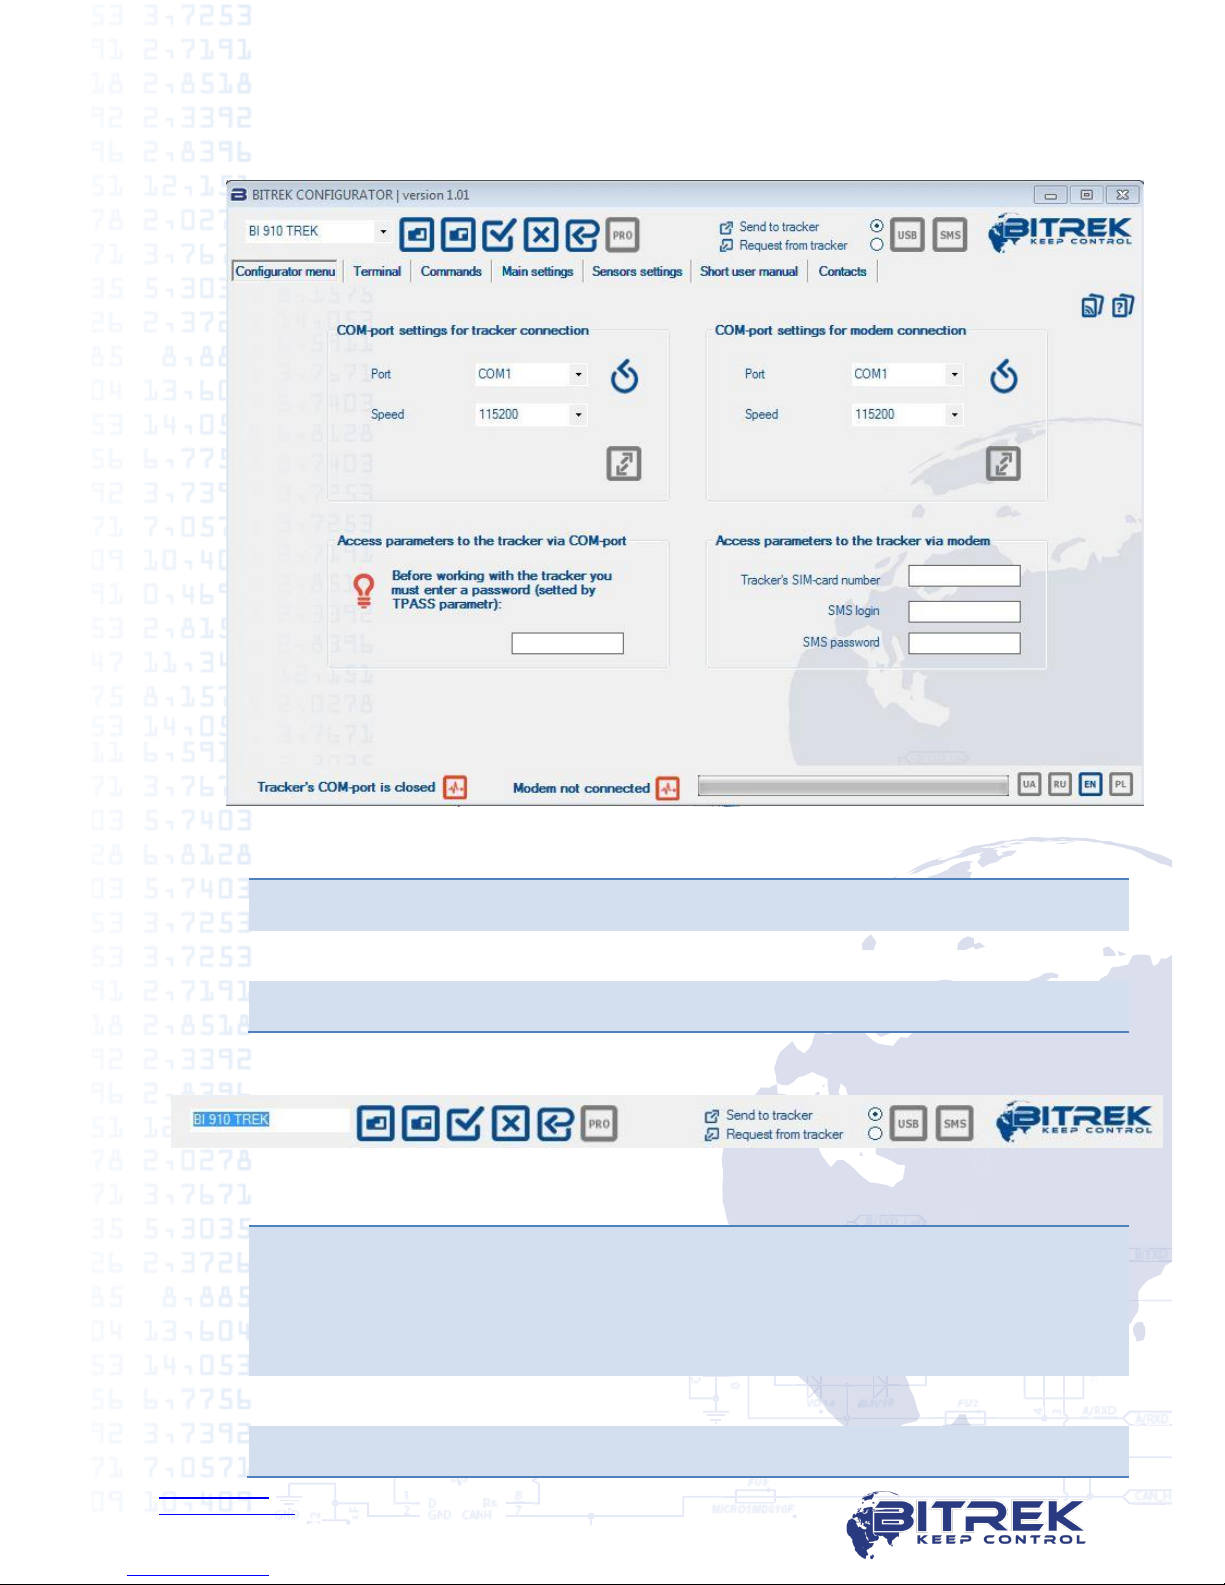
7.3. BITREK CONFIGURATOR general description
7.3.1. Interface
Picture 7.6. BITREK CONFIGURATOR main window
1
Instruments
2
Workspace
3
Status bar
7.3.2. Instruments:
Picture 7.7. BITREK CONFIGURATOR instruments
1
Model selection of connected device. Depending on the model different
parameters and commands in configurator workspace are available.
Make sure that the selected model equals to the model of the connected
tracker. To determine the tracker model you can use getver command
on "Commands" tab.
2
Open file configuration.
3
Save selected parameters in configuration file.
1
2
3
1
2
3
4
5
6
7
9
10
8
www.bitrek.eu
support@bitrek.eu
+380 44 507 02 07
4
Select all parameters. Is used for quick selection of all available
parameters of the tracker.
5
Deselect all parameters. Is used for quick deselection of all previously
selected parameters of the tracker.
6
Factory settings. This function displays all default parameters of your
tracker in workspace.
7
Professional mode. All parameters are divided into two groups -
"simple" and "professional". User can edit simple parameters all the
time. Professional parameters –only after «PRO» mode activation. The
professional options are available for viewing, sending to the tracker
and requesting from the tracker.
8
Parameter sending / requesting. Allows to select one of two modes:
upload parameters to the tracker with the chosen values;
request tracker’s settings and show them in interface.
Settings of this function don’t influence on commands sending.
9
Send via USB. By pressing this button, all marked parameters and
commands will be sent to the tracker via COM-port which the tracker is
directly connected in.
10
Send via modem. By pressing this button, all marked parameters and
commands will be sent to the tracker via connected GSM-modem by
SMS.
7.3.3. Status bar.
Picture 7.8. BITREK CONFIGURATOR status bar
1
Tracker connection status
2
Modem connection status
3
Progress bar
4
Language selection
1
2
3
4
www.bitrek.eu
support@bitrek.eu
+380 44 507 02 07
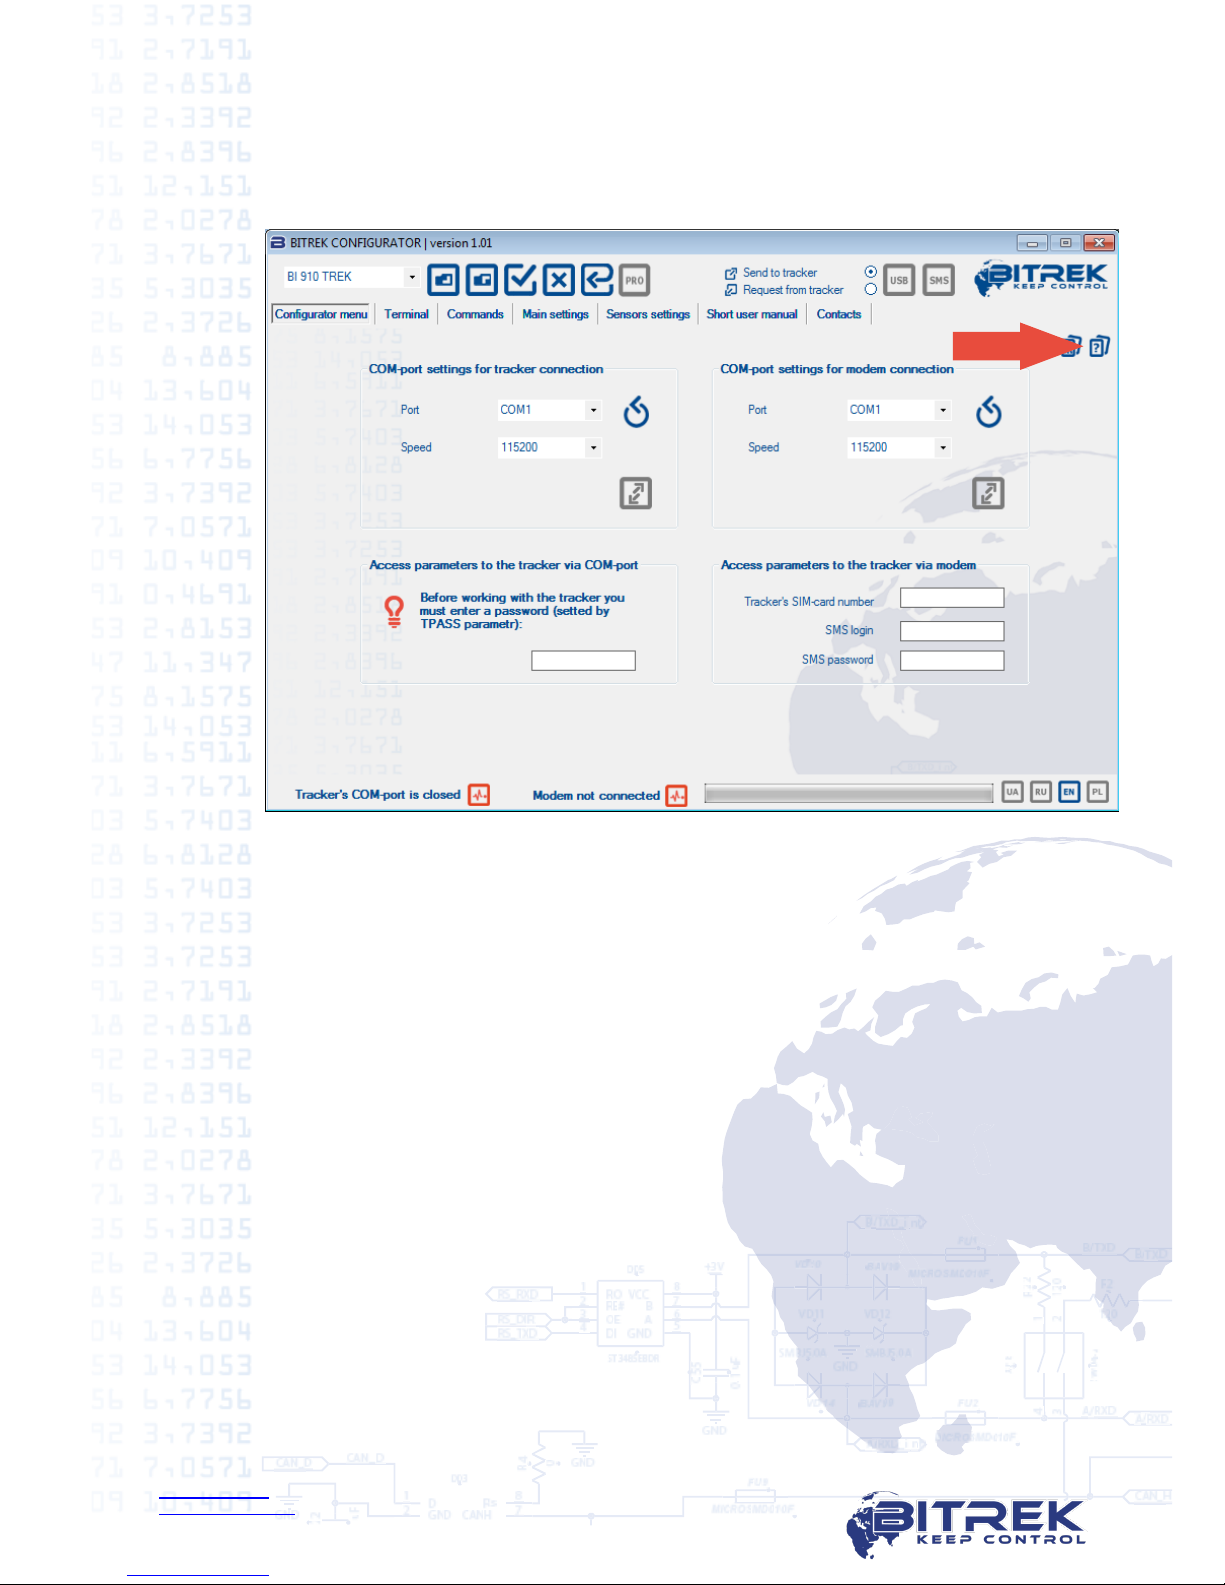
7.3.4. Help
On each tab BITREK CONFIGURATOR there is an icon with a built-in help in
which you can find answers to your questions about the hardware settings for
this tab:
Picture 7.9. BITREK CONFIGURATOR built-in help

www.bitrek.eu
support@bitrek.eu
+380 44 507 02 07
8.LED description
Picture 8.1. LEDs on the tracker
On the top of the tracker there are 3 LEDs which indicate the work of the device:
LED modes
Red LED
Yellow LED
Green LED
Lights constantly
External power is
connected
Connection to server
is established and
data is transferred
Doesn’t light
No external power
No satellites
Blinks 1 time in
0.5 seconds
Trying connect to
server
Blinks 1 time in
0.1 seconds
Unsuccessful
connection to the
server, retry the
connection after 2
minutes
Blinks 1 time in
2 seconds
Satellites OK,
location identified

www.bitrek.eu
support@bitrek.eu
+380 44 507 02 07
9.Tracker installation
Tracker placement should provide the ability to plug-in connectors, prevent
damage accidental and exclude direct sunlight, moisture, etc.
Recommended location for installation vehicle is empty space under the car
dashboard.
GPS- antenna is installing inside the vehicle or on the vehicle’s roof. If
installed inside the vehicle GPS-antenna should be placed that between it and the
firmament was no metal "screen". The desirable place is with the best sky view.
If installed under the frontal or rear window, reducing the signal and the
accuracy of the vehicle coordinates are possible.
GSM-antenna is installing inside the vehicle.
Antenna cables are laid and fixed over the entire length of the bundles, which
are attached to the mounting platforms. If necessary, the vehicle interior cables
are conducted through technological holes in the body. It’s required to lay the
cable so as to prevent damage during use when closing the door / hatches.
Power cables are conducted through technological apertures in the vehicle
from the battery location to the place of the regular tracker installation. Power
cables are connecting to the respective terminals of the battery. Tracker
connection is making according to the picture 6.1.
During the welding work in the vehicle, be sure that tracker is
disconnected from power supply and from the periphery.

www.bitrek.eu
support@bitrek.eu
+380 44 507 02 07
10. Important points during equipment configuration
We ask you to read this section attentively, as the most frequent problems
appear due to mistakes during the preparatory work on the equipment, as
follows:
10.1. Wrong connection to contacts or wires.
10.2. USB-UART wrong connection.
10.3. Antennas wrong connection.
10.4. Not removed PIN code verification on the SIM-card.
10.5. Not activated GPRS service on the SIM-card.
10.6. Sending incorrect commands via BITREK Configurator.
During trackers operation the following factors influence on its correct work:
10.7. Incorrect or unqualified device installation.
10.8. Tracker installation on inappropriate transport.
10.9. Intentional or unintentional trackers jamming using FM-transmitters and
other similar equipment.
10.10. Installation in easily accessible location for driver.
Remember that you can get maximum effect from our equipment only if
you work correctly with it as during the preparation stage so during its
usage.

www.bitrek.eu
support@bitrek.eu
+380 44 507 02 07
11. Conclusion
Dear Partners!
We hope sincerely that the information about the tracker BI 810 TREK,
described in this document, helped to answer all the questions and you were able
to solve the tasks in front of you.
If you have suggestions, comments or any other questions about working with
our equipment, you can always appeal BITREKTM helpdesk in any convenient
way.
Full list of contacts you can find at our official websites –www.bitrek.eu or
www.bitrek.com.ua.
We are looking forward to your comments and suggestions, that will help us get
better every day!
Table of contents
Other BITREK GPS manuals

BITREK
BITREK BI 868 TREK User manual

BITREK
BITREK BI-820OBD TREK User manual

BITREK
BITREK BI-530C TREK User manual

BITREK
BITREK BI-910 TREK User manual

BITREK
BITREK BI-868 TREK HW2 User manual

BITREK
BITREK BI 530R TREK User manual

BITREK
BITREK BI-520L TREK User manual

BITREK
BITREK BI-530P TREK User manual

BITREK
BITREK BI-810 TREK User manual

BITREK
BITREK BI 820 TREK OBD User manual


