BIXOLON Bixolon SRP-270 User manual

User's Manual
Ethernet Interface
Rev. 5.04 SRP-270
SRP-275
SRP-280
SRP-350
SRP-350plus
SRP-370 / 372
SRP-770
SRP-770II / 770IIE
SLP-T400 / T400E
SLP-T403 / T403E
SLP-D400 / D400E
SLP-D403 / D403E
http://www.bixolon.com

Ethernet
Rev. 5.04 - 2 -
■Table of contents
1. Interface setting Guiding...............................................................................................3
2. Manual Information........................................................................................................4
3. Interface card and available printer..............................................................................4
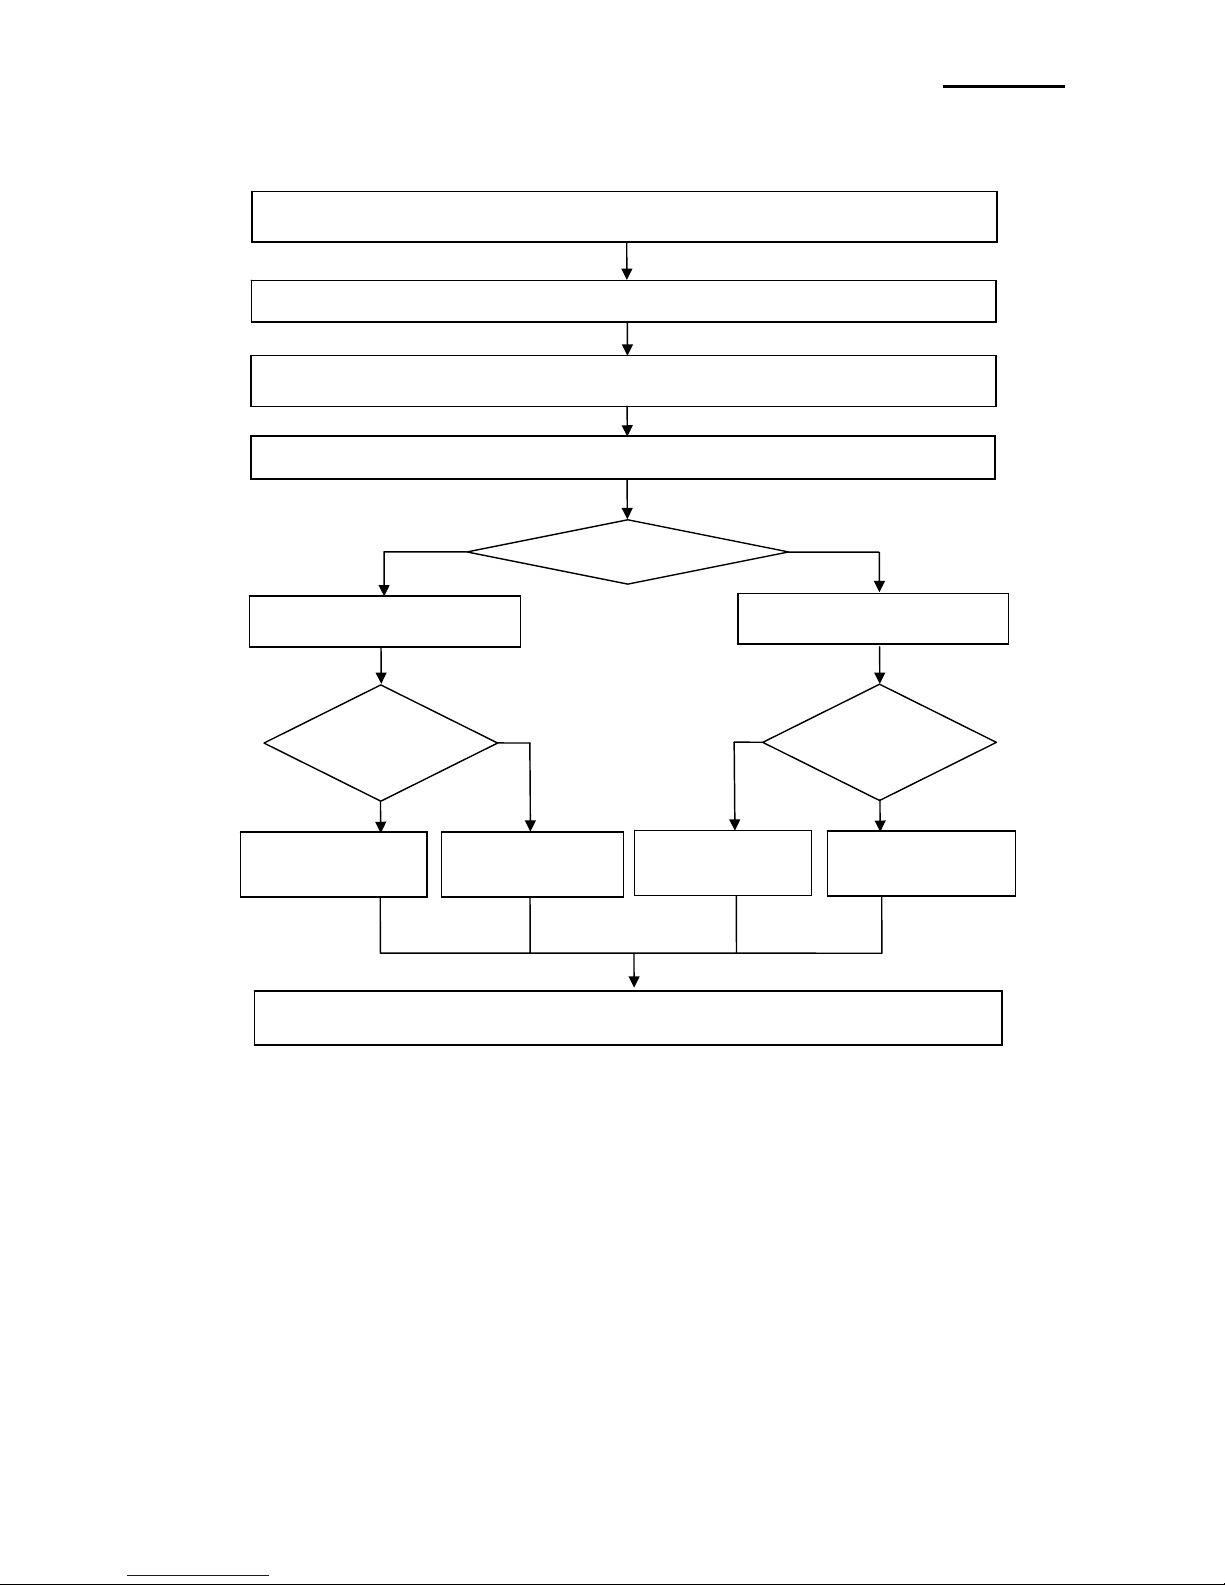
4. How to install..................................................................................................................5
5. Specifications.................................................................................................................6
5-1 Hardware version.....................................................................................................6
5-2 Configuration Tool....................................................................................................6
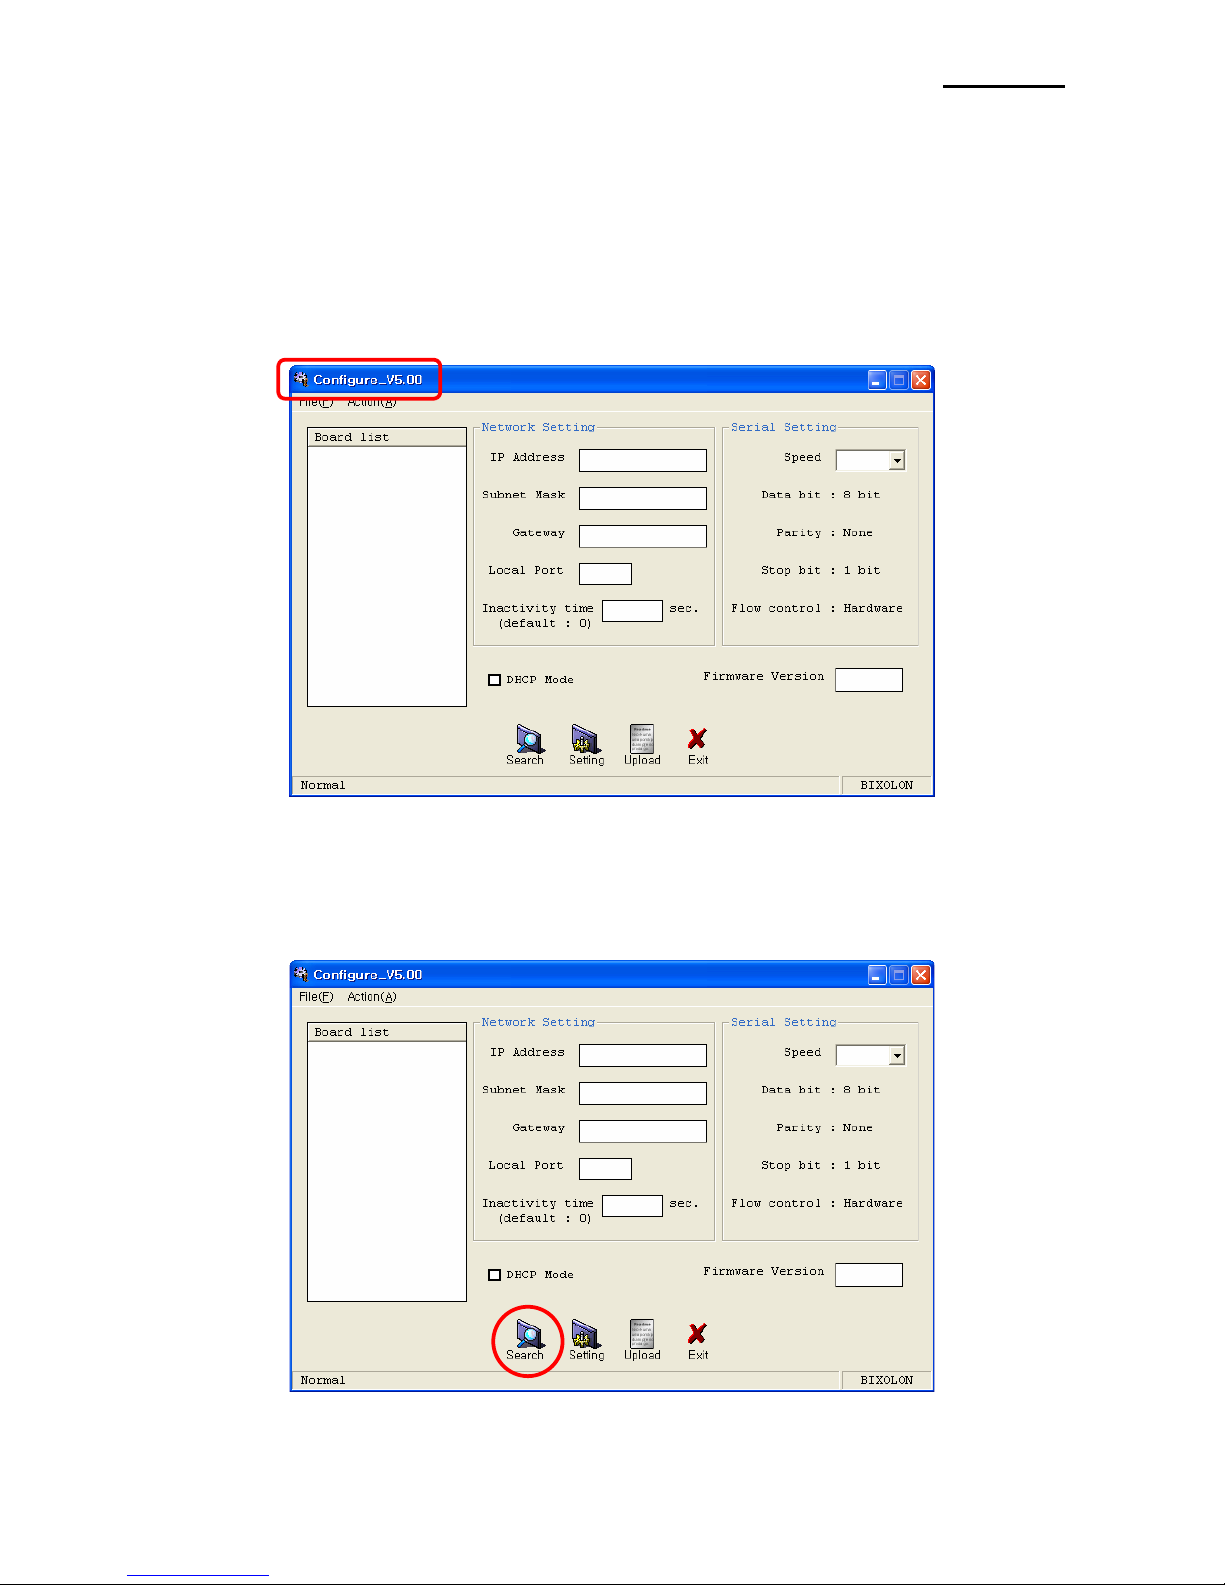
6. Configuration Tool .........................................................................................................7
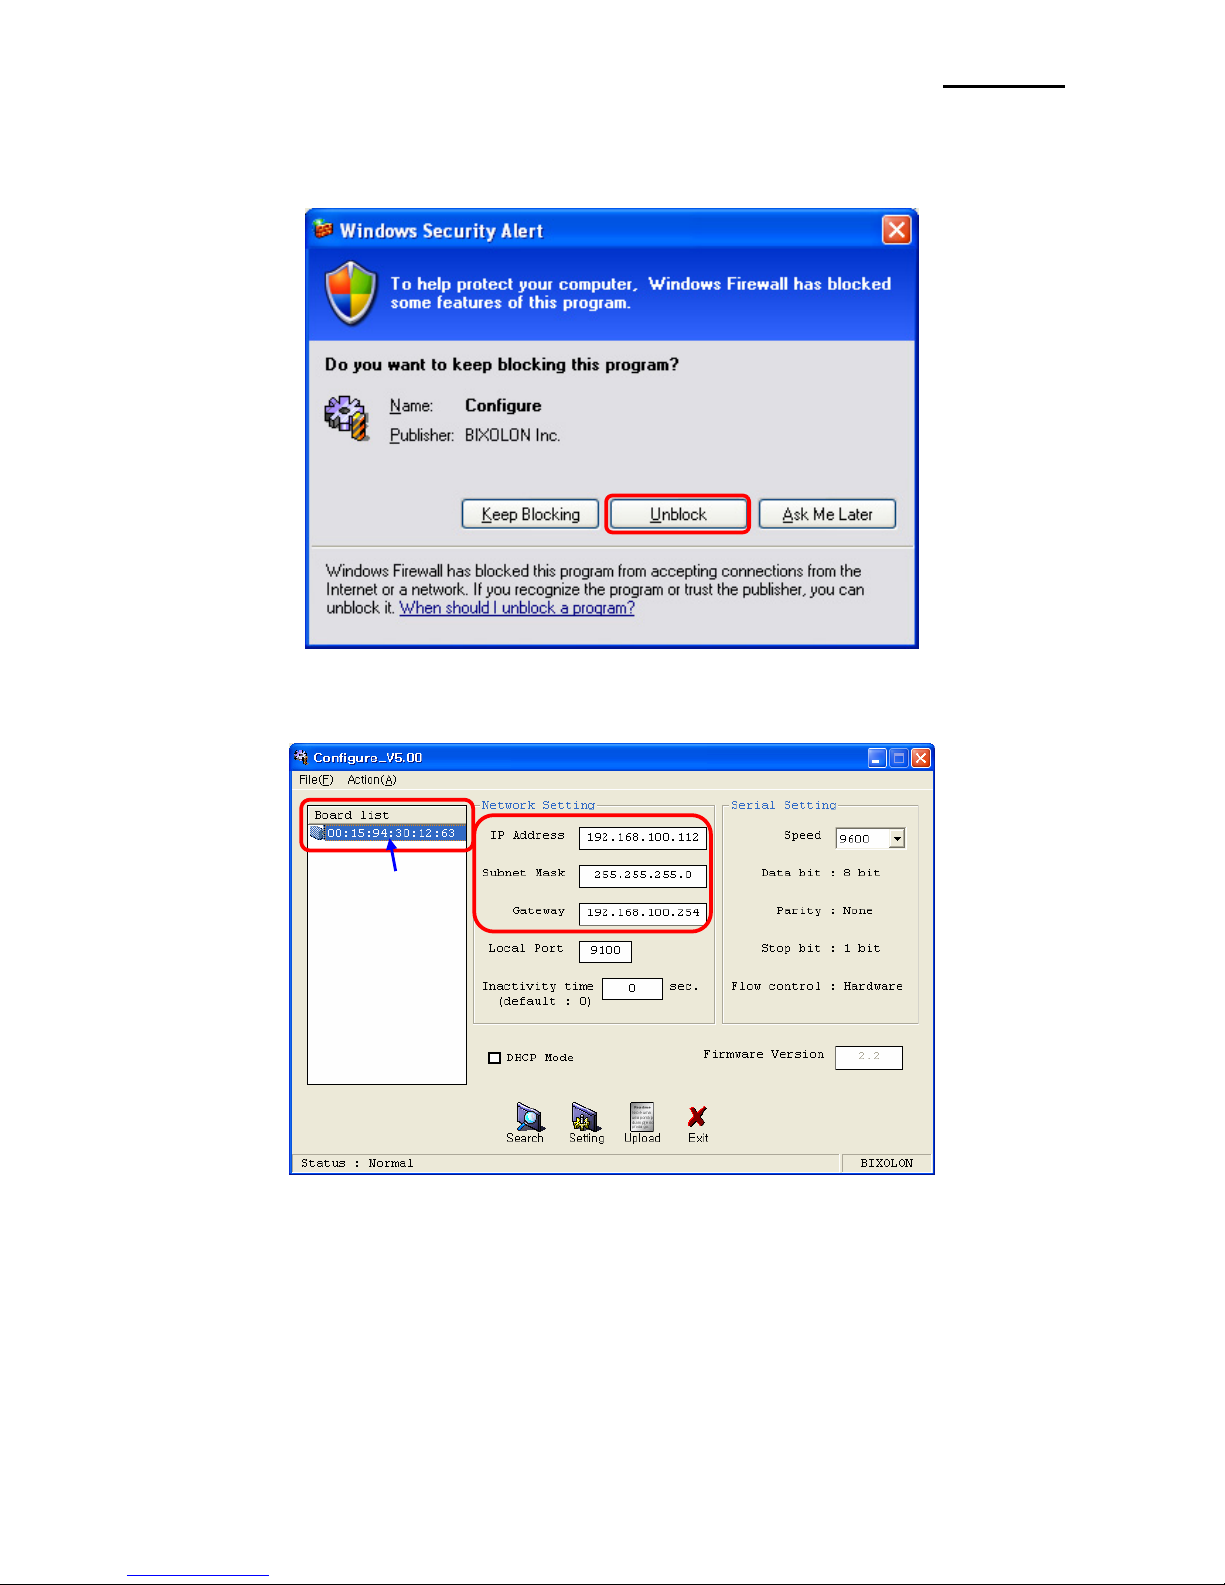
6-1 Static IP interface set up ..........................................................................................7
6-2 DHCP interface set up ...........................................................................................12
7. Web Server ...................................................................................................................16
7-1 Static IP interface set up ........................................................................................16
7-2 DHCP interface set up ...........................................................................................20
8. Ethernet test by using Windows test page ................................................................21
9. How to check Static IP or DHCP .................................................................................27
10. Factory Reset .............................................................................................................29
11. Function Key set up...................................................................................................30
[Appendix 1] Details of interface card............................................................................31
[Appendix 2] Hardware version and Configuration Tool ..............................................31
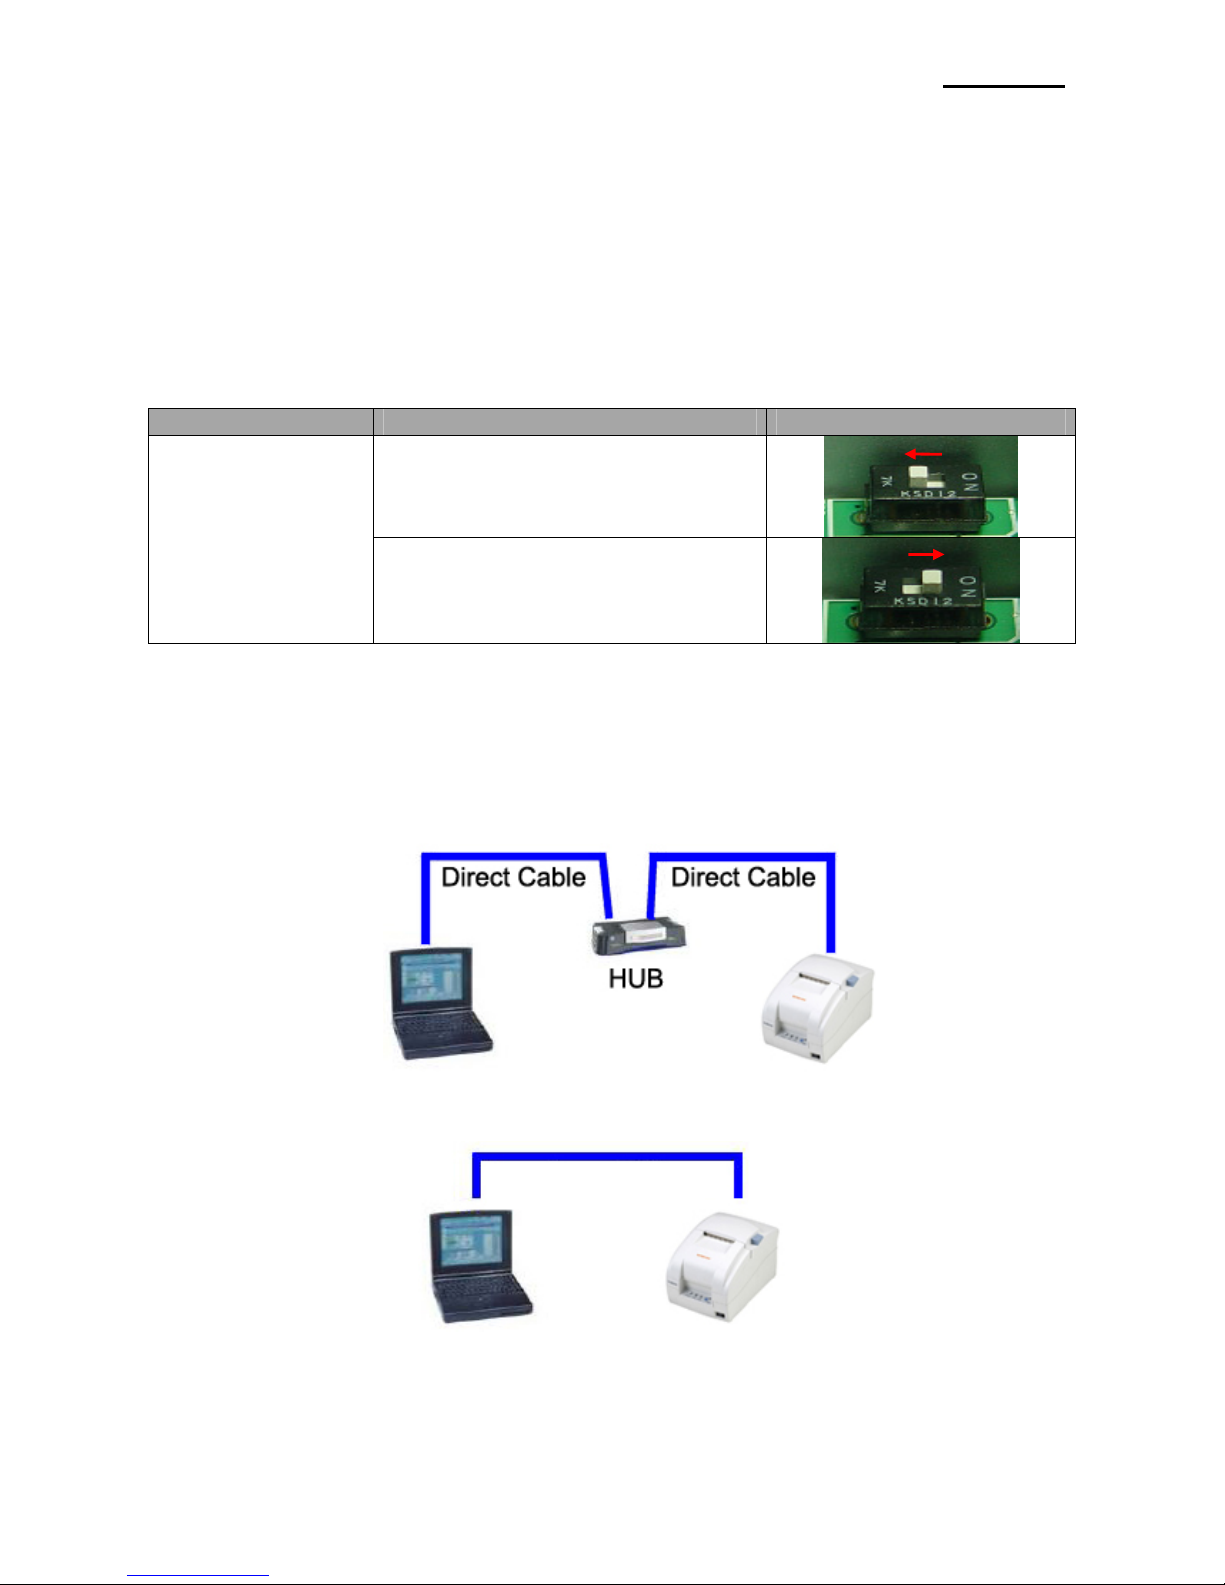
[Appendix 3] Setting up serial communication.............................................................32

Ethernet
Rev. 5.04 - 3 -
How to install (Page 5)
Check Network (Page 27)
Static IP?
DHCP
Static IP
Interface set up
(Page16)
Y N
Check the Interface card (Page 4)
Web-
server?
Setting up serial communication (Page 32)
Web-
server?
Interface set up
(Page7)
Interface set up
(Page20)
Interface set up
(Page12)
Y
Y
NN
Printer Driver set up and Test (Refer to Home page / Driver manual)
1. Interface setting Guiding

Ethernet
Rev. 5.04 - 4 -
2. Manual Information
The purpose of this manual is to provide information on the operation and usage
instructions of the Ethernet Interface for the BIXOLON Printers.
We at BIXOLON maintain ongoing efforts to enhance and upgrade the functions and
quality of all our products. In following, product specifications and/or user manual content
may be changed without prior notice.
3. Interface card and available printer
Interface
Type Printer
Interface
Card
Hardware
Version Picture
SRP-350
SRP-350Plus IFA-EP TYPE V1.x.x
SRP-275 IFC-EP TYPE V1.x.x
Ethernet
To
Parallel
SLP-T400E
SLP-T403E
SLP-D400E
SLP-D403E
- - ON Board
SRP-770
SRP-770II
SLP-T400
SLP-T403
SLP-D400
SLP-D403
IFA-EO TYPE V3.x.x
SRP-770IIE - - ON Board
SRP-270
SRP-280
SRP-350
SRP-350Plus
SRP-370
SRP-372
IFA-E TYPE V5.x.x
Ethernet
To
Serial
SRP-275 IFC-E TYPE
(Discontinued) V5.x.x

Ethernet
Rev. 5.04 - 5 -
4. How to install
1) Check the interface version
[Note]
Each version uses its own Configuration Tool.
2) Turn of the printer and insert the interface card.
[Note]
IFA-EP supports SRP-350 and SRP-350plus. When a user installs IFA-EP on printer,
user can select a model by using dip-switch of IFA-EP.
Interface Card Printer Picture
SRP-350
IFA-EP TYPE
SRP-350plus
3) Set the baud rate (Serial speed)
(Refer to [Appendix 3])
4) Connect LAN cable to the interface card and turn on the printer.
(1) Use direct cable to connect to HUB (Switch).
(2) Use cross cable to connect to LAN card of computer.
[Note]
You can use IFA/C-E TYPE (after V5.0.0) or IFA/C-EP TYPE, SLP-T40*E, SLP-D40*E
regardless of cable type.
Cross cable

Ethernet
Rev. 5.04 - 6 -
5. Specifications
5-1 Hardware version
Hardware version is marked on the label on the interface card bracket.
IFA-E TYPE (V3.x.x), IFA-EO TYPE (V3.x.x) doesn’t have Function key.
Interface Card Picture
IFA-EP TYPE
IFC-EP TYPE
IFA-E TYPE
IFC-E TYPE
(Discontinued)
[Note]
- The DIP switch on the interface board should always be OFF.
5-2 Configuration Tool
BIXOLON provides 2 types of network and serial communication set up utilities as a below.
- Configure_Vx.x.x.exe
- Web Server

Ethernet
Rev. 5.04 - 7 -
6. Configuration Tool
6-1 Static IP interface set up
1) Turn on the printer.
2) Execute Configure Tool.
[Note]
- Use proper Configuration Tool dependent on hardware version
3) Click Search.

Ethernet
Rev. 5.04 - 8 -
[Note]
- If Windows Security Alert pops up, please press Unblock.
4) Select MAC Address in Board list and set up Network Setting.
[Note]
- If many MAC addresses appear, refer to the MAC address on the label of the
interface card. Ask the Network administrator IP and its related information.
MAC Address

Ethernet
Rev. 5.04 - 9 -
- If you are not aware of Subnet Mask, refer to the below.
When the IP address is
(1) 1~126.xxx.xxx.xxx: Subnet Mask: 255.0.0.0
(2) 128~191.xxx.xxx.xxx: Subnet Mask: 255.255.0.0
(3) 192~223.xxx.xxx.xxx: Subnet Mask: 255.255.255.0
For example, when the IP address is 192.168.192.321,
Subnet mask is 255.255.255.0.
- If you are not aware of Gateway,
(1) When the Network is connected to Internet (Router or Server computer),
refer to the Network setting of other computers on the Network.
(2) When the Network is connected to Internet (Router or Server computer),
enter 0.0.0.0 for Gateway.
5) Enter value at Local Port.
[Note]
- Default value is 9100. Choose from 0 to 32767.

Ethernet
Rev. 5.04 - 10 -
6) Set Inactivity Time as ‘0’.
[Note]
- Default value is 0. Choose from 0 to 32767.
- When you set Inactivity time, Ethernet interface will disconnect by force
after designated time. When you set 0, Forced disconnection function is not available.
7) Set baud rate (Speed) at Serial Setting
[Note]
- The baud rate (Speed) should be same as the baud rate of the printer.
(Refer to [Appendix 1])
- Highest baud rate (Speed) can be used.
- The baud rate (Speed) of IFA/C-EP TYPE, SLP-T40*E, SLP-D40*E don’t need to
setting.

Ethernet
Rev. 5.04 - 11 -
8) When setting finishes, click Setting.
[Note]
Successfully finished set up Unsuccessfully finished set up
- When setting doesn’t finish correctly, try again.
9) Click Exit to finish set up.

Ethernet
Rev. 5.04 - 12 -
6-2 DHCP interface set up
1) Turn on the printer.
2) Execute Configure Tool.
[Note]
- Use proper Configuration Tool dependent on hardware version
3) Click Search.

Ethernet
Rev. 5.04 - 13 -
4) Select MAC Address in Board list and check at DHCP Mode.
[Note]
- If many MAC addresses appear, refer to the MAC address on the label of
the interface card.
- Ask the Network administrator IP and its related information.
5) Set baud rate at “Speed.
[Note]
- The baud rate (Speed) should be same as the baud rate of the printer.
(Refer to [Appendix 3])
- Highest baud rate (Speed) can be used.
- The baud rate (Speed) of IFA/C-EP TYPE, SLP-T40*E, SLP-D40*E don’t need to
setting.
MAC address

Ethernet
Rev. 5.04 - 14 -
6) When setting finishes, click Setting.
[Note]
Successfully finished set up Unsuccessfully finished set up
- When setting doesn’t finish correctly, try again.
7) Wait approximately 10 or more seconds until the printer receives IP from the server.

Ethernet
Rev. 5.04 - 15 -
8) Click Search to check given IP.
9) If the given IP is OK, click Exit.

Ethernet
Rev. 5.04 - 16 -
7. Web Server
7-1 Static IP interface set up
1) Execute Internet Explorer.
2) Enter IP address of the printer at Address of Internet Explorer and click go.
[Note]
- If you are not aware of IP address, check IP address by pushing Function key.
(Refer to 35Page])
- Ask Network administrator IP Address and its related information.
3) When Configuration Window appears, enter new Network Setting.

Ethernet
Rev. 5.04 - 17 -
[Note]
- If you are not aware of Subnet Mask, refer to the below.
- When the IP address is
(1) 1~126.xxx.xxx.xxx: Subnet Mask: 255.0.0.0
(2) 128~191.xxx.xxx.xxx: Subnet Mask: 255.255.0.0
(3) 192~223.xxx.xxx.xxx: Subnet Mask: 255.255.255.0
For example, when the IP address is 192.168.192.321,
Subnet mask is 255.255.255.0.
- If you are not aware of Gateway,
(1) When the Network is connected to Internet (Router or Server computer),
refer to the Network setting of other computers on the Network.
(2) When the Network is connected to Internet (Router or Server computer),
enter 0.0.0.0 for Gateway.
4) Enter value of Local Port.
5) Set Inactivity Time.

Ethernet
Rev. 5.04 - 18 -
6) Set baud rate (Serial speed).
[Note]
- The baud rate (Speed) should be same as the baud rate of the printer.
- The baud rate (Speed) of IFA/C-EP TYPE, SLP-T40*E, SLP-D40*E don’t need to
Setting.
7) When setting finishes, click Apply.
[Note]
- When the setting finishes successfully, the following message appears.
Please press here if you would like to back to the configuration

Ethernet
Rev. 5.04 - 19 -
8) If you click the message, you can check your configuration setting.
[Note]
- If any change was not found after setting on Web Server, check the bellows;
(1) Execute Internet Explorer.
(2) Internet Explorer Menu →Tools →Internet options.
(3) General tab →Temporary internet file →Settings

Ethernet
Rev. 5.04 - 20 -
(4) Check for newer version of stored pages →Click Every visit to the page.
(5) Click Refresh in Internet Explorer.
7-2 DHCP interface set up
1) Check at DHCP mode and click Apply.
2) Push the Function Key on the interface 10 or more seconds from finishing set up.
Enter given IP address at address of Internet Explorer to enter web server.
Other manuals for Bixolon SRP-270
9
This manual suits for next models
17
Table of contents
Other BIXOLON Recording Equipment manuals