BKI VG User manual

Rotisserie Oven
MODEL VG
OPERATION MANUAL
Serial Numbers 115493 and Higher

Warranty Information
LIMITED ONE YEAR WARRANTY
BKI (The “Company”) warrants to the original purchaser/user, that at time of shipment from the
Company factory, this equipment will be free from defect in materials and workmanship. Written
notice of a claim under this Warranty must be given within ONE YEAR AND THREE MONTHS
from date of shipment from the factory. Defective conditions caused by abnormal use or misuse,
lack of maintenance, damage by third parties, alterations by unauthorized personnel, acts of God,
failure to follow installation instructions or any other events beyond the control of the company will
NOT be covered under Warranty. The obligation of the Company under this Warranty shall be
limited to repairing or replacing (at the option of the company) any part which is defective in
reasonable opinion of the Company. The user will have the responsibility and expense of
removing and returning the defective part to the Company as well as the cost of reinstalling the
replacement or repaired part.
IN NO EVENT SHALL THE COMPANY BE LIABLE FOR LOSS OF USE, LOSS OF REVENUE
OR LOSS OF PRODUCT OR PROFIT OR FOR INDIRECT OR CONSEQUENTIAL DAMAGES
INCLUDING BUT NOT LIMITED TO, FOOD SPOILAGE OR PRODUCT LOSS. WARRANTY
DOES NOT COVER GLASS BREAKAGE. THE ABOVE WARRANTY IS EXCLUSIVE AND ALL
OTHER WARRANTIES, EXPRESS OR IMPLIED, ARE EXCLUDED INCLUDING THE IMPLIED
WARRANTIES OF MERCHANTABILITY AND FITNESS FOR A PARTICULAR PURPOSE.
THIS WARRANTY SHALL APPLY ONLY WITHIN THE CONTINENTAL UNITED STATES, ITS
TERRITORIES, AND POSSESSIONS AND IN CANADA.
LIMITED NINETY DAY LABOR WARRANTY
All labor necessary to repair or replace factory defective parts will be performed, without charge,
to the end user, by service personnel of a BKI Authorized Distributor during the first ninety days
after the date of installation of the new equipment.
Replacement parts: Any appliance replacement part, except lamps and fuses, which proves to
be defective in material or workmanship within 90 days from date of original installation will be
repaired or replaced without charge F.O.B. Factory, Simpsonville, S.C. or F.O.B. authorized
distributor.

Rotisserie Oven Table of Contents
1
Table of Contents
Table of Contents.....................................................................................................................................................1
Introduction..............................................................................................................................................................2
Safety Precautions.................................................................................................................................................2
Safety Signs and Messages..............................................................................................................................2
Safe Work Practices..........................................................................................................................................3
Safety Labels.....................................................................................................................................................4
Health And Sanitation Practices............................................................................................................................5
Food Handling...................................................................................................................................................5
Storage Of Raw Meats......................................................................................................................................5
Coding Cooked Foods.......................................................................................................................................5
Storage Of Prepared Foods..............................................................................................................................5
Operation .................................................................................................................................................................. 6
Controls and Indicators..........................................................................................................................................6
Controller Operation ..............................................................................................................................................8
Programming the Controller..............................................................................................................................8
Selecting a Program........................................................................................................................................11
Pre-Heating the Oven......................................................................................................................................11
Cooking ...........................................................................................................................................................12
Programming Examples..................................................................................................................................13
Locking the Controller .....................................................................................................................................15
Maintenance ...........................................................................................................................................................16
Scheduled Maintenance......................................................................................................................................16
Oven Cleaning.................................................................................................................................................16
Troubleshooting...................................................................................................................................................17
Notes ....................................................................................................................................................................... 19

Rotisserie Oven Introduction
2
Introduction
Your BKI VG is a computer controlled rotisserie oven. It utilizes a revolving mechanism and heating coils that
ensure even product cooking. A touch pad control panel and switches are provided to allow for quick setup and
operation. Removable components allow for easy maintenance and cleaning of the VG.
The BKI name and trademark on this unit assures you of the finest in design and engineering -- that it has been
built with care and dedication -- using the best materials available. Attention to the operating instructions
regarding proper installation, operation, and maintenance will result in long lasting dependability to ensure the
highest profitable return on your investment.
PLEASE READ THIS ENTIRE MANUAL BEFORE OPERATING THE UNIT. If you have
any questions, please contact your BKI Distributor. If they are unable to answer your
questions, contact the BKI Technical Service Department, toll free: 1-800-927-6887.
Outside the U.S., call 1-864-963-3471.
Safety Precautions
Always follow recommended safety precautions listed in this manual. Below is the safety alert symbol. When you
see this symbol on your equipment, be alert to the potential for personal injury or property damage.
Safety Signs and Messages
The following Safety signs and messages are placed in this manual to provide instructions and identify specific
areas where potential hazards exist and special precautions should be taken. Know and understand the meaning
of these instructions, signs, and messages. Damage to the equipment, death or serious injury to you or other
persons may result if these messages are not followed.
This message indicates an imminently hazardous situation which, if not avoided, will
result in death or serious injury.
This message indicates a potentially hazardous situation, which, if not avoided, could
result in death or serious injury.
This message indicates a potentially hazardous situation, which, if not avoided, may
result in minor or moderate injury. It may also be used to alert against unsafe practices.
This message is used when special information, instructions or identification are required
relating to procedures, equipment, tools, capacities and other special data.

Rotisserie Oven Introduction
3
Safe Work Practices
Wear Safe Clothing Appropriate To Your Job
Always wear your insulated mitts when handling hot racks or touch any hot metal
surface. If you lose or damage your mitts, you can buy new ones at your local
restaurant equipment supply store or from your local BKI Distributor.
Always wear non-skid shoes when working around the oven or any other
equipment.
Never wear loose clothing such as neckties or scarves while operating this
equipment. Keep loose hair tied back or in a hair net while operating this
equipment.
Always wear appropriate personal protection equipment during the cleaning
process to guard against possible injury from hot cleaning solution.
Beware of High Voltage
This equipment uses high voltage. Serious injury can occur if you or any untrained
or unauthorized person installs, services, or repairs this equipment. Always Use an
Authorized Service agent to Service Your Equipment.
Keep this manual with the Equipment
This manual is an important part of your equipment. Always keep it near for easy
access. If you need to replace this manual, contact:
BKI
Technical Services Department
P.O. Box 80400
Simpsonville, S.C. 29680-0400
Or call toll free: 1-800-927-6887
Outside the U.S., call 864-963-3471
Protect Children
Keep children away from this equipment. Children may not understand that this
equipment is dangerous for them and others.
NEVER allow children to play near or operate your equipment.
Keep Safety Labels Clean and in Good Condition
Do not remove or cover any safety labels on your equipment. Keep all safety labels
clean and in good condition. Replace any damaged or missing safety labels. Refer
to the Safety Labels section for illustration and location of safety labels on this unit.
If you need a new safety label, obtain the number of the specific label illustrated on
page 4, then contact:
BKI
Technical Services Department
P.O. Box 80400
Simpsonville, S.C. 29680-0400
Or call toll free: 1-800-927-6887
Outside the U.S., call 864-963-3471

Rotisserie Oven Introduction
4
Be Prepared for Emergencies
Be prepared for fires, injuries, or other emergencies.
Keep a first aid kit and a fire extinguisher near the equipment. You must use a 40-
pound Type BC fire extinguisher and keep it within 25 feet of your equipment.
Keep emergency numbers for doctors, ambulance services, hospitals, and the fire
department near your telephone.
Know your responsibilities as an Employer
• Make certain your employees know how to operate the equipment.
• Make certain your employees are aware of the safety precautions on the
equipment and in this manual.
• Make certain that you have thoroughly trained your employees about operating
the equipment safely.
• Make certain the equipment is in proper working condition. If you make
unauthorized modifications to the equipment, you will reduce the function and
safety of the equipment.
Safety Labels

Rotisserie Oven Introduction
5
Health And Sanitation Practices
BKI Rotisserie Ovens are manufactured to comply with health regulations and are tested and certified to NSF
standards. You must operate the equipment properly, using only quality products and use meat thermometers to
insure meats are thoroughly cooked.
Food Handling
• Wash hands thoroughly in warm, soapy water after handling raw poultry or meats.
• Clean and sanitize all utensils and surfaces that have been in contact with raw products. Clean and
sanitize the meat forks or baskets between cooking.
• Never place cooked meats on the same surfaces used to prepare raw meats, unless the area has been
thoroughly cleaned and sanitized.
Storage Of Raw Meats
• Designate an area or shelf strictly for the storage of all raw meats to be used in the rotisserie.
• Raw product must always be stored at temperatures below 38° F. (3° C.).
• Never store or mix raw foods above cooked foods, as this is a health hazard.The drippings from raw
foods contaminate cooked or processed foods.
• All chicken and chicken parts to be stored overnight must be thoroughly iced down and refrigerated.
Coding Cooked Foods
All products cooked during the day should be sold the same day.
NOTE: It is not the intent of the rotisserie program to have unsold merchandise at the end of the cooking day.
Follow your company’s procedures for the handling of any leftover product.
Storage Of Prepared Foods
• Cold foods should be kept at or below 38° F. (3° C.).
• Hot foods must be maintained to meet local health codes, usually a minimum 145° F. (63° C.).
Rotisserie Oven Operation
6
Operation
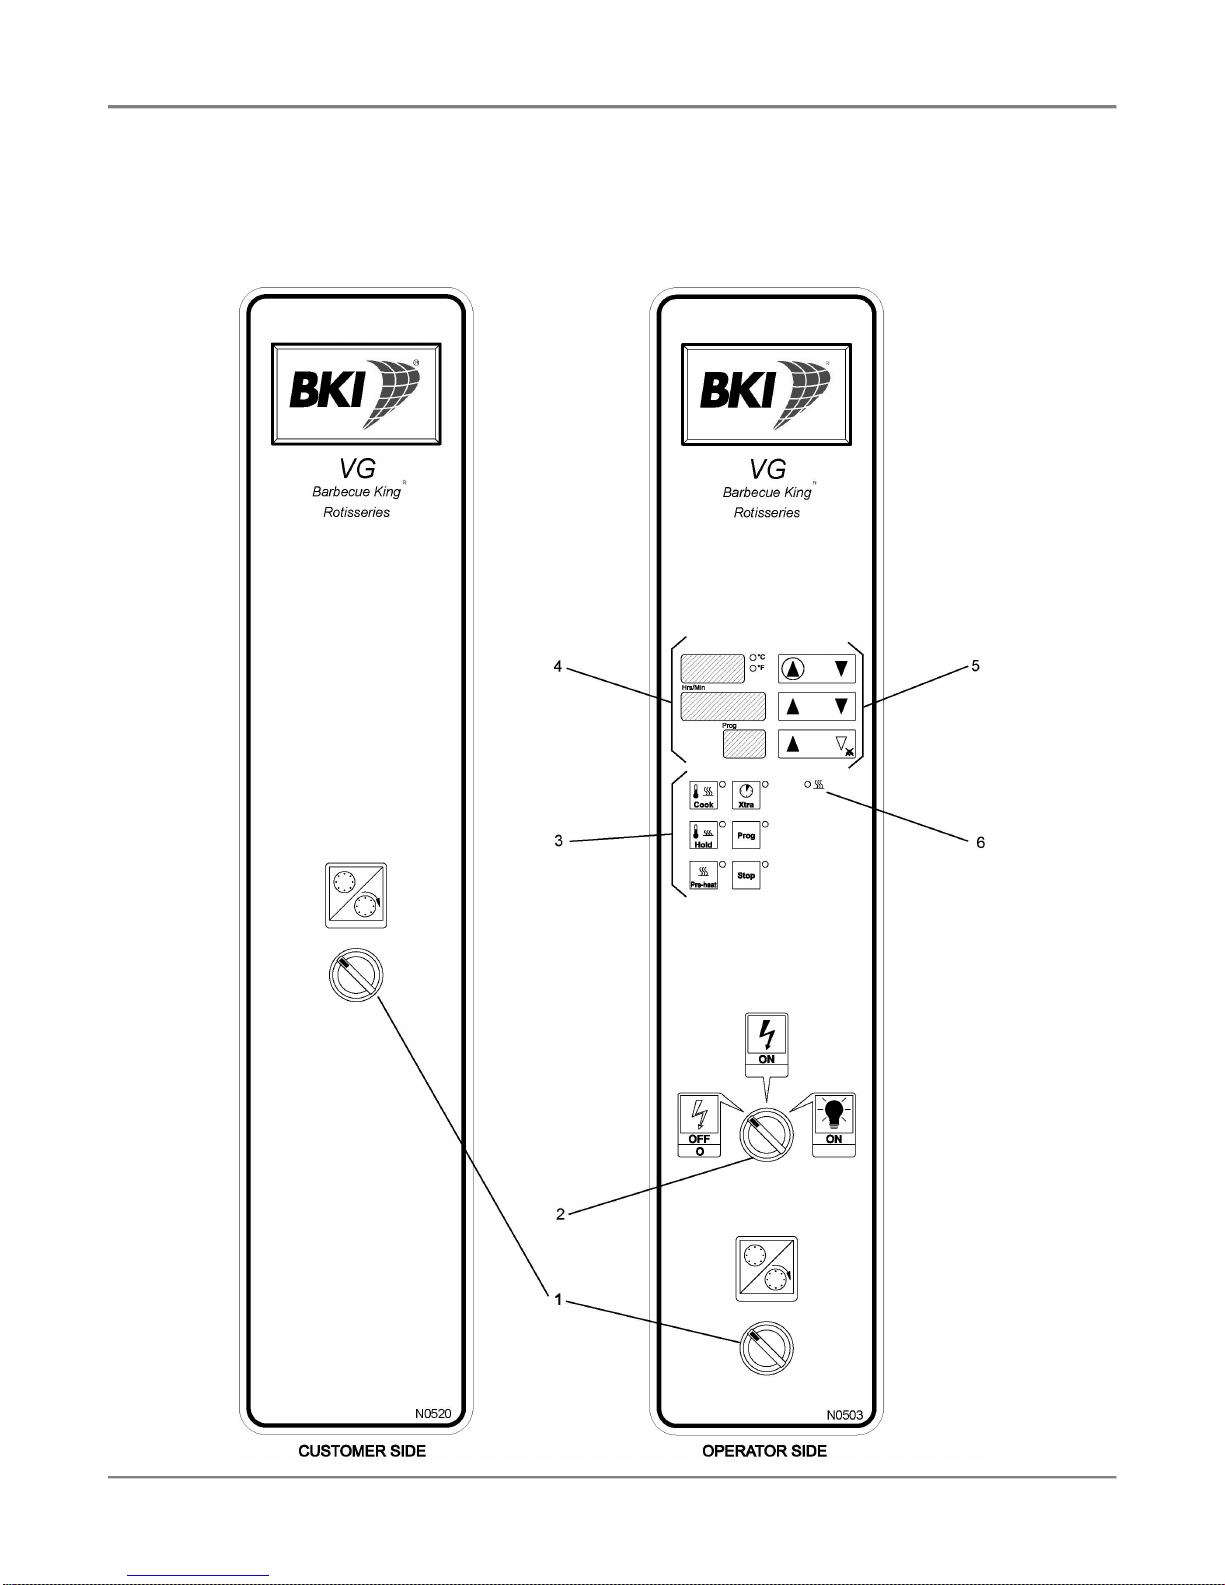
Controls and Indicators
Refer to the figure and table below for an explanation of the oven’s controls and indicators.

Rotisserie Oven Operation
7
Item # Description Function
1 Rotor Switch
When the switch is placed in this position, the rotor motor is off.
When the switch is placed in this position, the rotor motor is on
and the rotor system turns.
2 Operator Switch
When the switch is placed in the this position, power is
removed from the oven.
When the switch is placed in this position, power is supplied to
the oven.
When the switch is placed in this position, power is supplied to
the oven and lights inside the oven come on.
3 Controller Function
Keys Pressing a key activates it’s associated function and illuminates the light next
to it.
Starts the cook cycle of the program number selected. While in
the programming mode, the Cook button accesses Stage-2 cook
time and temperature settings.
Starts the hold cycle of the program number shown in the display
area. While in the programming mode, the Hold button accesses
the hold time and temperature settings.
Starts the oven pre-heating. While in the programming mode, the
Pre-heat button accesses Stage 1 cook time and temperature
settings.
Each press of the Xtra button adds five minutes to the
programmed cook time. Press this button up to eleven times for
an additional 55 minutes of cook time. The oven will be
maintained at the last program temperature.
Enters the ‘programming mode’ allowing the operator to create
presets for Programs 1-15.
A quick press of the Stop button ‘pauses’ the controller during a
Pre-heat or Cook/Hold cycle. Press and hold the Stop button to
end a Pre-heat or Cook/Hold cycle.

Rotisserie Oven Operation
8
Item # Description Function
4 Controller Display
Area All programming functions and Cook/Hold cycles are shown in the Display
area.
This display shows temperature. One of two LED’s beside this
display will light to indicate which temperature scale is being
used (Celsius or Fahrenheit).
This display shows cook time.
This display shows the selected program number.
5 Controller Navigation
Keys
These keys allow the operator to increase or decrease
temperatures of the presets. The circled key, if pressed during
a Cook/Hold cycle, displays actual oven temperature.
These keys
allow the operator to increase or decrease the cook
times.
These keys allow the operator to scroll through the 15
Cook/Hold programs. The down arrow key, when pressed,
cancels the ‘buzzer’ at the end of a Pre-heat, Cook, or Hold
cycle.
6 Heat Indicator Indicates when the heat is on.
Controller Operation
The VG Controller has 15 programmable cook programs. Each program or preset contains a multistage Cook
option and a Hold feature. The multi-stage cook option is made up of two parts: Stage- 1 and Stage-2. The Cook
options and Hold feature of each program has an adjustable cook time and temperature. The two-stage cook
option may also be used for a ‘delayed start’ or for a ‘cool down’ period.
The features and flexibility of this controller allow the operator to create programs based on a recipe or the
cooking needs of popular product lines and will help guarantee consistent results. The controller is divided into
three parts: the Display area, the Navigation keys, and the Function keys. There is also a light to indicate the
‘heat’ is on (located below the Navigation keys).
Programming the Controller
Preparation
• Determine the product to be cooked. Also determine if the two-stage cook feature is needed. This
information must be determined before the programming process begins.
• Establish a cook time and temperature for the product. If desired, decide on a Hold time and temperature.
Remember, the Xtra button only works if a Hold temperature has been set and the oven temperature at
the end of the Cook cycle is higher than the programmed Hold temperature.
NOTE: When programming the Hold temperature, set the temperature 20° more for Fahrenheit, 10° more
for Celsius, than the desired internal temperature. (e.g. Desired internal temp: 150° F — set the Hold for
170° F or 65° C – set the Hold for 75° C).
• Turn power on. When the controller comes on the lights flash, pause for a moment, and then show the
oven temperature and the word “OFF” in the time display.
Rotisserie Oven Operation
9
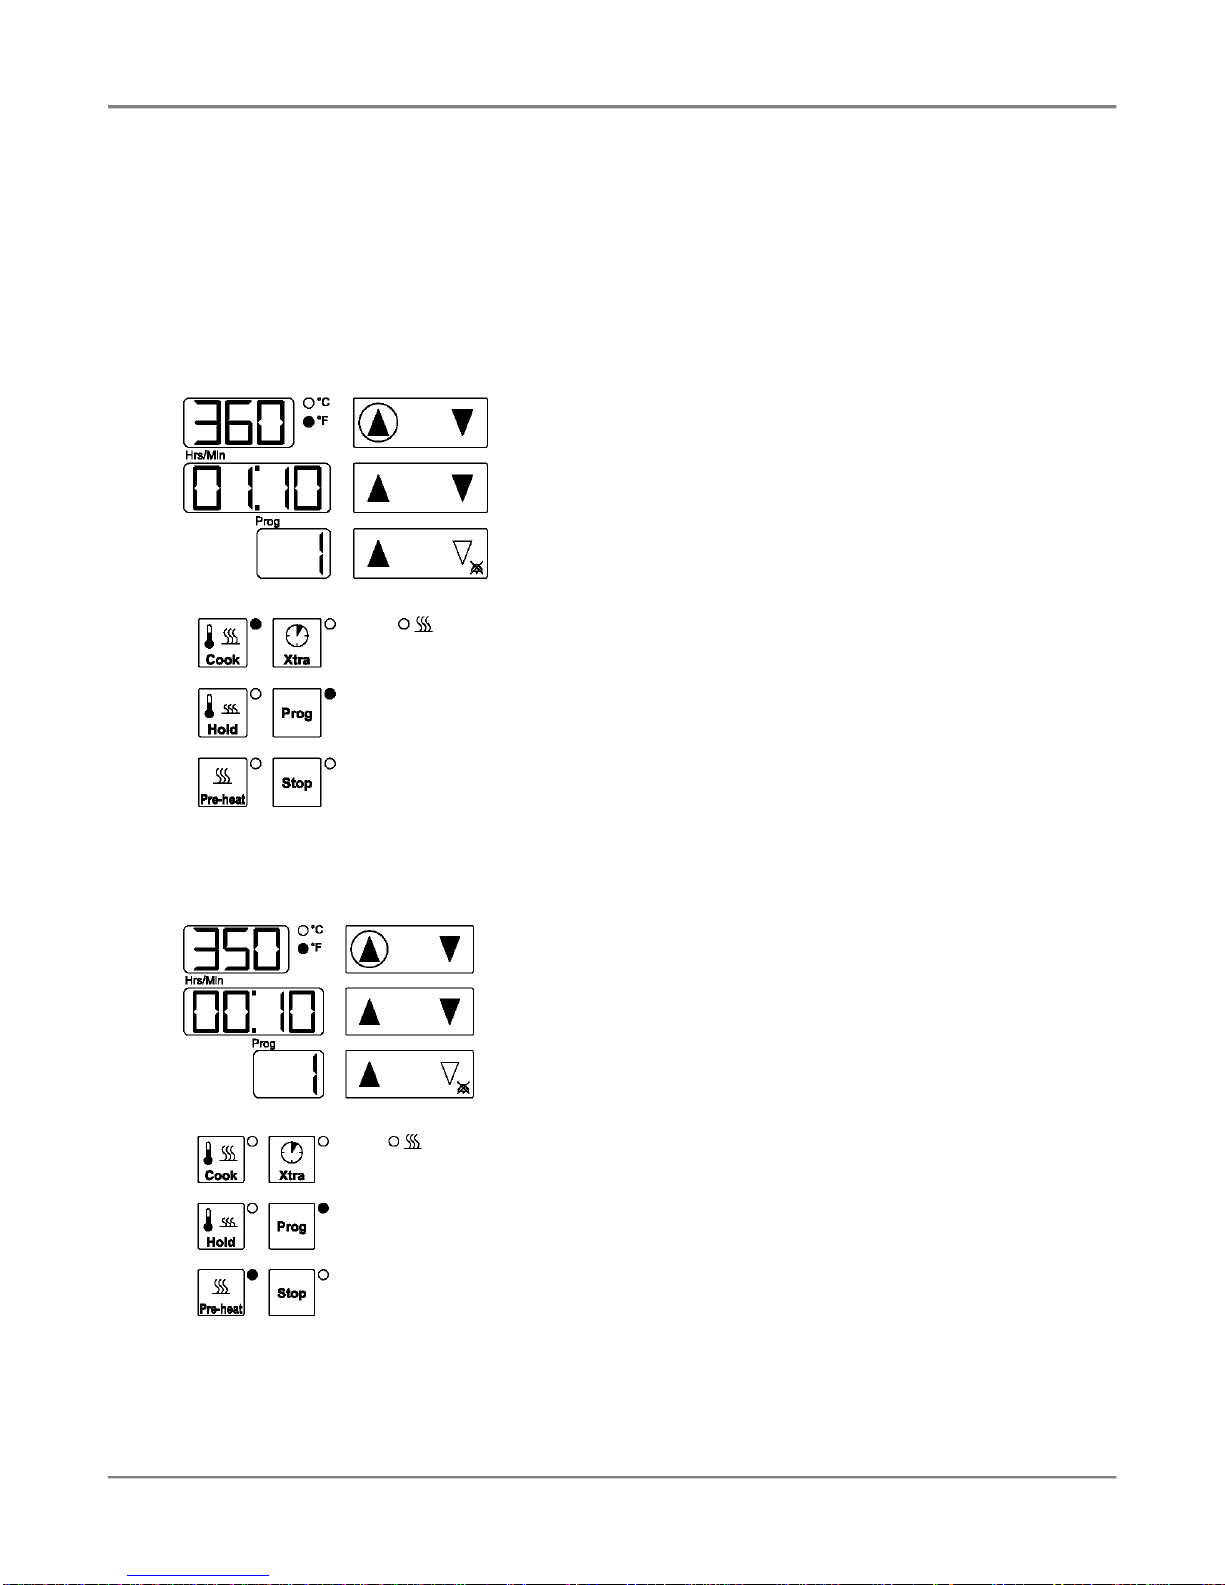
Setting a Two-Stage Program
1. Press and hold the PROG button. The lights next to the Prog and Cook buttons will illuminate. This
indicates that the controller is now in the programming mode.
2. Use the Navigation keys to scroll through the program numbers and to increase or decrease the Cook
times and temperatures for each program number. While in the programming mode, the display shows a
cook temperature, a cook time, and the program number. As long as the light by the Cook button is
illuminated, the information displayed is for Stage-2 as depicted in the example below. Use the Navigation
keys to change the settings if desired.
This example display shows the Stage 2 settings of
Program 1 set at 360° F with a 1 Hr. 10 Min. cook
time.
3. Press the Pre-heat button. The light by the Cook button disappears and the light by the Pre-heat button
appears. The new set of information displayed is for Stage-1, depicted in the example below. Use the
Navigation keys to change the settings if desired.
This example display shows the Stage 1 settings of
Program 1 set at 350° F with a 10 Min. cook time.
4. To exit the programming mode either press and hold the Prog button and wait for the word “OFF” to
appear in the time display, or when finished programming, wait 8 seconds (do not touch any key) and the
display will return to “OFF”.
Rotisserie Oven Operation
10
Setting a Single-Stage Program
To simplify the Cooking process, the Stage-1 Cook option may be by-passed.
1. Press and hold the PROG button. The lights next to the Prog and Cook buttons will illuminate. This
indicates that the controller is now in the programming mode.
2. Use the Navigation keys to scroll to the desired program number.
3. Press the Pre-heat button. The settings for Stage-1 appear in the display area. Set the Cook temperature
and Cook time to zero.
4. Press the Cook button. The settings for Stage-2 now appear in the display area. Set the desired Cook
temperature and Cook time for the Cook cycle.
Important Note: This procedure only effects the settings for Stage-1 in the program number displayed;
repeat the process as needed for the other program numbers.
5. To exit the programming mode either press and hold the Prog button and wait for the word “OFF” to
appear in the time display, or when finished programming, wait 8 seconds (do not touch any key) and the
display will return to “OFF”.
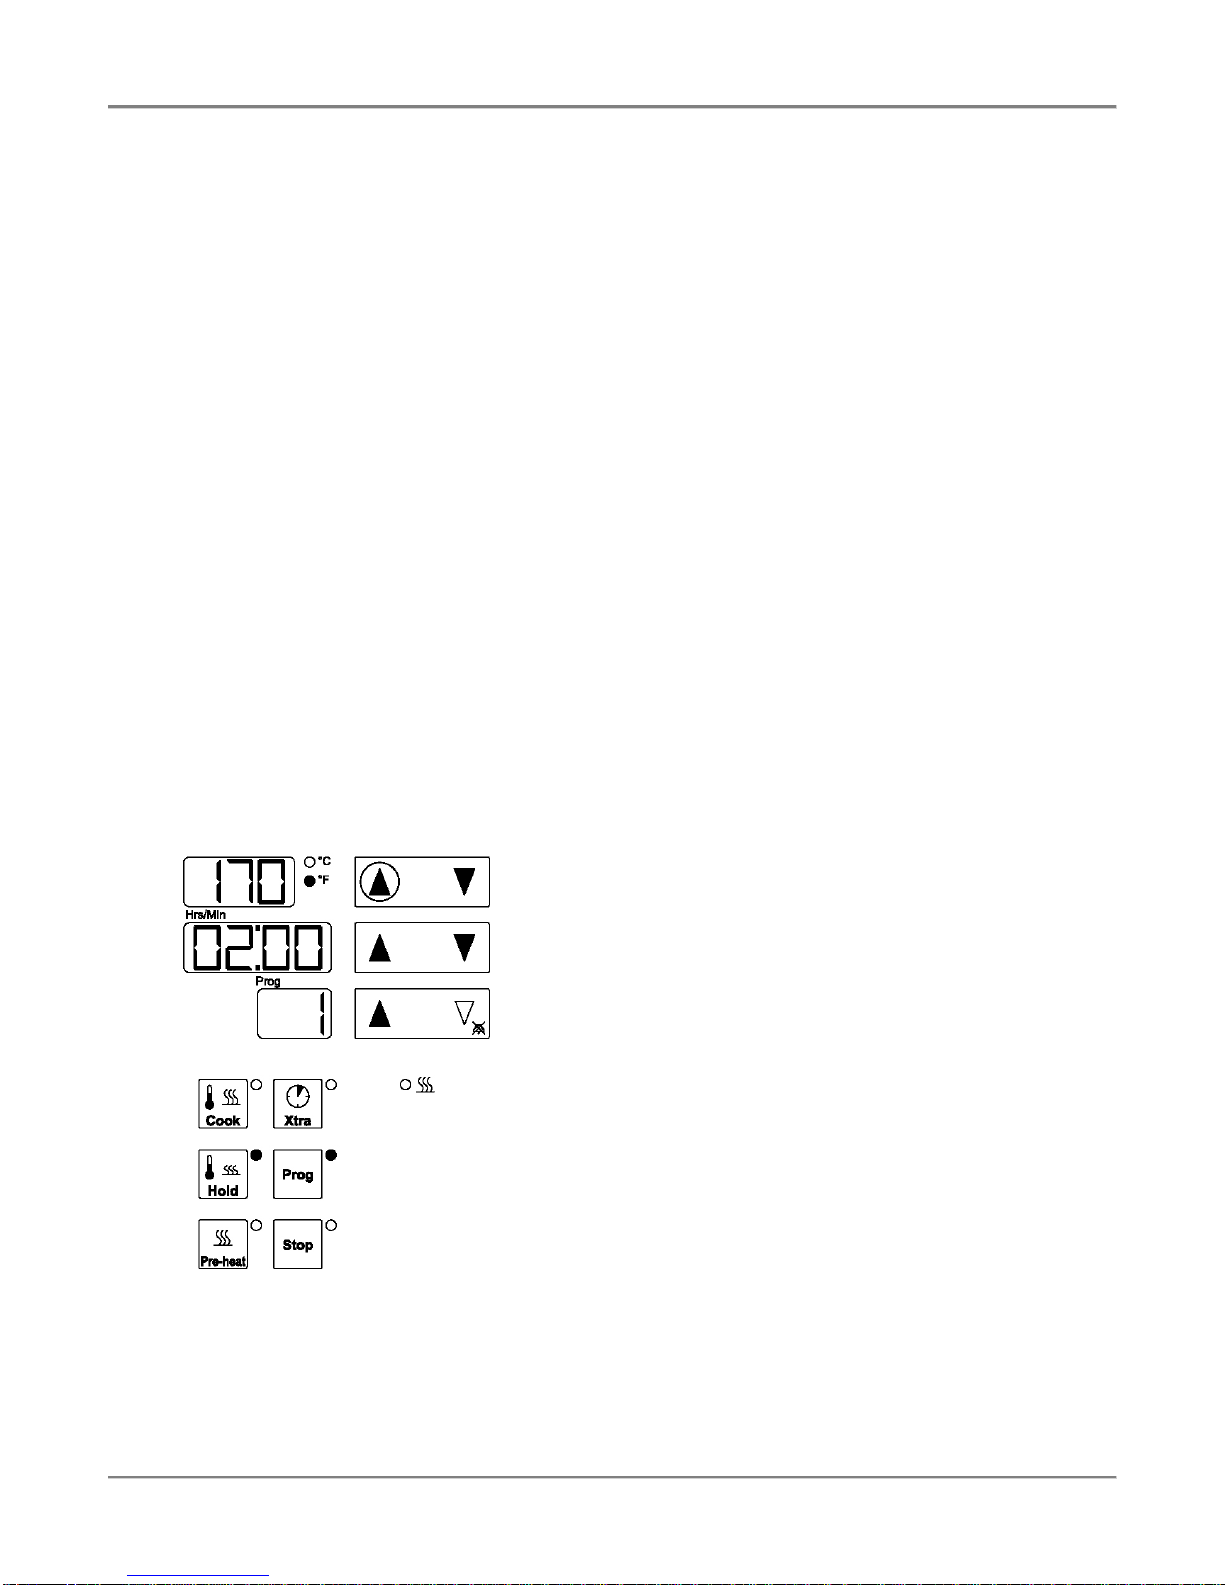
Setting a Hold Cycle
1. Press and hold the PROG button. The lights next to the Prog and Cook buttons will illuminate. This
indicates that the controller is now in the programming mode.
2. Use the Navigation keys to scroll to the desired program number.
3. Press the Hold button. A temperature and time will appear in the displays as depicted in the example
below.
This example display shows the Hold settings of
Program 1 set at 170° F with a 2 Hr. hold time.
4. Use the Navigation keys to change the settings if desired. The Hold cycle is intended for the program
number displayed only.
5. Remember to set the hold temperature 20° F (10° C) more than the desired internal temperature of the
product during a Hold cycle.
Note: A Hold time and temperature must be set if the Xtra button will be used.
Rotisserie Oven Operation
11
Saving the Program Settings
There are two ways to save the program settings. Press and hold the Prog button and wait for the word OFF to
appear in the time display, or when finished programming, wait 8 seconds (do not touch any key) and the display
will return to “OFF”. The new settings are automatically saved and, if there were no changes, the original program
is retained.
Selecting a Program
1. Press and hold the Prog button. The light next to the button will illuminate along with the light next to the
Cook button.
2. Release the button.
3. Use the Navigation keys next to the program number display and scroll up or down to locate the program
number desired. When scrolling through the programs, the Stage-2 settings for each program number will
be shown in the display area.
4. Once the desired program number is reached, release the Navigation key.
5. Wait 8 seconds or press and hold the Prog button. The controller will now use the newly selected
program number and its settings.
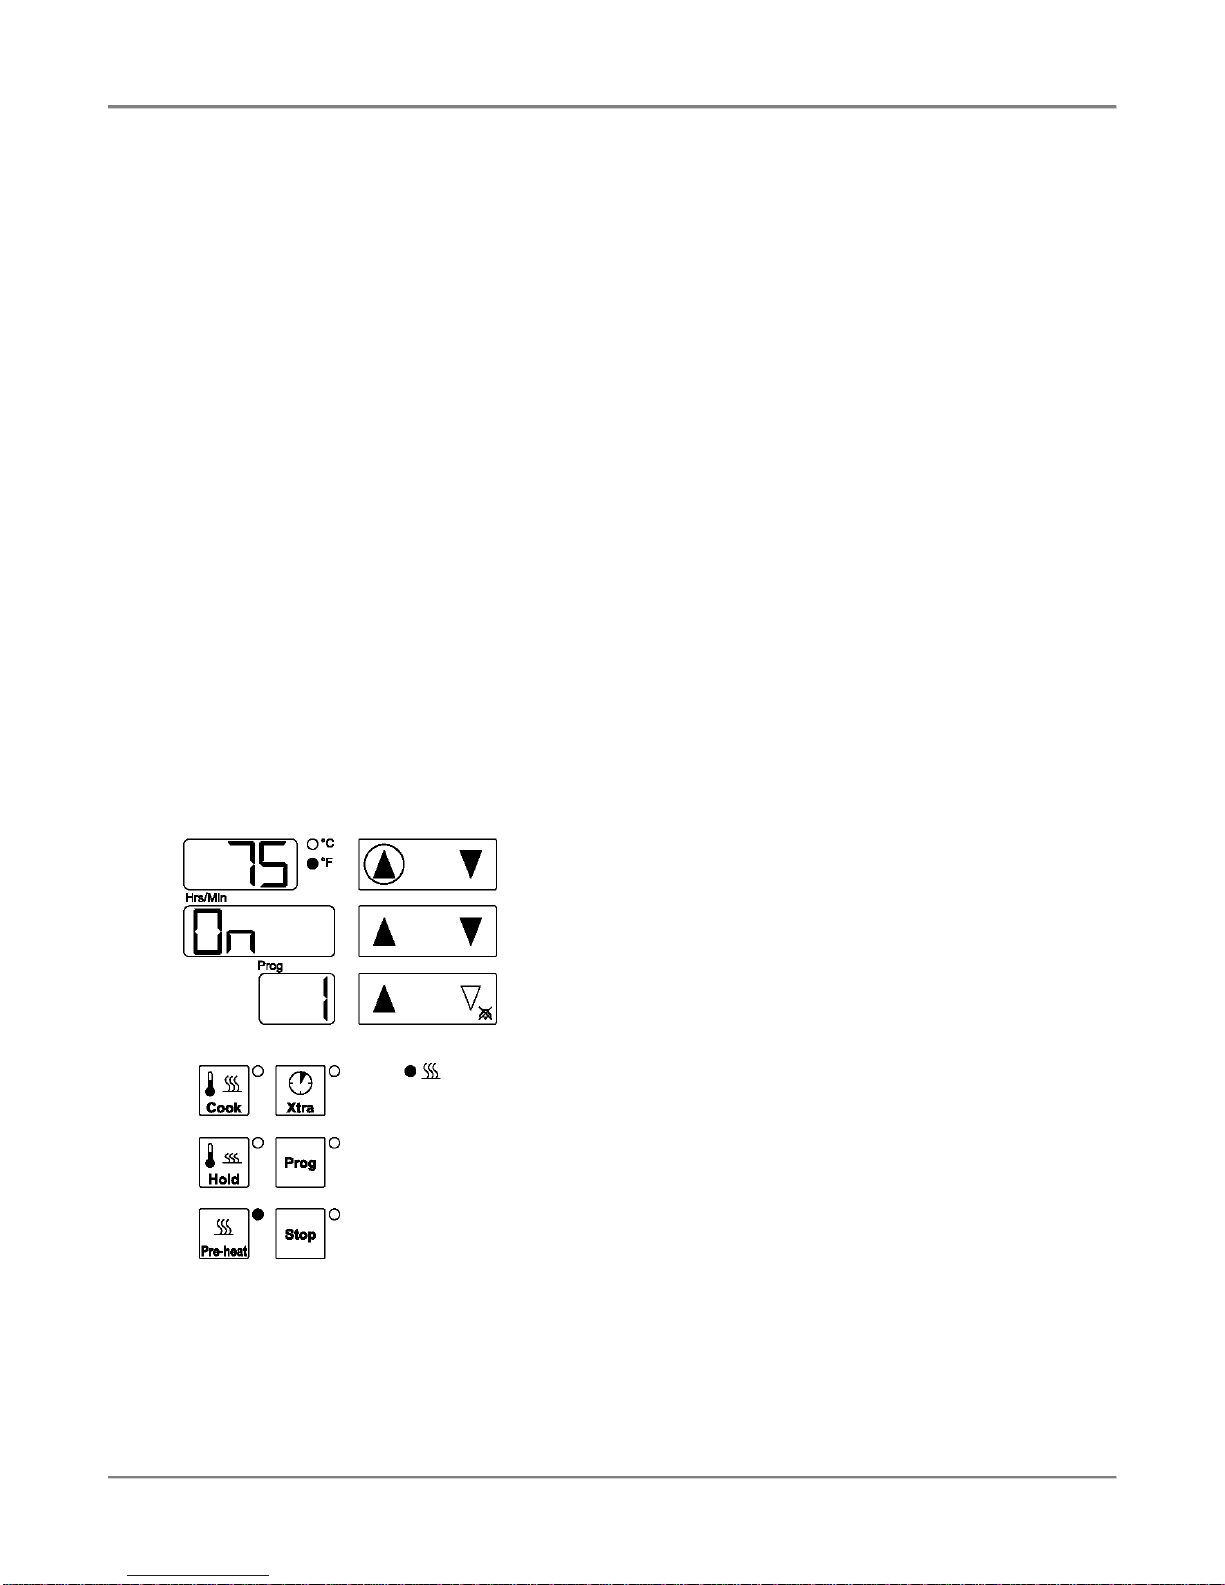
Pre-Heating the Oven
1. Select a program number as documented in this manual. Wait for the word “OFF” to appear in the display
area.
2. Press the Pre-heat button. The ‘heat-on’ light will illuminate and the cooking fans will come on. In the
display area, the temperature display will show real-time temperature changes in the oven and the time
display will show “On” as depicted in the example below.
This example display shows the Preheat cycle for
Program 1 with a starting oven temperature of 75° F

Rotisserie Oven Operation
12
3. Once the oven reaches the programmed temperature a buzzer will sound for 20 seconds. To turn off the
buzzer press the white down arrow. The controller will continue to maintain the programmed temperature
in the oven for up to 6 hours.
Remember that the Pre-heat function of the controller will satisfy Stage-1 first. For example, if Stage-1
has 85°F and Stage-2 has 350°F programmed, Pre-heat will bring the oven to 85°F and then sound the
alarm. If Stage-1 has a zero temperature/time programmed, the controller will bypass Stage-1 and begin
to heat the oven to what is programmed in Stage-2.
Avoid pressing the Stop button unless it is necessary. When the Stop button is pressed, the Preheat
function goes into ‘pause’ (the light next to the button will flash), the heating elements turn off, and the
cooking fans stop after 20 seconds. At this point the oven is not pre-heating. To restart the Pre-heat
function, simply press the Pre-heat button again.
Cooking
1. Place the rotor switch in the on position during pre-heat and cook functions. This prevents the rotor disks
(drums) from warping.
2. Select a program and Pre-heat the oven as documented in this manual.
3. When the buzzer sounds to indicate that the oven has reached the programmed temperature, press the
white down arrow to stop the buzzer and then press the Stop button. This will ‘pause’ the oven (heat is
off, fans turn off automatically after 20 seconds). Wait until the fans are off before opening the door to
load the oven.
4. Load the product into the machine.
5. Use the rotor switch on the front panel to operate the rotors during loading
NOTE: Do not forget to restart the rotor after loading as product under the air outlet will burn very quickly.
6. Close the Door.
7. Press the Cook button. The temperature display will show the programmed cook temperature. The
controller will automatically change between the Stage-1 and Stage-2 cook sections when the clock
reaches the proper time. The time display will show the total cook time (Stage-1 + Stage-2).
8. To see the actual temperature at the controller’s temperature probe, press and release the arrow with the
red circle around it; it will briefly show the actual temperature at the probe location in the oven and then
switch back to the programmed temperature.
9. At the end of the Cook cycle, the controller will automatically go into the Hold cycle (if programmed) and
begin counting up to the specified Hold time.
10. The product is now ready to be checked for internal temperature.
• ‘Pause’ the machine by pressing the Stop button and check the product. If more time is needed,
press the Xtra button. Each press of the Xtra button adds another 5 minutes to the previous Cook
cycle (up to 55 minutes).
• If the product is finished and ready for Hold, press the Hold button. This will continue the Hold
cycle that was started immediately following the end of the cook cycle.

Rotisserie Oven Operation
13
The example display shows the controller during a
Cook cycle: Program 1 set at 360° F with a cook time
of 1 hr., 10 min. The colon in the time display will
flash throughout the Cook cycle and the ‘heat on’
indicator will cycle with the heat.
Programming Examples
Example Program 1
This program will defeat Stage-1 cooking and only use the Stage-2 cooking and the Hold functions. Total cook
time is 1 hour, 10 minutes. Total Hold time is 2 hours.
Stage-1: temperature set to
“0°F”, time set to 0-hrs 00-mins. Stage-2: temperature set to
“360°F”, time set to 1-hr 10-mins. Hold: temperature set to
“170° F”, time set to 2-hrs.
Rotisserie Oven Operation
14
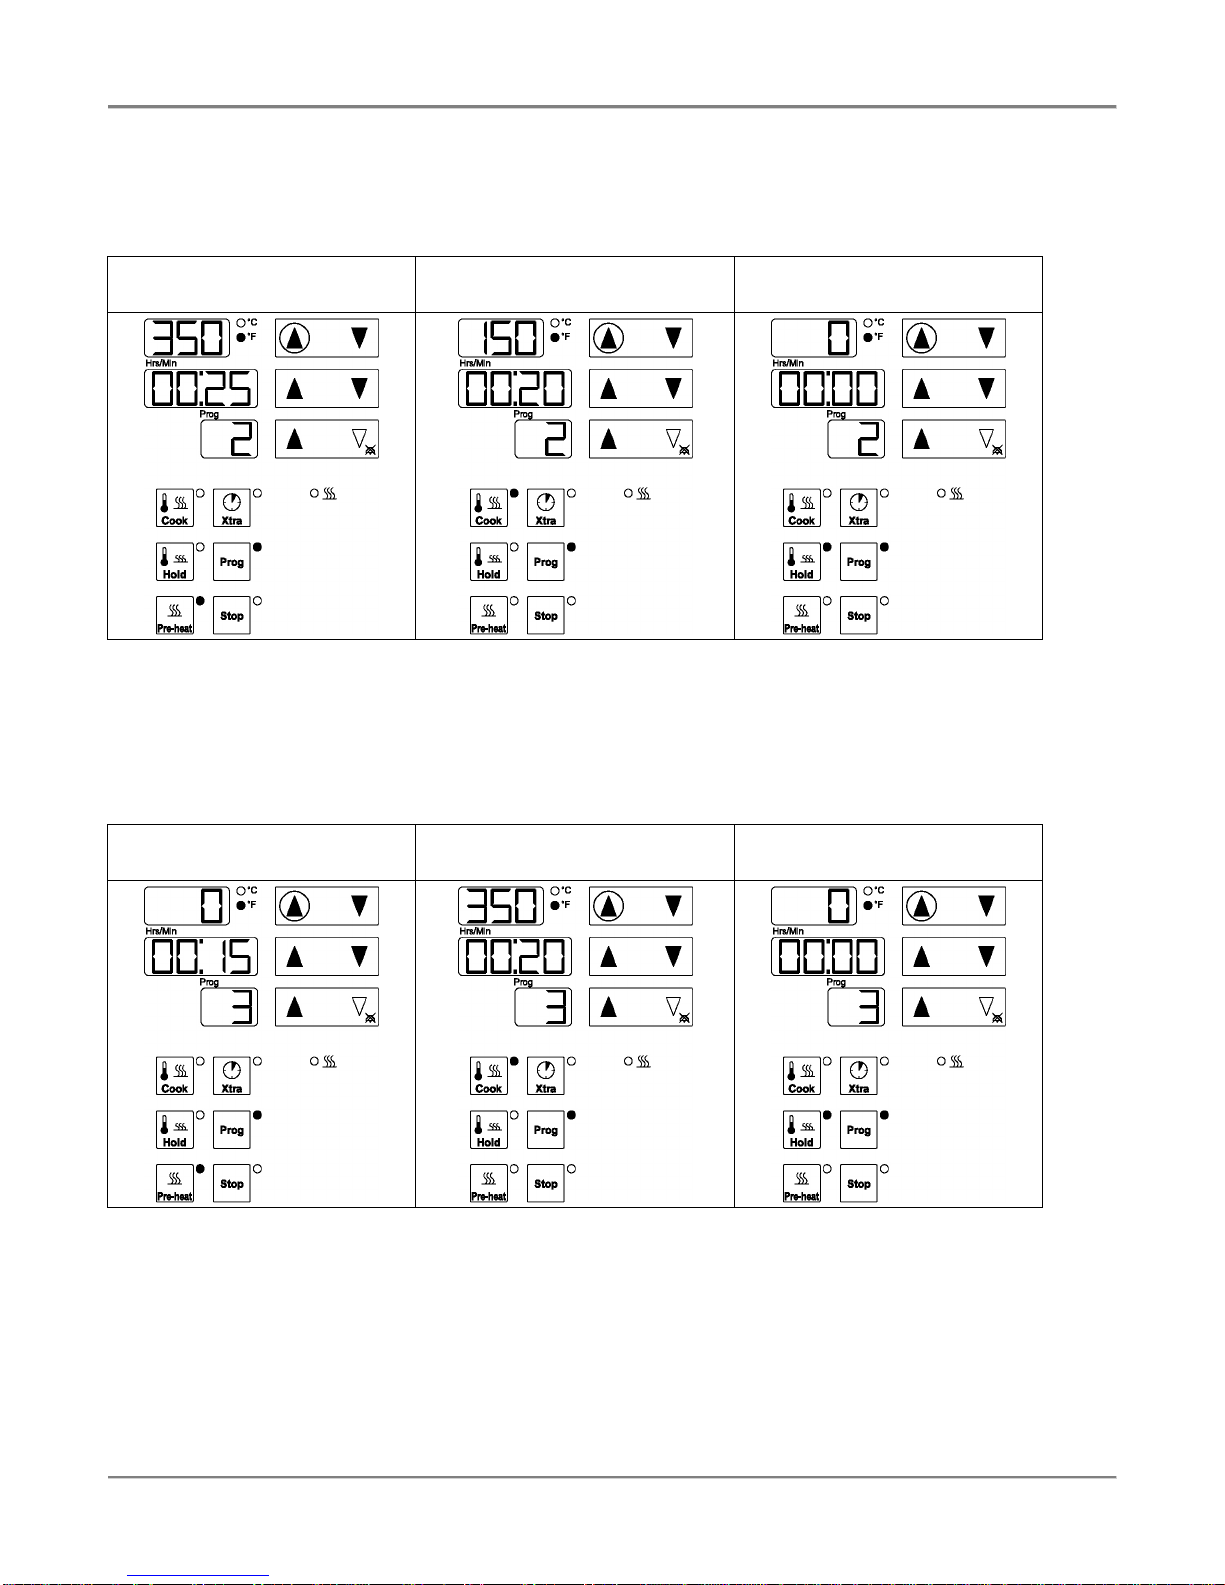
Example Program 2
This program cooks the product at 350°F for 25 minutes and then cooks at 150°F for 20 minutes. Total cook time
is 45 minutes. Since the Hold program is 0°F and 0 minutes, the Hold function is defeated and the Xtra button will
not work.
Stage-1: temperature set to
“350°F”, time set to 25-mins. Stage-2: temperature set to
“150°F”, time set to 20-mins. Hold: temperature set to “0°F”,
time set to 0-hr 0-mins.
Example Program 3
This is an example of a delayed start option. The program ‘Holds’ the product at room temperature for 15 minutes
and then Cooks at 350°F for 20 minutes. Total time is 35 minutes. Because Stage-1 has no temperature setting,
there is no need to pre-heat the oven. Since the Hold program is 0°F and 0 minutes, the hold function is defeated
and the Xtra button will not work. Reverse Stage-1 and 2 for an example of a ‘cool down’ option.
Stage-1: temperature set to
“0°F”, time set to 15-mins. Stage-2: temperature set to
“350°F”, time set to 20-mins. Hold: temperature set to “0°F”,
time set to 0-hr 0-mins.
Rotisserie Oven Operation
15
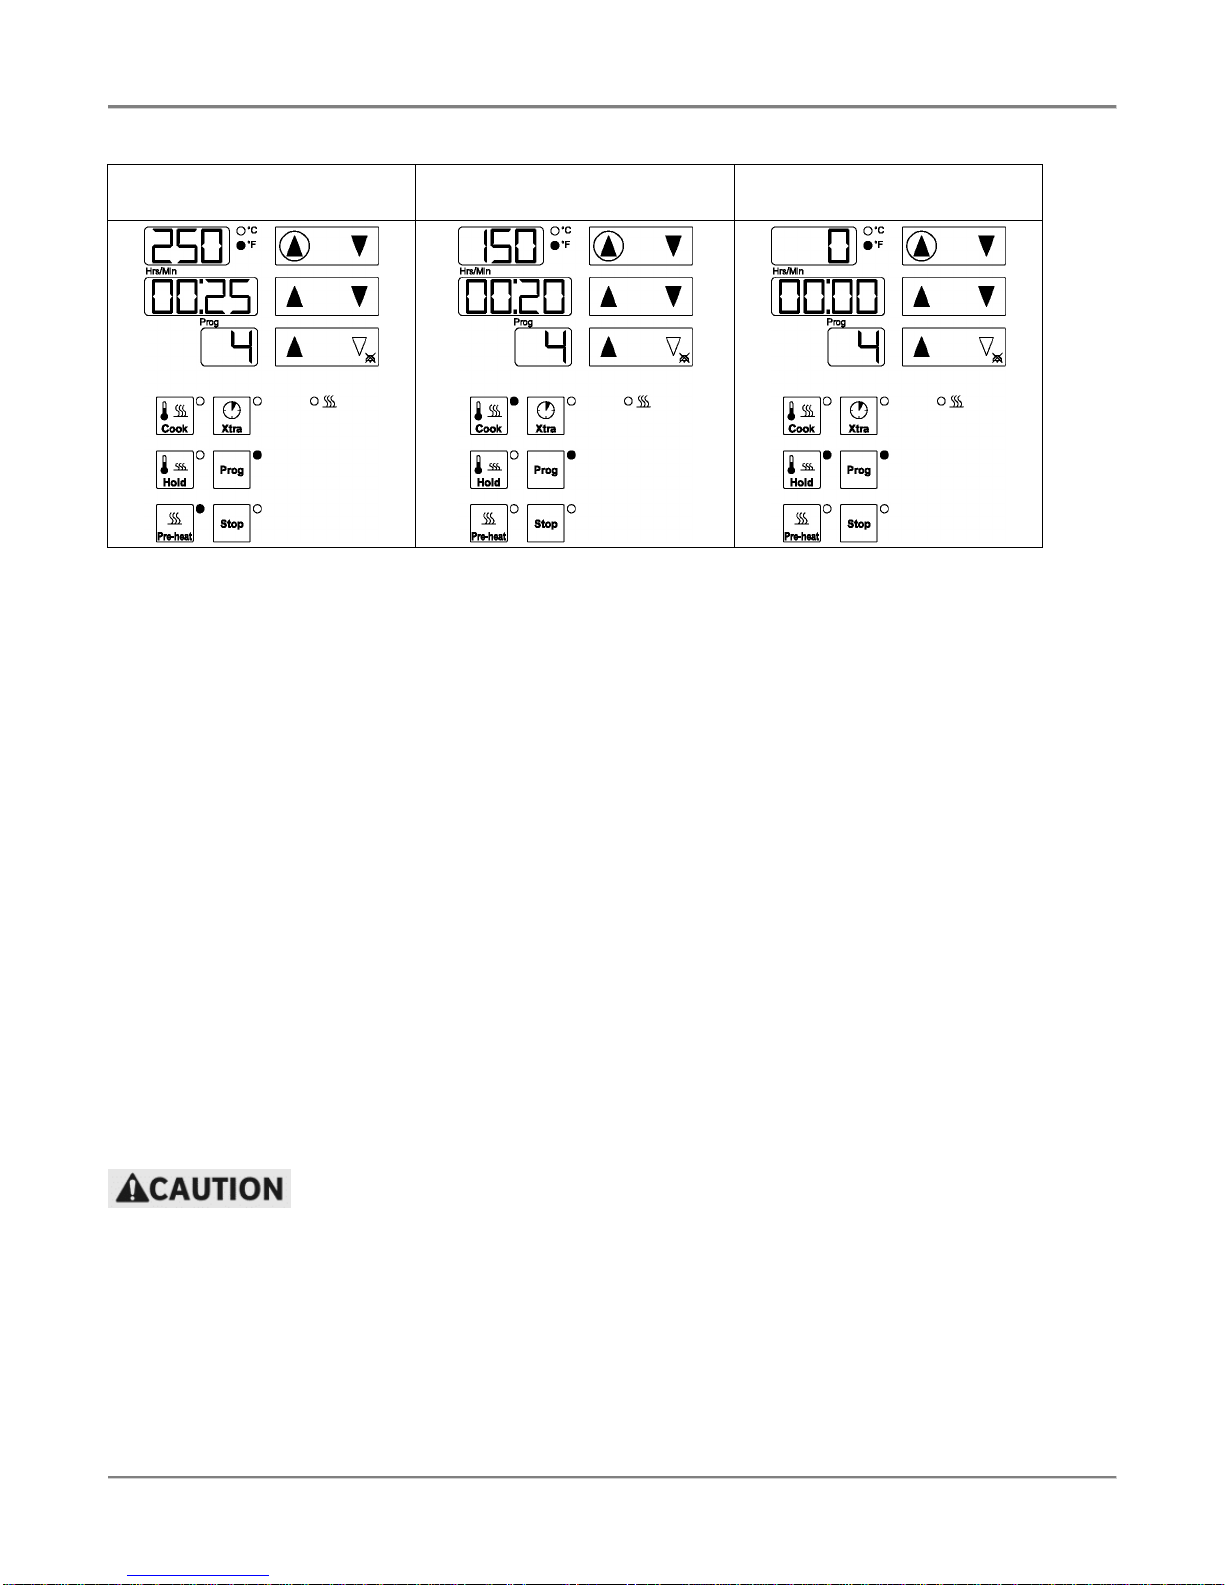
Example Program 4
Stage-1: temperature set to
“250°F”, time set to 25-mins. Stage-2: temperature set to
“150°F”, time set to 20-mins. Hold: temperature set to “0°F”,
time set to 0-hr 0-mins.
Locking the Controller
In some cases the Chefs, shift supervisors, or managers may want to pre-set the controller programs and then
lock the settings into place. Once locked, the operator may change the program number (as described earlier) but
cannot change Cook times and temperatures or Hold features within each program number.
1. Press and hold down (together) the up and down arrows next to the temperature display. After 5 seconds,
“P 1” will appear in the display. The operator now has access to the Parameter Programming Function of
the controller (PPF).
2. Use the up arrow next to the display to scroll to “P 19”.
3. At “P 19” press and hold the Cook button. The number “0” will appear in the display.
4. To lock the controller settings press the up arrow (next to the temperature display) while still holding down
the Cook button. The “0” will change to a “1”. Now the controller is locked. To unlock, use the down arrow
(next to the temperature display) and change the “1” to a “0”.
5. There are two ways to exit the PPF:
• After locking or unlocking the controller, release the buttons. Wait 30 seconds and the controller will
automatically exit the PPF, saving the changes.
• When finished, press and hold down (together) the up and down arrows (next to the temperature
display) for 5 seconds and the changes will be saved.
Changing other parameters may damage the unit and/or harm the operator.
All other parameters are factory set and should not be changed. If more information on parameter settings is
needed, contact an authorized BKI representative.

Rotisserie Oven Maintenance
16
Maintenance
Failure to comply with the maintenance below could result in a serious accident or
equipment damage.
Failure to remove power from this unit before performing maintenance may cause severe
electrical shock. This unit may have more than one disconnect switch.
Scheduled Maintenance
Use the following table to help manage scheduled maintenance activities.
Frequency Performed By Part Activity
Daily User Oven Clean the entire Oven.
Oven Cleaning
Cleaning is not only necessary for sanitary reasons, but will increase sales appeal and maximize operating
efficiency.
Failure to remove power from this unit may cause severe electrical shock. This unit may
have more than one disconnect switch.
Using abrasive cleaners may damage the cabinet finish. Use only a mild soap and water
solution.
DO NOT USE OVEN CLEANER on this machine. Caustic cleaners can cause damage to
the machine.
Never steam clean or get excess water in the interior of the cabinet as this can damage
unit.
Always wear appropriate personal protection equipment during the cleaning process to
guard against possible injury from hot cleaning solution.
1. Turn off all switches and controls.
2. Let the oven cool until it is warm, but not hot enough to burn you.
3. Pull grease drawer out of oven and empty it’s contents.
4. Clean grease drawer and tray area with hot soapy water.
5. Remove all food products from the unit. Remove V-spits, meat forks and hanging baskets from the unit
and place them in a large sink to soak in hot cleaning solution (BKI Cleaner).

Rotisserie Oven Maintenance
17
6. Remove the Rotor System as described below:
• Lift the washer from the groove and slide down the shaft.
• Slide collar down the shaft.
• Remove the inner shaft. NOTE: The welded bead in the center of shaft denotes the shaft removal
direction.
• Remove rotors.
7. Place the Rotor System components in a large sink to soak in hot cleaning solution. Clean the rotors with
warm water, a sponge and BKI Cleaner. Wipe dry with a clean cloth.
8. Remove the circulation bottom as described below:
• Remove the intake cover.
• Unscrew all 6 wingnuts. Allow the circulation bottom to drop down.
• Pull unit toward you until the pins are released.
9. Place the circulation bottom in a large sink and clean with hot soapy water.
10. Clean the top of oven. Carefully clean around fan blades and surrounding areas.
11. Clean the outside and inside of the rotisserie oven with warm water, a sponge and an approved cleaner
which is authorized for use on food surface areas.
12. Reassemble the oven.
Troubleshooting
Refer to the table below for troubleshooting information. Additional troubleshooting information can be found on
our website at http://www.bkideas.com/.
Problem Cause Possible Solution
Unit will not turn on. Power to unit is not on. Problem
with building power panel,
circuit breaker or fuse.
Check circuit breaker or fuses at building
power panel. If problem persists, contact
an authorized BKI service agent for
corrective action.
Blown fuse. Contact an authorized BKI service agent
for corrective action.
Hi-Limit is tripped. Contact an authorized BKI service agent
for corrective action.
Defective Hi-Limit switch. Contact an authorized BKI service agent
for corrective action.
Not rotating. Motor circuit breaker tripped. Contact an authorized BKI service agent
for corrective action.
Rotor switch not functioning. Defective switch. Contact an authorized BKI service agent
for corrective action.
Capacitor not functioning. Contact an authorized BKI service agent
for corrective action.

Rotisserie Oven Maintenance
18
Problem Cause Possible Solution
Oven does not heat at all. Improper parameter settings. Check parameter settings.
Improper program settings. Check program settings.
Hi-Limit is tripped. Contact an authorized BKI service agent
for corrective action.
Loose wire on heater circuit. Contact an authorized BKI service agent
for corrective action.
Defective relay. Contact an authorized BKI service agent
for corrective action.
Defective contactor. Contact an authorized BKI service agent
for corrective action.
Heating elements not
functioning. Contact an authorized BKI service agent
for corrective action.
Oven heats up slowly. Improper line voltage. Check incoming voltage. If problem
persists, contact an authorized BKI
service agent for corrective action.
Heating elements not
functioning. Contact an authorized BKI service agent
for corrective action.
Oven does not heat and
blower fan does not function. Circulation bottom is not
installed or microswitch is
defective or Hi-Limit is tripped.
Install the Circulation bottom if necessary.
For defective microswitch or HI-Limit trip
contact an authorized BKI service agent
for corrective action.
Control displays “F1”. Thermocouple connection is
loose or thermocouple
defective.
Contact an authorized BKI service agent
for corrective action.
Blower fan not functioning Defective motor. Contact an authorized BKI service agent
for corrective action.
Controller displays faulty
temperature readings above
400 degrees.
Defective controller, Defective
heating elements or Defective
thermocouple.
Contact an authorized BKI service agent
for corrective action.
Table of contents
Other BKI Oven manuals


 Rev. A Use and care guide")


