Black Diamond Equipment BDPM-60 User manual

INSTRUCTION MANUAL
BDPM-60
60 Qt. Planetary Mixer
This manual contains important information regarding your Black Diamond unit. Please read this
manual thoroughly prior to equipment set-up, operation and maintenance. Failure to comply
with regular maintenance guidelines outlined in this manual may void the warranty.

March 2019
WARNINGS
•
Do not immerse unit, cord or plug in liquid at any time
•
Unplug cord from outlet when not in use and before cleaning
•
Plug only into a 3-hole grounded electrical outlet of appropriate voltage
•
Do not operate unattended
•
Do not use this unit for anything other than intended use
•
Do not use outdoors
•
Always use on a firm, dry and level surface at least 12” from walls or any other obstruction
•
Do not use if unit has a damaged cord or plug, in the event the appliance malfunctions, or has been damaged in any
manner
•
Keep children and animals away from unit
•
Any incorrect installation, alterations, adjustments and/or improper maintenance can lead to property loss and
injury. All repairs should be done by authorized professionals only
•
Ensure that the designated power supply is adequate for continual usage
•
Do not hose down mixer
•
Do not operate with wet hands
•
Unplug from the electrical supply prior to any maintenance or repairs
TO INSTALL:
1. Remove unit from box and make sure all plastic, tape and packing materials are removed.
2. Place the unit on a flat, secure surface with at least 12” of open space around all sides.
3. Check to make sure the outlet of the correct voltage for this item (220V) is near. Do not use an extension cord, this
item must be plugged directly into an outlet.
STANDARD ACCESSORIES - This mixer comes with one of each of the following accessories:
When mixing always use the correct agitator for the job. To install agitator raise into the mixing axle and rotate
clockwise on the shaft until it locks into place. To remove an agitator, raise it on the shaft until it clears the lock and
rotate counterclockwise and lower. All of the accessories are fitted to the mixing bowl for precise use.
Flat Beater - Used for mixing dry ingredients and can work on all speeds. Do not run for more than 15 minutes.
Dough Hook - Used for mixing dough and can work in low and medium speeds only. Do not use on high speed. Do
not run for more than 20 minutes.
Wire Whip - Used for mixing liquids and soft ingredients and can work in all speeds. Do not run for more than
15 minutes.
NOTE: Always stop the machine first before changing speeds in order to avoid damage to the unit’s gears. Always
ensure that the bowl is fully lifted and the wire guard is closed when in use.
•
Slow speed is the middle setting (Dough hook setting with the knob facing forward)
•
Medium speed is the bottom setting (Flat beater setting with the knob facing down)
•
High speed is the top setting (Wire Whip setting with the knob facing up)
Flat Beater Dough Hook
Wire Whip
Mixing Bowl

March 2019
MIXER CAPACITY CHART
Product
Agitator
Speed
Max Bowl
Capacity (60 qt)
Bread and roll dough - 60% AR *•◊
Dough hook
1st only
80 lbs
Heavy bread dough - 55% AR *•◊
Dough hook
1st only
70 lbs
Pasta Basic Egg Noodle
Dough hook
40 lbs
Pizza dough, thin - 40% AR *X•◊□
Dough hook
1st only
40 lbs
Pizza dough, medium - 50% AR *•◊□
Dough hook
1st only
70 lbs (1st)/35lbs (2nd)
Pizza dough, thick - 60% AR *•◊
Dough hook
1st only
70 lbs
Raised donut dough - 65% AR *◊
Dough hook
1st and 2nd
60 lbs
Mashed potatoes
Flat beater
40 lbs
Waffle or Hotcake batter
Flat beater
24 qts
Egg whites
Wire whip
2 qts
Meringue (Qty. of water)
Wire whip
1
3/4
qts
Whipped cream
Wire whip
12 qts
Fondant Icing
Flat Beater
36 lbs
Cake
Flat beater
60 lbs
Pie Dough
Flat beater
50 lbs
* NOTE: The mixer capacity depends on the moisture content of the dough. When mixing doughs (pizza, bread, or bagels)
remember to check your AR%!
%AR (% Absorption Ration) = Water weight divided by flour weight. The capacities listed in the cart above are based on flour
at room temperature and 70˚F water temperature
XMaximum Mixing Time – 7 minutes
• If high gluten flour is used, reduce the batch size by 10%
◊If using chilled flour, water below 70˚F, or ice, reduce batch size by 10%
□ 2nd speed should never be used on 60% AR or lower with the exception of the BDPM-60. BDPM-60 requires a 50% reduction
in batch size to mix in speed 2 with 50% AR doughs.
Helpful measurements for calculating the correct size mixer for your application
8.3 lbs = 1 gallon of water - 2.08 lbs = 1 Quart
NOTES:
•
Do not use attachments on the #12 hub while mixing

March 2019
TO USE:
1. Plug the unit into an outlet of the appropriate voltage.
2. With unit turned off insert the mixing bowl into the holder in the down position and align on the pins. Once bowl is
securely aligned on pins, lock into place with the side clips.
3. Insert the desired agitator onto the mixing axle and turn to lock into place as directed on page 2.
4. Once the bowl and agitator are locked into place, add ingredients to the bowl and raise the bowl by pulling the bowl
lift handle towards you until it hits its full raised position.
5. Adjust your speed setting for the correct application by turning the knob to the correct position as described on
page 2.
6. Set the timer for the desired mixing time. The timer has two settings; turn the dial to the left for manual run or you
can turn the dial to the right to a desired set time for mixing. Once the timer goes off the machine will shut down.
The timer must be set to one of these settings or the machine will not operate.
7. With bowl in the fully raised position, the agitator locked into place and the correct speed setting selected, close the
wire guard over the bowl, set the timer and press the green power button to start mixing. The wire guard must be
closed fully for machine to operate.
8. Once mixing is completed, press the red stop button to stop the agitator.
9. Open the wire guard and lower the bowl to its lowest setting. If more mixing is needed repeat step 7.
NOTE: Always stop the machine before changing speeds.
Meat Grinder Attachment:
•
The Meat Grinder should only be used for purposes intended
•
Please remove bones, skins and any other foreign materials before grinding
•
Meats and other food should be defrosted and not used when frozen
•
For best results, cut the meat into smaller size pieces to fit easily through the feed tube
•
If not in use, please remove the meat grinder attachment from the unit
•
Do not run the grinder for longer periods of time then necessary
CLEANING - NOTE: To maintain cleanliness and increase service life, this item should be cleaned daily. Do not immerse the
unit in water or any other liquid, if liquid enters the electrical compartment it may cause a short circuit or electrical shock.
1. Before cleaning or attempting to move this item always turn off and unplug.
2. Wipe the entire unit with a clean soft cloth until it is completely dry.
3. To avoid damage to the unit, do not use abrasive cleaners or scouring pads.
4. If soap or chemical cleaners are used, be sure they are completely rinsed away with clean water immediately after
cleaning. Chemical residue could damage or corrode the surfaces of the unit.
5. After using of the machine, please remove the flat beater, dough hook, wire whip and meat grinder from the machine
and wash these parts thoroughly in hot, soapy water to prevent the growth of bacteria.
6. When clean and maintain the inside of the protective cover and swivel mount, please loosen the screw around the
protective cover and take off the protective cover. If there is no sign of oil leak, no need to take off the swivel mount.
Clean the swivel mount with a wet cloth, the protective cover can be cleaned by detergent and washed under the wa-
ter supply tap. After washing by clean water, use dry cloth to wipe out the water and make it dry.
To avoid serious injury or damage, never attempt to repair or replace a damaged power cord yourself. Contact a professional repair
service.
TO REMOVE GUIDE RAIL DUST GUARD PLATE FOR REGULAR CLEANING:
1. Rotate wheel to release bowl to the lowest position
2. Loosen screws on both sides of the guide rail dust guard plate
3. Remove the guide rail dust guard plate to clean, and ensure to clean inside the hole.
(Note: If screws are loosened manually, it is not necessary to remove the handwheel. If a power tool is used, the handwheel
must be removed first)
Net Weight: 661.5 lbs (300 KGS)
Dimensions: 30.5”x 26” x 52” (770 x 660 x 1315 mm)

March 2019
TROUBLESHOOTING
Problem
Possible Causes
Solution
The axles don’t work when
operating the machine
Electrical connection is not
good Check the plug in the outlet
Leaking oil
Oil gaskets are worn
out or damaged Replace the oil gasket(s)
Difficult to raise or lower the
bowl
Either the slideway is
corroded, or the lead screw,
bevel gear or hand wheel
shaft is dried out
Clean and oil the dried out
parts
Motor is overheating and
speed has decreased
The voltage is not enough,
incorrect speed is set or there
is too much food in the bowl
Check the voltage or adjust
the speed to a better setting.
If the bowl is overloaded,
remove some of the food to
lighten the load
Item is making too much
noise and overheating Poor lubrication Add or replace oil
Agitator touches bowl
Either the bowl or agitator
is deformed
Repair or replace deformed
part
Mixing bowl is out of position
Moving direction is not
correct Adjust position
March 2019
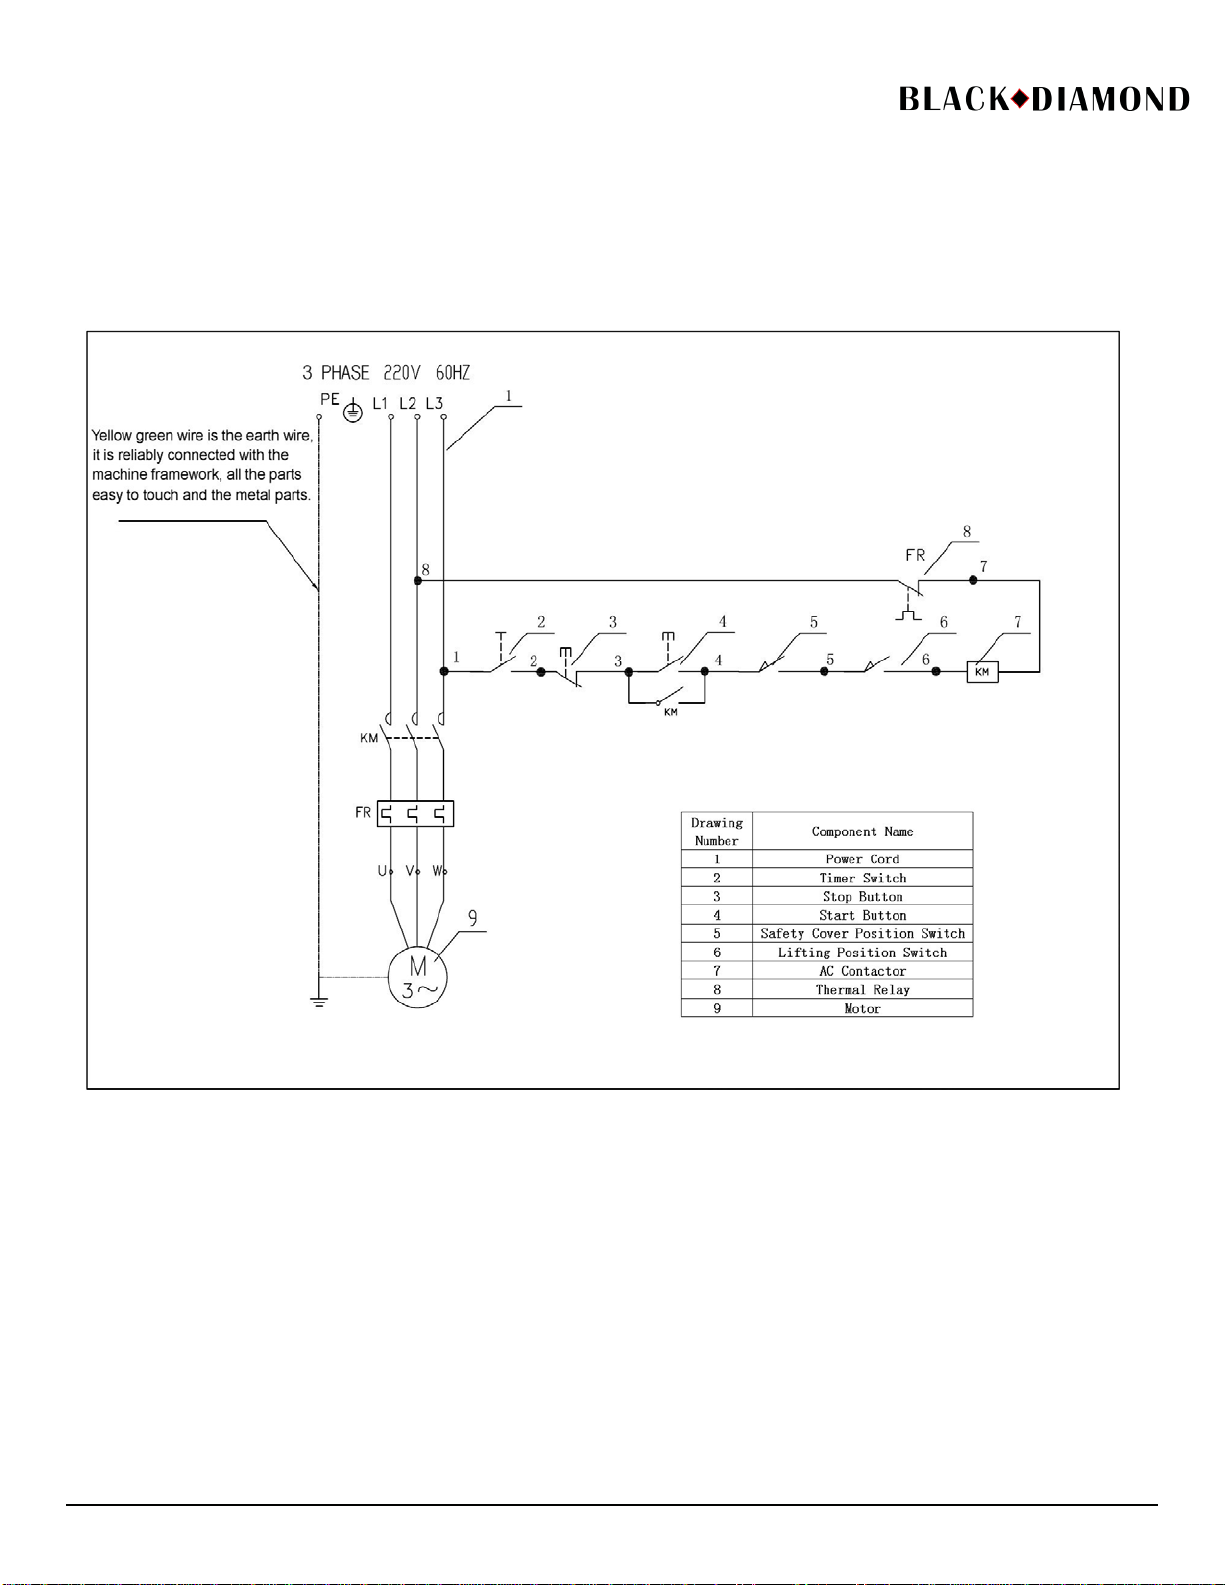
Wiring Diagram for the Planetary Mixer

March 2019
Parts Diagram and Replacement Parts for the Planetary Mixer

March 2019
Replacement Parts for the Planetary Mixer
Drawing
Number
Part Description
1
Timer
2 Start Button
3
Stop Button
4
Switch Panel
5 Convex Upper Cover
6
Large Flat Washer
7
Hex Bolt
8
Electrical Base Board
9
Cross Recessed Pan Head Screw
10 Hex Nut
11
Hex Nut
12
Spring Washer
13 Flat Washer
14
Electrical Base Board Fixed Rod
15
Thermal Relay
16 AC Contactor
17
Power Line Sheath
18
Power Line Sheath
19
Power Line Sheath
20 Synchronous Belt
21
Inner Hexagon Screw
22
Loose Rib
23
Hex Bolt
24
Motor Adjusting Base
25
Hex Bolt
26 Spring Washer
27
Motor Shaft Circlip
28
Motor Pulley
29
Flat Key
30
Hex Bolt
31
Spring Washer
32
Large Flat Washer
33 Motor
34
Casing
35
Data Plate
36
Hex Bolt
37
Power Line Sheath
38
Hex Bolt
39
Rear Cover Plate
40
Hex Bolt
41
Spring Washer
42
Bevel Gear Circlip
43 Lifting Bevel Gear
44
Rolling Bearing
45
Flat Key
46 Lifting Screw Arbor
47
Hex Bolt
48
Spring Washer
49
Bevel Gear Circlip
50 Lifting Bevel Gear
Drawing
Number
Part Description
51
Flat Key
52 Handwheel Shaft
53
Flat Key
54
Handwheel Shaft Fixing Base
55 Spring Washer
56
Inner Hexagon Screw
57
Elevating Handwheel
58
Shaft Circlip
59
Cross Recessed Countersunk Head Screw
60 Support Pillar
61
Base
62
Podotheca
63
Hex Bolt
64
Guide Rail Dust Guard Plate
65
Annular Gear
66 Inner Hexagon Screw
67
Front Cover
68
Inner Hexagon Screw
69
Locking Screw
70 Bevel Gear Base
71
O Ring
72
Oil Seal
73
Needle Roller Bearing Without Inner Ring
74
Plane Bearing
75
Passive Bevel Gear
76 Bearing Base Oil Hole Cover
77
Inner Hexagon Screw
78
Spring Washer
79
Loose Rib
80 Bearing Base
81
Handle Sleeve
82
Variable Speed Handle
83 Variable Speed Handle Base
84
Variable Speed Mandrel
85
Elastic Cylindrical Pin
86
Hex Bolt
87
Variable Speed Base
88
O Ring
89
O Ring
90 Position Limit Spring
91
Steel Ball
92
Eccentric Bushing
93 Shifting Fork Guide Rod
94
Shifting Fork Nut
95
Shifting Fork Spring
96 Shifting Fork Top Latch
97
Shifting Fork
98
Double-screw Bolt
99
Hex Nut
100
Protective Shield Position Switch Base

March 2019
Replacement Parts for the Planetary Mixer
Drawing
Number
Part Description
101
Position Switch
102 Cross Recessed Pan Head Screw
103
Hex Nut
104
Splitpin
105
Contact Terminal
106 Carrier Rod Base
107
Carrier Rod Spring
108
Carrier Rod
109 Hex Thin Nut
110
Spring Washer
111
Loose Rib
112
Passive Belt Wheel
113
Circlip For Hole
114
Rolling Bearing
115
Rolling Bearing
116 Input Shaft
117
Flat Key
118
Rolling Bearing
119 Bridge Shaft Dust Proof Cover
120 Hex Thin Nut
121
Small Flat Washer
122
Circlip For Hole
123
Rolling Bearing
124 Bridge Shaft
125 Flat Key
126 Flat Key
127
Bridge Shaft Big Gear
128 Bridge Shaft Sleeve
129 Bridge Shaft Small Gear
130
Shaft Circlip
131
Rolling Bearing
132 Hex Thin Nut
133
Loose Rib
134
Circlip For Hole
135 Rolling Bearing
136
Ratchet Upper Cover
137
External Star Wheel
138
Roller
139
Roller Spring
140
Clutch Inner Ring
141
Driving Bevel Gear
142 Upper Coupling Gear
143
Output Shaft Gear Sleeve
144
Clutch
145 Output Shaft
146
Flat Key
147
Flat Key
148
Flat Key
149
Flat Key
150
Output Shaft Gear Sleeve
Drawing
Number
Part Description
151
Lower Coupling Gear
152 Upper Sleeve For Bearing
153
Rolling Bearing
154
Circlip For Hole
155
Lower Sleeve For Bearing
156 Oil Seal
157
Shaft Circlip
158
Planetary Gear
159 Rolling Bearing
160
Swivel Mount
161
Flat Washer
162
Spring Washer
163
Hex Nut
164
Rolling Bearing
165
Oil Seal
166 Flat Key
167
Planetary Shaft
168
Taper Pin
169
Position Limiting Seat
170 Cross Recessed Pan Head Screw
171
Position Limiting Spring
172
Position Limiting Pin
173
Movable Cover Base
174
Position Limiting Spring
175
Position Limiting Pin
176
Position Limiting Pin Guard
177
Cross Recessed Countersunk Head Screw
178
Movable Shield
179
Fixed Shield
180
Hex Bolt
181
Bowl
182 Bowl Trolley
183
Hex Nut
184
Bowl Tight Pressing Shaft
185 Handle Core Shaft
186
Bowl Tight Pressing Handle
187
Pin Shaft Washer
188
Decorative Sheath Bushing
189
Core Shaft Spring
190
Hex Thin Nut
191
Hex Thin Nut
192 Decorative Sheath
193
Bowl Locating Pin
194
Pin Shaft Washer
195 Spring Washer
196
Cap Nut
197
Handle Lever
198
Bowl Base
199
Hex Bolt
200
Hex Bolt

March 2019
Replacement Parts for the Planetary Mixer
Drawing
Number
Part Description
201
Position Switch
202
Shaft Circlip
203 Lifting Nut
204
Elastic Cylindrical Pin
205
Pressplate
206 Flat Washer
207
Spring Washer
208
Hex Bolt
209
Beater
210 Hook
211
Whip

ACE Equipment One Year Limited Warranty
ACE warrants its equipment against defects in materials and workmanship, subject to the following conditions:
ACE Equipment is warranted for one year, effective from the date of purchase by the original owner. A copy of the
original receipt or other proof of purchase is required to obtain warranty coverage. This warranty applies to the original
owner only, and is notassignable.
Should any product fail to function in its intended manner under normal use within the limits defined in this warranty, at
ACE’s discretion, such product will be repaired, replaced with a refurbished unit, or replaced with a new unit by ACE,
after defective unit has been inspected and defect has been confirmed. ACE does not assume any liability for extended
delays in replacing any item beyond its control. This warranty does not apply to rubber and non-metallic synthetic parts
that may need to be replaced due to normal usage, wear or lack of preventativemaintenance.
This warranty covers products shipped into the 48 contiguous United States. Warranty coverage on products used outside
the 48 contiguous United States, Hawaii, Alaska, Puerto Rico, and Canada, cover parts only.
The following conditions are not covered by warranty:
•
Equipment failure relating to improper installation, improper utility connection or supply and problems due to
improper ventilation.
•
Equipment that has not properly been maintained, damage from improper cleaning, and water damage to
controls.
•
Equipment that has not been used in an appropriate manner, or has been subject to misuse, neglect, abuse,
accident, alteration, negligence, damage during transit, delivery or installation, fire, flood, riot, or act of God.
•
Equipment that has the model number or serial number removed or altered.
•
Equipment on which the security seal has been broken.
If the equipment has been changed, altered, modified, or repaired without express written permission from ACE, then the
manufacturer shall not be liable for any damages to any person or to any property, which may result from the use of this
equipment thereafter.
This equipment is intended for commercial use only and this warranty is void if equipment is used in other than a
commercial application.
For warranty and non-warranty related issues, technical support, please contact NSA at 1-877-672-7740. To purchase
replacement parts and warranty registration visit www.admiralcraft.com. Please have your model number, serial number
and proof of purchase ready. It is not necessary to contact the place where you originally purchased your product from.
“THE FOREGOING WARRANTY IS IN LIEU OF ANY AND ALL WARRANTIES EXPRESSED OR IMPLIED
INCLUDING ANY IMPLIED WARRANTY OF MERCHANTABILTY OR FITNESS FOR PARTICULAR
PURPOSES AND CONSTITUTES THE ENTIRE LIABILITY OF ACE. IN NO EVENT DOES THE LIMITED
WARRANTY EXTEND BEYOND THE TERMS STATED HEREIN.”
WARRANTY
REGISTRATION National Service America • 230 Park Ave, 3rd Floor WEST • New York, NY • 10169
CARD
MAIL CARD
IMMEDIATELY
(Name of Business) (Dealer Purchased From)
(Address) (City) (State) (Zip Code)
(Model Number) (Serial Number)
This card must be
mailed immediately
after installation date
This is to inform that I, (Please print name of individual who owns business)
have had the above installed in my place of business (Date of Purchase)
for warranty to be in
effect. (Contact Phone Number) (Contact E-mail) (Signature of Individual Who Owns Business)
The above warranties are in effect from this installation date, or 90 days, whichever comes first.
Table of contents
Other Black Diamond Equipment Mixer manuals


