Blackhole Eventide User manual


Copyright 2017, Eventide Inc.
P/N: 141256, Rev 5
Eventide is a registered trademark of Eventide Inc.
AAX and Pro Tools are trademarks of Avid Technology. Names and logos are used with permission.
Audio Units is a trademark of Apple, Inc.
VST is a trademark of Steinberg Media Technologies GmbH.
All other trademarks contained herein are the property of their respective owners.
Eventide Inc.
One Alsan Way
Little Ferry, NJ 07643
201-641-1200
www.eventide.com
I

Contents
1 Introduction 1
1.1 AboutThisProduct ....................................... 1
1.2 AboutThisManual ....................................... 1
2 Registration, Activation, and Installation 2
2.1 RegisteringYourPlug-in..................................... 2
2.2 ActivatingYourLicense ..................................... 2
2.3 InstallingYourPlug-In...................................... 3
2.4 Moving or Removing an Activation . . . . . . . . . . . . . . . . . . . . . . . . . . . . . . . 3
2.5 NavigatingthePlug-In...................................... 3
2.6 UsingtheRibbon......................................... 3
2.7 UsingtheHotswitch ....................................... 3
3 Blackhole 5
3.1 LevelsandMonitoring...................................... 6
3.1.1 In ............................................. 6
3.1.2 Out ............................................ 6
3.1.3 Meters........................................... 6
3.1.4 Overload ......................................... 6
3.2 BlackholeParameters ...................................... 6
3.2.1 Mix ............................................ 6
3.2.2 Gravity .......................................... 6
3.2.3 Size ............................................ 6
3.2.4 Predelay.......................................... 6
3.2.5 Low ............................................ 6
3.2.6 High............................................ 7
3.2.7 Tempo........................................... 7
3.2.8 ModDepth ........................................ 7
3.2.9 ModRate......................................... 7
3.2.10 Feedback ......................................... 7
3.2.11 Resonance......................................... 7
3.3 PerformanceControls ...................................... 7
3.3.1 Kill ............................................ 7
3.3.2 Freeze........................................... 7
3.3.3 Ribbon .......................................... 7
3.3.4 Hotswitch......................................... 8
3.4 Saving and Recalling Plug-In settings . . . . . . . . . . . . . . . . . . . . . . . . . . . . . 8
3.4.1 MixLock ......................................... 8
4 Conclusion 9
II

Chapter 1
Introduction
1.1 About This Product
Thank you for your purchase of the Eventide Blackhole plug-in. Eventide Blackhole is a classic Eventide
reverb effect capable of producing huge spaces and out-of-this-world soundscapes. For over 40 years,
innovative effects like these have made Eventide an industry leader, and we are proud that they continue
to be in demand today.
This package includes a plug-in version of the Eventide Blackhole reverb algorithm in Avid AAX, Apple
Audio Unit, and Steinberg VST formats.
We’ll get into more depth on the product soon but, before you forget, please take a few minutes to register
online. This helps us keep you informed of any important software updates, and any special offers that
may only be available to registered users.
1.2 About This Manual
While we’re very confident you’ll be able to use your new plug-in without reading this manual, we urge
you to have a quick look. There are several unique features and interesting options presented in Blackhole
and a cursory glance will illuminate any features you may overlook. We’ll try to keep it all relevant and
highlight any tips or cool tricks for you. We also won’t cover much at all about the operation of your
plug-in host or the Macintosh or Windows environments, as their owner’s manuals or online help should
provide you with the answers you need. We’ve made every attempt to integrate the standard controls
and features from the major plug-in hosts into our Blackhole plug-in so that you don’t have to learn
anything new.
If you find the need to get more information from us than this manual can provide, please visit our
support forum available via our website (http://www.eventideaudio.com).
1

Chapter 2
Registration, Activation, and
Installation
Eventide uses PACE’s ilok.com licensing system, with or without and iLok hardware dongle, to license
our plug-in products. Each license provides two activations which can reside on either your computer or
on an iLok license dongle. Once you’ve purchased your plug-in, you’ll need to register it on Eventide’s
website, activate your license, and install the plug-in on to your computer.
2.1 Registering Your Plug-in
When you purchase an Eventide Native plug-in, you’ll receive a Serial Number and License Key. The
Serial Number will be two letters followed by 6 numbers. If you have an individual Blackhole license, the
Serial Number will start with BH (i.e. BH-######). The License Key will be 3 sets of 4 characters,
a letter or a number, each; like XXXX-XXXX-XXXX.
Once you’ve received these codes, you can register your plug-in on the Eventide website. To do so, please
log in to http://www.eventideaudio.com, navigate to My Account in the top right corner, and select
Register a New Product. Then, fill out the form by selecting Native Plug-in (VST, AU, AAX) in the
Product Category field, select Blackhole in the Product list, and enter your Serial Number, License Key,
and iLok.com account name. If you don’t yet have an ilok.com account, you can create one for free at
http://www.ilok.com. Once you’ve done so, press Register.
Once you’ve entered this information and pressed the Register button, Eventide will send the applicable
plug-in license to your ilok.com account, which you will need to activate to your computer or iLok
dongle.
2.2 Activating Your License
To activate and manage your plug-in licenses you’ll need to install PACE’s iLok License Manager software
which you can download from http://www.ilok.com. If you don’t have this software installed, please
download and install it now.
Once you have installed and launched iLok License Manager you should be able to log in to your account
by clicking the large Sign In button in the upper left hand corner of the application. Once you have,
you should be able to see available licenses by choosing the Available tab at the top of the iLok License
Manager application. If you have successfully registered your plugin, your Blackhole Native license will
be available in this list. Please activate this license by dragging it to either your computer or iLok dongle
listed on the left. When you do so, you will be asked to confirm the activation, and you will be able to
see it by clicking on the location you have chosen. At this point your license is activated.
2

2.3 Installing Your Plug-In
You should have been given a link to the Eventide Native plug-in installer when you purchased your plug-
in, but if you haven’t, you can find downloads for all of Eventide’s Native Plug-Ins at http://https:
//www.eventideaudio.com/products/plugins. Please download and launch the correct installer for
your system.
Once you’ve launched the plug-in installer, it will take you through several pages of options. We have
tried to choose defaults for these options which will best serve the majority of users, but it is worth a
minute to make sure you understand these options before clicking through to the next page. Once you
have followed through the installer, your plug-ins and presets should be in your chosen locations, and
you can hit finish to end the installer application.
At this point, you should be ready to use your Blackhole Plug-In.
2.4 Moving or Removing an Activation
If at any point, you decide to move your plug-in activation, you can do so in iLok license manager. To
move an activation between an iLok dongle and your computer, simply plug in the iLok, locate the license
in its current location, and drag it to its new location. To deactivate a license, find it in its location,
right click on it, and choose deactivate.
Remember that each Eventide Native Plug-In License comes with two activations, which can be used on
either a computer or iLok dongle, meaning you can use Blackhole in two locations at the same time.
2.5 Navigating the Plug-In
The Blackhole user interface is designed with an emphasis on user control and playability. Specifically,
the large knobs are easily adjusted with an up-and-down motion of the mouse, and all controls produce
a smooth change in the audio, allowing you to glitchlessly shape the effect as you desire. Furthermore,
the Ribbon allows you to program two settings for any combination of the controls and seamlessly morph
to any sound between them. Finally, a programmable Hotswitch allows you to instantly jump to an
alternate sound at the push of a button. This combination of controls is intended to bring you as close
to the experience of manipulating real hardware as is possible in a virtual environment.
2.6 Using the Ribbon
To program the settings for the Ribbon, click on the blue dot at the tip of any knob and drag it to the
desired setting for the left hand side of the Ribbon. This will program the knob and draw a blue arc
from the initial position knob position to the new, programmed knob position. Now to adjust the knob
position for the right side of the Ribbon, click on the blue dot at the opposite side of the arc and adjust it
to the desired position for the right side of the Ribbon. If you wish to adjust the Ribbon programming for
any knob, simply grab the blue dots at either end of the mark and adjust them to the desired position. To
clear the Ribbon programming for any knob, simply click on the blue dot at either end of its arc.
Alternatively, the Ribbon can be programmed by pressing the button on the left side of the Ribbon and
moving the desired knobs to their Ribbon left positions. Then, press the button on the right side of
the Ribbon and move the programmed knobs to their desired positions for the right hand side of the
Ribbon. Now you will be able to morph between these two settings by clicking anywhere on the Ribbon
and moving the electric arc back and forth. Please refer to the Blackhole Presets for examples.
2.7 Using the Hotswitch
To program settings for the Hotswitch, click and hold the Hotswitch until the light ring around it begins
to flash. While the light ring is flashing, set the controls to any setting you desire. When you are
3

done, press the Hotswitch button again to return to the control to the default value. Now, pressing the
Hotswitch toggles between the default and programmed values.
4
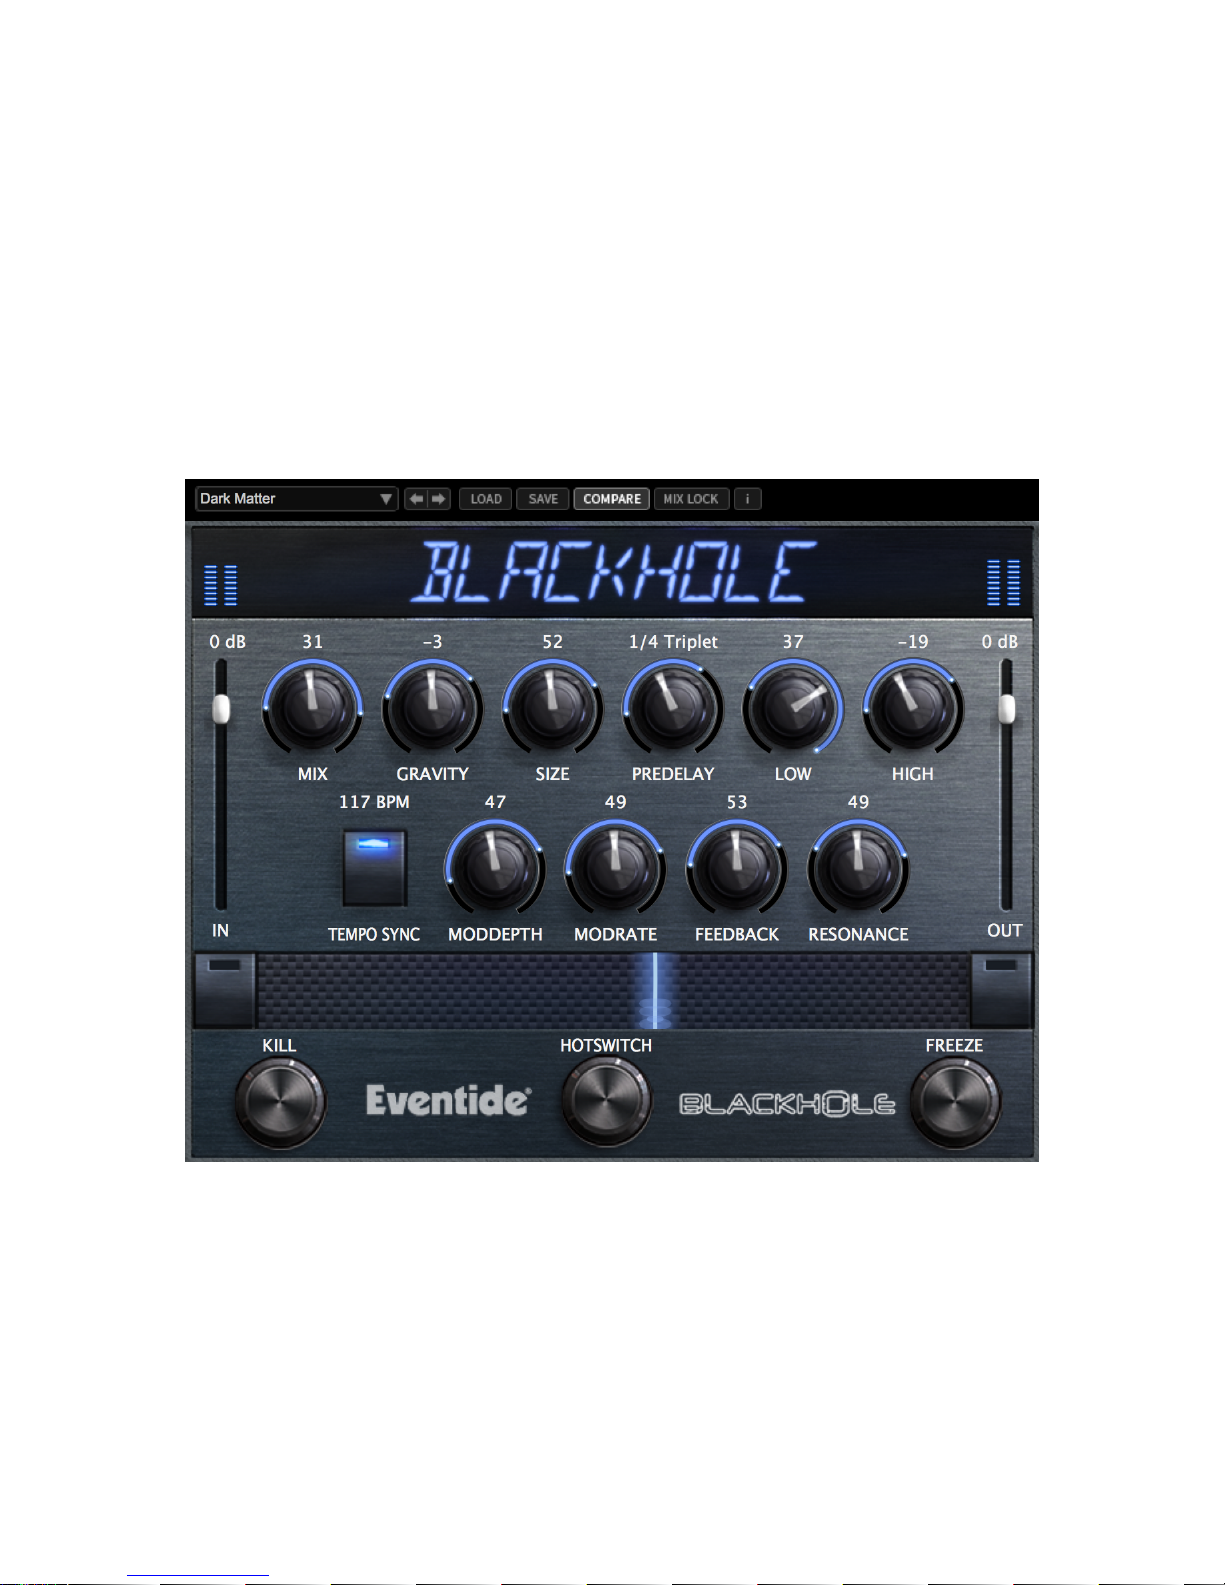
Chapter 3
Blackhole
The Blackhole is a reverb algorithm on a truly galactic scale. Beginning life as a preset in the DSP4000,
then later in the H8000, it’s lush sound and popularity encouraged us to feature it as one of the premier
algorithms in Eventide’s Space guitar pedal. Its soft attack and lingering, harmonic tail cause it to really
shine on guitars, strings, and pads, but those same qualities also allow it to transform a drum track into
something other-worldly. Enjoy, and don’t be afraid to turn the knobs. Blackhole can be used as Mono-In
Mono-Out, Mono-In Stereo-Out, or Stereo-In Stereo-Out.
5

3.1 Levels and Monitoring
3.1.1 In
Controls the input level to the plug-in, the range is between -60 dBfs and +12 dBfs. This parameter sets
the input level for both the wet and dry signals.
3.1.2 Out
Controls the output level of the plug-in, the range is also between -60 dBfs and +12 dBfs. This parameter
sets the signal level after the mix control.
3.1.3 Meters
Indicate the audio level before and after the reverb algorithm. These meters are after the input level
control and after the output level control, respectively, to aid in level adjustment.
3.1.4 Overload
Indicates an overload somewhere in the reverb’s signal chain and indicates that you may want to reduce
the input audio. This is a sticky indicator, so once it fires it will stay lit until cleared. To clear the
overload indicator, simply click on it.
3.2 Blackhole Parameters
3.2.1 Mix
Determines the relative level of the wet and dry signals in the plug-in. It has a special nonlinear taper
which puts most of the knob travel in the most usable range.
3.2.2 Gravity
The Blackhole’s equivalent of decay time. On the right-hand side, the GRAVITY control sweeps through
its forward reverb range from a very dense decay to a very long and smooth decay. On the left hand
side, the GRAVITY control is in its inverse mode and sweeps through a range of reverse reverb-like
settings.
3.2.3 Size
Determines the size of the reverb. This can range from cartoonishly small to cosmically epic.
3.2.4 Predelay
Sets the amount of delay before the reverb section. When tempo mode is off, this ranges from 0 to 2000
mS. When tempo mode is set to either Sync or Manual, it is set in beat divisions of the tempo.
3.2.5 Low
Controls the level of low frequencies in the reverb tail using a shelving filter with a corner frequency of
350 Hz.
6

3.2.6 High
Controls the level of high frequencies in the reverb tail using a shelving filter with a corner frequency of
2000 Hz.
3.2.7 Tempo
This button controls the tempo mode and has 3 states. In TEMPO OFF mode the PREDELAY is
displayed in milliseconds and the plug-in is not controlled by the tempo at all. In TEMPO SYNC mode
the tempo is retrieved from your DAW session and the PREDELAY is set in beat values relative to the
session tempo. In TEMPO MAN mode the tempo is set manually by either clicking and dragging the
tempo value, or by double clicking and entering a new value with your keyboard.
3.2.8 Mod Depth
Sets the modulation depth in the reverb tail. This can be a subtle control, which nevertheless can reduce
ringing in the reverb tail and add some motion to the sound.
3.2.9 Mod Rate
Sets the relative speed of the modulation in the reverb tail. Subtle but useful.
3.2.10 Feedback
Controls the feedback around the entire reverberation structure, for even larger sounds. Turning clock-
wise to INFINITE will allow for infinite reverberation time, while still letting incoming signal into the
reverberation structure. Turning further clockwise to FREEZE sets the reverberation time to infinite,
and does not allow incoming signal into the reverberation structure. Note that either Mod Depth or Mod
Rate must be turned down to 0 in order for infinite reverberation time to be achieved.
3.2.11 Resonance
Controls the resonance of the LOW and HIGH filters. When the filters are set to 0, this does nothing,
but when they are active, it can create a much more filtered sound. But be careful, extreme settings will
increase the chances of overloads.
3.3 Performance Controls
3.3.1 Kill
Kills the input to the reverb section allowing you to hear the reverb tail fade out. This can be useful to
help dial in the sound, or it can be automated for a more tremolo-like effect.
3.3.2 Freeze
Sets the reverb time to infinite, sets Mod Depth to FREEZE (equivalent to Mod Depth at ”0”), and
mutes the input, effectively freezing the audio in the reverb buffer. Making changes to some controls
when FREEZE is active can allow for interesting sound design.
3.3.3 Ribbon
The Ribbon allows the dynamic modification of several knobs at once, emulating what you would be able
to do with real hardware in front of you. See the ”Using the Ribbon” section for more details.
7

3.3.4 Hotswitch
Allows you to instantaneously toggle between two settings for any combination of knobs. See the ”Using
the Hotswitch” section for more details.
3.4 Saving and Recalling Plug-In settings
When Blackhole is installed, a library of settings is placed into the
<user>/Documents/Eventide/Blackhole/Presets folder. In this folder is a series of .tide files which will
show up as options in Eventide’s plug-in preset bar. From inside the Eventide Blackhole you can load
or save these settings. We recommend saving your own settings to this folder to ensure that they are
available to any instance of the plug-in you’re working with. You can also create sub-folders inside the
Blackhole Plug-In Folder if you wish.
3.4.1 Mix Lock
Located at the top next to the preset save/load buttons is a button called ”Mix Lock”. Pressing this will
enable a global mix value that will be the same on every preset that is loaded. This is especially useful
on an effect return track where the mix should always be set to 100.
8

Chapter 4
Conclusion
We hope you enjoy the Eventide Blackhole plug-in and put it to good use in all of your mixes. Please be
sure to check over Eventide’s other Native Plug-In offerings for more unique and interesting effects.
9
Table of contents
Popular Recording Equipment manuals by other brands


Black Lion Audio
Black Lion Audio PBR XLR 32 DSub owner's manual

Extron electronics
Extron electronics RGB 103 user manual
 Setup guide")
Convergent Design
Convergent Design Odyssey7Q ProRes 422 (HQ) Setup guide

Tigertronics
Tigertronics SignaLink Installation & operation

Faria Beede
Faria Beede DM0100 operating instructions

MORLEY PEDALS
MORLEY PEDALS POB2 manual