Blackline Safety G7 BRIDGE User manual

G7 BRIDGE
Technical User Manual

CONTENTS
OVERVIEW
Portable satellite & cellular base station..................................................................................... 2
Blackline Safety Network .................................................................................................................... 3
Blackline Live™ web portal .................................................................................................................. 3
Communication technology............................................................................................................. 4
What’s in the box .................................................................................................................................... 5
Hardware details ...................................................................................................................................... 6
INTERACTION
Buttons .......................................................................................................................................................... 7
NOTIFICATIONS
SureSafe™....................................................................................................................................................... 8
Charging light............................................................................................................................................ 9
TeamAlert™muster alarm..................................................................................................................... 10
OPERATING
Requirements............................................................................................................................................. 11
Charging ...................................................................................................................................................... 11
Power on ..................................................................................................................................................... 12
Reading the LCD screen....................................................................................................................... 13
Reading the menu .................................................................................................................................. 13
Features......................................................................................................................................................... 14
TeamAlert muster ......................................................................................................................... 14
Messages ........................................................................................................................................... 15
Settings.......................................................................................................................................................... 16
Pair new devices ........................................................................................................................... 16
Diagnostic tools ............................................................................................................................ 16
Sleep mode................................................................................................................................................. 16
Power o ..................................................................................................................................................... 17

MOUNTING
General mounting................................................................................................................................... 18
Magnetic mount ........................................................................................................................... 18
Multi-purpose mount................................................................................................................. 19
Optional mounting accessories....................................................................................................... 22
External bridge mount (not included).............................................................................. 22
External anchor points (not included) .............................................................................. 24
Internal dash plate mount (not included) ...................................................................... 25
Optional hardwiring accessories..................................................................................................... 26
External hardwire kit (not included)................................................................................... 26
Internal hardwire fuse expander (not included).......................................................... 27
FIRMWARE UPDATES
Over-the-air (OTA) rmware updates ........................................................................................... 28
G7 BRIDGE CARE
Weather-sealing plug............................................................................................................................ 28
SPECIFICATIONS
Detailed specications.......................................................................................................................... 29
SAFETY PRECAUTIONS
Danger........................................................................................................................................................... 30
Warning......................................................................................................................................................... 30
Legal notices .............................................................................................................................................. 31
SUPPORT
Learn more .................................................................................................................................................. 32
Customer Care........................................................................................................................................... 32

2|| G7 BRIDGE TECHNICAL USER MANUAL
OVERVIEW
PORTABLE SATELLITE & CELLULAR BASE STATION
What is a G7 Bridge?
The G7 Bridge system is an employee safety monitoring solution that keeps you
connected in remote locations outside cellular coverage. The system is comprised of
two parts, the G7 Bridge portable satellite/cellular base station and the employee-worn
Loner 900 or G7x safety monitoring device.
G7 Bridge is self-powered and portable, allowing you to quickly move it from one
vehicle to another, such as from a truck to an all-terrain vehicle.
Equipped with GPS location technology, it can provide your organization with a
simple alternative to elaborate eet management systems. G7 Bridge can notify mass
evacuations, connect you to monitoring personnel via two-way messaging, and
account for you on a real-time map providing a reference point to manage the fastest
emergency response to make a dierence.
It has your back at all times, no matter your location.

G7 BRIDGE TECHNICAL USER MANUAL || 3
BLACKLINE SAFETY NETWORK
How am I connected?
The Blackline Safety Network is the infrastructure used to monitor your safety. It is a
communications system that includes cellular networks, satellite networks, Blackline Live
web portal application, and your personal monitoring devices.
Each device requires an active service plan in order to connect to the Blackline Safety
Network. Depending on your needs and requirements, there are various service plan
options available such as 24/7 safety monitoring by Blacklines Safety Operations Center.
Contact your organization’s safety professional for more information regarding the
details of your service plan.
BLACKLINE LIVE™ WEB PORTAL
What is Blackline Live?
G7 Bridge utilizes the cloud-hosted Blackline Live web portal to monitor and manage all
your workers and devices. Your G7 Bridge can receive text messages from Blackline Live.
With Blackline Live’s live map and real-time alerting, you can quickly locate and respond
to a worker in distress. Real-time alerts show the device user on the map with the
type of alert, that can aid the coordination of an ecient emergency response to an
employee’s precise location.
You can create and customize conguration proles that determine how a device or
a group of devices operates in the eld. Similarly, alert proles are set up to determine
what contacts should be notied in the event of an incident and what response
protocol monitoring personnel will follow to ensure your team gets the help it needs.
Blackline Live allows you to tailor user access depending on employee roles, including:
employee, supervisor, administrator and monitoring team. This ensures that everyone
has access to exactly what is required when it comes to your devices.

4|| G7 BRIDGE TECHNICAL USER MANUAL
COMMUNICATION TECHNOLOGY
How does G7 Bridge communicate with my personal monitoring device?
G7 Bridge communicates with Loner 900 or G7x devices through an industrial quality
900 MHz radio link. Personal monitoring devices can operate up to 2 km away without
line of sight, or more than 10 km hilltop to hilltop from G7 Bridge.
NOTE: Terrain, foliage, and buildings will aect the overall 900 MHz radio link range.
How does G7 Bridge communicate with the Blackline Safety Network?
One G7 Bridge can link up to ve Loner 900 or G7x devices to the Blackline Safety
Network through Iridium satellites or 3G cellular data, contingent on rage or availability.
G7 Bridge is equipped with an internal Iridium satellite radio and antenna that facilitates
communication when outside the range of cellular networks. The transition between
satellite and cellular is automatic and seamless.
When mounted to a vehicle, all-terrain vehicle, snowmobile, or boat, G7 Bridge must
remain out in open sky, a minimum of 10 meters (10 feet) away from any buildings. This
will help ensure that it is able to send and receive signals to satellites.
900 MHz Radio Link
3G Cellular
Communication
Iridium Satellite
Communication

G7 BRIDGE TECHNICAL USER MANUAL || 5
WHAT’S IN THE BOX
Your G7 Bridge comes with:
G7 Bridge
Sealing plug
Magnetic mount
Multi-purpose mount
Adhesive foam pad
Charging components
• Charging cable
• Wall charger
• Vehicle 5V charger
Quick reference wallet card
Technical user manual

6|| G7 BRIDGE TECHNICAL USER MANUAL
HARDWARE DETAILS
Power button
Charging light
Weatherproof
enclosure
Base Charging Port Sealing plug
(removable)
Product label
OK button
Up button
LCD screen
Down button
SureSafe™
OK
Red alarm light
Side lights
Speaker
G7 BRIDGE TECHNICAL USER MANUAL || 7
INTERACTION
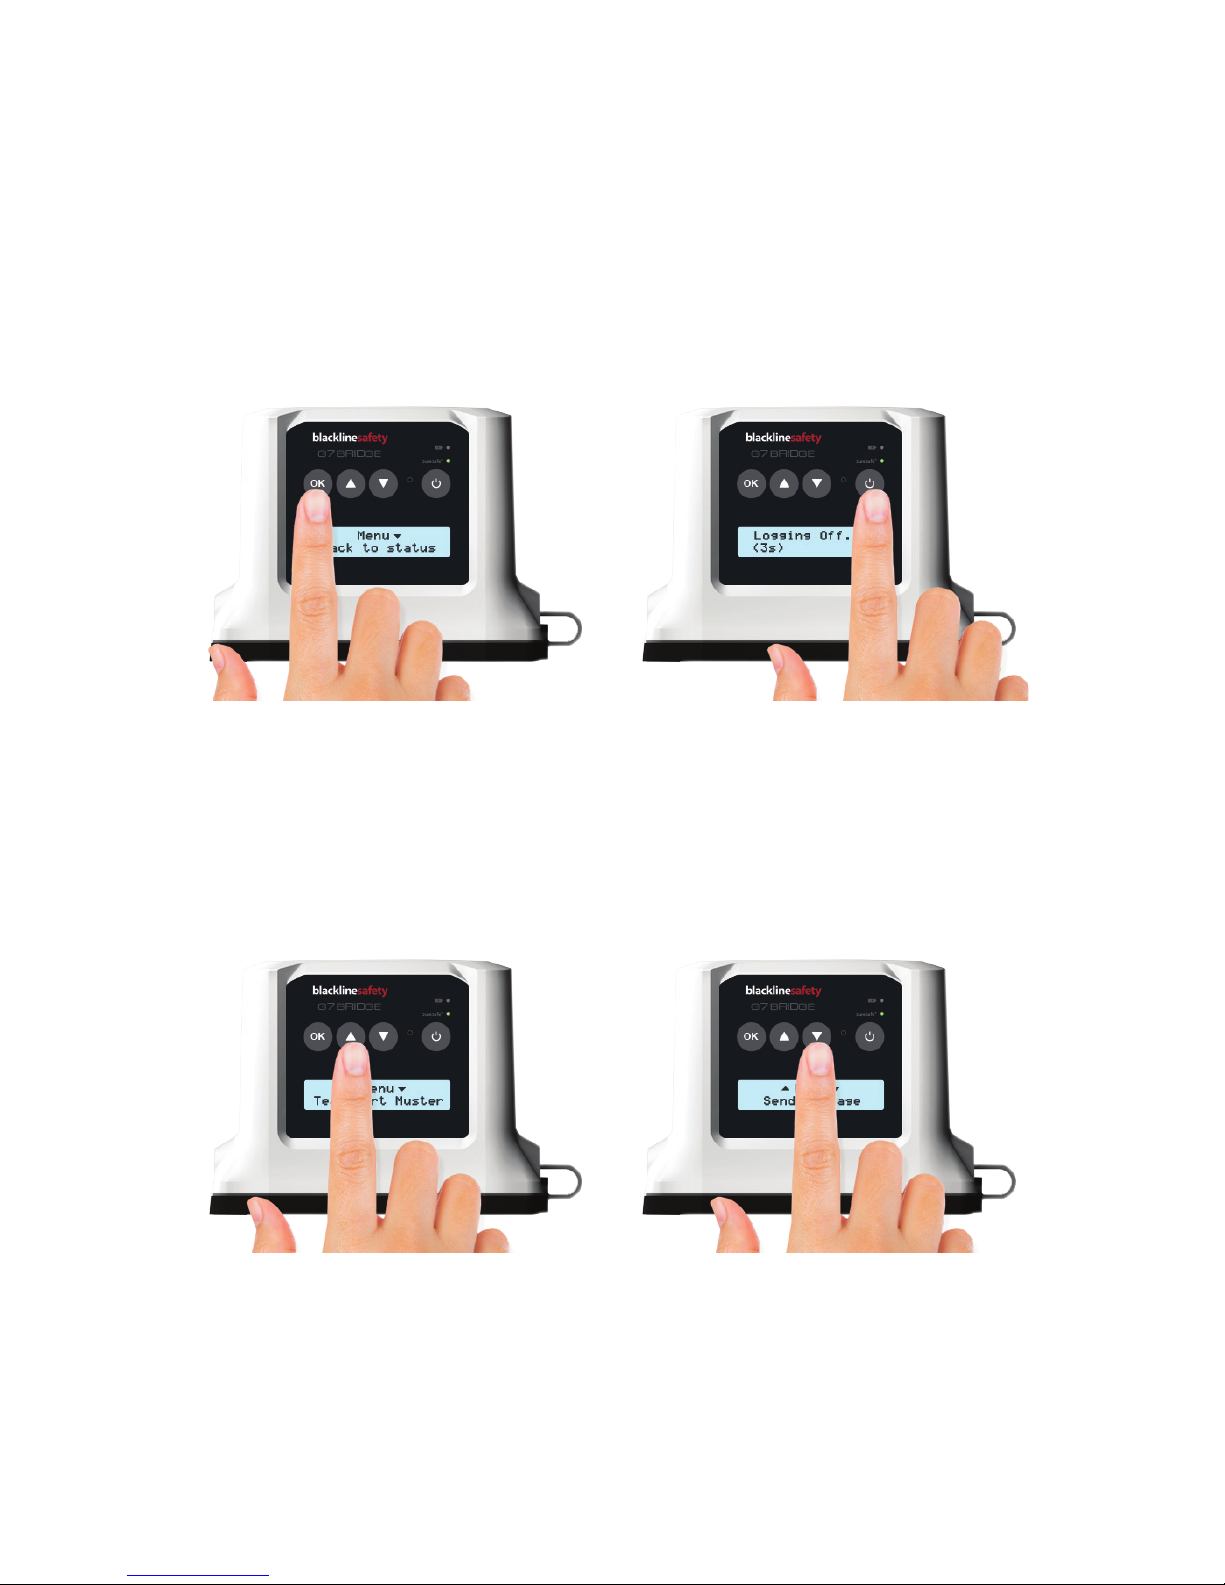
BUTTONS
Interacting with your G7 Bridge is easy with the LCD display and a few buttons.
OK button
Press OK to enter the menu on the LCD
screen and conrm a menu selection.
Power buttons
Press power button to turn on and o,
and return to menu.
Down arrow buttons
Press down arrow to enter or navigate
the menu.
Up arrow buttons
Press up arrow to enter or navigate
the menu.

8|| G7 BRIDGE TECHNICAL USER MANUAL
NOTIFICATIONS
SureSafe™
Are you Connected?
Your G7 Bridge lets you know your connection status.
Blinking
A blinking SureSafe green light indicates your G7 Bridge is connecting to the Blackline
Safety Network.
Solid
A solid SureSafe green light indicates you’re connected and being protected by the
Blackline Safety Network.
SureSafe™
Blinking/Solid

G7 BRIDGE TECHNICAL USER MANUAL || 9
CHARGING LIGHT
Charging Status
Your G7 Bridge lets you know your battery charging status. The more blinks during a
blinking pattern means more battery life.
1 Blink Pattern
Charging and your battery level is between 0%-19%.
2 Blink Pattern
Charging and your battery level is between 20%-49%.
3 Blink Pattern
Charging and your battery level is between 50%-69%.
4 Blink Pattern
Charging and your battery level is between 70%-89%.
5 Blink Pattern
Charging and your battery level is between 90%-99%.
Solid
Fully charged.
Charging Light
Blinking/Solid

10 || G7 BRIDGE TECHNICAL USER MANUAL
TeamAlert™MUSTER ALARM
Your G7 Bridge has a message for you.
Go back to your G7 Bridge and read the G7 Bridge screen.
The red lights on the side of your G7 Bridge will blink when a message has been
received by monitoring personnel. Read the information on your G7 Bridge
screen. Press the OK button to let G7 Bridge know you have read the and clear the
message. G7 Bridge will let you know that it is currently in a muster alarm state
(Muster Started). Press the OK button to enter the main menu, and press the OK
button again to stop the muster alarm from the menu selection.
Sound
TeamAlert muster alarm sound – A constant alarm sound.
TeamAlert™
Muster Alarm
Blinking

G7 BRIDGE TECHNICAL USER MANUAL || 11
OPERATING
REQUIREMENTS
What do I need for my G7 to operate?
Active service plan
Sucient battery level when portable, or available vehicle power connected via
power outlet, USB, cigarette socket or hardwire cable
Line of sight from G7 Bridge to Iridium communication satellites, or sucient cellular
network signal to communicate
Loner 900 or G7x devices within range of G7 Bridge radio link
NOTE: If G7 Bridge is in a very low charging state, it may take up to an hour of charging
before the red charging light begins to blink.
CHARGING
How do I charge my G7 Bridge?
Remove the sealing plug from the micro USB charging port on G7 Bridge. Insert micro
USB cable into charging port.
A blinking red light beside the battery icon will indicate your G7 Bridge is charging. The
LCD screen, and a solid red light will let you know when the device is fully charged.
It is recommended that you charge your G7 Bridge for 10 hours. Once charging is
complete, remove the power cable and replace the sealing plug.
NOTE: If G7 Bridge is in a very low charging state, it may take up to an hour of charging
before the red charging light begins to blink.
How often do I need to charge my G7 Bridge?
If G7 Bridge is being used as a portable base station and not hardwired to a vehicle’s
power system, it will need to be charged regularly based upon the amount of use.
The internal rechargeable battery will provide up to 44 hours of continuous run-time at
room temperature.
G7 Bridge is fully operational while being charged.

12 || G7 BRIDGE TECHNICAL USER MANUAL
POWER ON
How do I turn on my G7 Bridge?
Press the power button, and wait for the blinking SureSafe green light to turn solid. It
takes approximately 2 minutes for G7 Bridge to connect to the Blackline Safety Network.
Once connected, the green light will stay on and your safety is being monitored.
NOTE: Sucient battery power is required to connect to the Blackline Safety Network.
How do I connect my personal safety device?
Your G7 Bridge has been pre-programmed and set up to specically pair with your
personal safety monitoring devices. Pairing is as easy as pushing a button. Ensure that
your G7 Bridge is turned on and connected to the Blackline Safety Network, then press
the power button on your Loner 900 or G7x device. Wait for the blinking SureSafe green
light on your personal safety monitoring device to turn solid. Once connected, the
green light will stay on and your safety is being monitored.

G7 BRIDGE TECHNICAL USER MANUAL || 13
READING THE LCD SCREEN
READING THE MENU
Current communication
network
Personal monitoring
devices connected
Bottom line: The
action that can be
selected
Cellular network
connection strength
Satellite network
connection strength
Battery level
Top line: The
Menu or Sub-menu
you are in

14 || G7 BRIDGE TECHNICAL USER MANUAL
FEATURES
TeamAlert MUSTER
What is a TeamAlert Muster?
A TeamAlert muster is an alarm sent to all associated personal monitoring
devices to return back to the G7 Bridge. A TeamAlert muster can be initiated
from the G7 Bridge itself, or when monitoring personnel sends G7 Bridge a
message.
How do I initiate a TeamAlert Muster from G7 Bridge?
In the main menu, use the up or down arrow buttons to navigate to
TeamAlert muster, and press the OK button. Use the down arrow button
to navigate to Start, and press the OK button. G7 Bridge will go into a
TeamAlert muster alarm and display Muster Started on the LCD screen. All
personal monitoring devices connected to this specic G7 Bridge will go
into a personal warning alarm.
How do I silence a TeamAlert Muster on G7 Bridge?
In the main menu, use the up or down arrow buttons to navigate to
TeamAlert muster, and press the OK button. Use the down arrow button
to navigate to Stop, and press the OK button. Alternatively, if you initiated
a TeamAlert muster, your G7 Bridge may already be in the TeamAlert
submenu where you can select Stop and press the OK button.
NOTE: Silencing the TeamAlert muster will stop the alarm on both the G7
Bridge and all connected personal monitoring devices.

G7 BRIDGE TECHNICAL USER MANUAL || 15
MESSAGES
How do I receive a message?
G7 Bridge can receive messages from monitoring personnel. When there is an
incoming message, your G7 Bridge will inform you with a TeamAlert Muster
alarm. The message will appear on the LCD screen.
Press the OK button to let G7 Bridge know you have read the and clear the
message. G7 Bridge will let you know that it is currently in a muster alarm
state (Muster Started). Press the OK button to enter the main menu, and press
the OK button again to stop the muster alarm from the menu selection.
How do I view the last received message?
You can view the last received message in Message Inbox. When a new
message is received, the previous message is deleted. In the main menu, use
the up or down arrow button to navigate to Message Inbox, and press the OK
button. Press the down arrow button to view the last message, and press the
OK button to view the full message.
How do I send a message?
You can choose from a list of ten pre-programmed messages to send to
monitoring personnel. In the main menu, use the up or down arrow button
to navigate to Send Message, and press the OK button. Press the up or
down arrow buttons to navigate the pre-programmed message options,
and then press the OK button to send. The LCD screen will conrm that your
message has been sent.
NOTE: To make changes to the pre-programmed messages, please contact
our customer care team.

16 || G7 BRIDGE TECHNICAL USER MANUAL
SETTINGS
PAIR NEW DEVICES
To pair a personal safety monitoring device that has not been setup to connect with
your G7 Bridge, please contact our customer care team.
DIAGNOSTIC TOOLS
Diagnostics contains information about the rmware version and advance satellite
information. This information is not required for typical operations.
SLEEP MODE
What is sleep mode?
To maximize battery life, G7 Bridge will go into sleep mode two minutes after the
last button was pressed. Sleep mode will turn o the LCD screen to reduce power
consumption.
How do I wake up G7 Bridge from sleep mode?
Press any button to wake the LCD screen from sleep mode.
NOTE: If the LCD screen does not wake up, the battery may be depleted and will require
charging.

G7 BRIDGE TECHNICAL USER MANUAL || 17
POWER OFF
How do I shut down?
Always ensure that you turn o your personal safety monitoring device before turning
o G7 Bridge. When G7 Bridge is o, employees using a Loner 900 or G7x will no longer
be monitored.
First, press and hold the power button on your Loner 900 or G7x. The device will go into
shutdown sequence, once all the lights and vibrations have stopped you have been
logged o from the Blackline Safety Network. Second, press and hold the power button
on the G7 Bridge until it goes into shutdown sequence. Your safety is no longer being
monitored
NOTE: If you are in a challenging environment that makes communication dicult, G7
Bridge will extend the shutdown sequence up to 20 minutes until priority messages are
transmitted over the cellular or satellite network.

18 || G7 BRIDGE TECHNICAL USER MANUAL
MOUNTING
GENERAL MOUNTING
When mounting G7 Bridge, it is important to position it with an unobstructed line of sight to
the sky to communicate with the satellite system. Ensure it is placed as high as possible for
maximum distance of the 900 MHz radio link between G7 Bridge and connected personal
monitoring devices.
G7 Bridge is completely portable and can be permanently or temporarily installed depending
on your needs and requirements. It comes with two mounting options, a magnetic mount
and a multi-purpose mount.
MAGNETIC MOUNT
What is a magnetic mount?
The magnetic mount can be used to attach G7 Bridge to the roof of a vehicle. It contains
two rare earth magnets providing 224 lb of mounting force.
NOTE: Individuals with pacemakers or other medical devices and mechanical implants
should use caution when handling the magnetic mount. Strong magnets can damage
hard drives, credit cards, ID cards, and similar devices that use magnetic media.
Other manuals for G7 BRIDGE
8
Table of contents
Other Blackline Safety Measuring Instrument manuals


Popular Measuring Instrument manuals by other brands


Ballenger Motorsports
Ballenger Motorsports AFR500v2 Tuning Manual

Geotech
Geotech GEM5000 operating manual

Biospace
Biospace InBody230 Install manual

AMALGAMATED INSTRUMENT
AMALGAMATED INSTRUMENT HH4-PH Operation and instruction manual

Hioki
Hioki PW3365-20 quick start guide

Powell
Powell BriteSpot Plus Instruction bulletin

Sper scientific
Sper scientific 850013 instruction manual

ScienTECH
ScienTECH Vector Series operating manual

Compressed Air Alliance
Compressed Air Alliance POM400 user manual

horiba
horiba F-70 Series instruction manual

Panasonic
Panasonic DMRE20 - DVD VIDEO RECORDER operating instructions

Hilti
Hilti PD 42 operating instructions