Blackmagicdesign Blackmagic Video assist User manual


Welcome!
Thank you for purchasing Blackmagic Video Assist.
We are extremely excited to have designed the Blackmagic Video Assist, we think it’s
the perfect solution to help you shoot better video on any type of camera. Blackmagic
Video Assist combines the best of our monitoring and recording technologies for on
set monitoring and professional recording into one easy to use very compact product.
Blackmagic Video Assist can be mounted on your camera, or with the underside fold
out stand you can use it on a desk for general deck and monitoring use. That’s perfect
for use as a master recorder for a live production switcher. Blackmagic Video Assist also
has 6G-SDI inputs so it will even monitor Ultra HD! Blackmagic Video Assist is a very
versatile monitor and recorder that you can use with any camera and on any project.
This instruction manual contains all the information you need to start using your Blackmagic
Video Assist.
Please check the support page on our website at www.blackmagicdesign.com for
the latest version of this manual and for updates to your Blackmagic Video Assist’s
software. Keeping your software up to date will ensure you get all the latest features!
When downloading software, please register with your information so we can keep you
updated when new software is released. We are continually working on new features
and improvements, so we would love to hear from you!
Grant Petty
CEO Blackmagic Design
Contents
Blackmagic Video Assist
Getting Started 5
Plugging in Power 5
Plugging in Video and Audio 6
Inserting an SD Card 6
Recording 7
Recording Clean HDMI from DSLR Cameras 7
Playback 8
Looping playback 8
Settings 9
Changing Settings using the Touchscreen 9
Storage, Display and Setup Settings 12
Monitoring using on screen meters 13
About SD Cards 14
Choosing a Fast SD Card 14
Formatting SD cards using
BlackmagicVideoAssist 14
Formatting SD Cards using a Computer 15
Working with Files from SD Cards 16
Checking Disk Speed 16
Using DaVinci Resolve 17
Introducing DaVinci Resolve 17
Importing your Clips 18
Editing your Clips 18
Trimming Clips 19
Mapping Keyboard Shortcuts 19
Adding Transitions 20
Adding Titles 20
Adding Audio Tracks 21
Color Correcting your Clips 21
Using Scopes 22
Adding a Power Window 24
Tracking a Window 24
Using Plugins 25
Mastering your Edit 25
Post Production Workflow 26
Working with 3rd Party Software 26
Using Final Cut Pro X 26
Using Avid Media Composer 26
Using Adobe Premiere Pro CC 27
Using Autodesk Smoke 2013 27
Blackmagic Video Assist Utility 28
Help 29
Warranty 30

5
Getting Started
Plugging in Power
Getting started with your Blackmagic Video Assist is as
simple as plugging in power, connecting your video source,
and inserting an SD card.
To supply power, plug in the supplied power adapter to
your Blackmagic Video Assist’s power input on the right
side panel.
With external power connected, you can also charge two
LP-E6 type Lithium-Ion batteries, which can be mounted
to battery slots 1 and 2 on the back panel. To plug an LP-E6
type battery into your Blackmagic Video Assist, gently
press the battery against the inside top edge of the battery
slot, then slide the battery down against the back panel
until you feel it click and lock into place. Press the battery
release button on the top panel to remove a battery. For
more information on battery use and how to monitor the
battery power remaining, refer to the ‘settings’ section of
this manual.
To turn your Blackmagic Video Assist on, press the power
button on the right side panel. Press and hold to power off.
Connect external power to the +12V power input.
Press the power button to turn the unit on.
A kickstand is provided so you can mount the unit
on your desk. Simply lift the edge of the stand and
gently swing it into the open position.
Blackmagic Video Assist uses common LP-E6 type batteries.

6
Getting Started
Plugging in Video and Audio
The next step is to plug your SDI or HDMI source videointo
your Blackmagic Video Assist’s mini BNC or
HDMIinput.Blackmagic Video Assist will auto detect the
SDI or HDMI input depending on what you connect first.
Mini BNC to regular BNC cablescan bepurchased from
your nearest professional videoequipment stores. Mini
BNC connectors are also commonlyknown as DIN 1.0/2.3
connectors. When plugging in yourvideo,audio is also
connected as its embedded in theSDI or HDMI video signal.
Inserting an SD Card
To start recording clips with your Blackmagic Video
Assist,you need to insert a compatible SD card.If you are
recording high quality HD files then we recommend high
speed UHS-1 type SD Cards. However if you are recording
standard definition or lower bit rate lower quality
compression you might be able to use slower cards.
But generally the faster cards are better.
Before use, you will need to format your SD Card to either
HFS+ or exFATformats. It’s easy to format your media via
the ‘storage’settings in yourBlackmagic Video Assist. You
can alsoformat using a Mac OS X or Windows computer.
If you are using your media on Mac OS X then you can use
HFS+ which is the Mac disk format. If you are using Windows
then you should use exFAT format, which is the Windows
disk format and Mac OS X computers can also read
exFAT format.
To plug in an SD card:
Step 1.
Hold the card with gold connectors facing the LCD and
align it with Blackmagic Video Assist’s SD card slot.
Step 2.
Gently push the card into the slot until you feel it lock firmly
into place.
To remove the card, gently push until you feel it click, then
release. The card will eject a short distance, allowing you
to hold the edge of card and remove it from the slot.
That’s all there is to getting started. With power, video and
a formatted SD card plugged into your Blackmagic Video
Assist, you can now start recording!
Connect your source video to the SDI or HDMI input on the left side. Connect an HDMI TV or SDI monitor by plugging into the HDMI
or SDI output. You can listen to the audio on your clips during recording and playback by plugging a headset into the headset jack.
To start recording using your Blackmagic Video Assist,
you’ll need to insert an HFS+ or exFAT formatted UHS-1 SD
card. You can easily format your SD card using the storage
settings in Blackmagic Video Assist.
7
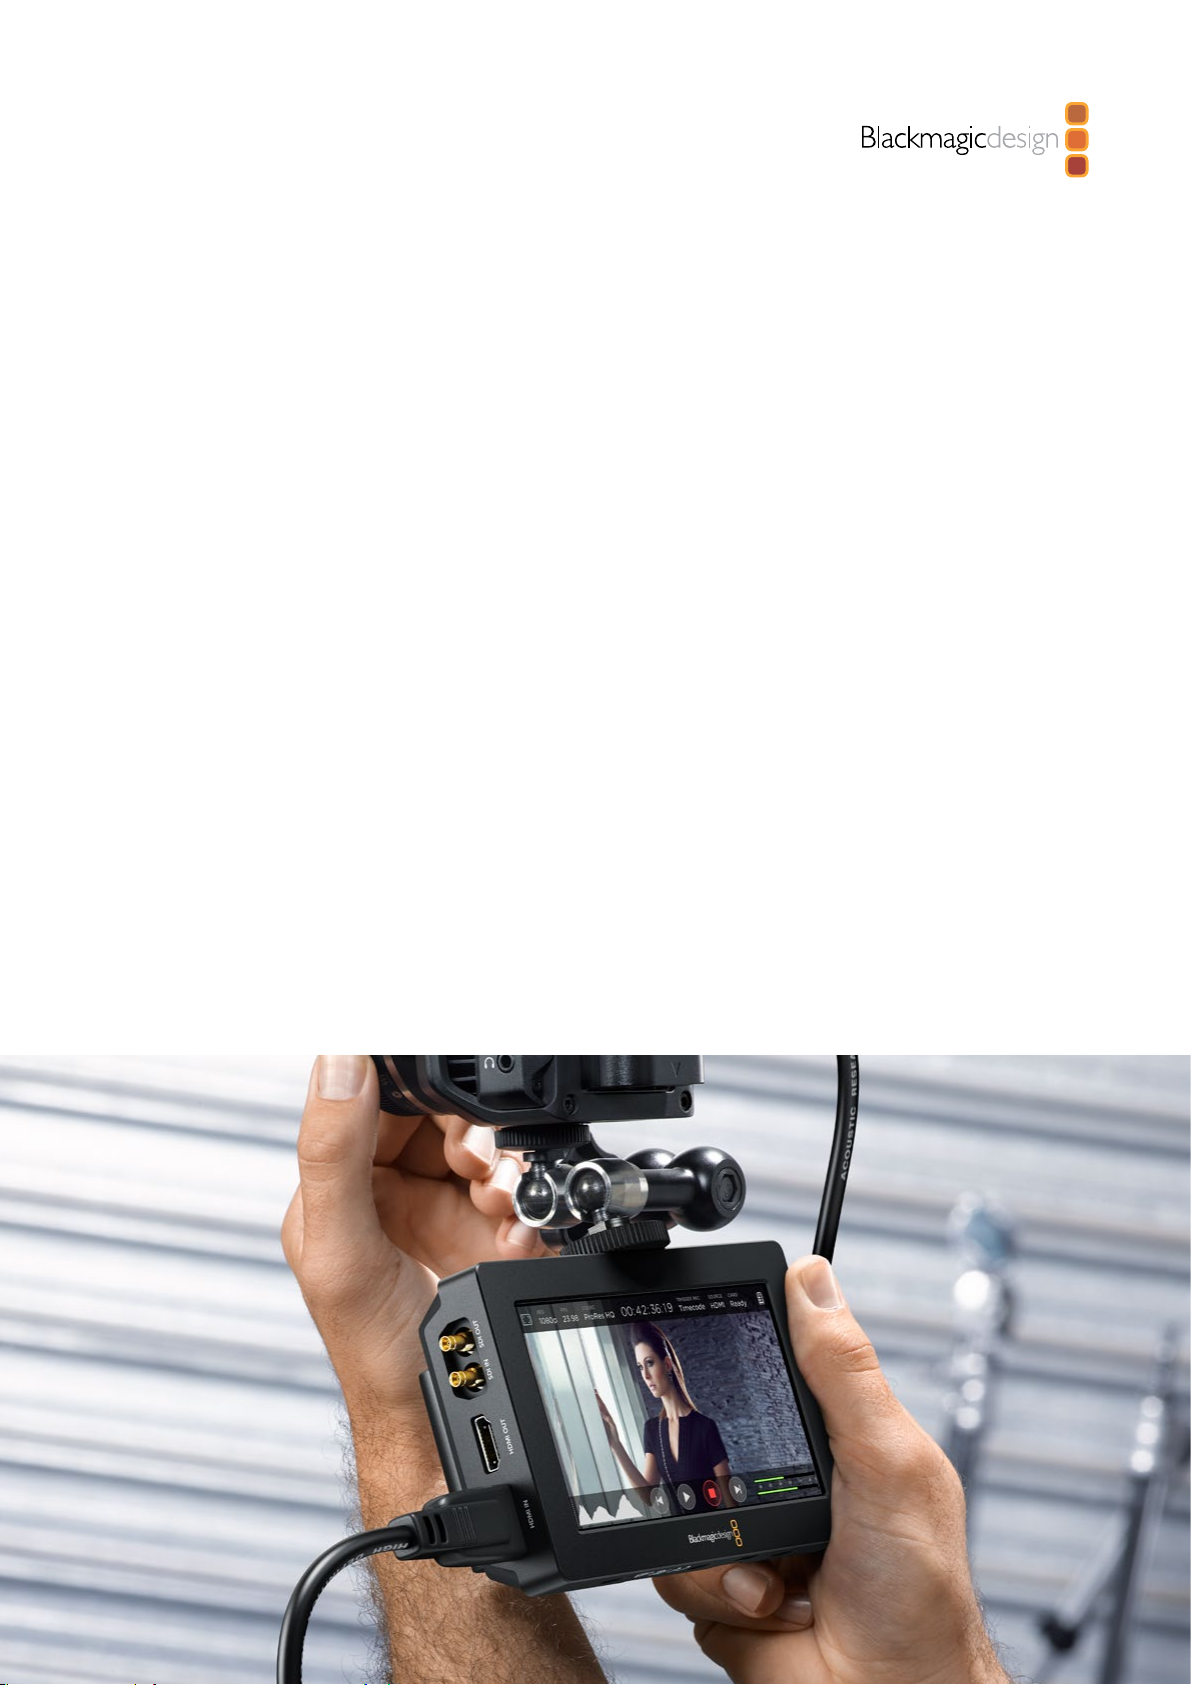
Recording
To start recording straight away, simply swipe the
touchscreen up or down to reveal the on screen display,
then tap the circular ‘record’ icon at the bottom of the LCD.
The ‘record’ icon will become a square ‘stop’ icon during
recording. Tap the stop icon to stop recording.
While recording, the timecode counter will continuously
update, showing you the duration of your clip. When the
on screen display is hidden, a small record indicator will
be displayed at the bottom of the LCD so you can easily
confirm you’re recording.
Blackmagic Video Assist records your clips to QuickTime
files when using ProRes codecs and MXF or QuickTime
files for DNxHD. When recording from a video source that
contains closed caption data, the QuickTime or MXF movie
will be recorded as well as a separate .MCC file containing
the closed caption data.
You can also set your Blackmagic Video Assist to use
‘timecode’ or ‘SDI start/stop’ trigger recording. This lets
you start and stop recording triggered by information
received via the HD-SDI signal. For information on how to
set your chosen codec, or to enable trigger recording, refer
to the ‘settings’ section of this manual.
When recording from an HDMI or SDI camera, make sure
the output is clean with overlays turned off as any overlays
that are present in your camera’s video output will be
recorded with your image. Please refer to the section below
titled ‘recording clean HDMI from DSLR cameras’ for more
information.
Recording Clean HDMI from DSLR Cameras
Some DSLR cameras record 8-bit video internally, and
some can provide a clean video image via their HDMI
output. By plugging the DSLR camera’s HDMI output into
your Blackmagic Video Assist, you can can bypass the
camera’s internal compression and record using high quality
10-bit ProRes or DNxHD codecs. Some DSLR cameras can
output 10-bit 4:2:2, which means your Blackmagic Video
Assist can record even higher quality externally.
In some countries, DSLR cameras are limited to short
recording durations, so an added benefit of recording
externally is bypassing these recording limitations. This is
particularly helpful when recording live events or interviews
for documentaries.
To make the most of this feature, you will need to set your
camera to output a clean image with overlays turned off.
This is normally done by changing your DSLR camera’s
HDMI output settings so it does not show any status
information in the video signal. This is important because
if there are any overlays visible in your image via the HDMI
output they will be recorded in your video, which you
probably don’t want.
To check the DSLR camera overlays are not visible:
Step 1.
Swipe your Blackmagic Video Assist’s touchscreen up or
down to hide the on screen display so you can monitor
only your DSLR camera’s image.
Step 2.
With the on screen display hidden, carefully check the
DSLR camera’s output video does not show any information
other than your clean video image. If you can see camera
overlays on your Blackmagic Video Assist’s LCD, change
the HDMI output or display menu settings on your camera
so HDMI overlays are turned off.
With a clean HDMI output from your camera you can now
record better quality video using professional ProRes and
DNxHD codecs on your Blackmagic Video Assist!
To start recording, simply swipe
the touchscreen up or down to
reveal the on screen display,
then tap the ‘record’ icon.
Tap again to stop recording.
8
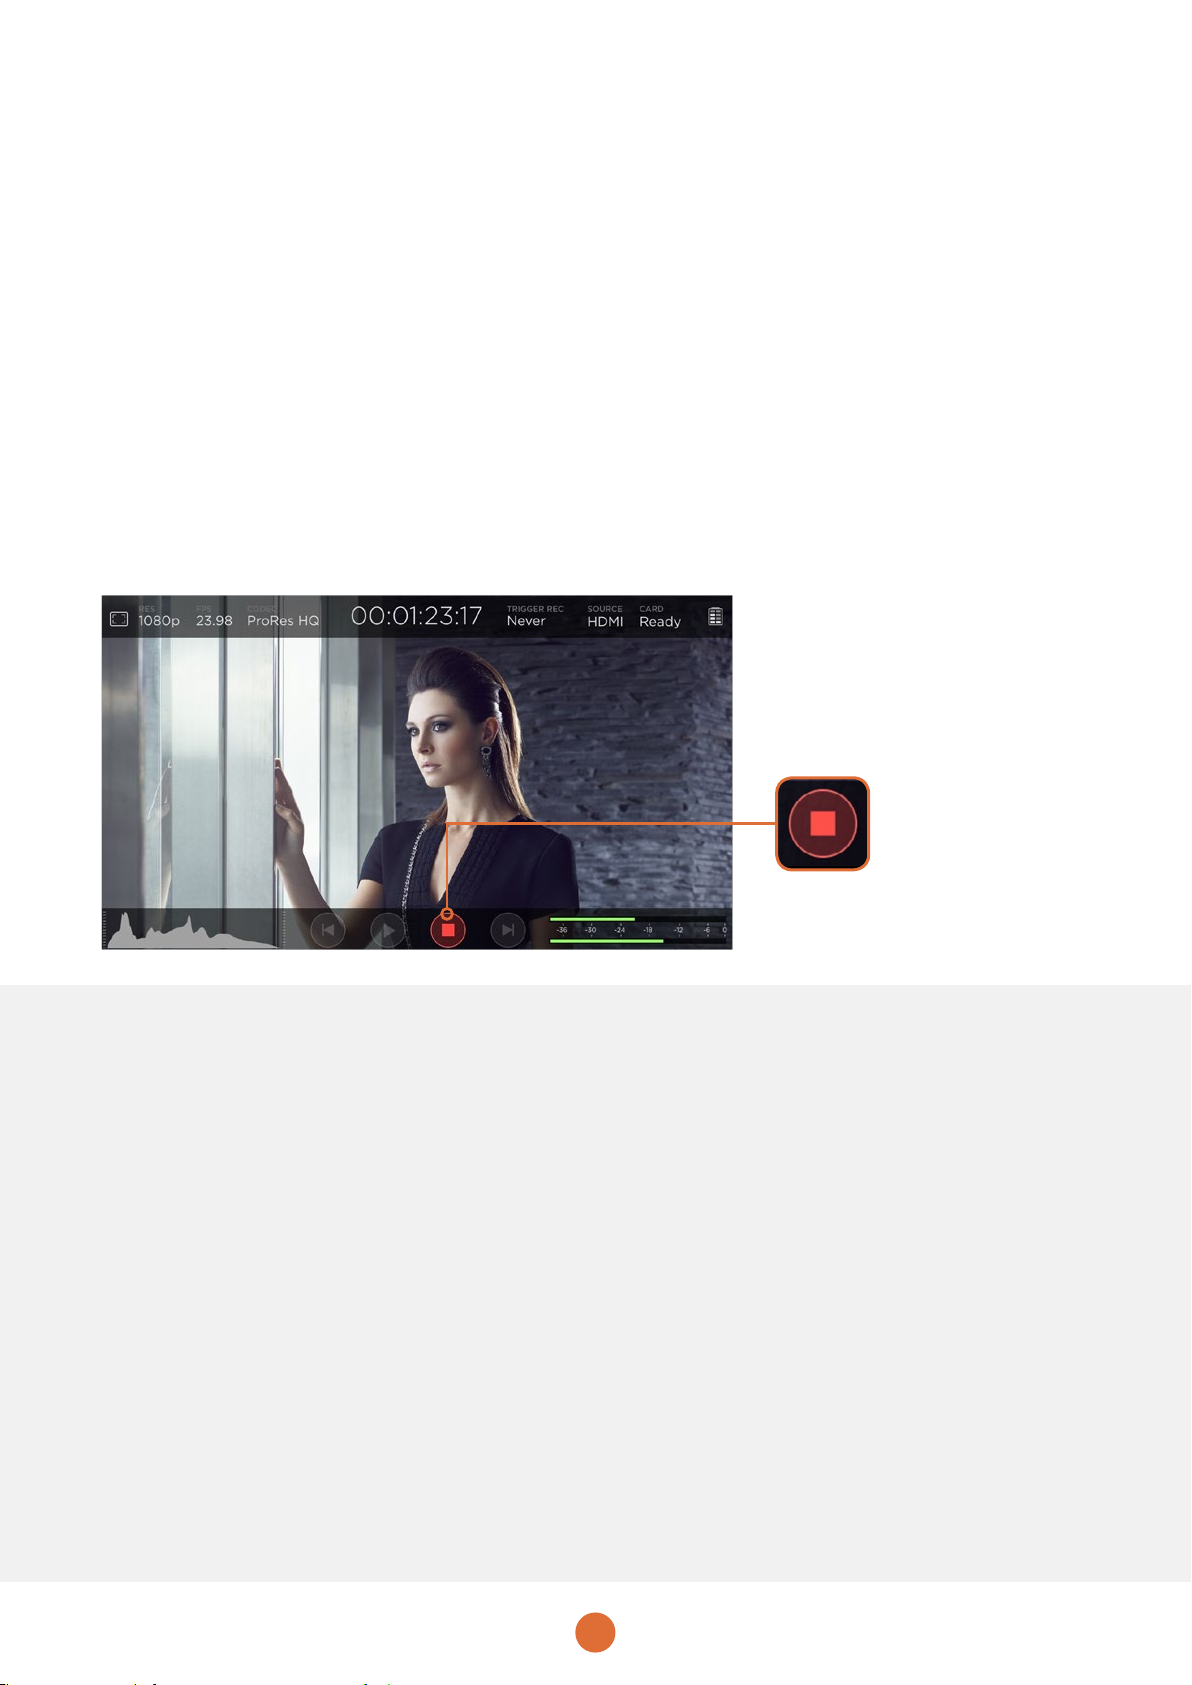
Playback
Playback features are easy to use. Simply swipe the
touchscreen up or down to reveal the on screen display,
then tap the transport control icons at the bottom of the LCD.
To play your clips, tap the ‘play’ icon.
During playback, tap the ‘pause’ icon to momentarily
‘freeze’ the playback on a frame of video.
Tap again to resume playback.
You can skip backwards or forwards through your
clips by repeatedly tapping the forward or reverse
skip icons. Tapping reverse skip once will restart
the current clip.
During playback you can scrub your clip forwards or
backwards by dragging the scrubbing slider left or right.
Tap the LCD to reveal or hide the slider. If you play back a
video clip that has an associated .MCC file, the closed
caption data will be played with the video via the SDI output.
Looping playback
Tap the loop icon once to set your Blackmagic
Video Assist to play back the current clip on
a continuous loop.
Tap again to play all your recorded clips on
a continuous loop.
Tap a third time to turn loop off.
Shuttle through your clip by dragging the scrubbing slider forwards or backwards.

9
Settings
Changing Settings using the Touchscreen
Your Blackmagic Video Assist features a built in 5”
touchscreen used to monitor your video and change settings.
To change settings:
Step 1.
Swipe the touchscreen up or down to reveal the on
screen display.
Step 2.
Tap the setting you wish to change. For example, if you
want to set the recording codec, tap the codec indicator
at the top of the display to open the codec settings.
Step 3.
In your chosen settings window, tap the menu buttons,
arrows or slider icons to choose from the available settings.
Tap outside the window to close the settings. You can hide
the on screen display by swiping the touchscreen
up or down.
Overlays
Tap the overlays icon to open the guides and
grid settings. These settings let you display
overlays on your Blackmagic Video Assist’s
LCD to help with composition and framing
when connected to a camera.
Guides
The frame guides feature provides aspect ratio overlays
for various cinema, television and online standards.
Tap the ‘guides’ menu button, then tap the left or right
arrows, or drag the slider icon left or right to choose a guide.
You can choose from the following frame guides:
HDTV
Displays action and title safe regions of your image within
a 1.78:1 aspect ratio compatible with 16:9 HD television and
computer screens.
4:3
Displays the 4:3 aspect ratio compatible with SD
televisionscreens, or to help frame shots when using
2xanamorphic adapters.
2.35:1, 2.39:1 and 2.40:1
Displays the broad widescreen aspect ratio compatible
with anamorphic or flat widescreen cinema presentation.
The three widescreen settings differ slightly based on the
changing cinema standards over time. 2.39:1 is one of the
most prominent standards in use today.
1.85:1
Displays another common flat widescreen cinema aspect
ratio. This ratio is slightly wider than HDTV, but not as wide
as 2.39:1.
Grid
The grid feature displays a ‘thirds’ overlay with two vertical
and horizontal lines placed in each third of the image. Set
the grid feature to ‘on’ or ‘off’ to view or hide the thirds overlay.
Thirds are an extremely powerful tool to help compose
your shots. For example, the human eye typically looks for
action near the points where the lines intersect, so it’s
helpful to frame key points of interest in these zones. An
actor’s eyeline is commonly framed along the top third of
the screen, so you can use the top horizontal third to guide
your framing. Thirds are also useful to maintain framing
consistency between shots.
2.39:1 frame guides are useful for framing shots to
suit a popular flat widescreen cinema format.

10
Settings
Frames Per Second
This setting displays the recording and playback speed of
your connected video format in frames per second.
Codec
Tap the ‘codec’ indicator to open the relevant settings, then
tap the left or right arrow icons to make your selection. The
codecs available are Apple ProRes 422 HQ, ProRes 422,
ProRes 422 LT, ProRes 422 Proxy, or Avid DNxHD codecs.
Timecode
The timecode counter displays the duration of your clips
in hours:minutes:seconds:frames.
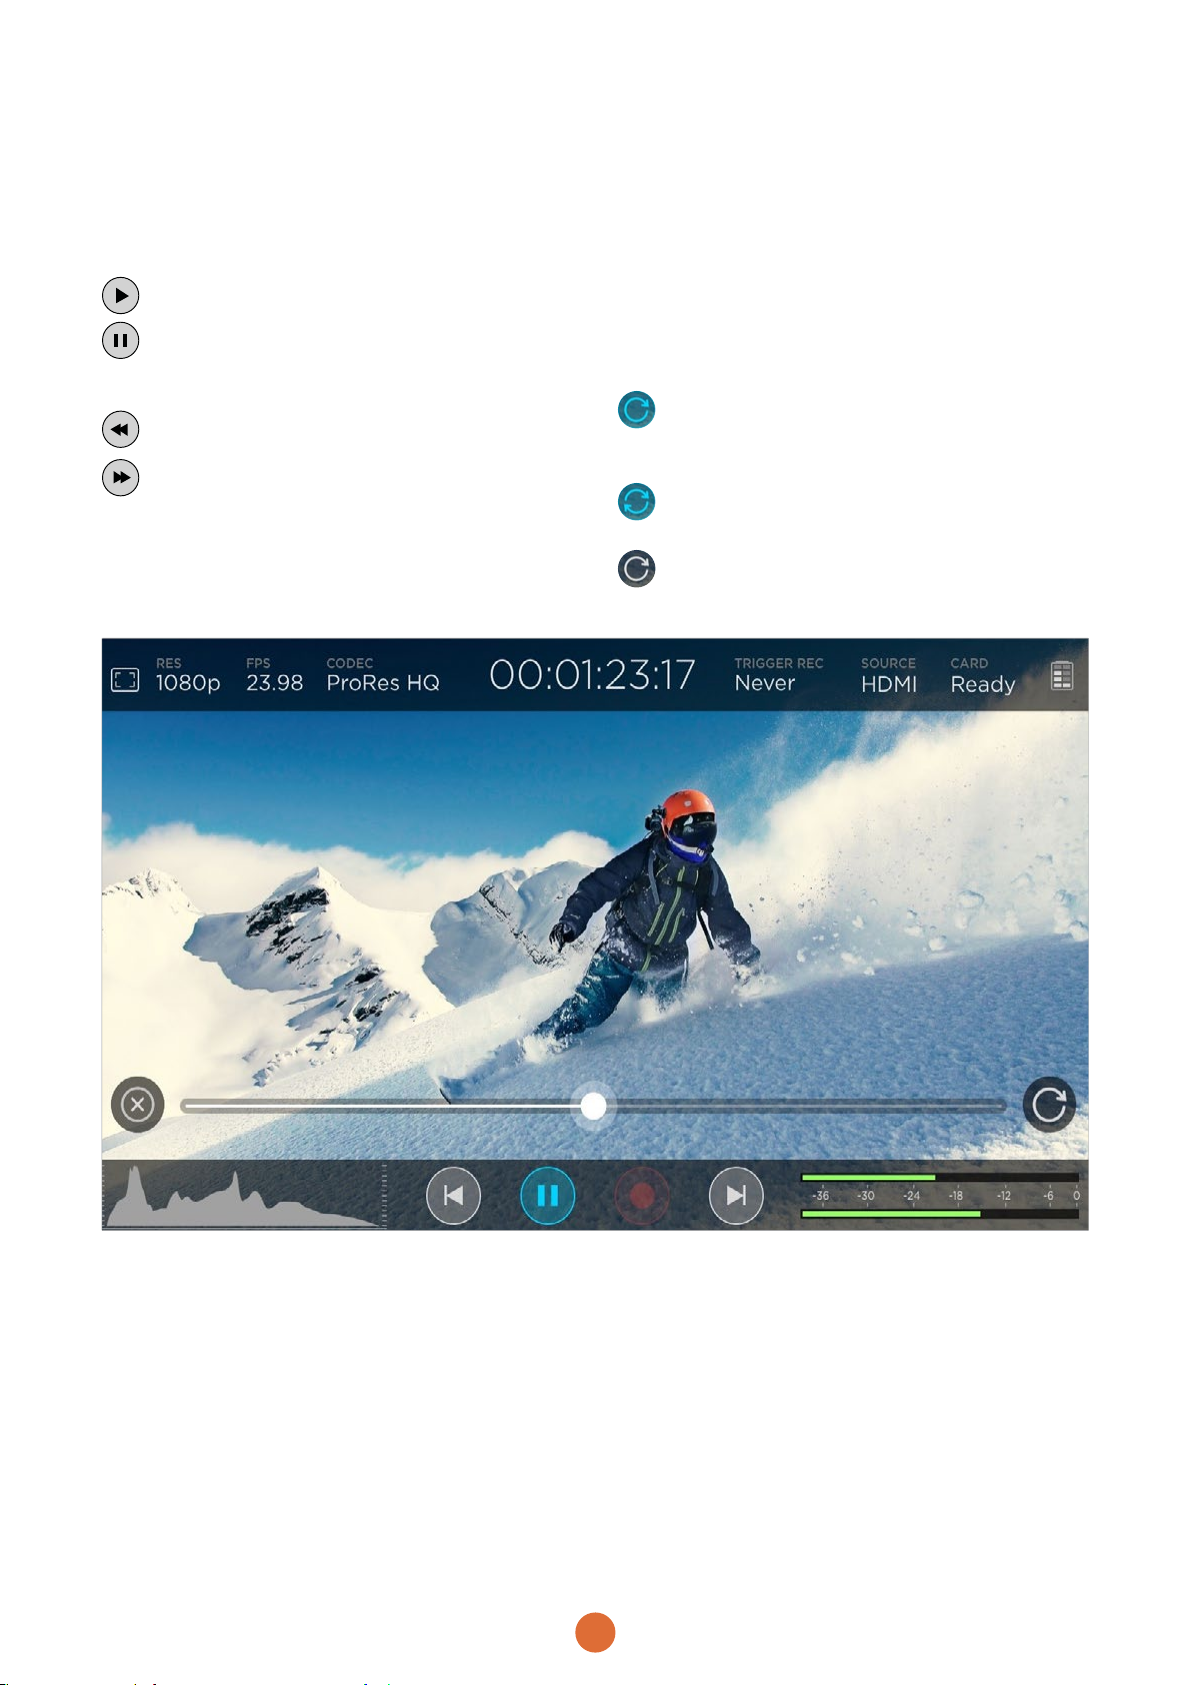
Trigger Record
Tap the ‘trigger record’ indicator to select between timecode
or SDI start/stop trigger recording. This lets you start and
stop recording triggered by information received over the
SDI connection. To disable trigger recording, select ‘never’.
T/C Run
When timecode run is selected, your Blackmagic Video
Assist will start recording as soon as it detects running
timecode from your SDI source. Recording will stop when
the timecode has ceased. This feature is useful when
connecting SDI cameras that don’t support SDI start/stop
trigger recording. You’ll need to set your camera’s timecode
setting to ‘record run’ to make sure timecode only runs
while your camera is recording. If your camera’s timecode
is set differently, for example time of day timecode, the
timecode is always running and will continuously trigger
the recording on your Blackmagic Video Assist.
Resolution
The resolution setting is displayed as ‘res’ on the
touchscreen and displays the resolution of your connected
input format. For example, 2160p, 1080p, 1080i, 720p, etc.
The following input formats are supported:
Supported Input Formats
SDI
525/59.94i NTSC, 625/50i PAL
720p50, 720p59.94, 720p60
1080PsF23.98, 1080PsF24
1080i50, 1080i59.94, 1080i60
1080p23.98, 1080p24, 1080p25, 1080p29.97,
1080p30, 1080p50, 1080p59.94, 1080p60
2160p23.98, 2160p24, 2160p25, 2160p29.97, 2160p30
HDMI
480p60, 576p50
525/59.94i NTSC, 625/50i PAL
720p50, 720p59.94, 720p60
1080i50, 1080i59.94, 1080i60
1080p23.98, 1080p24, 1080p25, 1080p29.97,
1080p30, 1080p50, 1080p59.94, 1080p60
Blackmagic Video Assist can record SD and HD video in
the following formats:
Supported Recording Formats
SDI
525/59.94i NTSC, 625/50i PAL
720p50, 720p59.94, 720p60
1080PsF23.98, 1080PsF24
1080i50, 1080i59.94, 1080i60
1080p23.98, 1080p24, 1080p25, 1080p29.97,
1080p30, 1080p50, 1080p59.94, 1080p60
HDMI
480p60, 576p50
525/59.94i NTSC, 625/50i PAL
720p50, 720p59.94, 720p60
1080i50, 1080i59.94, 1080i60
1080p23.98, 1080p24, 1080p25, 1080p29.97,
1080p30, 1080p50, 1080p59.94, 1080p60
11
SDI
This setting will set your Blackmagic Video Assist to start
and stop recording when you press the record start and
stop button on your camera. For SDI start/stop trigger
recording you will need to use a camera that can trigger
the record function via HD-SDI. Cameras which support
trigger recording may include menu options such as ‘trigger
rec’, HD-SDI remote I/F’ or ‘SDI remote start/stop trigger’.
Card
Displays the status of your SD card. The status indicators are:
Loading
When inserting an SD card, the indicator will display ‘loading’
to let you know Blackmagic Video Assist is verifying
your card.
Ready
When Blackmagic Video Assist has verified a formatted
SD card, the status will display ‘ready’ to indicate your card
is ready to record.
Format
If your SD card needs to be initialized, the indicator will
flash ‘format’ to prompt you to format the card. Tap the
‘card’ indicator or swipe the touchscreen left or right to
open the ‘storage’ settings where you can format your card.
For more information refer to the ‘about SD cards’ section.
No card
This indicator is displayed when there is no card inserted
in your Blackmagic Video Assist’s SD card slot.
Card full
The ‘card full’ indicator will flash for approximately three
minutes prior to stopping record when your SD card has
used its maximum recording space. When you see this
indicator, it’s a good time to swap over to an empty SD card.
When your card is full, the indicator will turn solid red and
the recording will stop. Blackmagic Video Assist will then
save the last recorded file.
Error
In the rare event your SD card becomes corrupted, or if the
card is unreadable, Blackmagic Video Assist will display a
red ‘error’ status.
Source
Displays the SDI or HDMI input source connected to your
Blackmagic Video Assist. Blackmagic Video Assist will use
the first source connected. If you have another source
connected, your Blackmagic Video Assist will swap over
to the other if the signal from the original source is lost for
a brief period of time. This can be useful for redundancy if
you need to run a back up signal.
Battery Level Remaining
Displays the amount of power remaining in your batteries.
Tap the battery icon to open a larger display with more
precise information about your battery levels.
During operation, your Blackmagic Video Assist will use
the battery with the lowest charge first, then swap over to
the other when depleted without interruption. When
recharging batteries, both will charge simultaneously.
Batteries will take approximately 3 hours to fully charge
when not in use depending on battery type and conditions.
Two fully charged Canon LP-E6 batteries will supply power
for approximately 3 hours of record time.
Settings

12
Headset Volume
To adjust the headset volume, simply tap on the audio
meters at the bottom right of the status display. This will
open the headset level setting. Drag the level slider left or
right to decrease or increase your headset volume.
Storage, Display and Setup Settings
Swipe the touchscreen left or right to open additional
settings and information. Here you can monitor storage
information for your SD card, format your card, adjust display
settings, and set the date and time.
Storage Settings
The storage settings let you monitor the capacity of your
inserted SD card, data used and the amount of free space
available. You can also format your card directly using your
Blackmagic Video Assist. For information on formatting
SDcards, refer to the ‘about SD cards’ section.
Display Settings
Tap the ‘display’ setting icon to open the display settings.
Here you can easily adjust the LCD brightness and contrast.
To adjust each setting, touch the relevant slider icon and
drag it to the left or right.
Brightness
Adjusts the general brightness of the LCD. For example, if
you are outside in bright conditions, increase the LCD
brightness to make it easier to view.
Contrast
Increases or decreases the range between the bright and
dark areas of the image. High contrast can reveal detail
and depth in the image, and low contrast can make the
image appear soft and flat.
Saturation
Increases or decreases the amount of color in your
displayed image.
All settings will be remembered when the unit is powered
off. It’s also worth mentioning that any changes to these
particular settings will affect the image displayed on the
LCD, but not your recorded video
Settings

13
Setup Settings
Setup lets you set the date and time for your Blackmagic
Video Assist’s internal clock.
Date and time
When these settings are maintained and accurate, useful
information is recorded in your clip names to inform you of
the date and time each clip was recorded.
To adjust the date and time settings:
Step 1.
Tap the day, month, year or time to reveal the edit arrows
for the selected setting.
Step 2.
Tap the up or down arrow icons to change a setting.
Step 3.
Tap outside of the setting to confirm the change and hide
the edit arrows.
Monitoring using on screen meters
Blackmagic Video Assist features useful scopes such as a
histogram and audio levels meter so you can check your
exposure and luminance range on cameras, plus monitor
the level of your source audio.
Histogram
The histogram display shows the distribution of the
luminance in your video. Pure black is on the far left side
of the display and pure white is on the far right of the display.
When the video signal stays within these limits you’ll know
your shadows and highlights are not clipping, which means
details in the tonal ranges of your video are preserved.
Audio Meters
The audio meters display shows audio levels for channels
1 and 2 of the input source. The display is calibrated to dBFS
units and features peak hold indicators which stay visible
for a short time so you can clearly see the maximum levels
reached. To achieve optimum audio quality, the levels from
your source equipment should never rise above 0 dBFS. If
your audio rises above 0 dBFS, the peak hold indicators will
turn red, indicating that audio is clipped.
Settings

14
About SD Cards
Choosing a Fast SD Card
It’s important to use high speed UHS-1 SD cards. These
cards are rated for fast data speeds and support larger
storage sizes.
All UHS-1 SD cards should be fast enough to record
compressed HD video up to 60 frames per second, however
it’s worth testing your card’s record speed to be sure. You
can do this using Blackmagic Disk Speed Test software
included with your Blackmagic Video Assist. For information
on using Disk Speed Test, refer to ‘checking disk speed’
in this section of the manual.
Formatting SD cards using BlackmagicVideoAssist
It’s very easy to format your SD card using the storage
settings in Blackmagic Video Assist. You can format your
card using HFS+ or exFAT formats.
HFS+ is also known as Mac OS Extended. It is the
recommended format as it supports “journaling”. Data on
journaled media is more recoverable and less likely to be
corrupted. HFS+ is natively supported by Mac OS X.
ExFAT is supported natively by Mac OS X and Windows
without needing to purchase any additional software.
However, exFAT does not support journaling which means
data is less protected against the rare event your media
card is corrupted.
To format your SD card:
Step 1.
Swipe your Blackmagic Video Assist’s touchscreen left or
right to open the storage settings.
Step 2.
Tap the ‘format card’ icon at the bottom right of the
touchscreen menu.
Step 3.
Tap the arrows to select your desired HFS+ or exFAT format
type, then tap the ‘format card’ icon again.
Step 4.
A warning will appear asking you to confirm the format. If
your SD card contains data already recorded, make sure
you back it up before formatting as this action cannot be
undone. Tap ‘format card’ to continue, or ‘cancel’ to cancel
the format.
Step 5.
A progress bar shows you the progress of the format.
‘Formatting complete’ will appear when the format is done.
Step 6.
Tap the ‘ok’ icon to return to the storage settings.
Blackmagic Video Assist can format your SD cards in HFS+
or exFAT formats using the ‘storage’ settings. Swipe the
touchscreen left or right to open the ‘storage’ settings menu.
15
About SD Cards
Formatting SD Cards using a Computer
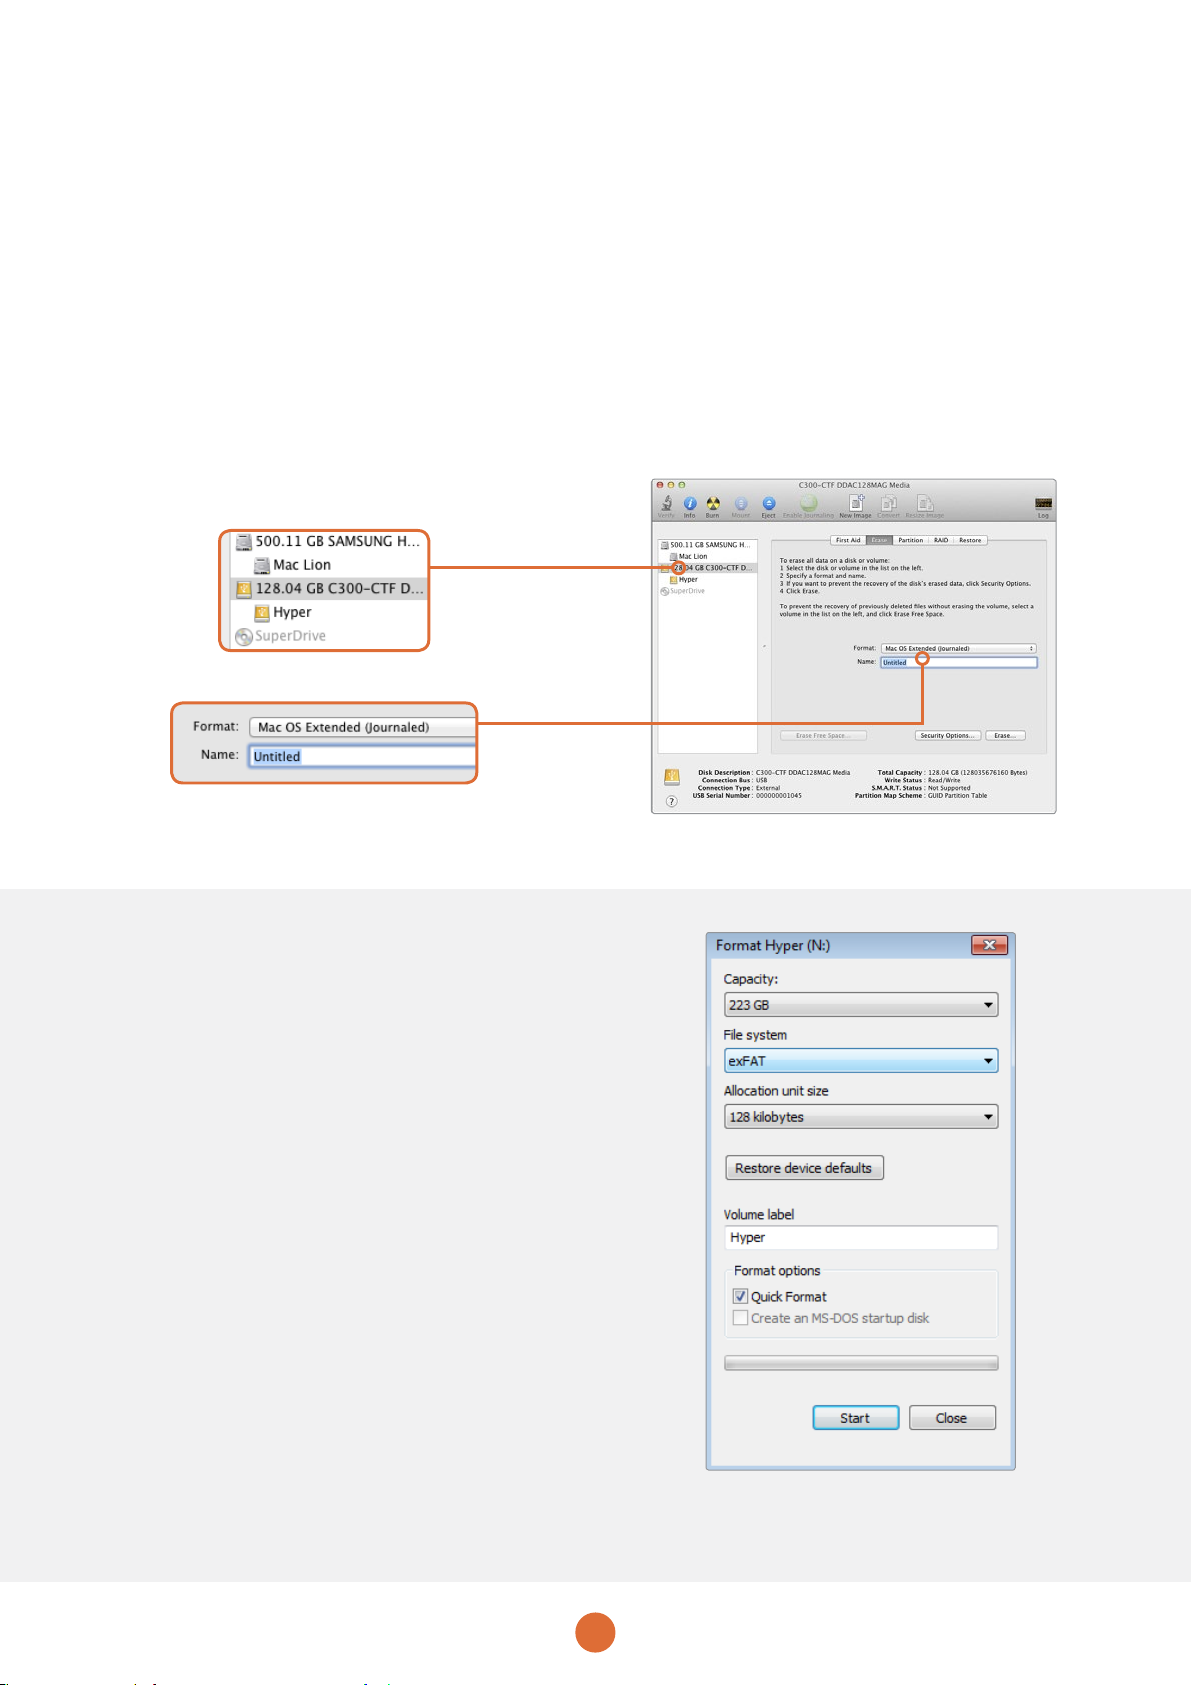
SD cards can also be formatted using a Mac OS X or Windows computer.
Preparing SD Cards on a Mac OS X computer
Use the ‘disk utility’ application included with Mac OS X to
format or initialize your SD card in the HFS+ or exFAT
formats. If your SD card already has files recorded on them,
remember to back up your media as all data will be lost
when it is formatted.
Step 1.
Plug an SD card into your computer’s SD card slot or via
an SD card reader.
Step 2.
Go to ‘applications/utilities’ and launch ‘disk utility’.
Step 3.
Click on the disk icon of your SD card and then click the
‘erase’ tab.
Step 4.
Set the format to ‘Mac OS extended (journaled)’ or “exFAT”.
Step 5.
Type a ‘name’ for the new volume and then click ‘erase’.
Your SD card will quickly be formatted and made
ready for use.
Preparing SD Cards on a Windows computer
The ‘format’ dialog box can format an SD card in the exFAT
format on a Windows PC. Remember to back up anything
important from your media as all data will be lost when it
is formatted.
Step 1.
Plug an SD card into your computer’s SD card slot or via
an SD card reader.
Step 2.
Open the ‘start menu’ or ‘start screen’ and choose
‘computer’. Right-click on your SD card.
Step 3.
From the contextual menu, choose ‘format’.
Step 4.
Set the file system to ‘exFAT’ and the allocation unit size
to 128 kilobytes.
Step 5.
Type a volume label, select ‘quick format’ and click ‘start’.
Step 6.
Your SD card will quickly be formatted and made
ready for use.
Use the ‘format’ dialog box feature in Windows to
format your SD card in the exFAT format
Use ‘disk utility’ on Mac OS X to erase your SD card in the Mac OS extended (journaled) or exFAT format.

16
Working with Files from SD Cards
You can access your ProRes or DNxHD files straight from
your SD card with any Mac OS X or Windows computer
that features an SD card slot or by using an SD card reader.
Step 1.
Remove the SD card from your Blackmagic Video Assist
and insert it into the SD card slot of your computer, or SD
card reader. The SD card can be accessed the same way
as you would an external hard drive, USB drive or any other
media storage device attached to your computer.
Step 2.
Double click on the SD card to open it and you should see
a list of QuickTime or MXF movie files.
Step 3.
Now you can simply drag the files you want from the card
onto your desktop or another hard drive, or you can access
the files straight from the card using your NLE software.
Step 4.
Before you physically remove the SD card from the SD
card slot, it’s always a good idea to eject the card safely
using either Mac OS X or Windows first. MCC closed caption
data files recorded by Blackmagic Video Assist can be
opened with MacCaption or CaptionMaker software for
Mac OS X or Windows respectively.
Checking Disk Speed
Blackmagic Disk Speed Test is a fun application that
measures the read and write performance of storage media,
then displays the results using video formats.
If you have ever wondered whether your storage media is
suitable for recording (“write”) or playback (“read”) of a
particular video format, you can use Disk Speed Test to
find out. Test the performance of your media drives with
a single click of the ‘start’ button! Disk Speed Test will even
show you how many streams of video your storage is
capable of handling.
Disk Speed Test is included free with the Blackmagic Video
Assist Utility software supplied with your Blackmagic Video
Assist and can be downloaded from our website free
of charge.
Insert your SD card into any computer with an SD card
slot to access your clips immediately.
HDMI
Use Blackmagic Disk Speed Test to find
out the performance of your SD card.
Blackmagic Disk Speed Test interface.
About SD Cards

17
Using DaVinci Resolve
Introducing DaVinci Resolve
Recording clips with your Blackmagic Video Assist is only
part of the process of creating television content, and just
as important is the process of media backup and
management as well as editing, color correction and
encoding final master files. DaVinci Resolve 11 for Mac OS
X and Windows is included with your Blackmagic Video
Assist so you have a complete solution for recording and
post production!
After connecting your SD card to your computer, you can
use DaVinci Resolve’s media management to create running
backups as you shoot. This is recommended as any type
of media is susceptible to becoming damaged or developing
a fault so backup ensures your shots will be immune to
loss. Once you have used DaVinci Resolve to back up your
media, you can then load your clips into the DaVinci media
pool, then edit, color correct, and finish your production
without ever having to leave DaVinci Resolve.
DaVinci Resolve will help you adjust your clips to get any
kind of look you are after. DaVinci Resolve is the same tool
used on most major blockbuster movies, so it’s much more
than a simple NLE software tool, as it has extremely
advanced technology built in for high end digital film. You
get the advantage of this technology when you use DaVinci
Resolve to edit and color correct your work.
Included here is information on how to get started using
DaVinci Resolve with your recorded clips. Of course, DaVinci
Resolve is extremely advanced and includes a lot more
features than you immediately see when first looking at its
user interface. To learn more about how to use DaVinci
Resolve, please check for the DaVinci Resolve instruction
manual pdf file on the DaVinci Resolve software SD card,
or check online for the many training courses and tutorial
videos available.
18
Using DaVinci Resolve
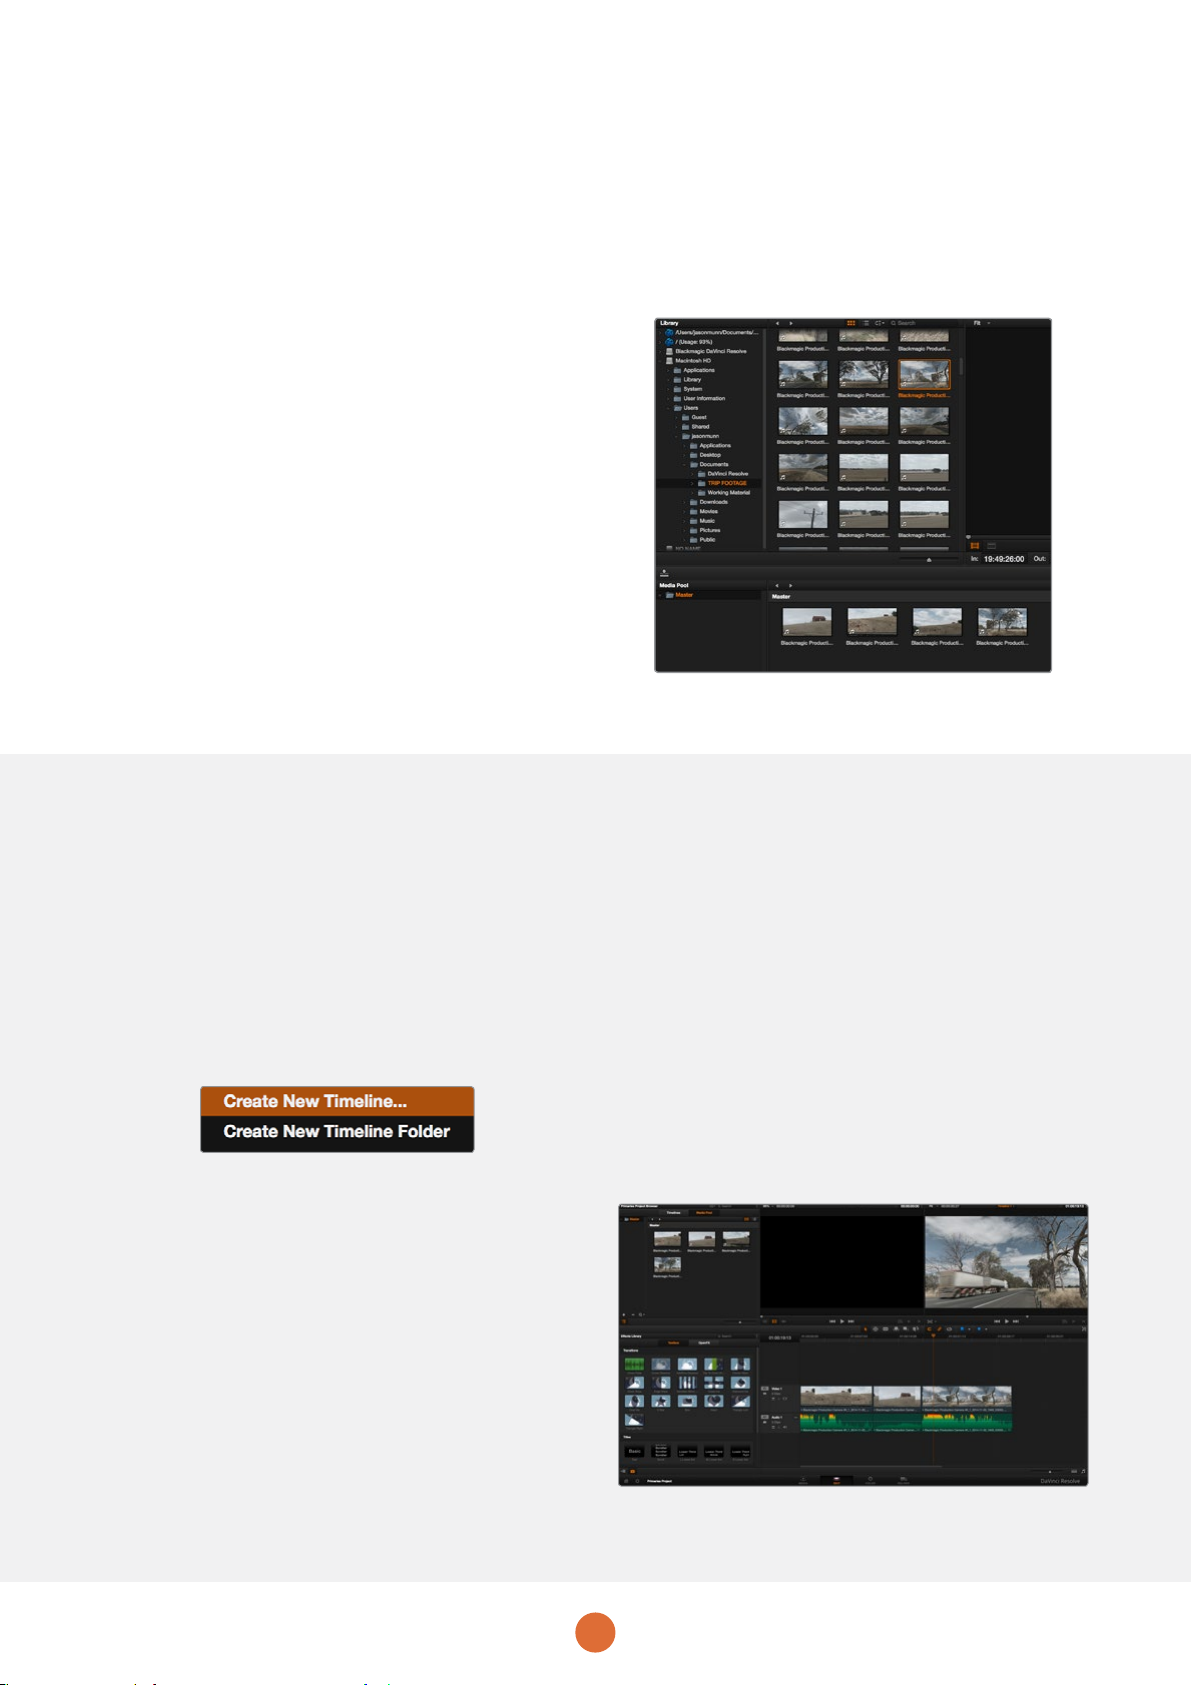
Importing your Clips
To start editing your clips, you’ll first need to import them
into the media pool:
Step 1.
Launch DaVinci Resolve. If this is the first time you’ve
opened DaVinci Resolve, click on the ‘plus’ icon at the
bottom left of the log in window and create a new user.
Log in and double click on ‘untitled project’ in the project
manager window.
Step 2.
You’ll now see the ‘media’ page with a library window at
the top left. The library window displays all your linked
media folders from where you’ll drag your clips and drop
them into the media pool.
If your clip folder doesn’t appear in the library, you’ll need
to add it. This is easily done by clicking on preferences in
the DaVinci Resolve title bar and clicking on the ‘plus’ icon
in the ‘media storage’ tab, browse to and select a drive or
folder path, click ‘save’, restart DaVinci Resolve and reopen
‘untitled project’ to refresh the media storage settings.
Step 3.
In the library window, click on your newly added clip folder.
Now simply drag your clips from your storage folder and
drop them into the media pool. If the untitled project settings
are different to your clip settings, you’ll be prompted to
either change the project settings to match your clips, or
leave the settings as they are. To get started quickly, click
‘change’. Now your project settings match your clips.
Editing your Clips
With your clips in the media pool, click on the ‘edit’ tab to
open the edit page.
Now you can start building your edit!
Step 1.
You’ll first need to create a new timeline. Right click in the
‘timelines’ window next to the folder library and select
‘create new timeline’. When the dialog box appears, click
the ‘create new timeline’ button.
Step 2.
Click on the ‘media pool’ button above the timelines window.
Now double click on a clip to open the clip in the source
viewer. Use the mouse pointer to scrub the play head in
the source viewer left and right until you find the start frame
you want for the clip. Mark the ‘in’ point with the ‘I’ shortcut.
Do the same for the end frame using the ‘O’ shortcut.
Step 3.
Go to the timeline and position the timeline play head
where you want your clip to be inserted.
Step 4.
To insert the clip onto the timeline, click inside the source
viewer then drag the mouse pointer across to the timeline
viewer. A list of edit options will appear. Select the type of
edit you want. Your clip will be placed onto the timeline
using the edit type you selected. You’ll find a description
of each edit type and how to use them in the DaVinci
Resolve manual.
A faster way to add clips to your edit is by dragging them
from the media pool and dropping them directly onto the
timeline where you can adjust your in and out points,
position your clips, try different plug in effects, titles and
more. This particular workflow is like using the timeline as
an artist’s palette.
To import your clips, simply drag them from the library
and drop them into the media pool.
To start editing your clips, you’ll need to
create a new timeline. The timeline is the stage
upon which all your editing will take place.
The ‘edit’ page. You can trim your clips, change their
order, move them around and add transitions between
them using the timeline editor.

19
Trimming Clips
When editing clips you’ll want to trim them to include only
the specific actions you want in each shot. There are various
ways, but the easiest is to adjust the clips’ in and out points
on the timeline:
Step 1.
After adding clips to your timeline, hover your mouse pointer
over the start of a clip until the pointer becomes a trim icon.
Step 2.
When the trim icon appears, click on the start of your clip
and drag it forwards or backwards to trim the in point.
Watch the timeline monitor as you trim to find the edit point.
Step 3.
Now click and drag the end of your clip to adjust the
out point.
The zoom slider is located underneath the timeline. By
dragging the slider left and right you can zoom in and out
of your timeline to make fine adjustments.
Turning the ‘snapping’ feature off is handy when fine tuning
edits, but it’s a helpful feature to keep your clips held tightly
against each other, so it’s worth turning back on once you’re
done. Press the ’N’ key to quickly turn snapping on or off
Mapping Keyboard Shortcuts
If you are familiar with keyboard shortcuts using other
editing software, you can easily map your own in DaVinci
Resolve to increase speed and optimise your workflow.
To map your own keyboard shortcuts:
Step 1.
Click on the project setting ‘gear’ icon at the bottom left
of your DaVinci workspace, then select keyboard mapping
from the settings list.
Step 2.
Select the shortcut you want to change from the categories
provided, for example timeline cut and paste shortcuts will
be in the ‘edit’ category.
Step 3.
Click on the shortcut once to highlight the setting. Double
click on the shortcut to enable the change.
Step 4.
Press your new shortcut keys on the keyboard. If you make
a mistake you can easily undo the change by clicking the
‘undo’ icon next to the setting.
Step 5.
Click save to confirm your new shortcut setting.
Trim your clips by dragging their start and end points left or right.
The ‘snapping’ feature can be turned off when making fine adjustments.
Using DaVinci Resolve

20
Adding Transitions
A transition is a visual effect used to bridge one clip to
another in a pleasing way, for example dissolves, wipes,
dips to color, and more. These can add a layer of excitement
to your edit. Transitions don’t always have to be joining
two clips, for example you can apply a dissolve transition
to the end of one clip to create a quick and easy fade to black.
To add a dissolve transition between two clips:
Step 1.
Make sure there are two clips edited tightly together on
the timeline. Go to the toolbox in the ‘effects library’ located
below the media pool and you’ll see the ‘transitions’ palette.
Step 2.
Click on the ‘cross dissolve’ transition, drag it to your timeline
and hover it over the edit point between two clips. You’ll
see the mouse pointer highlight both the end section of
the first clip, and the start of the second. Drop the transition
onto the clips. It’s important both clips have enough length
before and after their edit points to make room for
the dissolve.
You now have a smooth transition mixing from one clip to
the other. If you want to adjust the length of the transition
you can lengthen or shorten its start and end point using
a similar approach to trimming a clip. Hover your mouse
pointer over the start or end of the transition until the
transition trim icon appears, then drag it left or right.
Adding Titles
It’s easy to create titles for your edit. You can place a title
on any video track just as you would a clip. If you run out
of tracks you can easily add new ones by right clicking
next to an existing track name and selecting ‘add track’.
To create a title:
Step 1.
Go to the toolbox in the ‘effects library’ located underneath
the media pool and you’ll see the ‘titles’ palette. Use the
scroll bar to reveal more titles options.
Step 2.
Drag and drop a basic text title on the empty video track
above the clip you want the title to appear. You can even
drop your title next to a clip on Video 1 if you just want it
to appear over black. To see the title, make sure the timeline
playhead is on the title.
Step 3.
Double click on the title clip. The ‘inspector’ window will
appear showing you the settings for your title. Type your
title into the ‘text’ window.You can choose from a variety
of fonts and adjust the appearance of your title by changing
settings such as color, size, alignment, position, and more.
Transitions can be added to titles, just like they can for clips.
Drag a title type from the ‘titles’ palette
and drop it on an empty track.
Simply drag and drop transitions between adjoining clips
The transitions palette contains many types of transition effects.
Using DaVinci Resolve
Other manuals for Blackmagic Video assist
1
Table of contents
Languages:
Other Blackmagicdesign Recording Equipment manuals

Blackmagicdesign
Blackmagicdesign URSA Broadcast G2 User manual

Blackmagicdesign
Blackmagicdesign HyperDeck Studio User manual

Blackmagicdesign
Blackmagicdesign UltraStudio Pro User manual

Blackmagicdesign
Blackmagicdesign DeckLink Series User manual

Blackmagicdesign
Blackmagicdesign Video Recorder User manual

Blackmagicdesign
Blackmagicdesign ATEM Camera Converter User manual

Blackmagicdesign
Blackmagicdesign HyperDeck Studio User manual

Blackmagicdesign
Blackmagicdesign H.264 Pro User manual

Blackmagicdesign
Blackmagicdesign Audio Monitor User manual

Blackmagicdesign
Blackmagicdesign Videohub 12G User manual


