Blackmagicdesign ATEM Production Studio 4K User manual


Welcome
Thank you for purchasing an ATEM switcher for your live production work!
If you’re new to live production switchers, then you’re about to become involved in the most
exciting part of the television industry and that’s live production! There is nothing like live
production and it’s so easy to become addicted to the adrenaline rush of editing in real time
while the live event unfolds before your eyes. It’s real television the way it should be!
Previously, broadcast quality live production has always been way too high in cost for
most people to afford, while affordable switchers lacked broadcast features and quality.
The new ATEM switchers change this, and you can use them for the most amazing
professional live production results. We hope you get years of use from them and have
lots of fun with your live production!
This instruction manual should contain all the information you’ll need for installing your
ATEM Production Switcher. The ATEM switcher includes a software control panel which
you can run on your computer or you can purchase a hardware based broadcast control
panel separately. The computer and control panels connect to your ATEM switcher via a
network cable and you can directly connect them together without any extra equipment!
Please check the support page on our web site at www.blackmagicdesign.com for the
latest version of software for your ATEM switcher. Simply connect your computer to the
ATEM switcher and the ATEM broadcast control panel via USB to update software so
you get all the latest features! When downloading software, please register with your
information so we can keep you updated when new software is released. We are constantly
working on new features and improvements, so we would love to hear from you!
Grant Petty
CEO Blackmagic Design
English

Contents
ATEM Production Switchers
Getting Started 7
Introducing ATEM 7
What is an M/E Switcher? 7
What is an A/B Direct Switcher? 9
Understanding the ATEM Switcher 10
Plugging in Multi View Monitoring 11
Plugging in a Broadcast Panel 12
Installing Blackmagic ATEM
Software on Mac OS 14
Installing Blackmagic ATEM
Software on Windows 15
Plugging in your Computer 16
Switcher Settings 19
Plugging in Cameras and
Other Video Sources 22
Plugging in Audio 24
Connecting to a Network 24
Changing the Switcher
Network Settings 25
Understanding the Broadcast
Panel Network Settings 26
Setting the Switcher IP Location 26
Changing the Broadcast Panel
Network Settings 26
Updating the Software
usingATEMSetup 28
How to update the ATEM Software 28
Updating the Switcher Software 29
Updating the Broadcast
Control Panel Software 29
Updating via Ethernet 30
Changing your Switcher’s Language 30
Connecting Video Outputs 31
Using ATEM Software Control 33
Preference Settings 33
General Preferences 33
Button Mapping 34
Switcher Control Panel 34
Switcher Panel 34
Using Keyboard Hot Keys 35
Media Manager 35
Audio Mixer 36
Camera Control 36
Switcher Settings 37
Using the Software Control Panel 38
Mix Eects 38
Program Bus Source Select Buttons 38
Preview Bus Source Select Buttons 39
Transition Control and
Upstream Keyers 39
Downstream Keyers 41
Fade to Black (FTB) 41
Processing Palettes 42
Palettes Tab 42
Media Players Tab 43
Capture Tab 44
Audio Source Selection 47
Master Audio Level Output 47
Changing Switcher Settings 51
General Settings 51
Multi View Settings 57
Labels Settings 58
HyperDeck Settings 59
Controlling Auxiliary Outputs 60
Routing Auxiliary Outputs 60
Transition Control 60
Using Camera Control 62
Camera Control Panel 64
Camera Settings 65
DaVinci Resolve
PrimaryColorCorrector 69
Contents

HyperDeck Control 71
Introducing HyperDeck Control 71
Connecting HyperDecks 72
HyperDeck Settings 73
Controlling HyperDecks with
ATEM software 74
Playback 75
Recording 75
HyperDeck Setup with
ATEMBroadcast Panels 76
Controlling HyperDecks with
ATEM Broadcast Panels 78
HyperDeck Multi Control on
ATEM 2 M/E Broadcast Panels 79
Using the ATEM 1 M/E Broadcast
Panel 80
Using the Control Panel 80
Mix Eects 80
Source Names Display 81
Program Bus 81
Preview Bus 81
Destination Display and Select Bus 81
Transition Control and
Upstream Keyers 82
Downstream Keyers 83
Fade to Black 84
System Status 84
System Control 85
Menu Buttons 85
Joystick and Numeric Keypad 85
Controlling Cameras using
the Joystick 85
Connecting a Remote Head 86
PTZ Setup for Remote Heads 86
Joystick PTZ Controls 87
Controlling a HyperDeck 87
Button Mapping 87
Using the ATEM 2 M/E
BroadcastPanel 88
Using the Control Panel 89
Mix Eects 89
Source Names Display 89
Program Bus 89
Preview Bus 90
Destination Bus and Select Bus 90
Auxiliary Outputs 90
Downstream Keyers 93
Fade to Black 93
System Status 93
System Control 94
Menu Buttons 94
Joystick and M/E Pattern
and Key Buttons 94
Joystick and Numeric Keypad 95
Controlling Cameras using
the Joystick 95
Connecting a Remote Head 95
PTZ Setup for Remote Heads 96
Joystick PTZ Controls 96
Controlling a HyperDeck 97
Serial Port Pin Connections for
Control Cables 97
Button Mapping 97
Controlling Two ATEM Switchers 98
Using ATEM Television Studio HD 99
Using ATEM Television Studio Pro HD 106
Program and Preview Buttons 107
Transition Buttons 107
Transition Slider 108
Understanding the Audio Controls 109
Camera Control 110
Contents

Oset Color Control 114
Addressing Cameras using
theCall Button 114
Using the Upstream and
Downstream Keyers 114
Source Select Buttons for
Keyers and Macros 115
Using DVE Picture in Picture Buttons 116
Using the LCD Menus 116
Auxiliary Button 117
Fade to Black 117
Operating your ATEM Switcher 118
Internal Video Sources 118
Cut Transitions 120
Auto Transitions 121
DVE Transitions 130
Manual Transitions 134
Preview Transition 134
Keying on ATEM Switchers 135
Understanding Keying 135
DVE Key 144
Using Adobe Photoshop with ATEM 150
Using Auxiliary Outputs 151
Using SuperSource (Picture in Picture) 154
Using Macros 157
What is a Macro? 157
The Macros Window 157
Recording Macros 158
Recording a Macro using
ATEMSoftware Control 159
Building Large Macros 161
Recording Macros using an
ATEM 1 M/E Broadcast Panel 164
Recording Macros using an
ATEM 2 M/E Broadcast Panel 166
System Control Macros Menu 169
Using Tally 170
Sending Tally Signals via
aGPIand Tally Interface 170
Using Audio 173
Connecting other Audio Sources 173
Using Embedded SDI and
HDMI Audio Sources 174
Using a Third Party Audio Mixer
Control Surface 175
Working with USB 3.0 177
Using Blackmagic Media Express 178
Capturing Video and Audio Files 178
Playing back Video and Audio Files 182
Browsing Media 183
Editing Video and Audio Files to Tape 186
Using Blackmagic UltraScope 187
Blackmagic UltraScope Interface 189
Understanding Blackmagic
UltraScope Views 189
Developer Information 199
Blackmagic Video Device
Embedded Control Protocol 199
Blackmagic Embedded
TallyControl Protocol 206
Help 208
Regulatory Notices
andSafetyInformation 209
Warranty 210
Contents
Getting Started
Introducing ATEM
ATEM Production Switchers are professional broadcast grade digital production switchers
capable of switching and processing a variety of video sources in live video production and
broadcast environments. The switcher uses the current and familiar M/E (Mix Effects) based
design with software and hardware control options that provides an intuitive, fast and easy to
use workflow for program/preview switching! If you’re used to the older A/B direct switcher
style, ATEM switchers also support A/B direct switching which makes it easy to get started!
An ATEM production switcher only requires an ATEM production switcher and the included
software control panel to get started. Then you can optionally add one or more hardware
control panels if you need a more advanced solution.
Multiple control panels can be connected to control the same switcher by simple Ethernet
connections. The ATEM software control panel can be installed on as many computers as you
like at no extra cost.
Current ATEM Television Studio model switchers are small, self contained
portable switchers with built in control panels, so setup is minimal and
you don’t have to use the ATEM software panel if you don’t want to.
What is an M/E Switcher?
If you have used low cost switchers before, then these might not have used the mix effects
style of operation that’s commonly called an M/E style of operation. If you have used an M/E
style switcher, then you might want to skip ahead to install and get working with your new
ATEM switcher!
When you’re starting out with a switcher for the first time, the ATEM can look a little intimidating
with all its buttons and knobs, however it’s all very logically laid out so it’s very simple to use!
ATEM is a true high-end broadcast switcher that operates using the M/E workflow standards
used in the broadcast industry. This means once you get familiar with how it works, you will feel
instantly at home on virtually any switcher used in broadcast today.
77Getting Started

The M/E style of operation has been developed over decades to help eliminate errors when
switching live events and is a broadcast standard. It’s extremely easy to see what’s going on at
any time so you don’t get confused and make mistakes. The M/E style of operation lets you
check the sources you are about to switch on air, as well as try effects before using them on air.
You can see buttons for each keyer and transition, so you instantly know what’s going on and
what’s about to happen.
The best way to learn about how your ATEM works is to grab your switcher and play with it
while referencing this manual! You might want to jump ahead and install your switcher before
reading the rest of this section!
To start, the most visible part of an M/E based control panel is the fader bar, and the program
and preview rows of source buttons!
The program bus source select buttons are used to hot switch sources to the program output.
The source currently on air is indicated by a button that is illuminated red. Be careful when
selecting sources on this row, as they will instantly be switched on air!
A safer and more orderly way to do transitions is to select them on the preview row, and then
use a transition to cut or transition them on air.
The bottom row of buttons is the preview bus source selection. This is where you will spend
most of your time selecting sources about to go on air. This selected source is sent to the
program output when the next transition occurs. The next transition can be triggered by pushing
the cut button, the auto button, or by toggling the fader bar. You can select between a mix, dip,
wipe, DVE or other transition depending what you have selected in the transition control section.
This is a very powerful way to use a switcher, because you can select your source on the
preview row, and see it on the preview video output to confirm that you have the correct source
before you select the transition you want. You can see what’s happening at all stages so it’s hard
to make mistakes. Only the M/E style of operation allows you to keep track of what’s going on.
You also might notice that once your transition is complete, the sources selected on the
preview and program rows swap over. This is because the source you selected on the preview
row is now the new on air source, so it becomes selected on the program row once the
transition is complete. Remember the program row always shows what’s on air.
You will also see both the program and preview buttons illuminate red when doing an auto
transition, as for a short time, they are both on air while the transition occurs.
There are multiple types of transitions available, and they can be selected in the transition
control. On the ATEM 1 M/E Broadcast Panel there are two transition type buttons. One is
labeled DIP/MIX and the other is labeled DVE/wipe. Selecting these buttons selects mix and
wipe transitions, however pressing shift and then selecting mix or wipe allows more types of
transitions, dip and DVE. You can also select both buttons for a stinger transition. On the
ATEM2 M/E Broadcast Panel there are four transition type buttons. One is labeled DIP/MIX and
the others are labeled wipe, stng and DVE. Selecting these buttons selects mix, wipe, stinger
and DVE transitions. However pressing shift and then selecting mix allows for dip transitions.
Ifyou are using the ATEM software control panel on your computer, or ATEM Television Studio
Pro HD’s built in control panel, all transition types have their own button, and no shifting is
necessary to select any of them. Extra details on how all these transitions work are provided
later in this instruction manual.
The other concept that is important to know about M/E style switchers, including ATEM, is the
video on the program and preview rows is technically called the background video. This is
because the upstream (effects) keyers and downstream keyers will overlay on top of this
source. So you can load graphics into the keyers and see them with the preview video and
when keys are turned on, you will see the overlay on top of the program video. This is very
powerful and allows multiple layers to be built up.
88Getting Started

Another great advantage of the ATEM M/E style of operation is you can tie keyers to the
transition. This means when you do a mix transition, you can also fade on or off keyers at the
same time. This allows you to build up a composition, and then bring the whole lot on air at the
same time. This is what the next transition buttons do, and you can select background for
normal transitions, or select one or more keyers to transition them on air.
You can even press multiple buttons on the hardware control panel to tie multiple keys and the
background at the same time. There are also dedicated downstream key tie buttons to tie
downstream keyers to the transition. Downstream keys also have dedicated cut and mix
buttons and so are very flexible. Downstream keyers are always layered over the top of
everything including the transition, so are a great place to key bugs and logos!
Finally, when your live production is finishing, it’s nice to have a dedicated fade to black (FTB)
control to fade everything to black! You can see the dedicated fade to black control on the right
side of the keyboard. This lets you fade everything to black, and helps make sure you don’t
miss a layer. Fade to black is at the extreme end of the processing chain so you get a clean
fade of all sources.
The last part of an M/E style switcher is the select bus. This is above the program row, and
simply allows sources to be selected for effects processing and other purposes, and there is a
label above this to show what you’re switching. The select bus is commonly used to select key
inputs, and aux outputs. It’s a clean switch, so when used to select aux outputs, you get a
clean cut.
As you can see by this quick overview, M/E style of operation allows confident live production
with good feedback on what’s going on and the state of your switcher and programming at any
point in your production. Once you learn the M/E style of operation, you can move between
models of production switchers with little retraining as they all work the same!
What is an A/B Direct Switcher?
If you have been using video switchers for a long time, then you might be used to older-style
A/B direct switchers and you can easily set your ATEM switcher to A/B direct switching in the
ATEM software preferences. See the Transition Control section of this instruction manual for
details about where to change this setting.
A/B direct switchers have an A bus and a B bus. One bus is the program bus which shows a red
button for the current program output. The other is the preview bus which has a green button
for the preview video. As you move the fader bar up and down, the buses switch so that the red
program button follows the fader handle. This is where A/B direct switching is really easy to use
as the buttons stay lit in the same positions and just switch color between green and red.
A/B direct switching becomes a little more confusing when the fader bar is not used to make
the switch. If you use a cut or auto transition button to bring your preview source on air, or if you
use more than one control panel connected to your switcher, the fader bar won’t have moved
on the control panel that you are using. The red program output always follows the fader bar
handle and, as you haven’t moved it, the red program light has to move to another button on
the same row and the green preview light has to move to another button in its row.
This can become quite confusing when sometimes using the fader bar to make switches, and
sometimes not, as the rows containing your preview and program buttons will sometimes switch
and sometimes stay where they are which has the potential to lead to mistakes.
This is why modern M/E style switching is preferable because you’ll always find your green
preview button in the row labelled Preview, and the red program button in the row labelled
Program. It’s always consistent and there are no surprises with M/E style switching.
99Getting Started

Understanding the ATEM Switcher
The ATEM switcher provides all the video processing as well as all video input and output
connectors, connection for control panels and power connections. You use the switcher by
connecting and using various types of control panels. This allows the switcher to be located
remotely, such as in machine rooms where it’s closer to the connected video devices, while the
control panel can be placed in a location from where it is easier to run production.
The ATEM Television Studio HD switcher is a portable switcher with a compact control panel
built in. This model is light and portable, and lets you control your switcher from the front panel
using the buttons, rotary knob and LCD menus. ATEM Television Studio HD Supports SD and
HD video from HD-SDI and HDMI connections with 8 external inputs, 1 auxiliary output, 2 media
players, 1 chroma keyer, and more.
ATEM Television Studio HD
The ATEM Television Studio Pro HD model switcher is the same as the ATEM Television Studio
HD model with a console style control panel built in plus extra camera controls.
ATEM Television Studio Pro HD
ATEM Production Studio 4K supports SD, HD and Ultra HD video and is capable of switching 8
external inputs from its SDI and HDMI connectors. The front panel keypad lets you select
instantly between auxiliary output sources and the small LCD gives you instant feedback on the
status of the auxiliary output.
ATEM Production Studio 4K
1010Getting Started
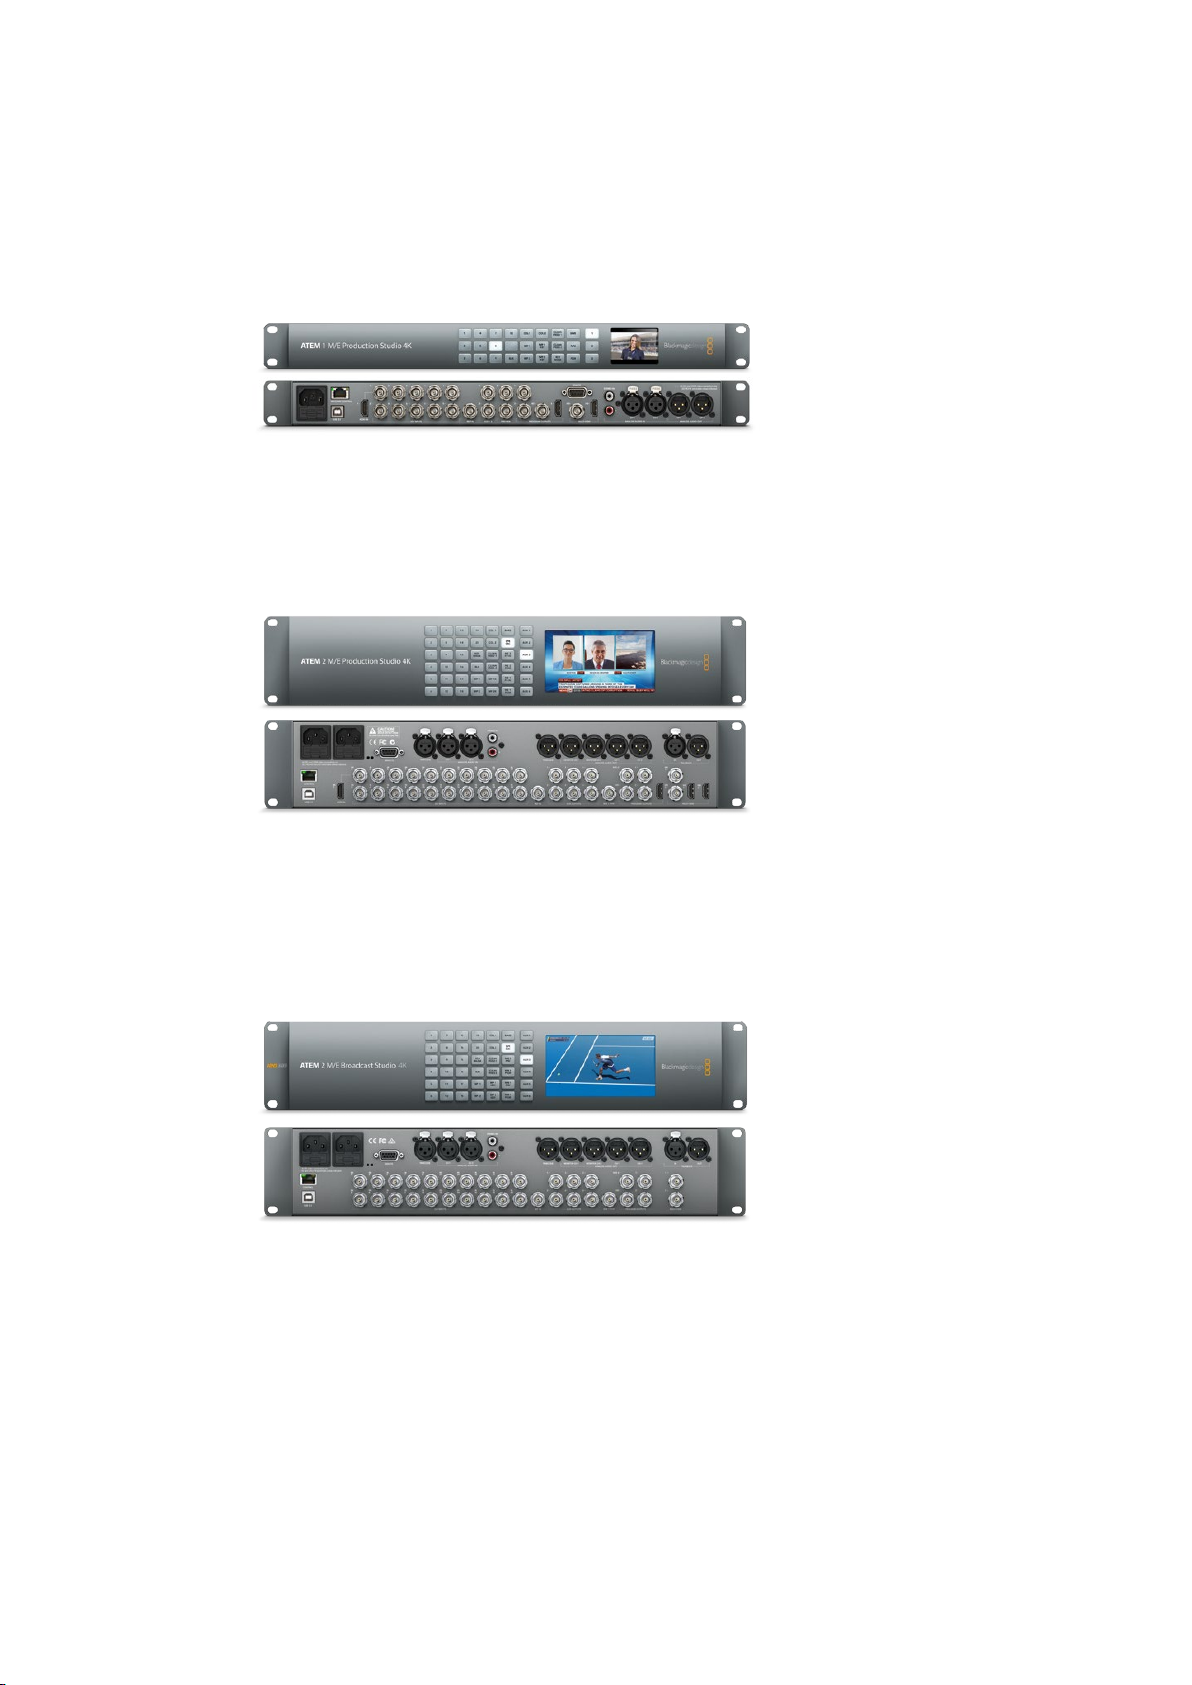
ATEM 1 M/E Production Studio 4K supports SD, HD and Ultra HD video and is capable of
switching 10 external inputs from its SDI and HDMI connectors. Input 1 is selectable between
the HDMI Input 1 and SDI Input 1 connector. The front panel keypad lets you select instantly
between 3 auxiliary output sources and the small LCD gives you instant feedback on the status
of the auxiliary outputs.
ATEM 1 M/E Production Studio 4K
ATEM 2 M/E Production Studio 4K supports SD, HD and Ultra HD video and is capable of
switching 20 external inputs from its SDI and HDMI connectors. Input 1 is selectable between the
HDMI Input 1 and SDI Input 1 connector. The front panel keypad allows on-the-fly selection of the
6 auxiliary output sources and the large LCD gives instant confirmation of your aux output content.
ATEM 2 M/E Production Studio 4K
ATEM 2 M/E Broadcast Studio 4K supports HD and Ultra HD video and is capable of switching
20 external inputs from SDI. Features include 4 media players, Ultra HD multi viewers and
12G-SDI support for Ultra HD frame rates up to 2160p59.94 on a single BNC connector.
The front panel keypad lets you select between 6 auxiliary output sources and you can monitor
the outputs on the large built in LCD.
ATEM 2 M/E Broadcast Studio 4K
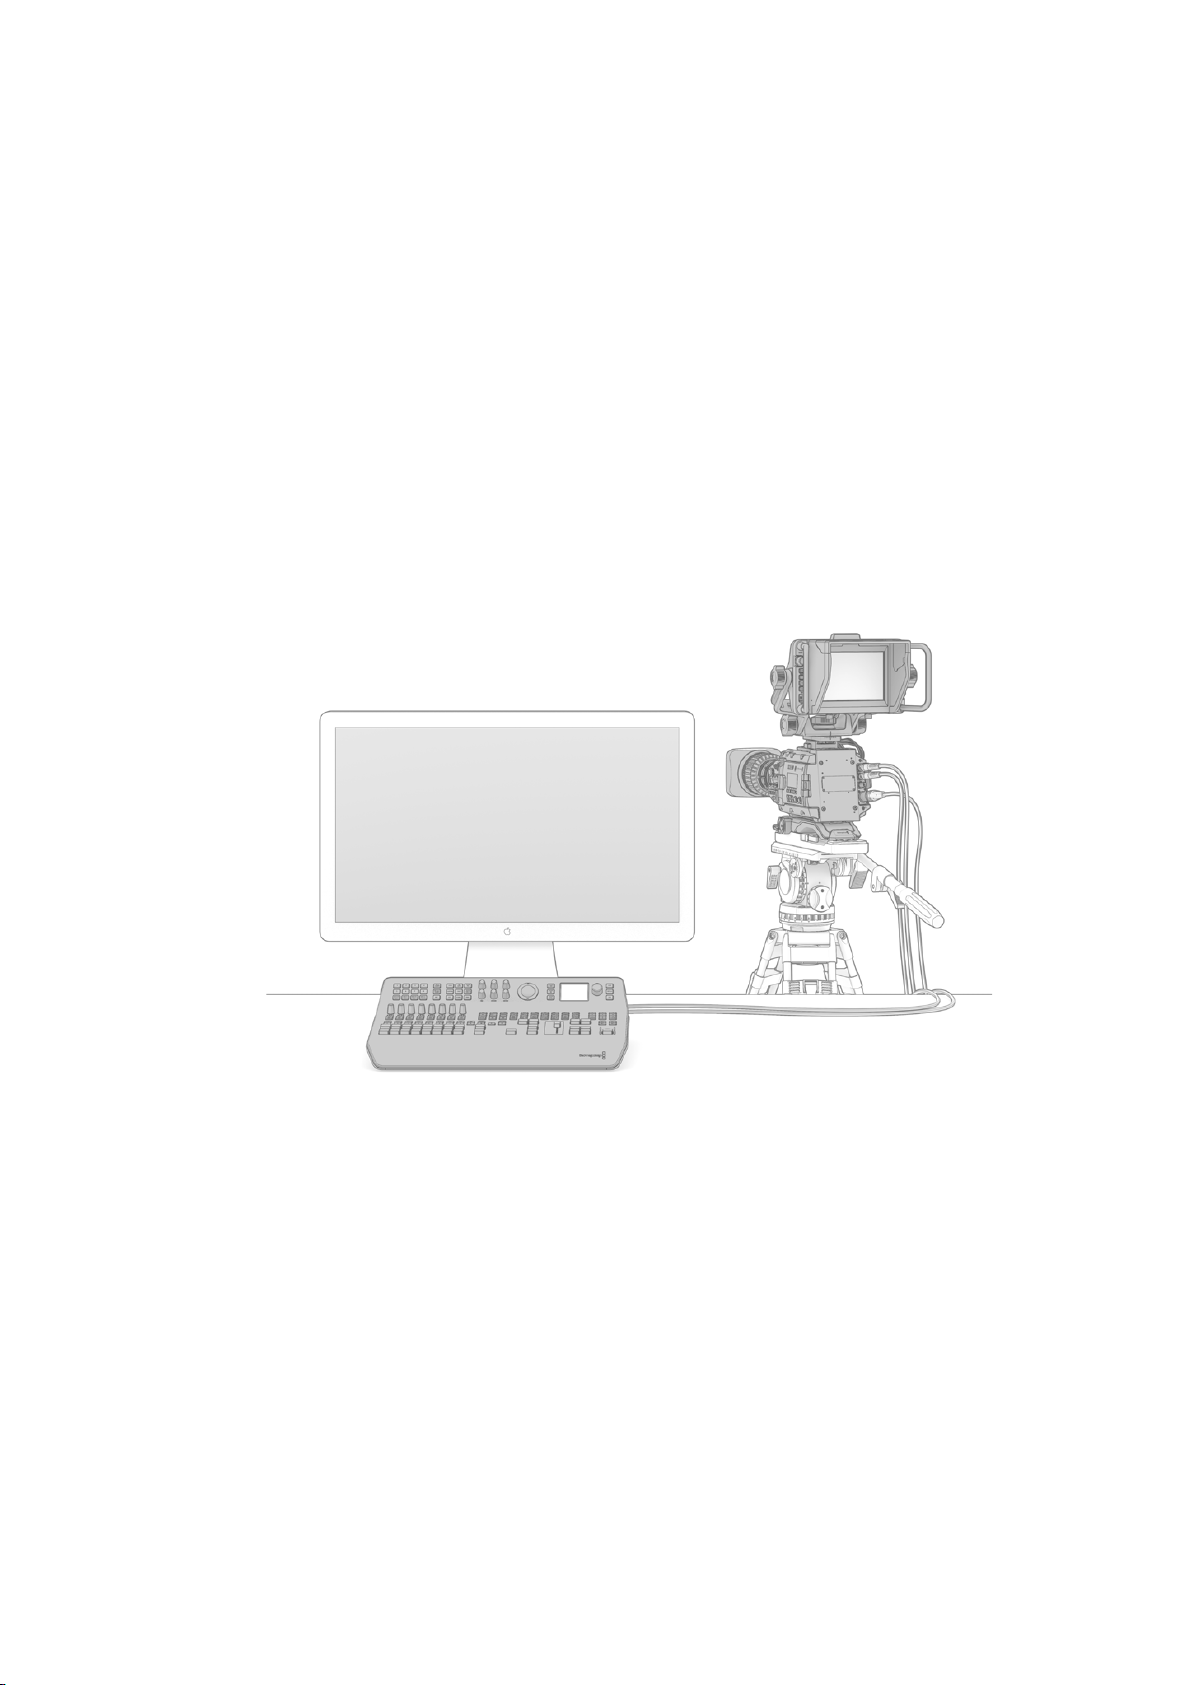
Plugging in Multi View Monitoring
The ATEM can be a little intimidating when first seen, especially since some models have no
controls to access, just lots of connectors! So the first step is to plug in power and a monitor and
see it working! The ATEM Production Studio 4K models have a front control panel with a built in
LCD so you only need to connect power to see them working!
A convenient way to check that your ATEM is powered on and working correctly is to plug an
HDMI television or SDI monitor into the multi view output on the right side of the rear panel.
1111Getting Started

You should see 8 video boxes at the bottom, and two larger boxes at the top, all bound by
white borders. Each box will have a label.
If you see this video output, then your ATEM is powered on and running fine! All you need to do
now is plug in some control panels and video sources so you can start using your switcher!
If you don’t see the multi view output on your television, check the connections and cables are
correct. You need to plug into the multi view connector on the rear of the ATEM. Next, check if
your television is compatible with the video standard set in the ATEM. If your television is not
compatible with the set standard, don’t worry, its easy to change once you connect your
computer to the ATEM.
If you still don’t see the multi view on your television, then double check your power connection
to make sure your ATEM is powered on.
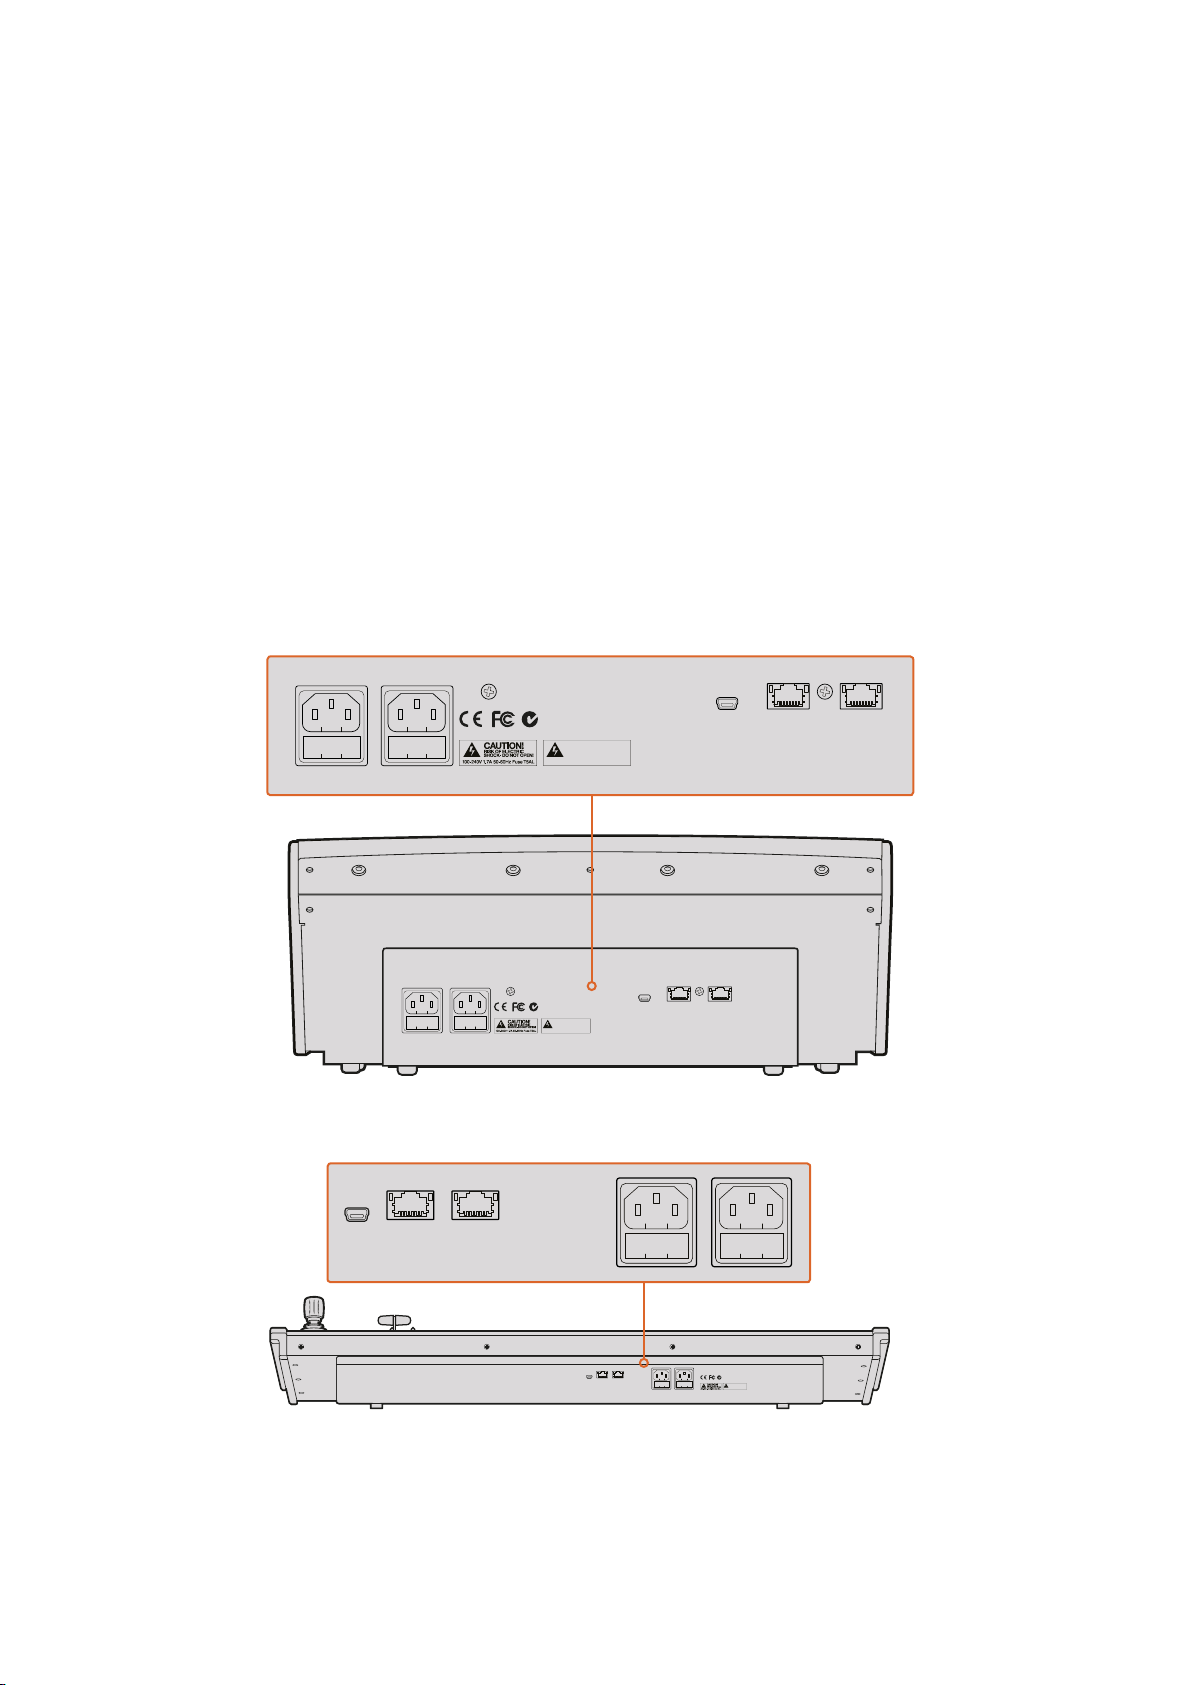
Plugging in a Broadcast Panel
If you have purchased an ATEM Broadcast Panel, then you won’t want to wait to plug in your
computer, as it’s much more fun to plug in the hardware panel first!
Plugging in the broadcast panel is simple, because it’s already set to the correct network
settings to plug into your switcher without any changes required.
1 Plug in the power to the broadcast panel. For redundant power on ATEM Broadcast
Panels with built in power supplies, plug in a second IEC power cord. For ATEM
Broadcast Panels with external power supplies, redundant power can be provided by
purchasing a second power supply and plugging it into the second power connector.
2 Plug one end of an Ethernet cable into one of the broadcast panel’s Ethernet ports.
Either of the ports will do, as there is an Ethernet switch inside the panel, so both ports
work the same.
3 Plug the other end of the same cable into the Ethernet port labeled Switcher Control on
the switcher.
1212Getting Started
If everything is working fine, you should see the lights on the Ethernet port start to flicker, and
the broadcast panel should come alive with buttons illuminated, and the main display on the
panel should say ‘ATEM Production Switcher’. The power status indicator lights on the front of
the panel will also illuminate.
If you don’t see this appear, then check that the switcher and the broadcast panel are powered
correctly and/or power connectors are firmly plugged in.
If things are still not working, then you should make sure that your broadcast panel is connected
directly to your switcher and not via a network. If this is correct, then the most likely cause of
the problem is the broadcast panel and the switcher have IP addresses in different ranges. In
this case, you will need to check and set these as described later in this manual.
If you need to manually set the network settings, then you might need to get the assistance of a
technically minded friend who understands how to set IP addresses. By default, the switcher is
set to a fixed IP address of 192.168.10.240, and the broadcast panel is set to fixed IP of
192.168.10.10, so when connected directly they should communicate without problem. Go to the
‘Connecting to a Network’ section in this manual to see how to check and set your switcher to
these addresses. Then it should work OK with a direct connection between the broadcast
panel and the switcher.
ATEM 1 M/E Broadcast Panel rear connectors
ATEM 2 M/E Broadcast Panel rear connectors
DISCONNECT POWER
FROM BOTH POWER
OUTLETS BEFORE SERVICING!
WARNING!
DISCONNECT POWER
FROM BOTH POWER
OUTLETS BEFORE SERVICING!
WARNING!
DISCONNECTPOWER
FROMBOTH POWER
OUTLETSBEFORE SERVICING!
WARNING!
DISCONNECT POWER
FROM BOTH POWER
OUTLETS BEFORE SERVICING!
WARNING!
1313Getting Started

Installing Blackmagic ATEM Software on Mac OS
Before installing any software you will need administrator privileges. It is also a good idea to
uninstall any previous versions of ATEM Software present on your computer.
1 Ensure you have the very latest driver. Visit www.blackmagicdesign.com/support
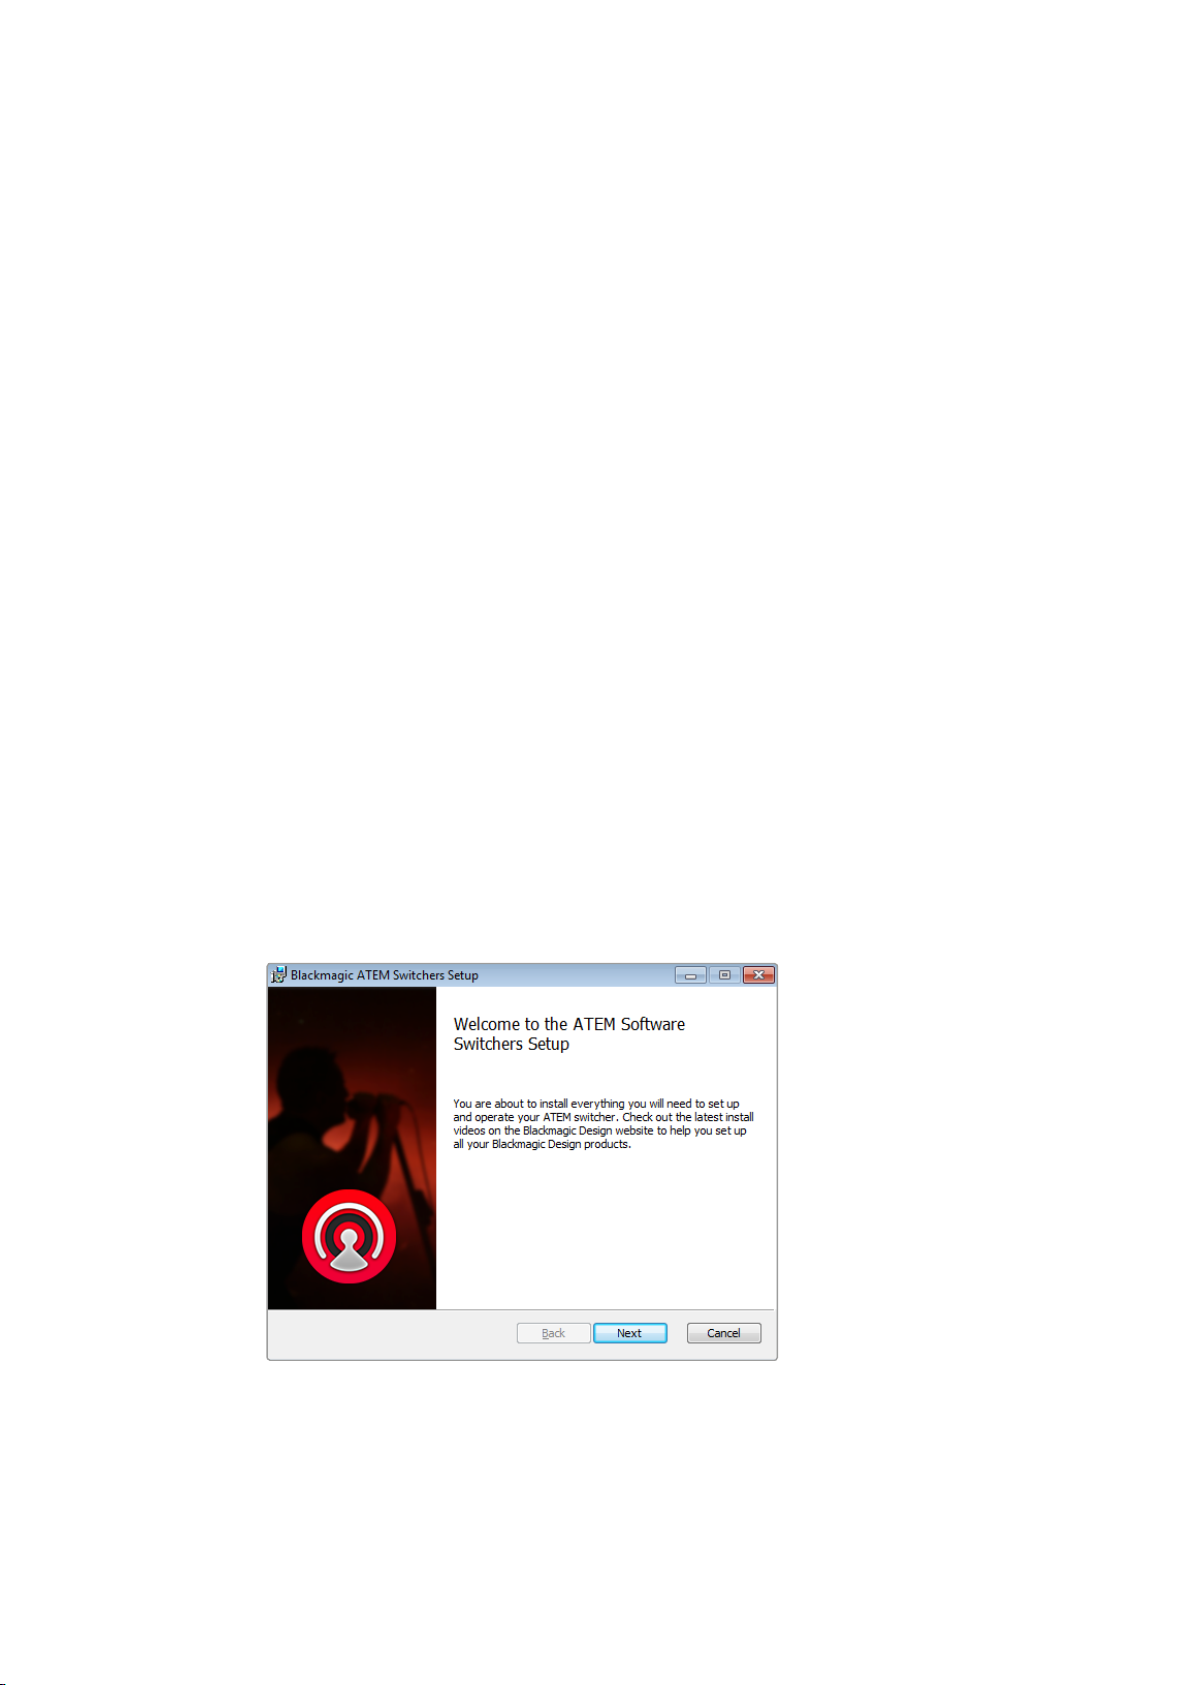
2 Open the “Blackmagic ATEM Switchers” folder from the disc or downloaded disk image
and launch the “Blackmagic ATEM Switchers Installer Software”.
3 Click Continue, Agree and Install buttons and the software will be installed on
your system.
4 Now restart your computer to enable the new software drivers.
Follow install prompts
Plugins and Applications that are Installed
The ATEM Switchers software installs the following components which are used by
ATEMSwitchers:
ATEM Software Control
Blackmagic ATEM Setup
Blackmagic ATEM Setup is used to configure network settings including IP address,
plus lets you update your ATEM switcher’s internal software. You can also launch ATEM
Software Control from the setup utility by clicking onitsicon next to the settings icon.
1414Getting Started
On Mac OS, all the files needed to run your ATEM switcher will be installed into a folder called
Blackmagic ATEM Switchers in the Applications folder.
In the Blackmagic ATEM Switchers folder, you will see ATEM Software Control and Blackmagic
ATEM Setup. ATEM Software Control is the software control panel for your switcher, which also
allows loading graphics into the switcher media pool, changing settings, mixing audio,
recording macros and controlling Blackmagic cameras, including Blackmagic Studio Cameras,
Micro Studio Cameras and URSA Mini.
Blackmagic ATEM Setup is the setup utility that allows you to browse connected switchers,
add additional switchers that are not automatically detected via their IP address, change your
switcher IP address, and update the switcher and panel software.
Also included in this folder is the instruction manual and some example graphics. Use the
example graphics to explore the internal media pool and keying functionality.
Installing Blackmagic ATEM Software on Windows
It is a good idea to uninstall any previous version of ATEM software present on your
WindowsPC before installing the latest software.
1 Ensure you have the very latest driver. Visit www.blackmagicdesign.com/support
2 Open the “Blackmagic ATEM Switchers” folder and launch the “Blackmagic
ATEMSwitchers Installer”.
3 The software will now be installed on your system. An alert will appear: “Do you want to
allow the following program to install software on this computer?” Click Yes to continue.
4 You will see a dialog bubble saying “found new hardware” and the hardware wizard
will appear. Select “install automatically” and the system will find the required Desktop
Video drivers. You will then receive another dialog bubble saying “your new hardware
is ready for use.”
5 Now restart your computer to enable the new software drivers.
Follow install prompts
1515Getting Started

Plugins and Applications that are Installed
The ATEM Switchers software installs the following components which are used by
ATEMSwitchers:
ATEM Software Control
Blackmagic ATEM Setup
Blackmagic ATEM Setup
Once the computer has restarted, all the ATEM software applications will be installed and can
be accessed from Start > Programs > Blackmagic Design.
In the ATEM Switchers folder, you will see ATEM Software Control and Blackmagic ATEM Setup.
ATEM Software Control is the software control panel for your switcher, which also allows
loading graphics into the switcher media pool, changing settings, mixing audio, recording
macros and controlling Blackmagic cameras including Blackmagic Studio Camera, Micro Studio
Camera, and URSA Mini.
Blackmagic ATEM Setup is the setup utility that allows you to browse connected switchers,
add additional switchers that are not automatically detected via their IP address, change your
switcher IP address, and update the switcher and panel software.
Also included in this folder is the instruction manual and some example graphics. Use the
example graphics to explore the internal media pool and keying functionality.
Plugging in your Computer
You can plug your computer directly into the ATEM switcher so you can control the switcher,
load the media pool with graphics and clips, and change switcher settings.
You will need to connect a computer otherwise you cannot change settings such as the
switcher video standard, as well as downconversion modes, input video connections and
labels, as well as customizing the multi view.
1616Getting Started

Connecting your computer is easy and after installing the ATEM Switcher Software simply follow
the directions below:
1 Connect an Ethernet cable from the switcher Ethernet port labeled Switcher Control to
the Ethernet port of your computer.
If you have a hardware panel installed, and already have this connected to your ATEM,
then plug your computer into the second Ethernet port on your hardware panel instead.
Now the computer will talk via your panel to the switcher, and both the hardware panel
and this software control panel can be operated in parallel.
2 Ensure your ATEM switcher is powered on.
3 Launch ATEM Software Control.
The setup dialog box will help you if you need to manually add
your switcher’s IP address when launching ATEM Software Control.
When running ATEM Software Control for the first time after installation, you will be prompted
by a setup dialog box to set the language for the software, plus choose between ‘program/
preview’ or ‘A/B direct’ transition control. You can learn more about these transition controls
earlier in the ‘Getting Started’ section, under ‘What is an M/E Switcher?’ and ‘What is an A/B
Direct Switcher?’.
After you have made your selection, click ‘continue’. ATEM Software Control will remember
these settings the next time it is launched. The software will now automatically search for your
ATEM switcher. If an earlier version of your switcher’s internal software is detected, you will be
prompted to update. Simply follow the prompts, or refer to the ‘updating the software’ section
for more information.
After updating, or if the internal software is already up to date, the setup dialog box will disappear
and the switcher page will be enabled so you can start using your ATEM switcher immediately!
If the setup dialog box remains visible, you will need to enter your switcher’s IP address. The
dialog box provides a button to open Blackmagic ATEM Setup where you can quickly locate
your ATEM switcher’s IP address. Copy the IP address from Blackmagic ATEM Setup, paste it
into the dialog box’s ‘IP address’ setting, then click ‘save’.
In the rare case your ATEM switcher is still not found, don’t be concerned. The solution is likely a
network setting on your computer. Changing network settings is easy and will only take a moment.
1717Getting Started

To change network settings:
1 Open your computer’s network settings using the control panel in Windows, or via
‘preferences’ on Mac OS. Select the Ethernet connection for your switcher and set it
to ‘manual’.
2 In your computer’s network settings, set the ‘IP Address’ to 192.168.10.50 and confirm
the new setting. If you don’t see the switcher software enabled, try changing the last
two digits of the new IP address to another number, such as 51, and click ‘apply’.
After a brief pause, the setup dialog box should disappear and ATEM Software Control will
enable the ‘switcher’ page with buttons illuminated. You’re now ready to start using your
ATEMswitcher and your setup settings will be remembered the next time you launch ATEM
Software Control.
If you’re more technically minded and want to connect your ATEM switcher to your existing
network, then you will need to change the network settings on your ATEM switcher and control
panel. Information on how to do this is available in the next section. You will need to manually
set the IP address for the switcher as well as all control panels to match your network IP address
range. Your ATEM switcher defaults to a fixed IP address of 192.168.10.240 when shipped and,
by using the Blackmagic ATEM Setup, you can customize the IP address for your custom
network configuration.
Manually setting the IP address for your Windows computer.
1818Getting Started

Manually setting the IP address for your Mac OS computer.
Switcher Settings
Now you have the software control working, you’ll need to apply your switcher settings.
Click on the gear icon on the lower left side of the interface to open the settings window
of the ATEMSoftware Control.
Set the switcher video standard
You can set the video standard to suit the region in which you are broadcasting, such as
2160p29.97, 1080i59.94, 720p59.94 or NTSC if you are broadcasting in NTSC based countries
including America and Japan, or you can set your video standard to formats such as
2160p25,1080i50, 720p50 or PAL if you are broadcasting in Europe or Asia.
Set Video Standard
If you’re working with standard definition video equipment in the widescreen anamorphic 16:9
video format, select 525i59.94 16:9 for anamorphic NTSC or 625i50 16:9 for anamorphic PAL.
Make sure all your cameras and any connected HDMI devices are also set to the same video
standard, or they won’t be visible on the switcher video inputs. This is generally quite easy, as
countries have standards for their HD and Ultra HD broadcasts and all equipment sold in these
countries matches this standard or at the very least can be switched between standards. When
all video standards are matched, you should see connected devices show up in the multi view
video input windows.
1919Getting Started
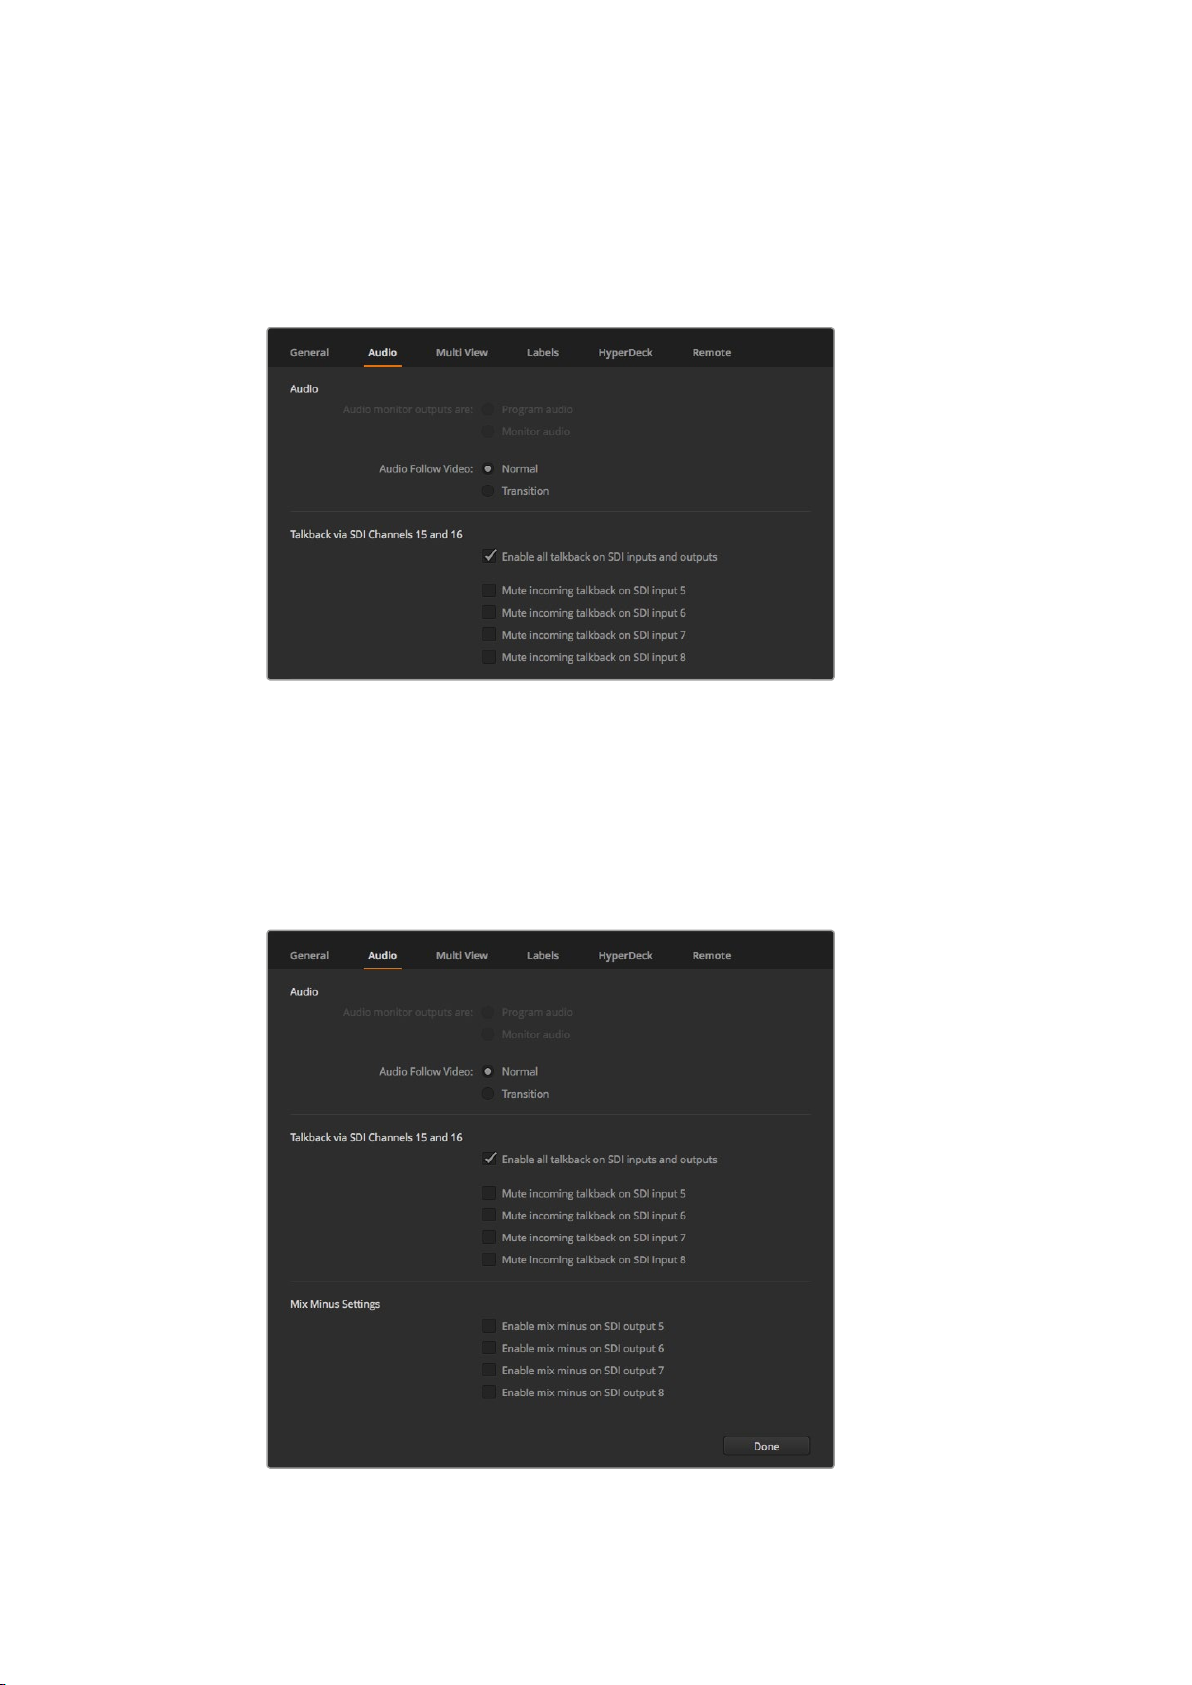
Set Audio Preferences
The ‘audio’ tab lets you select which XLR output to use for audio monitoring. This feature is
enabled on models that have XLR connectors. On some ATEM switcher models you can mute
incoming talkback on inputs 5 to 8 to prevent a potential feedback loop in the
talkback channels.
Audio Settings
These particular models also feature mix minus settings on SDI outputs 5 to 8 which lets you
mute the corresponding input from its program return output. For more information, refer to the
section titled, ‘Changing Switcher Settings/Setting the Audio Output Behaviour’.
The audio follow video settings let you set the switcher to use a default short crossfade when
switching sources with AFV enabled, or to use a duration set by your transition rate setting. For
more information refer to the ‘Using ATEM Software Control/changing switcher settings’ section.
Mix minus settings in the audio tab let you mute the corresponding input
from its program return output on some ATEM switcher models
2020Getting Started
This manual suits for next models
7
Table of contents
Languages:
Other Blackmagicdesign Switch manuals

Blackmagicdesign
Blackmagicdesign ATEM Camera Converter User manual

Blackmagicdesign
Blackmagicdesign Videohub Hardware Control User manual

Blackmagicdesign
Blackmagicdesign Videohub Hardware Control User manual

Blackmagicdesign
Blackmagicdesign Universal Videohub 288 User manual

Blackmagicdesign
Blackmagicdesign Videohub Hardware Control User manual

Blackmagicdesign
Blackmagicdesign Universal Videohub 288 User manual

Blackmagicdesign
Blackmagicdesign ATEM Live User manual

Blackmagicdesign
Blackmagicdesign ATEM Camera Converter User manual


