Blaupunkt TEV-501 User manual

VIDEO
Travel Entertainment
Video unit
TEV-501
Operating and installation instructions
http://www.blaupunkt.com

2
Bitte aufklappen
Open here
Ouvrir s.v.p.
Aprite la pagina
Hier openslaan a.u.b.
Öppna här
Por favor, abrir
Favor abrir
Åbn her

33
ENGLISH DEUTSCH
FRANÇAIS
ITALIANO
NEDERLANDS
SVENSKA
ESPAÑOL
PORTUGUÊS
DANSK
23 242221 25
27
28
26
20
12 10
9
8
11
19
18
17
1615
14
13
7
6
5
1
2
3
4

16
1TV/AV,Switch forTV and video
mode.
2PRESET , descending chan-
nel search.
3PRESET button, for activating
channel search mode.
4PRESET , ascending channel
search.
5CH , for selecting memory lo-
cations in a downwards direc-
tion.
6CH , for selecting memory lo-
cations in an upwards direction.
7BG/DK L, switch for television
systems.
8VIDEO IN, video input.
9AUDIO IN L, left channel audio
input.
:AUDIO IN R, right channel audio
input.
;HEADPHONE 2,
headphone output 2.
<HEADPHONE 1,
headphone output 1.
=POWER,on/off button.
>VOLUME ,decrease volume
level.
?VOLUME , increase volume
level.
@SENSOR, infrared receiver for
the remote control.
ASTOP/EJECT, stop button, eject
cassette from the unit.
CONTROLS
BREW, rewind button.
CPLAY, playbutton.
DFFWD, fast forward button.
EDC 12V, input for 12-volt direct
current.
FVIDEO IN, video input.
GAUDIO IN L, left channel audio
input.
HAUDIO IN R, right channel audio
input.
IAV OUT, output for an external
monitor.
JParking Hole for holding the
plug of the rod aerial when an
external aerial is connected.
KRod aerial and connecting plug.
LRF IN, aerial input for connect-
ing the rod aerial or an external
aerial.

1717
ENGLISH DEUTSCH
FRANÇAIS
ITALIANO
NEDERLANDS
SVENSKA
ESPAÑOL
PORTUGUÊS
DANSK
CONTENTS
Notes ...................................... 18
Securing and installing the
TEV-501 .................................. 19
Before using for the first time ......... 19
Securing the TEV-501 between
the front seats ............................... 20
Operating the TEV-501 in buildings 21
Operating the TEV-501........... 21
Switching the TEV-501 on/off ........ 21
Headphones connection ................ 21
Adjusting the volume ..................... 21
Activating mute .......................... 21
Adjusting the picture ...................... 22
Adjusting the contrast ................ 22
Adjusting the brightness ............. 22
Adjusting the colour rendition ..... 22
Adjusting the tint ........................ 22
Connecting an external monitor ..... 22
Operating the TEV-501’s
video mode ............................ 23
Playing a video cassette ................ 23
Inserting a video cassette .............. 23
Removing the video cassette ......... 23
Starting playback ........................... 23
Switching between TV and video
mode............................................. 23
Fast tape winding .......................... 23
Optimising playback ...................... 23
Television mode ..................... 24
Configuring the television system ... 24
Tuning into a station ....................... 24
Storing station presets................... 25
Selecting a memory location .......... 25
Connecting external sources . 25
Connecting a games console /
DVD player to the TEV-501 ........ 25
Using the remote control ....... 26
Specifications ........................ 27
Guarantee .............................. 27

18
Notes
Thank you for deciding to use a Blau-
punkt product. We hope you enjoy us-
ing this new piece of equipment.
Before using the TEV-501 (Travel En-
tertainmentVideo)unitforthe firsttime,
pleasereadtheseoperatinginstructions
carefully and keep them in the TEV-
501’s case for future reference.
The Blaupunkt editors are constantly
working on making the operating in-
structions clearer and easier to under-
stand. However, if you still have any
questions on how to operate the unit,
please contact your dealer or the tele-
phone hotline for your country. You will
findthehotlinetelephonenumbersprint-
ed at the back of this booklet.
Please observe the following safety in-
structions to ensure you operate the
TEV-501 safely and in a manner that
will not be of danger to anyone.
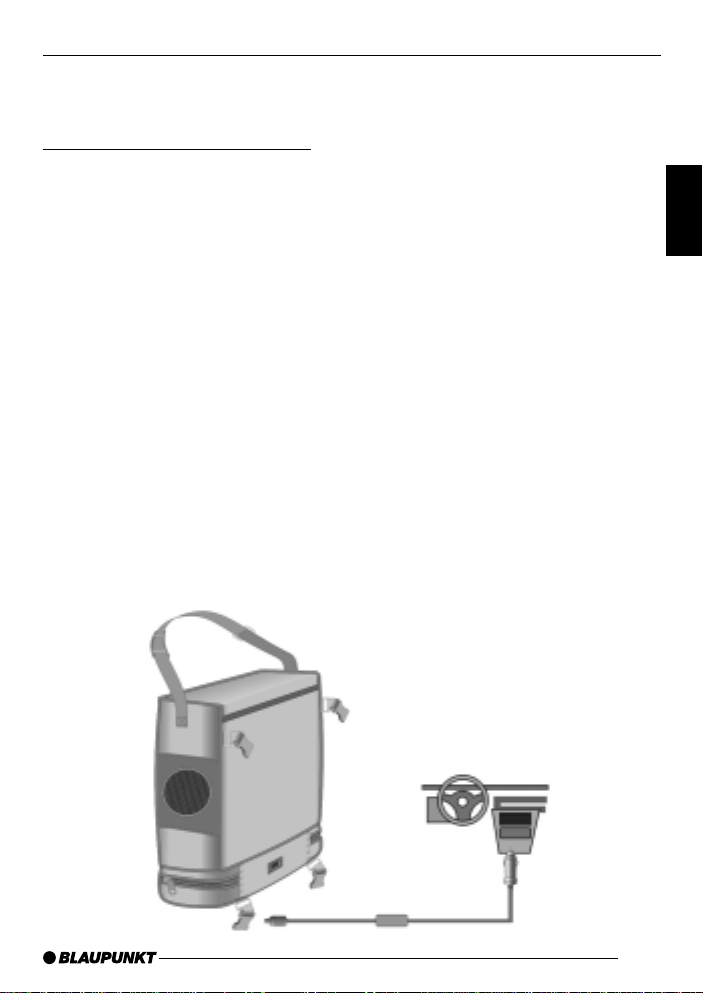
The TEV-501 must be connect-
ed to a switched power supply (e.g.
thecigarettelighter) andmustnot be
connecteddirectlyto thevehiclebat-
tery.To avoidthebattery runningflat,
disconnect the TEV-501 from the
power supply when not in use.
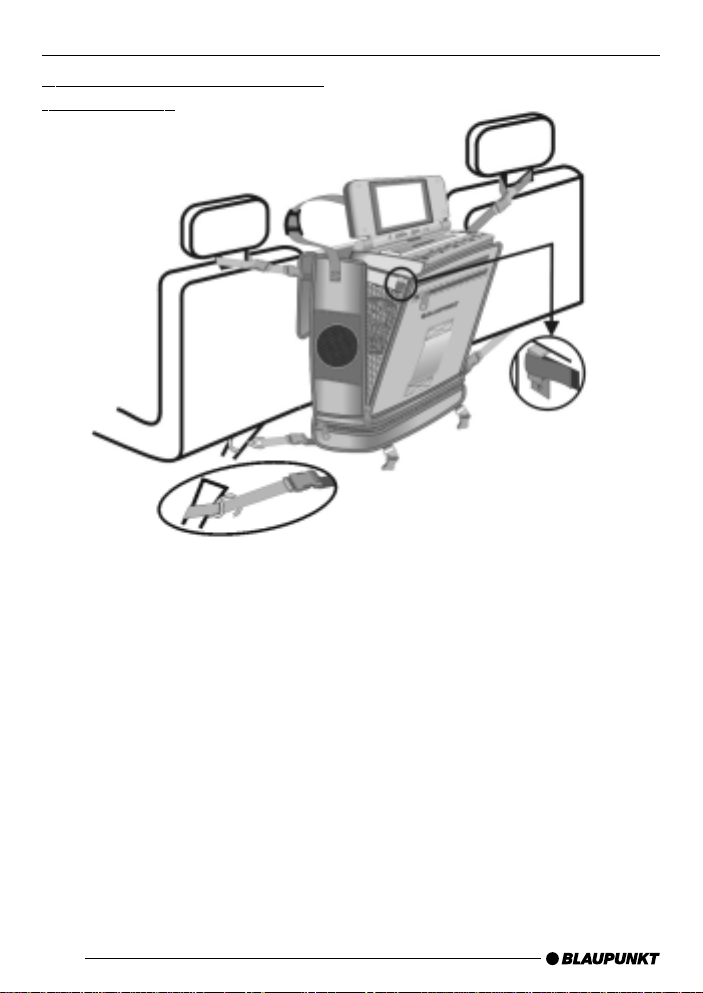
The TEV-501 must always be se-
cured in its case using the Velcro
straps.Fastentheunit usingtheeye-
lets positioned at the side.
Ensure that the unit is attached and
secured in accordance with the in-
formation provided in these operat-
ing instructions.
NOTES
The S-hooks and all the straps must
be attached and fastened correctly
toavoidthe unit causinginjuryin the
event of an accident.
To ensure that the TEV-501 is well
ventilated, only operate the unit with
the case open.
Only use the supplied power supply
unit. Always disconnect the power
supply from the electrical socket or
cigarette lighter first, before discon-
necting the cable from the TEV-501.
Never touch the unit with moist
hands.
To clean the unit, only use a dry, lint-
free cloth. Never use harsh cleans-
ing agents or thinners. Never allow
liquids to come into contact with the
inside or outside of the unit.
Danger due to electric shock. Never
open the unit’s housing. It does not
containanycomponentsthatcan be
serviced by the user.
Removethe video cassettefromthe
unit when not in use.

1919
ENGLISH DEUTSCH
FRANÇAIS
ITALIANO
NEDERLANDS
SVENSKA
ESPAÑOL
PORTUGUÊS
DANSK
Securing and installing the
TEV-501
Before using for the first time
➮Open the lower storage compart-
ment of the TEV-501’s case, and
remove the cigarette lighter adapt-
er and the four straps.
➮Close the lower storage compart-
ment.
➮Remove the unit from its case.
➮Thread the adapter cable through
the opening in the case.
➮Connect the plug to the DC 12V E
input of the TEV-501.
➮Place the unit back into the case.
➮Secure the TEV-501 using the Vel-
cro straps that are located inside
the case by threading the Velcro
straps through the eyelets on the
side of the unit.
CONNECTION
DC 12V

20
Securing the TEV-501 between
the front seats
➮Now take one of the straps that
has an S-hook attached.
➮Connect the buckle of the S-hook
strap to one of the buckles at the
lower end of the case.
➮Place the strap around the seat rail
of the driver seat or the lower safe-
ty-belt attachment point.
➮Thread the strap through the S-
hook.
➮Pull the strap tight.
➮Repeat this procedure for the pas-
senger seat.
➮Open the case’s upper lid.
CONNECTION
➮Take one of the straps that does
not have an S-hook attached.
➮Place the strap around one of the
headrest supports on the driver
seat.
➮Fasten the strap around the head-
rest support using the two buckles.
➮Connect one of the strap’s buckles
to the corresponding buckle on the
side of the bag. You can adjust the
length of the strap to suit the vehi-
cle’s interior.
➮Repeat this procedure for the pas-
senger seat.

2121
ENGLISH DEUTSCH
FRANÇAIS
ITALIANO
NEDERLANDS
SVENSKA
ESPAÑOL
PORTUGUÊS
DANSK
Operating the TEV-501
Switching the TEV-501 on/off
To switch TEV-501 on/off,
➮press the POWER button =on
theTEV-501.
Headphones connection
There are two 3.5 mm headphone con-
nections at the front of the TEV-501 la-
belled HEADPHONE 1 <and HEAD-
PHONE 2 ;. You can connect head-
phones to either of these jacks. If you
connect a headphone to the HEAD-
PHONE 2 ;jack, the unit’s internal
loudspeakerswillbedeactivated.If you
onlyconnecttotheHEADPHONE1<
jack, sound will also be outputted
through the internal loudspeakers.
Adjusting the volume
To increase the volume,
➮press the VOLUME button ?.
To decrease the volume,
➮press the VOLUME button >.
Whilst you are making your adjust-
ments,asymbolic representationofthe
volume level appears in the display.
Activating mute
You caninstantaneouslymute theTEV-
501’s audio output.
➮Press the MUTE Ubutton on the
remote control.
If you want to cancel mute mode,
➮press the MUTE Ubutton again.
➮Flip up the monitor.
➮Open the zip fasteners at the front
of the case. The unit is now tilted at
an angle of around 15°. Close the
zip fasteners until the unit is set at
an angle that you find convenient.
Operating the TEV-501 in
buildings
➮Place the unit on a secure and lev-
el surface.
➮Open the zip fastener of the lower
storage compartment, and remove
the power supply unit.
➮Connect the output of the power
supply unit to the DC 12V Einput
of the TEV-501.
➮Connect the mains power cable to
a 220-volt electrical socket.
CONNECTION OPERATING

22
Adjusting the picture
Adjusting the contrast
To adjust the contrast of the monitor,
➮press the PICTURE Wbutton on
the remote control.
CONTRAST
appears in the display.
➮Adjust the picture contrast using
the two buttons Won the re-
mote control.
Adjusting the brightness
To adjust the brightness of the monitor,
➮repeatedly press the PICTURE W
button on the remote control until
BRIGHTNESS
appears in the dis-
play.
➮Adjust the picture brightness using
the two buttons Won the re-
mote control.
Adjusting the colour rendition
To adjust the colour rendition of the
monitor,
➮repeatedly press the PICTURE W
button until
COLOR
appears in the
display.
➮Adjust the colour rendition using
the two buttons Won the re-
mote control.
Adjusting the tint
To adjust the tint of the monitor,
➮repeatedly press the PICTURE W
button until
TINT
appears in the
display.
➮Adjust the tint using the two but-
tons Won the remote con-
trol.
Connecting an external monitor
You can connect a monitor to the TEV-
501 in order to output to this monitor.
➮Connect an external monitor or tel-
evision to the AV OUT Iconnec-
tion on theTEV-501.
OPERATING

2323
ENGLISH DEUTSCH
FRANÇAIS
ITALIANO
NEDERLANDS
SVENSKA
ESPAÑOL
PORTUGUÊS
DANSK
Operating the TEV-501’s
video mode
Playing a video cassette
Note
●The TEV-501 is designed for play-
ing standard consumer video cas-
settes of the VHS variety (Video
Home System). Never try inserting
other cassettes other than VHS
cassettes into the TEV-501. Suita-
ble VHS video cassettes are la-
belled with the VHS symbol. Blau-
punkt-Werke cannot accept any lia-
bility for damage that may occur
from using other video cassettes in
this unit.
Inserting a video cassette
➮Carefully insert a video cassette
with its printed side uppermost and
its flap side first into the cassette
compartment of the TEV-501.
Removing the video cassette
➮With playback stopped, press the
STOP/EJECT button A.
Starting playback
To begin playback,
➮Press the PLAY button C.
Note
●Video cassettes will be played au-
tomatically if their recording protec-
tion mechanism has been activat-
ed.
Switching between TV and video
mode
Ifyouwanttoswitch betweentelevision
and video mode,
➮press the TV/AV button 1.
Fast tape winding
To fast forward the tape,
➮press the FFWD button D.
To fast rewind the tape,
➮press the REW button B.
Optimising playback
Duringvideoplayback,thepicturemight
sometimes appear distorted or
streaked. You can eliminate these ef-
fects to a large extent by adjusting the
tracking.
To eliminate distortion and streaks,
➮press the TRACKING or X
button on the remote control during
playback until the picture quality
improves.
VIDEO MODE

24
Tuning into a station
➮Switch on the TEV-501 by pressing
the POWER =button.
➮If need be, switch to television
mode using the TV/AV 1button.
➮Use the CH 5or CH 6but-
ton to select the channel memory
location in which you want to store
a station.
➮Press the PRESET button 3.
The frequency band is displayed sym-
bolicallyatthebottomofthedisplay.The
frequency range U, VL or VH is dis-
played on the left. Next to it is the
number of the set memory location.
➮Press the TV/AV 1button repeat-
edly until the required frequency
range U, VL or VH is shown.
➮To search for a station in an up-
wards direction, press the PRESET
4button.
➮To search for a station in a down-
wards direction, press the PRESET
2button.
A station is then searched for in the
specified direction. As soon as one is
found, the station searching procedure
stops.
Note:
●To optimise reception, you can tilt
the rod aerial in various directions.
Try finding the best position.
Television mode
The TEV-501 is equipped with an inter-
nal television receiver and a 44-chan-
nel memory.
Television channels are received using
the TEV-501’s rod aerial or an external
aerial.
Theaerialmustbeconnected totheRF
IN Lconnection.
If you want to use an external aerial in-
stead, you can protect the plug of the
disconnectedrodaerial from becoming
damaged by inserting it into the park-
ing hole.
Configuring the television
system
Inorderfortelevisionreception towork,
theTEV-501mustbe configuredforthe
televisionsystemofthecountry inwhich
you are located.
There are two television standards in
Europe(PALandSECAM)andtheTEV-
501 supports both. You can switch be-
tween PAL and SECAM.
For the PAL television standard,
➮slide the GB/DK L 7switch to the
left.
For the SECAM television standard,
➮slide the GB/DK L 7switch to the
right.
TELEVISION MODE

2525
ENGLISH DEUTSCH
FRANÇAIS
ITALIANO
NEDERLANDS
SVENSKA
ESPAÑOL
PORTUGUÊS
DANSK
Storing station presets
Onceyouhave found a station thatyou
want to store,
➮press the PRESET 3button.
Thefrequencyband displaydisappears
fromview.Thememorylocationisbriefly
displayed in the top right-hand corner.
If you want to set further stations, re-
peatthestepsdescribedin “Tuninginto
a station” and “Storing station presets”.
Selecting a memory location
Once you have stored some stations,
➮you can use the CH 5and CH
6buttons to select memory lo-
cations.
➮You can also select the memory
locations directly using the number
buttons Oon the remote control.
Connecting external
sources
You can connect up totwo external vid-
eo and audio sources to the TEV-501
(e.g. a games console or DVD player),
and use the monitor and loudspeakers
for the output. The TEV-501 has two
separate inputs for video signals and
stereo audio signals. The inputs are lo-
cated on the front and back of theTEV-
501.Ifalltheinputs areinuse, theTEV-
501 gives priority to the inputs at the
front of the unit.
Connecting a games console / DVD
player to the TEV-501
➮Use a suitable cable to connect a
games console / DVD player to the
VIDEO IN 8(F), AUDIO IN L 9
(G) and AUDIO IN R :(H) in-
puts at the front or back of the
TEV-501.
To avoiddamagetotheTEV-501
andthe gamesconsole/DVD player,
make absolutely certain that the ca-
ble colours match the jack colours
on the units.
➮First switch on the games console.
➮Now switch on the TEV-501.
To enable output of an external source,
➮press the STOP/EJECT Abutton.
EXTERNAL SOURCESTELEVISION MODE

26
Using the remote control
The buttons on the remote control
match those on the TEV-501.
The functions of the extra MUTE and
PICTURE buttons on the remote con-
trol are described in the operating in-
structions.
NTV POWER for switching televi-
sion mode on/off.
ONumber buttons for directly en-
tering a memory preset.
PTV/AV switch for TV and video
mode
QCH , for selecting memory lo-
cations in an upwards direction.
RCH , for selecting memory lo-
cations in a downwards direc-
tion.
SVOLUME , increase the vol-
ume level.
TVOLUME ,decrease the vol-
ume level.
UMUTE, to mute the unit’s vol-
ume.
VDISPLAY TV channel.
WPICTURE, sequence switch for
setting contrast, brightness, col-
our and tint.
XTRACKING, press the but-
ton to optimise the playback
quality.
TRACKING, press the but-
ton to optimise the playback
quality.
YFF, fast forward button.
ZPLAY, beginplayback.
[STOP,stop playback.
\REW, rewind button.
]VCP POWER for switching vid-
eo mode on/off.
REMOTE CONTROL
31
32
30
34 33
35
36
38 37
39
40
41
42 43
44
45

2727
ENGLISH DEUTSCH
FRANÇAIS
ITALIANO
NEDERLANDS
SVENSKA
ESPAÑOL
PORTUGUÊS
DANSK
SPECIFICATIONS
Specifications
Television standard:
PAL BG / PAL DK/
SECAM BG /
SECAM DK/
SECAM L
Video standard: PAL/ SECAM BG /
SECAM L
TV channels: VL 2-4, VH 5-12,
UHF 21-69, cable TV
SS1-S20
LCD display: TFT LCD
Diagonal image size:
Approx. 12.4 cm
(5 inches)
Audio tracks: 1
Tape width: 12.7 mm
Tape speed SP: 33.35 mm/s
Fast tape winding:
Less than 7 minutes
for a 120-minute cas-
sette
Video output: 1.0 Vp/p, 75 ohms
Video S/N: Better than 35 dB
Audio power: 2 x 0.5 W
Audio S/N: Better than 30 dB
Power supply: DC 12 V,
AC 100-240 V/
50-60 Hz
Power consumption:
18 W
Permissible air humidity:
10-75%
Permissible temperature range:
0°to +40°Celsius
Dimensions: (W x H x D)
275 x 345 x 125 mm
GUARANTEE
Guarantee
The scope of the guarantee depends
on the regulations in force within the
countryinwhichtheunitwaspurchased.
Ifyourunit developsafault, pleasecon-
tact your dealer and present the pur-
chase receipt.
Ifthe statutoryguarantee periodin your
country is less than 12 months, Blau-
punkt will grant a 12-month manufac-
turer’s guarantee. This guaranteedoes
not cover damage due to wear, incor-
rect usage or commercial use.
If you wish to enforce a claim under the
manufacturer’sguaranteethatis provid-
edbyBlaupunkt,pleasesend thefaulty
equipment together with the purchase
receipttotheBlaupunktcustomer serv-
ice centre in your country. You can find
out which address is closest to you by
contacting the telephone hotline listed
on the back page of this booklet. Blau-
punkt retains the right to rectify defects
or supply a replacement.
Subject to changes!

16
10/00 K7/VKD 8 622 402 656
Blaupunkt GmbH
Service-Nummern / Service numbers / Numéros du service après-
vente / Numeri del servizio di assistenza / Servicenummers /
Telefonnummer för service / Números de servicio / Números de
serviço / Servicenumre
Country: Phone: Fax: WWW:
Germany (D) 0180-5000225 05121-49 4002 http://www.blaupunkt.com
Austria (A) 01-610 390 01-610 393 91
Belgium (B) 02-525 5454 02-525 5263
Denmark (DK) 44 898 360 44-898 644
Finland (FIN) 09-435 991 09-435 99236
France (F) 01-4010 7007 01-4010 7320
Great Britain (GB) 01-89583 8880 01-89583 8394
Greece (GR) 0800-550 6550 01-576 9473
Ireland (IRL) 01-4149400 01-4598830
Italy (I) 02-369 6331 02-369 6464
Luxembourg (L) 40 4078 40 2085
Netherland (NL) 023-565 6348 023-565 6331
Norway (N) 66-817 000 66-817 157
Portugal (P) 01-2185 00144 01-2185 11111
Spain (E) 902-120234 916-467952
Sweden (S) 08-7501500 08-7501810
Switzerland (CH) 01-8471644 01-8471650
Czech. Rep. (CZ) 02-6130 0441 02-6130 0514
Hungary (H) 01-333 9575 01-324 8756
Poland (PL) 0800-118922 022-8771260
Turkey (TR) 0212-3350677 0212-3460040
USA (USA) 800-2662528 708-6817188
Brasil
(Mercosur) (BR) +55-19 3745 2769 +55-19 3745 2773
Malaysia
(Asia Pacific) (MAL) +604-6382 474 +604-6413 640
Other manuals for TEV-501
1
Table of contents
Other Blaupunkt DVD Player manuals

Blaupunkt
Blaupunkt DVP 01 User manual

Blaupunkt
Blaupunkt DVP 01 User manual

Blaupunkt
Blaupunkt BDVD5200H User manual

Blaupunkt
Blaupunkt DVP 01 User manual

Blaupunkt
Blaupunkt BDVD20H User manual

Blaupunkt
Blaupunkt MVP 01 User manual

Blaupunkt
Blaupunkt DVD-ME1 User manual

Blaupunkt
Blaupunkt DVD-ME1 User manual