5
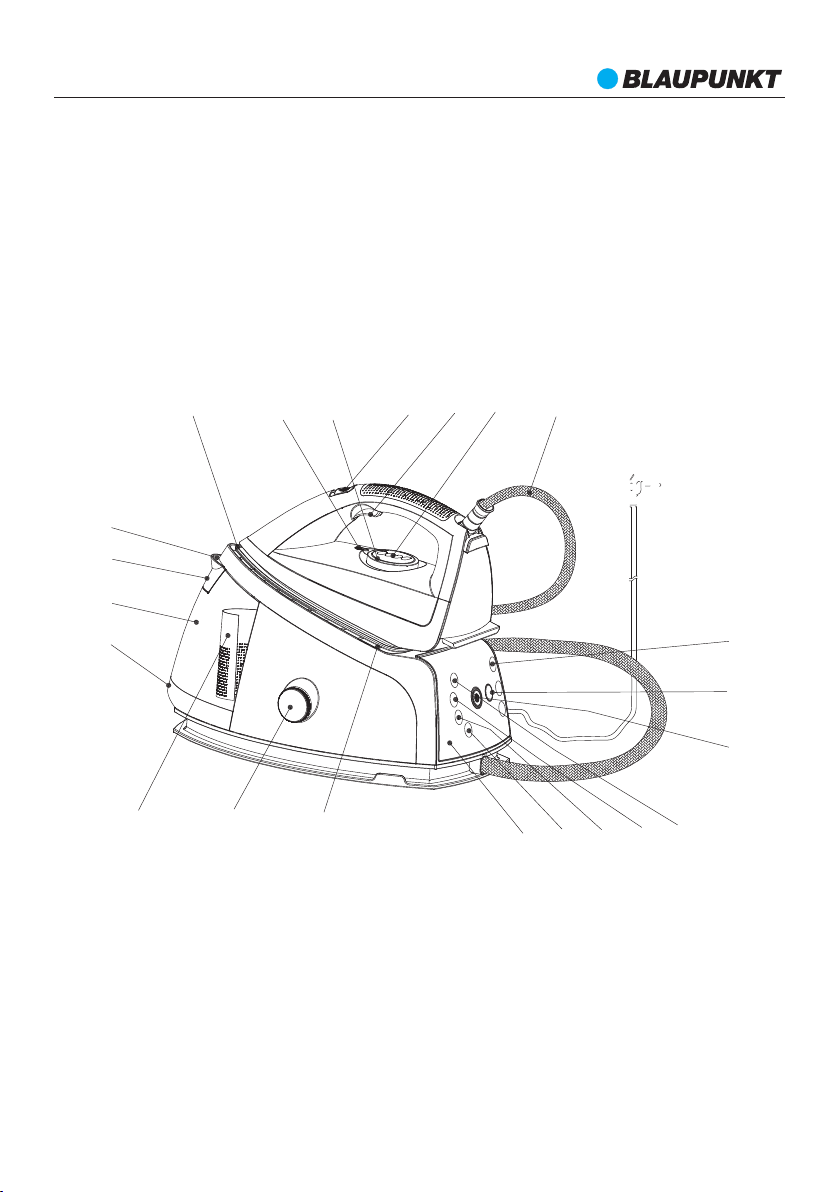
1. Control Panel
1a. DRY TANK - Information about empty
water tank (see FILLING THE WATER
TANK)
1b. FILTER - Reminder about the necessity
of the replacement of the water filter
(see CLEANING AND MAINTENANCE)
1c. PUMP - Information about the work of
the pump
1d. HEAT - Information about the work of
the boiler. When the light blinks the
steam station heats up the water. When
it is lit permanently, steam is ready for
ironing.
1e. – ON/OFF switch
1f. STEAM – steam intensity switch
1g. LOW, MEDIUM, HIGH – levels of
steam's stream intensity
2. Iron thermostat control light
3. Steam burst button
4. Steam burst button lock5.
Temperature control knob
6. Soleplate
7. Steam hose
8. Highlighted base for the iron
9. Water tank
9a. Water inlet
9b. Cap of water inlet
9c. Water tank handle with a button
10. Water filter
11. Filler cap with a safety valve
12. Band for steam hose
BEFORE FIRST USE
Remove all paper, cartons, and foil protecting the appliance and its parts.
The iron may emit a delicate smoke and smell the first time it is used. It is recommended that the iron
be warmed up before ironing and that it be used on an old piece of fabric a few times.
FILLING THE WATER TANK
Water in the tank can be refilled by taking out the tank or directly at the steam generator.
In order to take out the tank use the tank's handle on its bottom and while pressing the button, remove
the tank from the steam station. Tilt the cap of the water inlet and fill it inNot sure what you mean by
'fill it in'. Put the water tank into the steam station until it is properly mounted.
You can refill the water without removing the tank by tilting the cap of the water inlet and refilling the
tank through the inlet.
IRONING
After filling the water tank, connect the steam station to the power source. Turn on the steam station
(1e). Set the desired temperature of the iron with the knob according to recommendations. Set the
desired steam intensity by pressing the steam intensity button (1f ). The chosen setting shall be
presented by a highlighted symbol within the control panel.
When the steam readiness indicator (1d) stops blinking and lights permanently, ironing can start. Press
the steam burst button to release steam from the iron. In order to use steam in a permanent mode
move the button to lock it.
When there is no water in the tank, the lack of water control light lights up. Water can be poured into
the water tank through the water inlet.
After ironing, set the steam intensity to 0 and the temperature knob to the minimum position. Turn off
the steam station by pressing the ON/OFF button (1e).
SETTING THE IRONING TEMPERATURE
Set the ironing temperature using the temperature control knob and adjust it to the fabric being
ironed. First iron fabrics that require the lowest temperature.
low temperature - synthetic fabrics, silk
medium temperature – wool
high Temperature - cotton
MAX the highest temperature - linen
If you wish to decrease the temperature, wait until the pilot light turns on before continuing to iron.
•
••
•••
SSB801