BlazeVideo A390G User manual

CELLULAR
TRAIL CAMERA
A390G
INSTRUCTION MANUAL
Model# A390G-DEU Doc V2.0

TABLE OF CONTENT (English)
1. IN THE BOX.................................................................................... 1
2. IMPORTANT NOTE........................................................................1
2.1. About Batteries.................................................................... 1
2.2. About SD Card.....................................................................1
2.3. About SIM Card...................................................................2
3. INTRODUCTION.............................................................................2
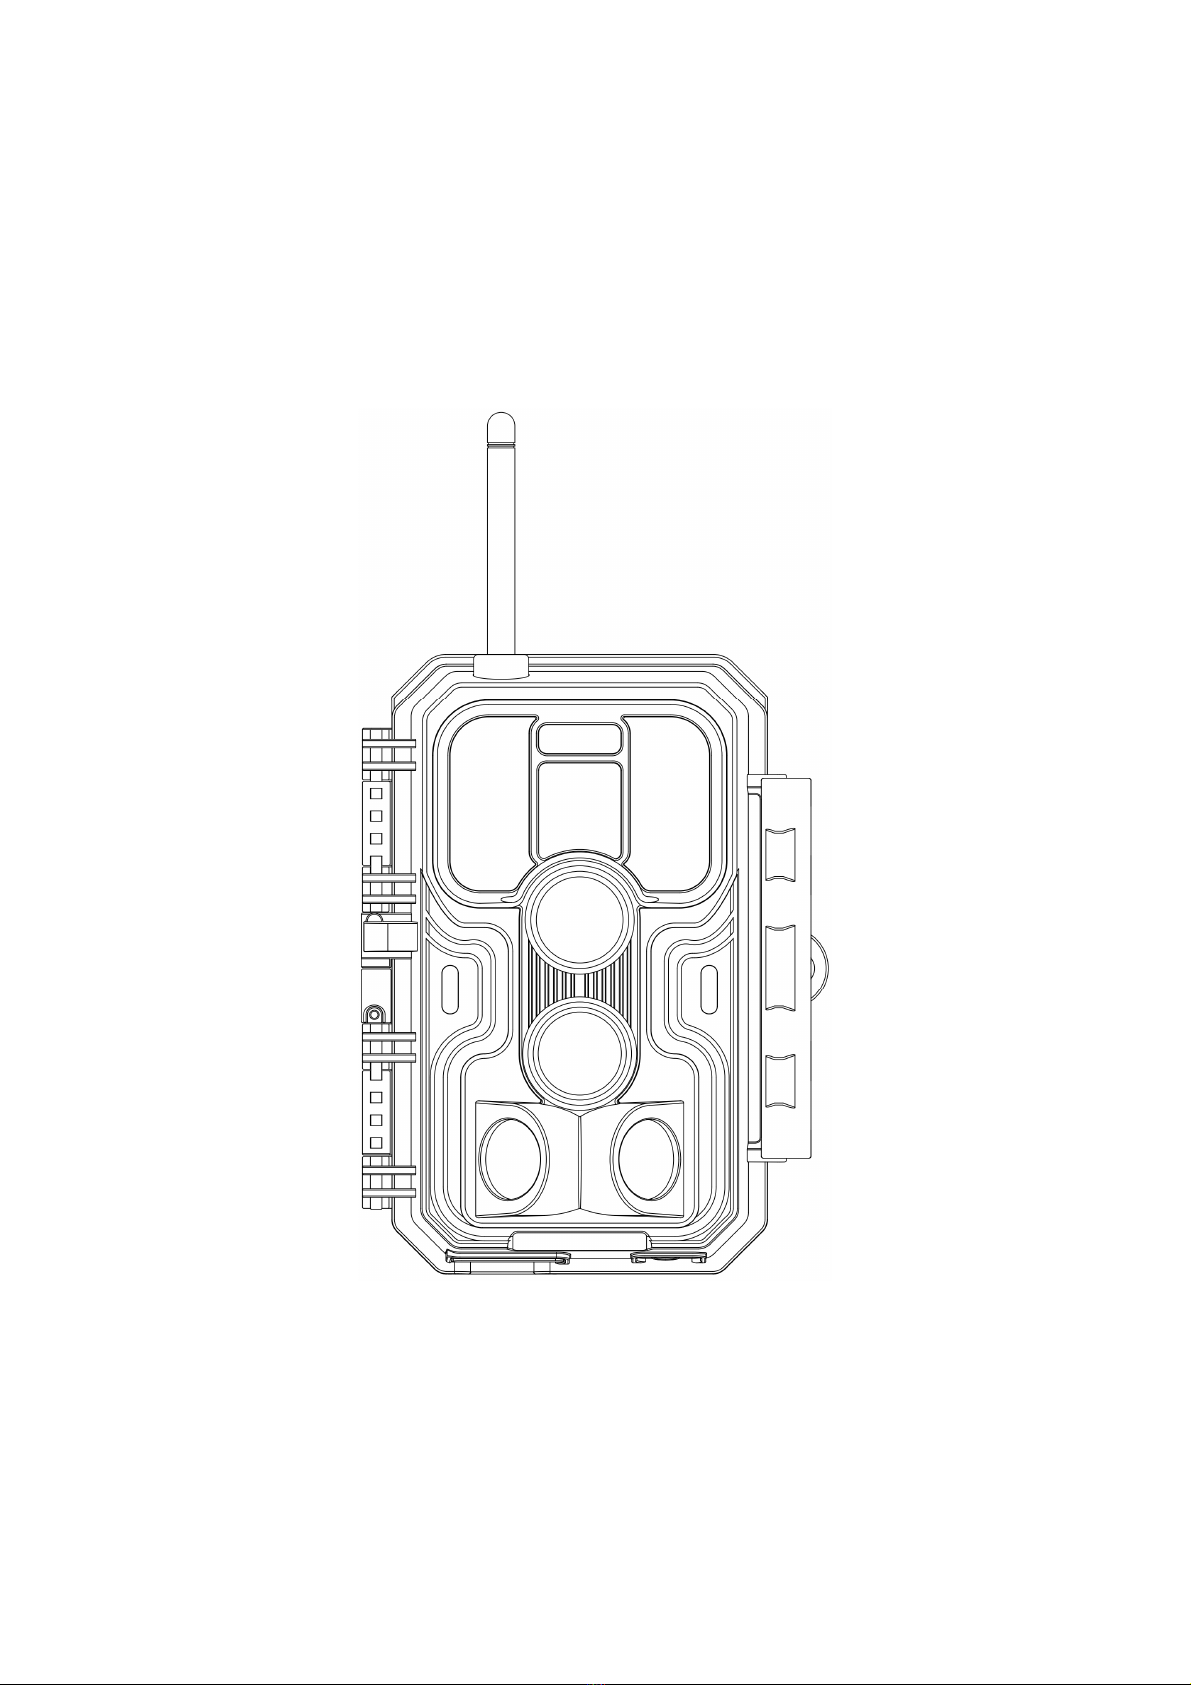
4. PARTS AND CONTROLS...............................................................3
5. INSTALLING THE BATTERIES AND SD CARD........................6
6. THE OFF, ON, AND SURVEILLANCE MODES.......................... 8
7. CELLULAR CONNECTION......................................................... 10
7.1. Download TrailCam Mobile App...................................... 11
7.2. Add Your Camera.............................................................. 11
7.3. Select Camera Type........................................................... 11
7.4. Login Your Account........................................................... 11
7.5. Activate Camera................................................................ 12
7.6. App Navigation.................................................................. 15
7.7. Get the First Picture.......................................................... 16
7.8. View Photo or Video..........................................................16
8. ADVANCED SETTINGS...............................................................16
9. MOUNTING AND POSITIONING............................................... 22
9.1. Mounting............................................................................22
9.2. Sensing Angle and Distance Test.......................................23
9.3. Starting.............................................................................. 25
10. REVIEW PHOTOS OR VIDEOS.................................................25
11. TECHNICAL SPECIFICATIONS............................................... 26
12. TROUBLESHOOTING................................................................ 28
13. WARRANTY................................................................................28

INHALTSVERZEICHNIS (Deutsche)
1. INHALT DER BOX........................................................................30
2. WICHTIGE ANMERKUNG.......................................................... 30
2.1. Über Batterien................................................................... 30
2.2. Über SD-Karte...................................................................30
2.3. Über SIM Karte................................................................. 31
3. EINFÜHRUNG...............................................................................31
4. KOMPONENTEN UND KONTROLLEN.....................................32
5. BATTERIEN UND SD-KARTE EINLEGEN............................... 36
6. ON-, OFF- UND ÜBERWACHUNGS-Modus.............................. 38
7. Mobilfunk Verbindung....................................................................41
7.1. Laden Sie die App "TrailCam Mobile" herunter...............41
7.2. Ihre Kamera hinzufügen.................................................... 41
7.3. Kameratyp Auswählen.......................................................41
7.4. Melden Sie sich bei Ihrem Konto an..................................41
7.5. Kamera aktivieren............................................................. 43
7.6. APP Navigation................................................................. 45
7.7. Holen Sie sich das erste Bild............................................. 46
7.8. Foto oder Video ansehen...................................................47
8. ERWEITERTE EINSTELLUNGEN.............................................. 47
9. MONTAGE UND POSITIONIERUNG.........................................55
9.1. Montage............................................................................. 55
9.2. Test Von Abtastwinkel Und Abstand................................. 56
9.3. Umschalten Von Funktionen Der Kamera........................ 58
10. FOTOS ODER VIDEOS ANSEHEN........................................... 58
11. DIE TECHNISCHEN DATEN.....................................................59
12. FEHLERBESEITIGUNG............................................................. 62
13. GARANTIE.................................................................................. 63

1
1. IN THE BOX
1xCamera,1xMountingStrap,1xAntenna,1xSIMcard,
1 x Instruction Manual, 1 x Mini USB Cord
Note: Memory card and batteries are not included (user supplied).
This camera is only applicable in the UK, Germany, France,
Italy and Spain.
2. IMPORTANT NOTE
2.1. About Batteries
Require eight (8) 1.5V AA Alkaline or Lithium batteries. We
recommend the use of Energizer AA Lithium batteries in this
camera to obtain maximum battery life.
Do not mix old and new batteries. Do not mix battery type.
Rechargeable NiMH AA batteries can be used, but are NOT
recommended as the lower voltage (generally 1.2V) they
produce may cause night recording issues, and you may have
to replace them frequently.
Remove batteries when the camera is NOT in use.
2.2. About SD Card
Require a standard-size SDHC/SDXC memory card (max
capacity 512GB, Class 10). Recommend using SanDisk 32GB
SDHC/Class10 memory cards in the camera to obtain the best
cost-performance.
Before use, please format your SD card in the camera.

2
2.3. About SIM Card
Your camera comes with a SIM card that only works with
T-Mobile, Telefonica and Vodafone cellular network in
Germany. Pleasemakesurethecellularsignalisgoodwhere
your camera is installed. Please don’t remove the SIM card. If
you have multiple cameras, please don’t exchange SIM cards
among them.
3. INTRODUCTION
3.1. About the Camera
The A390G is a new generation of 4G LTE cellular trail
camera. The camera has a built-in cellular module, allows you
remotely connect and operate the camera through a dedicated
App (“TrailCam Mobile”). The camera will send pictures to
cell phone according to the Transfer Schedule specified in the
App. The camera also features the all-new innovative and
ultra-clear imaging technology, encompasses smart night
vision, blur reduction, and noise reduction technology to
deliver high resolution image quality.
3.2. Main Features
Works with T-Mobile, Telefonica and Vodafone in Germany
(SIM card included)
Quick activation by App
Offers affordable and flexible data plan
Program your camera via App
Send pictures to cell phone
High quality pictures (32MP still photos), 1296P 20fps or
1080P 30fps H.264 video clips with audio
Clear night vision, flash range 100ft, equipped with 36pcs high

3
performance infrared no glow 940nm LEDs that function as a
flash (invisible to eyes)
Wide view angle - 70°
Easy to use/program with well-designed operation buttons and
built-in 2.4-inch color screen, easy to program, review pictures
and videos on the screen
Two working modes - Motion detection and Time lapse
Fast trigger time approx. 0.1~0.6 second (pre-activated
technology with 3 PIR sensors designed), Fast recovery time of
less than 0.5 second, Long trigger distance up to 75ft
Info strip on each capture: Date, Time, Temperature & Moon
phase
Operation Hours, Loop Recording, Time Lapse, Password
Protected
Built for any climate - IP66, Operation Temperature: -4~140°F
Support SD/SDHC/SDXC memory card, max capacity 512GB
(user supplied)
4. PARTS AND CONTROLS
The camera is equipped with an antenna, 36pcs infrared LEDs,
Indicator, Light Sensor, Optical Lens, PIR Sensors, Lock Holes
in front view (Figure 1).
TIP: During use, the black PIR Lens may be dirty or have
scratches, however it does not affect the performance due to
the reliability design. If you must clean it, please try to blow it
off or pick out the dirt very lightly. Please do not try to wipe it,
which may cause more scratches.

4
Figure 1: Front View
Install the antenna: The antenna is placed in the accessory
slot of the package box. Please screw the antenna into the
mounting base on the top of the camera and securely tighten it
(Figure 1).
The camera provides the following connections for external
devices:MiniUSBportandSDcardslotetc.(Figure 2).
IR LEDs
Lock
Hole
Optics
Lens
Central
PIR Lens
Light
Sensor Indicator
Lock
Buckle
Antenna
Side
PIR Lens
Side
PIR Lens

5
Figure 2: Bottom View
The camera has one security cable hole and two strap holes on
the back. The strap can be put through the strap holes and
fastened securely around a tree trunk by pulling the end of the
strap firmly (Figure 3).
Figure 3: Right / Back View
The camera has a 2.4-inch built-in LCD screen, which can be
used for reviewing pictures or videos and menu displaying, and
exclusive keypad design for easy program and operation, 8 AA
batteries slot supported (Figure 4).
Tripod Base
1/4" - 20
SD Card
Holder
DC 12V/1A
Plug 5.5x2.1mm
Strap
Hole
Lock
Buckle
Mini USB Port
Microphone
Security
Cable Hole

6
Figure 4: Inside View and Preinstalled SIM card
Figure 5: Operation Buttons
A power switch is used to power on (ON mode) or off the
camera (OFF mode). A START button is used to quickly
make the camera into the surveillance mode (motion detection)
or time lapse per your settings (Figure 5). When the camera is
in the surveillance mode, press the START button to wake up
the camera.
5. INSTALLING THE BATTERIES AND SD CARD
The Nano-SIM card is preinstalled, please don’t remove it.
Power
Switch
Color
Screen
Battery
Compartment
and Cover
Operation
Buttons
Surveillance
Mode
Nano-SIM
Card

7
Before you begin learning how to use your camera, you will
first need to install 8 AA batteries and insert an SD card.
Although that may only take you a minute, there are some
important notes about batteries and SD cards you should be
aware of, so please take the time to read the following
directions and cautions:
5.1. Loading Batteries
After opening the cover of the battery compartment, you will
see that the camera has eight battery slots (Figure 6). A full
eight batteries must be installed for the camera to operate. Be
sure to insert each battery with correct polarity (negative or
"flat" end against the long spring of each battery slot).
In ON mode when battery power level gets low, the message
"Low Battery" will show on the screen, please replace the
batteries. If the battery indicator shows in RED, this does mean
the batteries are not able to drive IR LEDs flash at night,
however the batteries stillworkatdaytimeuntil"Low
Battery". If you want to continue night vision, please replace
the batteries.
Figure 6: Loading the Batteries

8
5.2. Inserting the SD Card
Insert the SD card (with the camera powered off), before
beginning to operate the camera. Don't insert or remove the SD
card when the camera is powered on or in the surveillance
mode. (Figure 7).
Figure 7: Inserting the SD Card
The following describes how to insert and remove the SD card:
Insert the SD card into the card slot with its label side
upwards.A "click" sound indicates that the card is installed
successfully. If the wrong side of the card is facing up, you
will not be able to insert it without force, there is only one
correct way to insert cards. If the SD card is not installed
correctly, the device will not display an SD card icon on the
screen in ON mode.Formatting the SD card by using the
camera's "Format SD Card" menu option before first use is
recommended, especially when a card has been used in
other devices.
To take out the SD card, just gently push in the card (do not
try to pull it out without pushing in first). The card is
released from the slot and ready to be removed when you
hear the click. Be sure the camera's power is switched OFF
before inserting or removing SD cards or batteries.
6. THE OFF, ON, AND SURVEILLANCE MODES
The camera has three basic operational modes:

9
OFF mode: Power switch in the OFF position (The camera
is powered off).
ON mode: Power switch in the ON position (The camera is
powered on and its screen is on).
SURVEILLANCE mode: When the camera is powered on,
press START button to enter the surveillance mode. When
the screen is off, the camera enters standby and will perform
according to your settings.
App & Cellular Connection:
You can use the App to connect the camera when the camera is
operating in the ON or SURVEILLANCE mode.
6.1. OFF Mode
The OFF mode is the "safe" mode when any actions must be
taken, e.g., replacing the SD card or batteries, or transporting
the device. And of course, when you are storing or not using
the camera, you will switch it to OFF. Please note that in the
OFF mode the camera still consumes a little power. It's a good
idea to take the batteries out of the battery compartment if the
camera will not be used for a long time.
6.2. ON Mode
In the ON mode you can check and change the settings of the
camera with the help of its built-in screen. These settings,
found in the menu by pressing MENU key, let you change the
photo or video resolution, interval between photos, switch the
time imprint on, etc. (See more in Section 8 ADVANCED
SETTINGS).
On the screen display, you will see an information screen that
shows how many images have been taken, the battery level,

10
camera or video mode, etc.
Attention please:IntheON mode, the camera will
automatically enter SURVEILLANCE mode if there is no
operation (key pressing) within 3minutes. Then the camera
will perform as your settings in the menu.
In the ON mode, you can connect the camera to a computer's
USB port to download your images.
6.3. SURVEILLANCE Mode
Any time after the batteries and SD card have been inserted,
you can switch on the camera. When the START button is
pressed, the camera will enter into the SURVEILLANCE
mode. If the Mode in the settings is set as “Motion Detection”,
the camera will count down a 30-second delay and then be
ready to capture images. If the Mode is set as “Time Lapse”,
there will be no 30-second counting down, and the camera will
be ready to enter Time Lapse.
Once in the SURVEILLANCE mode, no manual controls are
needed or possible (the control keys have no effect). The
camera will take photos or videos automatically (according to
its current parameter settings).
TIP: You can press the START button again to wake up the
camera and reprogram your camera if required.
7. CELLULAR CONNECTION
We recommend that you take a few minutes to watch the
videos to quickly learn how to use the camera, please visit:
www.zopudt.com/tc/cell

11
7.1. Download TrailCam Mobile App
Before using the cellular functionality, please download the
‘TrailCam Mobile’ App.
NOTES:
The screenshots shown in this section are indicative only. The
actual diagram on different versions of App, iOS and Android
may differ.
During the use of the App, please grant the App access to
storage, location, camera and local network (if iOS) of your
device.
7.2. Add Your Camera
Open the App, tap the orange stripe on the top to add your
camera.
7.3. Select Camera Type
Please tap Cellular Camera.
The App is an unified App, supports cellular camera and Wi-Fi
camera (sold separately).
7.4. Login Your Account
Log in to your account to manage your cellular cameras, please
tap Log in.
Please enter your account and password to log in.
If you are using a cellular camera for the first time and don’t

12
have an account, please select your country where the
camera is applicable, then tap Sign up to create a new
account (Figure 8).
Figure 8: Selecting Your Country (select Germany if in Germany)
Note: Once you have signed up, the next time you log in, or if
you forget your password and need to update your password,
please make sure that the selected country is correct.
Input your email, read and accept the Privacy Agreement. Tap
“Next”, you will receive a verification code in your email in
minutes, please check your email later, find the code and input
it in the next dialog.
7.5. Activate Camera
After logged in your account, please make sure your camera is
near to you and in the ON mode.

13
Please follow the “Quick Start” instructions (steps) shown on
the App to configure the cellular network of your camera.
During setup, the App may ask access permission such as
camera to scan QR code, please allow it to complete the
process.
At the final step of Quick Start, go to the “Activation Code” in
thecameraMENUsettings,scantheQRcodewiththeApp.
Once scanned, the camera starts activating the SIM card, you
can press MENU to exit. The icons at the top of the camera
screen will change accordingly (Figure 9).
Figure 9: Icons at the top of the camera screen
Wait for the cellular is connected and device is activated (until
the following icons shows on the top bar of camera screen).
During the activating, there are icons to indicate the cellular
status (Table 1):
Table 1 - Camera network icons

14
Category Icon Description
Cellular
Signal
No SIM card detected.
The camera is searching for available
cellular network.
No cellular network service available.
“4G” indicates the camera is using 4G
cellular network, it may automatically
change to “3G” or “2G” (according to
local cellular network), and the white
“signal bar” indicates signal strength.
Note: In 3G or 4G cellular network, the
camera can send pictures or videos. In 2G
cellular network, the camera can ONLY
upload camera status.
Cellular
Connection
Cellular network is not connected.
The camera is not within the cellular
network service area.
Cellular network is successfully connected.
Device
Activation
The camera is not activated.
ThecameraandtheSIMcardis
unmatched (e.g. the camera has been
bound with other SIM card).
The camera has been activated
successfully.
In the App, once device is activated, the orange bar on the App

15
will turn into a green bar (Figure 10- 11).
Figure 10: Activating Figure 11: Activated
The ID “864977049769601” (cellular ID, just for example)
will turn into your camera name (e.g. you have programmed
your camera name as “JOHN”). Please note this ID may vary
from different camera and its SIM card.
7.6. App Navigation
Once the camera is fully activated, you can navigate the App.
The App supplies 4 main tabs: Plan, Status, Settings and
Gallery (Table 2). To get more detailed guide, please visit:
www.zopudt.com/tc/cell
Table 2 - App Navigation
Tab Description
Plan
List status of your current data plan, e.g. total
remaining effective days and remaining the amount
of data plan for this cycle. You can order a new plan
or order HD photos and Videos on demand.
Status
Camera status, including battery level, SD Card
capacity and used size, internal temperature of the
camera, number of pictures and videos stored on the
SD Card, modem ID, camera model, firmware
version number, etc.
Settings Display or program camera settings, such as mode,
picture quality etc.

16
Gallery Review or download the pictures or videos the
camera has taken.
7.7. Get the First Picture
After you successfully activate the camera, you would like to
get the first picture from the camera:
Make sure the camera is powered on (screen is on) and has
connected to cellular network (refer to the icon indicators in
Section 7.5).
Open the App, go to Settings Tab, toggle Transfer on Each
Capture to ON.
On the camera, Press START button, wait for the camera
goes into surveillance mode.
Walk through in front of the camera.
Check the Gallery tab in the App, generally in several
minutes you will get the picture sent from the camera.
After you successfully get the first picture, please remind
toggling Transfer on Each Capture to OFF to avoid
consuming more battery power.
For more details please visit: www.zopudt.com/tc/cell
7.8. View Photo or Video
Open the App Gallery tab to view, download, save or delete the
photos or videos.
For more details please visit: www.zopudt.com/tc/cell
8. ADVANCED SETTINGS
The trail camera comes with preset manufacturer settings. You
can change the settings to meet your requirements. Once the
camera screen is on, press MENU key to enter/exit the menu.

17
Press the UP/DOWN key to move the marker, Press the
LEFT/RIGHT key to change the setting, and press the OK
key to confirm the change. Always remember to press the OK
to save the change. Otherwise, you will lose your new setting.
Also you can program your camera in the App.
Note: All camera settings programmed through the App will
not take effect until the next “Cellular Transfer” cycle. After
the setting takes effect, the orange bar on the left of the
modified settings will disappear.Considering cellular
network transmission speed and power saving, the App will
limit photo quality and size, video quality and length.
Parameter
Settings
(Bold =
default)
Description
Cellular On
Off
Selecting On to enable cellular, you can
use the App to connect the cellular
network. Selecting Off to disable cellular,
the camera will operate in stand-alone
mode and save battery power.
APN
Only can be programmed in the camera.
Reserved for future use. Please don’t
change it.
Activation
Code
It is used for activating the camera. Scan it
in the App during the setup.
Cellular
Info
Details of cellular modem and network,
such as Adapter, IMEI, Configure, Status,
Signal, SIM, Network, Name, PIN,
ICCID, IMSI, APN, PDP etc.
Cellular
Transfer
Transfer
on Each
Capture:
Selecting On, the cellular network will
send picture to phone after each capture
by the camera. IMPORTANT Note:
This manual suits for next models
1
Table of contents
Languages:
Other BlazeVideo Scouting Camera manuals

BlazeVideo
BlazeVideo A350W User manual

BlazeVideo
BlazeVideo A323 User manual

BlazeVideo
BlazeVideo A252 User manual

BlazeVideo
BlazeVideo A280W User manual

BlazeVideo
BlazeVideo A252 User manual

BlazeVideo
BlazeVideo T326 User manual

BlazeVideo
BlazeVideo A323 User manual

BlazeVideo
BlazeVideo A350 User manual

BlazeVideo
BlazeVideo A262 User manual

BlazeVideo
BlazeVideo A323 User manual