Blu Studio G Plus HD User manual

1
BLU Studio G Plus HD
user manual

2
Table of Contents
Safety Information ............................................................... 4
Appearance and Key Function ........................................ 6
Introduction ........................................................................... 8
Call Functions....................................................................... 9
Contacts................................................................................ 11
Camera.................................................................................. 18
Gallery ................................................................................... 20

3
Music ..................................................................................... 22
Sound Recorder ................................................................. 23
Alarm Clock ......................................................................... 24
FM Radio .............................................................................. 25
Play Store ............................................................................. 26
Settings................................................................................. 27
Storage.................................................................................. 33

4
Safety Information
Please carefully read the items below:
Use Safely
Do not use the phone in situations where it might cause danger.
Transportation Safety
Please observe all transportation laws and regulations.
Please drive with both hands on the wheel.
DO NOT TEXT AND DRIVE
Hospitals
Please follow limitations.
Please turn off your mobile phone when near medical instruments.
Airports
Remember to follow all airport and flight safety regulations.
Please do not use your phone during flight.

5
Toxic Chemicals
Do not use your mobile phone around fuels or chemicals.
Hazard
Do not use in hazardous areas where explosions may occur.
Accessories and Batteries
Use only Blu authorized batteries and accessories.
Backup
Remember to keep a written record of all important information.
Water
Your phone is not waterproof. Keep it away from water and liquids.
SOS Emergency Calls
Make sure your mobile phone is switched on and in a service area. In home screen, tap the
phone key and dial 911 and send.

6
Appearance and Key Function
3
4
5
67 8
9
1
11
10
2

7
1.Volumeup/downkey 2.Power key
3.P/LSensor 4.RearcameraReceiver
5.Frontcamera 6.Backkey
7.Homekey 8.Menukey
9.Rearcamera 10.Flash
11.Speaker

8
Introduction
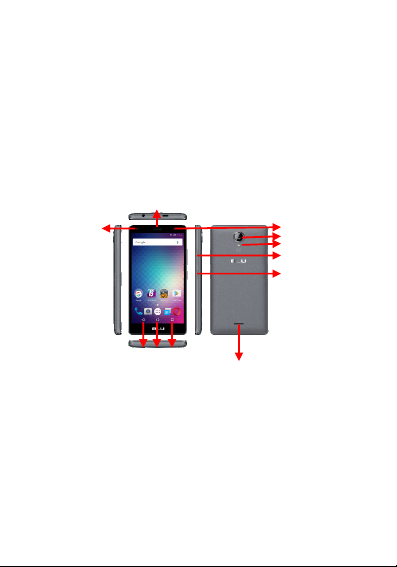
InstallationoftheSIMCards
Note: Please keep the SIM card out of the reach of children. The SIM card and its contacts
are easily damaged due to scratching or bending. Please be cautious when carrying,
installing or taking out the SIM cards. SIM: Contact your cellular phone service provider
directly to obtain the SIM card.
To insert SIM cards:
1. Remove the rear cover. Insert the SIM card(s).
2. Insert the SD card. (For additional storage capacity)
3. Replace the rear cover of the phone and power on.
PowerOnandOff
On - Please ensure the SIM card has been properly inserted into the
phone. Long press the Power key to switch on the phone.
Off - In standby mode, long press on Power key until an options menu
T card
SIM Slot2
SIM Slot1

9
appears. Select Power Off in the menu and confirm
Security
You may set a security lock feature as a security measure for the phone. For further
information regarding password locks, password revision and other functions please enter
into the security option in system settings.
CallFunctions
At the dial keyboard, enter the phone number and then click the dial key. If dialing an
extension, you may click the dial pad icon in the bottom of the screen to open the interface
and enter the number of the extension. You may also press and hold the 0 key to add a (+)
sign when adding an international dialing prefix.

10
history
Every telephone number
called and received will be
saved in the history. All
numbers in the history can
be dialed directly by clicking
the CALL BACK on the
screen. When the number
appears on the list, click it to
view details.
CallOptions
There are different options
that can be used in the
history and dialing interface.
You may press the MORE
while in the dial interface
and adjust speed dial and
call settings. In the dialing
interface, you may press the
search button
to browse through contacts list or set default contact resources.

11
Contacts
Enter: Click on the applications menu and select contacts.
• The default display is the phone contacts and SIM card
contacts.
• The contacts are organized alphabetically by default.
Click the Search icon to enter the contact search interface.
Any numbers or letters associated with any of the
contacts
saved in the list will be shown in the search results.
Add Contact

12
AddNewContact
1. Click the add contact icon (+) to
add contact.
2. Select to save your contacts to
the GoogleTM account, the phone
or the SIM card.
3. You may enter different contact
details which include adding a
picture, name, telephone number,
group, address, and email among
other options.
4. Click to finish and save contact.

13
Messages
You may use this function to exchange text messages and
multimedia messages with your family and friends. The
messages to and from the same contact or phone number
will be saved into a single conversation so you may see the
entire message history conveniently.
SendanSMS
Application Menu » Messaging » New message (or shortcut
icon)
1. Click to enter recipient (You may enter contacts from
contact book or enter a new number)
2. Compose Message
3. Send
SendanMMS
When creating message, the default message style is SMS.
The message will automatically convert to MMS when
adding an attachment.
1. Click the attachment icon in the messaging interface.

14
2. Click to add attachments and create an MMS message.
Internet Browser
Menu Functions
Backward
• After browsing through multiple pages, this option will return the user to the
previous page.
Forward
• After browsing through multiple pages, this option will move to a web page after
the current page.
Windows
• You may view all windows open by clicking the windows icon in the upper right
part of the browser.
Bookmarks
• Click the save to Bookmarks option to make the current URL as a saved
Bookmark.
• Click Bookmarks/History to opened saved bookmarks.
Find on page: Search current page.

15
Share page: Select to share
the current page.
Save for offline reading:
Saves page for offline
reading.
Bookmarks/History: Show
your browsing history and
view the most visited pages.
Settings: Contains a variety
of browser settings.

16
Bluetooth & Wi-Fi
Bluetooth is a short-range wireless communications technology that devices can use to
exchange information and connect to different types of devices which include headsets and
other devices.
Power onBluetooth
1) Settings » Bluetooth and select to power on Bluetooth.
2) The Bluetooth icon will appear in the notification bar.
Click “scan for devices” and the phone will start to scan for
all devices within range.
3) In Bluetooth settings all the devices found will displayed
in the list under the icon.
Note: The maximum detecting time of the phone is 2
minutes.

17
PoweronWi-Fi
1) Settings » Wi-Fi and select ON to power on
Wi-Fi
2) Click on the desired Wi-Fi network to be
connected. Unsecured networks can be connected
to directly - secured networks require a password
or credentials prior to connection.

18
Camera
Camera
Prior to use: Insert SD card before using the camera or video camera. All photos or videos
taken by the phone are typically stored in the memory card for large storage capacity of
images.
Open Camera
1. Applications Menu » Camera
2. Switch to video mode if you want to record videos.
Note: You may place a camera shortcut icon on any of the screens
Take Pictures
1. Aim the object that the picture will be taken.
2. Press the “Shutter” button on the screen.
3. After taking the picture, the file will be saved in the camera’s gallery folder.
4. You can view the photos by clicking the preview box button. You may adjust various
settings for the camera by pressing Menu while in the camera interface. When in the
camera viewfinder mode, you can switch to video or photos’ gallery.

19
Select between
Camera & Video
Settings
Picture modes

20
Gallery
OpenImages
Applications Menu » Gallery
SharePictures
You may share pictures by sending them through
different
types of installed applications. You may also send
pictures through the MMS message function by
composing a message and attaching the picture. Any
image can also be sent via the Bluetooth function by
selecting Bluetooth equipment that has been paired.
AdjustImage
Press Menu and Edit to adjust images
You may select from different effects that may include:
This manual suits for next models
1
Table of contents
Other Blu Cell Phone manuals