blue photon BlueCure 4 User manual
www.BluePhotonGrip.com • 855-777-20401002 Industrial Park Dr., Shelby, MI 49455
Adhesive Workholding
Quick Start Guide | BlueCure 4
Technology & Workholding Systems LLC
®
Before you start: review all safety and design precautions
This quick start guide was written for the users of Blue Photon’s workholding technology. Before
you use, read this manual carefully. In particular, pay attention to the warnings and cautions that
appear in the safety and design sections at the front of the manual. Before you begin, you should
also read the user guide. For more information, visit our website for the most up-to-date product
and safety information: www.BluePhotonGrip.com.
Sales and Engineering Support
Blue Photon Technology & Workholding Systems LLC
1002 Industrial Park Dr., Shelby, MI 49455
CAUTION
This guide as well as additional
manuals provide a description
of the function, application and
safety considerations of the Blue Photon system.
These manuals must be read and understood
before any attempt is made to install or use this
system. Improper use could result in damage to
the product or unsafe conditions for the user.
Follow these safeguards to prevent serious
injury or property damage. Consult the factory
on turning applications.
IMPORTANT
Before using the ultraviolet
(UV) LED equipment read and
understand all manufacturer’s
documentation for proper
setup, safety and necessary maintenance.
**Caution** Do not stare directly at the light
emitted from the LED head. This may be
harmful, resulting in eye injury.
Always use UV protective eyewear.
WARNING
Do not use the Blue Photon workholding
system to hold overhead loads. The
Blue Photon workholding system is not
designed to support people. Never stand
under a lifted xture and/or part. If insufcient holding
strength to resist cutting forces; or if improperly used, a
workpiece may be ejected from the xture at a high rate of
speed. Always follow employer work instructions and Blue
Photon user guide recommendations to minimize any risk.
Always use proper guarding to protect people from injury
due to a workpiece coming dislodged from the xture.
DESIGN
CONSIDERATIONS
This guide provides general operating
procedures. Your specic application
will have special considerations in setup,
function and use. There are several design considerations
that must be addressed before implementing Blue Photon
workholding. Review these considerations with your
design and engineering teams, including the number and
position of grippers, adhesive joint temperature, adhesive
cure time, amount of adhesive, setting the part on applied
adhesive, and part and gripper cleaning.
Adhesive Workholding
Quick Start Guide
Instructions
www.BluePhotonGrip.com • 855-777-2040
2
®
1. Installing the gripper adapters to the UV LED heads
The adapters protect the UV LED heads and provide an accurate alignment to the back of the gripper.
• Small Gripper Adapter
The adapter is screwed onto the UV LED head.
• Medium Gripper Adapter
UV LED head is inserted and pushed into the adapter until the head stops, then tighten the set screw to lock
in place.*
• Large Gripper Adapter
UV LED head is inserted into the adapter until the head is ushed, then tighten the set screw to lock in
place.*
*Caution: Do not over tighten the set screw.
1
7
8
9
2
3
46
5
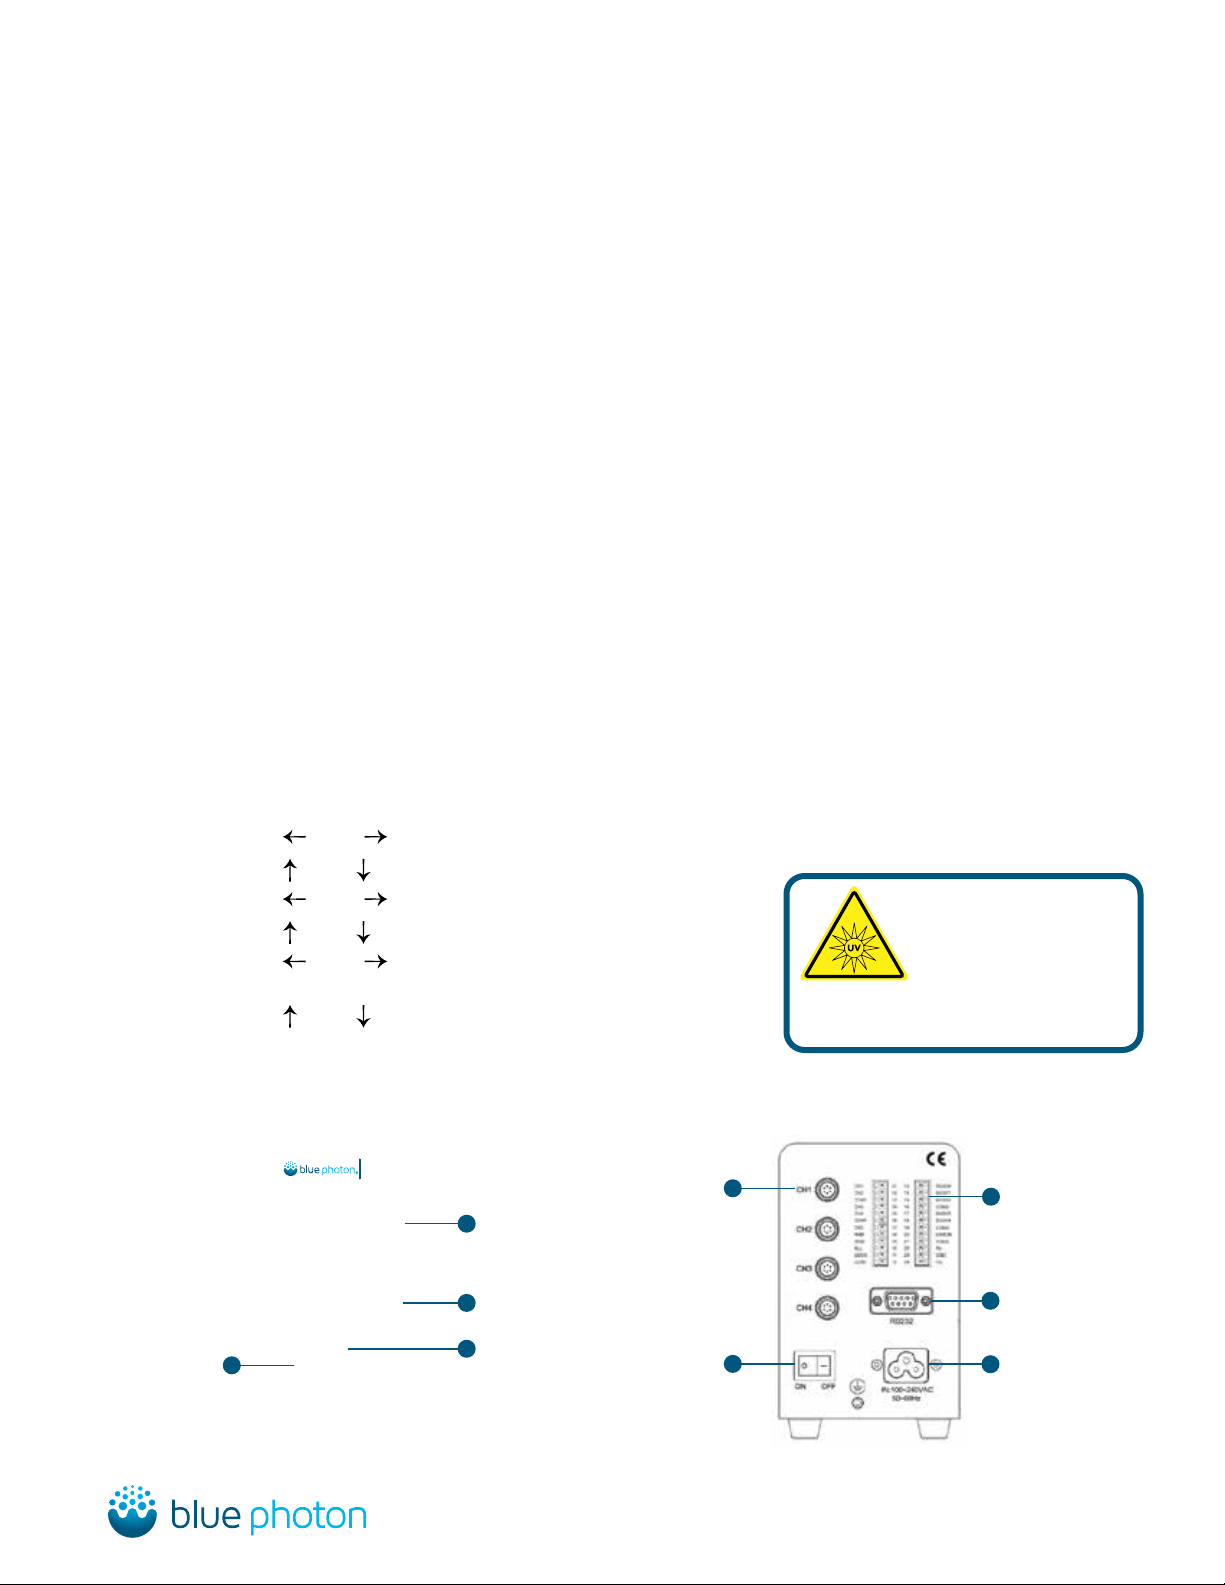
2. Setting up the UV LED head controller
Setup: A Mode: UV Power 100%
Irradiation time 060.0s
1. Turn the controller power switch on.
2. Turn the key switch on, located on front of control panel.
3. Press the “Run / Stop” button.
4. Press the “Set” button to enter into parameters setup mode.
5. Press “ ” and “ ” button to move cursor “_” to the irradiation mode.
6. Press “ ” and “ ” button to change it to A mode.
7. Press “ ” and “ ” button to move cursor “_” to the UV power.
8. Press “ ” and “ ” button to change it to 100%.
9. Press “ ” and “ ” button to move cursor “_” to the
irradiation time.
10.Press “ ” and “ ” button to change it to 060.0s.
11.Press the “Ent” button to save parameters.
12.Turn the key switch off and remove key.
13.Start the UV light source by pushing "Ent".
Front Panel Back Panel
CH1 100% A 060.0 S
CH2 100% A 060.0 S
CH3 100% A 060.0 S
CH4 100% A 060.0 S
Left: CH1~CH4 is the
UV Channel Number
Middle: UV Power /
Irradiation Mode
Right: Irradiation Time
CAUTION
Do not stare directly at
the light emitted from
the UV LED head. This
may be harmful, resulting in eye injury.
Always use UV protective eyewear.
LCD
Arrow Buttons
Key Switch Power Switch A/C Input Socket
RS232
Signal Ports
UV Output
Channels
Set / Esc / Ent /
Stop / Run
BlueCure Mini

Blue Photon Proprietary Information 3®
Step 3a
Step 3f
Step 3b Step 3c
Step 3e
Step 3d
Clean dirt and oil from the grippers
and workpiece.
Machine the workpiece.
Apply enough adhesive to the
grippers to fully ll the gap between
the part and gripper.
Position the part onto locators.
Polymerize the adhesive by applying
UV light for 60 to 90 seconds.
Insert LED heads into xture.
3. Bond your part
1. First clean your workpiece and grippers of any dust and debris by swiping with 90% pure or greater
isopropyl alcohol or another cleaning agent. Do not use an abrasive cleaner or cloth on the grippers.
See Step 3a below.
2. Apply the required amount of BlueGrip™ workholding adhesive to the face of each of the grippers. The ideal
gap is 0.02 (0.50 mm) for small grippers and 0.04 inches (1.02 mm) for medium and large grippers. See Step
3b below.
3. Place the part onto the xture using care not to smear or scrape off the adhesive that has been applied to
the face of the grippers. See Step 3c below.
4. Insert the LED heads into xture. See Step 3d below.
5. Start the UV light source by pushing “Ent”. Consult with your design and engineering team for specic
process parameters and conguration. BlueGrip workholding adhesive cures in 60 to 90 seconds.
See Step 3e below.
6. Remove heads and repeat if more grippers need curing.
7. Your part is ready for machining. See Step 3f below.
©2023 Blue Photon Technology & Workholding Systems LLC. All Rights Reserved. Blue Photon has made every effort to ensure the accuracy
of the product information in this document; however, we are not responsible for typographical discrepancies. Actual products may vary from
those shown in photos. Refer to our website for current product and safety information. Blue Photon Quick Start Guide V2.6 10646 04.03.23
www.BluePhotonGrip.com • 855-777-2040
1002 Industrial Park Dr., Shelby, MI 49455
®
Step 5c
Step 5b
Step 5a
Remove residual adhesive with steam
or hot water spray.
Soak the part and xture with
hot water.
Loaded in CNC machine spindle
(P/N 82400) to remove cured
adhesive.
Step 4a
Separate xture from workpiece with
a 1/4 turn twist or hot water soak.
4. Release the part
The part is released from the grippers with a 1/4 turn twist of the grippers or by a hot water soak.
• Twist Debond - twist the gripper 1/4 turn counter-clockwise to shear the adhesive bond. See Step 4 below.
Retighten the grippers after debonding.
• Soak Debond - soak the part and xture in hot water (at least 180ºF (82.2°C)) for 3-5 minutes then pull the
part off the grippers. Increasing the temperature of the water decreases the required soak time.
5. Cleaning cured adhesive
• Cleaning Tool - To remove residual, cured adhesive from the grippers use our spindle mounted cleaning tool
(P/N 82400) in your CNC machine along with the included program (formatted for Haas controls).
See Step 5a below.
• Hot Water - To remove residual, cured adhesive from the part and/or gripper use hot water with a pressurized
spray to weaken and strip away the cured adhesive. See Step 5b below.
• Steam - An application of pressurized steam will soften the adhesive enough to peel it away.
See Step 5c below.
• Dry Ice Blasting - A cold jet application will remove residual cured adhesive from the part as well.
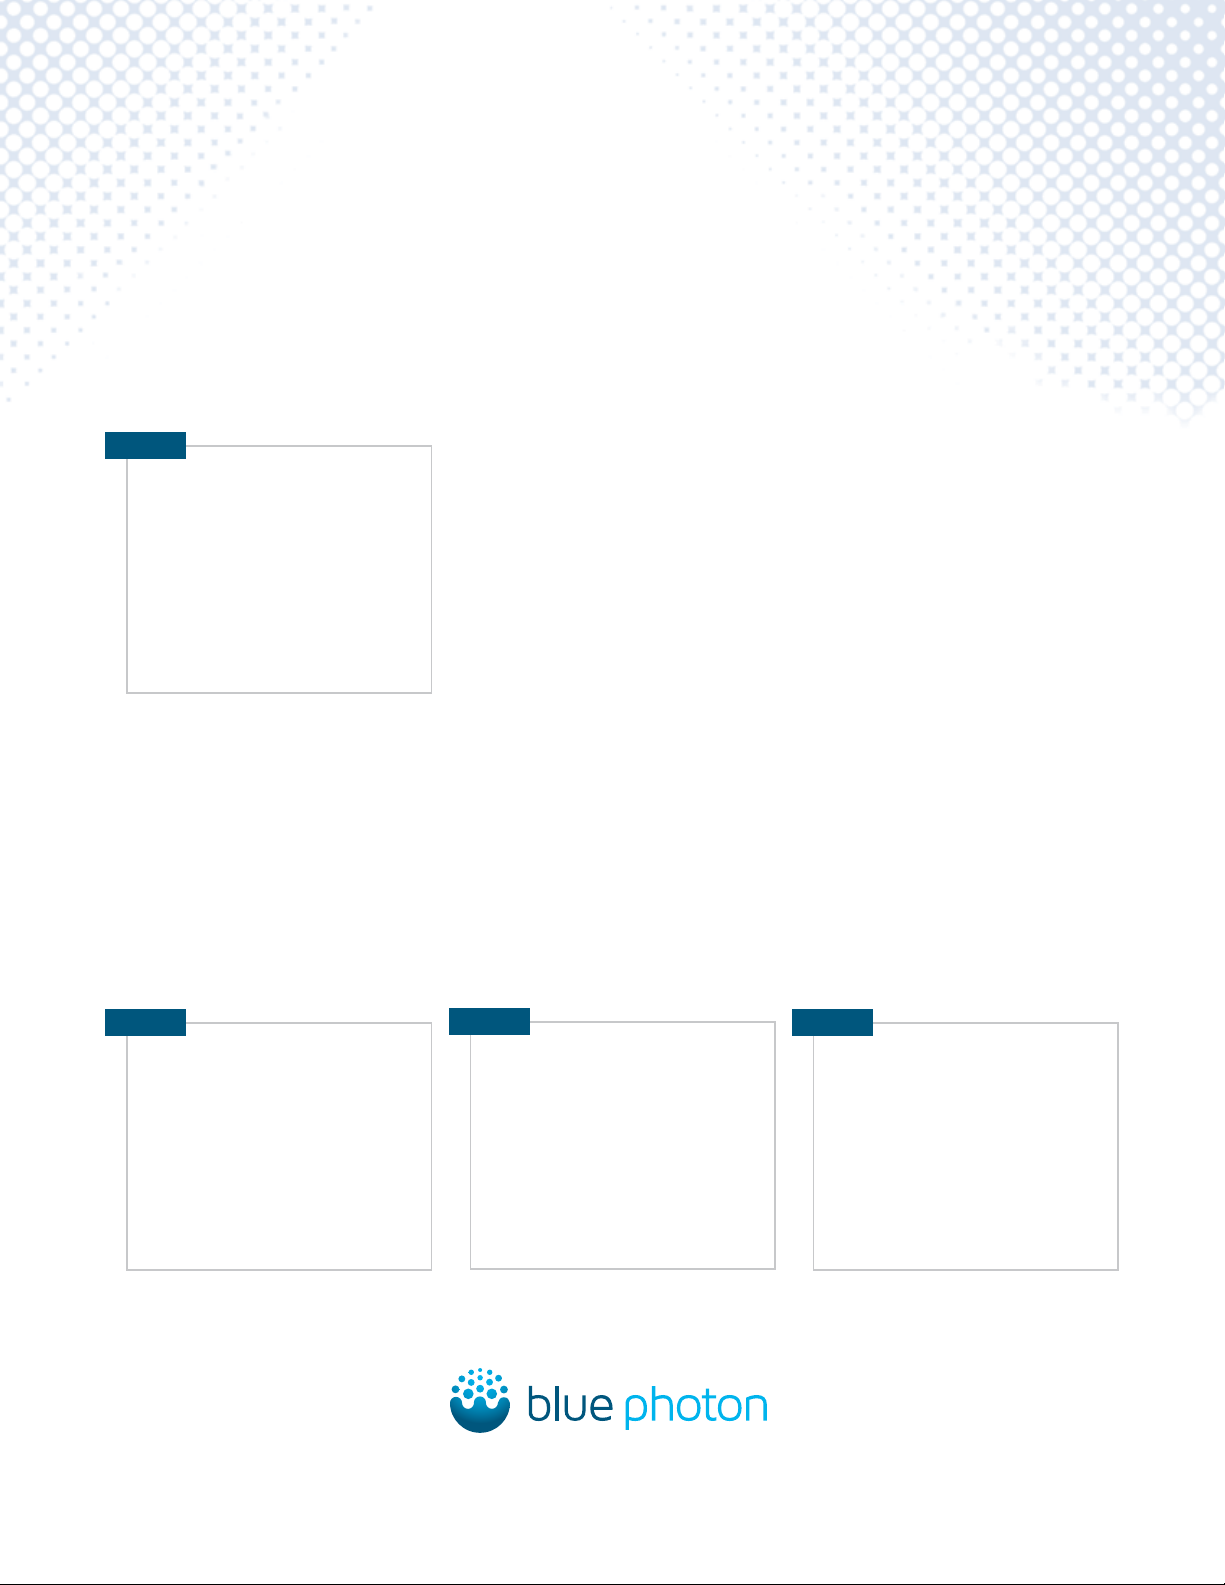
Popular Laboratory Equipment manuals by other brands

Thermo Scientific
Thermo Scientific 1267 Series operating manual

illumina
illumina Infinium LiHa operating manual

Zeiss
Zeiss TIRF 3 operating manual

REITEL
REITEL STEAMY MINI operating instructions

VWR
VWR 5600 Series Operating and maintenance manual

Gossen MetraWatt
Gossen MetraWatt SECULIFE UP operating manual


Funke Gerber
Funke Gerber CryoStar I manual

Thermo Scientific
Thermo Scientific Sorvall Legend X1R instruction manual

SP Scientific
SP Scientific VirTis BenchTop Pro Series Operator's manual

Westermo
Westermo PII-2G Quick installation guide

Hitachi
Hitachi L-2200 instruction manual

Gamry Instruments
Gamry Instruments PTC1 Operator's manual