Blue Robotics BlueROV2 Mounting instructions

5/20/2019 BlueROV2 Software Setup - Blue Robotics
https://bluerobotics.com/learn/bluerov2-software-setup/ 1/16
Home (https://bluerobotics.com)/Guide (https://bluerobotics.com/learn/)/BlueROV2 Software Setup
BlueROV2 Software Setup
Guides in this Series
BlueROV2 Assembly
(https://bluerobotics.com/learn/bluerov2-assembly/)
Get your BlueROV2 built quickly with this assembly guide!
BlueROV2 Software Setup
(https://bluerobotics.com/learn/bluerov2-software-setup/)
Privacy - Terms

5/20/2019 BlueROV2 Software Setup - Blue Robotics
https://bluerobotics.com/learn/bluerov2-software-setup/ 2/16
Software Introduction
These are instructions for the rst time that you set up your computer to work with the BlueROV2. If you
have not assembled your BlueROV2, please see our Assembly Guide (/learn/bluerov2-assembly/) and
assemble your BlueROV2 prior to setting up the software.
Select your operating system below to begin the installation and network conguration:
Windows Mac Linux
QGroundControl Installation, Network Setup and Joystick Setup
Install QGroundControl for Windows
To connect your computer to the BlueROV2, you need to download and install QGroundControl:
This is the current software version (updated 28 April 2019):
QGroundControl: v3.5.2 (release notes (https://docs.qgroundcontrol.com/en/releases/release_notes.html))
Windows (https://s3.amazonaws.com/downloads.bluerobotics.com/QGC/latest/QGroundControl-
installer.exe)
Windows Network Setup
Network Settings
1. Go to
Control Panel
>
Network and Sharing Center
and then choose "Change adapter settings".
Get your BlueROV2 connected to a topside computer, the vehicle updated, and joystick properly
calibrated!
BlueROV2 Operation
(https://bluerobotics.com/learn/bluerov2-operation/)
Learn how to operate your newly built BlueROV2!
Privacy - Terms

5/20/2019 BlueROV2 Software Setup - Blue Robotics
https://bluerobotics.com/learn/bluerov2-software-setup/ 3/16
(https://bluerobotics.com/wp-content/uploads/2019/03/network-and-sharing-center-annotated.png?x62571)
2. Right click on the Ethernet adapter, then choose
Properties
.
(https://bluerobotics.com/wp-content/uploads/2019/03/network-connections-annotated.png?x62571)
3. In the properties dialog, choose
Internet Protocol Version 4 (TCP/IPv4)
, then click
Properties
.
Privacy - Terms

5/20/2019 BlueROV2 Software Setup - Blue Robotics
https://bluerobotics.com/learn/bluerov2-software-setup/ 4/16
(https://bluerobotics.com/wp-content/uploads/2019/03/internet-protocol-version-4-annotated.png?x62571)
4. Select "Use the following IP address" And enter 192.168.2.1 for the IP address and 255.255.255.0 for the
Subnet mask. Then select OK.
Privacy - Terms

5/20/2019 BlueROV2 Software Setup - Blue Robotics
https://bluerobotics.com/learn/bluerov2-software-setup/ 5/16
(https://bluerobotics.com/wp-content/uploads/2019/03/static-ip-annotated.png?x62571)
Firewall
1. Go to
Control Panel
>
Windows Firewall
and then select "Allow an app or feature through Windows
Firewall".
2. Select "Change Settings" and then select "Open source ground control app provided by QGroundControl
dev team" or "QGroundControl".
Privacy - Terms

5/20/2019 BlueROV2 Software Setup - Blue Robotics
https://bluerobotics.com/learn/bluerov2-software-setup/ 6/16
(https://bluerobotics.com/wp-content/uploads/2019/03/windows-rewall-annotated.png?x62571)
Joystick Setup
Initial Setup for XBox Controllers on Windows
For using the shift button functionality of XBox Controllers on Windows:
1. Go to Start -> Settings
2. Open the Gaming settings
Privacy - Terms

5/20/2019 BlueROV2 Software Setup - Blue Robotics
https://bluerobotics.com/learn/bluerov2-software-setup/ 7/16
(https://bluerobotics.com/wp-content/uploads/2019/03/settings.png?x62571)
3. Go to Game Bar tab from the left navigation panel
4. Uncheck the 'Open Game bar using this button on a controller' option
Privacy - Terms

5/20/2019 BlueROV2 Software Setup - Blue Robotics
https://bluerobotics.com/learn/bluerov2-software-setup/ 8/16
(https://bluerobotics.com/wp-content/uploads/2019/03/gamebar.png?x62571)
This will enable the XBox home button on the controller to be used as the Shift button for ROV controls.
XBox 360 Controller
Plug and Play
XBox One Controller
Wired: Plug and Play
Wireless:
1. Plug in Microsoft XBox Wireless Adapter for Windows (https://www.microsoft.com/en-us/p/xbox-
wireless-adapter-for-windows-10/91dqrb97l130/jq56?
cid=msft_web_collection&activetab=pivot%3aoverviewtab).
2. Turn on the controller, then press the Wireless Enrollment button on the top of the controller and on
the wireless adapter.
Logitech GamePad (F710 and F310)
Logitech controllers should have the switch on the back set to "X".
Testing the Connection to the BlueROV2
1. With the BlueROV2 still connected and powered on, start the QGroundControl application.
Privacy - Terms

5/20/2019 BlueROV2 Software Setup - Blue Robotics
https://bluerobotics.com/learn/bluerov2-software-setup/ 9/16
2. Wait a few seconds for the ROV to auto-connect and the green parameters bar to nish loading from left
to right.
3. The video stream and telemetry information should now be shown in the QGroundControl application.
Update Software
There are two computers installed on the BlueROV2: a Pixhawk autopilot, and a Raspberry Pi 'companion'
computer. Before proceeding, we will check that the software on both computers is up to date, and update
the software if necessary.
These are the current software versions (updated 15 April 2019):
Companion: v0.0.17 (release notes (https://github.com/bluerobotics/companion/blob/master/release-notes.txt))
ArduSub: v3.5.4 (release notes (https://github.com/ArduPilot/ardupilot/blob/master/ArduSub/ReleaseNotes.txt))
Companion
Companion is the software that runs on the Raspberry Pi. To perform a companion software update:
1. Plug a _fully charged_ battery into the ROV and connect the tether to your computer.
2. Navigate to 192.168.2.2:2770/network (http://192.168.2.2:2770/network) in your browser and ensure that
the ROV has access to a WiFi network. If you do not see a webpage at this address, you need to perform the
update according to the instructions here (http://discuss.bluerobotics.com/t/software-updates/1128).
3. Navigate to 192.168.2.2:2770/system (http://192.168.2.2:2770/system). Click the button that says 'Update
companion'. If you do not see this button, then the companion software is up to date.
4. The update process will take between 5 and 20 minutes depending on the Internet connection speed.
Wait for the update process to complete.
5. When it completes, refresh your browser. The companion version should be updated, and the update
available message should no longer appear.
6. If the update fails (usually due to a loss of internet connectivity), you will be warned that the ROV will
reboot and to leave the battery plugged in. At this point, once you are able to refresh the webpage, it is safe
to either power down the ROV or attempt the update again.
ArduSub
ArduSub is the software that runs on the Pixhawk autopilot. To perform an ArduSub software update:
1. Navigate to 192.168.2.2:2770/network (http://192.168.2.2:2770/network) and ensure that the ROV has an
internet connection.
If the video stream is not shown or the vehicle does not connect, please follow the ArduSub Troubleshooting
Guide (https://www.ardusub.com/troubleshooting/troubleshooting.html) before contacting Blue Robotics
Support.
Privacy - Terms

5/20/2019 BlueROV2 Software Setup - Blue Robotics
https://bluerobotics.com/learn/bluerov2-software-setup/ 10/16
2. Navigate to 192.168.2.2:2770/system (http://192.168.2.2:2770/system). Click the button under the
'Pixhawk Firmware Update' section that says 'Stable'.
3. Wait for the update process to complete, and you are nished!
Joystick/Gamepad Calibration
Some joysticks require calibration before you can enable them for use with QGroundControl. If your joystick
requires calibration, the Joystick tab on the Vehicle Settings page will be red, and you should follow these
steps to calibrate your joystick. If your joystick does not require calibration, the Joystick tab will not be red,
and you can skip this step!
1. Go to the Vehicle Settings page in QGroundControl, then click on the red Joystick tab in the sidebar on
the left.
2. Ensure the 'TX Mode' selection is set to 3.
3. Click "Calibrate", then click "Next".
4. Follow the step-by-step instructions, move the sticks as indicated in the diagram in QGroundControl.
When completed, the Joystick tab will no longer be red, and the Enabled checkbox on the Joystick page
should be checked.
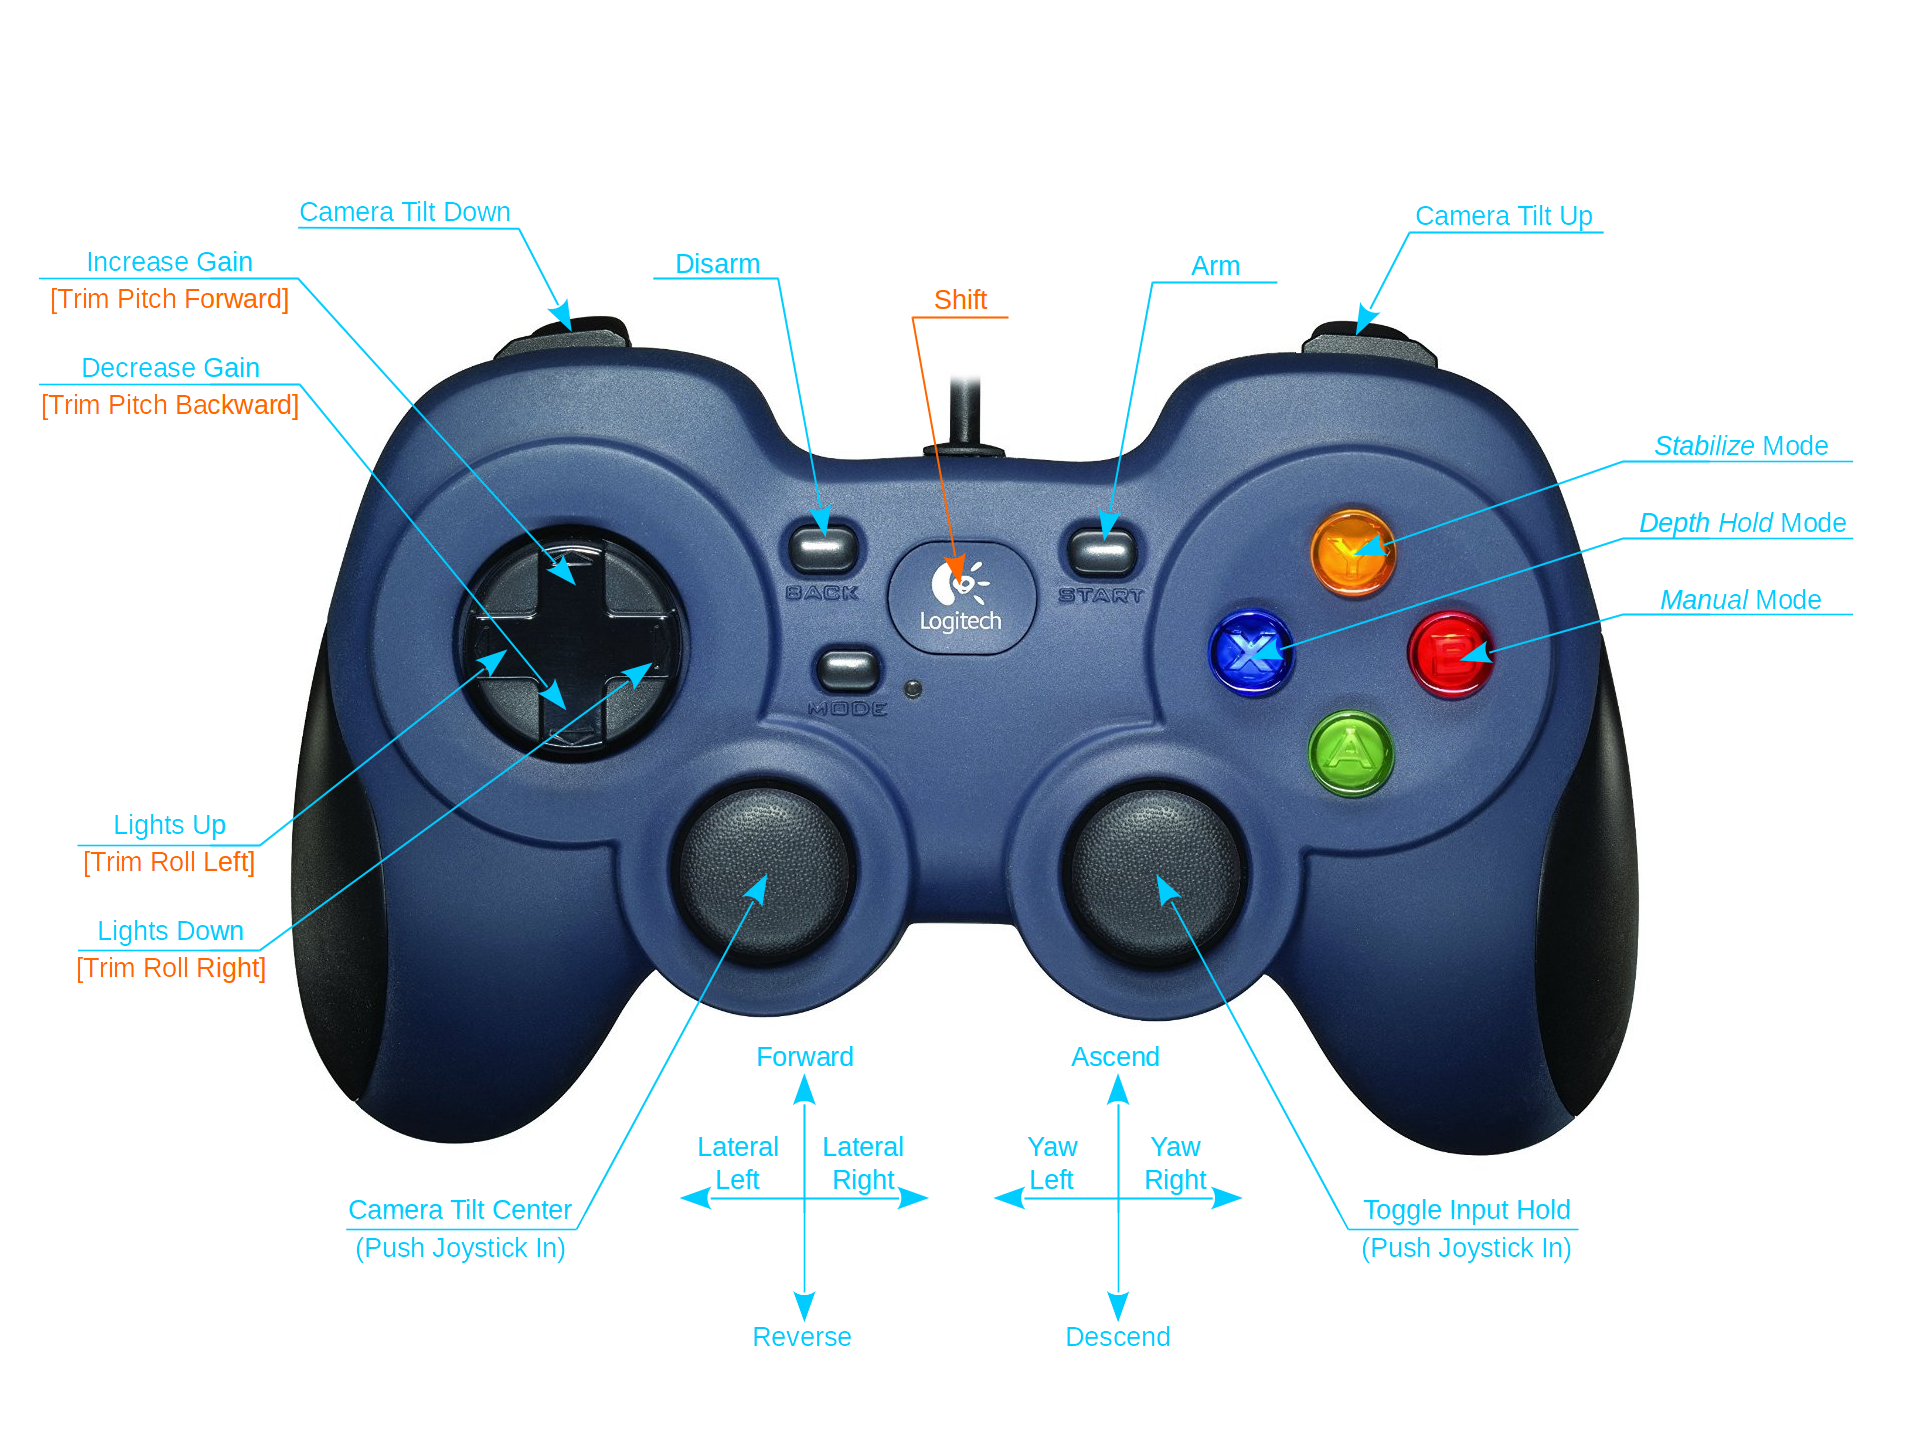
Button Setup
The default button setup for the BlueROV2 is as shown in the image below:
Privacy - Terms

5/20/2019 BlueROV2 Software Setup - Blue Robotics
https://bluerobotics.com/learn/bluerov2-software-setup/ 11/16
(https://bluerobotics.com/wp-content/uploads/2019/03/joystick-defaults.png?x62571)
The button functions may be recongured in the Joystick tab on the Vehicle Settings page.
Sensor Calibration
1. Go to the Vehicle Settings page in QGroundControl and select the red
Sensors
tab in the sidebar on the
left.
2. Choose `Roll90` for the Autopilot Orientation selection.
3. Click on the
Accelerometers
and follow the instructions.
4. Click on
Compass
and follow the instructions.
When completed, the
Sensors
tab will no longer be red.
Congure Motor Directions
The motor directions for the BlueROV2 must be congured prior to operation.
Be sure to keep all body parts and clothing clear of thrusters while the BlueROV2 is armed.
Privacy - Terms

5/20/2019 BlueROV2 Software Setup - Blue Robotics
https://bluerobotics.com/learn/bluerov2-software-setup/ 12/16
1. Go to the Vehicle Settings page in QGroundControl and select the
Motors
tab in the sidebar on the left.
2. Read and understand the instructions on the setup page.
3. Arm the BlueROV2 by clicking the switch on the page.
4. One at a time, move each slider, and make sure that the motor that spins is pushing air in the correct
direction. If a motor is spinning in the wrong direction, click the corresponding checkbox under the 'Reverse
Motor Direction' section to correct the motor rotation.
5. When you are nished with the setup, disarm the ROV by clicking the switch.
(https://bluerobotics.com/wp-content/uploads/2019/03/brov2-standard-motor-directions.png?x62571)
Voltage and Current Measurement Setup
Follow the respective guide for your Power Module (depreciated) or Power Sense Module (current).
DO NOT run thrusters for longer than 30 seconds in air or you will wear out the plastic bearings.
Privacy - Terms

5/20/2019 BlueROV2 Software Setup - Blue Robotics
https://bluerobotics.com/learn/bluerov2-software-setup/ 13/16
SOS Leak Sensor Setup
In the Safety tab, select "Pixhawk Aux6" as the leak detector pin, and set the Logic when dry to "Low."
(https://bluerobotics.com/wp-content/uploads/2019/01/sos-software.png?x62571)
To The First Dive!
Your computer setup is now complete! Please see our Operation Manual to nish getting ready for your rst dive!
Power Sense Module (PSM) Installation
(https://bluerobotics.com/learn/power-sense-module-psm-installation/)
Learn how to install and setup a Power Sense Module on your BlueROV2 or other underwater project!
Privacy - Terms

5/20/2019 BlueROV2 Software Setup - Blue Robotics
https://bluerobotics.com/learn/bluerov2-software-setup/ 14/16
Issue Reporting
We're always trying to make our documentation, instructions, software, and user experience better. If
you're having an issue with anything, please report it so that we can address it as soon as possible! Here's
where to do that depending on what's wrong:
ArduSub Issues: For anything related to the ArduSub software that runs on the Pixhawk and controls the
ROV, reports issues on the ArduSub Github Issues Page (https://github.com/bluerobotics/ardusub/issues). If
you're unsure where your issue should be posted, you can report it here.
QGroundControl Issues: For anything related to the QGroundControl software, joystick setup, video
streaming, etc., please report an issue on the QGroundControl Github Issues Page
(https://github.com/mavlink/qgroundcontrol/issues).
Documentation: For anything related to the documentation and instructions here, please report an issue by
submitting an e-mail to [email protected] (mailto:[email protected]).
BlueROV2 Operation
(https://bluerobotics.com/learn/bluerov2-operation/)
Learn how to operate your newly built BlueROV2!
Navigation
Guides in this Series
Software Introduction
QGroundControl Installation, Network
Setup and Joystick Setup
Testing the Connection to the
BlueROV2
Privacy - Terms

5/20/2019 BlueROV2 Software Setup - Blue Robotics
https://bluerobotics.com/learn/bluerov2-software-setup/ 15/16
Update Software
Joystick/Gamepad Calibration
Button Setup
Sensor Calibration
Congure Motor Directions
Voltage and Current Measurement
Setup
SOS Leak Sensor Setup
To The First Dive!
Issue Reporting
Print
Tags
BlueROV2 (https://bluerobotics.com/guide-tag/bluerov2/)
Posted 21 Jun 2016
Last updated on 14 May 2019
Sign up for the latest updates!
Subscribe
(https://github.com/bluerobotics) (http://www.facebook.com/bluerobotics)
Privacy - Terms
Email Address

5/20/2019 BlueROV2 Software Setup - Blue Robotics
https://bluerobotics.com/learn/bluerov2-software-setup/ 16/16
Copyright © 2019 - Blue Robotics Inc. | Contact Us (/contact/) | Terms and Conditions (/terms/#terms) |
Privacy Policy (/terms/#privacy)
(http://www.instagram.com/bluerobotics) (https://www.linkedin.com/company/blue-robotics-inc-)
(https://www.ickr.com/photos/134735962@N08)
(https://www.youtube.com/channel/UC3XeiPLt1JTutx7nyYn2Tzg) (https://twitter.com/bluerobotics)
(mailto:[email protected])
Blue Robotics provides high-quality, low-cost components, parts, and supplies for marine robotics.
Blue Robotics
Home (/)
About Us (/about/)
Blog (/blog/)
Gallery (/gallery/)
Technology (/technology/)
Software and Hardware (/software-and-hardware/)
Store
Visit the Store (/store)
Distributors (/distributors)
Ordering & Shipping Info (/order-shipping-info/)
Return Policy (/terms/#returns)
Support & Community
Documentation (//docs.bluerobotics.com)
Forums (http://discuss.bluerobotics.com)
Video Tutorials (//docs.bluerobotics.com/videos/)
Contact
Contact Us (/contact/)
Privacy - Terms
Other manuals for BlueROV2
2
Table of contents


