BlueSpot 31515 User manual

INFRARED
THERMOMETER
User Manual
31515

01
Thank you for purchasing a BlueSpot product, you can find further information on our range at
www.BlueSpot.uk.com. Please ensure that you are using the product correctly and that all
guidance and cautions are followed in accordance with the instructions. Please retain these
instructions for future reference.
General Information
Please make sure that you read these instructions carefully in order to avoid injury when using
the tool. Follow all health and safety rules and regulations. If in doubt and available please
contact a more knowledgeable source.
The product is marked with a sticker to show the laser aperture. Please make sure you are
aware of where this is before beginning.
• Maintain tool in good and clean condition for best and safest performance.
• Keep the work area clean, uncluttered and ensure there is adequate lighting.
• Maintain correct balance and footing. Ensure the floor is not slippery and wear
non-slip shoes.
• Keep children and unauthorised persons away from the work area.
• If the thermometer is damaged do not use.
• Do not point the laser directly at eyes or indirectly off reflective surfaces.
• Do not use the thermometer in the environment of explosive gas, steam or dust.
To avoid damaging the thermometer or the target please protect from the
following situations.
• Do not leave the thermometer on or near objects of high temperature.
• EMF (electro-magnetic fields) from arc welders, induction heaters.
• Thermal shock (caused by large abrupt ambient temperature changes. Allow
30 minutes for the thermometer to stabilise before use).
Safe use
The BlueSpot Infrared Thermometer is used for measuring the temperature of the objects surface,
which is applicable for various hot, hazardous or hard to reach objects. The thermometer consists
of optics, temperature sensor signal amplifier, processing circuit and an LCD display.The optics
collect the infrared energy emitted by an object and focus onto the sensor.The sensor then
translates the energy into an electricity signal.The signal will be shown digitally on the LCD.
The infrared thermometer boasts single dot laser targeting as well as a back light to illuminate
the screen in dark conditions.The readings are available in both Celsius and Fahrenheit. For more
accurate readings the thermometer features a hold function. Ideal for industrial and home use.
Accuracy +/- 0.5%
Product Introduction

fig.1
D
S
fig.2
Trigger
Finger Indents
02
Distance to Spot Size
Most organic materials and painted or oxidized surfaces have an emissivity of 0.95 (pre-set in
the thermometer). Inaccurate readings will result from measuring shiny or polished metal
surfaces.To compensate, cover the target surface with masking tape or flat black paint.
Measure the tape or painted surface when the tape or painted reach the same temperature as
the material underneath.
Emissivity
1. Open the battery compartment and insert 2 x 1.5V
AAA batteries.
2. Pull the trigger to turn on the thermometer.
3. Aim the thermometer at the target surface and pull
the trigger.The temperature will then be shown on the
LCD screen.The thermometer is equipped with a laser,
which should only be used for aiming.
How to Use the Infrared Thermometer
• When taking the measurement pay attention to the distance to spot size. As the distance
(D) from the target surface increases the spot size (S) of the area measured becomes
larger.The distance to spot size of the thermometer is 12:1.
The thermometer is equipped with a laser which you use for aiming.
• Field of view: Make sure the target is larger than the laser spot size.The smaller the target
the closer measure distance should be. When accuracy is critical, make sure the target is at
least twice as large as the spot size.
Distance to Spot Size
D:S=12:1
25mm@
300mm
75mm@
900mm
125mm@
1500mm
1.0"@
12"
3.0 "@
36"
5.0"@
60"
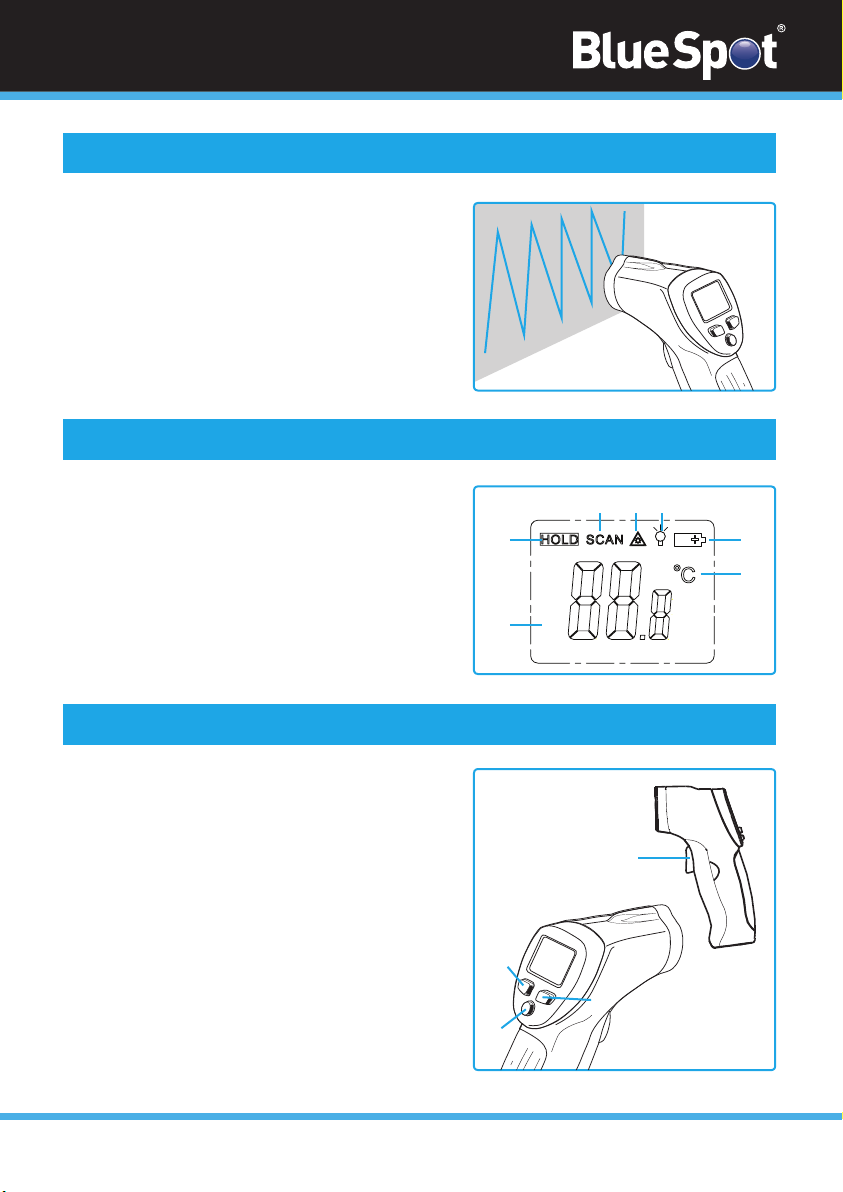
fig.3
fig.4
fig.5
A
1
B C D
G
E
F
2
3
4
03
Distance to Spot Size
To find a hot spot, aim the thermometer outside of
interest and then scan across with an up and down
motion until you locate the hotspot.
To find a hot spot, aim the thermometer outside of
interest and then scan across with an up and down
motion until you locate the hotspot.
Locating a Hot Spot
A) Data hold icon
B) Scanning icon
C) Laser on icon
D) Back light on icon
E) Low battery icon
F) Temperature unit
G) Temperature reading
LCD Display & Buttons
1. Trigger: When the user pulls and holds the
trigger the LCD display reads SCAN. Release
the trigger and the display reads HOLD for 7
seconds (approximately).There is a built in 20
second auto power off function.
2. Laser on/off button.
3. Celsius/Fahrenheit switch button.
4. Back light on/off button. When backlight is on,
any operations will activate the backlight for
approximately 7 seconds.
Buttons

Temperature range
Accuracy
Resolution
Repeatability
Response time
Spectral response
Emissivity
Distance to Spot size
Operating Temperature
Operating Humidity
Storage Temperature
Power
Typical battery life
-50 ~ 380ºC (-58 ~ 716ºF)
-0ºC ~ 380ºC (32ºF ~ 716ºF): ± 1.5ºC (±2.7ºF)
or ± 1.5%
-50ºC ~ 0ºC (-58ºF ~ 32ºF): ± 3ºC (±5ºF)
Whichever is greater
0.1ºC or 0.1ºF
1% of reading or 1ºC
500 mSec, 95% response
8-14 um
Class
Wavelength
CW / Pulsed
Max Average Power
Class 3R
654 nm
CW
<5.0mW
0.95 Preset
12:1
0 ~ 40ºC (32 ~ 104ºF)
10 ~ 90% RH non-condensing.
up to 30ºC (86ºF)
-20 ~ 60ºC (-4 ~ 140ºF)
1. 5V AAA*2 battery
Laser off: 12 hrs
04
ContactDistance to Spot Size
1. Lens Cleaning: Blow off loose particles using clean compressed air. Gently brush the
remaining debris away with a moist cotton swab.The swab may be moistened with water.
2. Case Cleaning: Clean the case with a damp sponge/cloth and mild soap.
Note:
• Do not use solvent to clean the plastic lens.
• Do not submerge the unit in water.
Maintenance

05
Notes
Contact
Find out more about the BlueSpot® Lifetime Guarantee at www.BlueSpot.uk.com
Tel: 0800 093 0115
Email: [email protected]
Orme Business Centre,
Greenacres Road,
Oldham,
OL4 3NT
ContactDistance to Spot Size
Always check and adhere to national regulations when disposing of any tools that are no longer
functional and cannot be repaired.
• Do not dispose of power tools with household waste.
• Contact your local waste disposal authority for information on how to correctly dispose
of tools.
Disposal
ContactDistance to Spot Size
Recycle unwanted materials instead of disposing of them as waste. All tools, accessories and
packaging should be sorted, taken to a recycling centre and disposed of in a manner which is
compatible with the environment. When the product becomes completely unserviceable and
requires disposal, drain any fluids (if applicable) into approved containers and
dispose of the product and fluids according to local regulations.
Environmental Protection
Notes
ContactDistance to Spot Size
Dispose of this product at the end of its working life in compliance with the EU Directive on
Waste Electrical and Electronic Equipment (WEEE). When the product is no longer required,
it must be disposed of in an environmentally protective way. Contact your local solid waste
authority for recycling information.
WEEE Regulations
Table of contents


